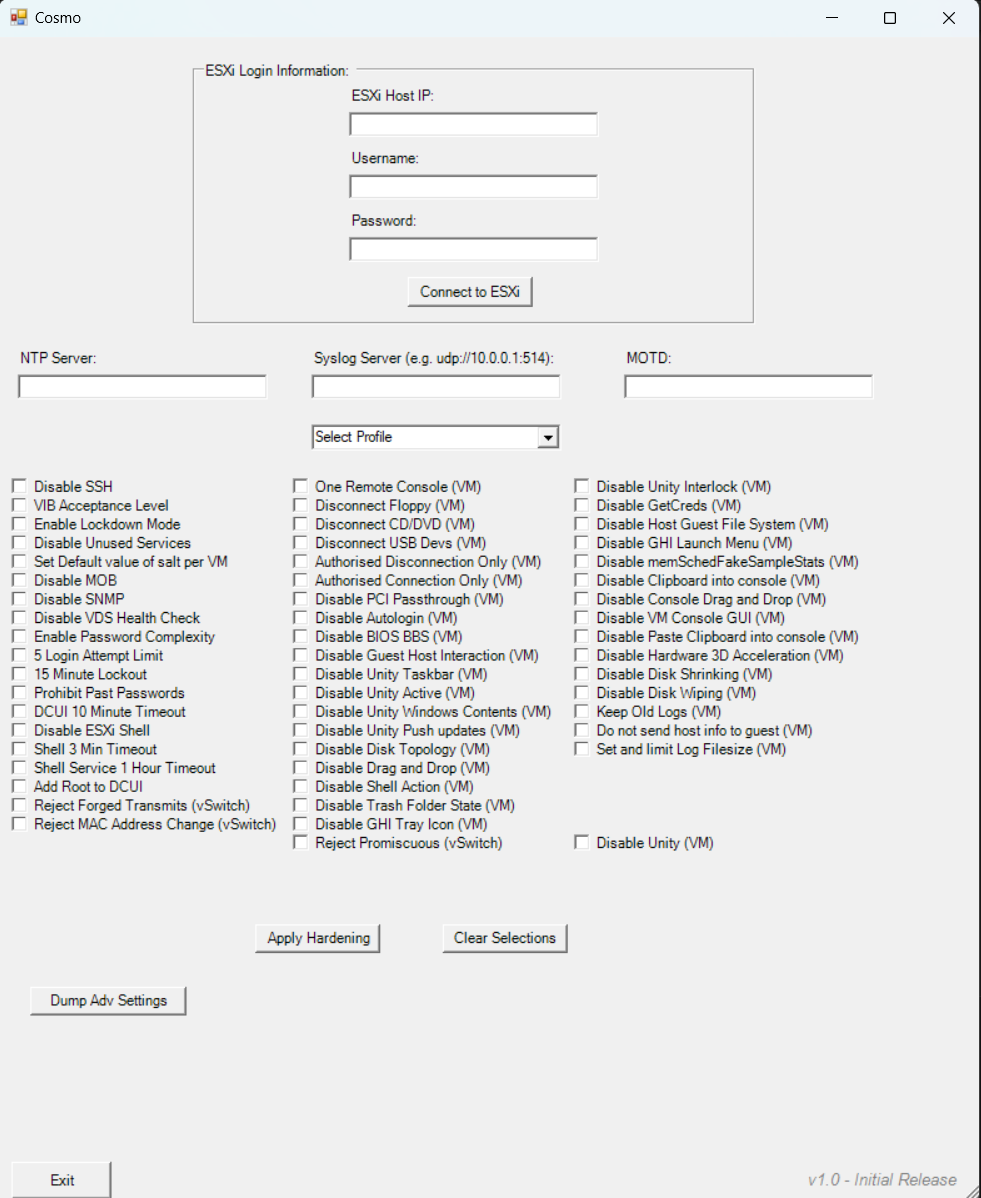
This was made to be an 'all in one' GUI based tool to make the process of hardening ESXi easier and more consistent. The reason it comes as a single powershell script is due to the ease of mobility, moving a single file is a lot easier than moving an entire codebase/source code in many other languages.
- This script will NOT configure the internal ESXi firewall, if you want to do that you must do it through the web ui.
- Certificates are not touched so if you don't want to use the self signed certificate then you must change them yourself.(It is recommended to keep a backup of the original certificates just incase they are required in the future)
- Hosts are NOT put into lockdown mode by default
General (Section 1)
This should have a defined process in the environment and cannot be automated by this script.
By default ESXi hosts do not permit the loading of kernel modules but this can be overridden - if you suspect unauthorized modules are being used, audit the kernel for any unsigned modules.
Communication (Section 2)
2.2(L1) Ensure the ESXi host firewall is configured to restrict access to services running on the host.
This cannot be automated - If you want to use the internal ESXi firewall do this thorugh the web client.
2.4(L2) Ensure default self-signed certificate for ESXi communication is not used & 2.7(L1) Ensure expired and revoked SSL certificates are removed from the ESXi server
To change the Cert replace the self signed certificate with your own, it is recommended to rename the current certificates and keep them just incase you need them in the future.
This must be done through the web ui.
To properly set the vSphere Authentication Proxy from Web Client directly:
- Select the host
- Click on Configure then expand System, select Authentication Services.
- Click on Join Domain
- Select Using Proxy Server radio button.
- Provide proxy server IP address.
To properly set the vSphere Authentication Proxy via Host Profiles:
- In the vSphere Web Client go to Home in the menu.
- Click on Policies and Profiles followed by Host Profiles.
- Choose the appropriate host profile
- Select Configure followed by Edit Host Profile... then expand Security and Services followed by Security Settings, then Authentication configuration.
- Select Active Directory configuration.
- Set the JoinDomain Method is configured to Use vSphere Authentication Proxy to add the host to the domain.
- Click on Save.
Logging (Section 3)
Configure remote Dump Collector Server
esxcli system coredump network set -v [VMK#] -i [DUMP_SERVER] -o [PORT]
Enable remote Dump Collector
esxcli system coredump network set -e true
Access (Section 4)
To create one or more named user accounts (local ESXi user accounts), perform the following using the vSphere client (not the vSphere web client) for each ESXi host:
- Connect directly to the ESXi host using the vSphere Client.
- Login as root.
- Select Manage, then select the Security & Users tab.
- Select Users then click Add user to add a new user.
- Once added now select the Host, then select Actions followed by Permissions.
- Assign the Administrator role to the user.
To use AD for local user authentication, perform the following from the vSphere Web Client:
- Select the host
- Click on Configure then expand System.
- Select Authentication Services.
- Click Join Domain followed by the appropriate domain and credentials.
- Click OK
Or
PowerCLI:
Get-VMHost HOST1 | Get-VMHostAuthentication | Set-VMHostAuthentication -Domain domain.local -User Administrator -Password Passw0rd -JoinDomain
To remove unauthorized users and groups belonging to esxAdminsGroup, perform the following steps after coordination between vSphere admins and Active Directory admins:
- Verify the setting of the esxAdminsGroup attribute.
- View the list of members for that Microsoft Active Directory group.
- Remove all unauthorized users and groups from that group.
If full admin access for the AD ESX admins group is not desired, you can disable this behavior using the advanced host setting: "Config.HostAgent.plugins.hostsvc.esxAdminsGroupAutoAdd"
To correct the membership of the Exception Users list, perform the following in the vSphere Web Client:
- Select the host.
- Click on Configure then expand System and select Security Profile.
- Select Edit next to Lockdown Mode.
- Click on Exception Users.
- Add or delete users as appropriate.
- Click OK.
Console (Section 5)
To enable lockdown mode, perform the following from the vSphere web client:
- From the vSphere Web Client, select the host.
- Select Configure then expand System and select Security Profile.
- Across from Lockdown Mode click on Edit.
- Click the radio button for Normal or Strict.
- Click OK.
This isn't done by the script as you should be using SSH keys in a secure environment. To remove all keys from the authorized_keys file, perform the following:
- Logon to the ESXi shell as root or another admin user. SSH may need to be enabled first
- Edit the /etc/ssh/keys-root/authorized_keys file.
- Remove all keys from the file and save the file.
To set a trusted users list for DCUI, perform the following from the vSphere web client:
- From the vSphere Web Client, select the host.
- Click Configure then expand System.
- Select Advanced System Settings then click Edit.
- Enter DCUI.Access in the filter.
- Set the DCUI.Access attribute is set to a comma-separated list of the users who are allowed to override lockdown mode.
In a secure environment data integrity should be monitored and authorised people should have access to the required systems through an RBAC system.
Host profiles could be used to track configuration changes on hosts but they do not track everything.
Storage (Section 6)
To enable bidirectional CHAP authentication for iSCSI traffic, perform the following:
- From the vSphere Web Client, select the host.
- Click Configure then expand Storage.
- Select Storage Adapters then select the iSCSI Adapter.
- Under Properties click on Edit next to Authentication.
- Next to Authentication Method select Use bidirectional CHAP from the dropdown.
- Specify the outgoing CHAP name. • Make sure that the name you specify matches the name configured on the storage side. o To set the CHAP name to the iSCSI adapter name, select "Use initiator name". o To set the CHAP name to anything other than the iSCSI initiator name, deselect "Use initiator name" and type a name in the Name text box.
- Enter an outgoing CHAP secret to be used as part of authentication. Use the same secret as your storage side secret.
- Specify incoming CHAP credentials. Make sure your outgoing and incoming secrets do not match.
- Click OK.
- Click the second to last symbol labeled Rescan Adapter.
To change the values of CHAP secrets so they are unique, perform the following:
- From the vSphere Web Client, select the host.
- Click Configure then expand Storage.
- Select Storage Adapters then select the iSCSI Adapter.
- Under Properties click on Edit next to Authentication.
- Next to Authentication Method specify the authentication method from the dropdown. o None o Use unidirectional CHAP if required by target o Use unidirectional CHAP unless prohibited by target o Use unidirectional CHAP o Use bidirectional CHAP
- Specify the outgoing CHAP name. • Make sure that the name you specify matches the name configured on the storage side. o To set the CHAP name to the iSCSI adapter name, select "Use initiator name". o To set the CHAP name to anything other than the iSCSI initiator name, deselect "Use initiator name" and type a name in the Name text box.
- Enter an outgoing CHAP secret to be used as part of authentication. Use the same secret as your storage side secret.
- If configuring with bidirectional CHAP, specify incoming CHAP credentials. • Make sure your outgoing and incoming secrets do not match.
- Click OK.
- Click the second to last symbol labeled Rescan Adapter
SAN's should have restictive zoning to prevent misconfigurations that can occur.
vNetwork (Section 7)
To stop using the native VLAN ID for port groups, perform the following:
- From the vSphere Web Client, select the host.
- Click Configure then expand Networking.
- Select Virtual switches.
- Expand the Standard vSwitch.
- View the topology diagram of the switch, which shows the various port groups associated with that switch.
- For each port group on the vSwitch, verify and record the VLAN IDs used.
- If a VLAN ID change is needed, click the name of the port group in the topology diagram of the virtual switch.
- Click the Edit settings option.
- In the Properties section, enter an appropriate name in the Network label field.
- In the VLAN ID dropdown select or type a new VLAN.
- Click OK
To change the VLAN values for port groups to non-reserved values, perform the following:
- From the vSphere Web Client, select the host.
- Click Configure then expand Networking.
- Select Virtual switches.
- Expand the Standard vSwitch.
- View the topology diagram of the switch, which shows the various port groups associated with that switch.
- For each port group on the vSwitch, verify and record the VLAN IDs used. Page 111
- If a VLAN ID change is needed, click the name of the port group in the topology diagram of the virtual switch.
- Click the Edit settings option.
- In the Properties section, enter an appropriate name in the Network label field.
- In the VLAN ID dropdown select or type a new VLAN.
- Click OK.
7.6 (L1) Ensure port groups are not configured to VLAN 4095 and 0 except for Virtual Guest Tagging (VGT)
To set port groups to values other than 4095 and 0 unless VGT is required, perform the following:
- From the vSphere Web Client, select the host.
- Click Configure then expand Networking.
- Select Virtual switches.
- Expand the Standard vSwitch.
- View the topology diagram of the switch, which shows the various port groups associated with that switch. Page 113
- For each port group on the vSwitch, verify and record the VLAN IDs used.
- If a VLAN ID change is needed, click the name of the port group in the topology diagram of the virtual switch.
- Click the Edit settings option.
- In the Properties section, enter an appropriate name in the Network label field.
- In the VLAN ID dropdown select or type a new VLAN.
- Click OK
Using the vSphere Web Client:
- Go to the Networking section of vCenter
- After selecting each individual switch you will need to perform the following.
- Go to Configure then expand Settings.
- Click on Netflow.
- Click on Edit.
- Enter the Collector IP address and Collector port as required.
- Click OK.
Virtual Machines (Section 8)
To disable unneeded functions, perform whichever of the following steps are applicable:
- Disable unused services in the operating system.
- Disconnect unused physical devices, such as CD/DVD drives, floppy drives, and USB adaptors.
- Turn off any screen savers.
- If using a Linux, BSD, or Solaris guest operating system, do not run the X Windows system unless it is necessary
To properly limit use of the VM console, perform the following steps:
- From within vCenter select Menu go to Administration then Roles.
- Create a custom role then choose the pencil icon to edit the new role.
- Give the appropriate permissions.
- View the usage and privileges as required.
- Remove any default Admin or Power User roles then assign the new custom roles as needed.
To configure all virtual serial ports to use secure protocols, change any protocols that are not secure to one of the following:
- ssl - the equivalent of TCP+SSL
- tcp+ssl - SSL over TCP over IPv4 or IPv6
- tcp4+ssl - SSL over TCP over IPv4
- tcp6+ssl - SSL over TCP over IPv6
- telnets - telnet over SSL over TCP
Create documentation and a standard process for the method for VM deployment. If utilizing templates in VMware create the templates, document the process for using them as well as keeping them up-to-date, then ensure the process is followed accordingly through periodic review.
To edit a powered-down virtual machine's .vmx file, first remove it from vCenter Server's inventory. Manual additions to the .vmx file from ESXi will be overwritten by any registered entries stored in the vCenter Server database. Make a backup copy of the .vmx file. If the edit breaks the virtual machine, it can be rolled back to the original version of the file.
Open the vSphere/VMware Infrastructure (VI) Client and log in with appropriate credentials. If connecting to vCenter Server, click on the desired host. Click the Configuration tab. Click Storage. Right-click on the appropriate datastore and click Browse Datastore. Navigate to the folder named after the virtual machine, and locate the .vmx file. Right-click the .vmx file and click Remove from inventory.
Temporarily disable Lockdown Mode and enable the ESXi Shell via the vSphere Client. Open the vSphere/VMware Infrastructure (VI) Client and log in with appropriate credentials. If connecting to vCenter Server, click on the desired host. Click the Configuration tab. Click Software, Security Profile, Services, Properties, ESXi Shell, and Options, respectively. Start the ESXi Shell service, where/as required. As root, log in to the ESXi host and locate the VM's vmx file.
find / | grep vmx
Add the following to the VM's vmx file.
ethernet0.filter1.name = dv-filter1
Where "ethernet0" is the network adaptor interface of the virtual machine that is to be protected, "filter1" is the number of the filter that is being used, and "dv-filter1" is the name of the particular data path kernel module that is protecting the VM.
Re-enable Lockdown Mode on the host.
Re-register the VM with the vCenter Server. Open the vSphere/VMware Infrastructure (VI) Client and log in with appropriate credentials. If connecting to vCenter Server, click on the desired host. Click the Configuration tab. Click Storage. Right-click on the appropriate datastore and click Browse Datastore. Navigate to the folder named after the virtual machine, and locate the .vmx file. Right-click the .vmx file and click Add to inventory. The Add to Inventory wizard opens. Continue to follow the wizard to add the virtual machine.
To configure VM limits correctly, do all of the following that are applicable:
- Use shares or reservations to guarantee resources to critical VMs.
- Use limits to constrain resource consumption by VMs that have a greater risk of being exploited or attacked, or that run applications that are known to have the potential to greatly consume resources.
- Use resource pools to guarantee resources to a common group of critical VMs
Independent Persistent Mode
When a VMDK is configured in Independent Persistent Mode, what you will see is that no delta file is associated with this disk during a snapshot operation. In other words, during a snapshot operation, this VMDK continues to behave as if there is no snapshot being taken of the virtual machine and all writes go directly to disk. So there is no delta file created when a snapshot of the VM is taken, but all changes to the disk are preserved when the snapshot is deleted.
Independent Non-persistent Mode
When a VMDK is configured as Independent Non-persistent Mode, a redo log is created to capture all subsequent writes to that disk. However, if the snapshot is deleted, or the virtual machine is powered off, the changes captured in that redo log are discarded for that Independent Non-persistent VMDK.
OPTIONS
Dependant
IndependentPersistent
IndependentNonPersistent
Get-VM | Get-HardDisk | Set-HardDisk -Persistence OPTION
If you have a setting that you would like to see in this please let me know
If you have an issue please create an issue or PR and I will fix it.