1.2.5 Missile Guide
Relevant Fields:
-
boostTransform- Name of the base transform(s) for boosters (if they exist), as well as any emitters (exhausts, etc.) used during the boost stage. -
decoupleBoosters- Boolean for whether or not there are boosters that should be decoupled after the boost stage. -
boosterDecoupleSpeed- Speed (in m/s) the boosters should be decoupled at. -
boosterMass- Mass (in t) of the booster. -
boostExhaustTransformName- Name of the transform(s) to attach the boost exhaust to (if baked in emitters are not used). -
boostExhaustPrefabPath- Location in GameData where BDArmory should look for the boost exhaust prefab. -
exhaustPrefabPath- Location in GameData where BDArmory should look for the exhaust prefab. -
rotationTransformName- Name of the transform which indicates the "up" direction for things like cruise missiles. -
deployAnimationName- Name of the animation which should be played upon launch. -
deployTime- Delay in seconds before the animation should be played. -
cruiseAnimationName- Name of the animation which should be played when the missile enters the cruise stage. -
cruiseDeployTime- Delay in seconds before the cruise animation should be played. -
flightAnimationName- Name of the animation that should play during the flight. -
OneShotAnim- Boolean for whether the animation should only play once, or continuously loop. -
fairingTransformName- Name of the transform(s) which form a deployable fairing.
BDArmory expects the part transform (or a transform called missileTransform) to point forwards (in Unity, this would be the Z+ axis, and in Blender, the Y+ axis) along the direction of flight. This serves as the main orientation of the missile.
boostTransform should be the parent of any boosters attached to the missile, as well as any baked-in particle emitters that are used during the boost stage. Any particle emitters not under boostTransform will be used for the cruise stage (unless otherwise specified, such as for RCS thrusters). If decoupleBoosters is set to true, boostTransform and anything attached to it will be decoupled at the end of the boost stage at a speed of boosterDecoupleSpeed m/s, reducing the mass of the missile by boosterMass t.
If you don't want to use baked-in particle emitters and want to use a pre-built exhaust prefab (like those found in the GameData/BDArmory/Models/exhaust folder, create transforms where you want these to be attached, orient them such that up (in Unity, this would be the Y+ axis, in Blender, the Z+ axis) points along the direction you want the exhaust to be in, and define it in the config via boostExhaustTransformName. For effects for the cruise stage, the transforms should be called exhaustTransform (custom transform names are not supported for this).
If a missile is intended to have RCS thrusters, these must be baked into the model using Unity. The particle emitters should be called rcsUp, rcsDown, rcsLeft, rcsRight and rcsForward respectively. Currently, only one particle emitter is supported for the up/down/left/right directions, however multiple rcsForward emitters can be used. They should be oriented such that the forwards (in Unity, the Z+ axis, in Blender, the Y+ axis) is pointed along the thrust direction.
All BDArmory missiles are roll-stabilized, however if a specific roll orientation is desired, a transform with this orientation can be specified with rotationTransformName, the missile will roll to try align with this and bank into turns. If none is specified, the missile will remain in the orientation it was fired in.
Animations must be baked into the part model itself, BDArmory offers 3 different types of animations, a deploy animation, a cruise deploy animation and a flight animation.
- The deploy animation, specified using
deployAnimationName, will be playeddeployTimeseconds after the missile is launched. Note that this is independent of the missile drop time, which determines how long the missile should wait before it fires its boost motor. - The cruise deploy animation, specified using
cruiseAnimationName, will be playedcruiseDeployTimeseconds after the cruise trigger. This will be discussed in Basic Flight Dynamics. - The flight animation, specified using
flightAnimationName, will play at the same time as the boost motor is started. This can either be a one-shot animation (by settingOneShotAnim = true) or it can be made to loop (for example, a propeller of some kind spinning).
BDArmory also offers support for custom fairings for cluster missiles (which will be discussed in depth later). The transform(s) that form this fairing should be specified in fairingTransformName, these will also be decoupled at boosterDecoupleSpeed when the missile releases its payload.
Relevant settings:
-
GLOBAL_LIFT_MULTIPLIER- Multiplier for lift, defaults to 0.25 -
GLOBAL_DRAG_MULTIPLIER- Multiplier for drag, defaults to 6
Relevant fields:
-
aero- Boolean value, all missiles that use aerodynamics should have this set to true. -
liftArea- Area (in 1000 m²) used in lift equation, note that the BD missile lift coefficient curve goes up to a maximum value of 1.5. Also used for drag if nodragAreais set. Note that the units are in 1000 m² due to legacy config compatibility reasons, so any area taken from a real missile needs to be divided by 1000. -
dragArea- Area used in drag equation. Same note as above. -
steerMult- Multiplies the ° of error in the pointing direction to get the control torque. -
maxTorque- Maximum control torque (in kN-m). -
torqueRampUp- Increase in available torque per second (in kN-m/s). Used to slowly increase maximum available torque post-launch, up tomaxTorque. -
aeroSteerDamping- Damping torque, given in units of kN-m / (radians / s). Is multiplied with the missile's current angular velocity. -
maxAoA- Maximum missile angle of attack (AoA) (in °). -
thrust- Missile thrust (in kN) for the boost stage. -
boostTime- Time (in s) that the boost stage should fire for. -
cruiseThrust- Missile thrust (in kN) for the cruise stage. -
cruiseTime- Time (in s) that the cruise stage should fire for. -
cruiseDelay- Time (in s) to wait after the boost stage before firing the cruise stage. -
cruiseRangeTrigger- Range (in m) from the target at which the cruise stage should fire (defaults to -1 which disables this function, intended for use with missiles that fire a motor when approaching the target). -
spoolEngine- Boolean, should the missile take time to get up to maximum thrust? -
maxTurnRateDPS- Turn rate of missiles (in °/s). For atmospheric missiles, used as a general guideline for the AI to understand the maneuverability of the missile. For exo-atmospheric missiles see the Orbital Flight Dynamics section. -
optimumAirspeed- Average missile flight velocity (in m/s). Used in lead calculation and range estimation for the AI. -
useSimpleDrag- Boolean, determines whether or not to use the full aerodynamic model or a simplified version (for things like bombs). -
simpleDrag- Drag coefficient for the simple drag model. Gets multiplied with 0.008 *partMass(as an analogy for the drag area) in the drag equation. -
deployedDrag- Drag coefficient for the simple drag model after the deploy animation plays. -
simpleStableTorque- Multiplier for AoA and drag to get the restorative torque applied. -
vacuumSteerableBoolean, can the missile be steered in a vacuum?
The engine of all missiles, atmospheric and orbital, is defined via thrust, boostTime, cruiseThrust, cruiseTime, cruiseDelay and cruiseRangeTrigger. The boost motor has a thrust of thrust kN and will fire for boostTime seconds. After this, the missile will wait for cruiseDelay seconds. If cruiseRangeTrigger is set, then the missile will check for if the target is closer than cruiseRangeTrigger meters before firing the cruise motor, otherwise, the missile will fire the cruise motor immediately after cruiseDelay. The cruise motor has a thrust of cruiseThrust kN and will fire for cruiseTime seconds. If the engine should take some time to get to the maximum thrust spoolEngine should be set to true.
The aerodynamic forces on a missile are dependent on two values, liftArea and dragArea. Most missiles (especially in legacy mods) won't specify a separate dragArea, in these cases liftArea is used for both. The equation for the forces on the missile are the normal lift and drag equations:
where liftArea and dragArea work out to be in terms of 1000 m² rather than something like m².
All atmospheric missiles use a simple proportional controller for flight control, the steering error in degrees, that is the angle between the forward vector and the target vector, is multiplied by steerMult to determine how much torque the missile should use to turn towards the desired target. This torque is the control torque. Higher steerMult values will result in a faster response by the missile, however, it also leads to the missile potentially overshooting the target and turning further than necessary, which in turn leads to oscillations. Look up proportional control theory for more details on this. steerMult is generally best kept as low as possible while still allowing the missile to maneuver as desired. The missile will try to point towards the target while staying below maxAoA.
Because the missile, like an arrow, is aerodynamically stable, there is a torque on the missile that wants to steer it towards the velocity/prograde vector, the flight controller also applies a torque to cancel this out, this torque is the compensation torque. The control torque is added with the compensation torque to get the final torque applied to the missile.
The total torque of the missile is limited by maxTorque. If the summed torque exceeds maxTorque, then first the control torque is reduced until the total torque is below maxTorque, if this isn't enough and the compensation torque still exceeds maxTorque, then it will be reduced until it is below maxTorque. While the missile is limited to stay below this point, at high speeds and low altitudes (or with a low enough maxTorque value) it is possible for this limit to occur at a very low AoA. In this case, steerMult values that worked well at higher AoA values may cause oscillations that can lead to the missile going out of control. As with all games (and simulations, for the most part), KSP takes a timestepping approach to simulate physics, meaning that we break time down into little steps and move forwards in time in these steps. Because of this, if the oscillations take less time to happen than each step, the controller may not have time to react to the changes, and the oscillations may get worse. If you see your missile losing control at high speeds and low AoA, particularly at low altitudes, and you see the torque value maxing out, first try reducing steerMult if possible. If this doesn't help, either try reducing the top speed of the missile, or increasing the maxTorque. If you still want the missile to be limited in performance at high speeds, check out gLimit in the Advanced Atmospheric Flight Dynamics section.
To try and mitigate any oscillations, aeroSteerDamping may be used. This is completely independent of maxTorque and acts to oppose the missile's angular velocity. You can think of it as placing the missile in molasses, the faster it tries to turn, the more it resists. While this can allow for higher steerMult values to be used without oscillations, it cannot solve problems with the missile losing control at high speeds and low AoA, as it cannot react fast enough.
maxTorque is ramped up after launch using torqueRampUp, which is multiplied with the time after launch to get the current torque, until you reach maxTorque. Lower values allow for the missile to start maneuvering slowly after launch.
maxTurnRateDPS and optimumAirspeed are primarily used for AI decision-making (aside from orbital missiles). Missiles with higher maxTurnRateDPS will be prioritized by the AI for targeting aerial targets. It should be set to a value representatitive of the performance of the missile, remember that the turn rate of a vehicle in °/s is:
where optimumAirspeed of the missile to get a rough number you can use for maxTurnRateDPS. optimumAirspeed is used for missile dynamic range determination, firing lead determination and also for missile evasion. It should be the average expected speed of the missile.
For bombs, sometimes it's desireable not to use the full aerodynamic system, in which case liftArea can be set to 0 and instead, useSimpleDrag may be set to true. This allows for more accurate bomb trajectory estimation, as the simplified model is not dependent on the orientation of the bomb. The equation for drag here is:
where simpleDrag is used as a pseudo-drag coefficient and simpleStableTorque which applies a torque of:
to oppose any deviation from the prograde/velocity vector. If the bomb has a deploy animation, like the SnakeEye bomb in BDA+, deployedDrag replaces simpleDrag after the deploy animation.
Relevant Fields:
-
useFuel- Boolean value, whether or not missiles should burn fuel. -
boosterFuelMass- Mass of the booster fuel (in t) (NOTE for decoupling boosters,boosterMassis the dry weight of the booster and should NOT include this). -
cruiseFuelMass- Mass of the cruise motor fuel (in t).
If the missile should burn fuel as it fires its motor, useFuel should be set to true and boosterFuelMass and cruiseFuelMass should be specified. When a missile has these parameters set, the right click menu in the hangar will detail the missile's boostTime/cruiseTime but instead for however long the fuel lasts.
Relevant Fields:
-
maxTurnRateDPS- For orbital missiles, this represents the maximum turn rate of the missile in °/s. -
hasRCS- Boolean, must be set to true if the missile has RCS thrusters. -
rcsThrust- Thrust provided by the RCS thrusters in kN.
Orbital missiles, compared to atmospheric ones, are fairly simple. The boost and cruise stage configuration is identical to that of atmospheric missiles, as covered above. The missile will be able to use its RCS thrusters up until the end of the cruise stage.
Relevant Fields:
-
liftArea/dragArea- Can have multiple values for boost, cruise (ifdecoupleBoostersis true), boost deploy (if adeployAnimationexists) and cruise deploy (ifcruiseDeployAnimationexists). -
maxTorqueAero- NEW FIELD - Aerodynamic torque, given in units of kN-m / Pa (of dynamic pressure), multiple values for boost, cruise, boost deploy and cruise deploy. -
deployedLiftInCruise- NEW FIELD - Boolean, whether or not to use the deployed values in the cruise stage. -
maxTorque- Can have multiple values for boost, cruise and post-thrust stages. -
steerMult- Can have multiple values for boost and cruise. -
gLimit- Missile normal g limit. -
gMargin- Allowable error in gLimit for aerodynamic efficiency. -
torqueLimiter- Boolean, should the torque-based AoA limiter activate? Defaults totrue. -
torqueMargin- Percentage safety margin for the missile's torque limiter (between 0-1). Defaults to 0.1.
To differentiate from thrust-vectoring missiles, maxTorqueAero was added to BDA+. It represents the torque provided by aerodynamic control surfaces on the missile, replacing the legacy maxTorque which, when working on advanced missile configs, represents thrust-vectoring torque. The equation used is:
Because this grows with velocity squared, generally it's a good idea to either set it based on desired torque at optimumAirspeed at sea level (where maxAeroTorque set will not generally be torque limited at higher speeds and gLimit should be used to limit the missile's maneuverability at high speeds.
For advanced aerodynamic models, liftArea, dragArea, maxTorqueAero, maxTorque and steerMult all support multiple values to specify the missile's flight model at different stages in flight, formatted as comma separated numbers.
For the aerodynamic terms, liftArea, dragArea and maxTorqueAero, you can input up to 4 values. The first value is used in the boost stage, then, if a booster is dropped (via decoupleBoosters), the second value will be used. The third and fourth values are added to the current liftArea/dragArea/maxTorqueAero when the deploy animation and cruise deploy animation play. If the boost deploy values should also be used in the cruise stage (for example, if the missile doesn't drop a booster, or if the cruise deploy animation deploys a separate pair of wings that don't replace the deploy animation's) then deployedLiftInCruise should be set to true, otherwise the value is lost once the boost stage is over. Note that if you don't want to use one of the values, you can simply set it to -1 or 0, but you cannot skip a value, I.E. if your missile doesn't drop a booster but it does have a deploy animation, you still have to write 1,-1,1.
You can input up to 3 values in maxTorque, as it is used to represent thrust-vectoring or some kind of RCS attitude control system. The first value is used during the boost stage, the second during the cruise stage and the third after the cruise stage ends.
For steerMult, as missile mass and characteristics might change between the boost and cruise stages, you can input two values, the first is used during the boost stage and the second is used after the boost stage ends.
Missiles can make use of the g-limiter by setting a gLimit, this will also enable advanced guidance behavior, where there different guidance laws can fly the missile based on g-commands which allow for much more efficient flight profiles. While the missile flight model will stall at 30° of AoA, while the motor is still firing, some missiles have enough thrust to pull higher g-loads than what would be possible purely aerodynamically by going to higher AoAs. This however, comes at the cost of stalling the missile and massively increasing drag, gMargin allows the missile to under-steer up to gMargin g's in order to remain aerodynamically efficient. When a g-command that exceeds the maximum g's the missile can pull while remaining efficient by more than gMarginis requested, the missile will be allowed to make that tighter turn. Generally speaking, it is better to use a more efficient guidance profile than to rely upon gMargin, however.
Disabling the torque limiter is generally not recommended, however if you see that guidance is unsatisfactory, and AoALim is less than maxAoA (indicating the torque limiter is active) in the debug telemetry interface, and torque isn't saturated, you can try setting torqueLimiter to false, or reducing the torqueMargin. Note this can result in missile instability and wobbles!
It's difficult to wrap one's mind around a missile's maneuver capability from just the equations of parameters. To allow mod authors to more easily understand the limits of their missiles, the BDArmoryMissileManeuverEnvelopePlotter.py script was created. Found in the GameData/BDArmory/Scripts folder, this python code provides a text-UI based plotter for a given missile's various performance parameters.
To run the file, the user must install Python, numpy and matplotlib, if you're unfamiliar with this process there are many tutorials online which detail this process for your specific OS. Once installed, simply run the file like any other Python script. This will lead to the main screen. The program comes preloaded with a config based on the default AIM-120 in BDArmory and GLOBAL_LIFT_MULTIPLIER and GLOBAL_DRAG_MULTIPLIER values that reflect the default BDArmory settings.
The plotter uses a simplified Kerbin atmospheric model, which approximates Kerbin's atmospheric density up to an altitude of 37,000 m. For use with other bodies (or modified Kerbin atmospheres), the function on line 66 of the file must be modified to reflect the desired atmosphere.
To plot the graphs, use the plot or p command, which will first perform the necessary calculations and then plot the 5 different graphs the program offers: the achievable g-loading, instantaneous turn rate, AoA limit, required torque, and torque margin. These are plotted for altitudes from 0 m up to maxAltitude and airspeeds from 0 m/s up to maxAirspeed, with numAlt being the number of altitude intervals to plot at and numAirspeed being the number of airspeed intervals to plot at. Note that larger numbers here will slow down the calculation! If desired, instead of 3D plots, 2D plots at a specific altitude or airspeed are also available by setting numAlt or numAirspeed to 1, which will plot a 2D curve at the given maxAltitude or maxAirspeed. Note that for airspeeds less than 100 m/s we don't plot the instantaneous turn rate as this leads to considerable spikes that make understanding the rest of the graph difficult.
The achievable g-loading plot is the main output of this program, this shows how many g's the missile can pull at a given altitude and airspeed, which corresponds to its maneuverability at those conditions, higher g's being better. To increase a missile's g capability, there are two options, either increase the liftArea or, for missiles with high thrust still firing their motors, increase the maxAoA. Both options increase drag (if no separate dragArea is used, if one is used, the former option doesn't increase drag), generally speaking the latter option will severely increase drag, however.
The instantaneous turn rate plot shows what the missile's maximum turn rate in °/s at a given altitude and airspeed. Higher is better, of course. You will notice that the maximum is actually often at lower altitudes and airspeeds for most BDA missiles under thrust. Recall that the instantaneous turn rate of a missile is:
where gLimit, however, this is only up to a certain point, when you reach the missile's gLimit and your missile has to decrease its turn rate to avoid exceeding gLimit. Careful balancing of liftArea, thrust and gLimit will allow you to adjust the missile's flight performance to your liking.
The max AoA plot is fairly straightforwards. It represents the max allowable AoA of the missile at any given condition, when not g-limited or torque limited, the missile will be limited to maxAoA. At higher airspeeds and lower altitudes, either the g or torque limiter will activate and clamp that limit down.
As previously discussed, torque is another limiting factor for missile maneuverability. Understanding the limitations brought on by maxTorqueAero can be difficult, and coming up with good values for it even moreso. To that end, the program will plot both the required torque for max instantaneous turn rate at given conditions, and, to allow a better understanding of when a missile is torque limited, the torque margin. The torque margin plot shows how much excess torque is available to the missile, at points where this plot reads 0, the missile becomes torque limited. By inputing an excess maxTorque value, you can read the required torque plot to give you an idea of how much torque you need at a given altitude/airspeed and inform your choice of maxTorqueAero. Then, you can test this value out with your desired maxTorque value, and see if the performance meets your requirements.
An additional plot will appear if your missile encounters conditions where it may potentially lose control, primarily at higher speeds and lower altitudes. This plot is not an absolute indicator of a potential problem, but you should test fire your missile at these conditions and see if the controller is able to keep the missile under control.
Relevant Fields:
-
missileRadarCrossSection- Radar cross-section of the missile (in m²). Defaults to 999. -
minLaunchSpeed- Minimum airspeed at which the missile may be launched (in m/s). Defaults to 0. -
minStaticLaunchRange- Minimum range the missile may be fired at at standstill (in m). -
maxStaticLaunchRange- Maximum range the missile may be fired at at standstill (in m). -
UseStaticMaxLaunchRange- Boolean, should the missile not use the dynamic launch range feature. Defaults tofalse. -
engineFailureRate- % chance that the engine will fail to start (from 0-1). Defaults to 0. -
guidanceFailureRate- % chance that the guidance will fail PER SECOND after launch (from 0-1). Defaults to 0. NOTE: this probability should be very low if used! -
missileType- What kind of missile is this? Can bebomb,torpedo, ormissile. -
rndAngVel- Random angular velocity (in rad/s) that the missile should have when dropped.
Note that missileType affects AI usage of the weapon, bomb types will use the bombing AI, torpedo will use the torpedo AI, while missile just uses the general AI.
Relevant Fields:
-
hasIFF- Boolean, whether or not missile has IFF and avoid locking friendly targets. -
maxOffBoresight- FoV of the missile's seeker (in °). -
lockedSensorFOV- 2 * FoV (cone width) of the missile's seeker once locked on a target (in °). -
seekerTimeout- Time before a seeker which has lost lock will declare a miss (in s). -
targetingType- The selected targeting type.
Relevant Fields:
-
heatThreshold- Minimum heat signature the missile can lock on to. -
frontAspectHeatModifier- Modifier for part heat signature when it is occluded. -
flareEffectivity- Modifier for flare effectiveness, 0 means flares have no effect on the missile. -
targetCoM- Boolean, if true the missile will target the CoM of the target instead of the hottest part (or engine plume, in the case of afterburning engines).
Heat targeting is one of the most basic types of targeting available in BDArmory. The heat signature of a part is the sum of the part's skinTemperature and thermalInternalFluxPrevious, and is attenuated by other parts in the way, as well as by distance, following the inverse-square law. Generally speaking, this means that a heatThreshold of around 250-300 should be used for early, rear-aspect missiles, and values below 100 should be used for modern all-aspect missiles. frontAspectHeatModifier can be used to further reduce the capabilities of older rear-aspect missiles. targetCoM is useful when configuring a modern imaging-infrared missile, increasing hit probability as well as damage by having the missile fly towards the target's CoM rather than towards the engine / afterburner exhaust plume. Heat seeking missiles will respect seekerTimeout and search for a target for seekerTimeout seconds before declaring a miss and self-destructing.
Note that heat targeting is a passive form of targeting, a target will only detect it via radar, visually or via a missile-warning system (which the default BD weapon manager is equipped with).
Relevant Fields:
-
uncagedLock- Boolean, defaults totrue. When set tofalse, the missile's seeker is locked in the forward position prior to launch, intended for use in older missiles. -
lockedSensorFOVBias- FloatCurve, target weighting based on angle (in °) from the expected target position. -
lockedSensorVelocityBias- FloatCurve, target weighting based on angle of the angular velocity (in °) from the expected target angular velocity. -
lockedSensorVelocityMagnitudeBias- FloatCurve, target weighting based on % similarity in the magnitude of the angular velocity from the expected target angular velocity. -
lockedSensorMinAngularVelocity- Minimum angular velocity (in °/s) for lockedSensorVelocityMagnitudeBias to work on. Should not be set to 0. Generally the default 5 is sufficient and should not be changed.
On all heat-seeking missiles, the seeker needs to be pointed towards a target prior to launch, if uncagedLock is true, the seeker can move prior to launch, and can be fed data from radars, IRSTs and HMDs, allowing the missile to be launched in more situations. This should generally only be set to false on older missiles. Flare rejection in BDA+ is done via the lockedSensorFOVBias, lockedSensorVelocityBias and lockedSensorVelocityMagnitudeBias curves. lockedSensorFOVBias is the most basic out of all of them, the seeker will take angle between where it expected the target to be, and where the target is, and weight the target's heatScore based on that. The curve should be defined for 0°, meaning exactly aligned with the expected target, up to half the lockedSensorFOV, the maximum angle a target can be at relative to the seeker's pointing direction. lockedSensorVelocityBias uses the target's angular velocity vector's direction. It compares the angle between it and the expected angular velocity vector, and weights the heatScore based on this, and as such the curve should be defined between 0° and 180°, 0° being exactly aligned with the expected angular velocity and 180° being exactly opposite. Finally lockedSensorVelocityMagnitudeBias compares the expected angular velocity and the target's angular velocity, using a % similarity. A minimum value of lockedSensorMinAngularVelocity must be used to avoid issues for static targets, the default 5 °/s is likely sufficient and shouldn't be changed. Note that when making these curves, you should consider the target's maneuvers. Setting the curves too tight might end up rejecting the desired target as well!
Relevant Fields:
-
activeRadarRange- Active radar range (in m). -
activeRadarLockTrackCurve- FloatCurve, gives the detectable RCS for a given range (in m). -
canRelock- Boolean, can a SARH missile be re-targeted (if another radar lock was active at the time). -
radarLOAL- Boolean, can ARH search for a target. -
chaffEffectivity- Modifier for chaff effectiveness, 0 means chaff has no effect on the missile.
Radar targeting, just like heat targeting, is fairly simple to set up in BDA+. In BDA+ this targeting type represents semi-active/active radar seekers. Setting activeRadarRange to 0 will make the missile semi-active only, meaning it will require the parent's radar to maintain a continuous lock on the target. If at any time, the parent's radar loses lock on the target, the missile will declare a miss and self-destruct, UNLESS canRelock is true, and an alternate target is locked by the parent vessel's radars, in which case the missile will switch targets to it.
Missiles with activeRadarRange greater than 0 will swap from SARH homing to their ARH seeker when the target is within that range, at which point the seeker will begin searching for the target. Note that if radarLOAL is not set to true, if the missile cannot find the target when it gets within range, it will also declare a miss and self-destruct. radarLOAL determines whether or not a radar missile can search for a target after being launched, this is useful for "maddog" launches (I.E. unguided, dumbfire launches) and in cases where the target potentially won't be immediately spotted by the missile's seeker. If radarLOAL is true, the missile will search for seekerTimeout seconds, either directly in front of it when launched with no target, prioritizing the closest target, in both angle and range, with a 5° margin in terms of angle. The seeker's performance is by default set to 5 m² at the activeRadarRange, ramping down to 0 m² at 0 m, but can also be specified using activeRadarLockTrackCurve. Radar missiles are affected by both chaff and jamming. Chaff introduces random error into the target's position as well as drags it behind the target's actual position, how much it affects the target's position can be adjusted with chaffEffectivity. Jamming makes it harder for the seeker to lock the target, potentially making a seeker at the edge of its detection capability lose its lock, and also reduces the effectiveness of chaffEffectivity, making jammers incredibly powerful tools.
Note that radar targeting is an active form of targeting, and along with radar, visual detection and missile-warning systems, if a target has a radar-warning receiver (which the default BD weapon manager is equipped with) they will be able to detect the incoming missile at twice the max range of the missile's onboard radar while active or as long as the parent radar remains locked.
Relevant settings:
-
RADAR_NOTCHING- Boolean, should radar notching features be enabled? Defaults tofalse. -
RADAR_NOTCHING_FACTOR- Multiplier for notch effectiveness, defaults to 1. -
RADAR_NOTCHING_SCR_FACTOR- Multiplier for the target's SCR, defaults to 0.01.
Relevant Fields:
-
activeRadarVelocityFilter- Minimum range rate (in m/s) before applying any notching effects (specifies a linear curve). -
activeRadarVelocityGate- FloatCurve, gives the detectability modifier as a % for a given range rate (in m/s). Should be 1 at the maximum range rate, and at the minimum value when at the minimum range rate (though no less than 0). -
activeRadarRangeFilter- Minimum range-to-terrain (in m) before applying any notching effects (specifies a linear curve). -
activeRadarRangeGate- FloatCurve, gives the notch effectiveness in % for a given range-to-terrain (in m). Should be 0 at the maximum range, and at the maximum at the minimum range (should not exceed 1). -
activeRadarMinTrackSCR- Minimum signal-to-noise ratio that a radar can track a notching target through. -
activeRadarCanNotch- Boolean, can the radar be notched? Defaults totrue. -
chaffNotchEffectivity- Chaff effectiveness in a beam/notch. Up to two values may be set, the first value being the beaming modifier, and the latter value being an additional notch modifier. When only one value is specified, it is used for both.
Advanced users may want to use the Radar Notching features, which can be turned on via the BDArmory settings menu. Radars have to deal with various sources of noise in the environment when trying to lock on to a target, including reflections from terrain. One of the ways this is done is by filtering based on the target's range-rate (their velocity in the direction of the radar's line-of-sight) and range, BDArmory uses these to implement a simplified radar notching model. The range-rate or velocity filter works by using the velocity of the target relative to the ground to differentiate it from the ground. Radars since the introduction of doppler radar can determine the velocity of the target along the line-of-sight of the radar, when the target is flying towards or away from the radar they can be differentiated from the ground using this. activeRadarVelocityFilter implements this in a basic way via a linear curve between activeRadarVelocityFilter and 0 m/s, with the modifier being 1 at activeRadarVelocityFilter (I.E. no effect) and 0.05 at 0 m/s. To "notch" the missile, the aircraft must have a range-rate lower than activeRadarVelocityFilter. More advanced users can customize the curve using activeRadarVelocityGate, just remember, the value should be 1 at the maximum velocity, and decreasing as the range-rate approaches 0 m/s. Of course, the designers of radars aren't dumb, they can additionally distinguish a target from the ground around them via the range of the target relative to the ground around them. Even if something is stationary in the air, if it is floating in the sky a radar won't mistake it for the ground. This is where activeRadarRangeFilter comes in, it sets the minimum range from the ground a target can be before "notching" becomes effective, it also specifies a linear curve, with 0 effectiveness at activeRadarRangeFilter, and 1 (or 100%) effectiveness at 0 m to the ground. Custom curves can also be specified via activeRadarRangeFilter, remember effectiveness should be 0 at the maximum range and approach 1 close to the ground. A target's radar cross section is multiplied by a value calculated according to:
where activeRadarVelocityGate, and activeRadarRangeGate. Note that notching behavior is also affected by RADAR_NOTCHING_FACTOR in the settings, higher values means more notch-effectiveness. If a target is large relative to the ground beneath it, radars can sometimes maintain a lock even through a notch, this can be specified via the activeRadarMinTrackSCR, which represents the minimum ratio of the target's RCS relative to the unobscured area illuminated by the lockedSensorFOV, multiplied by RADAR_NOTCHING_SCR_FACTOR, specified in the settings (with a default value of 0.01).
Chaff can additionally be made to be more effective by notchVMod and notchRMod via chaffNotchEffectivity, to simulate reduced radar filtering capabilities against chaff. When a target drops chaff, it will slow down, if a target is flying at some range-rate to the radar, then this slow-down allows the radar to distinguish between the target and the chaff. If the target flies perpendicular to the radar however, the chaff will remain at the same range-rate relative to the radar as the target, thus making it harder to distinguish it from the target. If the target is also flying close to the ground, the noise from the ground makes it even harder to distinguish the chaff from the radar. chaffNotchEffectivity can specify up to two multipliers, which are multiplied with notchVMod and notchRMod respectively, and contribute to the chaff positional distortion. As many modern radars use methods other than just the range-rate and range to distinguish targets from noise, the boolean activeRadarCanNotch can be set to false to disable radar notching for that missile, while still allowing the radar notching mechanics to influence chaff.
Laser targeting only requires targetingType to be set to laser. Laser targeting requires a targeting pod from the parent vessel, or a friendly vessel to designate a point for it to target. Dumbired laser targeting missiles will search for seekerTimeout seconds for a laser designator within its maxOffBoresight before declaring a miss and self-destructing. Laser targeting can be disrupted by smoke launchers, which will block and/or distort the laser designator.
Note that all BD vessels are equipped with laser-warning systems by default.
Relevant Fields:
-
gpsUpdates- Update rate for the GPS coordinates of the target (in seconds / update). Values < 0 disable updates, 0 is continuous updates.
GPS targeting is simple, it provides only position data for the target, which may be updated at a rate of gpsUpdates seconds per update. This targeting type is unsuitable for hitting any fast moving targets, as no velocity data is provided. While GPS spoofing is not currently a feature in BDArmory, jamming can interrupt the target position updates to the missile.
Note that GPS targeting is a passive form of targeting, a target will only detect it via radar, visually or via a missile-warning system (which the default BD weapon manager is equipped with).
Relevant Fields:
-
antiradTargetPrediction- Boolean, should the anti-radiation seeker be able to approximate the velocity of a target. Defaults totrue. -
antiradTargetTypes- The types of radars the seeker should be able to home in on. Should match therwrTypes of the radars it is intended to target, orMissileLockorJammingin the case of an anti-missile anti-radiation missile or a home-on-jam missile.
Anti-Radiation Target Types:
- 0 /
SAM- SAM site radar - 1 /
Fighter- Fighter radar (airborne) - 2 /
AWACS- AWACS radar (airborne) - 4 /
MissileLock- ACTIVE MISSILE (DO NOT USE UNLESS YOU KNOW WHAT YOU'RE DOING!) - 5 /
Detection- Detection radar (ground/ship based) - 6 /
Sonar- SONAR (ship/submarine based) - 8 /
TorpedoLock- ACTIVE TORPEDO (DO NOT USE UNLESS YOU KNOW WHAT YOU'RE DOING!) - 9 /
Jamming- Jammer
Anti-radiation missiles will seek out radar emissions detected by their seekers. The parent vessel must possess a radar-warning receiver (which it does by default when using the stock BD weapon manager) and must be actively pinged by the target radar. The target's position (and velocity, if antiradTargetPrediction is true) are only updated when the radar sweeps across the missile, therefore they are best used when the radar has locked on to the parent vessel, increasing the ping-rate. Note that anti-radiation missiles will generally struggle to hit maneuvering targets. The missiles will specifically home-in on the position of the radar, rather than the target vessel as a whole. Anti-radiation missiles will also respect seekerTimeout and will declare a miss and self-destruct after seekerTimeout seconds without a target update.
Note that anti-radiation targeting is a passive form of targeting, a target will only detect it via radar, visually or via a missile-warning system (which the default BD weapon manager is equipped with). Ground vessels will assume an unknown passive missile is an anti-radiation missile and respect the Disable Radar vs ARMs setting on their radars and their AI.
Relevant Fields:
-
gpsUpdates- Update rate for the target's position (in seconds / update). Values < 0 disable updates, 0 is continuous updates. -
inertialDrift- Drift of the onboard INS (in m/s).
Inertial targeting is a passive targeting type that relies upon the parent vessel to provide target position updates, determining its position relative to the target via an inertial navigation system. The launching vessel only requires a radar or ranging IRST detection in order to fire this missile at a target (though currently there isn't a method for a human player to fire on a target without a lock, though this lock may be broken after firing). Inertial targeting will try to predict the target's position at intercept, aiming the missile towards that point, however due to the potential inaccuracies in the prediction, and due to accumulating error in the missile's determination of its own position (specified by inertialDrift), inertial targeting is only suited for midcourse guidance, guiding the missile close to the target, but not all the way to the target. Inertial targeting is also affected by jamming, which disrupts the datalink between the missile and the parent vessel, preventing the target position from being updated. The missile will time out after seekerTimeout seconds without a target update.
Note that inertial targeting is a passive form of targeting, a target will only detect it via radar, visually or via a missile-warning system (which the default BD weapon manager is equipped with).
Relevant Fields:
-
terminalGuidanceType- ThetargetingTypeto be used in the terminal phase. -
terminalGuidanceDistance- Range at whichterminalGuidanceTypeshould activate (in m). -
terminalGuidanceShouldActivate- Boolean, should terminal guidance be used? player-configurable in the hangar. -
dumbTerminalGuidance- Boolean, should terminal targeting activate immediately upon reachingterminalGuidanceDistance? Defaults totrue. -
terminalSeekerTimeout- Seeker timeout for the terminal phase (in s).
For some guidance types, like GPS and inertial targeting, a terminal seeker is required to ensure hits against a moving, maneuvering target. This is where terminalGuidanceType can be useful, currently, aside from laser targeting, all other targeting types are supported for terminal targeting. If terminalGuidanceShouldActivate is true, the missile will swap over to use terminalGuidanceType at a distance of terminalGuidanceDistance, however how the handoff is performed depends on the dumbTerminalGuidance setting. If set to true, the seeker will swap over, regardless of whether or not it has locked onto a target, if false however, the missile will wait until it locks on to a target before handing over targeting to terminalGuidanceType. If specified, terminalSeekerTimeout will replace seekerTimeout as well. Do note that the seeker will look for a target in the viscinity of the current target position provided by targetingType, hwoever, it will lock on to whatever target it finds in the area, as long as it fits its engagement criteria, including IFF if hasIFF is true. To maximize chances of locking on to the correct target, the terminal seeker should have a range greater than terminalGuidanceDistance against the expected target.
Relevant Fields:
-
guidanceActive- Boolean, is the missile actively controlled? Should always betrueexcept for unguided weapons. -
homingType- The guidance law the missile should use. -
dropTime- Player-configurable delay before boost motor starts and guidance begins (in s). -
guidanceDelay- Time before guidance starts after drop (in s).
There are, broadly speaking, two categories of missile guidance laws in BDArmory+, attitude and acceleration command.
Attitude command guidance laws simply tell the missile to point in some direction. Generally speaking, these are the simpler of the two categories and require the least tuning, however they generally perform worse, as they simply rely on pointing the missile and allowing lift to slowly affect the velocity vector, rather than active control. For simplicity, these will henceforth be described as "pointing" command guidance laws, as this term is likely to be more familiar and intuitive to readers.
Acceleration command guidance laws, as the name suggests, tell the missile to accelerate a certain amount in some direction. This makes them more complex, but they achieve better performance since they're directly telling the missile how its velocity vector should change. These guidance laws generally require more careful tuning because of that complexity, and are less forgiving. Effective use of these guidance laws requires that the missile's gLimit be set to some value in order for them to accurately provide guidance, if you'd still prefer your missile to have no g-limit, you can just set it to a high value, E.G. gLimit = 99999. You can still use these guidance laws while leaving it at the default gLimit = -1 value, however this puts them in pointing command mode, they're still generally more effective than the regular pointing command type guidance laws, but they'll still perform worse than if gLimit is set.
The following guidance laws will generally be introduced in order of complexity. Pointing command guidance laws will be introduced first, followed by acceleration command guidance laws.
Glossary:
- AAM - Air-to-Air Missile
- SAM - Surface-to-Air Missile
- AGM - Air-to-Ground Missile
- ATGM - Anti-Tank Guided Missile
- AShM - Anti-Ship Missile
Pure pursuit guidance is the most naive form of missile guidance, especially in BDA+ since we use pointing commands for this guidance law. The missile simply points directly towards the target, making it generally unsuitable for use against moving targets. It will typically only be able to hit targets moving very slowly or non-maneuvering targets moving away from the missile. Generally, this type of guidance was only used in very early missiles and in guided bombs.
This guidance law is useful for:
- Early AAMs and SAMs
- Some AGMs / other air-to-ground ordnance
Lead pursuit guidance is a modified version of aampure and used to be the primary guidance type of BDA. It adds up to 8 seconds of lead to the position the missile points at, pointing in front of the target instead of right at the target. While less naive than pure pursuit, it is still generally unsuitable for hitting high speed targets other than slow moving or non-maneuvering targets moving away from the missile. For users who aren't familiar with tuning the more advanced acceleration-command guidance laws, this serves as a good option for midcourse guidance on non-lofting missiles.
This guidance law is useful for:
- Early AAMs and SAMs
- Midcourse guidance for non-lofting AAMs and SAMs
Relevant Fields:
-
agmDescentRatio- Multiplied with speed to determine current descent rate.
This guidance type is the basic air-to-ground guidance type, it simply tries to fly the missile with a constant descent rate towards the target. The missile will try to lead the target, however, generally fast-moving targets will be somewhat challenging for this guidance type to hit. If the missile is launched at low airspeed and without being pointed upwards, the missile will first climb a little before guiding as normal.
This guidance law is useful for:
- AGMs
- Some guided bombs
Relevant Fields:
-
beamCorrectionFactor- How hard should the missile correct for the movement of the beam? -
beamCorrectionDamping- Damping coefficient for this correction. -
targetingType = laser- Beam-riding guidance ONLY works for laser guided missiles.
This guidance type is a basic implementation of beam-riding guidance, the missile will steer itself to be on a beam between the targeting sensor and the target. If the beam is moving, this motion will be corrected for by beamCorrectionFactor, larger values mean a faster correction, but also more overshoot. beamCorrectionDamping acts as a damper for this behavior, and will reduce the intensity of the correction based on how fast the missile already is correcting for beam velocity. Being a pointing command guidance type, this guidance type doesn't guarantee a hit exactly where the beam is pointing.
This guidance law is useful for:
- ATGMs
Relevant Fields:
-
torpedo = true- Boolean, required for torpedoes. -
waterImpactTolerance- Impact tolerance of the torpedo (in m/s).
Torpedo / underwater guidance is fairly simple, the torpedo will use lead pursuit guidance to target a ship or submarine, however, unlike lead pursuit guidance, the torpedo will try to maintain the same depth at the target. For surface targets, the torpedo will stay at a depth of 3 m.
Relevant Fields:
-
BallisticOverShootFactor- Multiplier for gravity in trajectory simulation, shapes the missile's trajectory. Values < 1 give a lofted trajectory, while values > 1 give a depressed trajectory. -
BallisticAngle- Angle at which the missile climbs (in °).
This is a basic implementation of ballistic missile guidance. The missile will climb at BallisticAngle, while checking its horizontal velocity and acceleration as well as freefall time, the time it would take for the missile to fall back down on a ballistic path, and comparing the distance it will travel with the distance to the target. Drag is NOT considered, instead it is accounted for using BallisticOverShootFactor, higher values loft the missile, so it'll travel further than it needs to so that when drag slows it down, it'll fall on the target. Lower values give a depressed trajectory, which is faster, however it requires a much longer burn time to ensure it'll reach the target. Because no consideration is made for the atmosphere (beyond not considering the planet's rotation), it is entirely possible the missile flies over the target if BallisticOverShootFactor is set too low, or undershoots the target if it is set too high. Do note that engine modulation is used in part to achieve these characteristics!
This guidance law is useful for:
- Ballistic missiles
- Guided bombs
Relevant Fields:
-
CruiseSpeed- Maximum speed at which the cruise missile should fly at (in m/s). Note that this also sets the default speed the missile will fly at. -
CruisePredictionTime- Approximately how long it takes for the missile to react to obstacles (in s). Should be set to a lower time for more maneuverable missiles, and a higher time for less maneuverable missiles. -
CruiseAltitude- Altitude at which the missile should cruise at (in m). -
CruisePopup- Boolean, can the missile perform a popup attack. Note that this also sets the default setting in the hangar. -
CruisePopupAngle- Angle that the missile should popup at prior to final dive (in °). -
CruisePopupAltitude- Altitude that the missile should popup to, prior to the final dive (in m). -
CruisePopupRange- Range at which the missile should complete its popup maneuver (in m). -
maneuvergLimit- Approximate g-load the popup attack should be conducted at (1 g = 9.81 m/s²).
Cruise guidance is a quasi-terrain following guidance law used for cruise missiles. For MissileLauncher missiles, CruiseSpeed sets the maximum capability of the missile, however this can be modified in the hangar, depending on player needs. CruiseAltitude is also settable in the hangar. CruisePredictionTime is a bit more of a complex field, the guidance law uses an integral control loop, meaning it's constantly either adding a bit of pitch up or down depending on the missile's current and predicted conditions. The lower this value is, the less error there is in the missile's altitude following capabilities (typically), however, setting it too low means the missile won't react in time to objects in front of it, and will not pull up in time. This is available in the hangar, though this is primarily for tuning by the missile's mod maker and the player shouldn't generally have to adjust this value. This thus needs to be slowly tuned until satisfactory behavior is achieved.
For more advanced users, CruisePopup allows for the missile to perform a popup attack, this means the missile will pull up, and then nose-over into its terminal dive on the target. When CruisePopup is set to true in the missile's config file, an option appears in the hangar and in flight to allow the player to select if they want the missile to perform a popup attack. A steeper CruisePopupAngle will typically require more distance to carry out, for the missile to be stabilized at that angle a higher maneuvergLimit is typically needed. The missile will, to the best of its ability, try to get to an altitude of CruisePopupAltitude, at a range of CruisePopupRange flying straight-and-level (and the final dive angle can be determined via basic trigonometry). Note that larger maneuvergLimit values are associated with more of a slowdown, which might lead to the missile being an easier target!
This guidance law is useful for:
- Cruise missiles
- AShMs
Relevant Fields:
-
LoftMaxAltitude- Max altitude that the missile should fly at, should be set higher than you highest expected launch altitude -
LoftRangeOverride- Launch parameter, the missile will loft if the target is at a range greater than this, regardless of the next parameter -
LoftAltitudeAdvMax- Launch parameter, the missile will not loft if it has this much of an altitude advantage over the target -
LoftMinAltitude- Launch parameter, lofting in the lower atmosphere may result in worse performance therefore the missile will only loft if above this altitude. Can be set to 0. -
LoftAngle- Angle at which the missile should climb, a bigger angle means the missile has to turn more, which spends more energy but a smaller angle means the missile stays in the thicker atmosphere for longer.maxOffBoresightneeds to be set with this angle in mind. -
LoftTermAngle- Downwards angle at which the missile begins to go into its midcourse dive. Should be positive. The missile uses a ballistic simulation in order to determine the trajectory it should fly towards the target. Once the downwards angle of the trajectory reaches this angle, the missile will begin to guide using the ballistic trajectory. Around 20° works for typical AAM though higher values are recommended for faster missiles. -
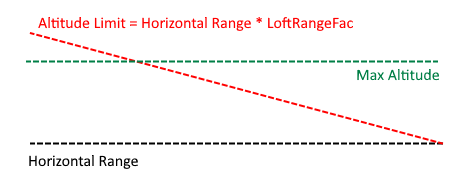
LoftRangeFac- Alternative terminal behavior, the horizontal range to the target is multiplied by this and determines a secondary altitude limit. I.E. for aLoftRangeFacof 0.5, then at 5,000 m away from the target, the missile should only be 2,500 m above the target. -
LoftVelComp- A velocity compensation factor which adjusts the aiming point of the missile on the horizontal plane. Setting this to positive means that if the target is moving away from you, then the missile will assume it's moving away from you at(1.0 + LoftVelComp)times the actual speed. If this is negative, then if the target is moving towards you, the missile will assume it's moving towards you at(1.0 + LoftVelComp)times the actual speed. I.E. if this is positive it will aim beyond a target moving away from you, increasing the missile's potential range, if it's negative it will aim in front of a target moving towards you, giving it more room to perform terminal maneuvers. Should be relatively low number, generally below 1.0 and negative. -
LoftVertVelComp- A vertical velocity compensation factor, similar toLoftVelComp, however it works in the vertical axis instead of the horizontal plane. It was found in testing that due to the missile climbing above the target, diving was a disproportionately effective tactic to use to defend against lofted missiles. This compensation factor, typically set to be negative, allows for the missile to give additional lead to diving targets in order to improve the chances of hitting. -
maneuvergLimit- Missile gLimit prior to going terminal, also used to determine if there needs to be an early handover to midcourse guidance, prior to reaching the max altitude specified. -
terminalHomingRangeThe range at which the missile should go back to simple lead guidance in order to hit the target. Setting it higher means the missile has more time to respond, setting it lower means the missile flies the more efficient ballistic trajectory for longer. -
terminalHomingTypeThe guidance law that the missile should use in its terminal phase, this defaults topronav, however can be set toaam,aampure,pronavoraugpronav. -
pronavGainThe proportional navigation gain (multiplier), higher numbers results in the missile making earlier and bigger corrections, lower numbers results in the missile making later but smaller corrections. Values of ~1-7 should be used, defaults to 3. This only needs to be set if noterminalHomingTypeis specified or ifpronavoraugpronavare used. Increase if the missile is not maneuvering hard enough, decrease if the missile becomes twitchy. - Optional:
terminalHomingis atrue/falsesetting which is part of the hybrid missile guidance settings. This can be set totrueto use alternative terminal homing types not listed above.
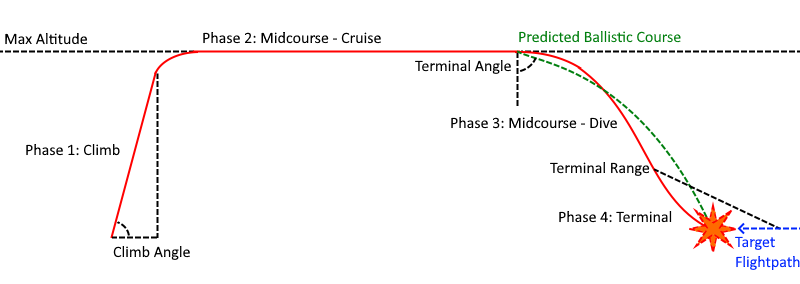
Missiles with loft guidance are able to fly a lofted trajectory rather than a direct path to the target, that is they will lob themselves upwards and then descend on their targets. As the atmosphere gets thinner at higher altitudes, this upwards trajectory allows missiles to have extended range. This is a more difficult to tune guidance method and is only particularly useful when missiles have limited burn times, I.E. more realistic missile configurations. The guidance has 3 phases, the boost / cruise phase, the midcourse phase and the terminal phase. When launched, the missile first makes a determination for whether or not to loft, based on the LoftMinAltitude, LoftRangeOverride and LoftAltitudeAdvMax settings. If the target is above LoftAngle, the missile will also go directly to terminal guidance. Note that surface launches are exempt from the LoftMinAltitude requirement. In the boost / cruise phase the missile will climb at LoftAngle, until it reaches LoftMaxAltitude or the target altitude + LoftAltitudeAdvMax, whichever is lower, unless the target is above LoftMaxAltitude, in which case the missile will climb to the target altitude. This altitude is further modified by LoftRangeFac, as specified above and in the diagram below. While the missile is climbing, the missile calculates the distance and altitude required for the missile to level out and then dive to the specified LoftTermAngle at the maneuvergLimit, and then calculates the ballistic trajectory required to reach the target, assuming no drag. When the dive angle exceeds the LoftTermAngle, the missile swaps over to midcourse guidance. When the missile has leveled out, only the distance and altitude required to dive to the specified LoftTermAngle is used. A higher maneuvergLimit will result in a more aggressive turn, and vice versa. maneuvergLimit should not exceed gLimit if gLimit is used! Note that the predicted lead for the target is modified by LoftVelComp and LoftVertVelComp, these are used to increase lead in cases where they may be required, mostly when the target is at high speed, moving towards the missile, and diving, which requires additional lead to hit. Once the missile swaps over to midcourse guidance, it tries to follow the ballistic no-drag trajectory between its current position and the target. While this no-drag assumption isn't accurate, this guidance still provides an improved trajectory compared to non-lofted missiles. At 3 times terminalHomingRange, the missile will begin to mix in the terminal guidance law's commands to smooth the transition between midcourse and terminal guidance. Finally, at terminalHomingRange, the missile swaps over to the terminal guidance law to hit the target.
Loft Guidance Flightpath:
LoftRangeFac:
Due to the more complex nature of this guidance law, tuning is more complicated. Note that in-game tuning is possible as most of the above parameters are available for editing in flight with the "Debug Missiles" option in the BDA+ Settings Menu, under "Debug", though some require that the "Advanced Tweakables" setting be on. The parameters will also need to be copied into the part files after being finalized. The default settings (I.E. the values the above parameters are set to when they aren't defined in the part file) will generally work for air-to-air missiles though how well they work depends on a case-by-case basis. Also, since lofted missiles dive down from above, chaff is generally more effective against these missiles. Continuous rod warheads are also generally not recommended with this guidance law.
Loft Guidance Tips
- If a missile begins its terminal dive and then just continues to dive downwards, particularly very fast missiles, you may need to increase the maxOffBoresight angle. Otherwise, increasing the
LoftTermAnglesuch that the missile dives down later or decreasing it may fix the issue. If all else fails you could increaseLoftTermRangeand allow for this to take over or you could setLoftTermAngleto 90° and useLoftRangeFacinstead. - If your missile is running out of energy prior to hitting you could try to:
- Adjust
LoftAngleup/down until you maximize the missile speed at top of climb for your ideal launch altitude and speed. - Adjust
LoftTermAngleto avoid abrupt turns. - Increase
LoftMaxAltitude. - Reduce the amount of
LoftVelCompif it's negative and you're leading the target too much. - Use the new
boosterFuelMassandcruiseFuelMassfields to allow your missile to burn fuel! Remember to also haveuseFuel = truein your missile config.
- Adjust
- Do not set
LoftMaxAltitudetoo high, the higher you go the thinner the atmosphere which means less drag, but also less lift! You could end up not being able to turn fast enough, or at all! Set it too low, however, and your missile may run out of energy before hitting the target! - If your missile is dropping vertically onto a target moving towards you and it doesn't have enough maneuvering room to catch the target, try increasing the amount of negative
LoftVelComp. Also potentially try increasingLoftVertVelCompin order to force your missile to give more lead to diving targets. - Setting
LoftTermAngleto a small value means your missile will need to make a smaller turn, however it could also make your missile too sensitive to target maneuvers and end up causing it to dive early and miss! - If your missile is just pointing directly at the target when it should be lofting, increase
maxOffBoresightor decreaseLoftAngleorLoftTermAngle. If the position the missile is trying to head to is outside ofmaxOffBoresightthe missile will default to pointing directly at the target. - If your missile isn't turning into the target in time after climbing, try adjusting
LoftRangeFacso that the missile stays at a lower altitude, closer to the target, rather than climbing to theLoftMaxAltitude. Remember thatLoftRangeFacis based on the horizontal distance to the target. - If your missile starts to twitch and/or maneuver erratically, try reducing the
steerMultand/or themaxTorque. This is typically caused by missiles over-steering. While this problem sometimes appears with otherhomingTypes this is especially a problem foraamloftas well aspronav/augpronav.
This guidance law is useful for:
- Advanced SAMs and AAMs
- Some advanced AGMs
- Any missiles that fly a lofted trajectory
This guidance law will try to accelerate towards a target whilst zeroing out any relative velocity that isn't in the direction of the target. When not launched from a turret and in a vacuum, the missile will first move away from the launching vessel before thrusting towards the target. Note that RCS thrusters greatly improve this guidance law's performance, for info on how to set them up refer to Modelling and Booster Definitions and Orbital Flight Dynamics. Note that this guidance assumes that the missile does not run out of fuel prior to intercept.
This guidance law is useful for:
- Exo-atmospheric missiles
Relevant Fields:
-
pronavGain- Proportional navigation gain. Defaults to 3, larger values result in more aggressive initial maneuvers and less aggressive terminal maneuvers. A value of 7 is suitable for most terminal guidance scenarios. -
pronavGainCurve- FloatCurve, gain schedule for proportional navigation, sets the gain based on the distance to the target. RequirespronavGainto be set to -1 to be used.
This is the first and most basic of the acceleration command guidance laws. At its heart, pronav is trying to get on a straight line path directly towards where the target will be when the two paths cross. To do this, it commands an acceleration which gives an angular rate proportional to the current angular rate relative to the target, as only when the missile is on the straight line path to the target will there be a constant angle to the target. This proportional command is why this guidance law is called "proportional navigation". While not the variant implemented in BDA+, an alternate, and for some, easier to understand explanation of pronav is the zero-effort-miss approach to proportional control. In this case, you calculate how far the missile will be from the target when at its closest point to the target, assuming no acceleration. By dividing this distance by the square of the time it takes to get there, you get, in essence, how much acceleration you'll need so that you'll hit the target, and you command an acceleration proportional to this. For a more thorough explanation of proportional navigation, practically all textbooks on missile guidance will cover this topic, additionally Ben Dickinson on YouTube and at Learn G&C covers the topic in depth.
This guidance law is useful for:
- AAMs
- Some AGMs
For advanced users, you may wish to implement a pronavGainCurve, by reducing the gain far away from the target, and increasing it close to the target, you can reduce the maneuvers the missile makes at longer ranges, reducing the missile's energy expenditure, and increase the aggressiveness of the maneuvers close to the target to ensure a hit.
This is a variant of proportional navigation, which adds the target's acceleration to the commanded acceleration, this allows the missile to better predict the target's motion, and allow the missile to hit targets with constant acceleration more efficiently. Do note that aside from targets with constant acceleration, pronav can outperform augpronav especially in the case of targets with noisy acceleration. For more on proportional navigation see the above section.
This guidance law is useful for:
- AAMs
- Some AGMs
Relevant Fields:
-
beamCorrectionFactor- Multiplies the distance error to the line-of-sight (LoS) to give the corrective velocity command. -
pronavGain/pronavGainCurve- Proportional navigation gain used to steer the missile to attain the commanded corrective velocity. -
beamgDeadzone- Minimum commanded acceleration before the missile steers. Primarily used to simulate things like sensor deadzones or manual missile control (MCLOS). -
beamWidth- Simulates a non-perfect beam that spreads out like a cone, represents the distance the beam spreads by per m of distance from the beam origin. -
targetingType = laserortargetingType = radar- CLOS guidance can only be used with laser or radar targeting!
This guidance law is the acceleration command version of beamriding, unlike beamriding this may be used with both laser AND radar targeting. The guidance law commands the missile to fly towards the LoS at a speed equal to its distance from the LoS times beamCorrectionFactor. This commanded velocity vector is then compared to the current velocity of the missile, producing an acceleration command proportional to the angular error times pronavGain / pronavGainCurve. This guidance law thus requires tuning both controllers, a large beamCorrectionFactor will result in a very high speed approach towards the LoS, which may result in an overshoot if pronavGain / pronavGainCurve are not sufficiently high, or the missile doesn't have sufficient maneuvering capability! Overshooting is easy to identify as the missile will bounce back-and-forth as it stabilizes on the LoS. Generally speaking, you'll want to use the maximum beamCorrectionFactor you can get away with without bouncing too much, and a pronavGain / pronavGainCurve that allows the missile to track the velocity command accurately. For missiles that are joystick guided (known as MCLOS), like early ATGMs, beamgDeadzone can be used to "simulate" error in the perception of the missile's velocity vector. A larger value means more inaccuracy and more bouncing about the LoS vector. Additionally, beamWidth may be used to simulate imperfect beams (or estimation inaccuracies in the case of MCLOS). Note that this guidance type does not compensate for sensor velocity, so it generally will not function when the sensor is on a fast-moving vehicle. It also doesn't compensate for beam motion, so the missile will lag behind the beam. The specific implementation used in BDA+ is described in the book "Modern Navigation, Guidance, And Control Processing" by Dr. Ching-Fang Lin.
This guidance law is useful for:
- ATGMs
- Some early SAMs
This is a variant of clos guidance which does compensate for sensor velocity and beam motion. This means the missile will typically track the beam far more accurately, making it useful against fast moving targets, as well as for use from fast-moving vehicles. Generally speaking though, it will still struggle to hit fast moving targets when used from a maneuvering vehicle.
This guidance law is useful for:
- Some AGMs
- Some early radar AAMs
- Some SAMs
Relevant Fields:
-
beamLeadFactor- Multiplier for lead. Defaults to 0.5 (half-correction guidance) and is generally best kept between 0-1. -
beamLeadMinAlt- Minimum altitude before "elevated by k" behavior kicks in (in m). Defaults to -1 or disabled.
This guidance law is again, a variant of clos guidance, this time it's the guidance type that forms the basis of the famous "half-correction" guidance law used in many Soviet SAMs. This guidance law shifts the beam so that it leads the target, instead of tracking the target directly, reducing the amount of maneuvering the missile has to do to when it gets close to the target. The amount of lead is controlled by beamLeadFactor, and generally the 0.5 value which matches half-correction guidance provides a good balance between leading the target, and also not overleading and allowing target maneuvers to throw off the missile. beamLeadMinAlt is an implementation of the "elevated by k" method used in early Soviet SAMs to prevent the missile from being driven into the ground. When the target is below an altitude of beamLeadMinAlt above the guidance radar, no downwards lead is applied, effectively reverting back to three point guidance in the vertical plane while the target is diving.
This guidance law is useful for:
- Some SAMs
Relevant Fields:
-
WeaveVerticalG- Vertical maneuver g (1 g = 9.81 m/s²). Defaults to 2. -
WeaveHorizontalG- Horizontal maneuver g (1 g = 9.81 m/s²). Defaults to 2. -
WeaveFrequency- Frequency of the weave maneuver (in Hz). Defaults to 0.05. -
WeaveRandomRange- Vector3, first value is the max variation in vertical g, second is max variation in horizontal and the third is the max variation in weave frequency. Defaults to (0.5, 0.5, 0.01). -
WeaveFactor- Multiplier for weave maneuver distance, higherWeaveFactormeans the weave maneuver ends closer to the target. Setting this value too high may result in the missile missing the target. -
WeaveTerminalAngle- Terminal angle for trajectory shaping (in °). Defaults to 25°. Positive values represent a terminal dive. -
WeaveUseAGMDescentRatio- Boolean, useagmDescentRatioto limit weave minimum altitude. Defaults to false. -
agmDescentRatio- Descent ratio, same asagmguidance mode. -
maneuvergLimit- Max g for pullup maneuver, higher values result in less conservative pullup to preserve minimum alt.
Weave guidance is an advanced terminal guidance law which performs a weave or corkscrew maneuver to increase the survivability of a missile against missile and gun-based point-defense. This guidance law is from the paper "A GUIDANCE LAW WITH SINUSOIDAL EVASIVE MANEUVER FOR ENHANCING SURVIVABILITY OF ANTI-SHIP MISSILES" by Lee et al. and features extensive customizability. Whilst for the most part, dodging point-defense missiles will be extremely difficult unless the missile's gLimit is equal to that of the point-defense missiles, weave guidance is very effective at throwing off the aim of gun-based point defenses. If the weave / corkscrew is affecting the missile's ability to hit the target, consider decreasing the WeaveFactor so that the missile focuses more on hitting the target. The underlying guidance law of weave guidance is biased proportional navigation, the biasing angle is specified via WeaveTerminalAngle, the missile will attempt to hit the target at this angle.
This guidance law is useful for:
- Terminal guidance of AShMs and cruise missiles
- Terminal guidance of ballistic missiles
Relevant Fields:
-
LoftMaxAltitude- Max altitude that the missile should fly at, should be set higher than you highest expected launch altitude. -
LoftAngle- Angle at which the missile should climb, a bigger angle means the missile has to turn more, which spends more energy but a smaller angle means the missile stays in the thicker atmosphere for longer.maxOffBoresightneeds to be set with this angle in mind. -
LoftRangeOverride- Midcourse guidance range, if a target is within this range the missile will immediately switch to kappa guidance. -
LoftTermAngle- Downwards angle at which the missile begins to go into its terminal dive. Should be positive. Unlike Loft Guidance, this is simply the vertical angle between the missile and the target. -
kappaAngle- Terminal velocity vector optimization, set this angle to something other than 0 to tell the missile that its final velocity vector should have this vertical angle to it, positive values are point down, negative values point up. E.G. ifkappaAngle = 45then the missile will try to ensure that it will impact the target with a 45° nose-down attitude. -
maneuvergLimit- Up to 3 values may be specified, if the latter two are not specified the first value will be used. The first value determines thegLimitof the missile in the boost / cruise phase, the second value determines if and when an early handover to the midcourse phase should occur, and the third value determines the maximum commanded g of the level-off maneuver.
Kappa guidance is an optimal guidance law which attempts to maximize a missile's terminal velocity, developed by Dr. Ching-Fang Lin and Dr. Demetrios Serakos and first implemented in the RIM-66 Standard Missile 2. The equations used in BDA+ are described in the book "Modern Navigation, Guidance, And Control Processing" by Dr. Ching-Fang Lin, which includes a derivation of the optimal gains used, for those interested. This guidance law uses the same lofting logic as Loft Guidance, climbing to LoftMaxAltitude and then diving onto the target, however being an acceleration command guidance law, more advanced methods were able to be used for trajectory shaping, and with the optimal Kappa guidance law serving as midcourse guidance, gives much improved terminal velocities with minimal tuning required. The guidance law, at its core is essentially biased proportional navigation but with gains that depend on the missile's velocity, altitude, thrust, aerodynamic characteristics and range-to-target. The gains were derived under assumptions of constant missile mass, linearized lift, quadratic drag, constant air density and thus are most optimal in a planar engagement, however, with the loft provided by the boost / cruise phase guidance and with appropriate selection of kappaAngle, kappa is still able to perform extremely well, outperforming even well tuned aamloft configurations.
Just as with loft guidance, while the missile is climbing, the missile calculates the distance and altitude required for the missile to level out and then dive to the specified LoftTermAngle at the second value of maneuvergLimit, however instead of a ballistic calculation the simple angle of the LoS to the target is used. When the dive angle exceeds the LoftTermAngle, the missile swaps over to midcourse guidance. The level-off maneuver is slightly different from loft guidance's implementation, a quarter of the third value of maneuvergLimit is used as the maximum g the missile should pull during the maneuver at 600 m/s, at airspeeds above / below 600 m/s, the missile will pull more / less in a linear relation. A quarter of the value is used as this allows the default value of 20 g to be used directly, and the g command is linearly related to airspeed to reduce excessively aggressive maneuvers at low speed, and to limit the turn distance at high speeds. Users should play around with these values until they get their ideal behavior.
Generally speaking, this guidance law is much easier to tune than Loft Guidance, simply set the desired loft parameters and kappaAngle and the guidance law will take care of the rest for you. Smaller values of LoftTermAngle mean that your missile will fly through denser air for longer due to a shallow dive angle while larger values of LoftTermAngle means your missile will have to make a larger correction when it starts its dive so this needs to be optimized for your missile and its intended targets. LoftRangeOverride can be useful for tuning this behavior as well. Steeper kappaAngle values will mean your missile will try to do a steeper dive, allowing you to fly through less of the thicker atmosphere at lower altitudes, but very steep trajectories may make it hard for your missile to hit a target.
This guidance law is useful for:
- Advanced AAMs and SAMs
- Some advanced AGMs
- Any missiles that fly a lofted trajectory
Relevant Fields:
-
terminalHoming- Boolean, should be set to true if terminal guidance law is used. -
terminalHomingType- TerminalhomingType. -
terminalHomingRange- Range at which missile should swap to terminalhomingType.
Setting terminalHoming = true allows you to use two types of homingType one for the initial boost/midcourse phase of the missile's flight and one for the terminal phase of the missile's flight. To do so, set homingType to whatever the boost/midcourse guidance law should be and then set terminalHomingType to be whatever the terminal guidance law should be. For example, augpronav and pronav tend to over-lead the target at long ranges causing missiles to lose a lot of speed whenever the target makes small turns. To remedy this, you could use homingType = aam for the boost/midcourse guidance and then set terminalHomingType = augpronav/pronav in order to take advantage of the improved hit rates. Remember to set terminalHomingRange far enough so your terminalHomingType actually gets a chance to kick in! For example, the aam -> augpronav/pronav missile could have a terminalHomingRange = 2000.
Let your creativity flow! Try out all kinds of combinations, not all combinations are guaranteed to work, or even be effective, but many can prove to be far more effective than the homingTypes used on their own!
Relevant Fields:
-
proxyDetonate- Boolean, does the missile have a proxy fuze? Defaults totrue. -
DetonateAtMinimumDistance- Boolean, can missile wait until it is at minimum dist before detonating? Defaults tofalse. Adjustable in hangar ifDetonateAtMinimumDistanceis set totrue. -
DetonationDistance- Distance the proximity fuze should trigger at (in m). Defaults to -1, which sets the fuze automatically based on the warhead and guidance type. -
adjustableProxyFuze- Boolean, can detonation distance be adjusted by the player in the hangar? Defaults totrue. -
fuzeArmingDelay- Delay post-launch until the fuze is armed (in s). Defaults to 0. -
impactFuzeArmingDelay- Boolean, is the impact fuze affected byfuzeArmingDelay. Defaults tofalse. -
proximityFuzeInhibitionAlt- Altitude below which the the proximity fuze will not function (in m). Defaults to -1 (which disables the feature).
The proximity and impact fuze are the most basic fuzes in BDA+. All missiles have impact fuzing, whether or not a missile has proximity fuzing can be adjusted via proxyDetonate. If DetonateAtMinimumDistance is set to true in the missile config, the player can adjust whether or not this feature is used in the hangar, but this will not be available in the hangar if it is set to false. For all air-to-air missiles, leaving DetonationDistance as -1 will automatically set the DetonationDistance at a quarter of the blast radius, but this can also be defined in the config. If this value shouldn't be player-adjustable in the hangar, adjustableProxyFuze can be set to false to disable it. While all BDA+ missiles have a default safety check to prevent missiles from detonating close to the firing vessel, an adjustable fuze delay can be set using fuzeArmingDelay, and if impactFuzeArmingDelay is set to true, the impact fuze also requires the delay to elapse before being armed. Finally, to simulate ground clutter making proximity fuzing difficult, proximityFuzeInhibitionAlt allows the mod maker to set an altitude below which the missile will not use its proximity fuze.
Relevant Fields:
-
isTimed- Boolean, does the missile have a time fuze? Defaults tofalse. -
detonationTime- Time fuze detonation time (in s). Defaults to 2. Adjustable in hangar.
The current time fuze in BDA+ is an in-hangar adjustable fuze, which requires isTimed to be true, and allows player selection of the detonation time between 2s-30s.
Relevant Fields:
-
altitudeFuzeMode- Missile altitude fuze, can be -2 or 2 for descending / ascending MSL, -1 or 1 for descending / ascending radar alt, or 0 for none. -
altitudeDetonationAlt- Altitude the fuze should be detonated at (in m).
The altitude fuze has 4 distinct modes, in addition to the standard off-setting, which is mode 0, there are the sea-level referencing modes (-2 and 2) and the radar altitude referencing modes (-1 and 1). Negative values mean the missile will only detonate on the way down, while positive values mean the missile will only detonate on the way up. Descending modes are useful for things like airburst munitions and bomblet dispensers, while ascending modes are useful for things like multi-stage missiles using MultiMissileLaunchers.
Warheads come in five varieties, explosive warheads, nuclear warheads, EMP warheads, cluster bombs and custom warheads, all of which require their own module on the missile part. The module name will be listed in the title of each section.
Relevant Settings:
-
HEAT_CONE_HALF_ANGLE- Half-angle of the HEAT damage cone (in °). Defaults to 2.5. -
HEAT_SPALL_MAX_RED- Maximum spall reduction by spall liners (from 0-1). Defaults to 0.5.
Relevant Fields:
-
fuseFailureRate- % chance for the warhead to fail to detonate (from 0-1). -
explModelPath- Model for the explosion. Should be given as a filepath withinGameData, E.G. BDArmory/Models/explosion/explosion. -
explSoundPath- Sound file for the explosion. Should be given as a filepath withinGameData, E.G. BDArmory/Sounds/explode1. -
tntMass- Explosive mass of the warhead (in kg). -
warheadType- Can bestandard,shapedchargeorcontinuousrod. -
caliber- Caliber of the warhead (in mm). Used for shaped charge warheads. -
apMod- Shaped charge / frag penetration modifier. -
HighExplosive- Not a field, but rather theHighExplosivecan be added to a part to set itstntMassas well.HighExplosivehas a RE of 1.5, I.E. thetntMasswill be 1.5 times theHighExplosivemass. Generally missiles should NOT use this however, and just specifytntMassdirectly.
This is the most basic warhead type, where the part itself is the warhead. Standard warheads are unidirectional, and have no modifiers to their explosions. Shaped charge warheads shoot out a hypervelocity jet of metal that acts like a kinetic penetrator. The performance of these depends on the shaped charge caliber, tntMass and apMod, and has been fitted such that the predicted penetration will be in-line with most modern warheads. Penetration decay is proportional to shapedcharge warheads are reduced outside of the cone-of-effect. Finally continuousrod warheads have increased frag damage between 30° and 60° of the warhead, and reduced blast effects outside of this area. Missiles with continuousrod warheads will also offset their aim point above / below the target (depending on the angle of approach) to ensure they detonate with the target inside their area-of-effect. Note that continuousrod warheads generally benefit from DetonateAtMinimumDistance.
Relevant Fields:
-
flashModelPath- Model for the nuke's flash. Should be given as a filepath withinGameData, E.G. BDArmory/Models/explosion/nuke/nukeFlash. -
shockModelPath- Model for the nuke's shockwave. Should be given as a filepath withinGameData, E.G. BDArmory/Models/explosion/nuke/nukeShock. -
blastModelPath- Model for the nuke's blast. Should be given as a filepath withinGameData, E.G. BDArmory/Models/explosion/nuke/nukeBlast. -
plumeModelPath- Model for the nuke's smoke plume. Should be given as a filepath withinGameData, E.G. BDArmory/Models/explosion/nuke/nukePlume. -
debrisModelPath- Model for the nuke's debris cloud. Should be given as a filepath withinGameData, E.G. BDArmory/Models/explosion/nuke/nukeScatter. -
blastSoundPath- Sound file for the nuke to play. Should be given as a filepath withinGameData, E.G. BDArmory/Models/explosion/nuke/nukeBoom. -
thermalRadius- Maximum range of effect for the nuke, no damage will be applied beyond this range even if the calculations say there should be damage (in m). Defaults to 750 and has a minimum value of 100. -
yield- Yield of the warhead (in kt). Defaults to 0.05. -
fluence- Amount of heating the bomb causes. Should generally matchyield. Defaults to 0.05. -
isEMP- Boolean, does the nuke have EMP effects? -
reportingName- String, what should the warhead's name be?
Nuclear warheads in BDA+ have extensive appearance customization, using 5 separate models. The flash model will always be displayed, as will the shock. The blast model will only display in-atmosphere (density < 0.05), and the plume and debris model will be displayed when close to the ground, the altitude at which this occurs is based on the yield. The damage range of a nuke depends on the yield of the nuke as well as the thermalRadius, thermalRadius is used to clamp the damage radius, and should be seen as a kind of limiter for the range of the nuke's blast. fluence is linearly related to the heating caused by the nuke, which scales based on the inverse square law. If isEMP is true, an EMP effect will be applied, scaling with the square-root of yield and inversely with distance.
Relevant Fields:
-
proximity- EMP radius (in m). -
AllowReboot- Does this warhead cause soft EMP damage (temporarily disabling vs. potentially permanently disabling a vehicle)? Defaults tofalse.
EMP damage is based on the EMP radius proximity, scaling linearly with target distance. When AllowReboot is true, the EMP damage dealt is "soft" EMP damage, and "hard" EMP damage, "soft" EMP damage will only disable a target, however "hard" EMP damage will continue to build up while a target is disabled and can eventually permanently disable a vessel, though this damage dissipates over time.
Relevant Fields:
-
subExplModelPath- Model for the explosion. Should be given as a filepath withinGameData, E.G. BDArmory/Models/explosion/explosion. -
subExplSoundPath- Sound file for the explosion. Should be given as a filepath withinGameData, E.G. BDArmory/Sounds/explode1. -
deployDelay- Arming delay (in s). -
deployAltitude- Deploy radar altitude (in m). -
submunitionMaxSpeed- Maximum additional submunition velocity (in m/s). -
swapCollidersOnDeploy- Boolean, should the bomb swap disabled and enabled colliders? Defaults totrue.
Cluster warheads in BD require specific model setup to use, the submunitions should be called "submunition", and if they're within a fairing, the fairing should be called "fairing". Cluster warheads will deploy at a radar altitude of deployAltitude when descending. Note that the missile also requires a BDExplosivePart module, as the submunition will match the tntMass of the BDExplosivePart module (but not the warheadType). When deployed the submunitions will travel at the original missile's velocity plus some random velocity, with a max of submunitionMaxSpeed.
Relevant Fields:
-
fuseFailureRate- % chance for the warhead to fail to detonate (from 0-1). -
explModelPath- Model for the explosion. Should be given as a filepath withinGameData, E.G. BDArmory/Models/explosion/explosion. -
explSoundPath- Sound file for the explosion. Should be given as a filepath withinGameData, E.G. BDArmory/Sounds/explode1. -
smokeTexturePath- Model for the tracer trail for the bullet. Should be given as a filepath withinGameData. -
bulletTexturePath- Texture for the bullet to use. Should be given as a filepath withinGameData, E.G. BDArmory/Textures/bullet. -
warheadType- Name of the bullet type the warhead should use. -
maxDeviation- Dispersion of the bullet as two standard deviations (in °). Defaults to -1. If set to -1, it will use the bullet'ssubProjectileDispersion. -
bulletDmgMult- Multiplier for bullet damage.
These are the most versatile of warhead types, allowing the mod maker to have the missile to launch a bullet when it detonates. The bullet's velocity is set to be the missile's velocity PLUS the config-specified bullet velocity, only the config-specified bullet velocity is affected by maxDeviation. BDCustomWarheads can be used for things like kinetic missiles, armor-piercing and semi-armor piercing warheads, larger pre-formed fragments (useful for things like space combat, can also be used for standard fragmentation though this is not recommended due to performance reasons), or as a simpler way of implementing cluster munitions. This also allows for warheads that continue on despite the missile being shot down, for things like anti-ship missiles etc. where a close interception might still leave a viable warhead that damages the ship regardless. Note that the projectileTTL of the bullet config should be used to specify the lifetime of the warhead before it despawns.
Relevant Fields (Module Name: MultiMissileLauncher):
-
isClusterMissile- Boolean, should be set totruefor cluster / multi-stage missiles. -
isMultiLauncher- Boolean, should be set tofalsefor cluster / multi-stage missiles. -
launchTransformName- Name of the parent transform for all sub-missile launch rails. The sub-missile transforms should be calledmissile1,missile2, etc. and should be aligned with the direction the sub-missile should face. -
subMunitionName- Name of the sub-missile, should match the part's name. -
subMunitionPath- File path of the submunition missile's model. -
displayOrdinance- Boolean, should sub-missiles be displayed in the model? Defaults totrue. -
displayOrdinanceHasColliders- Boolean, should sub-missiles have colliders in the model? Doesn't really improve performance, so mostly should be used for disabling colliders. Defaults totrue. -
offset- Distance the sub-missile should be offset forwards when launching (in m), mostly used to avoid clipping / physics issues. -
salvoSize- Number of missile to be fired at once. Should match the number of missile transforms. -
rippleRPM- How fast should the missiles be fired? Should be set high to ensure all sub-missiles are launched. -
ignoreLauncherColliders- Boolean, should the sub-missile temporarily disable colliders post-launch? Should be avoided if possible for cluster / multi-stage missiles, defaults tofalse. -
overrideReferenceTransform- Boolean, should missile use vessel forwards instead of sub-missile forwards for target acquisition? Should be used if sub-missiles are not pointed along the parent missile's forward direction, defaults tofalse. -
clusterMissileTriggerDist- Override for missile's detonation distance to deploy sub-missiles (in m).
Cluster / multi-stage missiles can be created using the module MultiMissileLauncher, examples of this can be found in BDArmory-Extended. The model of the missile should have a transform, specified by launchTransformName, with child transforms missile1, missile2, etc. placed and oriented where you want your sub-missiles to be. If these sub-missiles are not oriented forwards, overrideReferenceTransform should be used, as otherwise the first missile transform's direction will be used for various targeting calculations. Remember that you can also include fairings in MissileLauncher, for more information see Modelling and Booster Definitions. The sub-missiles can be specified via subMunitionName, which should match their part name, and subMunitionPath, which should lead to the model that should represent them in-flight, if displayOrdinance is true. To allow the missiles to deploy correctly, the model either has to take this into account, or offset should be used to ensure the sub-missiles separate sufficiently from the parent missile when launching. In extreme cases, ignorelaunchColliders can be used, however as it temporarily disables the sub-missiles colliders this can be troublesome when combined with a short clusterMissileTriggerDist when used in cluster / multi-stage missiles and should be avoided if possible. For the display models, displayOrdinanceHasColliders can be set to false to remove collisions from them if desired, though there isn't much of a performance gain from doing so. Having a very high rippleRPM is recommended for cluster missiles, especially if clusterTriggerDist is short to ensure all submunitions launch in time.
For a multi-stage missile, there should be a single sub-missile, stacked on the parent missile. If staging after a certain period of time is desired (instead of at a certain distance to the target, via clusterTriggerDist), isTimed on the parent missile should be used, see Time Fuze for more details.
Note that the parent missile will self-destruct after deploying the sub-missiles!
Relevant Fields (Module Name: MultiMissileLauncher):
-
isClusterMissile- Boolean, should be set tofalsefor launchers. -
isMultiLauncher- Boolean, should be set totruelaunchers. -
launchTransformName- Name of the parent transform for all missile launch rails. The missile transforms should be calledmissile1,missile2, etc. and should be aligned with the direction the missiles should face. -
RailNode- Prefix of the name of the missile selection attachment node. If the player can swap out what missile is loaded in the launcher, aRailNodeshould be specified, allowing players to select the missile that should be loaded by attaching it to these nodes. The code will look for attachment nodes with this string at the beginning of their name. -
scaleTransformName- Name of the transform used for overall scaling. -
lengthTransformName- Name of the transform used for length, I.E. forwards / backwards scaling (in Unity, this would be the Z axis, and in Blender, the Y axis). -
scaleMax- Max value for length / scale multiplier. -
offsetMax- Max offset along the length axis. -
adjustMissileVOffset- Boolean, should missile position account for missile diameter? Defaults tofalse. Should be set totrueon rail-type launchers andfalseon tube-type launchers. Offset is to the right (in Unity, this would be the Y+ axis, and in Blender, the Z- axis). -
displayOrdinance- Boolean, should missiles be displayed in the model? Defaults totrue. Disabling this can significantly improve performance, though it does mean the missiles will pop into existence when firing. -
displayOrdinanceHasColliders- Boolean, should missiles have colliders in the model? Doesn't really improve performance, so mostly should be used for disabling colliders. Defaults totrue. -
deployAnimationName- Name of animation launcher plays when firing (VLS hatches opening, etc). -
deploySpeed- Modifier value to adjust the deploy animation speed. -
subMunitionName- Name of the missile loaded. If pre-loaded, this should match the missile part's name. If the launcher is to be player-loaded, this should be left blank and aRailNodeshould be specified. -
subMunitionPath- File path of the missile's model. If pre-loaded, this should be set to whatever model should be used to represent the missile. If the launcher is to be player-loaded, this should be left blank. -
tntMass- Missile warhead mass, should only be set if the launcher is pre-loaded, and should match the pre-loaded missile. -
useSymCounterpart- Boolean, used for multi-launchers allowing simultaneous launches from symmetry counterparts. Defaults tofalse. -
salvoSize- Number of missile to be fired at once when this launcher is fired. -
setSalvoSize- Boolean, should the salvo size be player configurable in the hangar? Defaults tofalse. -
rippleRPM- How fast should the missiles be fired in a salvo? -
launcherCooldown- Cooldown time before the launcher can fire another volley, (in s). Defaults to 0. -
OverrideDropSettings- Boolean, iftrue, missile drop speed/direction is locked to forward and set to 10 m/s, to ensure missile launches forward from launcher. -
offset- Distance the sub-missile should be offset forwards when launching (in m), mostly used to avoid clipping / physics issues. -
ignoreLauncherColliders- Boolean, should the sub-missile temporarily disable colliders post-launch? Should be avoided if possible for cluster / multi-stage missiles, defaults tofalse. -
overrideReferenceTransform- Boolean, should missile use vessel forwards instead of missile forwards for target acquisition? Should be used if the missiles will not be aligned with the launch direction, E.G. in VLS cells. -
permitJettison- Boolean, can the missile pod be jettisoned, similar to rocket pods?
Relevant Fields (Module Name: ModuleMissileRearm):
-
railAmmo- Amount of ammo pre-loaded in the launcher. -
maxAmmo- Maximum amount of ammo available in the launcher. Should be >= to the number of tubes in theMultiMissileLauncher. -
MissileName- Name of the missile part loaded in the launcher. Should matchsubMunitionName. If the missile should not be pre-loaded, then this should be left blank as such:MissileName =. -
reloadTime- Time taken for the launcher to reload (in s) -
AccountForAmmo- Boolean, should the mass and cost of the loaded missiles be accounted for? Defaults totrue.
Setup (Module Name: MissileLauncher):
- For any launcher with a pre-loaded missile, the
MissileLaunchermodule should match the pre-loaded missile's exactly to ensure all aiming and weapon selection calculations are accurate. - For non-preloaded launchers, the
MissileLaunchermodule should be empty aside from a line with:missileType = launcher.
Turrets (Module Name: MissileTurret):
- Missile turrets with
MultiMissileLaunchers should generally be set up as usual, however an additional feature available is to use thedeployAnimation, specified viadeployAnimationNameinMissileTurret(and NOT inMultiMissileLauncher, animations there are only played just before the missile is launched, think silo doors).- To use this feature, the boolean
deployBlocksReloadshould be set totrue. - Additionally, if the turret should return to its default orientation when reloading,
deployBlocksYawanddeployBlocksPitchmay be used, which forces the turret to stay in its default yaw / pitch position while the animation is playing.
- To use this feature, the boolean
The MultiMissileLauncher can also be used to set up reloadable missile launchers, as well as generally more reliable missile turrets. For the most part it is recommended to use non-pre-loaded launchers, as these are more versatile and are easier to set up, requiring minimal setup in their MissileLauncher modules. Pre-loaded launchers should only be used when the loadout is fixed, and their MissileLaucher module should match those of their pre-loaded loadouts as this module is used for weapon selection, targeting as well as to set up the player-adjustable fields. If the launcher has some kind of bay door, or other pre-launch deployment animation, it can be specified with MultiMissileLauncher using deployAnimationName, as well as deploySpeed. Note that any turret and reload related animations should instead be set using deployAnimationName on the MissileTurret module! If the missile will generally not be pointed at the target when launched, overrideReferenceTransform should be used. VLS cells are the primary use-case for this in launchers. This should not be used for launchers which are intended to point towards the target prior to launch, such as swing-out arm launchers or launcher turrets. It is generally recommended that the models be designed such that the missile can be safely fired without collider issues, however, as KSP physics can get a bit weird sometimes, both the offset and ignoreLauncherColliders fields are available to fix these. While displayOrdinanceHasColliders generally does not help performance, displayOrdinance has a fairly sizeable effect on performance, if possible this should be set to false, though this will rarely be the case.