Library Documentation
This will probably be easier to navigate through in the GitHub's Wiki, however this will just be as in depth as the Wiki will be, so everything you need will be within this very file, the Code is also fully commented if you wish to jump straight into coding. If any explanations are weaker than other let us know so we can fix it up!
These list's stem I believe all the way back to Chaosyr's AP Computer Science Principles Project when they were making a Book Displayer Console App of sorts.
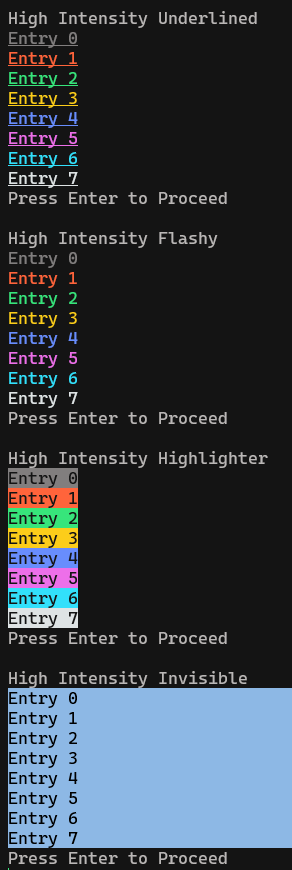
First off the Most Useful tool for seeing how these work would be calling Displayer.DisplayListBased(), this will iterate through every Color List we have in this project in a really nice to look and understand at way. If you're too lazy to call it here's a few Screenshots.
Taken In Microsoft's Command Prompt
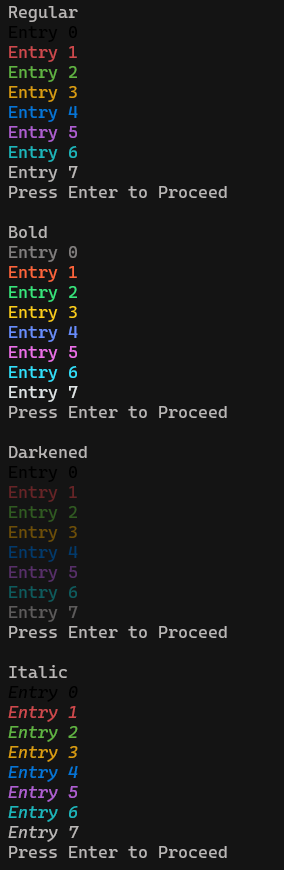
Taken In Microsoft's Command Prompt
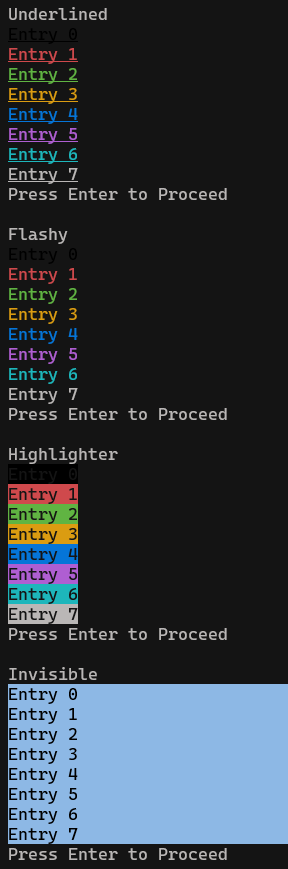
Taken In Microsoft's Command Prompt
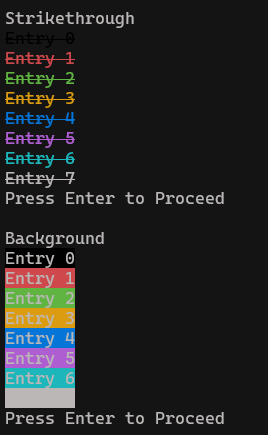
Taken In Microsoft's Command Prompt
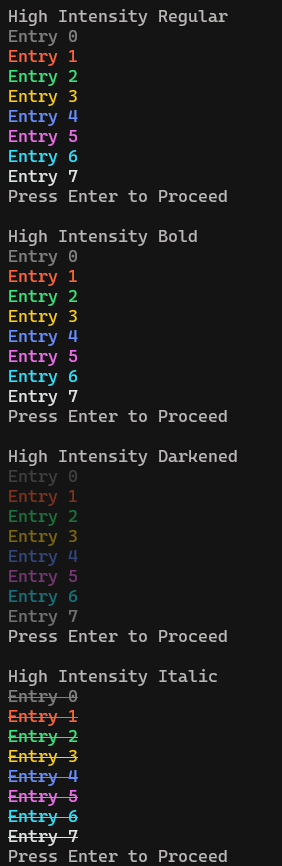
Taken In Microsoft's Command Prompt
Taken In Microsoft's Command Prompt
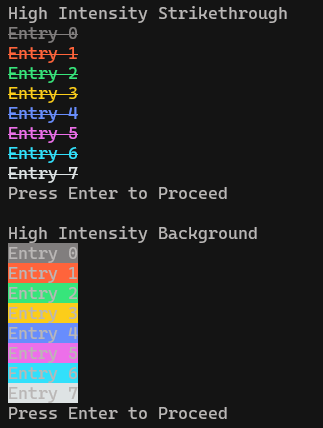
Calling the Lists are pretty straightforward. But essentially call ANSICodeLists than apply a .WhateverListThisIs to the end of it, and to choose an Entry append a [X] to the end of it, the X being the Entry Number shown in the above screenshots. For example ANSICodeLists.ColorList[4] would be Blue on the Regular list, apologies for any weird namings, these Lists are Old, the names will likely be standardized in the future, though it's highly recommended to use the Color Objects instead as it's much easier to work with.
These Functions Stem from a Mod Chaosyr made to enable ANSI in the BepInEx Console. They are also marked as Obsolete now as the Color Objects are much better to work with. So how do I use them? Well first you will need the context of the below tables for Inputs, there's a reminder of them in the functions Code Comments. Also for reference this utilizes the List's within ANSICodeLists to simplify the process [still overly complex though].
| Input | Description |
|---|---|
| Regular | The regular old fashioned color display system that just changes the color |
| Bold | The Bolded Version of the old fashioned color display, it changes both the color, and makes the text bolded or brighter. |
| Darkened | The Darkened Version of the old fashioned color display, it changes both the color, and makes the text dulled or darker. |
| Italic | The Italic version of the old fashioned color display, it changes both the color, and makes the text slanted. |
| Underlined | The Underlined version of the old fashioned color display, it changes both the color, and makes the text appear with a line beneath it. |
| Flashy | The Flashy version of the old fashioned color display, it changes both the color and makes the text blink on and off slowly. |
| Highlighter | The Highlighter version of the old fashioned color list, it changes both the color, and makes the foreground [text] and background invert there colors giving off the effect that it is being highlighted. |
| Invisible | The Invisible version of the old fashioned color list, it changes both the color, and and makes it so that when the text is highlighted with the cursor it will show the text contents. |
| Strikethrough | The Strikethrough version of the old fashioned color list, it changes both the color, and puts a line e.g. a strike through the text being displayed. |
| Background | This instead of changing the foreground [text] changes the background to the color. |
| HighIntensityRegular | The regular high intensity version of the color display system that just changes the color |
| HighIntensityBold | The Bolded Version of the high intensity version of the color display, it changes both the color, and makes the text bolded or brighter. |
| HighIntensityDarkened | The Darkened Version of the high intensity version of the color display, it changes both the color, and makes the text dulled or darker. |
| HighIntensityItalic | The Italic version of the high intensity version of the color display, it changes both the color, and makes the text slanted. |
| HighIntensityUnderlined | The Underlined version of the high intensity version of the color display, it changes both the color, and makes the text appear with a line beneath it. |
| HighIntensityFlashy | The Flashy version of the high intensity version of the color display, it changes both the color and makes the text blink on and off slowly. |
| HighIntensityHighlighter | The Highlighter version of the high intensity version of the color list, it changes both the color, and makes the foreground [text] and background invert there colors giving off the effect that it is being highlighted. |
| HighIntensityInvisible | The Invisible version of the high intensity version of the color list, it changes both the color, and and makes it so that when the text is highlighted with the cursor it will show the text contents. |
| HighIntensityStrikethrough | The Strikethrough version of the high intensity version of the color list, it changes both the color, and puts a line e.g. a strike through the text being displayed. |
| HighIntensityBackground | This instead of changing the foreground [text] changes the background to the high intensity version of the color. |
| Input | Input Number |
|---|---|
| Black | 0 |
| Red | 1 |
| Green | 2 |
| Yellow | 3 |
| Blue | 4 |
| Magenta | 5 |
| Cyan | 6 |
| White | 7 |
Now how would you call this functionality? Well as follows; GetColorFromType.GetColorFromString(Color, Type) or GetColorFromInt.GetColorFromInt(Color, Type). Again these are marked as Obsolete, and it is recommended that you instead use the Color Objects this library provides.
These are pretty straight forward, there are 3 hard coded constants provided for Resets, one for Everything, one for Foreground affects and one for Background affects e.g. Colors, the resets for the Text Types are in the Objects or bundled in the Everything Reset.
-
ANSICodeLists.ResetColorthis resets all effects done to the foreground, background, and all Text Types to default. -
ANSICodeLists.ResetForegroundthis resets all effects done to the foreground. -
ANSICodeLists.ResetBackgroundthis resets all effects done to the background.
This is a more refined system for doing basic stuff with ANSI Color Codes, it was made for the purpose of being in this Project. Beware this will be a long section because it's a powerful Object. So first off let's go over the getters and setters of the Object.
| Entry | What it is and or is used to do |
|---|---|
| BaseString | This is the base of the ANSI Escape Code for Colors. |
| Type | The effect being applied to the Text Processor, this is in the form of a Integer |
| BasicShade | This is the shade after the constructors run through their logic, the first 1-2 digits are whether its background or foreground, and the last digit is the shade. |
| Reset | A bool determining whether the Object classifies as a Reset or not, |
| Background | A bool determining whether the Object classifies as a Background or not. |
| HighIntensity | A bool determining whether the Object classifies as being High Intensity or not. |
| BaseColor | The Color as it was passed into the Constructor in Integer form before BG/HI was applied to the Int for the Escape Code |
| Now let's move onto the Constructors, these are pretty much the same but there is a few differences. |
Since the Types and Colors can be both String and Int we need to define both luckily we already defined it in the GetColorFromType so let's take that and modify it to match the new setup.
| Input | Description | Integer Input |
|---|---|---|
| Regular | The regular old fashioned color display system that just changes the color | 0 |
| Bold | The Bolded Version of the old fashioned color display, it changes both the color, and makes the text bolded or brighter. | 1 |
| Dulled | The Darkened Version of the old fashioned color display, it changes both the color, and makes the text dulled or darker. | 2 |
| Italic | The Italic version of the old fashioned color display, it changes both the color, and makes the text slanted. | 3 |
| Underlined | The Underlined version of the old fashioned color display, it changes both the color, and makes the text appear with a line beneath it. | 4 |
| Blink | The Flashy version of the old fashioned color display, it changes both the color and makes the text blink on and off slowly. | 5 |
| Rapid | The Flashy version of the old fashioned color display, it changes both the color and makes the text blink on and off rapidly. | 6 |
| Highlight | The Highlighter version of the old fashioned color list, it changes both the color, and makes the foreground [text] and background invert there colors giving off the effect that it is being highlighted. | 7 |
| Underlight | The Invisible version of the old fashioned color list, it changes both the color, and and makes it so that when the text is highlighted with the cursor it will show the text contents. | 8 |
| Strikethrough | The Strikethrough version of the old fashioned color list, it changes both the color, and puts a line e.g. a strike through the text being displayed. | 9 |
| Input | Input Number |
|---|---|
| Black | 0 |
| Red | 1 |
| Green | 2 |
| Yellow | 3 |
| Blue | 4 |
| Magenta | 5 |
| Cyan | 6 |
| White | 7 |
Okay now back to the Constructor, there are 3 optional bool's all defaulting to false, here's how they work;
- Reset - Marks the Object as a Reset Object and makes the appropriate reset object.
- Background - Marks the Object as a Background Object and makes the BasicShade take the form of a Background in the code,
- HighIntensity - Marks the Object as a HighIntensity Object and makes the BasicShade take the form of a HighIntensity shade in the code,
Some takeaways about these 3 items;
- Reset is done by checking the Type, so if you want to reset the color and a type at the same time you'll need at least a Color Object with just the color change, and a Color Object with the Type Change than call
.GetReset().Format()on both to do the same effect, we may add a Function that gets a "Full" reset of sorts in the future. - An Object can both be a Background and HighIntensity.
- When turning these markings on you need to do something like
reset: truein the constructor, this way the order isn't relevant, and you don't need to dofalseon all properties irrelevant, as they all default false.
Now let's get into the Object's Functions.
This function pretty much just says, hey this is our current object, lets just pass back the same object EXCEPT, reset is marked as True. This works because you need to do .Format() in order to get the code anyhow, and both the constructor and the .Format() handle reset Objects already.
This function pretty much just says oh, we have this Type, and we had a String switch already to make it an integer, lets reverse the integers last digit back to the original string and send that back. This has little to no use case off the top of my head and is mainly utilized for the Displayer associated with the Color object.
This function is vital to displaying the Code onto the screen so it takes affect. What this does well, in laymen's terms it formats the Variables in the Object into a Proper ANSI Escape Code for Colors. Though it's a bit more complex, and I'd recommend checking out the code to see the full of what it does! Same for the Constructors if you have not!
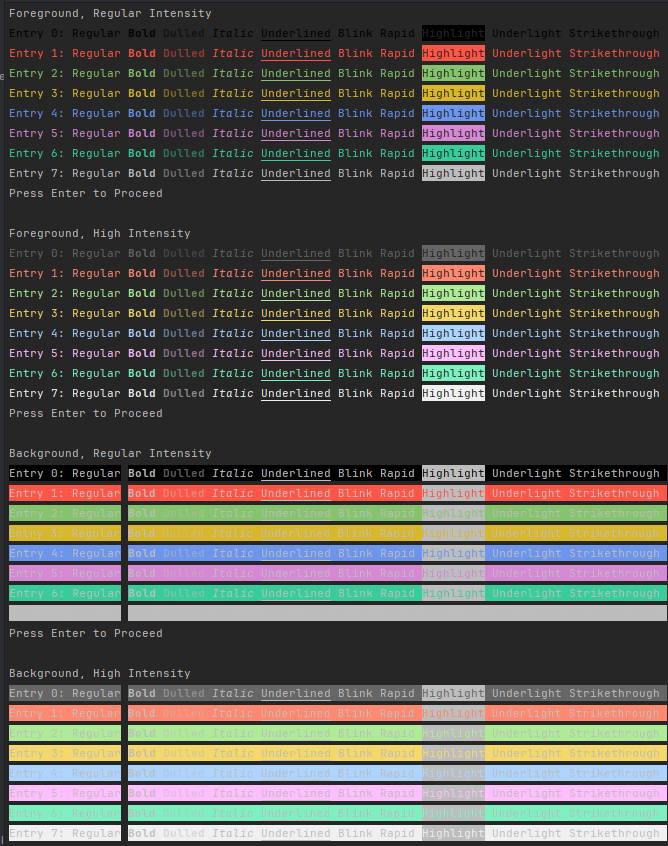
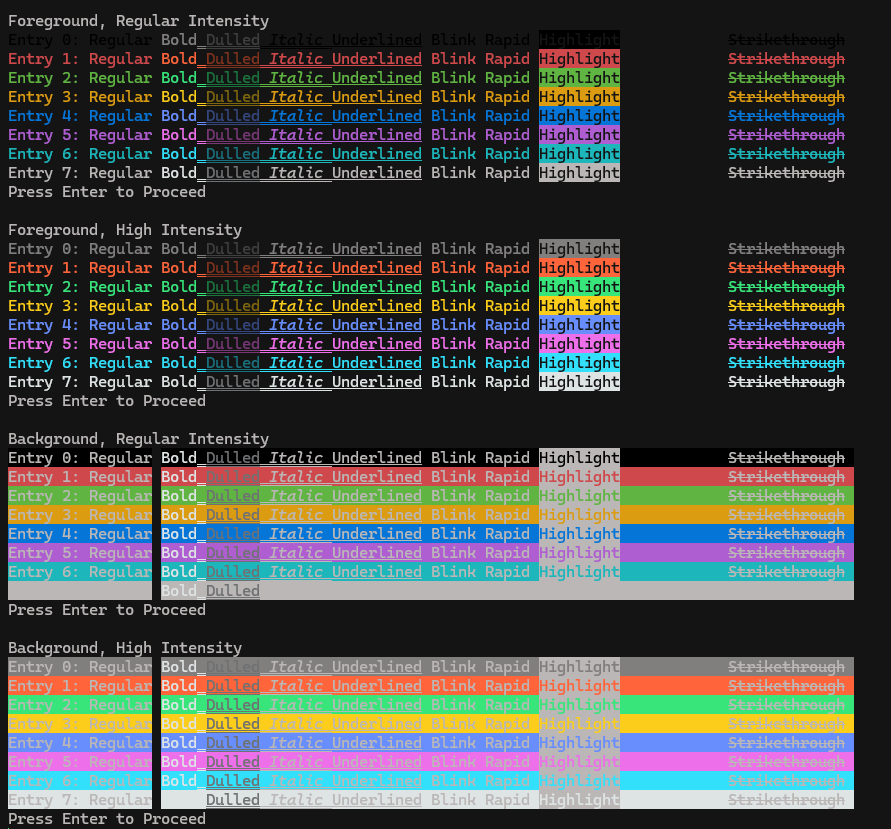
There is a Displayer associated with this Object to show all possibilities, you can call it via Displayer.DisplayColor(), this one I'd run yourself sense almost every console displays it differently for some reason The first screenshot is taken with JetBrains Rider, and the latter is taken with Microsoft's built-in Windows 11 Terminal. I show both rather than just Rider because Microsoft's Terminal actually handles the Underlight correctly (claps), however at the same time for some reason when Dulled Italic and Underlined are next to each other it decides to underline all 3 of them?!?! In fact double underline applied for Dulled and Italic, each mode is reset after usage for record so that shouldn't even be possible. But that's asides the point XD
Taken in JetBrains Rider
Taken In Microsoft's Command Prompt
So you may be wondering, well how do I utilize this Object within my own code? Here's an Example taken from the Tester used in Development of how you can use it, in fact two examples.
public static void Test()
{
    Console.WriteLine("Test 2");

    Color highlightRed = new Color("Highlight", "Red");
    Color delightRed = new Color("Highlight", "Red", reset:true);
    Color red = new Color("Regular", "Red");
    Color dered = new Color("Regular", "Red", reset:true);

    Console.WriteLine($"{red.Format()}This is a {highlightRed.Format()}ANSI{delightRed.Format()} Test{dered.Format()}, test complete");
    Console.ReadLine();
}
Taken In Microsoft's Command Prompt

So what is this doing? Well it's pretty straightforward, we are creating in this case 4 Color Objects [GetReset() did not exist yet], after creating these objects which are essentially Set Red with Highlight, Unset Highlight, Set Red, Unset Red, we test them by printing a line note how each Object in the printed line is followed by .Format() this is a required component so the ANSI Code actually prints and causes the format to change, note Legacy consoles will display the exact code instead, you can change this by enabling VirtualMachineProcessing at least on Windows.
public static void Test()
{
    Console.WriteLine("Test 5");

    Color highlightRedBGHI = new Color("Highlight", "Red", background:true, highIntensity:true);
    Color delightRedBGHI = new Color("Highlight", "Red", reset:true, background:true, highIntensity:true);
    Color redBGHI = new Color("Regular", "Red", background:true, highIntensity:true);
    Color deredBGHI = new Color("Regular", "Red", reset:true, background:true, highIntensity:true);

    Console.WriteLine($"{redBGHI.Format()}This is a {highlightRedBGHI.Format()}ANSI{delightRedBGHI.Format()} Test{deredBGHI.Format()}, test complete");
    Console.ReadLine();
}
Taken In Microsoft's Command Prompt

You may have noticed this is nearly identical to Test 2, and that's intentional, in this case we are enabling highIntensity and the background booleans so we change the background color versus the foreground one, and so that the colors appear brighter. Again notice that .Format() is required to display the color change properly.
Lastly let me show you the Displayer Code so you can see how to utilize .Reset()
Console.WriteLine("Foreground, Regular Intensity");

for (int i = 0; i < 8; i++)
{
    Color baseColor = new Color(0, i);
    string LinetoPrint = $"{baseColor.Format()}Entry {i}: ";

    for (int type = 0; type < 10; type++)
    {
        Color typedColor = new Color(type, i);
        LinetoPrint += $"{typedColor.Format()}{typedColor.GetTypeString()}{typedColor.GetReset().Format()} ";
    }

    Console.WriteLine(LinetoPrint + $"{baseColor.GetReset().Format()}");

    if (i % 15 == 0 && i != 0)
    {
        Console.WriteLine("Press Enter to Proceed");
        Console.ReadLine();
    }
}

Console.WriteLine("Press Enter to Proceed");
Console.ReadLine();
You already saw what this outputs in the Displayer section, so allow me to explain how the code works. In this case we start by looping through the 8 shades available in the Object. Within this Loop, we create a Color Object of the current iterated color, and set up the start of the printed line, being the $"{baseColor.Format()}Entry {i}: " what this does is set the color to the current iterated color, and set up the Entry with its associated number. What's next? We loop through all possible types for the current color. In this nested loop we do the following, create a typedColor e.g. a color which is set to the iterators color, and to the current type in iteration. After we do that we append the printed line with the following; $"{typedColor.Format()}{typedColor.GetTypeString()}{typedColor.GetReset().Format()}" it looks really complex but, it's not. What this is doing in a nutshell is this; Setting the Color and the current Mode to print, since we don't know the Types Name we call GetTypeString() to fetch it, and then after this we Reset the mode back to just the iterators color via .GetReset().Format(), this is essentially formatting the code of the outputted reset from GetReset(). Think of it as this; Set Mode, Say Something, Unset Mode. Once we clear the type loop, we print the line and append $"{baseColor.GetReset().Format()}" this says Reset Color, this way we ensure that the next line has the correct colors applied. Afterward we do a check by mod of 15 [not applicable here but applicable in 256] to pause the loop so that the person running the display can actually see the options they have. After we iterated through all colors, then we send the standard press enter to proceed.
This is a more refined system for doing basic stuff with ANSI Color Codes, it was made for the purpose of being in this Project. Beware this will be a long section because it's a powerful Object. So first off let's go over the getters and setters of the Object.
| Entry | What it is and or is used to do |
|---|---|
| BaseString | This is the base of the ANSI Escape Code for Colors. |
| Type | The effect being applied to the Text Processor, this is in the form of a Integer |
| BasicShade | This is the shade after the constructors run through their logic, the first 1-2 digits are whether its background or foreground, and the last digit is the shade. |
| Shade256 | This is the Shade of the Color256 being sent in. |
| Reset | A bool determining whether the Object classifies as a Reset or not, |
| Background | A bool determining whether the Object classifies as a Background or not. |
| Now let's move onto the Constructors, these are pretty much the same but there's a few differences. |
Since the Types can be both String and Int we need to define both luckily we already defined it in the GetColorFromType so let's take that and modify it to match the new setup.
| Input | Description | Integer Input |
|---|---|---|
| Regular | The regular old fashioned color display system that just changes the color | 0 |
| Bold | The Bolded Version of the old fashioned color display, it changes both the color, and makes the text bolded or brighter. | 1 |
| Dulled | The Darkened Version of the old fashioned color display, it changes both the color, and makes the text dulled or darker. | 2 |
| Italic | The Italic version of the old fashioned color display, it changes both the color, and makes the text slanted. | 3 |
| Underlined | The Underlined version of the old fashioned color display, it changes both the color, and makes the text appear with a line beneath it. | 4 |
| Blink | The Flashy version of the old fashioned color display, it changes both the color and makes the text blink on and off slowly. | 5 |
| Rapid | The Flashy version of the old fashioned color display, it changes both the color and makes the text blink on and off rapidly. | 6 |
| Highlight | The Highlighter version of the old fashioned color list, it changes both the color, and makes the foreground [text] and background invert there colors giving off the effect that it is being highlighted. | 7 |
| Underlight | The Invisible version of the old fashioned color list, it changes both the color, and and makes it so that when the text is highlighted with the cursor it will show the text contents. | 8 |
| Strikethrough | The Strikethrough version of the old fashioned color list, it changes both the color, and puts a line e.g. a strike through the text being displayed. | 9 |
Okay now back to the Constructor, the shade parameter is a value of 0-255, there are also 2 optional bool's all defaulting to false, here's how they work;
- Reset - Marks the Object as a Reset Object and makes the appropriate reset object.
- Background - Marks the Object as a Background Object and makes the BasicShade take the form of a Background in the code,
Some takeaways about these 2 items;
- Reset is done by checking the Type, so if you want to reset the color and a type at the same time you'll need at least a Color256 Object with just the color change, and a Color256 Object with the Type Change than call
.GetReset().Format()on both to do the same effect, we may add a Function that gets a "Full" reset of sorts in the future. - When turning these markings on you need to do something like
reset: truein the constructor, this way the order isn't relevant, and you don't need to dofalseon all properties irrelevant, as they all default false.
Now let's get into the Object's Functions.
This function pretty much just says, hey this is our current object, lets just pass back the same object EXCEPT, reset is marked as True. This works because you need to do .Format() in order to get the code anyhow, and both the constructor and the .Format() handle reset Objects already.
This function pretty much just says oh, we have this Type, and we had a String switch already to make it an integer, lets reverse the integers last digit back to the original string and send that back. This has little to no use case off the top of my head and is mainly utilized for the Displayer associated with the Color object.
This function is vital to displaying the Code onto the screen so it takes affect. What this does well, in laymen's terms it formats the Variables in the Object into a Proper ANSI Escape Code for Colors. Though it's a bit more complex, and I'd recommend checking out the code to see the full of what it does! Same for the Constructors if you have not!
There is a Displayer associated with this Object to show all possibilities, you can call it via Displayer.DisplayColor256(), it'll look similar to the one outlined in the Color Object, also because there's a ton of them, there won't be screenshots so, I encourage you run it yourself!!! And yeah it has the same display issues that were mentioned on the Color Object (would be really cool if they were fixed if your listening Microsoft, and if you brought back Blinking)
So you may be wondering, well how do I utilize this Object within my own code? Here's an Example taken from the Tester used in Development of how you can use it.
public static void Test()
{
    Console.WriteLine("Test 6");

    Color256 testingWhite = new Color256("Regular", 255);
    Color256 detestingWhite = new Color256("Regular", 255, reset:true);
    Color256 highlightTestingWhite = new Color256("Highlight", 255);
    Color256 delightTestingWhite = new Color256("Highlight", 255, reset:true);

    Console.WriteLine($"{testingWhite.Format()}This is a {highlightTestingWhite.Format()}ANSI{delightTestingWhite.Format()} Test{detestingWhite.Format()}, test complete");
    Console.ReadLine();
}
Taken in Microsoft Command Prompt

How this works? It creates four Color256 Objects, two Setters, two Unsetters. Then prints a line that does the following; Sets the Color, says something, sets a highlight, says something, unsets the highlight, says something, unsets the color, says something.
Console.WriteLine("Foreground");

for (int i = 0; i < 256; i++)
{
    Color256 baseColor = new Color256(0, i);
    string LinetoPrint = $"{baseColor.Format()}Entry {i}: ";

    for (int type = 0; type < 10; type++)
    {
        Color256 typedColor = new Color256(type, i);
        LinetoPrint += $"{typedColor.Format()}{typedColor.GetTypeString()}{typedColor.GetReset().Format()} ";
    }

    Console.WriteLine(LinetoPrint + $"{baseColor.GetReset().Format()}");

    if (i % 15 == 0 && i != 0)
    {
        Console.WriteLine("Press Enter to Proceed");
        Console.ReadLine();
    }
}
Console.WriteLine("Press Enter to Proceed");
Console.ReadLine();
Taken In JetBrains Rider
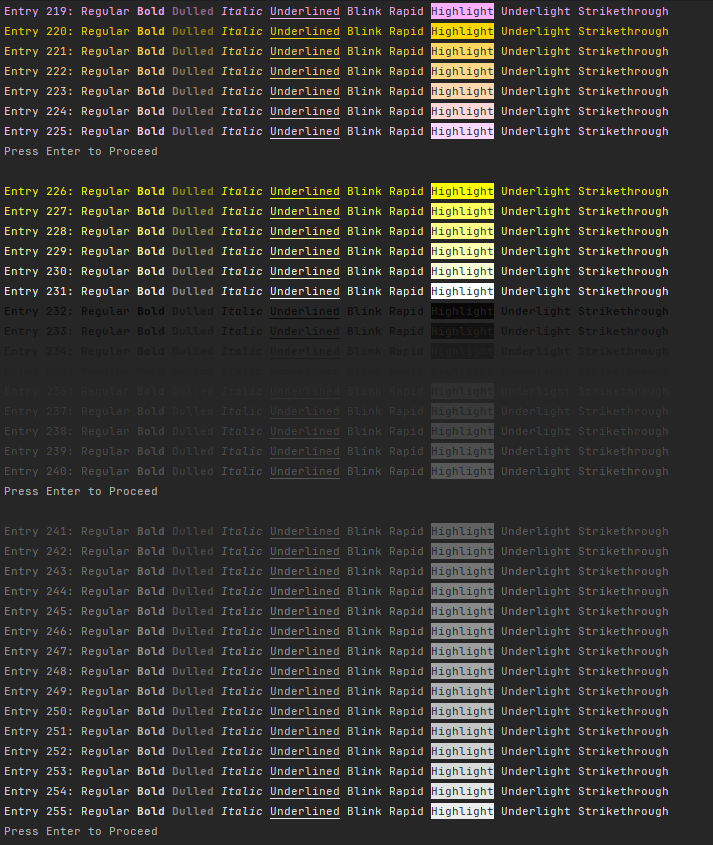
This was explained better in the Color Object, but here's what this does, iterates over every possible color the object can use, creates a Color256 for the BaseColor, creates a line in which sets that color and states the current Entry Number, iterates over all possible types, creates a Color256 for the Type, appends it to the printed line in the form of a Set, Say, Unset, once it's done iterating the types it prints the line, and appends an unset for the iterated color, every 15 goes it pauses to let the user read the entries and see what each are. Then, follows suit with the normal Press Enter To Proceed so that the app doesn't just close out once all entries are gone through.
This Object is similar to the Color and Color256 Objects, however here's the kicker, ColorRGB supports all RGB Colors!!! Plus we have some extensions to convert Gray, HSL/HSV, and Hex codes into RGB, which will be covered in the next section.
Let's start by covering the Getters and Setters of the Object
| Entry | What it is and or is used to do |
|---|---|
| BaseString | This is the base of the ANSI Escape Code for Colors. |
| Type | The effect being applied to the Text Processor, this is in the form of a Integer |
| BasicShade | This is the shade after the constructors run through their logic, the first 1-2 digits are whether its background or foreground, and the last digit is the shade. |
| Red | This is the Red value of the RGB passed in. |
| Green | This is the Green value of the RGB passed in. |
| Blue | This is the Blue value of the RGB passed in. |
| Reset | A bool determining whether the Object classifies as a Reset or not, |
| Background | A bool determining whether the Object classifies as a Background or not. |
| With that out of the way lets delve into the Constructors in which are provided. |
The below table is associated with the first variable of the constructor; the Types e.g. the Text Processing Modes in which are provided for ANSI.
| Input | Description | Integer Input |
|---|---|---|
| Regular | The regular old fashioned color display system that just changes the color | 0 |
| Bold | The Bolded Version of the old fashioned color display, it changes both the color, and makes the text bolded or brighter. | 1 |
| Dulled | The Darkened Version of the old fashioned color display, it changes both the color, and makes the text dulled or darker. | 2 |
| Italic | The Italic version of the old fashioned color display, it changes both the color, and makes the text slanted. | 3 |
| Underlined | The Underlined version of the old fashioned color display, it changes both the color, and makes the text appear with a line beneath it. | 4 |
| Blink | The Flashy version of the old fashioned color display, it changes both the color and makes the text blink on and off slowly. | 5 |
| Rapid | The Flashy version of the old fashioned color display, it changes both the color and makes the text blink on and off rapidly. | 6 |
| Highlight | The Highlighter version of the old fashioned color list, it changes both the color, and makes the foreground [text] and background invert there colors giving off the effect that it is being highlighted. | 7 |
| Underlight | The Invisible version of the old fashioned color list, it changes both the color, and and makes it so that when the text is highlighted with the cursor it will show the text contents. | 8 |
| Strikethrough | The Strikethrough version of the old fashioned color list, it changes both the color, and puts a line e.g. a strike through the text being displayed. | 9 |
Okay now back to the Constructor, After the Type you chose, there are 3 parameters that follow these correlate with; Red, Green, Blue, each are a 0-255 integer, there are also 2 optional bool's all defaulting to false, here's how they work;
- Reset - Marks the Object as a Reset Object and makes the appropriate reset object.
- Background - Marks the Object as a Background Object and makes the BasicShade take the form of a Background in the code,
Some takeaways about these 2 items;
- Reset is done by checking the Type, so if you want to reset the color and a type at the same time you'll need at least a ColorRGB Object with just the color change, and a ColorRGB Object with the Type Change than call
.GetReset().Format()on both to do the same effect, we may add a Function that gets a "Full" reset of sorts in the future. - When turning these markings on you need to do something like
reset: truein the constructor, this way the order isn't relevant, and you don't need to dofalseon all properties irrelevant, as they all default false.
This function pretty much just says, hey this is our current object, lets just pass back the same object EXCEPT, reset is marked as True. This works because you need to do .Format() in order to get the code anyhow, and both the constructor and the .Format() handle reset Objects already.
This function pretty much just says oh, we have this Type, and we had a String switch already to make it an integer, lets reverse the integers last digit back to the original string and send that back. This has little to no use case off the top of my head and is mainly utilized for the Displayer associated with the Color object.
This function is vital to displaying the Code onto the screen so it takes affect. What this does well, in laymen's terms it formats the Variables in the Object into a Proper ANSI Escape Code for Colors. Though it's a bit more complex, and I'd recommend checking out the code to see the full of what it does! Same for the Constructors if you have not!
So while we do have a Displayer with Displayer.DisplayColorRGB(), it will take an hour or so to complete so, I would advise instead opening an Art Program or similar and using the Color Picker to choose a color. Plus it also doesn't have a functional [had a pause but, it only worked in one iteration of green so removed it] pausing system.
That said if anyone makes a video slowed down of the Displayer running I can link it here, because it is really satisfying to watch and pretty useful for seeing what works against the console or not, just would not recommend the current system for it!!!
These examples are pretty much the same as Color and Color256's so these won't be too wordy as its already explained twice!
public static void Test()
{
    Console.WriteLine("Test 9");

    ColorRGB grayBG = new ColorRGB("Regular", 64, 56, 56, background:true);
    ColorRGB degrayBG = new ColorRGB("Regular", 64, 56, 56, reset: true, background:true);
    ColorRGB highlightGrayBG = new ColorRGB("Highlight", 64, 56, 56, background:true);
    ColorRGB delightGrayBG = new ColorRGB("Highlight", 64, 56, 56, reset: true, background:true);

    Console.WriteLine($"{grayBG.Format()}This is a {highlightGrayBG.Format()}ANSI{delightGrayBG.Format()} Test{degrayBG.Format()}, test complete");
    Console.ReadLine();
}
Taken in JetBrains Rider

Within this example, again we make 4 Color Objects this time ColorRGB, 2 sets, 2 unsets, all associated with RGB(64, 56, 56). After we set these up we print a testing message in the vein of; Turn color on for the background, Turn Highlight on, turn Highlight off, turn color off for the background. Note once more that the .Format() is required for it to print properly.
This one's more complex but as an Example here is our current RGB Displayer setup.
Console.WriteLine("Foreground");

for (int r = 0; r < 256; r++)
{
    for (int g = 0; g < 256; g++)
    {
        for (int b = 0; b < 256; b++)
        {
            ColorRGB baseColor = new ColorRGB(0, r, g, b);
            string LinetoPrint = $"{baseColor.Format()}Entry {r}, {g}, {b}: ";

            for (int type = 0; type < 10; type++)
            {
                ColorRGB typedColor = new ColorRGB(type, r, g, b);
                LinetoPrint += $"{typedColor.Format()}{typedColor.GetTypeString()}{typedColor.GetReset().Format()} ";
            }

            Console.WriteLine(LinetoPrint + $"{baseColor.GetReset().Format()}");
        }
    }
}

Console.WriteLine("Press Enter to Proceed");
Console.ReadLine();
Taken in Microsoft Command Prompt
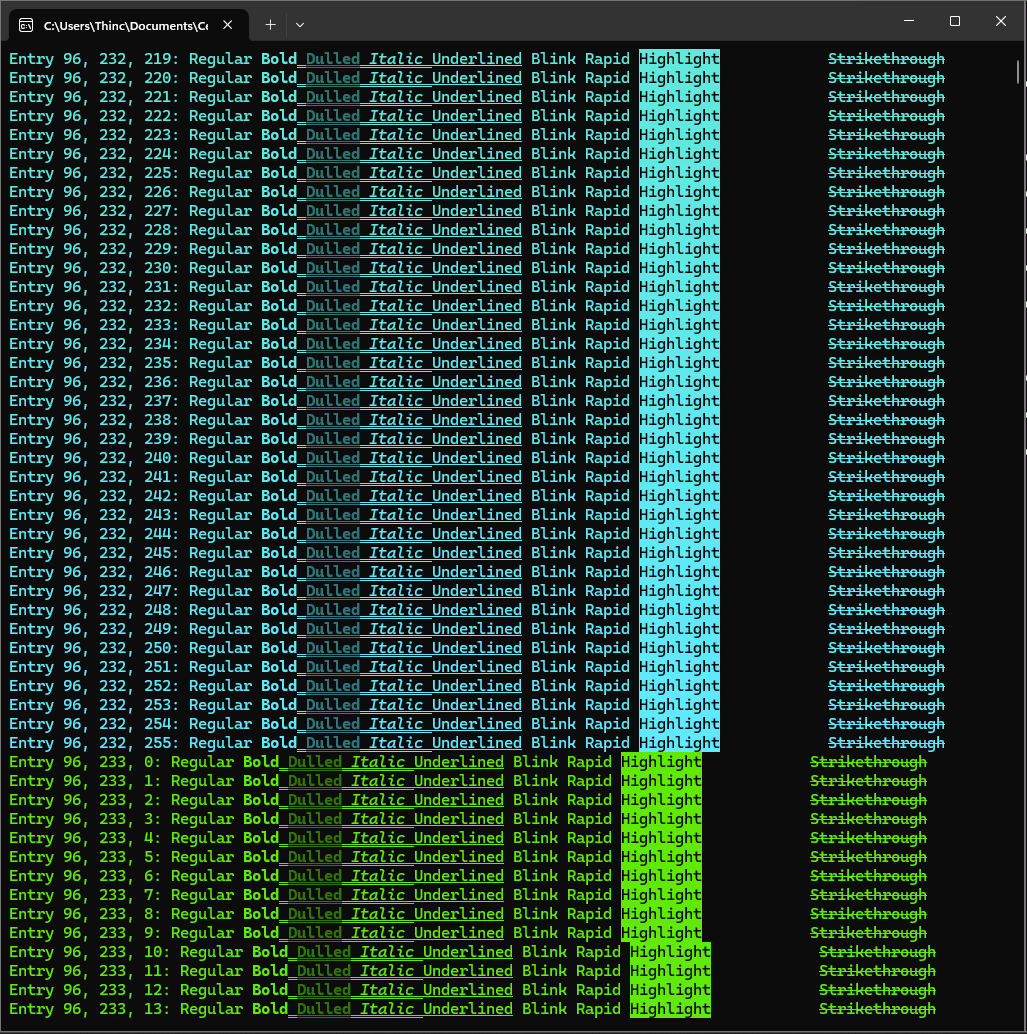
So what this does is essentially starts a loop through all 256 shads of red, followed by all 256 shades of green, followed by all 256 shades of blue. Once we are in the Blue loop we set up the iterator color, filling in a 0 for Normal color, and the r, g, and b iteration values. Afterwards we start the print line of Color On, Entry R G B. Than we loop through all possible types, and create a typed color in that loop. With that typed color we add to the printing line essentially Turn Type On, Print Type, Turn Type Off and Space, this repeats until we reach the end of the code block for the loop. Once we exit the type loop we add Color Off and print the line. This one doesn't have a pause, frankly because I couldn't get it working, which is why I do not recommend it. However, it's beautiful to watch.
Now let's dig into the RGB Convertors and how to use them.
For this one you simply need to pass in either something like "#ffffff" or "ffffff", because hex is base 16 it must be a string. How it works internally is trimming the start of the code of #'s, than converting each split of 2 characters in the code from base 16 into base 10, than returns the RGB values that were outputted.
Now here's an example from the Tester of how you can use it.
public static void Test()
{
    Console.WriteLine("Test 11");

    (int r, int g, int b) = ConvertFromXToRGB.ConverToRGBFromHex("#aa55cb");

    ColorRGB hex = new ColorRGB("Regular", r, g, b);
    ColorRGB dehex = new ColorRGB("Regular", r, g, b, reset: true);

    Console.WriteLine($"Let's give this {hex.Format()}hex (#aa55cb){dehex.Format()} conversion a test. Resultants; {r}, {g}, {b}");
    Console.ReadLine();
}
Taken in JetBrains Rider

So here's what this piece of code is doing, First it gets the RGB pair from the Hex Conversion of "#aa55cb". Then it takes that color and makes two ColorRGB's from it, setting the mode to Regular (e.g. normal color), followed by the returned R G B from the hex conversion, one a reset one a set. Lastly it prints a line attempting to see if the color converted properly with a Format() for turning the Hex on and off, and feeds back the results it got from the math it did. And that's pretty much all there is to it!!
So code wise this is the simplest one by far, essentially what it does is take the passed in gray and set that gray to each R G B value and returns it.
Here's an Example from the Tester on how to use it!!
public static void Test()
{
    Console.WriteLine("Test 10");

    (int r, int g, int b) = ConvertFromXToRGB.ConvertToRGBFromGrayscale(134);

    ColorRGB grayscale = new ColorRGB("Regular", r, g, b);
    ColorRGB degrayscale = new ColorRGB("Regular", r, g, b, reset: true);

    Console.WriteLine($"Let's give this {grayscale.Format()}grayscale (134){degrayscale.Format()} conversion a test. Resultants; {r}, {g}, {b}");
    Console.ReadLine();
}
Taken in JetBrains Rider

Code wise this does the same thing as the HEX conversion, however it is a grayscale instead, and yes the Resultants should be the same number ats the input three times.
This one's probably one of the trickier ones to explain on a coding frontier plus its off slightly in rounding but here's what it does;
- Takes the Shade and Value and Divides them by 100f into a Float.
- Calculates the Difference by doing the Shade and Value results from step 1 and multiplying them.
- Solves for "X", by taking the Difference we just got and Multiplying it by 1 subtracted by the Absolute value of Hue/60f mod 2 subtracted by 1.
- Gets the Missing value by doing the Value value retrieved in step 1 subtracted by the Difference.
- Next it determines a Quadrant in which the HSV color falls into and calls
BackToRGB()for the associated combination. - in
BackToRGB()it takes the floats passed in and does the following to the RGB values.- Gets the Maximum comparatively between the Value to 0f.
- Gets the Minimum comparatively to that Maximum to 1f.
- Multiplies that minimum by 255.
- Rounds the Product of the multiplication.
- Casts the rounding into an Integer.
- In the case it fails to land a Quadrant it returns a 0,0,0 otherwise it returns the result from Step 6.
Now here's an example of how you can use it without needing to know all of that Math!
public static void Test()
{
    Console.WriteLine("Test 12");

    (int r, int g, int b) = ConvertFromXToRGB.ConvertToRGBFromHueShadeValue(283, 58, 79);

    ColorRGB hsv = new ColorRGB("Regular", r, g, b);
    ColorRGB dehsv = new ColorRGB("Regular", r, g, b, reset: true);

    Console.WriteLine($"Let's give this {hsv.Format()}hsv (283, 58, 79){dehsv.Format()} conversion a test. Resultants; {r}, {g}, {b}");
    Console.ReadLine();
}
Taken in JetBrains Rider

Again similar to the last two code wise except this time it converts from an HSV pair to an RGB. Also, the R and B value are off by 2 digits from the math not sure as to where it stems but yeah ^^
This one is also one of the trickier ones code wise but here's what it does broken down.
- Takes the saturation and lightness and divides them by 100f.
- Calculates the Difference from the following equation; 1 subtracted by the Absolute value of 2 multiplied by the light value from Step one, subtracted by 1, than after all of the prior multiplying by saturation also from the prior step.
- Solves for "X" by taking the Difference and multiplying it by 1 subtracted by the Absolute value of Hue/60f mod 2 subtracted by 1.
- Gets the Missing value via Light from Step 1 subtracted by the Difference divided by 2.
- Next it determines a Quadrant in which the HSL color falls into and calls
BackToRGB()for the associated combination. - in
BackToRGB()it takes the floats passed in and does the following to the RGB values.- Gets the Maximum comparatively between the Value to 0f.
- Gets the Minimum comparatively to that Maximum to 1f.
- Multiplies that minimum by 255.
- Rounds the Product of the multiplication.
- Casts the rounding into an Integer.
- In the case it fails to land a Quadrant it returns a 0,0,0 otherwise it returns the result from Step 6.
Alright now let's get into the example from the Tester
public static void Test()
{
    Console.WriteLine("Test 13");

    (int r, int g, int b) = ConvertFromXToRGB.ConvertToRGBFromHueSaturationLightness(283, 53, 56);

    ColorRGB hsl = new ColorRGB("Regular", r, g, b);
    ColorRGB dehsl = new ColorRGB("Regular", r, g, b, reset: true);

    Console.WriteLine($"Let's give this {hsl.Format()}hsl (283, 53, 56){dehsl.Format()} conversion a test. Resultants; {r}, {g}, {b}");
    Console.ReadLine();
}
Taken in JetBrains Rider

Again pretty much identical to the prior examples just this time it utilizes HSL instead, this one is off by 1 in the R and B and 2 in the G, again not sure where the rounding errors stem from.