installation
The long version of the README quick start, with exact paths and the Windows things that trip people up.
Confirm these are working before you start:
- SignalRGB — signalrgb.com. Open it once and pick any effect; if no LEDs light up, fix that first. This project rides on top of SignalRGB's effect canvas, so SignalRGB has to be functional in the first place.
-
A wallpaper host — pick at least one (the installer asks):
- Lively Wallpaper (free, recommended) — rocksdanister.com/lively. The GitHub installer build is preferred; the Microsoft Store / MSIX build also works.
-
Wallpaper Engine (paid, on Steam) — auto-detected by the
installer; bundles get copied straight into Steam's
wallpaper_engine\projects\myprojectsfolder.
-
Windows 10 or 11. No other dependency — the bridge ships as a
single self-contained
.exe(Python + Tk + Pillow + psutil + pystray all bundled by PyInstaller).
Grab the latest SignalRGBWallpaperSetup-<version>.exe from the
Releases page
and run it. Approve the UAC prompt — the installer drops the bridge
into C:\Program Files\SignalRGBWallpaper\ so Windows Defender
stops flagging unsigned binaries that live in user-writable
%LOCALAPPDATA% paths. Your library + per-screen settings remain
under %LOCALAPPDATA%\SignalRGBWallpaper\ (user data, not code).
The wizard is six screens long. Click through them in order — the defaults are sensible for new installs, and an upgrade run uses the same defaults so you can mostly just hold Enter.
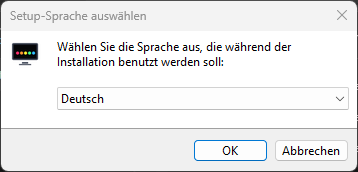
The wizard offers German and English. Pick whichever you prefer — the
rest of the wizard, the tray menu, the About dialog and the
Configurator all follow the same setting after install (the bridge
also re-resolves on launch from your Windows locale unless you set
"language" explicitly in config.json).

MIT license, the whole project is open source. Accept and click Weiter / Next.
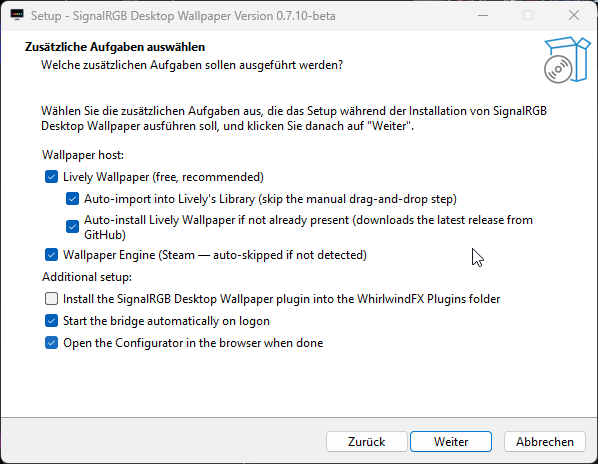
This is the meaty page. Defaults match the most common path (Lively + auto-import + auto-install Lively if missing + WE auto-copy when Steam is detected):
Wallpaper host:
- ☑ Lively Wallpaper (default on) — required for the Lively path.
- ☑ Auto-import into Lively's Library (sub-task) — when this
task and a Lively install (GitHub or MSIX build) are both present,
the four glow bundles get extracted directly into Lively's
Library\wallpapers\signalrgb-glow-screen-{1,2,3,4}\with deterministic folder names. Every subsequent installer run overwrites in place — no more "delete and re-import after every update" dance. - ☐ Auto-install Lively Wallpaper if not already present — opt-in. When ticked AND Lively isn't on disk, the installer downloads the latest release from GitHub and runs it silently before the auto-import step. Default off because it adds network egress at install time and AV / SmartScreen can flag the silent install on some setups — tick it only if you actually need Lively installed for you. Users who already have Lively (or want to install it separately from the MS Store) can leave this off.
- ☑ Wallpaper Engine (Steam — auto-skipped if not detected) —
copies the single combined
signalrgb-glow/bundle into…\steamapps\common\wallpaper_engine\projects\myprojects\. You assign it once per monitor in WE and pick a different Screen index per assignment.
Additional setup:
- ☑ Install the SignalRGB Desktop Wallpaper plugin (required)
— drops
SignalRGB_Desktop_Wallpaper.js+.qmlinto yourDocuments\WhirlwindFX\Plugins\folder. Without this, SignalRGB has no way to send colours to the bridge and the whole product does nothing. Only uncheck if you're maintaining the plugin file by hand (devs only). - ☑ Start the bridge automatically on logon — adds an HKCU
Runregistry entry. Standard per-user autostart, no service. - ☑ Open the Configurator in the browser when done — pops the in-browser settings UI right after install so you can pick a background and start configuring without finding the tray icon first.
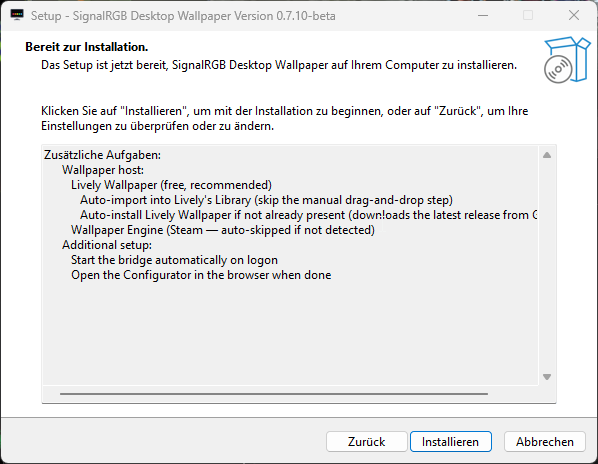
Quick recap of what's about to happen. Click Installieren / Install.
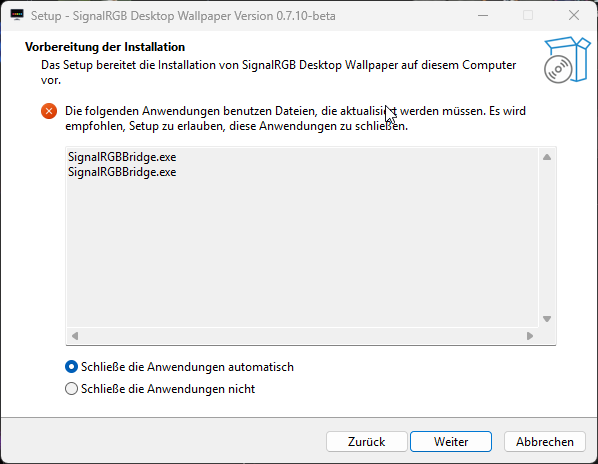
Only appears when you're upgrading and the bridge is still running. Pick Schließe die Anwendungen automatisch / Close the applications automatically and the installer will end the running process before overwriting it — saves a manual quit + re-run. The bridge can be auto-restarted at the end of the wizard via the Start now checkbox on the final page.
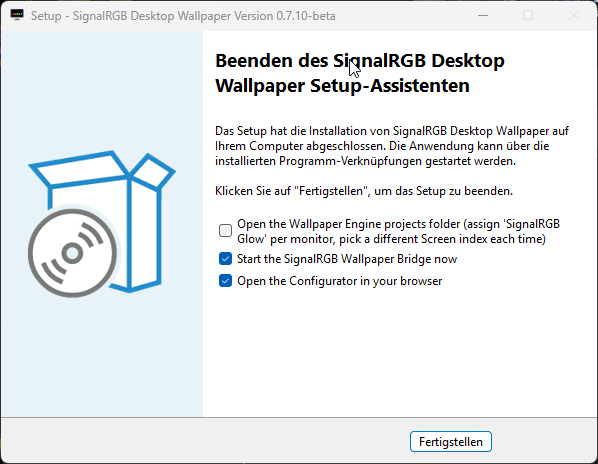
Two opt-in actions at the end:
- ☑ Start the SignalRGB Wallpaper Bridge now — launches
SignalRGBBridge.exeso the tray icon appears immediately. If unticked you can also start it via Start menu later. - ☑ Open the Configurator in your browser — pops
http://127.0.0.1:17320/configuratorso you can pick a background, set glow + widget options, etc.
A third checkbox shows up only when Wallpaper Engine was picked AND Steam wasn't detected: Open the Wallpaper Engine bundle folder. In that case the installer dropped
signalrgb-glow/into{app}\Wallpaper Engine wallpapers\instead of Steam'smyprojects\, and you need to drag the folder into Wallpaper Engine by hand. Once Steam IS detected, the bundle goes straight into the right place and no post-install action is needed.
The installer opens whichever folder(s) the auto-import skipped (for a
manual fallback) and starts the bridge if you kept "Start now". The
bridge lives in the system tray as a small monitor icon with five RGB
pads underneath. Click it for the Configurator… entry — that's the
new in-browser settings UI for everything (per-screen backgrounds, glow
layout, widgets, effects, parallax, …). See
tray-settings.md for everything the tray menu
actually offers, and the in-browser Configurator
section below for the main settings flow.
If you'd rather not run the installer:
| File | Where it goes | Size |
|---|---|---|
SignalRGBBridge.exe |
Anywhere stable (e.g. C:\Tools\SignalRGBWallpaper\) |
~20 MB |
SignalRGB_Desktop_Wallpaper.js |
Documents\WhirlwindFX\Plugins\ |
~20 KB |
SignalRGB_Desktop_Wallpaper.qml |
same folder | ~3 KB |
SignalRGB_Glow_Screen{1,2,3,4}.zip |
Drag each onto Lively | ~100 KB each |
SignalRGB_Glow_WE_Single.zip |
Extract; drop signalrgb-glow/ into Steam's …\steamapps\common\wallpaper_engine\projects\myprojects\. Assign once per monitor, pick a different Screen index per assignment in WE's properties panel. |
~300 KB |
Then double-click SignalRGBBridge.exe.
OneDrive note: if your Documents folder is OneDrive-synced, the actual path is
%USERPROFILE%\OneDrive\Dokumente\WhirlwindFX\Plugins\(German Windows) orOneDrive\Documents\…. SignalRGB watches whichever path you've redirected to.
SignalRGB hot-reloads on file change — the Desktop Wallpaper - Screen N devices should appear in your device list within a few seconds. If they don't:
- Restart SignalRGB (right-click its tray → Quit, then relaunch).
- Confirm the files landed in the right folder (with or without OneDrive).
- See Troubleshooting → "Plugin not appearing".
If you don't see the icon: Windows might be hiding it. Right-click the taskbar → Taskbar settings → "Select which icons appear on the taskbar" → enable SignalRGBBridge. If the process isn't running at all, see Troubleshooting → "Bridge won't start".
Right-click the tray icon → Configurator… (default action).
A browser tab opens at http://127.0.0.1:17320/configurator. Per-screen
tabs at the top, vertical section sidebar on the left, and a
📺 Vorschau toggle in the header that pops a floating live
preview of the wallpaper (independent of the open tab).
The sidebar splits the settings into six tabs:
- Look — Quick Looks, Background (with current-bg thumbnail), Glow, and a Screen-Layout card that declares span / mirror setups for ultrawides that are actually two monitors.
- Library — searchable / sortable / tag-filtered wallpaper grid with right-click context menu (apply / rotate / mirror / pin / delete) and a live-preview-on-hover.
- Effects — ambient preset tiles (snow / rain / sparks / aurora with live mini-canvas previews), tint toggle, density, pixelfx mode (mouse trail / hover glow / click ripple / all), 3D parallax.
- Widgets — prominent lock-bar at the top, drag-and-resize layout preview underneath (snap-to-grid optional), widget list with per-type Configure + Remove buttons, add-widget picker grid.
- Integrations — System (bridge toggles + maintenance) stays open; OpenRGB output, OpenRGB SDK server, per-screen colour source, sACN / E1.31, MQTT, REST API, plugins each collapse into their own block.
- System — presets, per-app profiles, backup / restore, screen count picker.
Settings push to the live wallpaper over WebSocket immediately — no Lively reload needed.
For the screen count itself: open the System tab in the Configurator — the Bildschirme / Screens card has a 1 / 2 / 3 / 4 picker. The SignalRGB plugin polls the bridge every tick and adjusts its device list accordingly.
Open SignalRGB → Layouts. For each Desktop Wallpaper - Screen N device, drag it onto the canvas at the position you want it to sample from. Typical layouts:
- Single monitor: centre the device, scale to cover the canvas.
- Two monitors (left + right): Screen 1 on the left half, Screen 2 on the right half.
- Three monitors: divide the canvas into thirds.
Optionally bump Glow Grid Base Size in the plugin's settings up to
128 — the bridge transparently chunks any frame > 4 KB across
multiple datagrams. 32 / 36 / 64 / 96 / 128 are all valid; bigger =
finer glow gradient + more browser work.
For ultrawide monitors (21:9 / 32:9, or anything non-square), set
the plugin's Aspect Ratio to Auto (the default) — the bridge
publishes each screen's actual viewport over GET /config, and the
plugin derives the longer side of the glow grid from it. So a
3840 × 1080 monitor at base size 32 sends a 114 × 32 grid instead of
a square 32 × 32 that would under-sample its width. The other
options force a fixed shape (1:1 / 16:9 / 21:9 / 32:9 /
9:16) or let you type a Custom Cols × Rows directly. See
multi-screen-setup.md for a worked example.
Lively users: if you let the installer auto-import, your library already has SignalRGB Glow - Screen 1 / 2 / 3 / 4 tiles. Right-click each → Set as wallpaper → pick the matching monitor.
If you didn't auto-import, drag each SignalRGB_Glow_ScreenN.zip onto
Lively to import, then assign.
Wallpaper Engine users: if you let the installer auto-copy, WE already lists SignalRGB Glow under My Wallpapers — one tile that you assign to every monitor you want to drive. Open each assignment's properties panel and pick a different Screen index (Screen 1 / 2 / 3 / 4) so the bridge sends the matching SignalRGB device's colours.
If you didn't auto-copy, extract SignalRGB_Glow_WE_Single.zip and
drop the signalrgb-glow folder into
…\steamapps\common\wallpaper_engine\projects\myprojects\.
- Tray settings reference — what every menu entry does
- Multi-screen setup — canvas placement walkthrough
- Building glow wallpapers — using the in-browser builder to cut transparent regions
- Troubleshooting — when something doesn't work
Via the installer: Windows Settings → Apps → SignalRGB Desktop
Wallpaper → Uninstall. (Or unins000.exe in the install folder.)
The uninstaller:
- Kills the running bridge first (
taskkill /f /im SignalRGBBridge.exe). - Removes the bridge exe + bundled files from
{InstallDir}. - Removes the auto-imported Lively folders
(
signalrgb-glow-screen-{1,2,3,4}\) if Lively was detected — leaves other Lively wallpapers alone. - Removes the auto-copied Wallpaper Engine bundle (
signalrgb-glow\, plus the legacySignalRGB_Glow_Screen{1..4}\folders for users upgrading from pre-0.7.2-beta installs) if Steam was detected — leaves other WE wallpapers alone. - Drops the autostart
Runregistry entry.
The plugin in WhirlwindFX\Plugins\ is not removed automatically —
delete by hand if you want SignalRGB to forget about it.
Manual install: reverse the manual steps. The bridge writes its
config to %LOCALAPPDATA%\SignalRGBWallpaper\config.json — delete that
folder to throw away your saved settings.