WDAC for Lightly Managed Devices
-
Create Signed and Reputable WDAC Policy Base policy to provide trust for Windows and Microsoft signed programs and components, and to allow apps with Known Good state.
- For the PowerShell method, we will create our own
Signed and Reputable WDAC Policybased offAllowMicrosoftpolicy template.
- For the PowerShell method, we will create our own
-
Merge Microsoft recommended block rules with the base policy from step 1.
- Microsoft recommended driver block rules is already enabled by default but the official update schedule is at least twice a year, however, you can manually update it more regularly if you want.
-
After performing the previous steps, you can test the configuration and deployment with your personal programs or in case of enterprises, business programs and if necessary, create additional policies to allow trust for programs that are essential for your workflow but are blocked/denied. The policy that you will create for those programs can either be merged with the ISG supplemental policy from step 3 or be deployed as a supplemental policy of the Base policy.
Copy the AllowMicrosoft.xml example policy from "C:\Windows\schemas\CodeIntegrity\ExamplePolicies\AllowMicrosoft.xml" to a different location.
Use the command below to add the following policy rule options to it
0 - Enabled:UMCI
2 - Required:WHQL
11 - Disabled:Script Enforcement (Use this only if you are going to use PowerShell on the system)
12 - Required:Enforce Store Applications
14 - Enabled:Intelligent Security Graph Authorization
15 - Enabled:Invalidate EAs on Reboot
16 - Enabled:Update Policy No Reboot
17 - Enabled:Allow Supplemental Policies
19 - Enabled:Dynamic Code Security
20 - Enabled:Revoked Expired As Unsigned
$AllowMicrosoftPolicyPath = <Path to AllowMicrosoft.xml>
@(0, 2, 11, 12, 14, 15, 16, 17, 19, 20) | ForEach-Object { Set-RuleOption -FilePath $AllowMicrosoftPolicyPath -Option $_ }
Use the command below to remove the following policy rule options from it
1 - Enabled:Boot Menu Protection
3 - Enabled:Audit Mode (Default)
4 - Disabled:Flight Signing
5 - Enabled:Inherit Default Policy
6 - Enabled:Unsigned System Integrity Policy (Default)
7 - Allowed:Debug Policy Augmented
8 - Required:EV Signers
9 - Enabled:Advanced Boot Options Menu
10 - Enabled:Boot Audit on Failure
13 - Enabled:Managed Installer
18 - Disabled:Runtime FilePath Rule Protection
$AllowMicrosoftPolicyPath = <Path to AllowMicrosoft.xml>
@(1, 3, 4, 5, 6, 7, 8, 9, 10, 13, 18) | ForEach-Object { Set-RuleOption -FilePath $AllowMicrosoftPolicyPath -Option $_ -Delete }
Reset both the PolicyID and BasePolicyID values and also convert it to multi-policy format.
Set-CiPolicyIdInfo -FilePath $AllowMicrosoftPolicyPath -ResetPolicyIDFrom Microsoft recommended block rules document, copy the WDAC policy XML at the end (you might need to expand that section to view it), use a text editor like VS Code to edit it as recommended:
The blocklist policy includes "Allow all" rules for both kernel and user mode that make it safe to deploy as a standalone WDAC policy. On Windows versions 1903 and above, Microsoft recommends converting this policy to multiple policy format using the Set-CiPolicyIdInfo cmdlet with the -ResetPolicyId switch.
Then, you can deploy it as a Base policy side-by-side with any other policies in your environment. To instead add these rules to an existing Base policy, you can merge the policy below using the Merge-CIPolicy cmdlet.
If merging into an existing policy that includes an explicit allowlist, you should first remove the two "Allow all" rules and their corresponding FileRuleRefs.
So, after removing these elements from XML policy file:
<Allow ID="ID_ALLOW_A_1" FriendlyName="Allow Kernel Drivers" FileName="*" />
<Allow ID="ID_ALLOW_A_2" FriendlyName="Allow User mode components" FileName="*" /><FileRuleRef RuleID="ID_ALLOW_A_1" />
<FileRuleRef RuleID="ID_ALLOW_A_2" />Save it to a file, call it for example, MSFTRecommendedBlockRules.XML, then run this PowerShell command to reset both the PolicyID and BasePolicyID values and also convert it to multi-policy format.
Set-CiPolicyIdInfo -FilePath <Path to MSFTRecommendedBlockRules.XML> -ResetPolicyIDRemove policy rule options that we don't need from it such as Audit mode.
$AllowMicrosoftPolicyPath = <Path to MSFTRecommendedBlockRules.XML>
@(1, 3, 4, 5, 6, 7, 8, 9, 10, 13, 18) | ForEach-Object { Set-RuleOption -FilePath $AllowMicrosoftPolicyPath -Option $_ -Delete }
Merge the Microsoft recommended block rules with the AllowMicrosoft policy that now also supports ISG.
Merge-CIPolicy -PolicyPaths .\AllowMicrosoft.xml,MSFTRecommendedBlockRules.XML -OutputFilePath .\Merged.xmlMake sure
.\AllowMicrosoft.xmlis mentioned first. so that the merged policy will inherit its info.
It is possible to deploy Microsoft recommended block rules as a standalone base policy, side-by-side with AllowMicrosoft policy, by keeping its allow rules in place. Refer to this document about how multiple base policies work.. "Only applications allowed by both policies run without generating block events", that means even though the Microsoft recommended block rules have 2 allow all rules, they don't actually allow everything to run, because the same allow all rules don't exist in AllowMicrosoft policy since it only contains explicit allow rules.
Set the hypervisor Code Integrity option for the final merged policy to Strict
Set-HVCIOptions -Strict -FilePath <Path to Merged.xml>Refer to this page to see how to Sign and deploy the WDAC policy file you created.
As mentioned earlier, Microsoft recommended driver block rules is already enabled by default but the official update schedule is at least twice a year, however, you can manually update it more regularly if you want.
Follow these steps to download and apply the vulnerable driver blocklist binary
Note that the Microsoft recommended driver block rules that are enforced as a result of using either memory integrity (also known as hypervisor-protected code integrity or HVCI), Smart App Control, or S mode, are saved in a file called
driversipolicy.p7bin the%windir%\system32\CodeIntegritydirectory. The file you will be downloading from Microsoft document is calledSiPolicy.p7band it won't overwrite thedriversipolicy.p7bbut it will take precedence over thedriversipolicy.p7bwhen deployed, because it has newer version and you can verify it after using refresh tool by observing the Code Integrity event logs as described in the document.
Download and use WDAC Policy Wizard. It provides GUI for creating and managing WDAC policy files and makes everything easy. It was created by the Microsoft WDAC feature team as part of an ongoing effort to provide enhancing tooling for professionals leveraging WDAC technologies. It also comes in .MSIX format which is awesome.
Launch WDAC Policy Wizard app, select Policy Creator, confirm the Policy type is "Multiple Policy Format" and it's set to create a "Base Policy".
Multiple Policy format produces
.cipbinary files while Single policy format produces.p7bbinary files.
In the "Select a Base Template for the policy" section, there are 3 modes and there are clear descriptions for each of them. We're going to use "Signed and Reputable Mode". After selection, browse for a directory to save the policy and the binary file.
In the "Configure Policy Template" section, there are many options, you can find detailed explanation for each of them here.
Going to use these options:
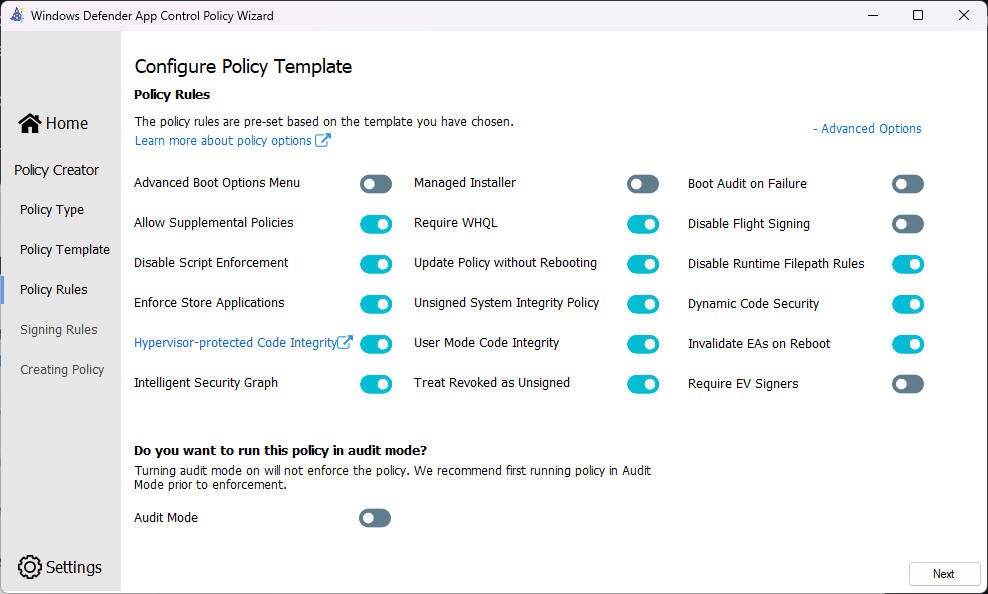
In the next section, check the box next to this option:
- Merge with Recommended User Mode Block Rules
We don't need to use the Recommended Kernel Block Rules because it's already being enforced by default and if we want to update it more regularly, we can do so by following this section of the document.
Select Next and create the policy and .cip binary file.
Citation: If you only manage Windows 11 22H2 systems (and above), then you don't need the recommended driver block rules in your WDAC policy. Otherwise, you should have the driver block rules in your policy. In either scenario, you should have the recommended user mode rules.
Citation: ISG does not include the recommended blocklist(s).
Refer to this page to see how to Sign and deploy the WDAC policy file you created.
In order for ISG to work properly, we need to run this command in an elevated PowerShell console:
appidtel startAs noted in the Microsoft document, this step isn't required for WDAC policies deployed over MDM, as the CSP will enable the necessary components. This step is also not required when the ISG is configured using Configuration Manager's WDAC integration.
Also run this command to set the Application Identity (AppIDSvc) service startup to automatic. It's a protected service so can't be disabled or modified using Services snap-in.
sc.exe config appidsvc start= autoYou can use WDAC Policy Wizard or PowerShell cmdlets to create supplemental policies.
Using PowerShell, you can use a command like this that is thorough enough to include any type of files regardless of where they are located or whether or not the files have digital signature.
New-CIPolicy -FilePath .\Policy_LeafCertificate_FallBack_SignedVersion_FileName_FilePublisher_Hash.xml -ScanPath 'C:\Folder' -Level LeafCertificate -Fallback SignedVersion, FileName, FilePublisher, Hash -UserPEs -MultiplePolicyFormat -UserWriteablePathsThen you have to reset both the PolicyID and BasePolicyID values and also convert it to multi-policy format.
Set-CiPolicyIdInfo -FilePath <Path to Supplemental.XML> -ResetPolicyIDOnce you do that, you have to use this cmdlet to specify the base policy ID of the supplemental policy.
Set-CIPolicyIdInfo -FilePath ".\Supplemental_Policy.xml" -BasePolicyToSupplementPath ".\Base_Policy.xml"Deploy the WDAC Policy by copying it to the C:\Windows\System32\CodeIntegrity\CiPolicies\Active folder or use this command:
CITool --update-policy "Path To Policy\{PolicyGUID}.cip"Since we are using the policy rule option 16 - Enabled:Update Policy No Reboot in the Base policy, we can use this command to refresh WDAC policies and apply the new supplemental policiy without the need for reboot.
CITool --refreshSign the Supplemental policy if the base policy is also signed.
One of the differences between using ISG in a WDAC policy vs using Smart App Control (which also use ISG) is that WDAC policy + ISG rule option passes along reputation from app installers to the binaries they write to disk, it can over-authorize files in some cases. For example, if the installer launches the app upon completion, any files the app writes during that first run will also be allowed.
Smart App Control however doesn't do this, it will trust the installer file itself if it's trustworthy and subsequently checks the trustworthiness of any binaries the installer tries to use and write to the disk, if any of those binaries or components can't be verified or are malicious, they get blocked.
Explained more in here:




- Create AppControl Policy
- Create Supplemental Policy
- System Information
- Configure Policy Rule Options
- Policy Editor
- Simulation
- Allow New Apps
- Build New Certificate
- Create Policy From Event Logs
- Create Policy From MDE Advanced Hunting
- Create Deny Policy
- Merge App Control Policies
- Deploy App Control Policy
- Get Code Integrity Hashes
- Get Secure Policy Settings
- Update
- Sidebar
- Validate Policies
- View File Certificates
- Microsoft Graph
- Firewall Sentinel
- Data Analysis in AppControl Manager
- Compare Policies

- Protect
- Microsoft Security Baselines
- Microsoft Security Baselines Overrides
- Microsoft 365 Apps Security Baseline
- Microsoft Defender
- Attack Surface Reduction
- Bitlocker
- Device Guard
- TLS Security
- Lock Screen
- User Account Control
- Windows Firewall
- Optional Windows Features
- Windows Networking
- Miscellaneous Configurations
- Windows Update
- Edge Browser
- Certificate Checking
- Country IP Blocking
- Non Admin Measures
- Group Policy Editor
- Manage Installed Apps
- File Reputation
- Audit Policies
- Cryptographic Bill of Materials
- Intune
- Configuration Service Provider (CSP)
- Service Manager
- Exploit Mitigations
- Sandbox Maker
- WinGet Management
- Secure Vault
- Duplicate Photos Finder
- EXIF Manager
- Download Manager
- Bootable Drive Maker

- Introduction
- How To Generate Audit Logs via App Control Policies
- How To Create an App Control Supplemental Policy
- The Strength of Signed App Control Policies
- How To Upload App Control Policies To Intune Using AppControl Manager
- How To Create and Maintain Strict Kernel‐Mode App Control Policy
- How to Create an App Control Deny Policy
- App Control Notes
- How to use Windows Server to Create App Control Code Signing Certificate
- Fast and Automatic Microsoft Recommended Driver Block Rules updates
- App Control policy for BYOVD Kernel mode only protection
- EKUs in App Control for Business Policies
- App Control Rule Levels Comparison and Guide
- Script Enforcement and PowerShell Constrained Language Mode in App Control Policies
- How to Use Microsoft Defender for Endpoint Advanced Hunting With App Control
- App Control Frequently Asked Questions (FAQs)
- System Integrity Policy Transformations | XML to CIP and Back
- About Code Integrity Policy Signing

- How To Install Microsoft Store Apps Completely Offline
- Create Bootable USB flash drive with no 3rd party tools
- Event Viewer
- Group Policy
- How to compact your OS and free up extra space
- Hyper V
- Git GitHub Desktop and Mandatory ASLR
- Signed and Verified commits with GitHub desktop
- About TLS, DNS, Encryption and OPSEC concepts
- Things to do when clean installing Windows
- Comparison of security benchmarks
- BitLocker, TPM and Pluton | What Are They and How Do They Work
- How to Detect Changes in User and Local Machine Certificate Stores in Real Time Using PowerShell
- Cloning Personal and Enterprise Repositories Using GitHub Desktop
- Only a Small Portion of The Windows OS Security Apparatus
- Rethinking Trust: Advanced Security Measures for High‐Stakes Systems

- Clean Source principle, Azure and Privileged Access Workstations
- How to Securely Connect to Azure VMs and Use RDP

- Basic PowerShell tricks and notes
- Basic PowerShell tricks and notes Part 2
- Basic PowerShell tricks and notes Part 3
- Basic PowerShell tricks and notes Part 4
- Basic PowerShell tricks and notes Part 5
- How To Access All Stream Outputs From Thread Jobs In PowerShell In Real Time
- PowerShell Best Practices To Follow When Coding
- How To Asynchronously Access All Stream Outputs From Background Jobs In PowerShell
- Powershell Dynamic Parameters and How to Add Them to the Get‐Help Syntax
- RunSpaces In PowerShell
- How To Use Reflection And Prevent Using Internal & Private C# Methods in PowerShell