Azure Cloud Setup
This page provides information for how to replicate an azure cloud setup that worked for previous teams. The information in this document can be adapted to other cloud platforms if needed.
- Author: Alex Wilkes <adw4236@rit.edu>
The primary access point into azure is portal.azure.com.
NOTE: RIT Students have an account by default using your rit email (@rit.edu with no g). You should just be able to log in with it.
With an RIT account, you get a subscription with $100 that you can use towards any resource.
Some Azure terms to familiarize yourself with are
- Resource: An instance of a service offered by Azure.
- Resource Group: A group of related resources.
- Subscription: A flow of money that can be tied to one or more resources.
To create a resource group
- From the portal home, click on Resource Groups
- Click the new button in the upper left-hand corner
- Select your subscription and enter a name.
- Review + create.
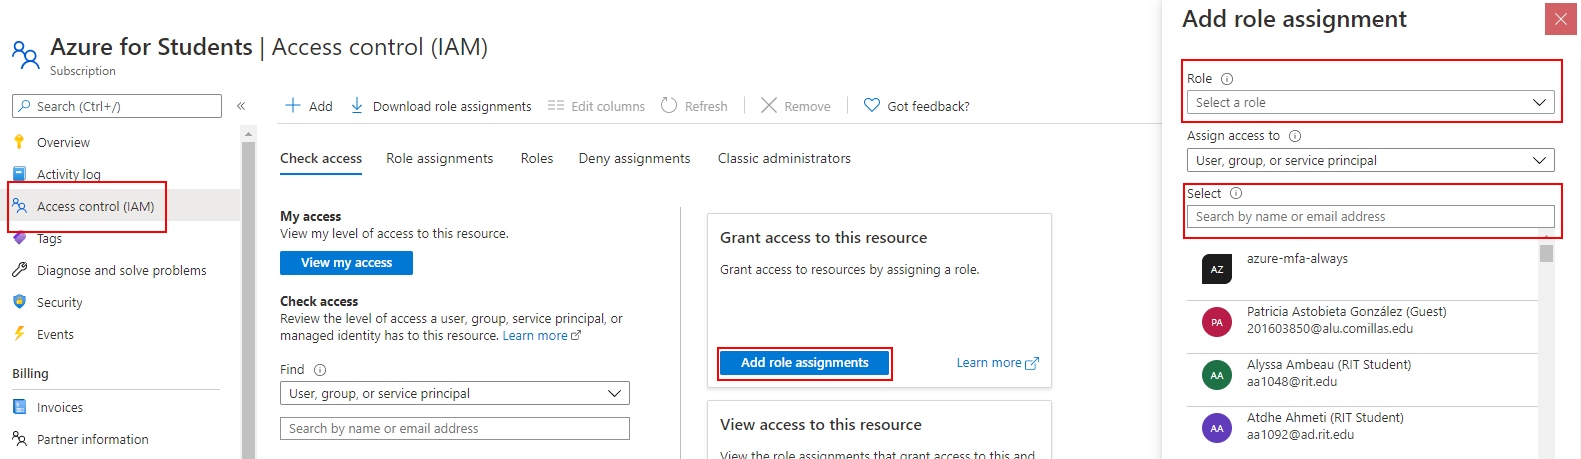
To share access to the newly created resource group, you need to share both the resource group, and the subscription you created it under.
- Navigate to Resource Groups from the portal (You are already on this page if you just did the last section)
- Click on the link in the subscription column of the group you just created.
- Click Access control (IAM)
- Click Add role assignments under "Grant access to this resource"
- Select "Owner" or "Contributor" as the role
- Search for the email of the person you would like to add.
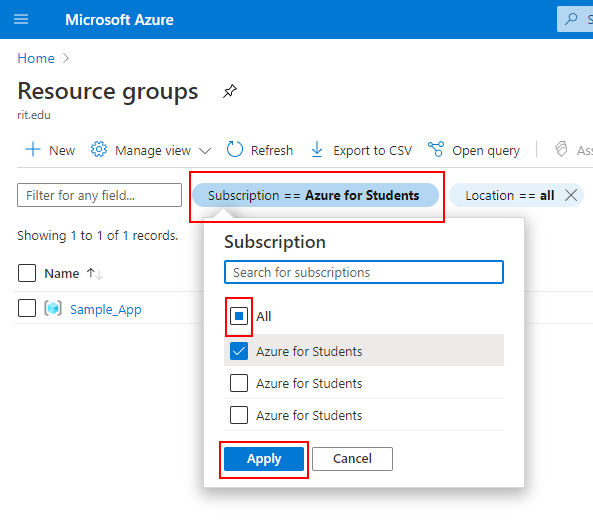
Once access has been granted, it may take several minutes for the other member to receive access, and they will not be notified in any way.
Once the other party receives access, they will need to change the default filters in the resource group screen on the portal to actually see the resource group.
- Select the subscription filter at the top.
- Check the new subscription (or just all).
- Apply, then the resource group should now show up.
The app service is what you can use to host the Node.JS app itself.
- In the resource group you created, click the add button in the upper left corner.
- Pick "Web App" from the list of resources offered.
- Fill out the settings as needed.
- The app was not ran in a docker container previously
- The runtime stack is Node, whatever version the app is running on (probably the latest)
- The Fork in The Code team was unsuccessful at setting up the environment on windows
- Review and create.
- It may take several minutes for your service to become available.
There is a lot of information available to you through the App Service, you can refer to the Azure Documentation for more details.
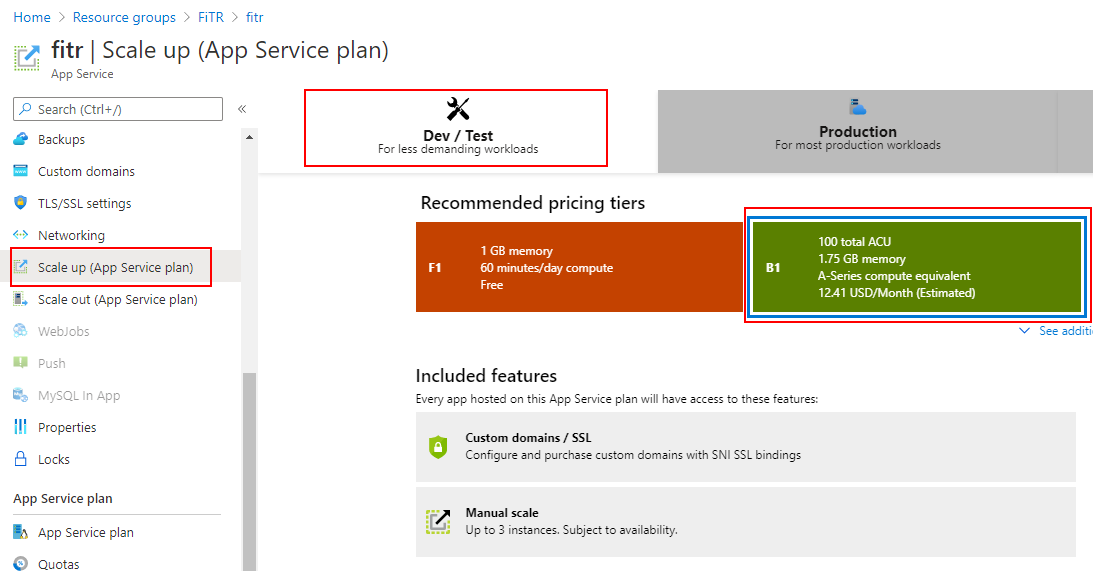
The app service plan dictates how many resources Azure will give to your particular app.
The FiTR Application is too large to run on the free version, so it will need at least B1 in order to function at least as a staging area. More information on Azure pricing can be found on the Cloud Configuration page.
To upgrade the app service to B1:
- Select "Scale up" under settings in the left navigation
- Under Dev / Test select B1
- Apply
Application settings are passed to the program as environment variables.
- Select Configuration under Settings on the left navigation.
- Add a new application setting for each environment variable needed by the program. This
is a combination of the environment variables for the frontend and backend.
- The database information will be retrieved in the CosmosDB section
- The API server URL should just be the app service plan URL prefixed by
api..
- Save the settings in the upper left before leaving.
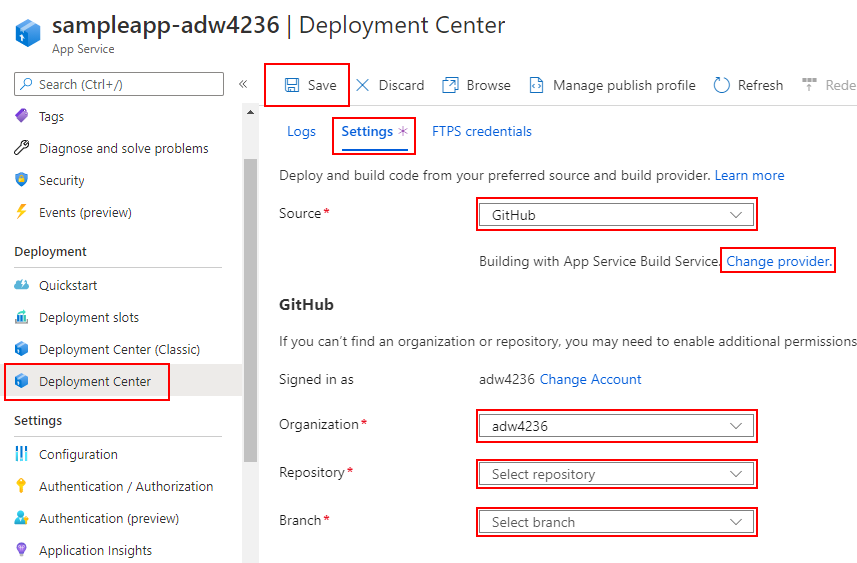
There are many ways to approach deploying to the azure service, outlined here is one method that has worked in the past using Azure's built in Kudu Deployment.
Note: This step must be done by the person that owns the repository (anyone if you are working from a github organization).
- Select Deployment Center on the left navigation.
- Select the settings tab.
- Set the source to GitHub.
- Change the provider to "App Service Build Service"
- Select the organization and repository (If it is a personal organization, select your username here).
- Select "master" as the branch
- Select Save in the upper left corner
- The app will take a long time to load on first connection if it hasn't been lode recently. There is a setting under Configuration > General Settings to keep your app always on. This may have other consequences though.
- You can see how much storage space the app is using under Quotas
- Under Advanced Tools, there are additional logs. The "Bash" tab at the top allows you to explore your deployment. You can also SSH, but that is not as straightforward.
- You can see the live logging of the application under Log Stream under Monitoring.
CosmosDB is one of multiple options for databases on Azure, it works well since it can be configured to use the mongoose API.
- Under the resource group, add a new resource just like with the App Service.
- Select Azure CosmosDB.
- Change the configurations as needed.
- Change the API to "Azure Cosmos DB for MongoDB API"
- Provisioned throughput is likely the best option.
- Apply the free tier discount, so the first 400ru/s are free (See pricing overview below)
- Review + create, wait several minutes for the resource to be fully operational.
The MongoDB connection string as well as the username and password are found on the Connection String page under Settings. Before using them as is however, read below.
The application is capable of creating databases automatically, but it is very important that databases are created manually because otherwise Azure will by default provision each collection separately leading to large unexpected charges. See below for more details.
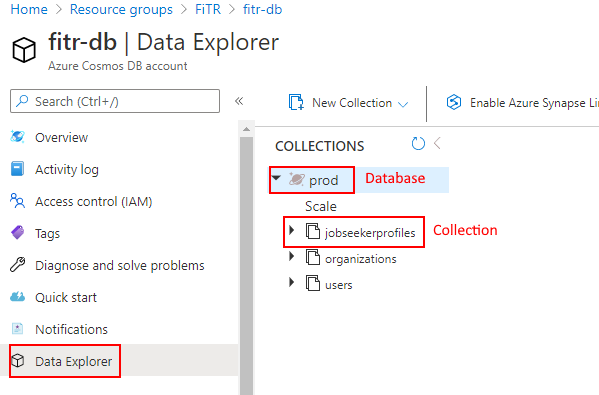
- Navigate to the Data Explorer in the left menu.
- Click the dropdown next to new collection.
- Select "New Database".
- Name the database something.
- Ensure the throughput is limited to 400RU/s which, if you opted into the free discount above, should not cost any money to run.
In order to ensure this database is used and no new databases are automatically created, the connection string must include this database name directly after the database URL.
...fitr-db.mongo.cosmos.azure.com:10255/<DATABASE_NAME_HERE>?...
For Example:
mongodb://fitr-db:...long_hash...@fitr-db.mongo.cosmos.azure.com:10255/<DATABASE_NAME_HERE>?ssl=true&replicaSet=globaldb&retrywrites=false&maxIdleTimeMS=120000&appName=@fitr-db@
Once you have your connection string, this can be used in any environment variables for the application including the one needed in the App Service created above.
For every database after your first, you will have to pay for the throughput, you only get your first 400RU/s for free.
The azure pricing system for databases is a bit confusing if you aren't used to it. More details can be found on the Cloud Configuration page, but a quick overview here is necessary, so the team is not charged more than they need to be.
Azure databases charge based on the RU (Request Unit, a relatively arbitrary unit of work) your database has provisioned. While you can let azure increase the number of RU/s you have provisioned automatically, that typically is not desired because then you can't predict how much you will spend.
Instead, you can set a hard limit on maximum RU/s in two ways.
- On a database itself (Of which there can be multiple per CosmosDB instance).
- On individual collections.
While it is a bit confusing, you can see what a database is vs what a collection is by navigating to the Data Explorer. A database is the one with the planet icon, collections are the items contained in that database.
If you followed the above instructions to create a database, your database should be configured so that you only have 400RU/s being used. If you however let the databases get generated by the mongoose API, they will automatically provision 400RU/s for each collection instead of each database. This means that each database would provision 400 times the number of collections in the database, which can lead to spikes in cost.