![]()
HEVC-Style Vision Transformer
🤗 Models | 🤗 Datasets | 📄 Technical Report | 📝 Blog
Video understanding models face a fundamental trade-off: incorporating more frames enables richer temporal reasoning but increases computational cost quadratically. Conventional approaches mitigate this by sparsely sampling frames, however, this strategy discards fine-grained motion dynamics and treats all spatial regions uniformly, resulting in wasted computation on static content.
We introduce OneVision Encoder, a vision transformer that resolves this trade-off by drawing inspiration from HEVC (High-Efficiency Video Coding). Rather than densely processing all patches from a few frames, OneVision Encoder sparsely selects informative patches from many frames. This codec-inspired patch selection mechanism identifies temporally salient regions (e.g., motion, object interactions, and semantic changes) and allocates computation exclusively to these informative areas.
Coupled with global contrastive learning over a 2M-scale concept memory bank, OneVision Encoder achieves state-of-the-art performance across major video benchmarks (MVBench, VideoMME, Perception Test), while also delivering strong results on image understanding tasks (DocVQA, ChartQA, and OCRBench).
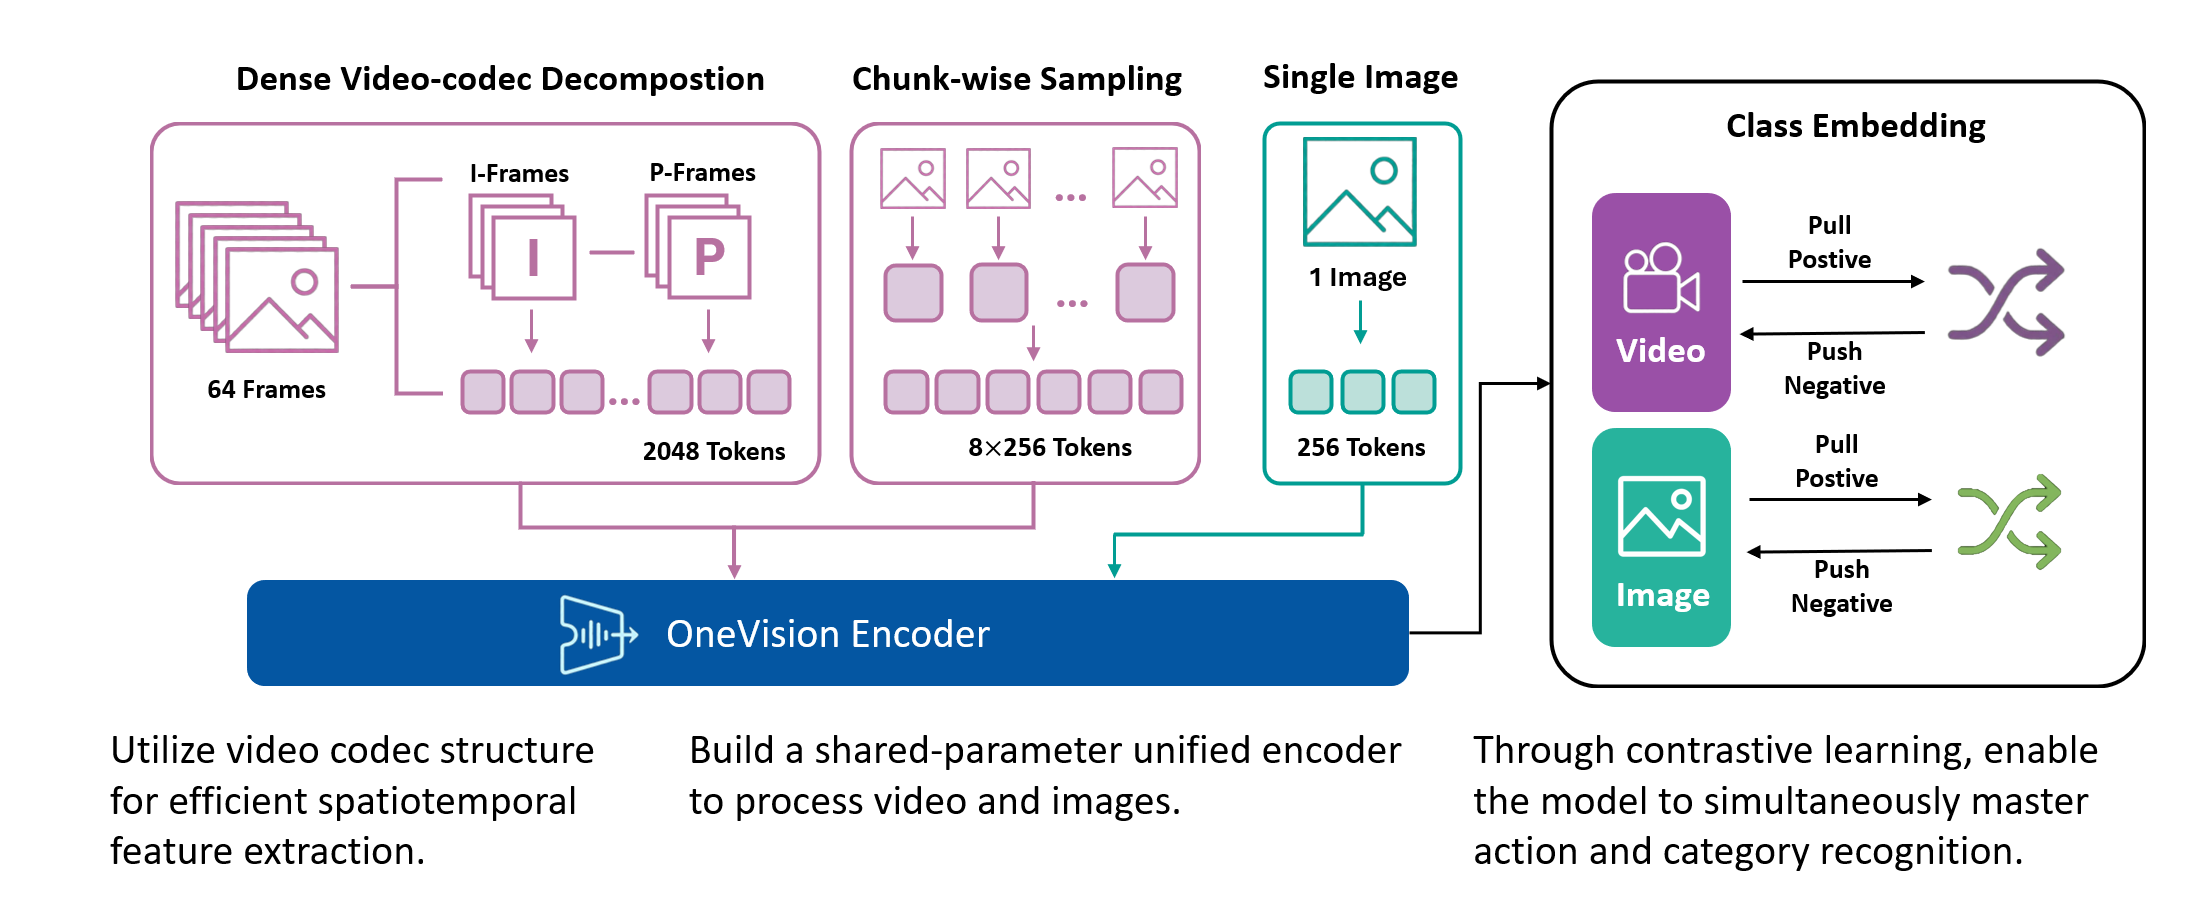
The visualization below illustrates four different video processing pipelines. (1) Original Video: a continuous 64-frame sequence that preserves the complete temporal context. (2) Uniform Frame Sampling: a conventional strategy that selects 4–8 evenly spaced frames; while simple and efficient, it is inherently lossy and fails to capture fine-grained inter-frame motion. (3) Temporal Saliency Detection: a global analysis of all 64 frames to identify regions rich in temporal information, including motion patterns, appearance variations, and semantic events. (4) Codec-Style Patch Extraction: selective extraction of the temporally salient patches in a zigzag order, achieving 75–98% compression while retaining critical temporal dynamics.
 |
 |
Standard contrastive learning methods (e.g., CLIP) are fundamentally constrained by batch size, as negative samples are drawn only from the current batch, typically limited to 32K–64K examples. This restriction yields a narrow and incomplete view of the embedding space, often resulting in suboptimal representation learning. In contrast, our approach maintains a global concept bank comprising 2M clustered centers, allowing each training sample to contrast against a diverse and representative set of negatives independent of batch composition. This global contrasting mechanism leads to more discriminative embeddings and well-separated semantic clusters.
We train the model on a mixed dataset comprising 740K samples from LLaVA-OneVision and 800K samples from LLaVA-Video SFT, proceeding directly to Stage-2 fine-tuning. Following a streamlined native-resolution strategy inspired by LLaVA-OneVision, input frames that match the model’s native resolution are fed directly into the network without tiling or cropping, allowing us to fully evaluate the ViT’s native-resolution modeling capability.
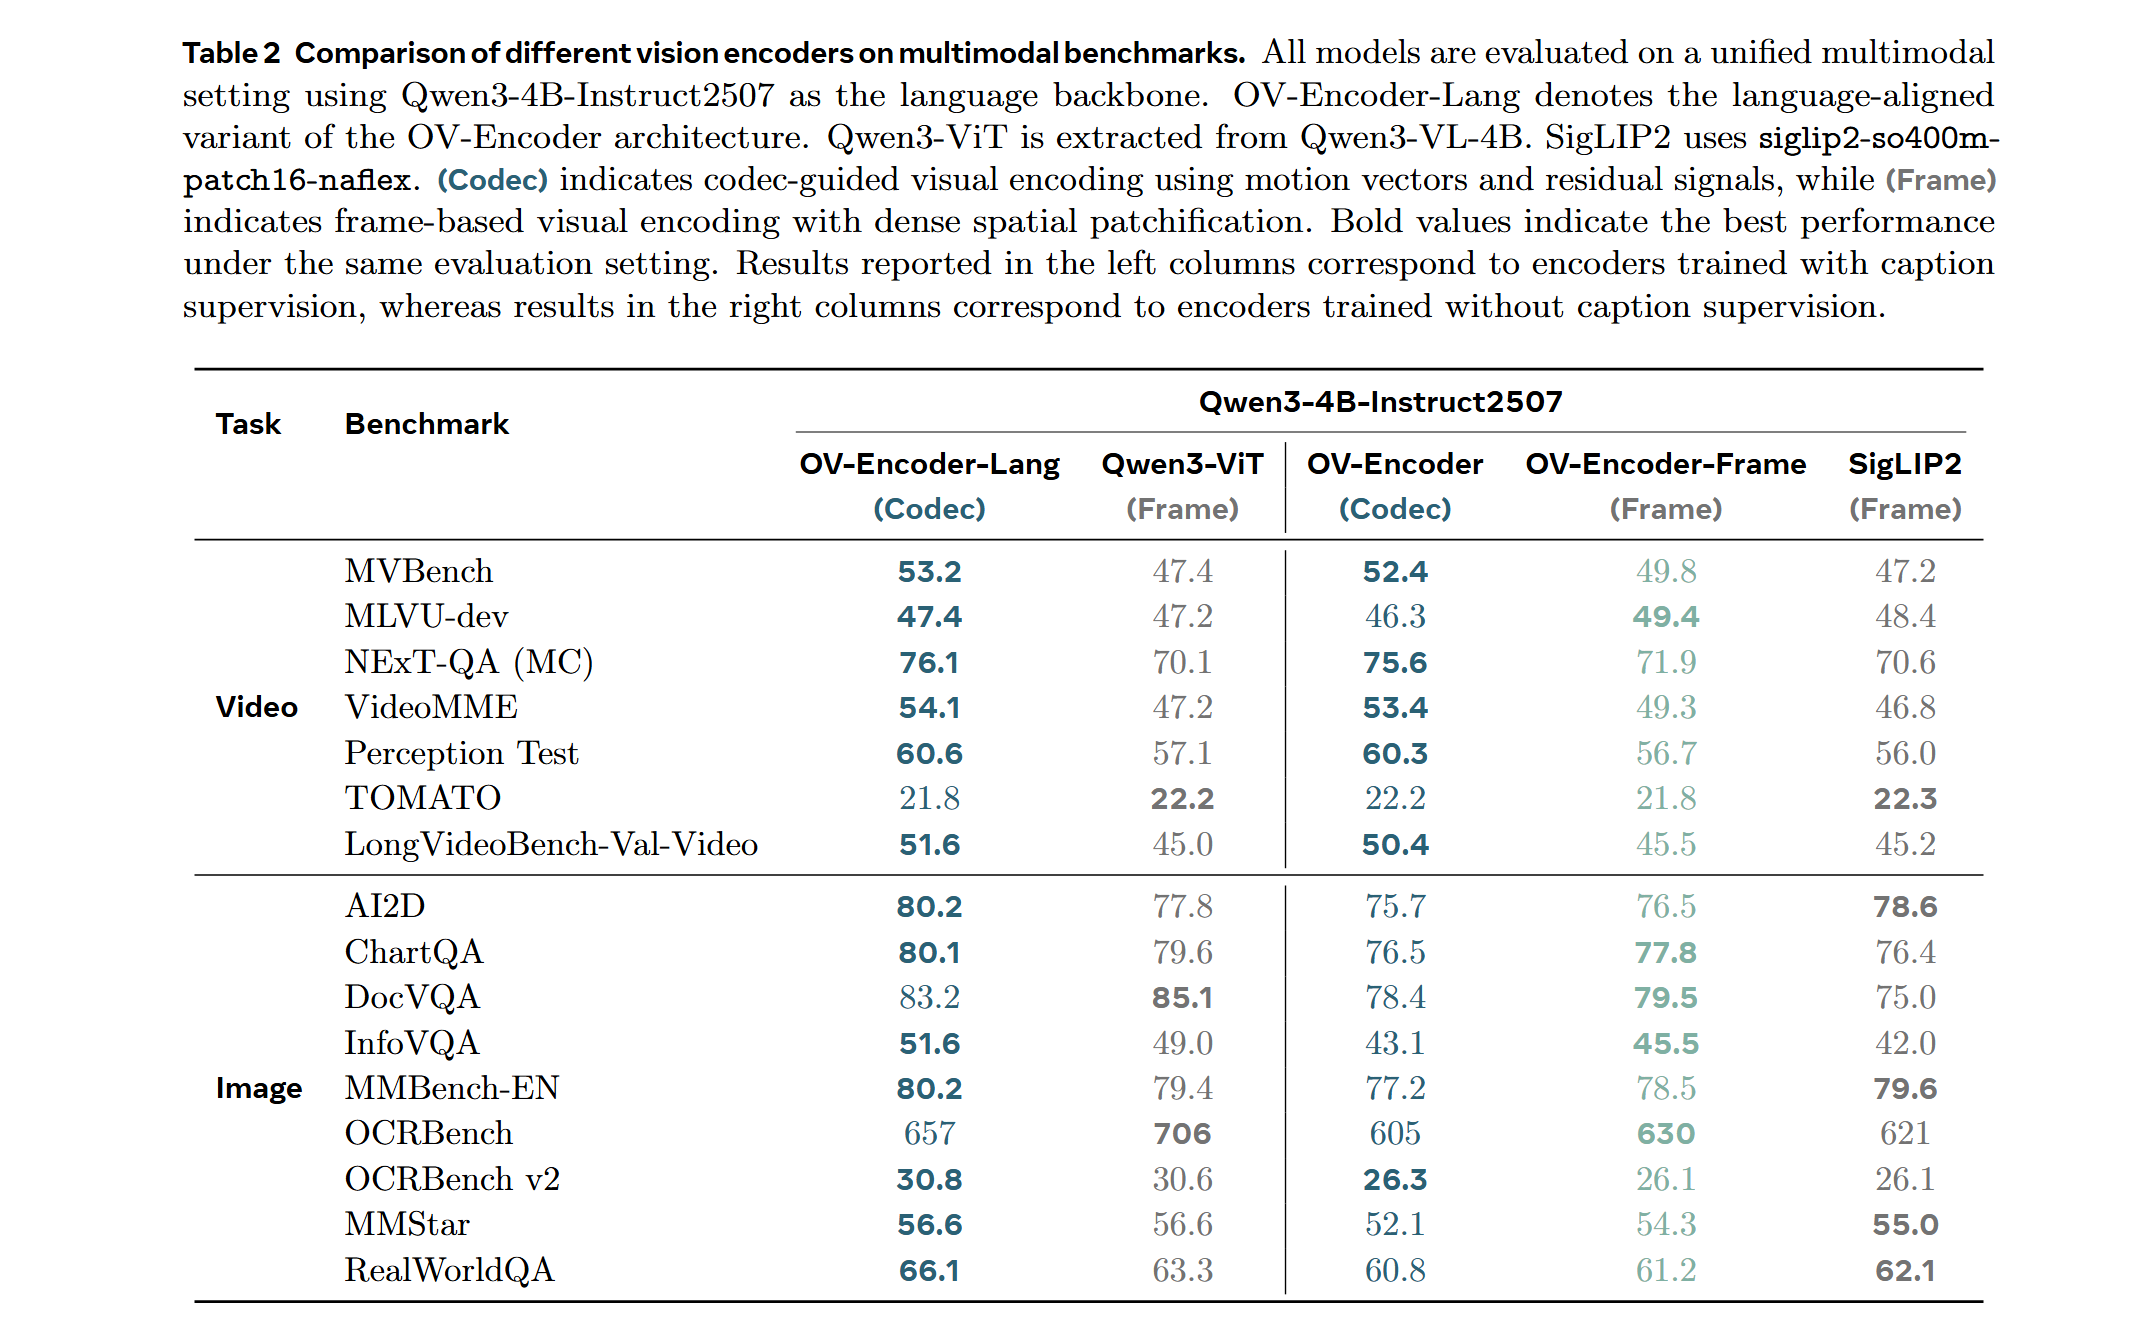
We compare the performance of different vision encoders using the Attentive Probe evaluation protocol. All models are evaluated with a single-clip input and trained for 10 epochs across eight action recognition datasets. The results report both the average accuracy and per-dataset performance under 8-frame and 16-frame input configurations.
- Docker with NVIDIA GPU support
- CUDA-compatible GPU(s)
docker build -t ov_encoder:25.12 .docker run -it --gpus all --ipc host --net host --privileged \
-v "$(pwd)":/workspace/OneVision-Encoder \
-w /workspace/OneVision-Encoder \
ov_encoder:25.12 bashInside the container, install the package in editable mode:
pip install -e .Note: This model supports native resolution input. For optimal performance:
- Image: 448×448 resolution (pre-trained)
- Video: 224×224 resolution with 256 tokens per frame (pre-trained)
Use CLIP preprocessing from the model repository.
from transformers import AutoModel, AutoImageProcessor
from PIL import Image
import torch

# Load model and preprocessor
model = AutoModel.from_pretrained(
    "lmms-lab-encoder/onevision-encoder-large",
    trust_remote_code=True,
    attn_implementation="flash_attention_2"
).to("cuda").eval()

preprocessor = AutoImageProcessor.from_pretrained(
    "lmms-lab-encoder/onevision-encoder-large",
    trust_remote_code=True
)

# Image inference: [B, C, H, W]
image = Image.open("path/to/your/image.jpg")  # Replace with your image path
pixel_values = preprocessor(images=image, return_tensors="pt")["pixel_values"].to("cuda")
with torch.no_grad():
    outputs = model(pixel_values)
    # outputs.last_hidden_state: [B, num_patches, hidden_size]
    # outputs.pooler_output: [B, hidden_size]

# Video inference: [B, C, T, H, W] with visible_indices
num_frames, frame_tokens, target_frames = 16, 256, 64
# Load video frames and preprocess each frame (replace with your video frame paths)
frames = [Image.open(f"path/to/frame_{i}.jpg") for i in range(num_frames)]
video_pixel_values = preprocessor(images=frames, return_tensors="pt")["pixel_values"]
# Reshape from [T, C, H, W] to [B, C, T, H, W]
video = video_pixel_values.unsqueeze(0).permute(0, 2, 1, 3, 4).to("cuda")

# Build visible_indices for temporal sampling
frame_pos = torch.linspace(0, target_frames - 1, num_frames).long().cuda()
visible_indices = (frame_pos.unsqueeze(-1) * frame_tokens + torch.arange(frame_tokens).cuda()).reshape(1, -1)
# visible_indices example (with 256 tokens per frame):
#   Frame 0 (pos=0):  indices [0, 1, 2, ..., 255]
#   Frame 1 (pos=4):  indices [1024, 1025, 1026, ..., 1279]
#   Frame 2 (pos=8):  indices [2048, 2049, 2050, ..., 2303]
#   ...
#   Frame 15 (pos=63): indices [16128, 16129, ..., 16383]

with torch.no_grad():
outputs = model(video, visible_indices=visible_indices)Add codec-style input documentation for temporal saliency-based patch selection.
Training configurations and hyperparameters will be documented soon. For now, please refer to --help for available options.
To evaluate the encoder with uniform frame sampling, first navigate to the evaluation directory:
cd eval_encoderThen run the following command:
torchrun --nproc_per_node=8 --master_port=29507 attentive_probe.py \
  --eval_freq 1 \
  --default_lr_list 0.0001 \
  --batch_size 32 \
  --default_weight_decay 0 \
  --dali_py_num_workers 8 \
  --model_family llava_vit_sampling \
  --dataset diving48 \
  --num_frames 8 \
  --model_weight lmms-lab-encoder/onevision-encoder-large \
  --model_name hf_llava_vit_large_ln \
  --embedding_size 1024 \
  --frames_token_num 256
Sampling-Specific Parameters:
frames_token_num: Number of tokens per frame (e.g., 256 tokens for standard sampling).
To evaluate the encoder with codec-style patch selection, first navigate to the evaluation directory:
cd eval_encoderThen run the following command:
torchrun --nproc_per_node=8 --master_port=29512 attentive_probe_codec.py \
  --eval_freq 1 \
  --default_lr_list 0.0001 \
  --batch_size 4 \
  --default_weight_decay 0 \
  --dali_py_num_workers 8 \
  --model_family llava_vit_codec \
  --dataset diving48 \
  --num_frames 64 \
  --model_weight lmms-lab/onevision-encoder-large \
  --model_name hf_llava_vit_large_ln \
  --embedding_size 1024 \
  --default_epoch 30 \
  --data_root /path/to/your/data_attentive_probe/ \
  --cache_dir /path/to/your/cache_residuals/ \
  --K_keep 2048 \
  --mv_compensate median
Codec-Specific Parameters:
cache_dir: Directory for cached codec patches. This is where the codec-selected patches will be stored/loaded.K_keep: Number of patches to keep. For example, 256 patches per frame × 8 frames = 2048 total patches. Adjust based on your frame count and desired compression ratio.mv_compensate: Motion vector compensation method (e.g.,median).
The following parameters are common to both evaluation methods:
dataset: Dataset to evaluate on (e.g.,diving48,ssv2,kinetics400). Prepare the dataset according to the Attentive Probe format.num_frames: Total number of frames in the video sequence (e.g., 8 for sampling, 64 for codec).model_weight: Path to the pre-trained model. Uselmms-lab-encoder/onevision-encoder-largeto load directly from HuggingFace, or provide a local path.model_name: Model architecture name (e.g.,hf_llava_vit_large_ln).embedding_size: Size of the embedding dimension (e.g., 1024).batch_size: Training batch size (varies by evaluation type).default_lr_list: Learning rate for the probe training.default_weight_decay: Weight decay for optimization.eval_freq: Evaluation frequency during training.dali_py_num_workers: Number of DALI data loading workers.data_root: Root directory containing your prepared dataset (codec evaluation only).
This project is released under the Apache 2.0 License.
- Model Card - Detailed documentation for OneVision Encoder Large model
- Data Card - Training dataset information and statistics