Repository navigation
Your first patch
With the dependency configured on the last page, it is time to get started with your first patch.
PatchLib works with both Java and Kotlin. The guide is written for Java. Kotlin has some minor differences that you need to be aware of when using it. You can find those on the Patching with Kotlin page.
PatchLib uses an annotation-based API. An annotation in Java is just a piece of metadata that can be read by other sources and always starts with an @ symbol. The first annotation from PatchLib that you will need to use is the @Patch annotation.
For the purpose of this guide, let's say we want to create a patch that modifies the Automated Ship hullmod and adds something to its tooltip. To get started with this, create a new Java class and annotate it with @Patch.
@Patch()
public class AutomatedHullmodPatch {

}
@Patch marks this class as a patch. A patch is a class used for patching code. PatchLib will scan your entire mod for this annotation. You do not need to manually register your patches anywhere.
As such, you can place your patch classes anywhere you want.
It is recommended to place patches into a dedicated package, but you can decide whether you want one central folder for all your patches (i.e mymod.patches)
or to have multiple subpackages in places where you need them (i.e mymod.hullmods.patches & mymod.scripts.patches)
Next up, we need to expand our @Patch annotation with an additional parameter, one that tells the patch which classes it targets.
@Patch(target = @ClassMatch())
public class AutomatedHullmodPatch {

}
This is done with the @ClassMatch() annotation. PatchLib requires you to nest multiple annotations like this in several places.
A class match allows us to narrow down which classes to target in a variety of ways. Note that by default, an empty @ClassMatch targets every class. It is your job to narrow it down further.
One of the easiest ways to do so is with the type parameter. This restricts it to a specific class; you will discover more matching parameters on the next page.
@Patch(target = @ClassMatch(type = Automated.class))
public class AutomatedHullmodPatch {

}

//Alternative "typeName" argument, which uses the full package path instead.
//This is useful for janino loaded classes, which have no compile time .class reference.
@Patch(target = @ClassMatch(typeName = "com.fs.starfarer.api.impl.hullmods.Automated"))
public class AutomatedHullmodPatch {

}
So far, so good, but now we actually want our patch to do something! For our goal of adding to the hullmod's tooltip,
we need a way to execute code after its tooltip method. For this, we can use the @After annotation.
This annotation marks a method as an After hook. This is one of many annotations that allow modifying original code.
As the name may imply, this specific annotation will allow you to insert code after the original end of a method.
@Patch(target = @ClassMatch(type = Automated.class))
public class AutomatedHullmodPatch {

    @After()
    public static void afterAddPostDescriptionSection() {

    }
}
A method annotated like this is called a patch handler in PatchLib terminology.
A patch handler method always needs to be public and static, and always returns void.
As you may guess, our @After annotation is still missing something. We need to make it define what method we want to patch.
For this, we have the @MethodMatch annotation. You use it quite similarly to the @ClassMatch annotation.
It also has many different ways to filter down, but once again, we will rely only on methodName for now. As the name implies, it filters targets down by the exact method name.
@Patch(target = @ClassMatch(type = Automated.class))
public class AutomatedHullmodPatch {

    @After(target = @MethodMatch(methodName = "addPostDescriptionSection"))
    public static void afterAddPostDescriptionSection() {

    }
}
With this, we now have the class and method we want to patch targeted. But for this patch to become functional, we are still missing one aspect.
Every patch handler requires a context parameter. This context provides many utilities that unlock the full power of patches. If you do not provide this parameter, your patch will not load.
The type of context is different for each type of patch. For @After patches, the type is AfterContext. Each type of context shares some methods, but each one also has methods only relevant to itself. The AfterContext can be used to modify a method's return value.
@Patch(target = @ClassMatch(type = Automated.class))
public class AutomatedHullmodPatch {

    @After(target = @MethodMatch(methodName = "addPostDescriptionSection"))
    public static void afterAddPostDescriptionSection(AfterContext context) {
                                                //    ^ The Context parameter
    }
}
This is now a fully functioning patch. Any code that you write into this patch handler is now executed after the original method. To get anything interesting done, we will need to make use of the context parameter.
All contexts have access to the getArg method. This enables your patch handler to retrieve one of the parameters of the method you are patching. This is important here, since the TooltipMakerAPI tooltip parameter is passed in the original method.
//The method we are patching
public void addPostDescriptionSection(TooltipMakerAPI tooltip, HullSize hullSize, ShipAPI ship,
                                      float width, boolean isForModSpec)
In our case, the parameter we want is the first parameter. So we can use context.getArg(0) to retrieve it. We will also need to cast it to the right type, which we can do by prefixing it with (TooltipMakerAPI).
@Patch(target = @ClassMatch(type = Automated.class))
public class AutomatedHullmodPatch {

    @After(target = @MethodMatch(methodName = "addPostDescriptionSection"))
    public static void afterAddPostDescriptionSection(AfterContext context) {
        TooltipMakerAPI tooltip = (TooltipMakerAPI) context.getArg(0);
    }
}
Now we have everything set up to fulfill our initial goal. We can use the retrieved tooltip parameter to append to the original tooltip!
@Patch(target = @ClassMatch(type = Automated.class))
public class AutomatedHullmodPatch {

    @After(target = @MethodMatch(methodName = "addPostDescriptionSection"))
    public static void afterAddPostDescriptionSection(AfterContext context) {
        TooltipMakerAPI tooltip = (TooltipMakerAPI) context.getArg(0);

        tooltip.addSpacer(10f);
        tooltip.addPara("Tooltip added with PatchLib!", 0f,
                Misc.getHighlightColor(), Misc.getHighlightColor());
    }
}
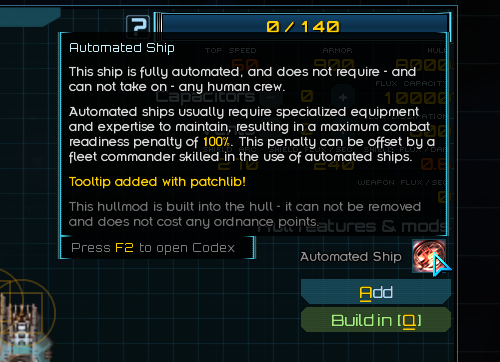
If we now boot the game up, we can see that the hullmod's tooltip has been modified:
You may start the game up and find that your patch did, in fact, not apply. Note that installation only happens once the game has loaded the class. In some cases, it is possible that the installation may only happen once you interact with what you patched, so not seeing the installation entry right away does not mean it won't work.
There are a few things that may lead to your patch not being discovered:
- Your patch handler is not static.
- Your patch handler is not public.
- Your patch handler is missing, or using the wrong context parameter.
- Your
@ClassMatchor@MethodMatchare not configured correctly. - You are using the Kotlin programming language and forgot the
@JvmStaticannotation. - You haven't compiled your mod.
- PatchLib is not enabled.
To double-check if and how the library has installed your patches, there are two ways:
PatchLib adds a debug menu that can be opened in the title screen or campaign by pressing CTRL + P. It gives you access to patchlibs log ingame, but more importantly also shows you a list of patches, which can be expanded to display a patches handlers and which sites those are installed in to.
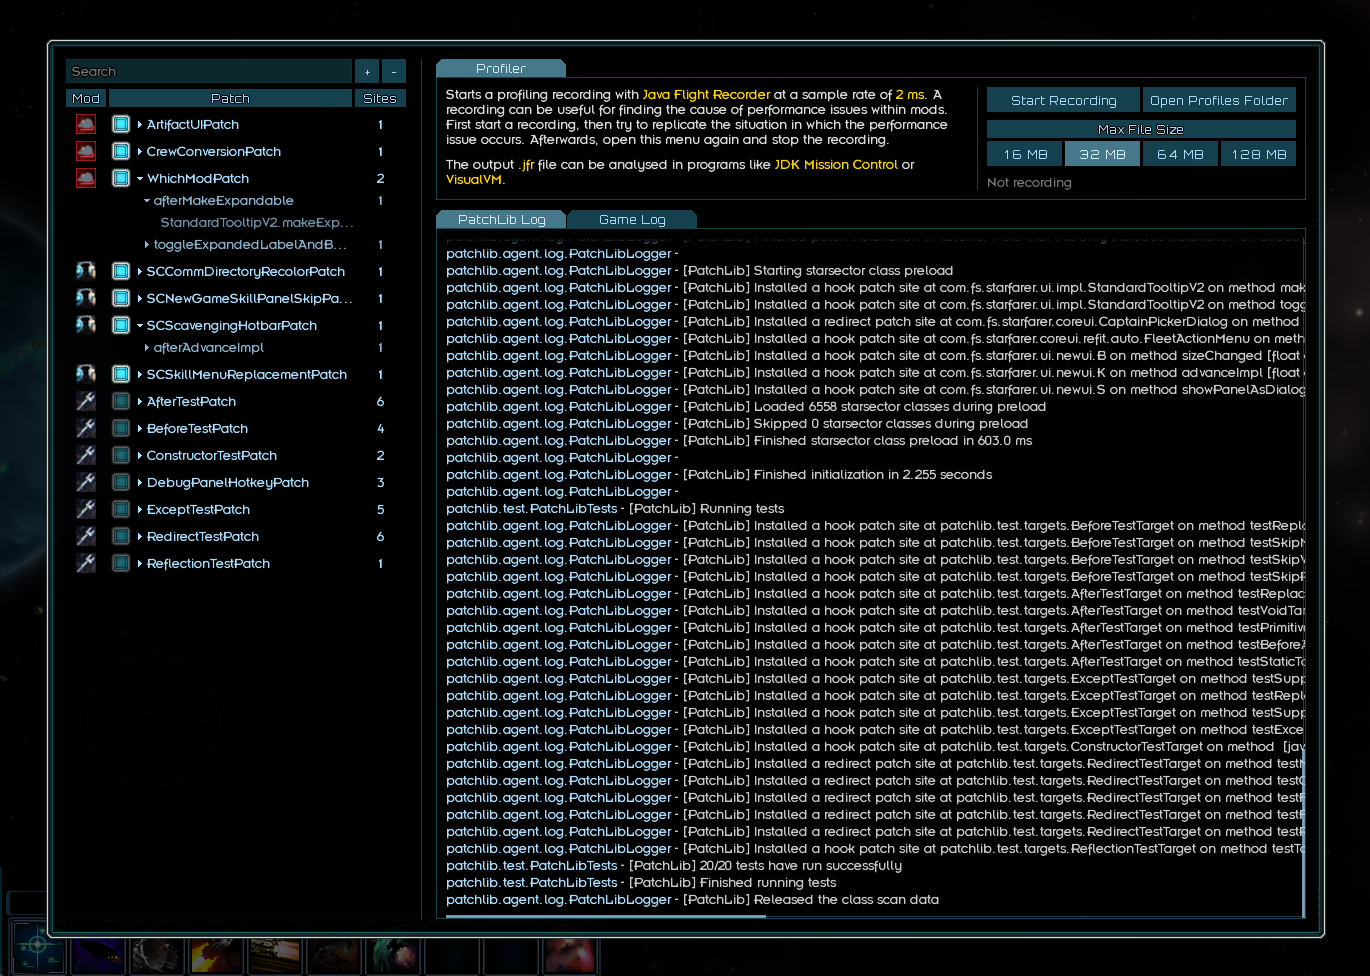
PatchLib prefixes all of its log entries with [PatchLib], so you can CTRL+F for the relevant log entries.
There are two different types of log entries:
//A discovery log entry, your patch was discovered and registered by patchlib.
[PatchLib] Discovered patch afterAddPostDescriptionSection in patchlib.patches.AutomatedHullmodPatch   (! PatchLib !)

//An installation log entry, shows that a patch was installed in a specific place.
[PatchLib] Installed a hook patch site at com.fs.starfarer.api.impl.hullmods.Automated on method addPostDescriptionSection
Now that we understand the basics, we can finish this page by expanding our hullmod example slightly. Instead of just modifying the tooltip, we can add a second patch handler to our class.
This handler will target the same class, but can target another method. So with one handler, we can modify the tooltip, and with the other, we can add actual stat changes to the hullmod,
by targeting the applyEffectsBeforeShipCreation method.
@Patch(target = @ClassMatch(type = Automated.class))
public class AutomatedHullmodPatch {

    @After(target = @MethodMatch(methodName = "addPostDescriptionSection"))
    public static void afterAddPostDescriptionSection(AfterContext context) {
        TooltipMakerAPI tooltip = (TooltipMakerAPI) context.getArg(0);

        tooltip.addSpacer(10f);
        tooltip.addPara("Automated ships have an increased top speed of 20, but have a 25%% peak performance time reduction.",
                0f, Misc.getTextColor(), Misc.getHighlightColor(), "20", "25%");
    }

    @After(target = @MethodMatch(methodName = "applyEffectsBeforeShipCreation"))
    public static void afterApplyEffectsBeforeShipCreation(AfterContext context) {
        MutableShipStatsAPI stats = (MutableShipStatsAPI) context.getArg(1);

        stats.getPeakCRDuration().modifyMult("automated", 0.75f);
        stats.getMaxSpeed().modifyFlat("automated", 20f);
    }

}
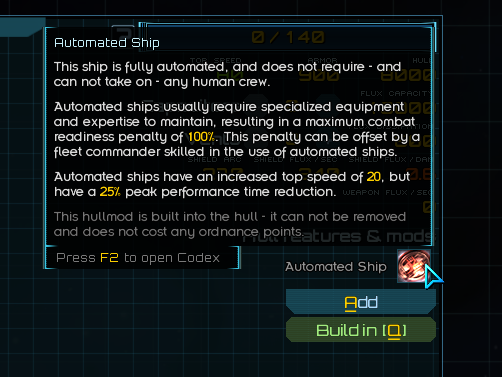
Now in-game, we can see our new tooltip and test the stat changes:
You may be aware that hullmods can actually have their code replaced in a simpler manner, by just overwriting the plugin path provided in the hull_mods.csv. That is much simpler, but has its own issues.
For one, only one mod can do such a replacement, whereas multiple mods can patch the same class and the same method multiple times. A full replacement could also break or prevent changes added in future game versions.
There are also many cases where no such replacement is possible at all. Hullmods have been used as an example here due to them being easy to grasp.
With this page, you have learned the basics of how PatchLib is used. The next pages are less-handholdy. They serve to show more features of the library and guide you around potential edge cases.