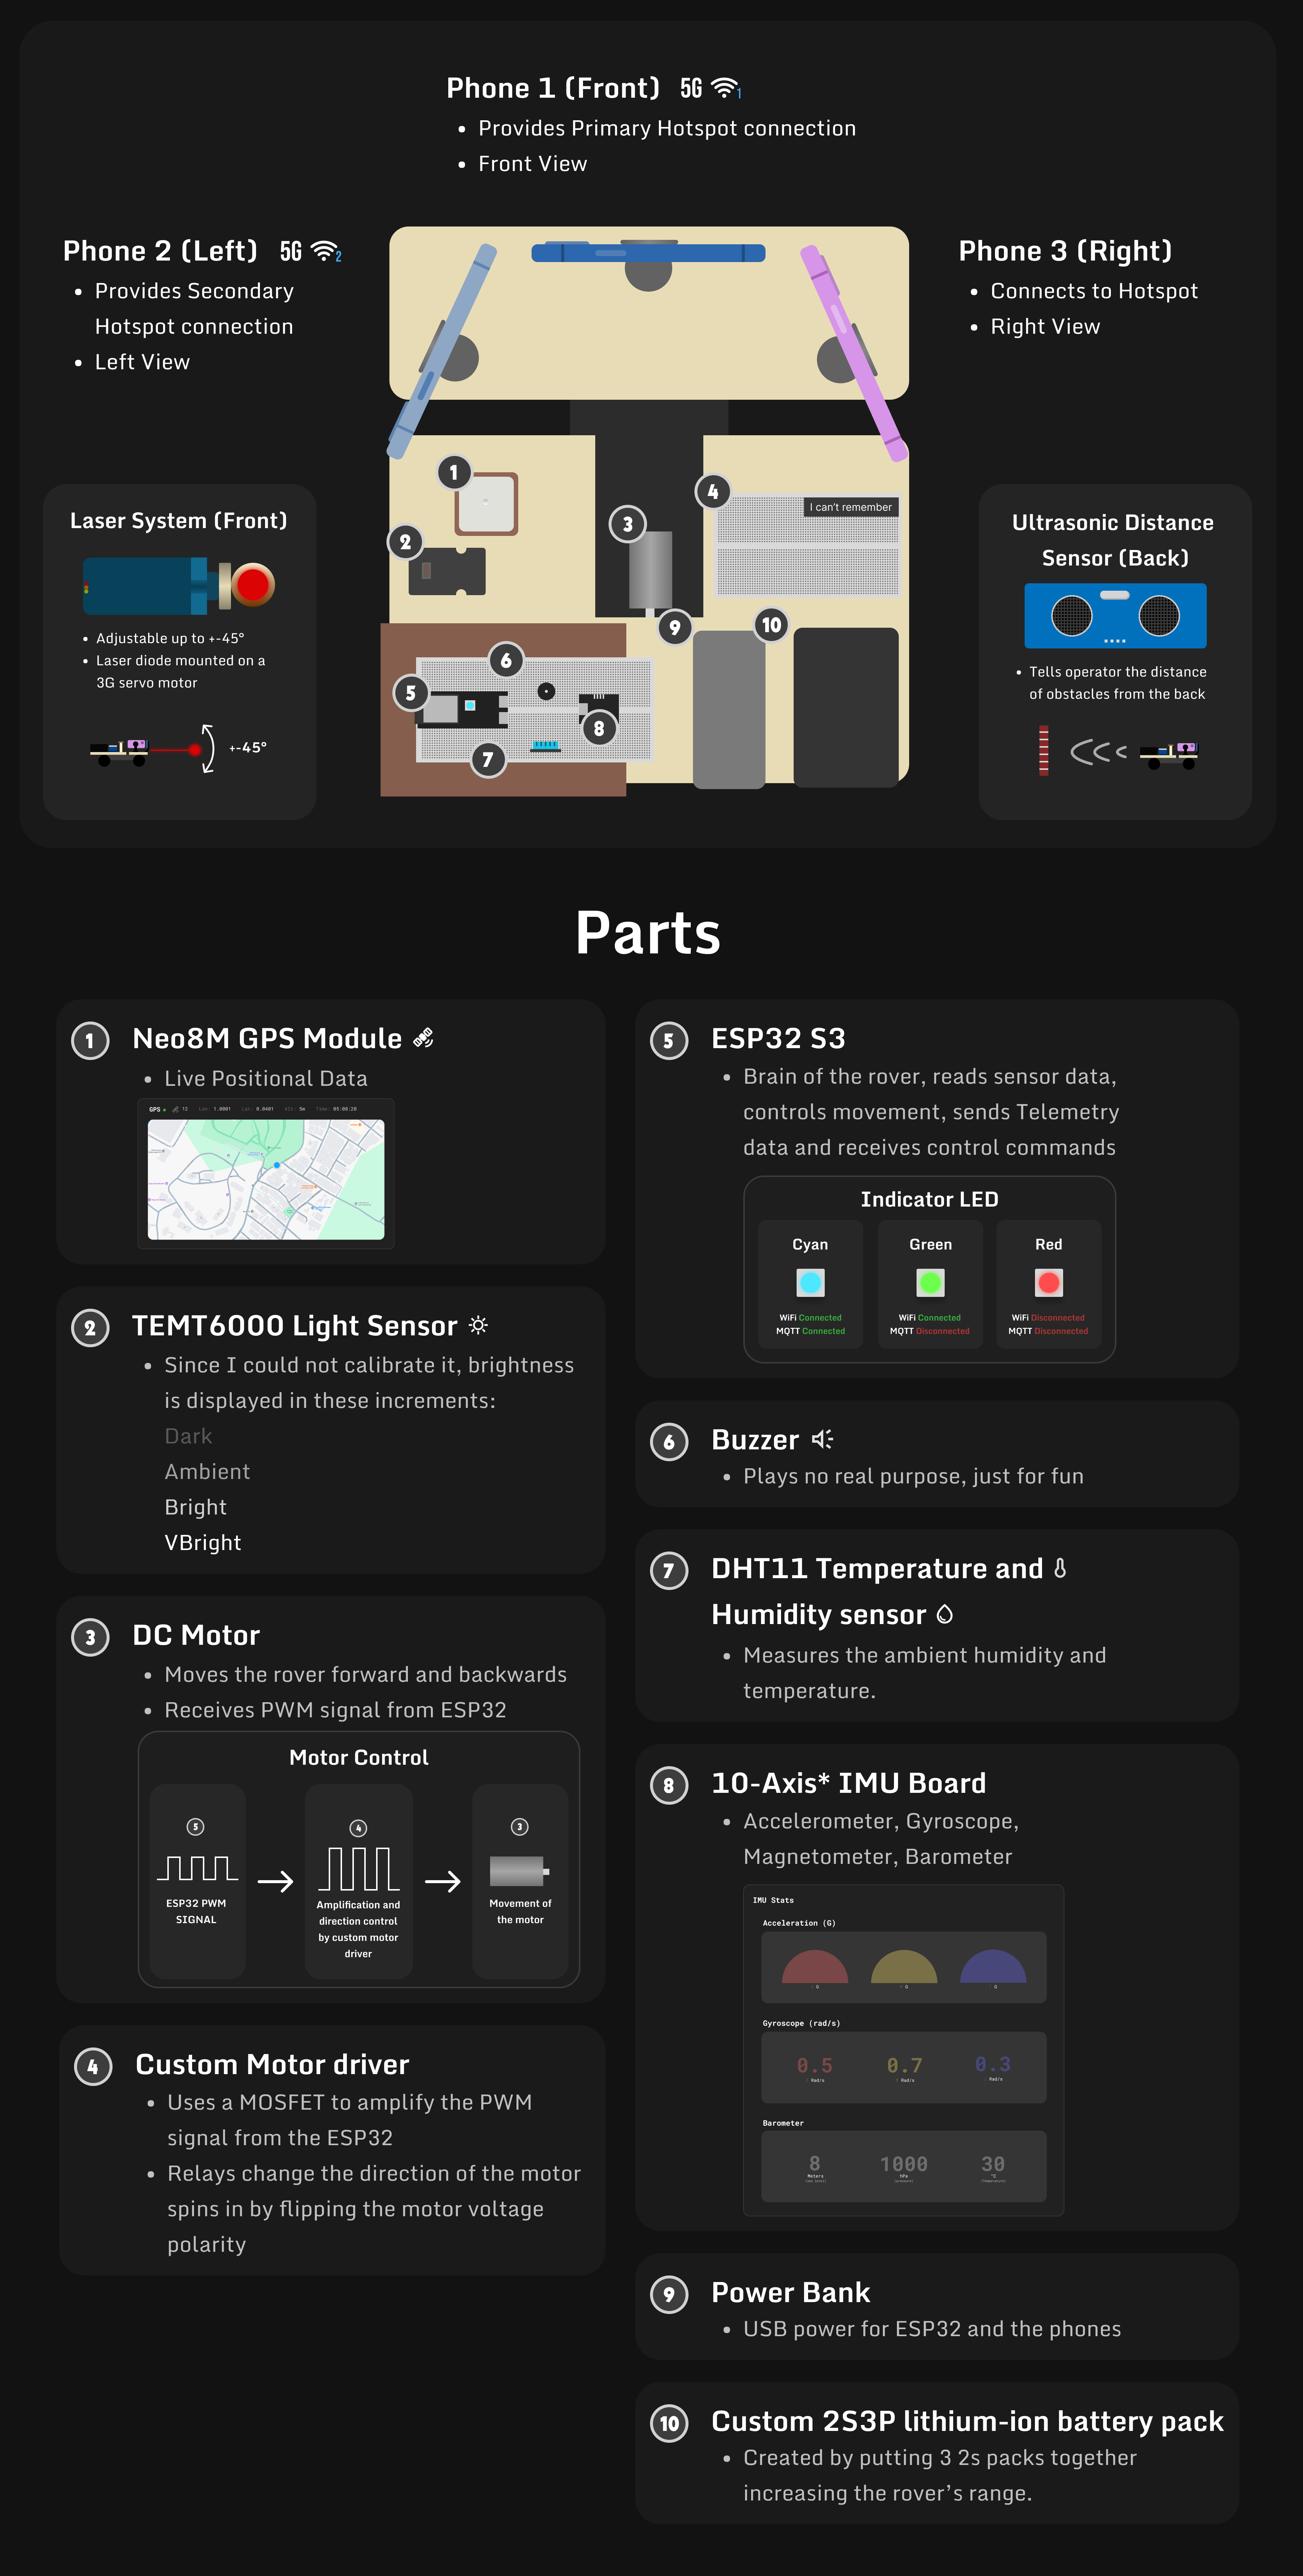
The rover:
- ESP32-S3 (Devkit-C1 type)
- 3 Different phones ( As long as one of them has a cellular connection)
- Neo8M GPS Module
- Temt6000 Light Sensor
- Motor that accepts PWM (create your own circuit to amplify the signal from the ESP32)
- Create your own circiut to control the direction of the motor from PIN10 of the ESP32.
PIN10: HIGH (fowards), LOW (backwards)
- Buzzer
- Ultrasonic distance sensor
- DHT11
- IMU (optional)
Connect the sensors following this:
Sensor Pin DHT11_PIN 8Ultrasonic_Trigger_PIN 8Ultrasonic_ECHO_PIN 16GPS_RX 17GPS_TX 18Light Sensor 1Laser Servo 7Steering Servo 4Laser Pin 6Buzzer Pin 5
Server:
- Node.js (Express)
- Reverse Proxy (Nginx Proxy Manager)
- MQTT Broker (Mosquitto)
- TURN Server (CoTurn)
Service Port Node.JS Web 8181MQTT 1883MQTT WSS 9001TURN TCP 5349TURN UDP 49152-65535
Import the ESP32 folder in PlatformIO. Ensure all the sensors are corrected to the ESP32 correctly.
- head over to Line 33 & 34 of main.cpp and add the SSID & Password WiFi hotspot credentials from the phone that has cellular data enabled.
33| #define WIFI_SSID "Your_SSID" // WIFI SSID34| #define WIFI_PASSWORD "Your_Password" //Password
- head over to Line 36 of main.cpp and add the MQTT server address (that we will set later).
36| #define MQTT_SERVER "x.x.x.x" // MQTT server address
Install the Mosquitto Docker image or any other MQTT broker of your choice. ( As long as it supports MQTT Websockets ).
- Configure the Mosquitto Docker image using the
mosquitto.conffile. Enable MQTT Websockets and allow anonymous connections. Link in your Certfile and Keyfile into the config file.
listener 1883allow_anonymous truelistener 9001protocol websocketscertfile /path/to/your/cert.pemkeyfile /path/to/your/key.pemallow_anonymous trueIMPORTANT! You will need to use Web Socket Secure (WSS) to connect to the MQTT broker to the web app. So the Certfile and Keyfile is a MUST!
In my case, im using Unraid and Nginx Proxy Manager Crowsdec, I found my Certfile and Keyfile at this path:
/mnt/user/appdata/NginxProxyManager-CrowdSec/UnraidData/certifications/live/npm-4
- Open the port
1883&9001on your firewall and Router.
Install the CoTURN Docker image and run it.
and configure the turnserver.conf file.
listening-port=3478tls-listening-port=5349listening-ip= {Local IP}external-ip={External IP}/{Local IP}min-port=49152max-port=65535realm= {YourDomain.com}cert=/path/to/cert.pempkey=/path/to/privkey.pemserver-name={Subdomain.YourDomain.com}user={UserName}:{Password}
- Open the ports
3478&5349and49152-65535on your firewall and Router.
Note! The web app is heavily based on this guide by Robertbunch from this YouTube video: # Want to make a video chat app? Watch this video for WebRTC! And the gauges are based on this YouTube video: # Responsive Gauge (CSS-Only) - HTML, CSS & JavaScript Tutorial
- [Socket.IO] Head over to the
~/web/send.jsLine 5 and~web/view.jsLine 169 and change to the Socket.IO URL which should be the same as the web app URL.
~/web/send.jsLine 55| const socket = io.connect('https://Yourdomain.com/',{
~web/view.jsLine 169169| const socket = io.connect('https://www.Your_Domain.com/',{
- [TURN] Head over to the
~/web/send.jsLine 21 - 42 and~web/view.jsLine 193 - 214 and change url to point to your TURN server something liketurn:turn.yourdomain.com:port. and change the username and password to the one you set when creating your turn server. or try out this publick list of Free TURN servers webRTC stun / turn server list But your milage may vary.
~/web/send.jsLine 21 - 42urls: ["turn:turn.Your_Domain.com:3478?transport=udp"]username: "Username"credential: "Password"urls: ["turns:turn.Your_Domain.com:5349?transport=tcp"]username: "Username"credential: "Password"
~/web/view.jsLine 193 - 214urls: ["turn:turn.Your_Domain.com:3478?transport=udp"]username: "Username"credential: "Password"urls: ["turns:turn.Your_Domain.com:5349?transport=tcp"]username: "Username"credential: "Password"
- [MQTT] Head over to
~web/view.jsLine 29 and change the url to point to your MQTT broker something likewss://mqtt.yourDomain.com:port. You should have the same mqtt broker configured on your ESP32's config earlier.
~/web/send.jsLine 29const client = mqtt.connect('wss://mqtt.your_Domain.com:9001', {
Ensure you have Node.Js installed, open the ~/web folder and run nodemon .\server.js.
The web app should be accessible at localhost:8181/view, or yourdomain.com/view If you already have it proxied.
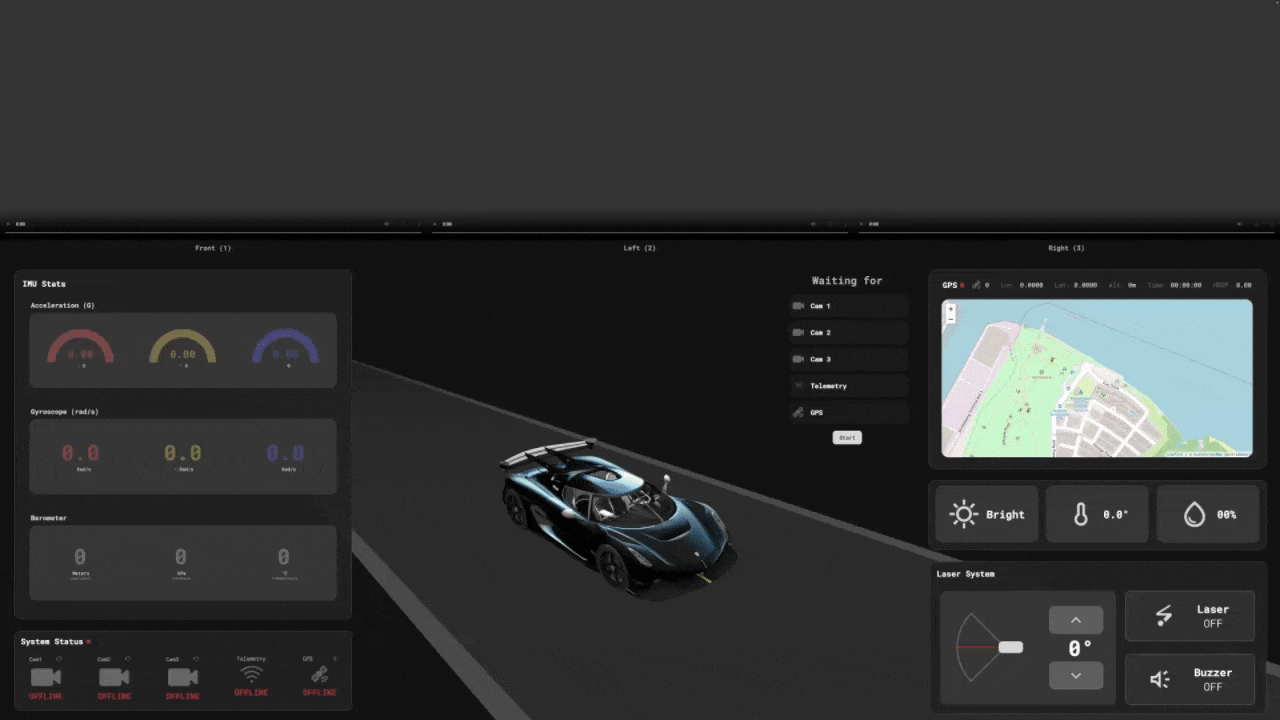
Headover to your phones, ensure that you have cellular hotsopt enabled on the phone that has a cellular connection. Then ensure that the other phones are connected to the hotspot. and haead over to the pages, Yourdomain.com/send1, Yourdomain.com/send2, Yourdomain.com/send3 to start streaming the cameras to the Web app. ensure that the ESP32's Built-In NeoPixel is lit up cyan in color.
Then go to YourDomain.com/view and connect a Xbox Controller or any controller that supports GamePad API to your computer. When you push the left stick, the rover should start moving.
| Control | Action |
|---|---|
| Left stick vertical | Forward/Backward |
| Left stick horizontal | Left/Right |
| D-Pad Up | Laser angle up |
| D-Pad Down | Laser angle down |
| D-Pad Left | Toggle Laser |
| D-Pad Right | Toggle Buzzer |