Frequently Asked Questions
We collect feedbacks and sorted them into a FAQ section here:
The general guides for installing Pytorch can be summarized as follows:
- Check your NVIDIA GPU Compute Capability @ https://developer.nvidia.com/cuda-gpus
- Download CUDA Toolkit @ https://developer.nvidia.com/cuda-downloads
- Install PyTorch command can be found @ https://pytorch.org/get-started/locally/
- For a given project, the database contains the latest model id under the "iteration" column.
- A model_id of -1 means no AI model has been trained at all.
- A model_id of 0 represents the initial autoencoder.
- A model_id of >=1 represents the deep learning iteration.
- The get_latest_model_id function will pull this information from the database.
Since Quick Annotator currently does not support WSIs, the users need to divide WSI into smaller image tiles. QA provides a script cli\extract_tiles_from_wsi_openslide.py, which imports OpenSlide.
However, we received feedbacks that many Windows users had difficulty in OpenSlide. Therefore, we provide a detailed tutorial for installing and importing OpenSlide in Windows.
- Find and install OpenSlide Python with proper python version @ https://pypi.org/project/openslide-python/
- Find and install OpenSlide Window Binaries @ https://openslide.org/download/
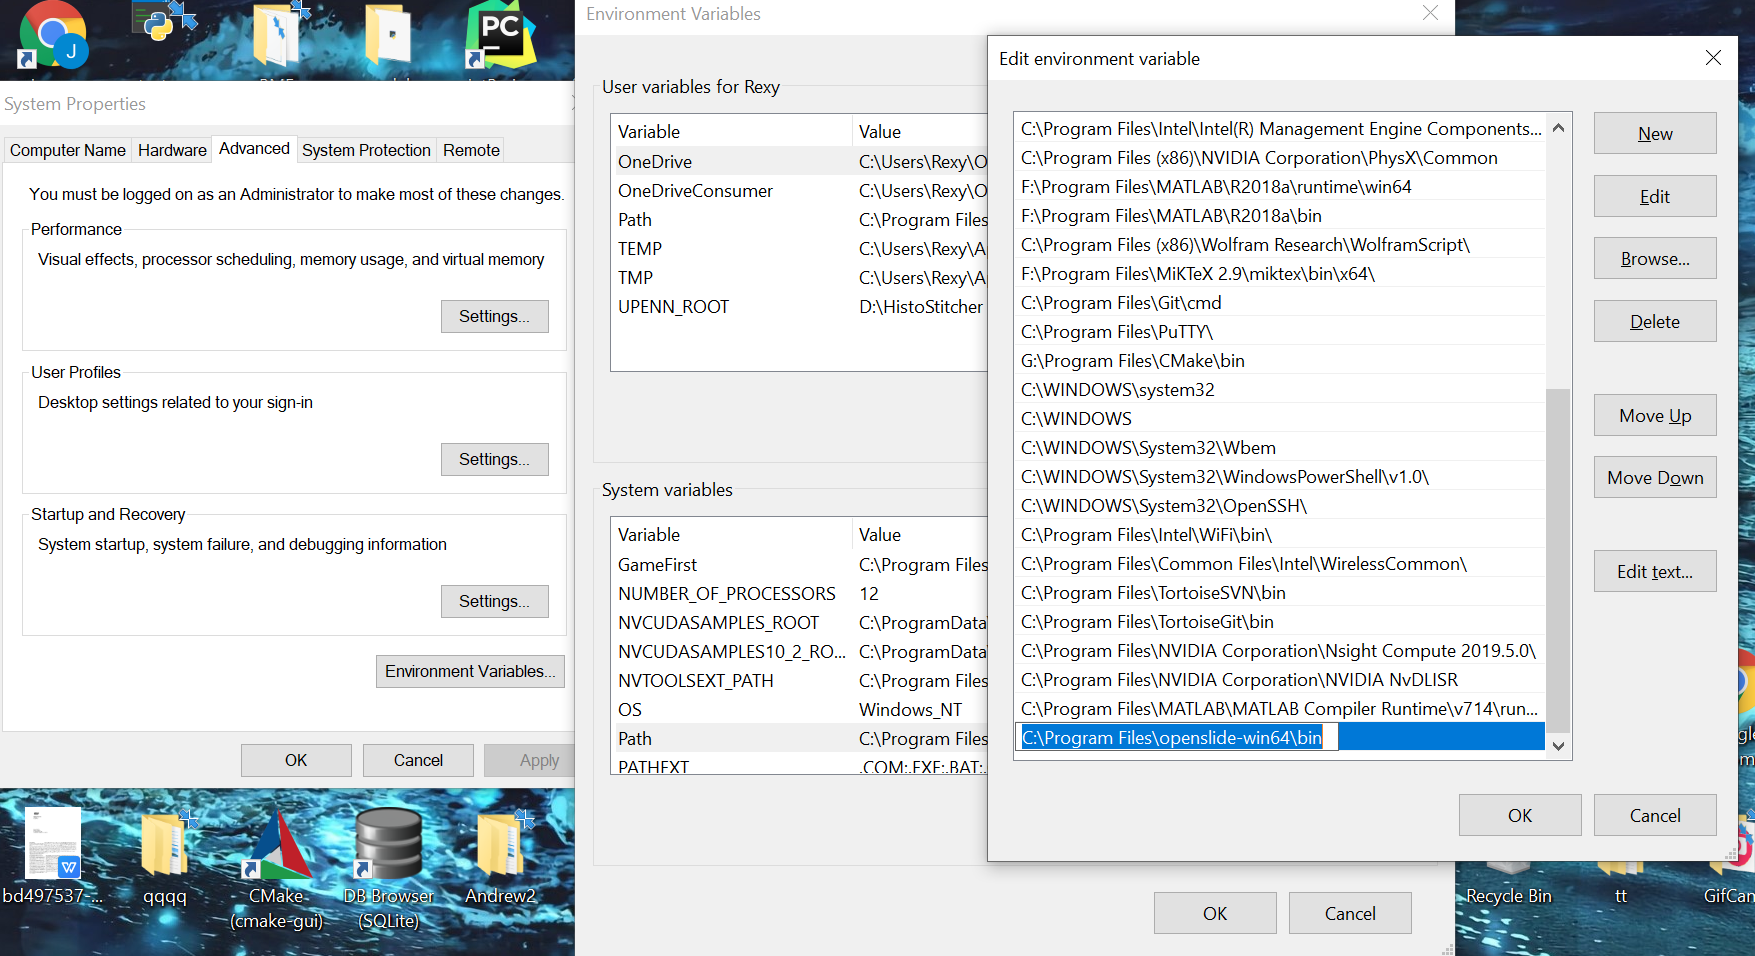
- Add openslide\bin to system environment path. (Many of our testers forget to add OpenSlide to path, so they could not import OpenSlide properly.)
    Control Panel -> System Properties -> Advanced -> Environment Variables
    -> System variables -> *Path*
The efficiency improvements of QA differs from the histologic structures that use employs. In a recent paper, we presented an efficiency plot for pancreatic cell nuclei, colon tubules, breast cancer epithelium, which corresponds to small, medium, and large scales tissues.

Efficiency metric over time demonstrating the improvement in speed afforded by QA in annotating (A) nuclei, (B) tubules, and (C) epithelium. The x-axis is the human annotation time in minutes, and the y-axis is the annotation speed in terms of annotated histologic structures per minute. The trend of performance improvements varies per use case, with (a) the nuclei showing a consistent improvement in time, (b) the tubule performance plateauing after annotating a few structures, and (c) the epithelium requiring several additional iterations before reaching its plateau. These plateaus indicate the DL model is sufficiently trained to produce suggestions agreeable to the user.
The autoencoder(model 0) considers as the starting point of the training process, which affects the overall trained performance. In the Image List Page, QA has a function (Re)train Model 0. The user would like to update the autoencoder when needed. For example, the user employs QA to finish annotations to 30 image slides and upload another 30 image tiles. The user could update the autoencoder if he/she believes the newly uploaded images are dissimilar enough.
It could be used for troubleshooting by retraining the autoencoder. The autoencoder is designed to be the optimized starting point for deep learning training, but it is still possible (even unlikely) that the autoencoder is not well generated. For example, when working on a verified dataset, the user uploads many well-delineated annotations, but the prediction suggestion is worse than the expectation. This is probably because autoencoder is not well generated, affecting the training process.
QA currently does not support importing existed annotations from the user interface. However, QA does provide a python script that imports existed annotation into QA's project. When running this script, the existed annotations will be imported to a QA's server that is currently running with a specified server address. Therefore, some advanced users need to specify the --server parameter if they are running multiple Quick Annotator applications simultaneously.
Open cli folder and use import_annotations_cli.py to import existed annotations to QA's Project. Here is a basic usage tutorial.
E:\Study\Research\QA\GithubQA\QuickAnnotator\cli>python import_annotations_cli.py --help
usage: rest_workflow_example_cli.py [-h] [-s SERVER] -n PROJNAME [-p PATCHSIZE]
                                 [-r STRIDE] [-t TRAINPERCENT] [-b]
                                 [input_pattern [input_pattern ...]]

Import existing images with annotations into quick annotator. Note: Masks are
expected to be in a subdirectory called "masks"

positional arguments:
  input_pattern         Input filename pattern (try: *.png)

optional arguments:
  -h, --help            show this help message and exit
  -s SERVER, --server SERVER
                        host with port, default http://localhost:5555
  -n PROJNAME, --projname PROJNAME
                        project to create/add to
  -p PATCHSIZE, --patchsize PATCHSIZE
                        Patchsize, default 256
  -r STRIDE, --stride STRIDE
                        stride between ROIs, default 256
  -t TRAINPERCENT, --trainpercent TRAINPERCENT
                        Percet of ROIs to use for training, default .8
  -b, --bgremove        Don't create ROI if patch is mostly white
Note: The import_annotations_cli.py imports existed annotations and extracts them into smaller patches (PATCHSIZE) ready for training DL models. Thus these patches will be assigned into training or testing sets according to a percentage, TRAINPERCENT.
There is another rest_workflow_example_cli.py script in the cli folder that is useful if someone wants to e.g., quickly set up a project or test QA. It is similar to the import_annotations_cli.py script, however including more workflow e.g., train_AE, train_DL, etc.