Repository navigation
How To Use
Installation
Modes and States
Interface
Button Input
Display Devices
End-Effector
Peripheral Devices
Home Position
Charging
After taking the product from the packaging box and turning on the power, it immediately enters the standby state and is ready for use.
Unplugged Coding can be used immediately, and Plugged Coding is used by connecting via the Mini Dongle+.

RaccoonBot has an initial standby state and two operating modes.
The operating modes are divided into Coding Mode and Unplugged Mode.
-
Standby State
When the power is turned on for the first time, RaccoonBot enters the standby state (Standby Status).
This state is the default ready state in which no specific operating mode has been selected.
In addition, when the Teach button is pressed in the standby state, the robot automatically switches to Unplugged Mode, allowing learning and control to begin immediately without any additional setup process.
That is, RaccoonBot can be used conveniently without performing special procedures for mode switching.
In the standby state, previously saved motions can be played back, and new motions can be added and saved.
Of course, it is also possible to directly record and save new motions from the beginning. -
Coding Mode
By connecting to the Mini Dongle+, users can directly control RaccoonBot through coding.
Coding can be performed using the RobomationLAB, Scratch, and Python environments, and users can quickly and intuitively learn how to use the robot through various examples and practice materials provided by RobomationLAB. In addition, learning is supported from basic to advanced levels, ranging from artificial intelligence (AI) education to kinematics and inverse kinematics analysis. -
Unplugged Mode
Without complex coding, the Teaching & Playback feature allows users to learn and experience the sophisticated operation principles of the robotic arm easily by performing various missions.
RaccoonBot is not limited to simply moving objects. By integrating with peripheral devices such as conveyors, it enables the implementation of real factory automation systems and vividly reproduces industrial processes.
In addition, by utilizing the automatic horizontal and vertical maintaining function of the End-Effector, users from beginners to experts can operate the robot intuitively and engage in creative robot application learning.
RaccoonBot connects via Bluetooth 5.0, and the functions and interfaces of each component can be identified in the figure below.
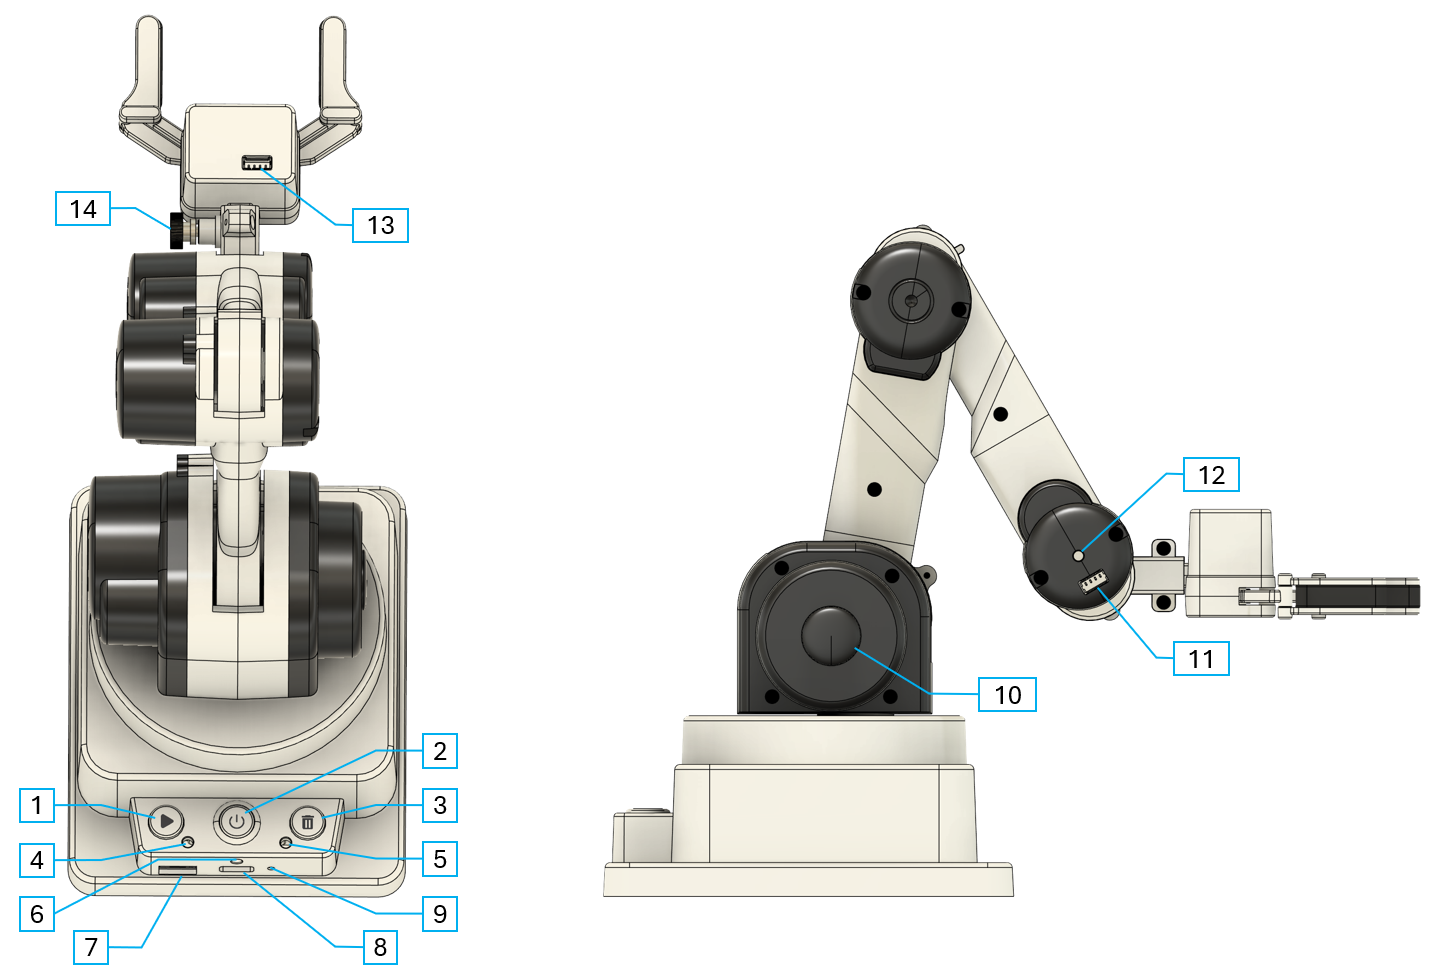
| No. | Name | Description |
|---|---|---|
| 1 | PLAY Button | Play/Stop taught motions Save taught motions to the robot |
| 2 | POWER Button | Power on/off Stop all motions and move to the home position |
| 3 | DELETE Button | Delete the most recently taught motion Delete all taught motions |
| 4 | Status LED | Indicates operation status |
| 5 | Mode LED | Indicates operation mode |
| 6 | Charging LED | Indicates charging and battery status |
| 7 | Peripheral Port | Connection port for peripheral devices (e.g., conveyor) |
| 8 | Charging Port | USB charging port |
| 9 | Reset Switch | Power reset switch |
| 10 | TEACH Button | Save joint angles Save motions with gripper open/close Add waiting time during motion |
| 11 | End-Effector Mount | Connect End-Effectors (e.g., finger gripper) |
| 12 | Joint LED | Indicates joint status |
| 13 | Gripper Connector | Connects to RaccoonBot |
| 14 | Clamping Knob | Fixes the End-Effector |
RaccoonBot has four buttons: Power, Play, Delete, and Teach.
In Unplugged Mode, each button performs its own specific function.
In Coding Mode, the buttons can be used as event input devices, allowing users to directly control robot motions or conduct learning processes.
Button input operates in three ways: Click, Double Click, and Long Click.

| Input Type | Function Description | Notes |
|---|---|---|
| Click | Turn on RaccoonBot | When the power is off |
| Click | Stop all motions and move to Home | When the power is on |
| Double Click | - | |
| Long Click | Turn off RaccoonBot |
| Input Type | Function Description | Notes |
|---|---|---|
| Click | Play / stop taught motions | Playback |
| Double Click | Repeat taught motions continuously | Playback |
| Long Click | Save taught motions to internal memory of RaccoonBot |
| Input Type | Function Description | Notes |
|---|---|---|
| Click | Delete the most recently taught motion | |
| Double Click | - | |
| Long Click | Delete all taught motions |

| Input Type | Function Description | Notes |
|---|---|---|
| Click | Save joint angles | Teaching |
| Double Click | Save the motion along with opening/closing the gripper | |
| Long Click | Add waiting time during motion** |
** This is used to pause the robotic arm for a certain amount of time before it moves on to the next action during the Teaching process.
While holding down the Teach button, the joint LED and the buzzer blink (beep) together once per second, and the waiting time is added (counted).
RaccoonBot has Mode, Status, and Joint LEDs, and each LED indicates the current operating state of the robot.
RaccoonBot also has a Charging LED, which indicates the charging status and battery status.

| LED Color | LED Operation | Description |
|---|---|---|
| ⬛ Off | Off | Standby state |
| 🟢 Green | On | Executing taught motions |
| 🟢 Green | Blinking | Repeating taught motions |
| 🔵 Blue | On | Bluetooth connection completed (standby)** |
| 🔵 Blue | Blinking | Bluetooth communication in progress |
| 🟠 Orange | On | Robotic arm moving to Home |
| 🟠 Orange | Blinking | Saving taught data |
| 🌈 Rainbow | Blinking | Deleting saved data |
| 🔴 Red | Blinking | Inspection required |
** The Bluetooth connection completed (standby) state indicates that RaccoonBot and the Mini Dongle+ are paired, but Bluetooth communication has not yet started.
In this state, actual communication is not performed and it does not affect the basic operation of the robot.
| LED Color | LED Operation | Description |
|---|---|---|
| ⚪ White | On | Standby state |
| 🟢 Green | On | Unplugged Mode |
| 🟡 Yellow | On | Automatic horizontal/vertical maintaining function enabled in Unplugged Mode |
| 🔵 Blue | On | Coding Mode |
| 🔴 Red | Blinking | Inspection required |

| LED Color | LED Operation | Description |
|---|---|---|
| ⚪ White | On | Standby state |
| 🟣 Purple | Turns on once | Teach button pressed / Save Joint angle |
| 🟢 Green | On | Unplugged Mode |
| 🟢 Green | Blinking | Robotic arm operating in Unplugged Mode |
| 🟡 Yellow | On | Automatic horizontal/vertical maintaining function enabled in Unplugged Mode |
| 🟡 Yellow | Blinking | Robotic arm operating with the automatic horizontal/vertical maintaining function in Unplugged Mode |
| 🔵 Blue | On | Coding Mode |
| 🔵 Blue | Blinking | Robotic arm operating in Coding Mode |
| 🔴 Red | Fast blinking | Obstacle detected |
| 🔴 Red | Slow blinking | Battery empty |
RaccoonBot is planned to sequentially provide various types of grippers.
This section explains how to install the finger gripper, which is included as a basic component.
RaccoonBot allows the gripper to be replaced according to different working environments.
When attaching the gripper, align it correctly with the End-Effector Mount as shown in the figure below.
To remove the gripper, turn the Clamping Knob counterclockwise to detach it.
When installing a new gripper, attach it to the End-Effector Mount and then turn it clockwise to secure it firmly.
Be sure to fasten it tightly without any looseness to ensure stable robot operation.

The gripper of RaccoonBot must be connected to the End-Effector Mount and the Gripper Connector using the dedicated Connection Cable.
At this time, please make sure to align the connector orientation correctly before attaching it properly.
When disconnecting the cable, do not pull it forcefully; hold the connector part and disconnect it slowly.
Applying excessive force may damage the cable or the connector.

RaccoonBot is planned to provide various types of peripheral devices sequentially .
The first peripheral device to be provided is the conveyor. (Updated soon)
When the power of RaccoonBot is turned on, the robotic arm automatically moves to the Home position.
The Home position refers to the reference posture of the robot before it begins operation.
The exact angles of each joint are shown in the figure below.

RaccoonBot can be charged via the USB-C port.
A USB 5V / 3A charger is recommended, and a full charge takes approximately 3 hours.
The robot can be used while charging; however, for stable operation, continuous use is recommended after charging for at least 30 minutes.
The charging LED allows users to check the charging status and remaining battery level.
Using a fast charger (high-voltage charger) may damage the power circuit of RaccoonBot.
Be sure to use a charger that complies with the USB 5V / 3A specification.
If a voltage higher than 6V is supplied to the charging port, the protection circuit will activate, a buzzer sound will occur, and charging will be automatically stopped.

| LED Color | LED Operation | Charging Cable Status | Description |
|---|---|---|---|
| ⬛ Off | Off | Not connected | Battery Sufficient |
| 🔴 Red | Slow blinking | Not connected | Battery Normal |
| 🔴 Red | Medium blinking | Not connected | Battery Low |
| 🔴 Red | Fast blinking | Not connected | Battery Empty |
| ⬛ Off | Off | Connected | Charging Complete |
| 🔴 Red | On | Connected | Charging in Progress |