Spring Security基于角色登录实例
程序可根据自己分配的角色在登录时将用户重定向到不同的URL。
最基本的,我们要做的是创建一个自定义的成功处理程序来负责根据登录用户的角色重定向到相应的URL。Spring Security中已经提供了 SimpleUrlAuthenticationSuccessHandler,它包含了成功处理程序的逻辑。我们只是用自己的重定向逻辑扩展它来实现我们的目标。
当这个处理程序成功,我们将通过注册 formLogin() 或 loginPage()。完整的例子如下所示
用到的技术如下:
- Spring 3.2.RELEASE
- Spring Security 4.0.1.RELEASE
- Maven 3
- JDK 1.8
- Tomcat 7
- Eclipse JUNO Service Release 2
让我们现在就开始,建议您按照以下步骤一起来实践。
现在,让我们解释在上面添加的结构每个细节提及的内容。
<project xmlns="http://maven.apache.org/POM/4.0.0" xmlns:xsi="http://www.w3.org/2001/XMLSchema-instance"
         xsi:schemaLocation="http://maven.apache.org/POM/4.0.0 http://maven.apache.org/maven-v4_0_0.xsd">
  <modelVersion>4.0.0</modelVersion>
  <groupId>com.anlu.secrity</groupId>
  <artifactId>Spring-secrity-taglibs</artifactId>
  <packaging>war</packaging>
  <version>1.0-SNAPSHOT</version>
  <name>Spring-secrity-taglibs Maven Webapp</name>
  <url>http://maven.apache.org</url>
  <properties>
    <!--<spring.security.version>4.0.1.RELEASE</spring.security.version>-->
    <spring.security.version>3.2.3.RELEASE</spring.security.version>
  </properties>
  <dependencies>
    <dependency>
      <groupId>junit</groupId>
      <artifactId>junit</artifactId>
      <version>3.8.1</version>
      <scope>test</scope>
    </dependency>
    <!--日志包-->
    <dependency>
      <groupId>junit</groupId>
      <artifactId>junit</artifactId>
      <version>3.8.1</version>
      <scope>test</scope>
    </dependency>
    <dependency>
      <groupId>org.slf4j</groupId>
      <artifactId>slf4j-log4j12</artifactId>
      <version>1.7.21</version>
    </dependency>

    <!--j2ee相关包 servlet、jsp、jstl-->
    <dependency>
      <groupId>javax.servlet</groupId>
      <artifactId>javax.servlet-api</artifactId>
      <version>3.1.0</version>
    </dependency>
    <dependency>
      <groupId>javax.servlet.jsp</groupId>
      <artifactId>jsp-api</artifactId>
      <version>2.2</version>
    </dependency>
    <dependency>
      <groupId>javax.servlet</groupId>
      <artifactId>jstl</artifactId>
      <version>1.2</version>
    </dependency>

    <!--mysql驱动包-->
    <dependency>
      <groupId>mysql</groupId>
      <artifactId>mysql-connector-java</artifactId>
      <version>5.1.35</version>
    </dependency>

    <!--spring相关包-->
    <dependency>
      <groupId>org.springframework</groupId>
      <artifactId>spring-web</artifactId>
      <version>4.3.1.RELEASE</version>
    </dependency>
    <dependency>
      <groupId>org.springframework</groupId>
      <artifactId>spring-webmvc</artifactId>
      <version>4.3.1.RELEASE</version>
    </dependency>

    <!--其他需要的包-->
    <dependency>
      <groupId>org.apache.commons</groupId>
      <artifactId>commons-lang3</artifactId>
      <version>3.4</version>
    </dependency>
    <dependency>
      <groupId>commons-fileupload</groupId>
      <artifactId>commons-fileupload</artifactId>
      <version>1.3.1</version>
    </dependency>

    <!-- Spring Security -->
    <dependency>
      <groupId>org.springframework.security</groupId>
      <artifactId>spring-security-web</artifactId>
      <version>${spring.security.version}</version>
    </dependency>

    <dependency>
      <groupId>org.springframework.security</groupId>
      <artifactId>spring-security-config</artifactId>
      <version>${spring.security.version}</version>
    </dependency>

    <dependency>
      <groupId>org.springframework.security</groupId>
      <artifactId>spring-security-taglibs</artifactId>
      <version>${spring.security.version}</version>
    </dependency>
  </dependencies>
  <build>
    <finalName>Spring-secrity-role-basedLogin</finalName>
  </build>
</project>
<?xml version="1.0" encoding="UTF-8"?>
<beans:beans xmlns="http://www.springframework.org/schema/security"
             xmlns:beans="http://www.springframework.org/schema/beans"
             xmlns:xsi="http://www.w3.org/2001/XMLSchema-instance"
             xsi:schemaLocation="http://www.springframework.org/schema/beans
	http://www.springframework.org/schema/beans/spring-beans-3.0.xsd
	http://www.springframework.org/schema/security
	http://www.springframework.org/schema/security/spring-security-3.2.xsd">


    <http auto-config="true">
        <intercept-url pattern="/" access="ROLE_USER"/>
        <intercept-url pattern="/home" access="ROLE_USER"/>
        <intercept-url pattern="/admin**" access="ROLE_ADMIN"/>
        <intercept-url pattern="/dba**" access="ROLE_ADMIN and ROLE_DBA"/>
        <form-login login-page="/login"
                    username-parameter="username"
                    password-parameter="password"
                    authentication-success-handler-ref="customSuccessHandler"
                    authentication-failure-url="/Access_Denied"/>
        <csrf/>
    </http>

    <authentication-manager>
        <authentication-provider>
            <user-service>
                <user name="anlu" password="123456" authorities="ROLE_USER"/>
                <user name="admin" password="123456" authorities="ROLE_ADMIN"/>
                <user name="dba" password="123456" authorities="ROLE_ADMIN,ROLE_DBA"/>
            </user-service>
        </authentication-provider>
    </authentication-manager>

    <beans:bean id="customSuccessHandler" class="com.anlu.secrity.config.CustomSuccessHandler"/>

</beans:beans>
下面是上面提及成功处理的类,如下图的所示 -
package com.anlu.secrity.config;

import org.springframework.security.core.Authentication;
import org.springframework.security.core.GrantedAuthority;
import org.springframework.security.web.DefaultRedirectStrategy;
import org.springframework.security.web.RedirectStrategy;
import org.springframework.security.web.authentication.SimpleUrlAuthenticationSuccessHandler;
import org.springframework.stereotype.Component;

import javax.servlet.ServletException;
import javax.servlet.http.HttpServletRequest;
import javax.servlet.http.HttpServletResponse;
import java.io.IOException;
import java.util.ArrayList;
import java.util.Collection;
import java.util.List;

@Component
public class CustomSuccessHandler extends SimpleUrlAuthenticationSuccessHandler {

    private RedirectStrategy redirectStrategy = new DefaultRedirectStrategy();

    @Override
    protected void handle(HttpServletRequest request, HttpServletResponse response, Authentication authentication) throws IOException, ServletException {
        String targetUrl = determineTargetUrl(authentication);
        if (response.isCommitted()) {
            System.out.println("Can't redirect");
            return;
        }
        redirectStrategy.sendRedirect(request, response, targetUrl);
    }

    /*
	 * This method extracts the roles of currently logged-in user and returns
	 * appropriate URL according to his/her role.
	 */
    protected String determineTargetUrl(Authentication authentication) {
        String url = "";

        Collection<? extends GrantedAuthority> authorities = authentication.getAuthorities();

        List<String> roles = new ArrayList<String>();

        for (GrantedAuthority a : authorities) {
            roles.add(a.getAuthority());
        }

        if (isDba(roles)) {
            url = "/db";
        } else if (isAdmin(roles)) {
            url = "/admin";
        } else if (isUser(roles)) {
            url = "/home";
        } else {
            url = "/accessDenied";
        }

        return url;
    }

    private boolean isUser(List<String> roles) {
        if (roles.contains("ROLE_USER")) {
            return true;
        }
        return false;
    }

    private boolean isAdmin(List<String> roles) {
        if (roles.contains("ROLE_ADMIN")) {
            return true;
        }
        return false;
    }

    private boolean isDba(List<String> roles) {
        if (roles.contains("ROLE_DBA")) {
            return true;
        }
        return false;
    }

    public void setRedirectStrategy(RedirectStrategy redirectStrategy) {
        this.redirectStrategy = redirectStrategy;
    }

    protected RedirectStrategy getRedirectStrategy() {
        return redirectStrategy;
    }


}
注意:看看如何扩展 SimpleUrlAuthenticationSuccessHandler类和overridinghandle()方法,这个方法简单地使用配置RedirectStrategy[默认在这种情况下]调用重定向,由用户定义determineTargetUrl方法返回URL。此方法提取当前认证对象用户记录的角色,然后构造基于角色有相应的URL。最后RedirectStrategy,这是负责 Spring Security 框架内的所有重定向,请求重定向到指定的URL。
以下步骤:其余的都是和之前教程文章中的内容相同了。
<?xml version="1.0" encoding="UTF-8"?>
<web-app xmlns="http://java.sun.com/xml/ns/javaee"
         xmlns:xsi="http://www.w3.org/2001/XMLSchema-instance"
         xsi:schemaLocation="http://java.sun.com/xml/ns/javaee
          http://java.sun.com/xml/ns/javaee/web-app_3_0.xsd"
         version="3.0">

  <display-name>Archetype Created Web Application</display-name>

  <!-- Spring MVC -->
  <servlet>
    <servlet-name>mvc-dispatcher</servlet-name>
    <servlet-class>org.springframework.web.servlet.DispatcherServlet
    </servlet-class>
    <init-param>
      <!--Sources标注的文件夹下需要新建一个spring文件夹-->
      <param-name>contextConfigLocation</param-name>
      <param-value>classpath:spring/spring-mvc.xml</param-value>
    </init-param>
    <load-on-startup>1</load-on-startup>
  </servlet>
  <servlet-mapping>
    <servlet-name>mvc-dispatcher</servlet-name>
    <url-pattern>/</url-pattern>
  </servlet-mapping>

  <listener>
    <listener-class>org.springframework.web.context.ContextLoaderListener
    </listener-class>
  </listener>

  <!-- Loads Spring Security config file -->
  <context-param>
    <param-name>contextConfigLocation</param-name>
    <param-value>
      classpath:/spring/spring-secrity.xml
    </param-value>
  </context-param>

  <!-- Spring Security -->
  <filter>
    <filter-name>springSecurityFilterChain</filter-name>
    <filter-class>org.springframework.web.filter.DelegatingFilterProxy
    </filter-class>
  </filter>

  <filter-mapping>
    <filter-name>springSecurityFilterChain</filter-name>
    <url-pattern>/*</url-pattern>
  </filter-mapping>
</web-app>
package com.anlu.secrity.controller;

import org.springframework.security.core.Authentication;
import org.springframework.security.core.context.SecurityContextHolder;
import org.springframework.security.core.userdetails.UserDetails;
import org.springframework.security.web.authentication.logout.SecurityContextLogoutHandler;
import org.springframework.stereotype.Controller;
import org.springframework.ui.ModelMap;
import org.springframework.web.bind.annotation.RequestMapping;
import org.springframework.web.bind.annotation.RequestMethod;
import org.springframework.web.bind.annotation.RequestParam;
import org.springframework.web.servlet.ModelAndView;

import javax.servlet.http.HttpServletRequest;
import javax.servlet.http.HttpServletResponse;

@Controller
public class HelloController {
    @RequestMapping(value = { "/", "/home" }, method = RequestMethod.GET)
    public String homePage(ModelMap model) {
        model.addAttribute("user", getPrincipal());
        return "welcome";
    }

    @RequestMapping(value = "/admin", method = RequestMethod.GET)
    public String adminPage(ModelMap model) {
        model.addAttribute("user", getPrincipal());
        return "admin";
    }

    @RequestMapping(value = "/db", method = RequestMethod.GET)
    public String dbaPage(ModelMap model) {
        model.addAttribute("user", getPrincipal());
        return "dba";
    }

    @RequestMapping(value = "/Access_Denied", method = RequestMethod.GET)
    public String accessDeniedPage(ModelMap model) {
        model.addAttribute("user", getPrincipal());
        return "denied";
    }

    @RequestMapping(value = "/login", method = RequestMethod.GET)
    public ModelAndView login(@RequestParam(value = "error", required = false) String error,
                              @RequestParam(value = "logout", required = false) String logout) {
        ModelAndView model = new ModelAndView();
        if (error != null) {
            model.addObject("error", "Invalid username and password!");
        }

        if (logout != null) {
            model.addObject("msg", "You've been logged out successfully.");
        }
        model.setViewName("login");

        return model;
    }

    @RequestMapping(value="/logout", method = RequestMethod.GET)
    public String logoutPage (HttpServletRequest request, HttpServletResponse response) {
        Authentication auth = SecurityContextHolder.getContext().getAuthentication();
        if (auth != null){
            new SecurityContextLogoutHandler().logout(request, response, auth);
        }
        return "redirect:/login?logout";
    }

    private String getPrincipal(){
        String userName = null;
        Object principal = SecurityContextHolder.getContext().getAuthentication().getPrincipal();

        if (principal instanceof UserDetails) {
            userName = ((UserDetails)principal).getUsername();
        } else {
            userName = principal.toString();
        }
        return userName;
    }

}
login.jsp
<%--
  Created by IntelliJ IDEA.
  User: Anlu
  Date: 2017/12/2
  Time: 14:56
  To change this template use File | Settings | File Templates.
--%>
<%@ page contentType="text/html;charset=UTF-8" language="java" %>
<%@ taglib prefix="c" uri="http://java.sun.com/jsp/jstl/core"%>
<html>
<head>
    <title>Login Page</title>
    <style>
        .error {
            padding: 15px;
            margin-bottom: 20px;
            border: 1px solid transparent;
            border-radius: 4px;
            color: #a94442;
            background-color: #f2dede;
            border-color: #ebccd1;
        }

        .msg {
            padding: 15px;
            margin-bottom: 20px;
            border: 1px solid transparent;
            border-radius: 4px;
            color: #31708f;
            background-color: #d9edf7;
            border-color: #bce8f1;
        }

        #login-box {
            width: 300px;
            padding: 20px;
            margin: 100px auto;
            background: #fff;
            -webkit-border-radius: 2px;
            -moz-border-radius: 2px;
            border: 1px solid #000;
        }
    </style>
</head>
<body onload='document.loginForm.username.focus();'>

<h1>Spring Security Custom Login Form (XML)</h1>

<div id="login-box">

    <h2>Login with Username and Password</h2>

    <c:if test="${not empty error}">
        <div class="error">${error}</div>
    </c:if>
    <c:if test="${not empty msg}">
        <div class="msg">${msg}</div>
    </c:if>

    <form name='loginForm'
          action="<c:url value='j_spring_security_check' />" method='POST'>

        <table>
            <tr>
                <td>User:</td>
                <td><input type='text' name='username' value=''></td>
            </tr>
            <tr>
                <td>Password:</td>
                <td><input type='password' name='password' /></td>
            </tr>
            <tr>
                <td colspan='2'><input name="submit" type="submit"
                                       value="submit" /></td>
            </tr>
        </table>

        <input type="hidden" name="${_csrf.parameterName}"
               value="${_csrf.token}" />

    </form>
</div>

</body>
</html>
welcome.jsp
<%--
  Created by IntelliJ IDEA.
  User: Anlu
  Date: 2017/12/4
  Time: 16:33
  To change this template use File | Settings | File Templates.
--%>
<%@ page contentType="text/html;charset=UTF-8" language="java" %>
<%@ taglib prefix="c" uri="http://java.sun.com/jsp/jstl/core"%>
<html>
<head>
    <meta http-equiv="Content-Type" content="text/html; charset=ISO-8859-1">
    <title>Welcome page</title>
</head>
<body>
Dear <strong>${user}</strong>, Welcome to Home Page.
<a href="<c:url value="/logout" />">Logout</a>
</body>
</html>
admin.jsp
<%--
  Created by IntelliJ IDEA.
  User: Anlu
  Date: 2017/12/4
  Time: 16:33
  To change this template use File | Settings | File Templates.
--%>
<%@ page contentType="text/html;charset=UTF-8" language="java" %>
<%@ taglib prefix="c" uri="http://java.sun.com/jsp/jstl/core"%>
<html>
<head>
    <title>Admin page</title>
</head>
<body>
Dear <strong>${user}</strong>, Welcome to Admin Page.
<a href="<c:url value="/logout" />">Logout</a>
</body>
</html>
dba.jsp
<%--
  Created by IntelliJ IDEA.
  User: Anlu
  Date: 2017/12/4
  Time: 16:34
  To change this template use File | Settings | File Templates.
--%>
<%@ page contentType="text/html;charset=UTF-8" language="java" %>
<%@ taglib prefix="c" uri="http://java.sun.com/jsp/jstl/core"%>
<html>
<head>
    <title>DBA page</title>
</head>
<body>
Dear <strong>${user}</strong>, Welcome to DBA Page.
<a href="<c:url value="/logout" />">Logout</a>
</body>
</html>
denied.jsp
<%--
  Created by IntelliJ IDEA.
  User: Anlu
  Date: 2017/12/4
  Time: 14:51
  To change this template use File | Settings | File Templates.
--%>
<%@ page contentType="text/html;charset=UTF-8" language="java" %>
<html>
<head>
    <title>Title</title>
</head>
<body>
<h1>您的访问被拒绝了!</h1>
</body>
</html>
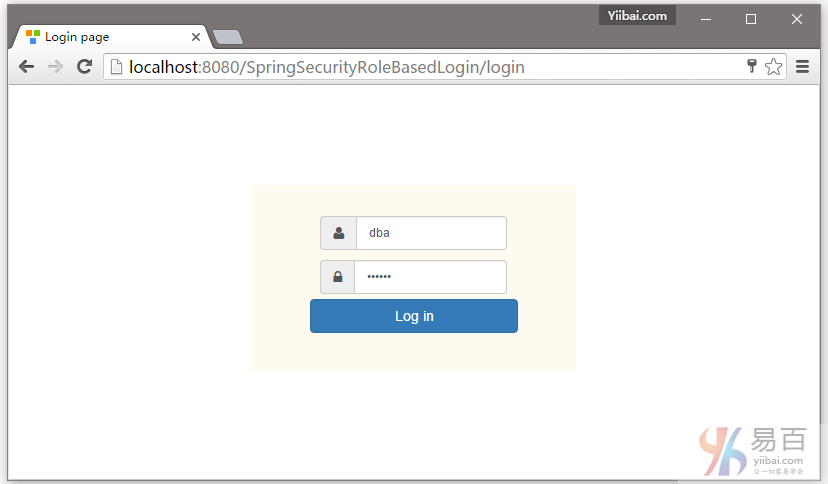
打开浏览器,然后访问:http://localhost:8080/SpringSecurityRoleBasedLogin ,如果没有任何错误,将提示登录 -

DBA提供的凭据(用户名和密码登录),如下所示:
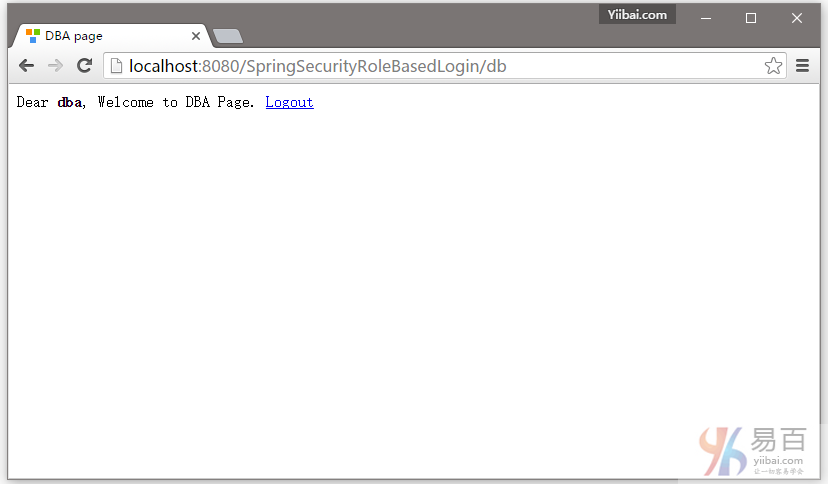
提交,您将会被跳转到 /db 页面,作为登录的用户具有DBA角色(基于角色的登录)。如下图中所示 -
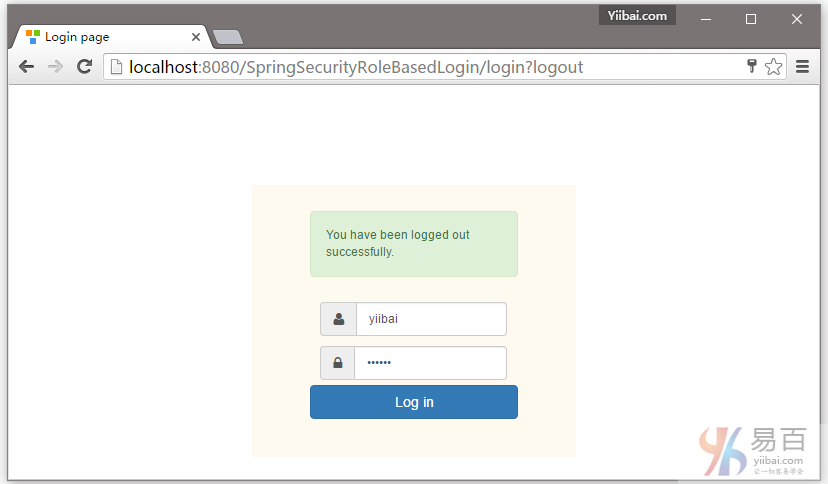
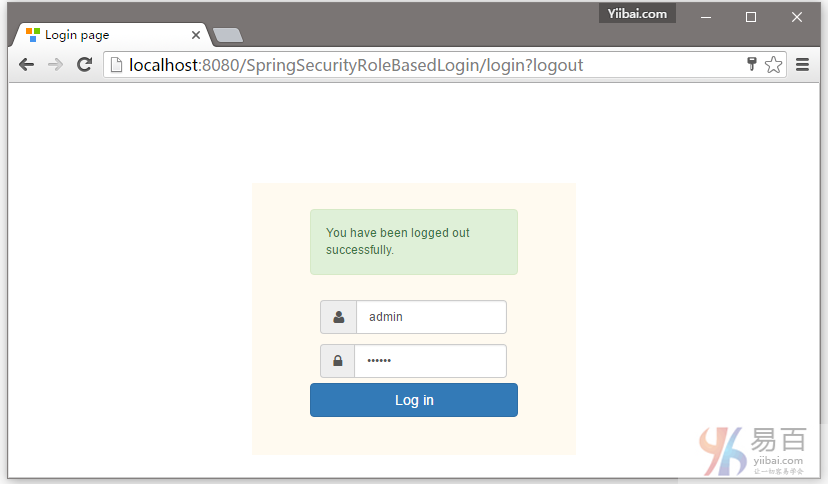
现在注销,并填写用户(yiibai)角色的凭据(使用用户名和密码)登录。
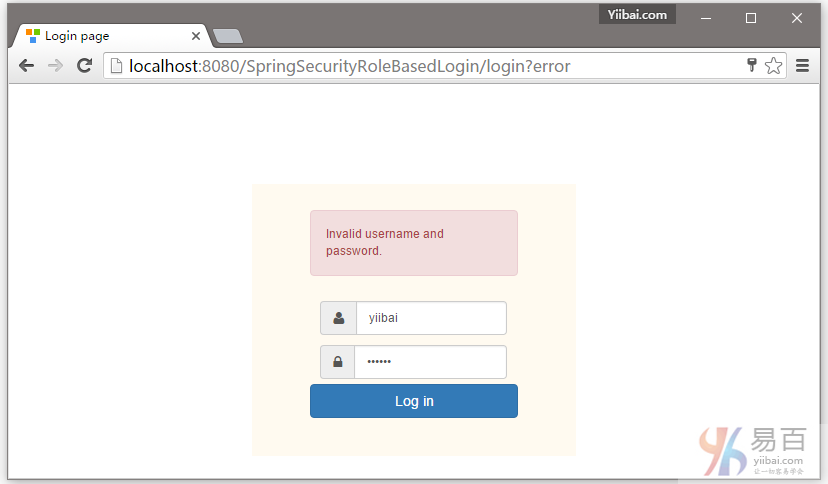
首先提供一个错误的密码,然后点击登录 -
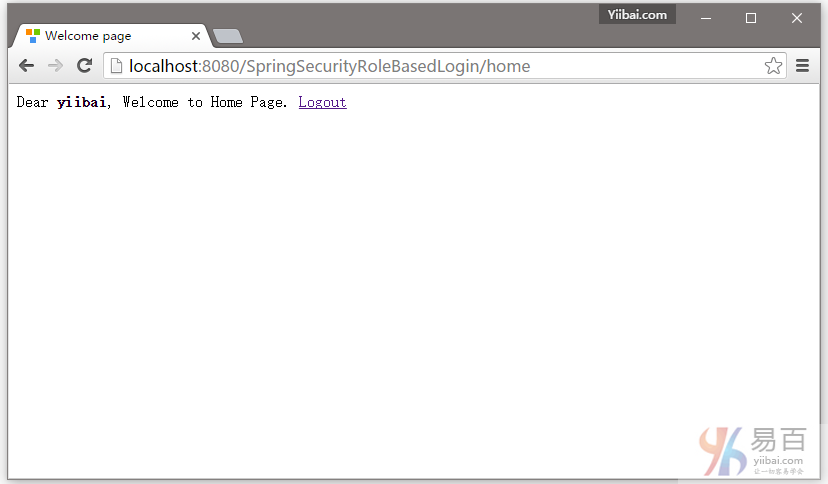
提供正确的用户角色的凭据,您将被重定向到主页。
现在尝试访问管理页面。您应该看到拒绝访问页面。

现在,注销并使用管理员凭据登录,您将会被重向到URL:/admin 。如下图中所示 -
用户 admin 登录成功后的页面,如下所示 -
