Home
Digital Twin Simulator for Polaris GEM e2 and e4 vehicles in University of Illinois Urbana-Champaign
This simulator was initially developed by Hang Cui for e2. It is currently under development with the addition and testing of the e4 model using GEMstack for research and teaching at University of Illinois at Urbana-Champaign.
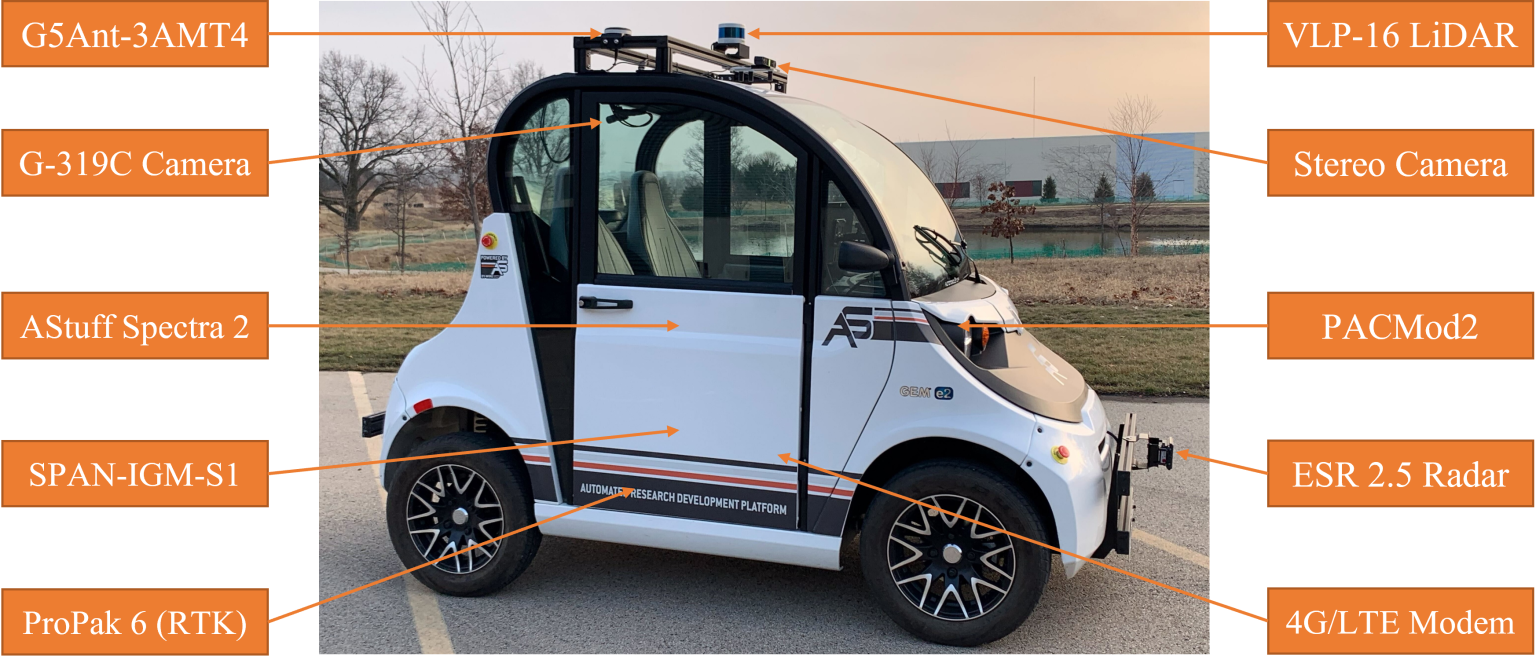
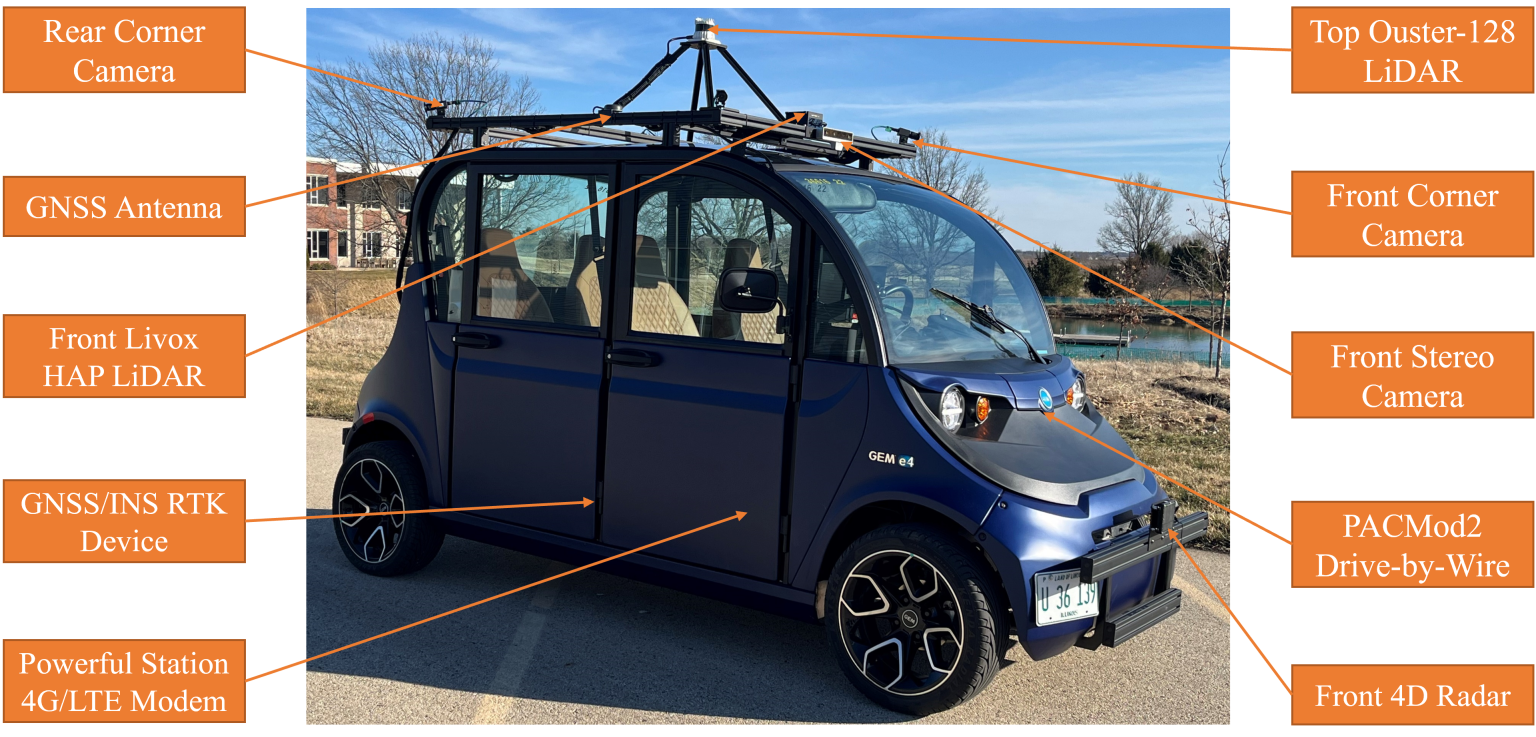
| Polaris GEM e2 Vehicle | Polaris GEM e4 Vehicle |
|---|---|
 |
 |
- Creating a Workspace
- Running the stack on Ubuntu 20.04 or 22.04 with Docker
- Building the Simulator and its packages
- Running the Simulator
- Vehicle Selection
- Utils Scripts
Before building the Docker image, you need to create a ROS workspace and clone this repository into it. Follow these steps:
- Create a new ROS workspace directory:
mkdir -p ~/gem_simulation_ws/src
cd ~/gem_simulation_ws- Clone the repository into the src folder:
cd src
git clone https://github.com/harishkumarbalaji/POLARIS_GEM_Simulator.git
cd POLARIS_GEM_Simulator- Once you have set up the workspace, you can proceed with building the Docker image as described below.
Note
Make sure to check the Nvidia Driver and supported CUDA version before proceeding by following the steps in the previous section.
- Docker (In Linux - Make sure to follow the post-installation steps from here)
- Nvidia Container Toolkit
Try running the sample workload from the NVIDIA Container Toolkit to check if your system is compatible.
sudo docker run --rm --runtime=nvidia --gpus all ubuntu nvidia-smiYou should see the nvidia-smi output similar to this.
If you see the output, you are good to go. Otherwise, you will need to install the Docker and NVidia Container Toolkit by following the instructions.
-
For Docker, follow the instructions here.
-
For Nvidia Container Toolkit, run
setup/get_nvidia_container.shfrom this directory to install, or see this for more details.
To build a Docker image with all these prerequisites, you can use the provided Dockerfile by running.
Important
Do not run the Docker scripts (build_docker_image.sh, run_docker_container.sh, stop_docker_container.sh) with sudo. Instead, follow the post-installation steps to allow non-root users to run Docker commands.
bash setup/build_docker_image.shTo run the container, you can use the provided Docker Compose file by running.
Note
If you want to open multiple terminals to run the container, you can use the same command. It will automatically start a new terminal inside the same container.
bash run_docker_container.shYou can use the host volume under the container's home directory inside the <username> folder. This allows you to build and run files that are on the host machine. For example, if you have a file on the host machine at /home/<username>/project, you can access it inside the container at /home/<username>/host/project.
To have a good developer environment inside the Docker container, you can use the Dev Containers extension in VSCode. Follow these steps:
- Install the Dev Containers extension in VSCode.
- Open the cloned repository in VSCode.
- Press
ctrl+shift+p(or select the remote explorer icon from the left bar) and selectDev-Containers: Attach to Running Container.... - Select the container name
gem_stack-container. - Once attached, Select
File->Open Folder.... - Select the folder/workspace you want to open in the container.
This will set up the development environment inside the Docker container, allowing you to use VSCode features seamlessly.
To stop the container, you can use the provided stop script by running.
bash stop_docker_container.shTo build the simulator and its packages, you can use the provided docker run script and then navigating to the place your simulator workspace is located and then build using,
Note
Make sure you have cloned this repository inside the src folder of your simulator workspace before building the packages.
cd <path_to_your_simulator_workspace>
# You should see the src folder inside your simulator workspace
catkin_makeThe simulator supports both Polaris GEM e4 (default) and GEM e2 vehicles. You can select which vehicle to use when launching the simulator.
The simulator now uses the E4 vehicle by default. To run with the default E4 vehicle in the parking world:
source devel/setup.bash
roslaunch gem_launch gem_init.launch world_name:=parking.world x:=-9.4 y:=-5.7 yaw:=220
The simulator supports custom scenes with static objects (cones, signs, etc.) and dynamic agents (pedestrians, bicycles, cars) using YAML configuration files.
To enable the custom scene feature, set the custom_scene parameter to true when launching the simulator.
This will automatically load the corresponding YAML configuration file (e.g., highbay_track.yaml) from the gem_gazebo/scenes/ directory.
The YAML configuration file consists of two main sections:
-
objects: Static items placed in the scene (cones, signs, etc.) -
agents: Dynamic entities that can move (pedestrians, vehicles, etc.)
The file should be placed in the gem_gazebo/scenes/ directory with the same base name as your world file.
# Static objects section
objects:
  - name: cone1
    source: {type: fuel, uri: "https://fuel.gazebosim.org/1.0/OpenRobotics/models/Construction%20Cone"}
    xyz: [x, y, z]
    rpy: [roll, pitch, yaw]
    static: false  # Set to false to enable physics, true to keep static (default: false)

  - name: traffic_light
    source: {type: mesh, uri: "model://traffic_light/meshes/traffic_light.dae", scale: [0.3, 0.3, 0.3]}
    xyz: [x, y, z]
    rpy: [roll, pitch, yaw]
    static: true  # Keep this object fixed in place

  - name: stop_sign
    source: {type: sdf, uri: "model://stop_sign"}
    xyz: [x, y, z]
    rpy: [roll, pitch, yaw]
    static: true  # Keep this object fixed in place

# Dynamic agents section
agents:
  # Animated pedestrian (uses Gazebo actor with animation)
  - name: pedestrian1
    source: {type: fuel, uri: "https://fuel.gazebosim.org/1.0/OpenRobotics/models/Walking%20Person"}
    trajectory:
      - [time, x, y, z, roll, pitch, yaw] # First waypoint
      - [time, x, y, z, roll, pitch, yaw] # Second waypoint

  # Rigid motion vehicle (kinematically moved)
  - name: bicycle1
    motion: rigid
    source: {type: fuel, uri: "https://fuel.gazebosim.org/1.0/athackst/models/bicycle"}
    trajectory:
      - [time, x, y, z, roll, pitch, yaw] # First waypoint
      - [time, x, y, z, roll, pitch, yaw] # Second waypoint
# Add more waypoints as neededBoth objects and agents share these common source types:
-
fuel: Models from Gazebo Fuel - https://app.gazebosim.org/ -
sdf: Complete model references (e.g., "model://stop_sign") -
mesh: Direct mesh files (e.g., "model://traffic_light/meshes/traffic_light.dae")
For static objects:
- Require
name,source, position (xyz), and orientation (rpy) in radians - Only mesh files support the
scaleparameter as [scale_x, scale_y, scale_z] - Optional
staticparameter:-
static: false(default) - Object has physics enabled, can be moved/knocked over during simulation -
static: true- Object is fixed in place, no physics applied
-
For dynamic agents:
-
motion: rigid- Required for vehicles/objects (not needed for pedestrians) - Pedestrians use Gazebo's native actor animation
- All require
trajectorypoints in format:[time, x, y, z, roll, pitch, yaw] - Time values indicate when the agent should reach each waypoint
- Trajectories loop continuously
See the highbay_track.yaml file in the gem_gazebo/scenes/ directory for a complete example.
source devel/setup.bash
roslaunch gem_launch gem_init.launch world_name:="highbay_track.world" x:=12.5 y:=-21 yaw:=3.1416 custom_scene:=true
To use the 3D mesh model of the High Bay environment:
-
Download Resources: Download the 3D mesh files from this link
-
Install Files:
- Extract the downloaded zip file
- Place the extracted
high_bay_3dfolder inside thegem_gazebo/modelsdirectory - Make sure the folder contains the
.daefile and associated texture files (.pngfiles)
-
Launch the Environment:
source devel/setup.bash
roslaunch gem_launch gem_init.launch world_name:="high_bay_3d.world" x:=17.81 y:=-10 yaw:=3.14To use the E2 vehicle instead, set the parameter vehicle_name to e2:
source devel/setup.bash
roslaunch gem_launch gem_init.launch world_name:="track1.world" vehicle_name:=e2
source devel/setup.bash
roslaunch gem_launch gem_sensor_info.launch

source devel/setup.bash
roslaunch gem_launch gem_init.launch world_name:="track1.world" vehicle_name:=e2
rosrun gem_pure_pursuit_sim pure_pursuit_sim.py
source devel/setup.bash
roslaunch gem_launch gem_init.launch world_name:="track1.world" vehicle_name:=e2
rosrun gem_stanley_sim stanley_sim.py

source devel/setup.bash
roslaunch gem_launch gem_init.launch world_name:="track2.world" vehicle_name:=e2 y:=-98.5
source devel/setup.bash
roslaunch gem_launch gem_init.launch vehicle_name:=e2

source devel/setup.bash
roslaunch gem_launch gem_init.launch world_name:="highbay_track.world" vehicle_name:=e2 x:=12.5 y:=-21 yaw:=3.1416

To set the position and yaw of the vehicle, run the set_pos python script in the utils folder.
source devel/setup.bash
cd src/POLARIS_GEM_Simulator
python3 utils/set_pos.py --x 12.5  --y -21 --yaw 3.1416
It will automatically detect the vehicle model and set the position.
To manually steer the car and record waypoints to a csv file, run
source devel/setup.bash
cd src/POLARIS_GEM_Simulator
python3 utils/generate_waypoints.py
The controls are: W/S - forward/back | A/D - left/right | R - start/stop waypoint recording | Q - quit
Waypoints are recorded to a utils/waypoints/waypoints.csv directory. The lattitude, longitude, and heading are recorded in start frame.
To monitor and log collision events between the vehicle and other objects in the simulation, run:
source devel/setup.bash
rosrun gem_gazebo collision_logger.py
The logger will:
- Create a timestamped log file in the
logsdirectory - Monitor collisions between vehicle parts (body, front bumper, rear bumper) and other objects
- Display collision information in real-time, including:
- Collision location
- Contact normal
- Collision depth
- Log all collision data to a file for later analysis