Prerequisites
Before start building Wolf.Engine, you need following prerequisites.
-
- Following graphics API(s) are supported
- Vulkan 1.0
- DirectX 11.x\12
- Metal
- Following operating systems are supported
- Microsoft Windows 8.0 or later versions
- Ubuntu 16.04 or later versions
- Apple OS X EL Capitan or later versions
- Following graphics API(s) are supported
-
-
For Windows, You need to use Microsoft Visual Studio 2015 or later versions.
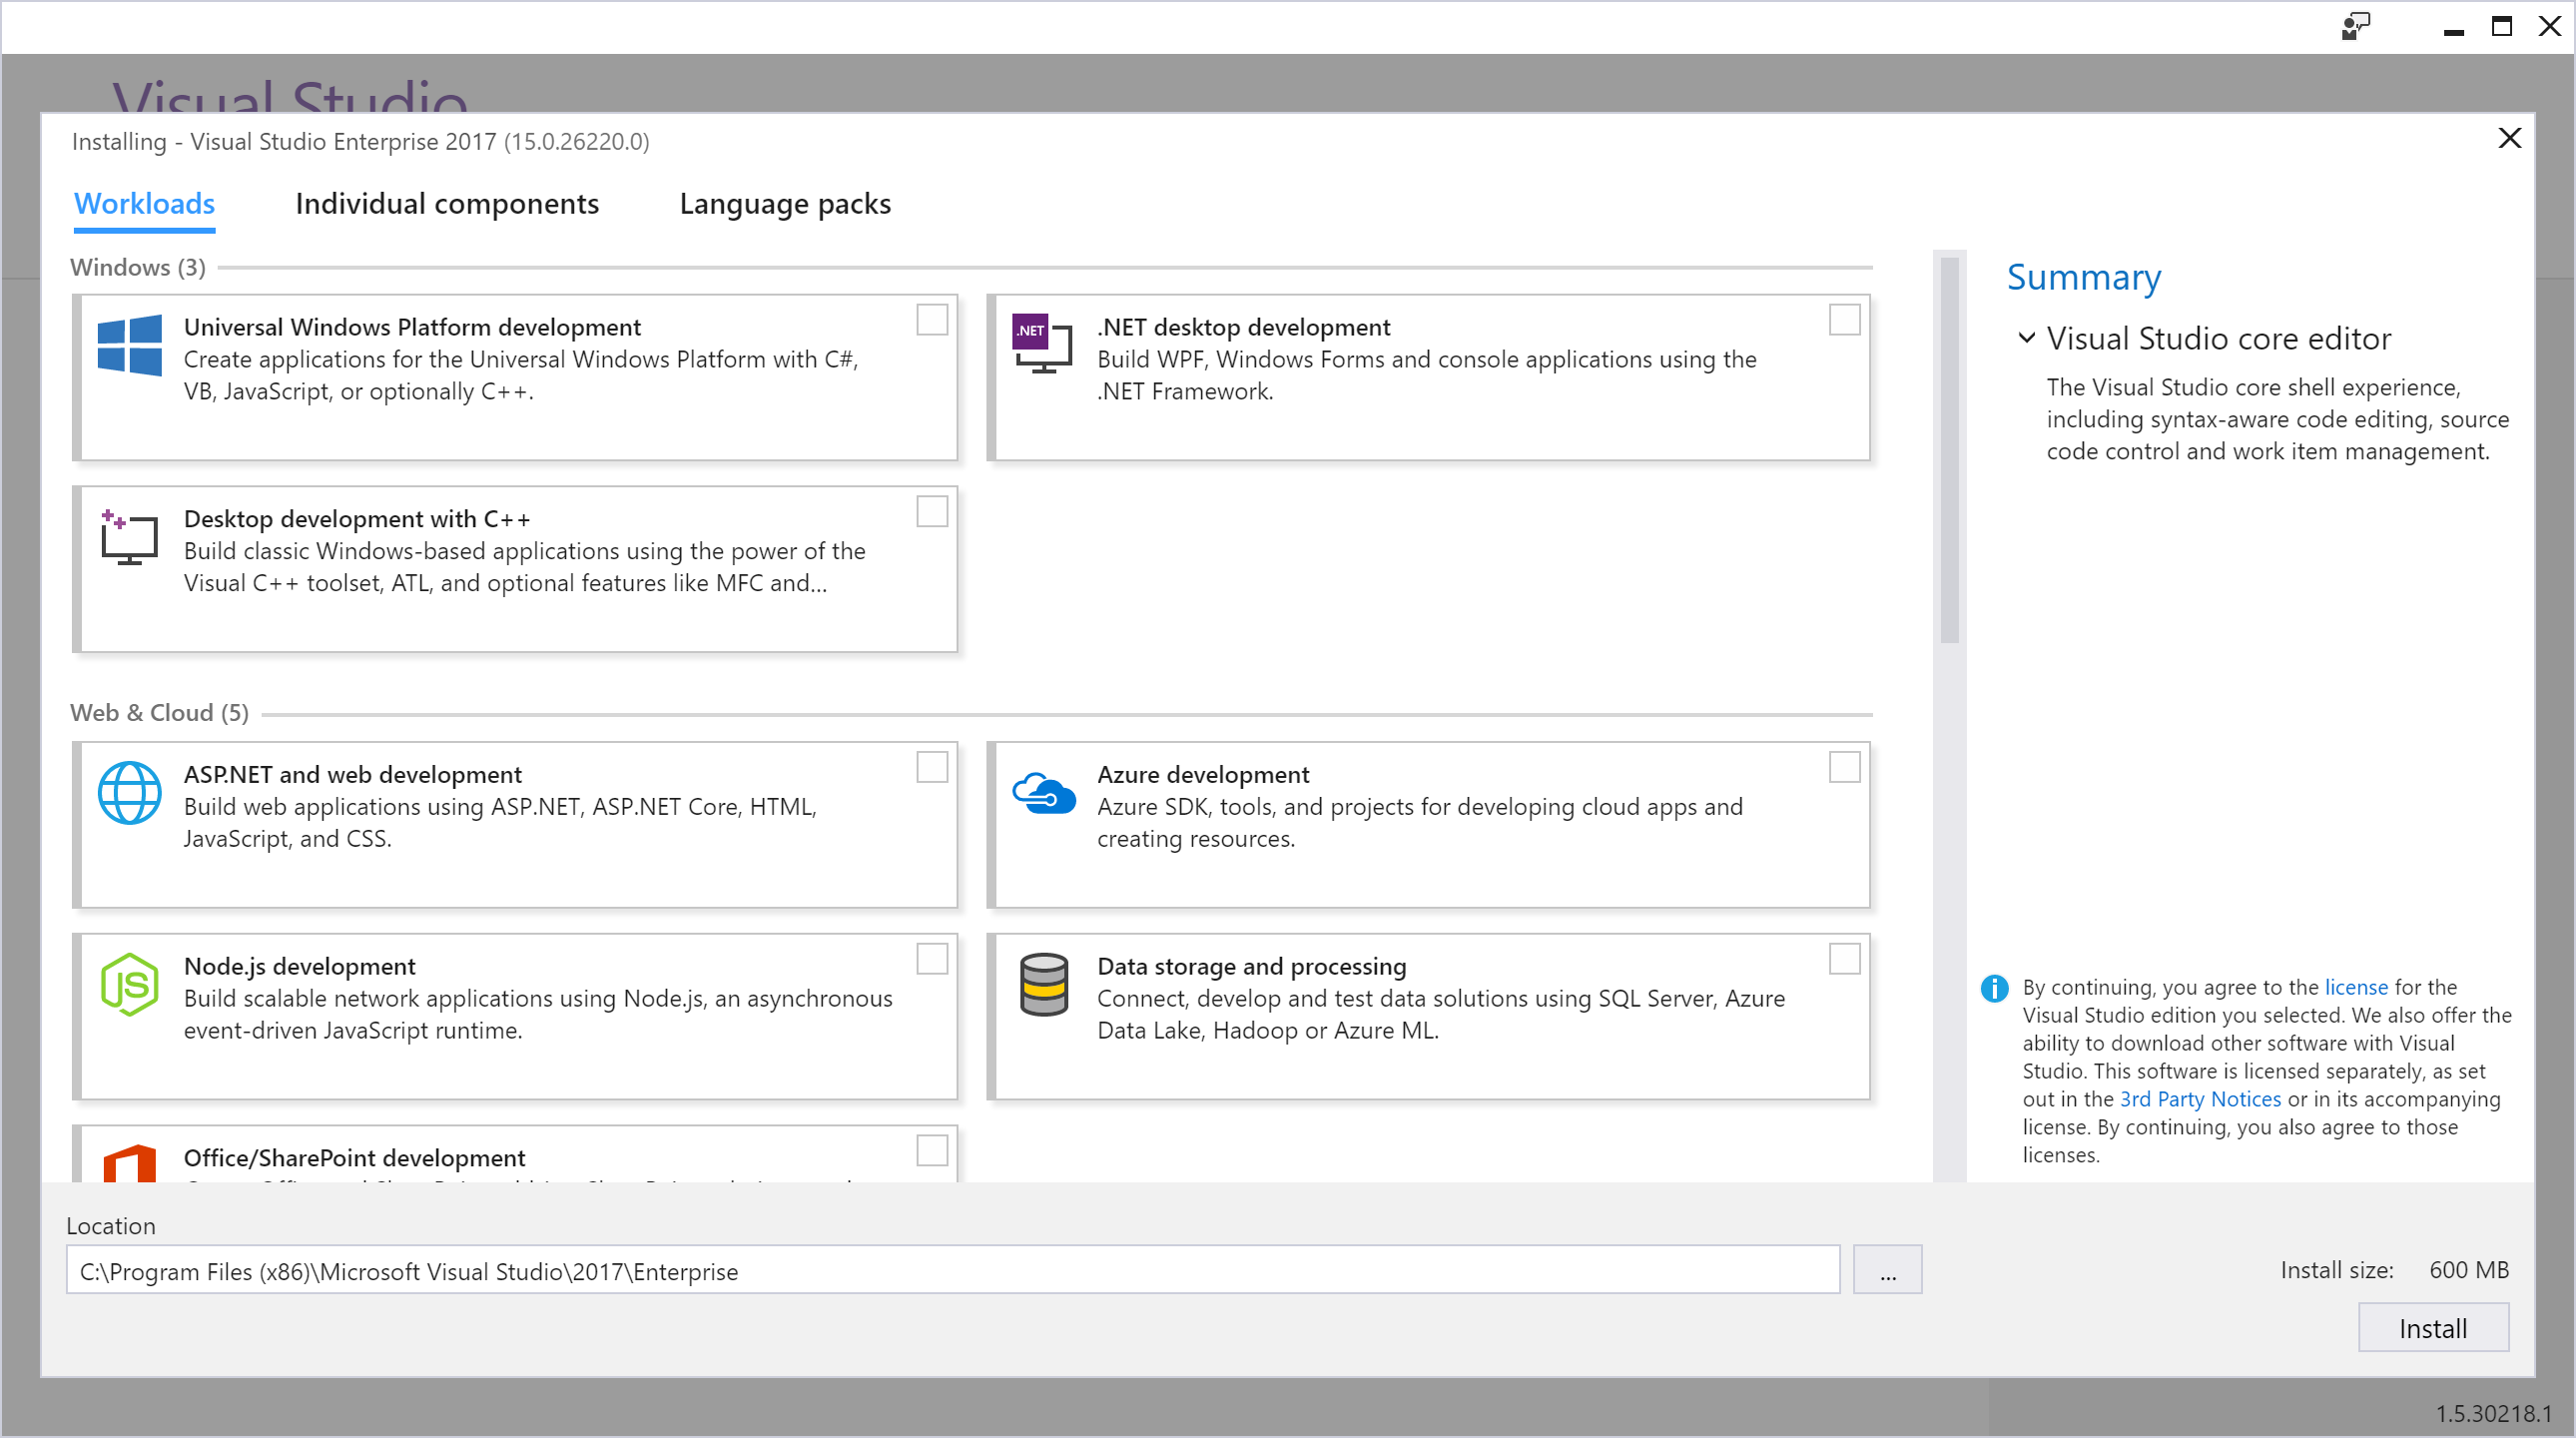
- The following image shows Visual Studio Setup, first select Desktop development with C++, please note that Wolf build with vc14.1 (visual c++ 2017). If you want to build Wolf for Universal Windows Platform, include Universal Windows Platform development.
- If you want to build Wolf for android, you need to download Nvidia Tegra Nsight for Visual Studio.
- The following image shows Visual Studio Setup, first select Desktop development with C++, please note that Wolf build with vc14.1 (visual c++ 2017). If you want to build Wolf for Universal Windows Platform, include Universal Windows Platform development.
-
For Linux, my best choice for debugging is NetBeans, make sure select C/C++ Netbeans tool, however you can build Wolf with make file or your preferred IDE.
-
After you download netbeans-X.Y-cpp-linux-x64.sh (X and Y are major and minor version of netbeans, e.g. at the time of writing this Wiki, I used netbeans-8.2-cpp-linux-x64.sh and x64 means my ubuntu OS type is 64-bit), then do the following steps:
cd "~/path-to-the-directory-of-downloaded-file"sudo chmod +x ./netbeans-8.2-cpp-linux-x64.sh- You might need to enter your password
- run install with following command
./netbeans-8.2-cpp-linux-x64.sh - After installing completed, Open the netbeans.conf file located in the
netbeans/etcdirectory via a text editor and make sure the value ofnetbeans_jdkhomeis as followingnetbeans_jdkhome="/{path-to-the-netbeans}/netbeans-8.2/bin/jre" - Wolf build with clang 5 or later versions on linux.
- Add it with following commands for ubuntu 16.04
wget -O - https://apt.llvm.org/llvm-snapshot.gpg.key | sudo apt-key add - sudo apt-add-repository "deb http://apt.llvm.org/xenial/ llvm-toolchain-xenial-5.0 main" sudo apt-get update sudo apt-get install -y clang-5.0 sudo update-alternatives --install /usr/bin/clang++ clang++ /usr/bin/clang++-5.0 100 sudo update-alternatives --install /usr/bin/clang clang /usr/bin/clang-5.0 100 clang --version //this command shows version of clang which must be 5.0- Run following commands for ubuntu 18.04
sudo apt-get update
sudo apt-get install clang
-
-
For Mac, You need to use XCode, then you can build Wolf for OSX and iOS platforms using Wolf's project files.
-
-
- Some files compressed with 7z format, it is recommended to setup 7zip.
- For Windows, you can download 7-Zip from Official site
- For Mac, I recommended Keka, the macOS file archiver
- For Linux, execute following commands:
sudo apt-get updatesudo apt-get install p7zip-full
- Some files compressed with 7z format, it is recommended to setup 7zip.
-
- For Windows & Mac
- For Linux, execute following commands:
sudo apt-get updatesudo apt-get install cmake
-
- Python helps you set up Wolf easily, however if you would like to use pyWolf, which is a python binding for Wolf, you need to setup up Python 2.7.14-x64 for your target OS.
- Python for Windows
- Python for Mac
- Python for Linux, run following commands
-
python2.7 -Vshould outputs Python 2.7.X - If python 2.7 not found then set it up via following commands:
sudo apt-get updatesudo apt-get install build-essential checkinstallsudo apt-get install libreadline-gplv2-dev libncursesw5-dev libssl-dev libsqlite3-dev tk-dev libgdbm-dev libc6-dev libbz2-devcd /usr/srcsudo wget https://www.python.org/ftp/python/2.7.14/Python-2.7.14.tgzsudo tar xzf Python-2.7.14.tgzcd Python-2.7.14sudo ./configuresudo make altinstall-
python2.7 -Vshould outputs Python 2.7.14
-
- Some examples, used PySide, make sure add this package via pip
sudo apt-get install python-pippip install pyside
- Python helps you set up Wolf easily, however if you would like to use pyWolf, which is a python binding for Wolf, you need to setup up Python 2.7.14-x64 for your target OS.
-
-
Windows/Linux, setup the latest SDK from LunarG
- For Windows, just run .exe and follow setup instructions
- For Linux, run following commands after downloading Vulkan SDK
-
sudo apt-get install mesa-utilsopenGL utilities -
sudo add-apt-repository ppa:oibaf/graphics-driversupdate openGL drivers -
sudo apt-get install vulkan-utils mesa-vulkan-driversvulkan utilities -
sudo apt-get install libxcb1-dev libx11-dev libxrandr-dev libwayland-devfor xcb, X11, xranddr wayland headers and libraries - We need git, python 2 in order to build Vulkan_SDK tools also We need cmake for linux to build Vulkan SDK samples and examples, you can set it up by running following command
sudo apt-get install git python cmake
- Before continue make sure all packages are up to date
sudo apt-get updatesudo apt-get upgrade
-
glxinfo | grep OpenGLthis command will show version of openGL - Now it's time to setup Vulkan SDK.
cd ./Directory-Of-Downloaded-Vulkan-SDK -
sudo chmod +x ./vulkansdk-linux-x86_64-1.0.X.Y.run(which X and Y are build numbers) - enter password if asked
- run it
./vulkansdk-linux-x86_64-1.0.X.Y.run - Now we need to build Vulkan SDK
cd /path-to-the-Vulkan-SDK/export VULKAN_SDK=/home/pooyaeimandar/VulkanSDK/1.0.X.Y/x86_64export PATH=$VULKAN_SDK/bin:$PATHexport LD_LIBRARY_PATH=$VULKAN_SDK/lib:$LD_LIBRARY_PATHexport VK_LAYER_PATH=$VULKAN_SDK/etc/explicit_layer.d- make sure test environment variables by echo. e.g.
echo $VULKAN_SDK - before start building, make sure that your PC is connected to the internet
- build vulkan tools
sudo chmod +x ./build_tools.sh./build_tools.sh
- build vulkan examples
sudo apt-get install libpng-devsudo chmod +x ./build_examples.sh./build_examples.sh- to verify example, run "~/VulkanSDK/1.0.X.Y/examples/build/cube" and you must see a cube which is rotating and rendering by Vulkan
- build vulkan samples
sudo chmod +x ./build_samples.sh./build_samples.sh
- In any case you faced with any error, make sure read these information
-
-
Android, Vulkan supported on Android 6 (Marshmallow) and later versions. The Android SDK is available via android.com
-
OSX/iOS, Unfortunately Vulkan not supported by Apple, Wolf used MoltenVK as an implementation of Vulkan which runs on Apple's Metal graphics framework.
-
-
- Starting with Windows 8, the DirectX SDK is included as part of the Windows SDK, which will be install on your Windows OS by installing Visual Studio. Make sure update your graphics device
-
- If you need to build wolf.media_core you have to add ffmpeg package to your OS.
sudo apt-get install ffmpeg
ffmpeg -version  (this will outputs ffmpeg version)
sudo apt-get install libavcodec-dev libavformat-dev libswresample-dev libavutil-dev libswscale-dev
- If you need to build wolf.media_core you have to add ffmpeg package to your OS.
-
- Make sure, update your graphics driver to the latest version. Find your driver based on graphics card manufacturers
-
Intel Graphics Driver
- For Linux , you need to enable DRI3
- Create or modify file on following path
/etc/X11/xorg.conf - Add following text to it
Section "Device"
    Identifier  "Intel Graphics"
    Driver      "intel"
    Option      "DRI"    "3"
EndSection
- Create or modify file on following path
- For Linux , you need to enable DRI3
-
Intel Graphics Driver
-
AMD Graphics Driver
- For Linux download driver from AMDGPU-PRO Driver for Linux® and follow install instruction
- Create or modify file on following path
/etc/X11/xorg.conf - Add following text to it
Section "Device" Identifier "AMDGPU" Driver "amdgpu" Option "AccelMethod" "glamor" Option "DRI" "3" EndSection - When you face black screen, make sure update grub with "
quiet splash radeon.modeset=1"
- Create or modify file on following path
- For Linux download driver from AMDGPU-PRO Driver for Linux® and follow install instruction
- Nvidia Graphics Driver
- Make sure, update your graphics driver to the latest version. Find your driver based on graphics card manufacturers