Home

DISCLAIMER: we are currently in the process of updating our documentation which we'll be working on through to the end of June. An older version of the wiki can be found at https://code.soundsoftware.ac.uk/projects/beaglert/wiki
Before starting, make sure you have:
- Beaglebone Black
- Bela cape
- standard-A to mini-B USB cable
- 2GB or larger micro-SD card
- Optional, but recommended: up to two 3-ways female connectors for audio in/out from the cape. You will probably want some sort of stereo female jack connector at the other end.

Stack the audio cape on top of the Beaglebone Black (BBB). Make sure all the pins from the cape fit into the socket header of the BBB and that no pin gets bent in the process.
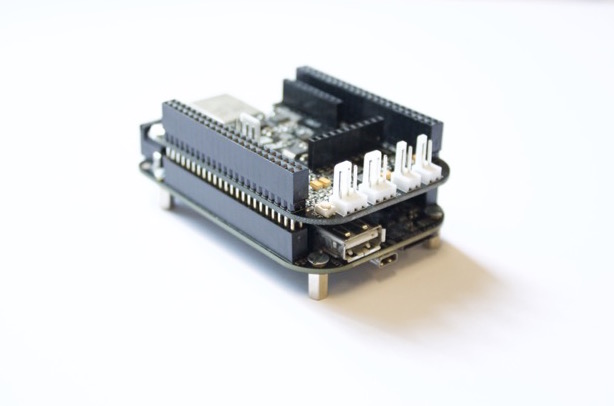
In case you did not get a Bela SD card with your kit, you will need to follow the instructions detailed here to flash your own SD card: Flashing or backing up your SD card Once you have your SD card, Insert it into the BBB and plug it into your computer with the USB cable. The BBB will boot up after around 40 seconds and advertise itself to your computer as a network interface.
Communication between the BBB and the host pc takes place through the Ethernet over USB network connection. In order to log into the BBB you need an ssh client and you may need some network drivers according to your operating system, as detailed below.
If you are running Yosemite or earlier:
- install network drivers for the BBB from http://beagleboard.org/static/beaglebone/latest/Drivers/MacOSX/RNDIS/HoRNDIS.pkg
- install the serial drivers from http://beagleboard.org/static/Drivers/MacOSX/FTDI/EnergiaFTDIDrivers2.2.18.pkg . NOTE: this requires a reboot.
If you are running El Capitan:
- make sure you upgrade to 10.11.4. NOTE: earlier versions of El Capitan may have troubles with the Beaglebone Black over USB.
- install HoRNDIS-rel8pre2.pkg instead (from http://nyus.joshuawise.com/HoRNDIS-rel8pre2-dbg.pkg).
Now you should be ready to go:
- make sure the BBB is plugged in and booted up (might take up to one minute after you plug it in).
- open a browser and go to http://192.168.7.2, the IDE should show up. Now go to Build your first project.
In case the IDE is not showing up try the following:
- go to System Preferences->Network, click the + symbol at the bottom left. From the popup window, select "Beaglebone Black"
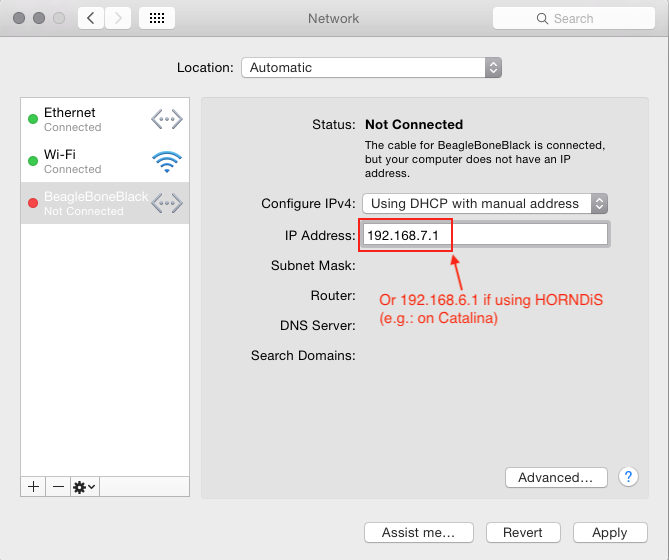
- now set the "Configure IP v4" field to "Using DHCP with manual address" and set the IP address to 192.168.7.1
- click apply and wait a few seconds, the indicator close to the icon should turn green
- open a browser and go to http://192.168.7.2, the IDE should show up or go to Build your first project. Alternatively if you're comfortable with the terminal jump to the Test ssh connection section below to check that everything is working properly.
In you're using Linux everything you need should already be on your machine!
- make sure the BBB is plugged in and booted up (might take up to one minute after you plug it in).
- open a browser and go to http://192.168.7.2, the IDE should show up or go to Build your first project.
In case it does not (or if it does but you plan to use ssh via the terminal as well) jump to the Test ssh connection section below to check that everything is working properly.
If you are having trouble, you may have to manually turn the interface on: the
ifconfig
command will show you the list of available interfaces on your computer, one of them will be the BeagleBone Black. Once you identify the name of the interface, you have to assign your computer an IP address on that interface:
ifconfig interfaceName up 192.168.7.1
where you will have to replace interfaceName with the name of the machine connected to the BeagleBone Black.
If you're using Windows you'll need to install the following network drivers and follow these steps:
- http://beagleboard.org/static/Drivers/Windows/BONE_D64.exe (Windows 64 bit) or
- http://beagleboard.org/static/Drivers/Windows/BONE_DRV.exe (Windows 32bit)
- in the network connections manually set the IP address for the BBB to 192.168.7.1
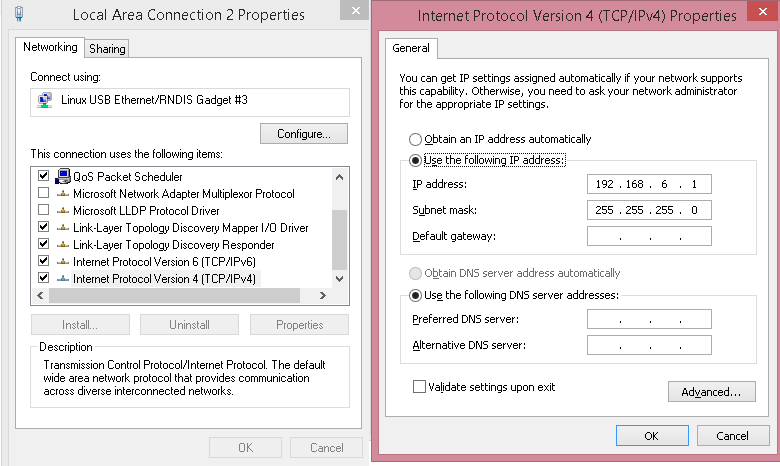
- Open a browser and go to http://192.168.7.2, the IDE should show up or go to Build your first project. In case it does not (or if it does but you plan to use ssh as well) jump to the Test the ssh connection section below to check that everything is working properly.
NOTE: if you're using Windows you will need a toolkit that allows you to use ssh and some other basic shell tools. The shell scripts in this project have been tested with mingw http://sourceforge.net/projects/mingw/. Make sure you install also a copy of rsync with it. You will want to note that in order to paste code into the mingw terminal you have to right click on the terminal's title bar and navigate the menu to edit->paste.
Before building your first project it's a good idea to acquaint yourself with Bela's hardware. An explanation of everything that you have at your disposal and how it works can be found in the Hardware explained section.
Building projects with the browser-based IDE couldn't be easier. Just plug in the your BBB to the computer and once it is up and running, open a browser and go to http://192.168.7.2/
You can edit the code in the browser window, click the button to compile and run it on the board. The IDE also allows you to manage projects in the Project Explorer tab, to edit project settings in the Project Settings tab, to explore many examples in the Code Examples tab and to browse the built-in documentation in the Documentation tab. Messages from the compiler will be displayed in the browser window.
When using the USB network connection, the BBB has a self-assigned IP of 192.168.7.2, we will log in with username root and an empty password (older images have a password 'a').
If you have gone through operating system-specific steps above, you should be able to connect to the beaglebone with
$ ssh root@192.168.7.2
According to the settings of your ssh client, you might, or might not, be prompted with something along the lines of
The authenticity of host '192.168.7.2 (192.168.7.2)' can't be established. RSA key fingerprint is 35:b2:ff:ae:c2:02:30:af:84:1e:0d:f5:c9:c8:4b:34. Are you sure you want to continue connecting (yes/no)?
type yes and press the return key.
If everything is ok, you will now be displayed the BBB prompt:
root@arm ~$