Kinetic Py2 Solution
Solution of the Exercise Based on Kinetic-Py2
The proposed solution is made by the behaviour node, which implements the Finite
State Machine, and a helper class called InterfaceHelper, which only addresses the
stimulus, i.e., the interface to trigger transitions on the Finite State Machine.
This approach allows decoupling the Finite State Machine implementation from its
interfaces with the other components of the architecture.
The proposed solution has been implemented to make the robot reactive to the stimulus, i.e., battery level, user's speech-based and gesture-based commands. In other words, the implementation is never blocks the robot's computation. The implemented solution has also been designed in order to be robust but further improvements can be done to optimize the computation speed and robustness.
The implemented solution assumes that no states of the Finite State Machine run concurrently. Therefore, no clients of the plan and control action server can make concurrent requests.
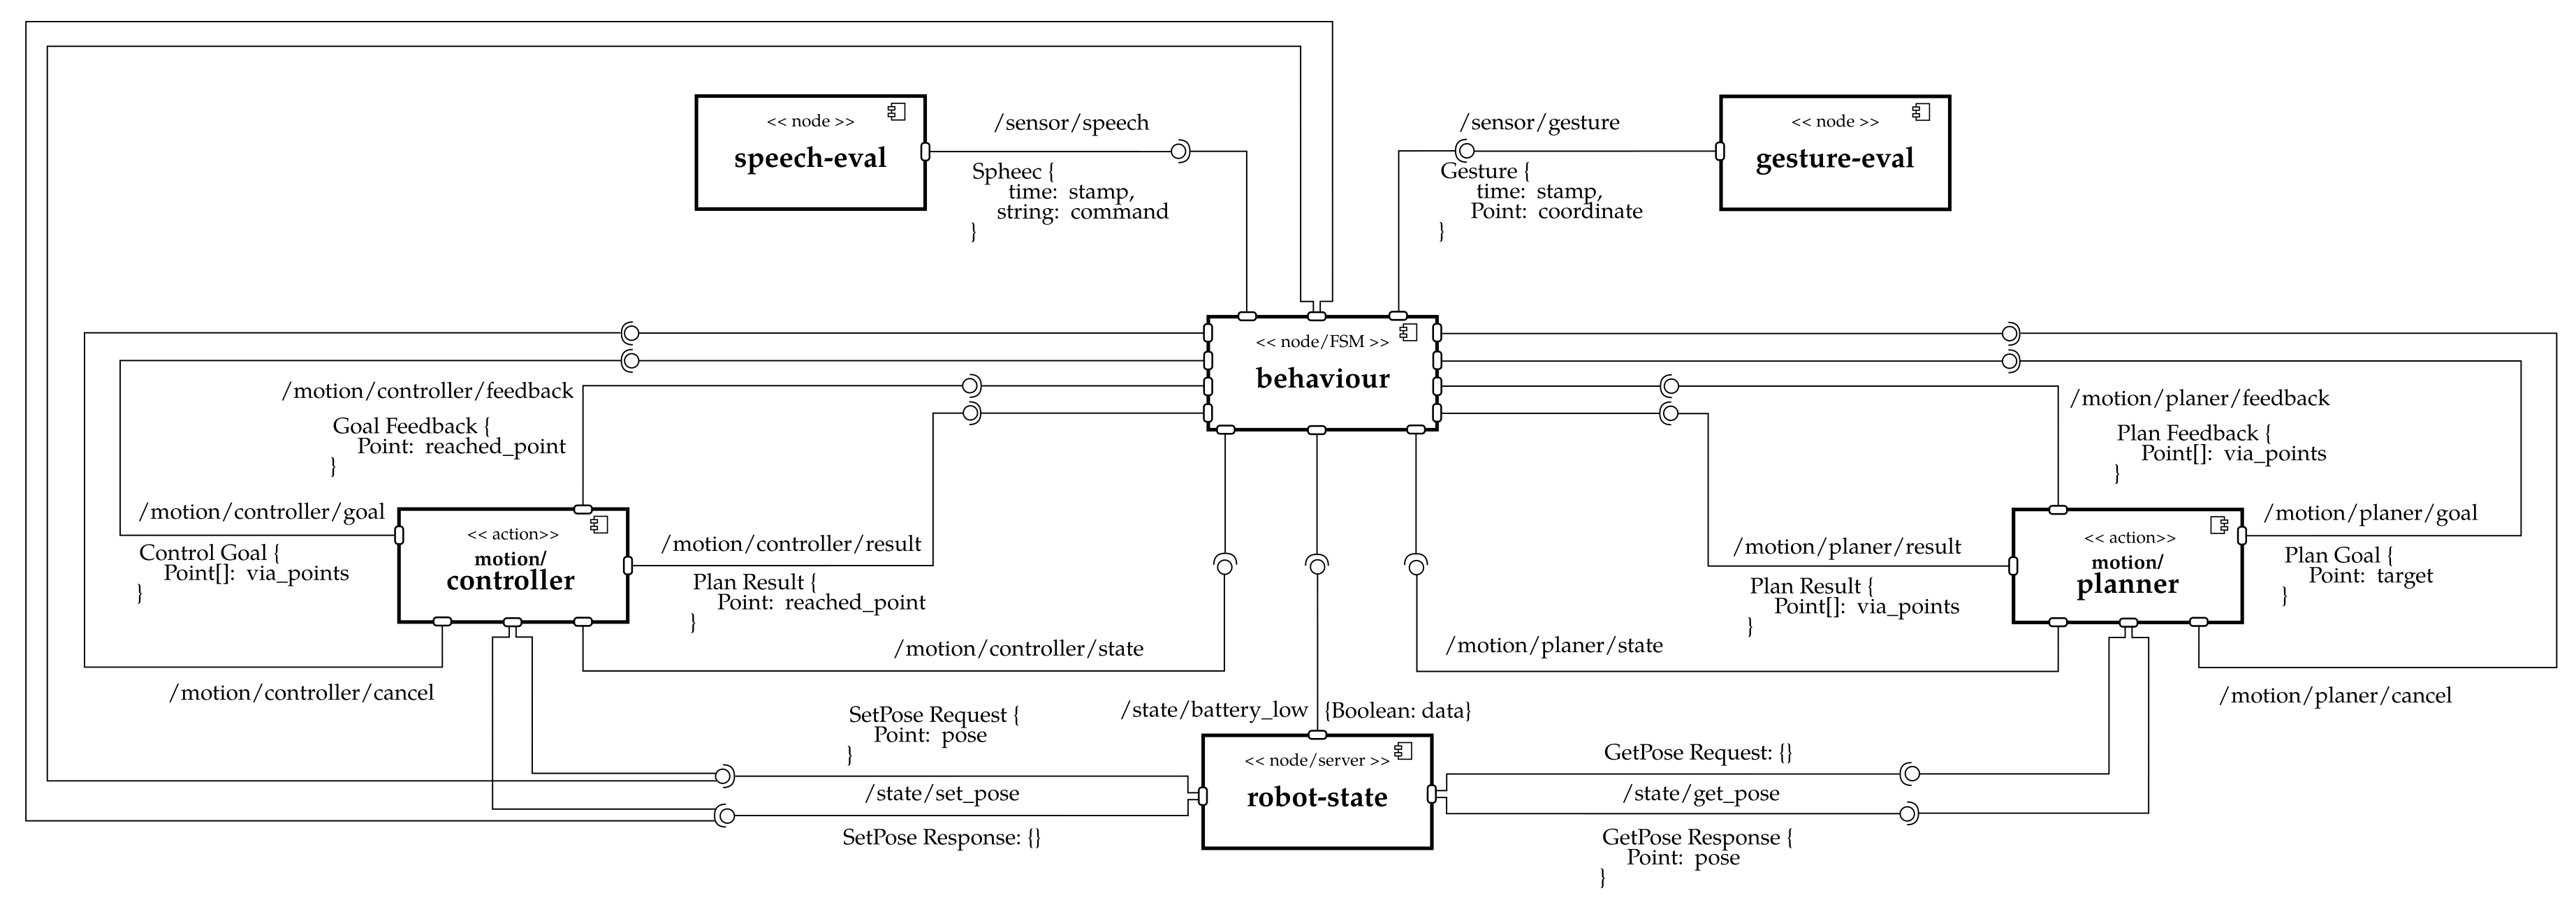
The figure below shows the complete software architecture. This figure connects the
components presented in the README
file with the behaviour node.
Note that this example relies on the behaviour node to set the initial position.
This is a simplification made for showing purposes but, for more realistic architectures,
a general solution should be used instead. This is important to not make the
behaviour node dependent on the initialization of the robot's position.
In addition, the data shared among several components (e.g., the robot position) has been interfaced through a server/client protocol for showing purposes. However, a publisher/subscriber protocol could be more appropriate in some situations (e.g., the robot's position is updated with high frequency).
For showing purposes, the interfaces of the controller are simplified. In particular,
the controller does not get the robot's pose from the robot-state node, which should
be used in a more realistic implementation to implement a closed-loop controller.
However, thanks to the modularity of the proposed components it is easy to implement
the interfaces for a closed-loop controller. Indeed, it is sufficient to modify the
controller node in order to perform a request to the get_pose server.
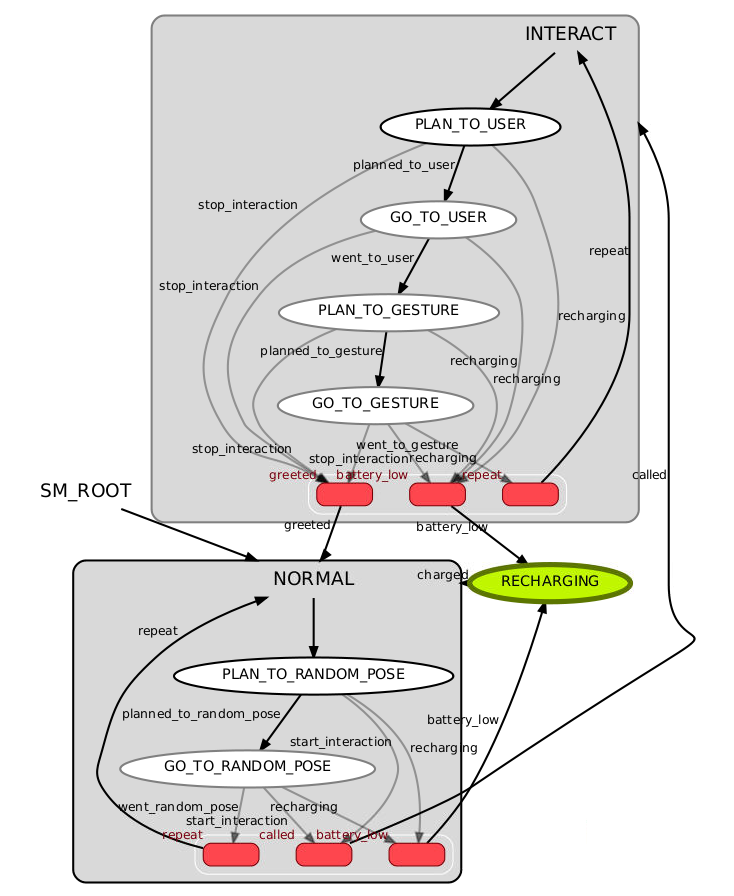
The figure below shows the Finite State Machine, which is made of three main nodes,
two of which are inner Finite State Machines. This implementation is done to make the
execute function of each node as simple as possible. This approach also has the
effect to simplify the synchronization among the ROS-based thread concerning
subscribers and action servers.
Note that the graph below does not show loop-like transitions used to make the Finite State Machine robust to unexpected stimuli. However, the actual code implements such a feature to improve the robustness, and you can see more details about it in the documentation of the code.
To install the solution, install the repository first as detailed in the README file. Then, perform the following steps:
- Create the
scripts/behaviour.pyfile. - Copy on that file the code available here.
- Give running permissions to that file with
chmod +x behaviour.py. - Create the file
scripts/fsm_helper.py. - Copy on that file the code available here.
- Give running permissions to that file with
chmod +x fsm_helper.py. - Modify file
scripts/architecture_name_mapper.pyin order to add the following two variablesNote that a ROS parameter with the name# The name of the node implementing the Finite State Machine. NODE_BEHAVIOUR = 'behaviour' # The name of the ROS parameter to configure the user's position as static coordinate. # `PARAM_USER_POSE` should be a list of two coordinates ordered as `[x, y]`. PARAM_USER_POSE = 'config/user_pose'
config/user_poseis already configured by the launcher files available in thelaunch/folder. - Add the
behaviournode to thelaunch/manual_sense.launchandlaunch/random_sense.launchfiles by adding<node pkg = "arch_skeleton" type = "behaviour.py" name = "behaviour" output = "screen" > </node>
- For consistency, you might want to add the
scripts/behaviour.pyscript in thecatkin_install_pythonfield of theCMakeLists.txtfile. After that, you might want to runcatkin_makeandcatkin_make install. Since Python has been used, this step is not strictly required. - User
roslaunch arch_skeleton manual_sense.launchorroslaunch arch_skeleton random_sense.launchto run the code. Eventually, you might want to runrosrun smach_viewer smach_viewer.pyto check the behaviour.