Repository navigation
Materials and the Materials Rack
| Material | Class | Used for |
|---|---|---|
| Planks | WoodenPlank |
Frames, plank walls, doors, window covers and signs. |
| Logs | WoodenLog |
The wood tier of floors, foundations, roofs and stairs. Also the palisade and the compound gates. |
| Metal sheets | MetalPlate |
The metal tier and concrete doors. |
| Concrete blocks | BSBB_ConcreteBlock |
The concrete tier. Made in the concrete mixer. Stacks of 8. |
| Cement bags | BSBB_CementBag |
The concrete mixer turns them into concrete blocks. Stacks of 8, 10 kg each. |
| Stones | Stone |
The concrete mixer, with the cement bags. |
| Burlap sacks | BurlapSack |
Sandbags and flat roofs. |
| Nails and wire |
Nail, MetalWire
|
Free by default (Pieces.FreeMaterials). |
- Concrete blocks and cement bags spawn as industrial loot. See Installation.
- Materials count if they are in your inventory or hands, on the ground within 2.5 m or on a Materials Rack within 20 m. Materials in crates, barrels or cars don't count.
- To make players pay for nails and wire again, set
Pieces.FreeMaterialsto[]. - The concrete tier only takes concrete blocks, which come out of the concrete mixer (see below). Doors, gates and other pieces that move also take metal sheets.
- Server owners can change the concrete recipe with
Pieces.ConcreteRecipeType:2takes concrete blocks and cement bags, as before the mixer, and1(classic) takes cement bags, metal sheets and wire, with no blocks. -
CostOverrideschanges the cost of any class. See the example. The default costs are inbs_default_costs.json, which the server writes on every start. To change costs without sending them to the players, use a config.cpp mod.
Each cell is the cost of that step only. Nails and wire are left out because they are free by default.
| Piece | Frame | Wood | Metal | Concrete |
|---|---|---|---|---|
| Wall (4 m) | 3 planks | 13 planks | 8 metal sheets | 9 concrete blocks |
| Narrow wall (2 m) | 2 planks | 6 planks | 4 metal sheets | 6 concrete blocks |
| Stilted foundation | 3 planks | 4 logs, 7 planks | 10 metal sheets | 13 concrete blocks |
| Floor | 3 planks | 4 logs, 7 planks | 6 metal sheets | 8 concrete blocks |
| Roof | 3 planks | 4 logs, 7 planks | 8 metal sheets | 7 concrete blocks |
| Flat roof | 3 planks | 11 planks, 2 burlap sacks | 6 metal sheets | 8 concrete blocks |
| Switchback stairs | 3 planks | 4 logs, 7 planks | 4 metal sheets | 6 concrete blocks |
| Door | 8 planks | 3 metal sheets | 4 concrete blocks, 5 metal sheets | |
| Double gate | 14 planks | 6 metal sheets | 6 concrete blocks, 8 metal sheets | |
| Shutters | 4 planks | 2 metal sheets | 2 concrete blocks, 3 metal sheets | |
| Palisade section | 3 logs | 8 logs | 12 metal sheets | 14 concrete blocks |
| Compound gate | 12 logs | 12 metal sheets | 8 concrete blocks, 12 metal sheets | |
| Watchtower | 6 planks | 6 logs, 14 planks | 10 metal sheets | 13 concrete blocks |
| Command cabinet | Level 1: 10 planks, 4 metal sheets | Level 2: 6 metal sheets | Level 3: 10 concrete blocks | |
| Materials Rack | 12 planks, 2 logs | |||
| Concrete mixer | 6 metal sheets, 4 planks | |||
| Sign on a post | 3 planks | 1 metal sheet (sheet metal) |
Doors, gates and other pieces that move take concrete blocks and metal sheets for the concrete tier. Every piece and tier is in Piece Reference.
Concrete blocks come out of the concrete mixer. With the default settings, 1 cement bag and 8 stones make 4 blocks in about a minute.

- Build it with the Building blueprint. It is in the Foundations ring, next to the Materials Rack. It costs 6 metal sheets and 4 planks.
- It stands on open ground or on a floor.
- To make it run, it needs a spark plug and a charged car or truck battery in its slots. Neither gets used up.
- Put the cement bags and the stones in its slots, then look at it and choose Start engine.
- You can watch it mix and pour. The blocks come out on its pallet; take them from its inventory. Stop engine turns it off.
- It stops by itself when something runs out or the pallet is full. Aim at it to see why.
- Only players who can build there can use it and open its slots.
Note
Server owners can change the mixer in the ConcreteMixer section: what a batch takes and gives, how long it takes, the parts it needs, and water or fuel if they want them. They can also place public mixers that anyone can use, nobody can dismantle or damage, and that aren't saved. See Configuration Reference.
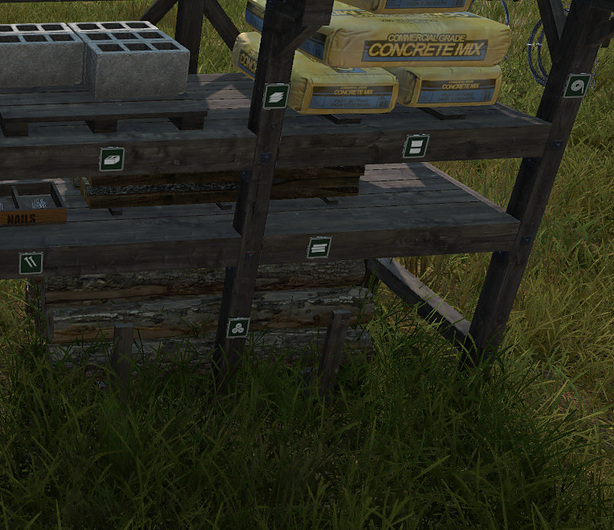
A rack where you keep your building materials. You can see the materials on it, and racks close to you pay for your building.
- Build it with the Building blueprint. It is in the Foundations ring.
- It stands on the ground or on a floor. It is low enough to fit under a floor.
- To store materials, look at it and press F (Store materials). It takes materials from your inventory, from your hands and from the ground within 3.5 m. The shelves fill up from the bottom.
- To take materials out, open its inventory like any container.
- When you build, racks within 20 m pay first. The closest rack is used first, and the top shelves first. After that come your inventory and the ground.
- A rack only pays where you are allowed to build.

In the game: aim at a rack with a build tool in your hands to see its stock.
Each rack holds:
| Material | Amount |
|---|---|
| Planks | 200 |
| Logs | 50 |
| Metal sheets | 120 |
| Concrete blocks | 80 |
| Cement bags | 50 |
| Nails | 600 |
| Wire | 20 |
- On the material cards, materials that come from a rack have a small rack icon.
- When you aim at a rack you see its stock, whether it pays for your building, and how many blueprint marks are nearby with the materials they still need.
- Bullets and melee don't damage it. Explosives do.
- If it is destroyed, half of each material drops and the rest is lost. If it is dismantled, everything drops.
Note
Server owners can change the rack in the MaterialShelf section. They can turn off the paying, so racks are only storage. They can also change the radius, the order and the drop %, or allow only players who can build there to use it (LockToTerritory). Capacity can lower the amounts above. See Configuration Reference.
Tip
Next: Territory.