This is a sample project based on GetX.
- Change theme.
- Internationalization.
- Handle call API (base on Dio).
- Flutter Version: 3.19.6.
- Dart SDK: 3.3.4.
- IDE: Android Studio or Visual Code.
- Dart programming language.
- GetX, get_storage.
- Dio, interceptors.
- Run "Pub get" in Terminal or in file pubspec.yaml.
cd <base-getx>
flutter pub getconst: Includes app configuration such as Theme, Role,... .lang: Includes file languages.models: Includes model common.pages: Includes screen common such as Login, changePassword,... .routes: Routes management.services: Includes services such as API, Firebase, Storage.utils: Includes utilities such as Validation, Formatter,... .widgets: Includes widgets common.
pages: The directory contains screen of project.- Subpage structure
const: Config use only in page.models: Contain all model of page.widgets: Widget of page.services: Handle call api.page_controller.dart: File handle logic page.page_view.dart: File view of page.page_bindings.dart: File binding of page.
- Subpage structure
This project supports two languages: English and Vietnamese.
- First, Add a language key.
lib/lang/vi_vn.dart
{
  'login': 'Đăng nhập',
}
lib/lang/en_us.dart
{
  'login': 'Login',
}
- Second, Use a language key.
Text('login'.tr),- Third, Change language.
final lang = Get.find<LangController>();
lang.changeLang('vi', 'VN');
lang.changeLang('en', 'US');Directory lib/const/theme. Includes configuration about Color, TextStyle, BoxShadow, BoxDecoration.
- First, Color.
// Add a color.
// Directory lib/const/theme/styles.
static const white19 = Color(0xffF5F8FB);

// Use a color.
Text('login'.tr, style: Styles.normalText(color: Styles.white19)),- Second, TextStyle.
TextStyle defined in path
lib/const/theme/styles.dartis not corrected.
// Use a TextStyle.
Text('login'.tr, style: Styles.normalText()),- Third, BoxShadow.
// Use a BoxShadow.
Container(
  decoration: BoxDecoration(
    color: Colors.white,
    boxShadow: Styles.boxShadow1(),
  ),
  child: Image.asset('assets/icons/ic_advance_ticket.png', width: 24),
),- Fourth, BoxDecoration.
// Use a BoxDecoration.
Container(
  decoration: Styles.boxDecoration1(),
  child: Image.asset('assets/icons/ic_advance_ticket.png', width: 24),
),Small, easy to use and extensible logger which prints beautiful logs.
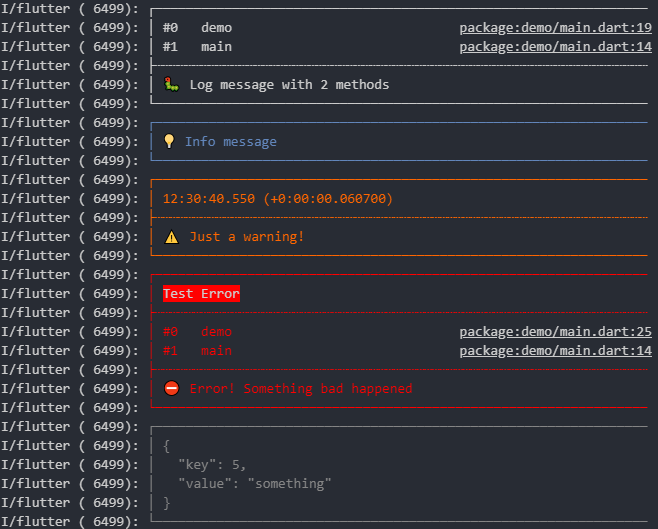
///Logger.
static void showLogInfo(String msg) {
  loggerNoStack.i(msg);
}

static void showLogWarning(String msg) {
  loggerNoStack.w(msg);
}

static void showLogError(String msg) {
  logger.e(msg);
}

///Usage.
AppUtils.showLogInfo('This is info log');
AppUtils.showLogWarning('This is warning log');
AppUtils.showLogError('This is error log');

///Note.
//loggerNoStack : number of method calls to be displayed equal 0.
//logger: number of method calls to be displayed equal 2.This project uses GetX for state management. In Controller layer, use GetxController.
There are two ways to update the status. Use variables Rx or Function update();
- First way: Use variables
Rx
// Class controller.
import 'package:get/get.dart';

class CounterController extends GetxController {
  Rx<int> count = 0.obs;

  void increment() {
    count.value++;
  }
}
// Class view.
import 'package:flutter/material.dart';
import 'package:get/get.dart';
import 'counter_controller.dart';
class CounterView extends GetView<CounterController> {
const CounterView({Key? key}) : super(key: key);
@override
Widget build(BuildContext context) {
return Scaffold(
body: Obx(() {
return Text('${controller.count.value}');
}),
);
}
}- Second way: Use Function
update();In case there are many places, it is necessary to update the status using ID.
// Class controller.
import 'package:get/get.dart';

class CounterController extends GetxController {
  int count = 0;

  void increment() {
    count++;
    update([1]); //Only update widget with id equal to 1.
  }
}
// Class view.
import 'package:flutter/material.dart';
import 'package:get/get.dart';
import 'counter_controller.dart';
class CounterView extends GetView<CounterController> {
const CounterView({Key? key}) : super(key: key);
@override
Widget build(BuildContext context) {
return Scaffold(
body: GetBuilder<CounterController>(
id: 1,
builder: (c) {
return Text('${c.count}');
},
),
);
}
}Read more Getx state management
This project uses GetX for route management. Defined in path lib/routes/routes.dart
import 'package:get/get.dart';
import '/pages/page.dart';

abstract class Routes {
  static const login = '/login';
  static const loginOutSide = '/login_outside';
  static const changePassword = '/change_password';
}

abstract class AppPages {
  static String initial = Routes.login;

  static final routes = [
    GetPage(
      name: Routes.login,
      page: () => const LoginView(),
      binding: LoginBinding(),
    ),
  ];
}Navigate to a new screen with name.
Get.toNamed(Routes.login);To navigate and remove the previous screen from the tree.
Get.offNamed(Routes.login);To navigate and remove all previous screens from the tree.
Get.offAllNamed(Routes.login);To close anything you would normally close with Navigator.pop(context).
Get.back();On other screen, send a data for previous route:
Get.back(result: 'success');Just send what you want for arguments. Get accepts anything here, whether it is a String, a Map, a List, or even a class instance.
Get.toNamed(Routes.login, arguments: 'Get is the best');on your class or controller:
print(Get.arguments);
//print out: Get is the best
Read more Getx route management
Directory lib/utils. Includes utilities such as: Validation, Formatter, Downloader, Uploader.
Including device operations such as: deviceInfo, makePhoneCall, sendSms, sendEmail,... .
How to use.
AppNative.sendSms('This is a new message'),Includes input authentication methods such as: email, password,... .
How to use.
AppValidation.email('datpm@bssd.com'),Includes methods datePicker and dateFormat.
How to use.
DateFormatter.formatDate5('20/09/1999'),DateTime? datePicker = await DateFormatter.datePicker(
context,
initDate: initDate,
errorFormatText: 'msg_error_format_date'.tr,
);Includes methods timePicker and timeFormat.
How to use.
TimeOfDay time = TimeOfDay.now();
var result = await TimeFormatter.timePicker(context, time);Definition of utility methods is used a lot.
How to use.
// Show dialog loading.
AppUtils.showLoader();

// Hide dialog loading.
AppUtils.hideLoader();

// Show message error with snack bar.
AppUtils.showError('This is an error message');

// Show message success with snack bar.
AppUtils.showSuccess('This is an success message');

// Get platForm.
AppUtils.getPlatForm();

// Logout.
AppUtils.logout();Here is a sequence diagram of action get data from API.

As usual, we can change domain, setting when before api in lib/services/api/base_api.dart.
// const domainPublic = 'https://service.mdo.com.vn/api/';
const domainTest = 'https://service-mass.mdo.com.vn/api/';
// const domainTest = 'https://test.mdo.com.vn/api/';
// const domainTest = 'https://staging.mdo.com.vn/api/';
How to use.

- First, Create a model map data response from api (quicktype.io).
class LoginModel {
  LoginModel({
    required this.status,
    required this.message,
    this.data,
  });

  int status;
  String message;
  Data? data;

  factory LoginModel.fromJson(Map<String, dynamic> json) => LoginModel(
    status: json["status"] ?? 0,
    message: json.containsKey("message") ? json["message"] : '',
    data: (json["data"] == null) ? null : Data.fromJson(json["data"]),
  );
}

class Data {
  Data({
    required this.token,
    required this.tokenTimeout,
    required this.captcha,
    required this.refreshToken,
    required this.refreshTokenExpiredAt,
  });

  String token;
  int tokenTimeout;
  String captcha;
  String refreshToken;
  int refreshTokenExpiredAt;

  factory Data.fromJson(Map<String, dynamic> json) => Data(
    token: json.containsKey("token") ? json["token"] : '',
    tokenTimeout: json["tokenTimeout"] ?? 0,
    captcha: json.containsKey("captcha") ? json["captcha"] : '',
    refreshToken: json["refreshToken"] ?? '',
    refreshTokenExpiredAt: json["refreshTokenExpiredAt"] ?? 0,
  );
}- Second, Create function call api login in
login_service.dart.
Future<LoginModel?> login(String request) async {
  try {
    var response = await _service.postRequest(
      url: CommonApi.login,
      data: request,
    );
    if (response != null) {
      return LoginModel.fromJson(response.data);
    }
  } catch (e) {
    debugPrint(e.toString());
  }
  return null;
}- Third, Create function handle logic with UI in
login_controller.dart.
Future<void> login() async {
  AppUtils.showLoader();
  LoginRequest request = LoginRequest(
    username: _fields.email.value.trim(),
    password: _fields.password.value,
    guid: storage.deviceID,
    captcha: _fields.captcha.value.trim(),
  );
  var result = await loginService.login(request.toJson());
  await AppUtils.hideLoader();

  if (result != null && result.status == StatusCodes.ok) {
    Get.offAllNamed(Routes.root);
  } else if (result != null && result.message.isNotEmpty) {
    AppUtils.showError(result.message);
  } else {
    debugPrint('error ---> _login');
    AppUtils.showError('msg_have_error'.tr);
  }
}- Note, with api need param data create model request
login_request.dart.
class LoginRequest {
  LoginRequest({
    required this.username,
    required this.password,
    required this.guid,
    required this.captcha,
  });

  String username;
  String password;
  String guid;
  String captcha;

  Map<String, dynamic> toMap() => {
    "username": username,
    "password": password,
    "guid": guid,
    "captcha": captcha,
  };

  String toJson() => json.encode(toMap());
}
- Add
with AdaptivePageinto Widget.
class LoginView extends StatelessWidget with AdaptivePage{
  const LoginView({Key? key}) : super(key: key);

  @override
  Widget build(BuildContext context) {
    return Scaffold(
      body: adaptiveBody(context),
    );
  }

  @override
  Widget mobileLandscapeBody(BuildContext context, Size size) {
    // TODO: implement mobileLandscapeBody
    throw UnimplementedError();
  }

  @override
  Widget mobilePortraitBody(BuildContext context, Size size) {
    // TODO: implement mobilePortraitBody
    throw UnimplementedError();
  }

  @override
  Widget tabletLandscapeBody(BuildContext context, Size size) {
    // TODO: implement tabletLandscapeBody
    throw UnimplementedError();
  }

  @override
  Widget tabletPortraitBody(BuildContext context, Size size) {
    // TODO: implement tabletPortraitBody
    throw UnimplementedError();
  }
}
Container(
  width: 25,
  height: 25,
  decoration: BoxDecoration(
  color: (controller.cusCb1.value)
            ? Styles.primaryColor
            : Colors.transparent,
  border: Border.all(width: 1, color: Styles.black2),
  borderRadius: BorderRadius.circular(5),
  ),
    child: Theme(
      data: ThemeData(unselectedWidgetColor: Colors.transparent),
       child: Checkbox(
         value: controller.cusCb1.value,
         onChanged: controller.onChangedCusCb1,
         activeColor: Colors.transparent,
         checkColor: Colors.white,
         materialTapTargetSize: MaterialTapTargetSize.padded,
        ),
    ),
),