Implementation
Quake III Arena was developed by id Software with the id Tech 3 engine. Unlike most other games released at the time, Quake III Arena requires an OpenGL-compliant graphics accelerator to run. The graphic technology of the game is based tightly around a "shader" system where the appearance of many surfaces can be defined in text files referred to as "shader scripts." Quake 3 introduced spline-based curved surfaces in addition to planar volumes, which are responsible for many of the surfaces present within the game. Quake 3 also provided support for models animated using vertex animation with attachment tags (known as the .md3 format), allowing models to maintain separate torso and leg animations while holding weapons. Other visual features include volumetric fog, mirrors, portals, decals, and wave-form vertex distortion.
In our engine, we use the assimp library to load and process geometry of Quake 3 data formats, that is, the bsp maps and the md3 models. However, there are missing features from the id Tech 3 engine since the library doesn’t read the Quake file shaders, it doesn’t include spline-based curved surfaces and the models neither attach to any weapon nor load animations. In order to overcome these limitations, we have added some modifications in the assimp library using part of the Irrlicht graphics engine code which supports Quake3 shaders and Bezier patches for curved surfaces. Although assimp is not intended to display Quake shader effects, we have added part of Irrlicht code for loading any texture in the shader files. As result, it is replaced the shader effect for a texture with some transparency which our engine loads and apply onto the surfaces.
Regarding to the Quake 3 animated models, the assimp library has implemented an attachment system which decompose a model in multiple parts without any animation data. In addition to the torso, leg and head, we have added attachment to a weapon and also animation data associated to each part of the model. The source code of the changes is available for anyone interested.
When the game starts up, it is loaded an XML level file which contains the map and its actors. The Quake file level is in GameEngineTutorial/Assets/World directory and it defines all of the static actors that the base game logic is responsible to load, that is, the game map and the skybox.
<World name="Bloodrun" >
	<StaticActors>
		<Actor resource="actors\quake\maps\bloodrun.xml" />
		<Actor resource="actors\quake\skies\afternoon_sky.xml" />
	</StaticActors>
</World>
All the actor files contain actor components, particularly, the game map actor components are the physics component which load the bsp map file for collision detection, and the render component for drawing the static mesh level. From the bsp tree, we read two type of geometry for collision detection; The leaf nodes contain primitive shapes called brushes which are restricted to convex shapes just to reduce the complexity of geometry processing. The other type are the curved surfaces which are created as concave shapes using the Bezier algorithm. It is worth noting, that while debugging physics the collision detection is very fast when processing convex shapes. However, there is a delay while processing certain areas with concave shapes that we can only solve by running the game on release mode.
We have stated that the assimp library is responsible for loading Quake 3 levels. They are stored in pk3 files which is a compressed file for storing multiple assets such images, textures, and geometry information that belongs to the level. The MeshFileLoader located in Graphic/Scene/Element/Mesh will create the mesh buffers filled out with the required rendering data for the MeshNode to draw the whole static level. When rendering large meshes such as static environment, it is common to use visibility algorithms to determine which surfaces need to be rendered, so we can optimize the number of vertices and associated data that will be sent to the rendering system. Currently we haven’t implemented any visibility system in the engine, but it is possible to render the scene entirely at an optimal frame rate by using a Texture2Array shader effect which is an array for 2D textures with the same size and format. From the shader side, they are treated as a single resource, and sampling them requires of an extra coordinate that indicates which array element to sample from. Any Quake environment could contain over 20 different texture sizes which can be classified in diffuse with/without transparency. We use the texture size as the extra coordinate required for sampling the texture array and at each level, we create and fill out visual data with mesh buffer vertices, indices and texture. Nowadays graphics cards have enough memory space that can afford to render completely Quake levels using this technique in which we create visual data based on the different texture sizes.
<Actor type="Map" resource="actors\quake\maps\bloodrun.xml">
   <TransformComponent>
	<Position x="0" y="0" z="0"/>
	<YawPitchRoll x="0" y="0" z="0"/>
   </TransformComponent>
   <PhysicsComponent>
        <Shape>BSP</Shape>
        <Density>Infinite</Density>
        <PhysicsMaterial>Normal</PhysicsMaterial>
        <Mesh>art\quake\maps\bloodrun.bsp</Mesh>
   </PhysicsComponent>
   <MeshRenderComponent>
	<Mesh>art\quake\maps\bloodrun.pk3</Mesh>
	<Material type="0" />
   </MeshRenderComponent>
</Actor>
There are four different type of actor components in Quake, BaseFire, BasePickup, BaseTarget and BaseTrigger which define a specific behavior shared among actors of the same type. In the Assets/Actors/Quake folder can be found all the different actors such as, firing and explosion weapon effects, item models which can be picked up, target actors which define spawn positions in the world, trigger actors which are structure elements that let the players access other areas, and the player actors which are represented in any possible view, human controlled, AI or remote. The BaseFire is the base actor component class for projectiles created after firing weapons such as RocketLauncher, GrenadeLauncher or Plasmagun. The BasePickup, BaseTarget and BaseTrigger are the base actor component classes needed for creating all the different actors that belong to a level map in the game-specific load function. This function takes place after parsing the bsp level file, and will spawn all the actors for duel gameplays.
<Actor type="Fire" resource="actors\quake\effects\rocketlauncherfire.xml">
   <TransformComponent>
	<Position x="0" y="0" z="0"/>
	<Scale x="1.0" y="1.0" z="1.0" />
	<YawPitchRoll x="0" y="0" z="0"/>
   </TransformComponent>
   <PhysicsComponent>
        <Shape>Box</Shape>
        <Density>heavy</Density>
        <PhysicsMaterial>Normal</PhysicsMaterial>
        <RigidBodyTransform>
		<Position x="4" y="0" z="0"/>
		<YawPitchRoll x="0" y="0" z="0"/>
		<Scale x="6" y="2" z="2" />
	</RigidBodyTransform>
   </PhysicsComponent>
   <MeshRenderComponent>
	<Mesh>art/quake/models/ammo/rocket/rocket.md3</Mesh>
	<Material type="1" />
   </MeshRenderComponent>
   <RocketFire>
	<Projectile type="4" code="2" explosion="10000" />
   </RocketFire>
</Actor>
The RocketFire class derives from the BaseFire class and represents the firing rocket. This actor component class updates the projectile timing and creates the explosion actor after the internal timing is up. Additionally, it is necessary three more actor components to properly create a firing rocket; The transform component provides the necessary properties to translate, rotate and scale the rocket. The physics component encapsulates the rocket in a colliding box shape with the properties required to freely fly toward the aimed trajectory. The rigid body transform allows us to offset the rocket position, rotation and scale, in order to place it slightly ahead of the rocket launcher muzzle. As we know, the physics system informs to the other system about the changes in the rigid body transform after the simulation, which means that we only need to worry about putting the physics transformation data and let the other systems update from it. The mesh renderer component will load the md3 model with transparent material as the parameters states and it will use the MeshFileLoader to create an AnimatedMeshNode. We have learnt that this node is responsible for drawing animated mesh, skeletal animation and morph target animation, but in this case, it will also draw the md3 model without any animation associated.
<Actor type="Weapon" resource="actors\quake\models\weapon\shotgun.xml">
   <TransformComponent>
	<Position x="0" y="0" z="0"/>
	<YawPitchRoll x="0" y="0" z="0"/>
   </TransformComponent>
   <AudioComponent>
	<Sound>audio/quake/sound/misc/w_pkup.wav</Sound>
	<Looping>0</Looping>
   </AudioComponent>
   <PhysicsComponent>
        <Shape>Trigger</Shape>
        <Density>Infinite</Density>
        <PhysicsMaterial>Normal</PhysicsMaterial>
        <RigidBodyTransform>
		<Position x="0" y="0" z="0"/>
		<YawPitchRoll x="0" y="0" z="0"/>
		<Scale x="16" y="16" z="16" />
	</RigidBodyTransform>
   </PhysicsComponent>
   <MeshRenderComponent>
	<Mesh>art/quake/models/weapons2/shotgun/shotgun.md3</Mesh>
        <Material type="0" />
	<Animator> <Animation type="18" /> </Animator>
   </MeshRenderComponent>
   <WeaponPickup>
	<Weapon type="0" code="1" wait="40000" ammo="10" />
    </WeaponPickup>
</Actor>
The WeaponPickup actor component derives from the BasePickup class and represents the weapon that the player has already picked up in the level. This class along with the other BasePickup derived classes handles the respawn timing of the associated item actor by setting the scene node visibility to true or false depending whether the weapon has respawned or not. Although all the actors which can be picked up represent different kind of items, they contain the same actor components behaving the same way. The audio component contains the audio file which is loaded by the resource manager when the actor is created and will be played whenever the player picks up any weapon item. The physics component creates a ghost trigger which is a box volume defined by the scale parameter of the rigid body with no collision response. Ghost triggers are used to detect which objects entry and exit the containing area. The physics system will inform to the game logic of any object entering or leaving the area so it can decide whether the weapon can be grabbed or not. The mesh renderer component will create an AnimatedMeshNode from the md3 model which is loaded without transparency and will attach a simple rotation animator to the already created node. It is important to distinguish the animated meshes created for skeletal animation or morph target animation from the animators which are attached to the scene node for creating simple animation effects.
<Actor type="Explosion" resource="actors\quake\effects\bulletexplosion.xml">
   <TransformComponent>
	<Position x="0" y="0" z="0"/>
	<Scale x="1.0" y="1.0" z="1.0" />
	<YawPitchRoll x="0" y="0" z="0"/>
   </TransformComponent>
   <BillboardRenderComponent>
	<Material type="1" />
	<Animator type="96" time="600" />
	<Texture>
		art/quake/models/weaphits/bullet1.jpg,
		art/quake/models/weaphits/bullet2.jpg,
		art/quake/models/weaphits/bullet3.jpg,
		art/quake/gfx/colors/black.jpg
	</Texture>
	<TextureColor r="1.0" g="1.0" b="1.0" a="1.0" />
	<TextureSize x="16.0" y="16.0" />
   </BillboardRenderComponent>
</Actor>
The explosion actor is only created to display a graphic effect. The render component creates a billboard node to which it is attached a texture animator and shows a short explosion animation after the projectile has impacted. It can be marks left of the machinegun bullets, spreading pellets of the shotgun, plasma pulses, and grenades or rocket explosions. Similarly, if any player has been hit by a direct impact weapon then it is created an effect which contains short bleeding animation attached to a billboard scene node.
<Actor type="Player" resource="actors\quake\players\player.xml">
   <TransformComponent>
	<Position x="0" y="0" z="30"/>
	<YawPitchRoll x="0" y="0" z="0"/>
   </TransformComponent>
   <PhysicsComponent>
	<Shape>Controller</Shape>
	<Density>glass</Density>
	<PhysicsMaterial>Normal</PhysicsMaterial>
	<RigidBodyTransform>
		<Position x="0" y="0" z="6"/>
		<YawPitchRoll x="0" y="0" z="90"/>
		<Scale x="24" y="24" z="60" />
	</RigidBodyTransform>
   </PhysicsComponent>
   <MeshRenderComponent>
	<Mesh>art\quake\models\players\player\lower.md3</Mesh>
	<Material type="0" />
   </MeshRenderComponent>
</Actor>
As simple as the player XML file may looks, it is by far the most complicated actor implemented. In the game-specific code, it has been created a PlayerActor derived from the main Actor class which defines a character (NPC or human) in the Quake world. The implementation has been ported from the released Quake 3 Arena source code and its entire purpose is to manage characters data such as player states, actions and animations.
The physics component creates a kinematic character controller which the physics simulation automatically computes for dynamic movement. The character is modeled using an upright capsule shape which has the advantage that the lower spherical cap smooths up/down movement when it moves over small obstacles or over stairs. We only need to define their main parameters such as the gravity or the falling speed, the collision flags, and the step-up operation in which the current capsule position changes by a step height amount. During the game we can modify the walk and jump direction and the physics simulation will take care of the movement on the surface for sliding if it is inclined, falling down if there is no contact with the ground, pushing objects by applying impulse to the object or stopping if it hits a wall.
The renderer component will load the md3 model through the MeshFileLoader class. The difference with the other actor’s renderer component is that we are loading an animated md3 model composed by multiple parts of the model, the upper part contains the head, the torso and the weapon, and the lower part is associated to the leg. In the mesh parameter, it is only stated the file of model’s lower part but that is enough because the library will associate that part with the rest of the body in the same directory where the md3 file is loaded. Regardless what type of player we are loading, the naming must be respected since the library will look specifically at the predefined names. Each part of the player model has associated animation parameters used for the AnimatedMeshNode to render the mesh vertices depending on the current animation (see AnimationType enumerator in the PlayerActor class), and the current animation frame calculated based on the frames per second parameter.
    AnimationData md3Animation;
    md3Animation.mBeginFrame = atoi(start.C_Str());
    md3Animation.mEndFrame = atoi(end.C_Str());
    md3Animation.mLoopFrame = atoi(loop.C_Str());
    md3Animation.mFramesPerSecond = (float)atoi(fps.C_Str());
    md3Animation.mAnimationType = atoi(type.C_Str());
    meshMD3->AddAnimation(md3Animation);
Upon any actor creation there is always an ongoing game event, for example, the environment is being loaded or the physics system sends a collision event. The game-specific events defined in QuakeEvents are the main communication between game logic/view and we have included the necessaries for the Quake 3 Arena code to run into our engine. The SpawnActor, MoveActor, FallActor and JumpActor events are sent by the PlayerActor to communicate a change on the player position. The game logic receives these events so it can apply an action on the physics depending on the nature of the event, and if certain conditions have met, it also sends a sound event. Whereas the game view receives these events to update the animation mesh state. It may seem that we are overcomplicating the implementation when we are sending a sound event while dealing with the current action event. Be aware that by doing so, we are letting the system to handle the events separately, instead of generating additional code that would couple the HumanView Audio with the Game Logic. The advantages of working this way is better appreciated when we are developing more complicated games that would require of nested and mixed code from different game system to implement specific mechanics. Such line of development makes the game harder to understand, especially when debugging for fixing any issue, which our game engine would solve by triggering chained events and, therefore, delegating the specific implementations to the responsible subsystems.
The FireWeapon and ChangeWeapon events are also sent by the PlayerActor in the UpdateWeapon method. The process of changing the weapon happens in two phases when the player is not firing. In the lowering phase, the player drops the current weapon and send an event to the human view so it can start the weapon lowering animation. In the raising phase, it is sent an event to the human view to start the new weapon raising animation. Before any weapon fires, it is checked that the player is not changing the weapon and that there is enough ammo to send the firing event to the game logic/view. From the game logic side, all the weapons calculate the weapon muzzle position and orientation from which the projectile will exit, and then call a firing function for the current active weapon. Although every weapon has a unique way to handle the firing action in separated functions, they all follow the same steps. The gauntlet, shotgun, machinegun, railgun and lightning gun are direct impact weapons with different attack range, aiming accuracy and amount of damage. They need to calculate the necessary physics ray collisions within the attack range of the weapon, and some of them add imprecision, specifically the machinegun bullets and shotgun pellets. If there is any hit towards the aiming direction of the weapon, then we create the bleeding actor effect close to the hit point, reduce the target player status after calculating the generated damage, and emit the proper pain sound event. In case that the calculated damage makes the player health status reach zero, the dead actor event is sent to let the human view update the animation. The weapons that create projectile actors need to calculate the direction of the muzzle and the required force to fire a projectile. Afterward the physics system will handle the projectile simulation in the environment and report to the game logic any collision detected with the surface or other players. The rocket and plasma projectiles explode upon any contact or when their inner explosion time is up, and the grenade projectile only when the time is up. At this point the derived BaseFire actor component will create an explosion actor and a splash damage event is sent to the game logic. The splash damage calculates the distance between the player and the explosion position, and if it is within the damage range of the weapon then it proceeds to calculate the damage following exactly the same steps as direct impact weapons.
We can see that there are many game assets which are involved in the construction of actors, such as models, textures and sounds. It wouldn’t be reasonable to load all of them when the player is carrying out an action since that would slow down the performance, neither we want to load the same assets over and over. During the QuakeHumanView class construction, it is registered all the necessary media data in the Resource Cache in order to visualize content for the HUD and in-game actors. As we know, the QuakeHumanView is the main class that interacts with a human player using controller classes that implement the BaseMouseHandler and BaseKeyboardHandler interfaces. The QuakeCameraController class implements these interfaces to record keyboard and mouse events and translate them into commands for a free-fly camera node. Its OnUpdate() method will process the keyboard and mouse state in order to calculate and update the camera transform matrix. The transform matrix is calculated based on the Euler angles which describe the orientation of a rigid body with respect to a coordinate system. In 3-dimensional linear algebra, the orientation is calculated by multiplying rotations about three distinct axis in a certain order. These rotations are also known as yaw, pitch and roll and their angles are defined in the engine as follows:
- Roll is the angle of rotation about the y-axis
- Pitch is the angle of rotation about the x-axis
- Yaw is the angle of rotation about the z-axis
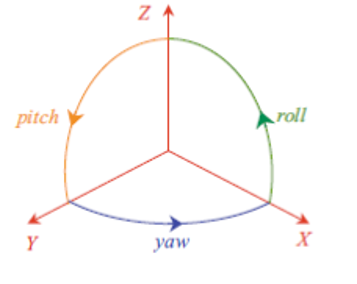
After handling the mouse movement, we can calculate the yaw and pitch rotations as result of the mouse position. The pitch angle is truncated in between -90 to 90 degrees so the camera can look up and down within that range, and the yaw angle has no constraints so the camera can rotate around the z-axis freely.
   mPitch = eastl::max(-89.f, eastl::min(89.f, mPitch));

   // Calculate the new rotation matrix from the camera
   // yaw and pitch (zrotate and xrotate).
   Matrix4x4<float> yawRotation = Rotation<4, float>(
      AxisAngle<4, float>(Vector4<float>::Unit(YAW),
      mYaw * (float)GE_C_DEG_TO_RAD));
   Matrix4x4<float> pitchRotation = Rotation<4, float>(
      AxisAngle<4, float>(Vector4<float>::Unit(PITCH),
      -mPitch * (float)GE_C_DEG_TO_RAD));

   mAbsoluteTransform.SetRotation(yawRotation * pitchRotation);
The transform matrix also contains the translation in world space that we will use to move the camera. From the previously calculated rotation matrix we extract forward, right and up axis vectors. Each vector corresponds to a rotation angle and movement key that we sum up in order to obtain the direction vector. We also need to know how far to move the camera based on the cameras speed multiplied by the elapsed time from the last update.
   float elapsedTime = (float)deltaMs / 1000.0f;

   Vector4<float> direction = atWorld + rightWorld + upWorld;
   Normalize(direction);

   mMoveSpeed = mMaxMoveSpeed;
   direction *= mMoveSpeed * elapsedTime;
   Vector4<float> pos = mCamera->GetAbsoluteTransform().GetTranslationW0() + direction;
   mAbsoluteTransform.SetTranslation(pos);
The QuakePlayerController class implements keyboard and mouse interfaces and generates game commands for the controlled player node. The player transform matrix is calculated exactly the same way as the camera but with the difference that the md3 models swaps the x-axis for the y-axis, and also the rotation matrix for the physics rigid body differs from the player scene node so we have to calculate two different transformations. Unfortunately, the axis swapping for md3 models makes the code confusing as we have to mind about the pitch rotation using the roll axis. We also need to take this into account when calculating the weapon aiming in the QuakeLogic.
   mPitchTarget = eastl::max(-85.f, eastl::min(85.f, mPitchTarget));
   mPitch = 90 * ((mPitchTarget + 85.f) / 170.f) - 45.f;

   // Calculate the new rotation matrix from the player
   Matrix4x4<float> yawRotation = Rotation<4, float>(
      AxisAngle<4, float>(Vector4<float>::Unit(YAW),
      mYaw * (float)GE_C_DEG_TO_RAD));
   rotation = -yawRotation;
   Matrix4x4<float> pitchRotation = Rotation<4, float>(
      AxisAngle<4, float>(Vector4<float>::Unit(ROLL),
      mPitch * (float)GE_C_DEG_TO_RAD));
   mAbsoluteTransform.SetRotation(yawRotation * pitchRotation);

   // update node rotation matrix
   pitchRotation = Rotation<4, float>(
      AxisAngle<4, float>(Vector4<float>::Unit(ROLL),
      mPitchTarget * (float)GE_C_DEG_TO_RAD));
   pTransformComponent->SetRotation(yawRotation * pitchRotation);
For the player movement we don’t need to calculate the up-vector since it only moves on ground except when is falling or jumping in which case it is added the unit vector for the z-axis. Regardless if the player is falling, jumping or moving the direction vector is calculated based on the same principle of direction * speed * elapsed time. The player rotation and movement are updated separately by sending the actor rotation and move events. If the player enters in a teleporter, the controller triggers the TeleportActor event in response to the collision which will send the player instantly to another area of the map. If the player stepped into a jumppad, it will behave as a normal jump to the jumppad target destination with a push force proportional to the distance between the player and the jumppad target. At last, the controller updates the player weapon actions and will send an event after detecting a keyboard or mouse event associated with the weapon action.
The other view implemented is the QuakeAIView for an NPC which manages basic behavior such as moving, attacking and any other kind of action designed in the game. In this game showcase, we will only show an agent which is capable of traverse randomly through the map since we have another project specialized in AI combats (it can be seen in the following repository https://github.com/enriquegr84/GameEngineAI). The OnUpdate() method is the same that the QuakePlayerController regarding to the player actions, but unlike the human view, it will not process the keyboard and mouse state since the AI is controlled by the computer. Instead, the AI will calculate and update the player transform matrix based on the implemented NPC movement behavior.
There are three methods which determine the direction in which the NPC will move; smooth movement, stationary and cliff control. Since the bot doesn’t have any information about the environment, these methods make use of the physics system to know about any potential obstacle or collision in the direction the player is facing, whether ray casting for cliff control or shape casting for body movement.
Stationary. If our position hasn’t changed after some time, we will make the AI player to turn sharply other random direction.
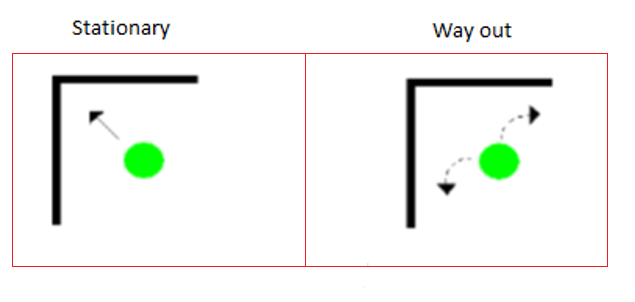
We only need the player position and rotation in order to know if there is any obstacle close to the direction we are moving. If the physics system detects a collision close enough to our player position and we have been under a specific collision distance for 100 milliseconds then we decide that the AI player is stuck and therefore, we will make the AI player turn sharply any random direction.
   ActorId actorId = GameLogic::Get()->GetGamePhysics()->ConvexSweep(
	mPlayerId, start, end, collision, collisionNormal);
   if (Length(collision - position) < 50.f)
   {
      mStationaryTime += deltaMs;
      if (mStationaryTime > 100)
      {
         //Choose randomly which way too look for obstacles
         int sign = Randomizer::Rand() % 2 ? 1 : -1;
         mYaw += 130.f * sign;
      }
   }
else mStationaryTime = 0;Smooth. In order to achieve realistic movements, we translate the character smoothly while traversing the map or turning to avoid obstacles.
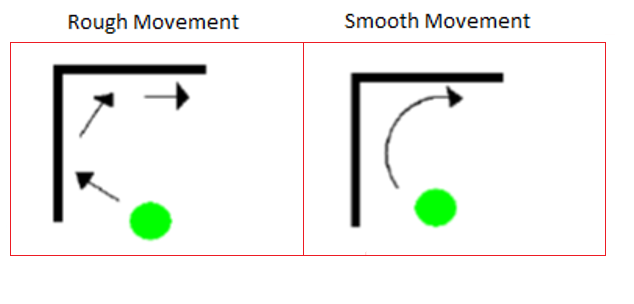
When we are facing a close obstacle, we need to look both sides and determine in which one we are moving forward. First, we choose randomly one way to look for an obstacle, either right or left. Next, we will turn smoothly up to 90 degrees, and for each angle we will check for collisions until we meet an angle which is far enough from the minimum collision distance. If we have met any angle that surpass the minimum collision threshold, then that will be the new direction to move forward. Otherwise, we will look for an obstacle in the other direction.
   int sign = Randomizer::Rand() % 2 ? 1 : -1;
   for (int angle = 1; angle <= 90; angle++)
   {
	rotation = Rotation<4, float>(
		AxisAngle<4, float>(Vector4<float>::Unit(YAW),
		(mYaw + angle * sign) * (float)GE_C_DEG_TO_RAD));

	atWorld = Vector4<float>::Unit(PITCH); // forward vector
	atWorld = rotation * atWorld;

	start.SetRotation(rotation);
	end.SetRotation(rotation);
	end.SetTranslation(mAbsoluteTransform.GetTranslationW1() +
		atWorld * 500.f + scale[YAW] * Vector4<float>::Unit(YAW));

	collision = end.GetTranslation();
	actorId = GameLogic::Get()->GetGamePhysics()->ConvexSweep(
		mPlayerId, start, end, collision, collisionNormal);
	if (Length(collision - position) > 80.f)
	{
           mOrientation = Randomizer::Rand() % 2 ? 1 : -1;
           mYaw += angle * sign;
	   return;
        }
   }
As we are getting close to an obstacle, it is appreciated the smoothness in its movement as the bot turns slowly until it finds a way out. It is worth noting that although we have taken randomly any direction for avoiding an obstacle, the bot keeps turning the same direction for that obstacle. This is due to as we are turning in any direction away from the obstacle, it gets harder to the other direction finding an angle which can surpass the minimum collision threshold.
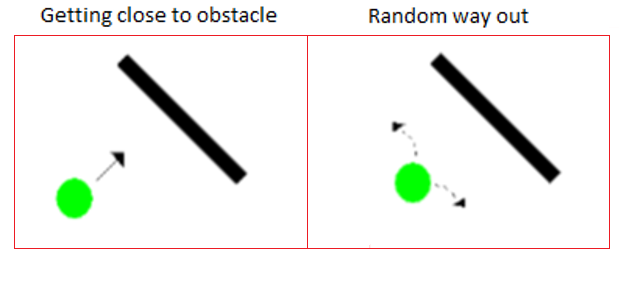
If after detecting any obstacle we couldn’t find any way out, then we let the stationary method to handle the situation. In case we haven’t detected any obstacle then we will simply move forward with a slight deviation of the current trajectory.
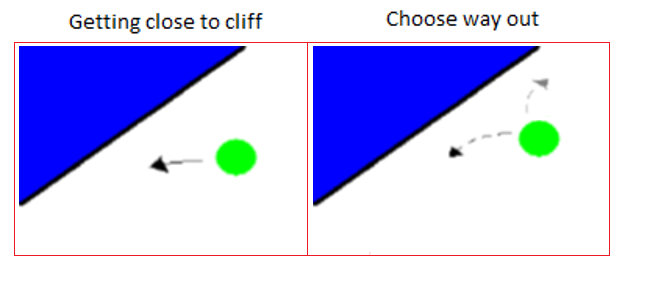
Cliff. How can we be sure that we are heading to a cliff? This question is very tricky because we don’t have any information about the map and we can only rely on the physics system to find out what is beneath the player by using raycasting. In order to solve the problem, we have determined empirically the angle of the ray inclination and the collision distance below the floor. The angle of inclination has been set to a value slightly ahead of looking completely down, so we can look what is ahead but not so far away to not overlook anything. The collision distance has been set to a distance higher enough that it could be considered a steep slope and not just a stair or an inclined surface.
   Matrix4x4<float> rotation = Rotation<4, float>(
	AxisAngle<4, float>(Vector4<float>::Unit(YAW), mYaw * (float)GE_C_DEG_TO_RAD));

   Vector4<float> atWorld = Vector4<float>::Unit(PITCH); // forward vector
   atWorld = rotation * atWorld;

   Vector3<float> position = HProject(
	mAbsoluteTransform.GetTranslationW1() + atWorld * 10.f);

   Transform start;
   start.SetRotation(rotation);
   start.SetTranslation(position);
   Transform end;
   end.SetRotation(rotation);
   end.SetTranslation(mAbsoluteTransform.GetTranslationW1() +
	atWorld * 10.f - Vector4<float>::Unit(YAW) * 300.f);

   Vector3<float> collision, collisionNormal;
   collision = end.GetTranslation();
   ActorId actorId = GameLogic::Get()->GetGamePhysics()->CastRay(
	start.GetTranslation(), end.GetTranslation(), collision, collisionNormal);
   //Check whether we are close to a cliff
   if (abs(collision[2] - position[2]) > 60.f)
Once we have detected that we are heading to a cliff, we need the AI agent to make a realistic turn and avoid falling off. In the implementation, we have applied the same solution of the movement smoothness with the difference that for each angle we cast a ray to detect the cliff threshold, and that we have set conveniently a wider view angle range. As expected, the bot turns smoothly while avoiding to fall off the cliff. The only exception is when the bot needs to turn sharply because it is at the corner of the cliff.
Let’s show an NPC navigating randomly through the map in the following video.
- Video without audio: https://www.youtube.com/watch?v=tkI0Uf7Deko&feature=youtu.be
We have developed a simple Quake game as an example of the game engine usage which show how the architecture works altogether with the three main layers. In its simplicity, we have reviewed most of the game engine components which can still be expanded and enhanced as we add more features to the game. After experimenting with the game, we have come to realize that one of the most important modules which need to be improved is the physics system. Bullet is a great open source physics engine which provides a fully featured real-time physics simulation for games, visual effects, robotics and reinforcement learning. Certainly, we have been able to successfully create a world in Bullet physics with two character controllers which interact with each other and other physics objects such ghost triggers for items, collision boxes for projectiles and collision meshes for the level geometry. Through the game development experience, we can say that overall the system works well, however in comparison with the Havok physics engine in a similar context the results haven’t been satisfactory due to several issues. First of all, the lack of documentation made the process of understanding and dealing with physics issues harder, especially with the character controller. In some occasions, the character controller doesn’t land properly on ground and that makes hard to jump when sliding down on inclined surfaces. In the map, there are narrow parts of the collision geometry which normally any physics engine would let the player slide away or simply ignore it, but Bullet physics treats it as solid walkable ground. At some points in the portal element, the player gets stuck because it doesn’t detect any collision. On rare occasions, it has happened a difficult bug to reproduce in which the game crash after the player collides with concave meshes or after a collision between the two players on the air.
These details lead us to the conclusion that Bullet physics is not stable enough or at least is not prepared for Quake levels. On the contrary, the experience of developing with Havok physics in a similar context were greater as a result of a more stable simulation. Plus, Havok physics performance is significantly better than Bullet physics in the geometry collision detection including raycasting and shapecasting. Unfortunately, nowadays Havok doesn’t offer any free license. Still we can ask for one since this an educational project. Another interesting module which needs to be complete is the network system which would allow us to create a multiplayer game over the Internet.