The following documents detail a 2-hour exercise, in which small teams assemble a prototype of a WiFi controllable "Smart" thermostat. This activity was developed as a team building exercise at a corporate conference to highlight the maker movement and disruptive potential of open source hardware. The vast majority of participants were business executives/MBAs with no technical background. The activity was successfully completed by 10 teams ranging in size from 3-10 members in 60-120 minutes, with light guidance from two facilitators.
The activity was inspired by the Spark team's blog post with an "open source" Nest: http://blog.spark.io/2014/01/17/open-source-thermostat/
Because the activity received very positive feedback, we'd like to release the documents for others to repeat. The forums here at Spark have been incredibly helpful in development of this exercise - we've tried to reference back to specific posts, but likely forgot a few, so please accept our apologies (or, let us know and we will happily add a link).
We kicked off the activity with a ~10 minute PowerPoint presentation. Apologies for the poor formatting, it is an artifact of removing our company's branding. I am happy to speak privately about the talk track.
Each ~10 person team was given a 12 page instruction manual. We suggested that the team's split themselves into a "hardware" and "software" group. Progress was checked at 5 "checkpoints", where teams were measured on speed to completion.
Pre-written code was provided to each team. The code corresponds to the checkpoints in the instruction manual & requires a few easy changes to be made by each team.
A HTML5 / JavaScript based interface allowed each team to view the status of / control their thermostat. It is based on the recently released SparkJS library. It was hacked together quickly, so I'm sure my CS professor wouldn't be so proud of the code quality ;) I've flagged several places for future TODOs if anyone is so inclined.
As mentioned above, it was a contest to see which team could get to each checkpoint first. To track this, in the pre-written code, a line in the setup() routine published an event to the Spark API with the team's current status. While easily "hacked" and by no means the most elegant solution, it worked for our purposes. An HTML file listened for the published event & displayed the timestamp for each checkpoint -- we projected this. An (unfortunate) limitation of this HTML file is that if you refresh the page, all timestamp data is cleared.
To overcome this limitation, a node.js application listened for the same event & logged timestamps to a CSV file. The included Excel file allows simple processing of this data to determine a winner. Instructions for getting node.js working on Windows can be found here: https://community.spark.io/t/tutorial-spark-cli-on-windows-01-oct-2014/3112
- Live_Status_Page.html: HTML5 / JavaScript page that listens for each checkpoint & displays timestamps on screen (Based on: http://community.spark.io/t/multiple-cores-publishing-to-one-web-page/4161)
- Example_Live_Results.html: Example of what the live status page could look like post exercise
- eventLogger.js: Node.JS application to log the timestamps for each checkpoint (Based on https://community.spark.io/t/spark-publish-nodejs-and-eventsource-solved/3901/2)
- Score Calculator and Dashboard vPublic.xlsx: Excel tool to post-process data from eventLogger.js
To avoid potential issues and simplify, each Spark was pre-configured to a unique account & configured with a local WiFi network (instructions for how to do this can be found in the Spark documentation http://docs.spark.io/connect/). The Spark team suggested that we use a 2.4Ghz only (e.g., turn off 5Ghz) 802.11b / g only access point with WPA2. The access point was configured on an otherwise unused channel (e.g., at the conference center, we had IT turn off all other WiFi networks on the channel used).
Each team needs the following components. Note, the Adafruit LED matrixes require a small amount of soldering (<5 mins / kit). As well, we soldered wires to the buttons for simplicity, but you could also use wire with quick connects or similar.
A basic Fritzing diagram is included. It is for visual display only, so we only built out the breadboard tab. We opted to not share this with participants as we thought it would be "too easy." Our helpers had this in hand when they walked around the session in case a team was struggling - although it turned out this was unnecessary.
- (1) Spark Core: https://www.spark.io/
- (2) LED display - red: http://www.adafruit.com/products/870
- (1) LED display - green: http://www.adafruit.com/products/872
- (1 bundle) Wire bundles: http://www.adafruit.com/products/153
- (1) Cooling button: http://www.adafruit.com/products/481
- (1) Heating button: http://www.adafruit.com/products/559
- (1) USB power: http://www.adafruit.com/products/501
- (1) Temp sensor: http://www.adafruit.com/products/165
- (1) Capacitor (10000 pf): http://www.digikey.com/product-detail/en/K103K15X7RH5TL2/BC1111CT-ND/286733
- (1) Motion sensor: http://www.parallax.com/product/28033
- (15 cables) Jumper cables: Either one works, but the parallax ones have a slightly tighter fit around the LED jumper pins: http://www.parallax.com/product/800-00047 or https://www.adafruit.com/products/824
- (2) 10k ohm resistor: Purchased as part of this kit: https://www.sparkfun.com/products/10969, but any resistor will work!
- (1) 220 ohm resistor: Purchased as part of this kit: https://www.sparkfun.com/products/10969, but any resistor will work!
- (optional): USB power source, required if your participants will not have laptops to plug the Sparks into
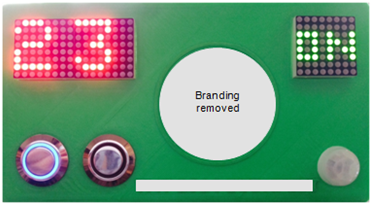
Each team was provided a 3D printed "faceplate" in which all components could be inserted. We opted to have attendees super glue the components in place vs. "perfectly" engineer the faceplate. For the demonstration unit, we designed a box that enclosed the entire device - great for a "wow" factor. We used a LulzBot TAZ 4, which we would recommend, primarily due to their support team going above & beyond in helping us setup / configure the printer.
In case it helps someone, we included a version of the "faceplate" that has the beginnings of more "perfect" engineering but it is completely untested & currently not very 3D printer friendly.
The STL & Autodesk Inventor files are available.
- Cover_Split_Top-vPublic: "Faceplate" provided to each attendee (note - we embossed our conference name / logo but have removed here - https://github.com/epec254/Thermostat_Conference/blob/master/07%20Thermostat%20enclosure/Cover_Split_Top-vPublic.png)
- Cover_Split_Bottom-vPublic: Bottom of the "faceplate" to make it snap into the top of the box (printed separately and "acetone glued" to the top)
- Box_Square_Bottom v3: Box to enclose entire device, note that it does not fit a power source and requires you to shorten all wires (just used for the demo unit - https://github.com/epec254/Thermostat_Conference/blob/master/07%20Thermostat%20enclosure/Box_Square_Bottom%20v3.png)
- Cover_Split_Bottom-Needs Support Material vPublic: More "engineered" but completely untested bottom for the "faceplate"