
Hello👋, I am Andrejs
I am a passionate data scientist and ML engineer on a continuous journey of learning by doing, and this is my MLOps portfolio project for the MLOps Data Engineering course.

Any eCommerce company acquires, transforms and stores lots of data about their customers behavior while they are browsing, purchasing, paying for the products, etc. All information is collected real-time. To improve such business metrics as customer retention, conversion rate, average purchase and others it is crucial to regularly perform business analysis of collected information, propose improvements and act upon them.
This analysis may involve customer churn prediction, clustering, modeling the effectof new features, identifying patterns in their actions online, calculating predefined metrics and tracking their change in time,…
This particular dataset comes from Kaggle:
eCommerce Events History in Cosmetics Shop
Raw data is split by one month per file and covers 5 months (Oct 2019 – Feb 2020). Each row in the file represents an event. All events are related to products and users. Each event is like many-to-many relation between products and users.
| Property | Description |
|---|---|
| event_time | Time when event happened at (in UTC). |
| event_type | purchase / cart / view / remove_from_cart / purchase |
| product_id | ID of a product. |
| category_id | Product's category ID. |
| category_code | Product's category taxonomy (code name) if it was possible to make it. Usually present for meaningful categories and skipped for different kinds of accessories. |
| brand | Brand name. Can be missing. |
| price | Float price of a product. |
| user_id | Permanent user ID. |
| user_session | Temporary user's session ID. Same for each user's session. Is changed every time user come back to online store from a long pause. |
Develop an end-to-end data ingestion, processing and analysis pipeline including a dashboard for users to perform advanced analytics and prediction models. Namely:
- Copy data from the data source (Kaggle) to the data lake (Google Cloud Storage)
- Copy data from the data lake to the data warehouse (BigQuery)
- Transform and produce interesting data from the staging-data, and store them in development/production-data (using DBT)
- Create a custom dashboard to display some of the information stored in the production-data.
- Terraform: to pre-configure GCP
- Google Cloud Platform:
- Google Cloud Storage for the Data-lake
- Big Query for the Data-warehouse.
- Google Compute Engine (Virtual Machine)
- Python
- Prefect for orchestrating data ingestion to the Data Lake and Data Warehouse
- Data Build Tool (dbt) ****to transform data and create new high-level tables
- Google Looker Studio: create and host dashboards and reports.

Prerequisites:
- www.gmail.com account
- www.kaggle.com account
- www.getdbt.com account
https://console.cloud.google.com/projectcreate


Necessary access rights: storage admin, bigquery, storage object admin


Create an API key for the service account.

Save generated key as json file: ecommerce-behavior-381716-8015d2562308.json
Put generated file somewhere, but make sure not to commit it accidentally to your repo (add to .gitignore). Later we will copy these credentials to the VM.

Go to Compute Engine API and enable it if not active yet.

Create a new VM. I called the VM vm-ecommerce-behavior.
Choose suitable compute resources (≥8 Gb RAM), region\zone.

Setup the boot disk:
💡 Operating system: Ubuntu Version: Ubuntu 20.04 LTS Boot disk type: Standard persistent disk Size: 40GB

https://cloud.google.com/compute/docs/connect/create-ssh-keys
In the terminal run:
ssh-keygen -t rsa -f KEYFILE_NAME -C USER_NAME -b 2048
ssh-keygen -t rsa -f gcp -C fn -b 2048
This will create a public (gcp.pub) and private (gcp) key-files in your ~/.ssh directory


Go to the VM, check the check box and press start if it's not already running. Copy the External IP address that is displayed once it starts: 34.141.225.195

You can then create a config file in your .ssh directory and add the following entry:
Host <name to use when connecting
    HostName <public IP address>
    User <User name you chose when running the ssh-keygen command>
    IdentityFile /home/<local user name>/.ssh/<your private key>
Host ecommerce
HostName 34.141.225.195
User fn
IdentityFile C:\Users\320188473\.ssh\gcp-ecommerceNow you can run ssh ecommerce in your terminal to connect to the VM.
VS code has built-in functionality to do port forwarding and code in the remote environment via SSH
https://code.visualstudio.com/docs/remote/ssh
Open and run the following ssh commands in separate powershell windows (one per port)
ssh -i ~/.ssh/PRIVATE_SSH_KEY -L PORT_LOCAL:localhost:PORT_REMOTE USER_NAME@EXTERNAL_IP
ssh -i ~/.ssh/gcp-ecommerce -N -L 4200:localhost:4200 fn@34.141.225.195
This method is not persistent, exists only while cmd is open. To make it persistent either use some ssh flag, and then kill the ssh process every time to reset port forwarding. Or go for another option.
First need to convert SSH keys to the PuTTy format
Puttygen > Import Key > select private key >saveprivate key > name : *_ppk.ppk


git clone [https://github.com/fluentnumbers/ecommerce_behavior.git](https://github.com/fluentnumbers/ecommerce_behavior.git)
- Kaggle credentials for the dataset access
Go to your kaggle account settings and download a token as kaggle.json

locally cd to the folder with kaggle.json
sftp ecommerce (or your hostname in .ssh/config)
put kaggle.json ecommerce_behavior/credentials/kaggle.json transfer the files
chmod 600 /home/fn/ecommerce_behavior/credentials/kaggle.json (mind that fn is the username)
- GCP credentials
locally cd to where you stored your GCP service account credentials file ecommerce-behavior-381716-8015d2562308.json.
sftp ecommerce (or your hostname in .ssh/config)
put ecommerce-behavior-381716-8015d2562308.json ecommerce_behavior/credentials/ecommerce-behavior-381716-8015d2562308to transfer the files to the .gc directory.
exit and ssh ecommerce again
sudo apt-get update
sudo apt-get install make -y
sudo apt-get install wget
wget https://repo.anaconda.com/archive/Anaconda3-2022.10-Linux-x86_64.sh
bash Anaconda3-2022.10-Linux-x86_64.sh
source .bashrc or log out \ log in to the VM.
Go to the ecommerce_behavior.env_sample, copy and rename it to .env (git ignored) **and check the file for necessary changes, but at the very least you need to adjust:
# CHANGE_THIS
GCP_PROJECT_ID=ecommerce-behavior-381716
# CHANGE_THIS
GCP_CREDENTIALS_PATH=/home/fn/ecommerce_behavior/credentials/ecommerce-behavior-381716-8015d2562308.json
# CHANGE_THIS
GCP_BUCKETNAME=ecommerce_ecommerce-behavior-381716
# CHANGE_THIS
GCP_REGION=europe-west4
After all is set:
cd ecommerce_behavior
pip install -r requirements.txt
make vm_setup installs terraform, sets environmental variables and GCP auth
cd ecommerce_behavior
make terraform_setup init, plan and apply IaC
You should see lots of outputs


gcloud auth application-default login and follow instructions to authorize

cd ecommerce_behavior
make prefect_start_ui
You can now access Prefect UI in your http://localhost:4200/ (if the port 4200 is forwarded properly)
Switch to another terminal window
make prefect_create_blocks blocks are created: http://localhost:4200/blocks
make prefect_build_deployment
make prefect_agent_start
Switch to another terminal window
make prefect_run_web2gcp
Raw data converted to .parquet should appear in the GCP bucket:

Wait until it is finished copying files to GCP.
make prefect_run_gcp2bq
Same data joined into one table should appear in your BigQuery:

Create a project ecommerce with Project subdirectory dbt:

Select BigQuery as a Database Connection:

Upload GCP service account ecommerce-behavior-381716-8015d2562308.json file:

Define the name for the BigQuery dataset where the development results will appear: dbt_dev ****(or whatever is set in our .env file)

When later DBT models are run in development environment, this dataset will be created (if not existing already). Though, it will be created with default Region and other settings, so it is recommended to pre-create a dbt_dev dataset in BQ in the same location as the original dataset with data (europe-west4). If make terraform_setup step was done correctly, then the dataset already exists.

Select git clone and paste the SSH key git@github.com:fluentnumbers/ecommerce_behavior.git from the repo.

You will get to see a deploy key, copy it and head to your Github repo >> settings tab>>Security>>Deploy keys. Add the copied key and check the mark “Allow write access”:

Go to DBT, change branch to dbtdev and start developing additinal models if needed. Current models are quite simplistic as the focus was not on the data analytics, but on the DE part. There is table partitioning step by month and clustering by user-id. It seems that total queries execution time improves, but can be that not all queries benefit from partitioning.

We configured the development environment such that commands like dbt build and dbt run will create new entities inside the dbt_dev dataset inside the BQ. Once the development is done we would like to execute (scheduled) jobs only for the queries relevant for the end user, that is in Production environment.
Therefore we create a Deployment environment in Deploy>>Environments and the outputs will be stored into the dbt_prod (or whatever is set in our .env file) ****dataset. Same as for the development it is better to pre-create the dataset in BQ. If make terraform_setup step was done correctly, then the dataset already exists.
By default deployment runs are executed for the main branch, so make sure to merge necessary changes from the development.

Also create a deployment job in Deploy>>Jobs>Create Job: Select Production environment, dbt build as a command, press Save.
Deploy>>Jobs>>Create job

One can now trigger the job manually, using predefined schedule, etc.
Go to Deploy>>Jobs and run “Production run”. Once the job is finished successfully you should see new tables in your BigQuery dbt_prod dataset.

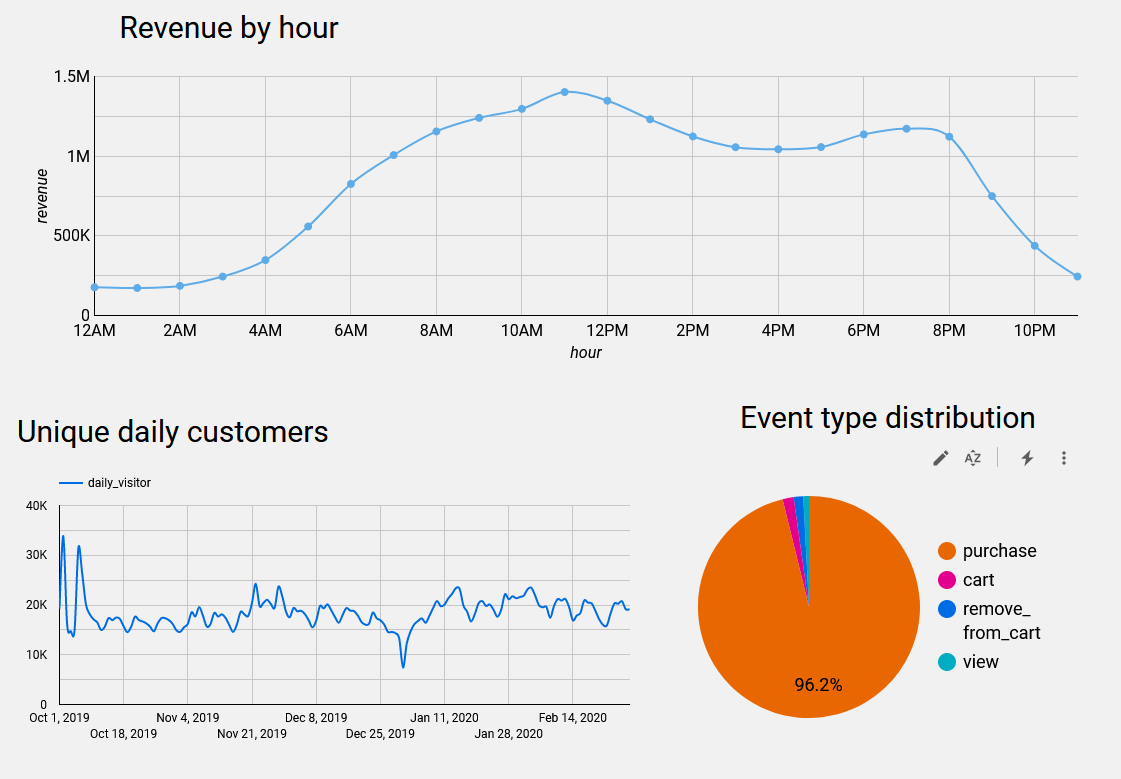
Go to https://lookerstudio.google.com/, authorize BigQuery usage and compose a dashboard from available tables.
Mine draft dashboard is available here: https://lookerstudio.google.com/reporting/8b14d1fc-321b-4987-93f7-66d895a4394c
- Perform more meaningful analysis of the data with multiple inter-dependent DBT models (this project work was focused on DE practices and tools)
- Automate project and VM creation (can be done from a local machine using Google CLI, before establishing remote connection)
- Dockerize all steps (docker-compose up it using makefile)
- Explore the potential of Prefect + DBT binding
- Dashboard in Dash + hosting on Heroku\Fly.ai with more advanced graphs (following more advanced analysis)