


- Introduction
- prerequisites
- Usage
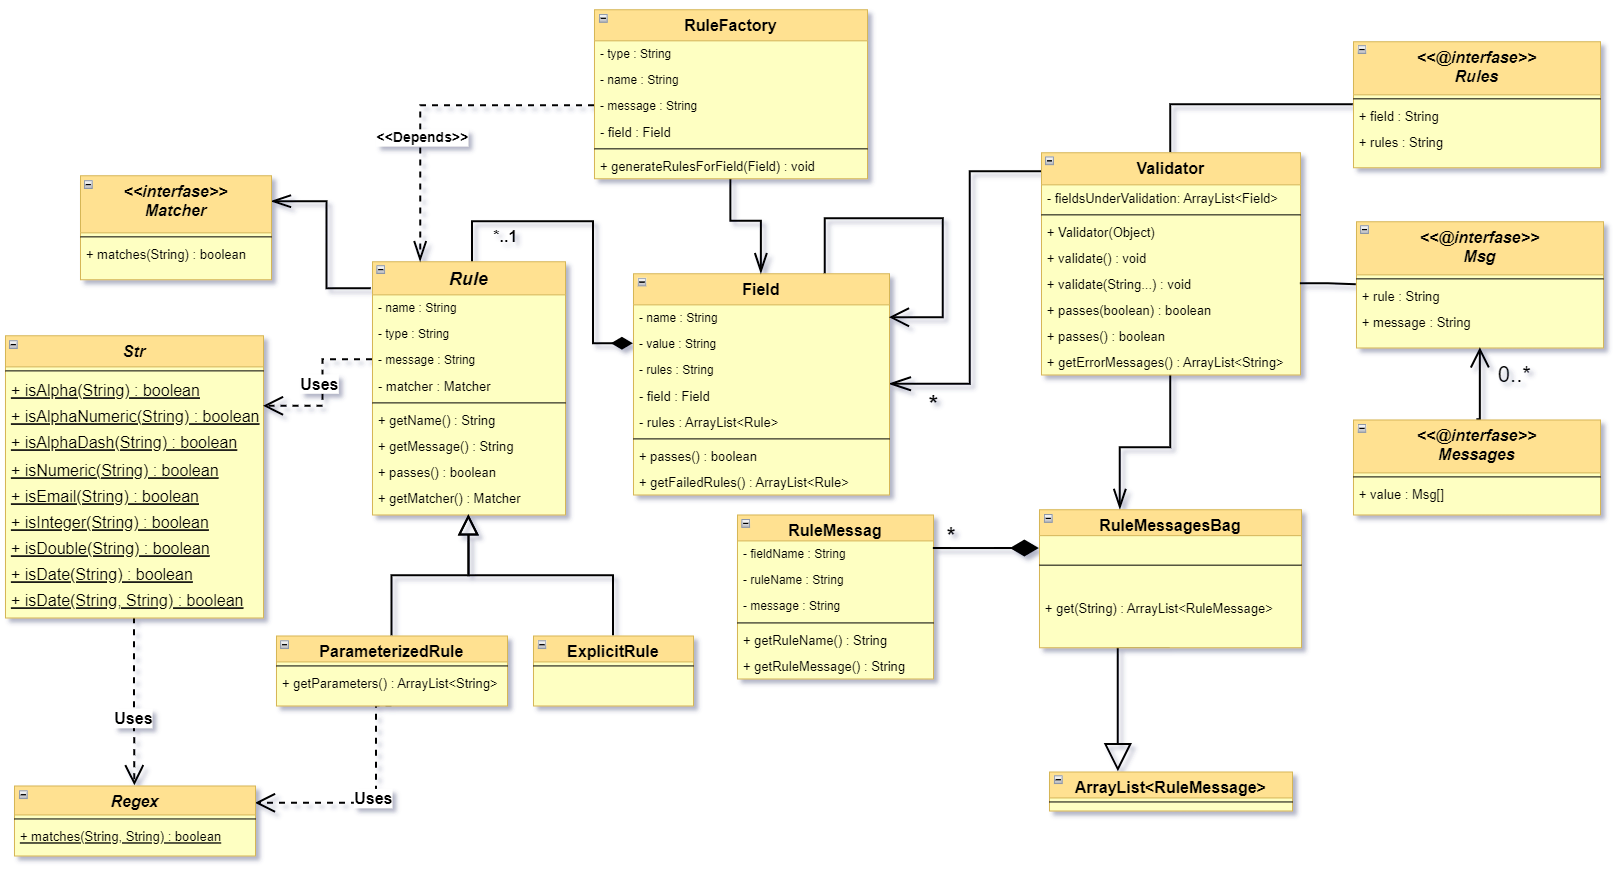
- Class Diagram
- Changelog
- Contributing
- Security Vulnerabilities
- Credits
- License
girover/javaFxValidation is a powerful package that enables you to effortlessly validate all JavaFX inputs.
With this package, you can easily validate text fields, checkboxes, radio buttons, and other input types without the need to write complex validation code from scratch.
One of the benefits of using this package is that it helps to save a significant amount of time and effort.
You don't need to worry about writing long validation code, as the package provides pre-built validation rules that you can easily apply to your input fields.
Additionally, girover/javaFxValidation is highly customizable, allowing you to tailor your validation rules to meet the specific needs of your project.
You can define your own validation rules, such as specifying the minimum and maximum length of a text field, or requiring that a checkbox be checked before a form can be submitted.
In summary, girover/javaFxValidation is an excellent package that simplifies the process of validating JavaFX inputs.
Whether you're building a small application or a complex project, this package can help you save time and reduce the risk of errors in your input validation code.
- Java
- Ms SQL Server
- JavaFx
Suppose you have a controller that includes some javaFX components such as TextFields, and you need to validate the input values entered by the user.
To accomplish this, you can pass the controller to the constructor of a Validator object.
Once you have done this, you can call the validate() method, or the validate(field1, field2, ...) method if you only need to validate certain fields.
This will ensure that the input values are checked against any validation rules you have defined by @Rules annotation, and will provide appropriate feedback to the user if any errors are found.
import javafx.scene.control.TextField;
import javaFxValidation.Validator;

public class MainController {

    @FXML
    private TextField name;

	public void onClickBtnSave(ActionEvent event) {
		try{
			// Create instance of javaFXValidation.Validator
			Validator validator = new Validator(this);
			// Start validation
			validator.validate();

		}catch(ValidationException e){
			System.out.println(e.getMessage);
		}

	}
}
The code shown above creates an instance of the Validator class.
However, since no rules have been assigned to the field that needs validation, the code will not perform any validation checks.
It is essential to define the validation rules before calling the validate() method to ensure that the input value is checked against the rules defined for the specific field.
By assigning appropriate validation rules to each field, you can ensure that your application only accepts valid input and provides appropriate feedback to the user if any errors are found.
In order to initiate field validation using validator, there are two important steps to follow.
The first step is to add the @Rules annotation to the fields that you want to validate. This annotation requires two values: the first is field, which is the name of the field, and the second is rules, which is a string containing all the rules that you want to apply to this field.
For more information on how to write rules, refer to the Writing Rules section.
The second step is to call either the validator.validate() method or the validator.validate(field1, field2, field3, ...) method.
The former method will validate all fields that have been annotated with @Rules in the controller, whereas the latter method will only validate the fields that you specify as arguments (i.e. field1, field2, field3, etc.), provided that they have been annotated with the @Rules annotation.
By following these steps, you can ensure that your JavaFX inputs are thoroughly validated against the rules that you have defined, providing your users with accurate and helpful feedback when necessary.
Look at this example:
import javafx.scene.control.TextField;
import javaFxValidation.Validator;
import javaFxValidation.annotations.Rules;

public class MainController {

    @FXML
    @Rules(field="user name", rules="required")
    private TextField name;

	public void onClickBtnSave(ActionEvent event) {
		try{
			Validator validator = new Validator(this);
		}catch(ValidationException e){
			System.out.println(e.getMessage);
		}

	}
}
Note It's important to note that the field name specified in the
@Rulesannotation doesn't have to be the same as the variable name.
This means that you can apply validation rules to any field in your JavaFX controller, regardless of how it is named.
In the example shown, we have added the @Rules annotation before the field name and specified a name for the field using the field attribute (in this case, "user name").
We have also specified the validation rules to apply to the field using the rules attribute, with the value "required" indicating that the field is mandatory. All available rules.
After the validator has validated the desired fields, you can check whether they have passed the validation rules or not by calling the pass() method or the pass(boolean) method.
The pass() method returns a boolean value indicating whether all of the validated fields have passed their respective rules or not.
The pass(boolean) method takes a boolean argument, which specifies whether to stop validating on the first failure or not.
If the argument is true, the validation will stop on the first failure, otherwise, it will continue validating all the fields annotated with @Rules.
By using these methods, you can easily determine whether your JavaFX inputs are valid or not, and provide appropriate feedback to your users as needed.
	if(validator.pass())
		System.out.println("all fields are valid");
	else
		System.out.println("Failed to pass all rules");
The pass() and pass(boolean) methods generate error messages for all rules that the field does not pass.
This is useful for providing users with specific feedback on what data they entered incorrectly and what needs to be corrected.
Example
	boolean stopOnFirstFailure = true;
	if(validator.pass(stopOnFirstFailure))
		System.out.println("all fields are valid");
	else
		System.out.println("Failed to pass all rules");
. . .
The javaFxValidation package uses two types of rules: explicit and parameterized.
Explicit rules do not accept parameters, while parameterized rules do.
As mentioned in the Validator class section, rules are passed via the @Rules annotation as a string.
However, this string has a specific format: rules are separated from each other using the | character.
For example, to validate that an email field is required and must be a valid email address, you can use the following code:
    @FXML
    @Rules(field = "email", rules = "required|email")
    TextField email;
In the example above, the field email has two rules to pass: required and email.
required means that the value of this field cannot be null or empty, while email means that the value of this field must be a valid email address.
You can specify as many rules as you need for a field in a single string, separated by the | character.
But what if a rule requires parameters? It's straightforward to pass parameters to a rule by using the : character between the rule name and the parameters.
For example, @Rules(field = "name", rules = "required|min:2|max:20") means that the name must be provided because of the required rule, and the length of the name must be between 2 and 20 characters due to the min and max rules, respectively.
Some rules accept multiple parameters, such as the in rule, which checks if a value is in a list of allowed values.
To specify multiple parameters for a rule, use the , character between parameters.
For example, @Rules(field = "user role", rules = "required|in:admin,student,teacher") means that the user role must be one of the allowed values: admin, student, or teacher.
Note By default, all fields are considered optional, which means that no rules will be applied to them if their values are null or empty strings. However, if you use the required rule, then the value cannot be null or an empty string, and all other rules will also be applied.
Take a look at this example:
import javaFxValidation.Validator;

public class MainController {

    @Rules(field="user name", rules="length:10")
    private String name = "";

	public void onClickBtnSave(ActionEvent event) {

		try {
			Validator validator = new Validator(this);
			validator.validate();

			if(validator.pass())
				System.out.println("Passed successfully");

		} catch (ValidationException e) {
			e.printStackTrace();
		}
	}
}
The value of the name field is an empty string and the required rule is not specified, then the length:10 rule will not be applied to the name field.
But if the value of name is not empty, then the length:10 rule will be applied and an error message will be generated if the value is not exactly 10 characters long.
| # | Exlpicit Rules (Do not take Parameters) | Parameterized Rules (Accepts parameters) |
|---|---|---|
| 1 | required |
digits |
| 2 | alphaNumeric |
between |
| 3 | alphaDash |
in |
| 4 | numeric |
notIn |
| 6 | email |
max |
| 7 | date |
min |
| 8 | boolean |
digits_max |
| 9 | digits_min |
|
| 10 | length |
|
| 11 | length_max |
|
| 12 | length_min |
|
| 13 | gt |
|
| 14 | gte |
|
| 15 | lt |
|
| 16 | lte |
|
| 17 | equal |
|
| 18 | format |
|
| 19 | regex |
|
| 20 | same |
This rule checks that the field is not null or an empty string. ⬆️
	@FXML
	@Rules(field = "name", rules = "required")
	private TextField nameField;
This rule checks that the field only contains alphabetic and numeric characters. ⬆️
Note This cann't accept spaces
	@FXML
	@Rules(field = "user name", rules = "alphaNumeric")
private TextField usernameField;This rule checks that the field only contains alphabetic, numeric, hyphen, and underscore characters. ⬆️
Note This cann't accept spaces
	@FXML
	@Rules(field = "username", rules = "alphaDash")
private TextField usernameField;This rule checks that the field only contains numeric characters. ⬆️
	@FXML
	@Rules(field = "age", rules = "numeric")
private TextField ageField;This rule checks that the field contains a valid email address. ⬆️
	@FXML
	@Rules(field = "email", rules = "email")
private TextField emailField;This rule checks that the field contains a valid date in the dd/mm/yyyy format. ⬆️
	@FXML
	@Rules(field = "dob", rules = "date")
private TextField dobField;This rule checks that the field contains a boolean value (true or false). ⬆️
	@FXML
	@Rules(field = "isRegistered", rules = "boolean")
private CheckBox isRegisteredField;The field under validation must be a numeric value containing only digits and must match the given length. ⬆️
	@Rules(field = "age", rules = "digits:2")
TextField age;The field under validation must have a size between the given min and max. Strings and numerics are evaluated in the same fashion as the size rule. ⬆️
	@Rules(field = "score", rules = "between:0,100")
TextField score;The field under validation must be included in the given list of values. ⬆️
	@Rules(field = "user role", rules = "in:admin,editor,contributor")
TextField role;The field under validation must not be included in the given list of values. ⬆️
	@Rules(field = "role", rules = "notIn:admin,editor")
TextField role;The field under validation must be less than or equal to a maximum value. ⬆️
	@Rules(field = "age", rules = "max:60")
TextField age;The field under validation must be greater than or equal to a minimum value. ⬆️
	@Rules(field = "age", rules = "min:18")
TextField age;The field under validation must be a numeric value containing only digits and must not exceed the given length. ⬆️
	@Rules(field = "phone", rules = "digits_max:10")
TextField phone;The field under validation must be a numeric value containing only digits and must not be less than the given length. ⬆️
	@Rules(field = "phone", rules = "digits_min:6")
TextField phone;The field under validation must have a length equal to the given length. ⬆️
	@Rules(field = "username", rules = "length:8")
TextField username;The field under validation must not exceed the given length. ⬆️
	@Rules(field = "password", rules = "length_max:20")
TextField password;The field under validation must be at least the given length. ⬆️
	@Rules(field = "password", rules = "length_max:20")
TextField password;This rule validates that the value of the field is greater than a given value. ⬆️
	@Rules(field = "age", rules = "required|gt:18")
TextField age;This rule validates that the value of the field is greater than or equal to a given value. ⬆️
	@Rules(field = "age", rules = "required|gte:18")
TextField age;This rule validates that the value of the field is less than a given value. ⬆️
	@Rules(field = "age", rules = "required|lt:18")
TextField age;This rule validates that the value of the field is less than or equal to a given value. ⬆️
	@Rules(field = "age", rules = "required|lte:18")
TextField age;This rule checks whether the value of a field is equal to a given value. It can be used with both numeric, char, boolean, and string values. ⬆️
	@Rules(field = "accept conditions", rules = "required|equal:true")
CheckBox acceptConditions;The rule is used to ensure that a given field matches a specific date format.
This rule takes one parameter: the desired date format. The format parameter should be a valid date format string that is supported by the SimpleDateFormat class in Java.
Here is an example of using the format rule to validate a date field named dateOfBirth that must be in the format dd-mm-yyyy:
	@FXML
	@Rules(field = "dateOfBirth", rules = "required|format:dd-mm-yyyy")
	TextField dateOfBirth;
In this example, the required rule ensures that the dateOfBirth field is not null or empty. The format: dd-mm-yyyy rule ensures that the dateOfBirth field matches the specified format.
This rule validates that the value of the field under validation is the same as the value of another field.
It is useful when you need to confirm that two fields have the same value, such as password and password confirmation.
	@FXML
	@Rules(field = "password", rules = "required|min:8|max:25")
	TextField password;

	@FXML
	@Rules(field = "confirm password", rules = "same:password")
TextField confirmPassword;The regex rule is used to validate a field against a regular expression pattern.
It takes one parameter which is the regular expression pattern that the field's value should match.
Here is an example of how to use the regex rule with a regular expression pattern to validate a field called phone:
	@FXML
	@Rules(field = "phone", rules = "regex:^\\(\\d{3}\\)\\s\\d{3}-\\d{4}$")
	TextField phone;
In this example, the phone field will be validated against the regular expression pattern ^(\d{3})\s\d{3}-\d{4}$, which matches US phone numbers in the format (XXX) XXX-XXXX.
If the value of the phone field does not match the regular expression pattern, an error message will be generated.
After calling the pass() method, you can retrieve all error messages by calling the getErrorMessages() method.
This method returns an ArrayList containing all error messages generated during the validation process.
You can then use these error messages to inform the user of any validation failures and prompt them to correct their input.
Let us take a look at an example.
import javaFxValidation.Validator;

public class MainController {
	@rules(field = "name", rules = "length:10")
	private String name      = "yourName";

	@rules(field = "birth date", rules = "required|format:dd-mm-yyyy")
	private String birthDate = "01/01/1990";

	@rules(field = "CPR", rules = "required|digits:10")
	private String CPR       = "123456789";

	@rules(field = "email address", rules = "required|email")
	private String email     = "example@domain@com";

	public void onClickBtnSave(ActionEvent event) {

		try {
			Validator validator = new Validator(this);
			validator.validate();

			if(validator.pass())
				System.out.println("Passed successfully");
			else
				for(String errorMessage : validator.getErrorMessages())
					System.out.println(errorMessage);
		} catch (ValidationException e) {
			e.printStackTrace();
		}
	}
}
The result of this code will be:
The length of name must be 10.
The date format of birth date must be dd-mm-yyyy.
The CPR Field must be 10 digits.***
The email address must be a valid email address.
The example in the previous section shows default error messages that are generated when a rule is violated.
However, you can customize the error messages for any rule on any field by using the @Msg annotation.
This annotation allows you to specify the name of the rule and the message you want to display in case of a violation.
For example, if you want to change the error messages for the field emailAddress:
	@Rules(field = "email address", rules = "required|email")
	@Msg(rule = "required", message = "We need your email address. Please provide it.")
	@Msg(rule = "email", message = "Please type a valid E-mail address.")
	private TextField emailAddress;

	public void onClickBtnSave(ActionEvent event) {
		try {
			Validator validator = new Validator(this);
			validator.validate();

			if(validator.pass())
				System.out.println("Passed successfully");
			else
				for(String errorMessage : validator.getErrorMessages())
					System.out.println(errorMessage);

		} catch (ValidationException e) {
			e.printStackTrace();

		}
	}
The result of this code will be:
We need your email address. Please provide it.
Please type a valid E-mail address.
Suppose you have an entity class called User that represents a user in your application.
The User class has several fields such as name, email, password, and age.
To ensure that the data entered by the user is valid, you want to apply some rules to these fields.
You can use the @Rules annotation to define the rules for each field.
For example, to ensure that the name field is required and has a minimum length of 2 characters.
Similarly, to ensure that the email field is required and has a valid email format.
	public class User {
    		@Rules(field = "name", rules = "required|min:2|max:20")
   		private String name;

    		@Rules(field = "email", rules = "required|email")
    		private String email;

    		@Rules(field = "age", rules = "required|numeric")
    		private int age;

    		@Rules(field = "password", rules = "required|alphaDash|min:8|max:30")
    		private String password;

    		// constructor, getters and setters
	}
Once you have defined the rules for all fields, you can create an instance of the Validator class passing in an instance of the User class that you want to validate.
	User user = new User("John Doe", "johndoe@example.com", "password123", 25);
	Validator validator = new Validator(user);
	validator.validate();

	if (validator.pass(true)) {
    		// No validation errors, proceed with saving the user
    		userRepository.save(user);
	} else {
    		// Validation errors occurred, display them to the user
    		for (String message : validator.getErrorMessages()) {
        		System.out.println(message);
    		}
	}
The validator will check all the rules that you defined for each field and return a list of error messages if any of the rules are not satisfied.
In this example, if the name field is empty or has less than 2 characters or more than 20 characters, or if the email field is empty or has an invalid email format, or if the age field is empty or not a numeric, or if the password not matches the given rules, then the validator will return a list of error messages.
You can then display these error messages to the user to inform them of the validation errors.
If there are no validation errors, you can proceed with saving the user to the database or performing other operations as needed.
. . . .
Please see CHANGELOG for more information on what has changed recently.
Please see CONTRIBUTING for details.
Please review our security policy on how to report security vulnerabilities.
The MIT License (MIT). Please see License File for more information.