The hexbatch project has code executing as elements inside shells. This program is used to test some concepts
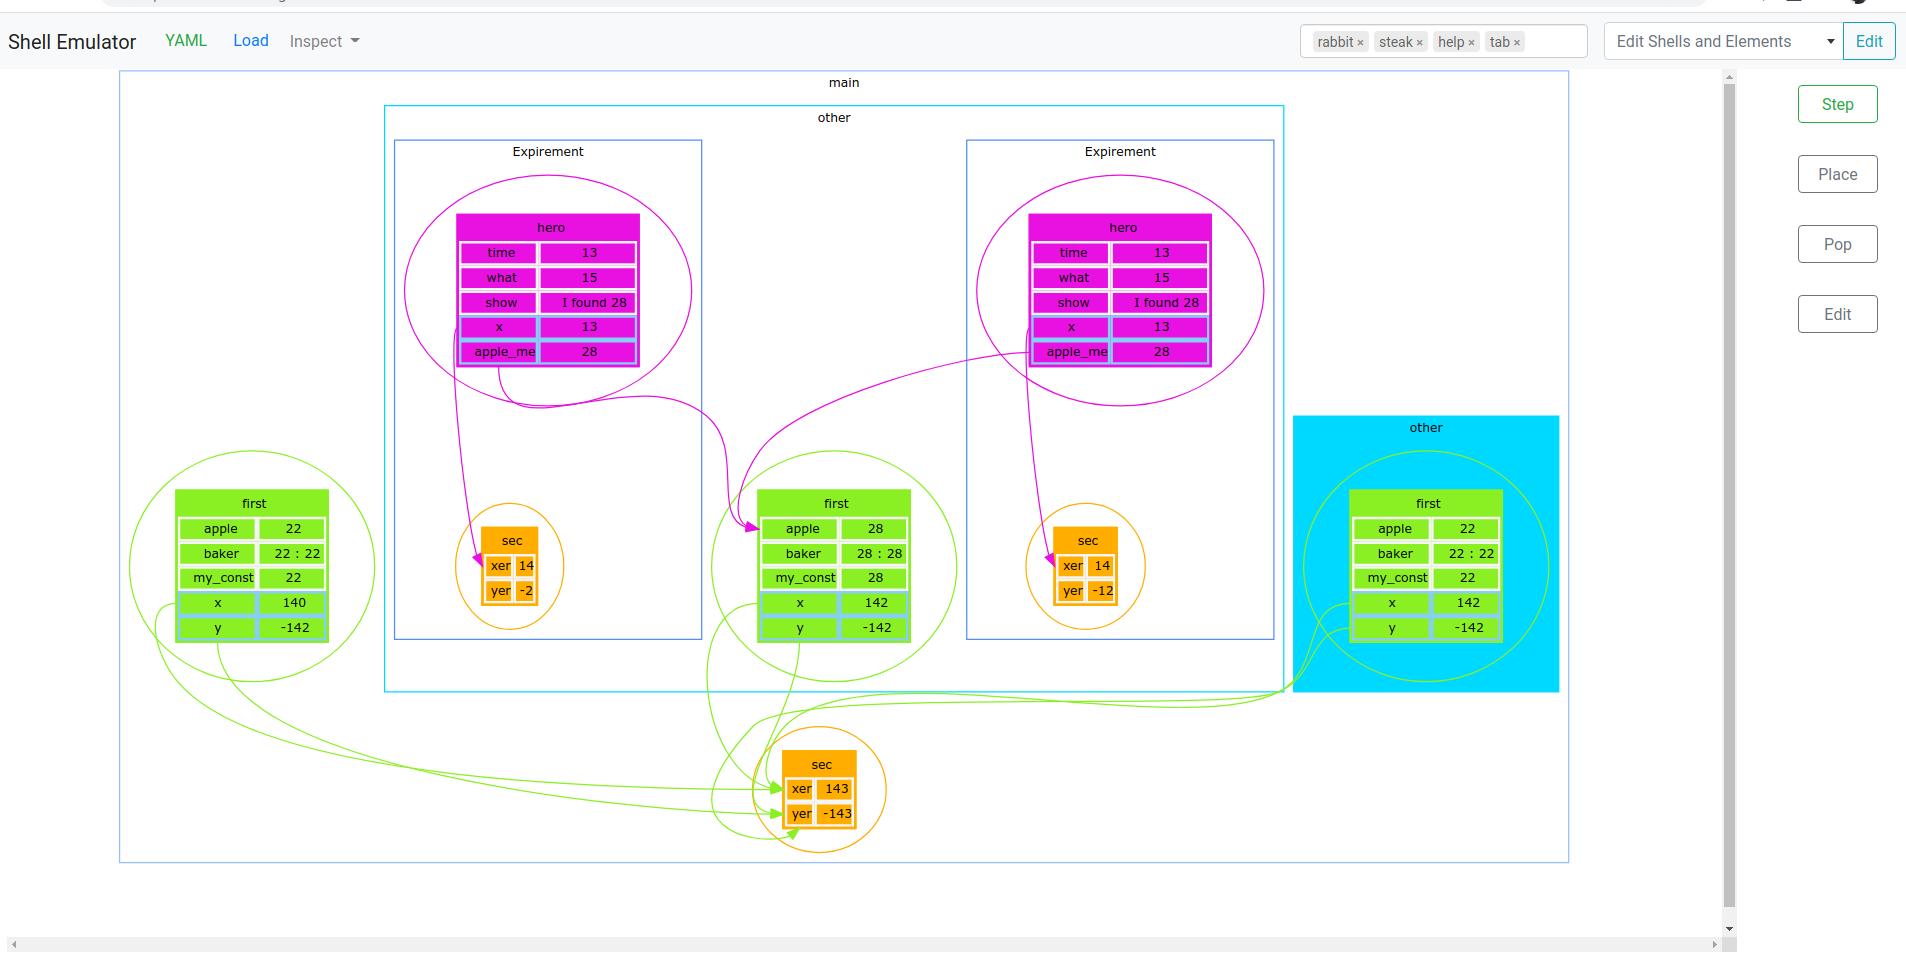
This version has dots to show the graphs of the elements and shells
run yarn at the root to install the js libraries
Load in index.html in a web browser. You do not need a local server here, just the files on disk
- Add in a new yaml or copy and paste it from somewhere, and press the load button.
- Watch things change in the yaml by pressing the step button
- Add new shells and elements
- Place and Pop Shells by selecting the shell to do this
- Edit elements after you click on them
- Alternately Do changes by editing the YAML text
- This is version 0.3 , its econo lodge not the hilton
- You must select a shell by clicking on an element, on the table with the text
- When you select a shell, the dot might suggenly draw it in a different place
- The new element dialog sometimes cannot be be selected from the dropdown until you select something else
- The gui is a little rough. But it will work if you jiggle things about*
- To make a new doc, simply empty out the yaml, and a new one will be made
Please refer to the yaml example below at the bottom of the page , or see yaml/testing.yaml
-
The YAML Document is only automatically read from and written to under the
game:key, so you can add anything else in other keys Here, in the example I put in an author, date and notes -
Under the game key there are three sections
-
element_lib:Defines the different elements shells can use. While any shell can mix and match elements, or the element can only appear in one shell if needed; all the elements are listed here in no particular order . Each element starts its name as the key its under, and has the following subkeys-
element_name- The name of the element needs to be unique, its an error to name two different elements the same name
-
guidthis is automatically generated, but if provided it will be used instead. Must be unique if provided -
element_variables- The Variables used in the element are defined here. Each variable is entered under its name
and has the following keys
variable_nameThe name of the variable. Each variable needs to be a different name inside the element. But, any elements can use the same names. Variable names need to be valid js syntaxvariable_initial_valueWhat the starting value will be if not otherwise set by the running_shells section ( talked about further down). If this is not set, then the initial value will be null. Any valid javascript primitive value (string number boolean null) will be fine here
- The Variables used in the element are defined here. Each variable is entered under its name
and has the following keys
-
element_gloms- The Gloms used in the element are defined here. Each glom is entered under its own name, and has the folowing keys
glom_target_nameThis is the name of the variable, in other elements of the shell or in the shells in the chain above, that this glom will try to findglom_reference_nameThis is the the name the glom value is referred to in the script of the element. Its only used in its own element. Glom names need to be unique among variables and gloms inside each element. Glom names need to be valid javascript syntax Different elements can used the same glom names
- The Gloms used in the element are defined here. Each glom is entered under its own name, and has the folowing keys
-
element_script- The javascript which runs inside the element when a step happens
- the this keyword will be having the variables and gloms, so can reference this.glom_reference_name or this.variable_name
-
-
shell_libDefines the shells that can be used. Each shell has a parent, and name, and a list of variables it uses. Each shell is entered under its own name and has the following keysshell_namethe name of the shellguidthis is automatically generated, but if provided it will be used instead. Must be unique if providedshell_parent_nameall shells, except a top shell, has a parentelementsan array of elements it uses, each element object here has two keyselement_nameThe name of the element which is already defined in the element_lib sectionelement_initHas two possible values, new or find , if new , then the variable is initilized fresh (using the init value defined above for it), if find then the element is only added if it exists in a parent or ancestor already If the variable is found ok, then it has the same starting value as the current one it finds. The search will go from the parent on to the top shell and stop as soon as it finds a matchelement_endHas two possible values, void or return, and tells of what happens with the values in the element when the shell is popped (removed). If void , then nothing happens. If return, then the nearest element with the same name, in the ancestor chain, is updated with the element's values that will be erased
-
running_shellsstores the current information for the stepping, it is refreshed in the yaml after each step, automatically. And when the Load button is pressed the next step will read from whatever state is in the running_shells now Each shell is entered under its own name, and if more than one shell is there, then this is an array of objects under the key . Each running shell entry has the following keysguidthis is automatically generated, but if provided it will be used instead. Must be unique if providedshell_elementscontains the current state of the elements and all its variables and gloms. Each element is entered under its name . Each element object here has the following keysglomsunder which are key values with the glom reference name, and its current value. Unset gloms are always nullvariableshave key values with the name of the variable, and its current value
shell_childrenhas any child shells defined under here. So, because there is only one top shell, it means all the other shells will be entered under the top shell shell_children, or nested further on down in other levels after that
-
-
There can be other sections besides the game key. Any new key can be added to store information. There are some keys used like this for the editors
colorsis a dictionary of uuids (found above) as the keys, and css colors. used to remember color preferences for the different elements and shellstagsis a string array, and is used to fill in a tag display at the top, to help sort test scripts
- the yaml will be parsed and checked for following the rules, then the yaml will be copied back out to replace the text that was loaded
- Useful to see if the yaml and code works okay
-
The YAML is read in again each time the button is pressed, so you can make edits here to the yaml in between
-
The elements in each shell, from the inner most shells to the top shell in that order, will try to glom and then run their javascript
-
Gloms work by looking for the elements in the current shell, and if not there, will keep looking up to the next parent until it gets to the top
-
Once all the glomming is done, then the scripts for each element are run. And the order is the same , run from the inner most shell to the top shell
-
After the step, the yaml is updated on the screen and the running_shells section will have the new values
-
If you want to remove a shell, just delete it from the running_shells
Must select a shell first, its color will change
Dialog to insert will list choices. If no choices then there are no shells that have the parent of what you selected
Must select a shell first
Popped shell elements might update same elements in shells above, depending on their setting
-
Adding tags is done by either modifying a tag array in the yaml , next to the game (or adding one if missing). Or by adding tags in the tag input at the top
-
When adding editing the yaml , the tags will be synced when the yaml is loaded
Event system connects the shell data to the gui, there are several callback events, including on change for different parts
- on_change_input_key
- When a non game key is changed in the text input
- on_change_master_shell
- When a master shell changes its defination from the last time. Master shells are the ones defined in the shell_lib
- on_change_running_shell
- When a shell, or its elements or the variables inside the elements change. Also when any child shells change. Called only if changes
- on_change_master_element
- When the definition of a master element, the elements defined in the element_lib, are changed from last time
- on_change_running_element
- When an element inside a running shell is changed from the last time
- on_refresh
- When the output is refreshed, this is also how the yaml editor knows to update its own text
- on_pre
- Fired before the refresh, useful to update non game keys or other meta data
- on_step
- Fired after each step
- on_load
- Fired after the shells load from the source
- on_selected_running_shell
- Fired when selected is chosen or reset
- Bootstrap
- Ace JS library
- Bootstrap 4 toast wrapper
- Yaml Library
- Lodash
- TokenField
- Select2
- Select2 Bootstrap 4 Theme
- Uuid
- Tingle
- Font Awesome
- d3-graphviz (Dots)
Dot guides
author: Will
date: 2021-03-14
notes: first test
game:
  element_lib:
    first:
      element_name: "first"
      element_variables:
        apple:
         variable_name: apple
         variable_initial_value: 1
        baker:
          variable_name: baker
          variable_initial_value: 'a string will go here'
        my_const:
          variable_name: my_const
          variable_initial_value: 22
      element_gloms:
        x:
          glom_target_name: 'xer'
          glom_reference_name: 'x'
        y:
          glom_target_name: 'yer'
          glom_reference_name: 'y'
      element_script: |
        this.apple = this.x * this.y + (this.apple* this.my_const)/10;
        this.baker = this.y + ' is y value';

    second:
      element_name: 'second'
      element_variables:
        xer:
          variable_name: xer
          variable_initial_value: 1
        yer:
          variable_name: yer
          variable_initial_value: 1
      element_gloms: {}
      element_script: |
        this.xer ++;
        this.yer --;

  shell_lib:
    main:
      shell_name: main
      shell_parent_name: null
      elements:
        - element_name: first
          element_init: new
        - element_name: second
          element_init: new
    other:
      shell_name: other
      shell_parent_name: main
      elements:
        - element_name: first
          element_init: find


  running_shells:
    main:
      - shell_elements:
          first:
            variables:
              apple: -10101
              baker: 'inititted b'
            gloms:
              x: 28,
              y: -527
          second:
            variables:
              xer: 100
              yer: -100
            gloms: []
        shell_children:
          other:
            - shell_elements:
                first:
                  variables:
                    apple: 25
                  gloms:
                    x: 0.125
            - shell_elements:
                first:
                  variables:
                    apple: 5
                    baker: 'bottom of the barrel'
                  gloms: { }