从 cc-switch 导出 ChatGPT OAuth 登录凭证,支持 CPA / Sub2API / Cockpit / 9Router 四种代理格式,并自动通过 Auth0 refresh_token 轮换令牌。
cc-switch 是一个 AI 客户端配置管理工具,把多个 OpenAI ChatGPT 账号的 OAuth session 信息(id_token、access_token、refresh_token、session_token)统一存储在 SQLite 中。
但 cc-switch 的数据库格式和各个代理工具(cli-proxy-api、Sub2API、Anti-Gravity Cockpit、9Router 等)所需的导入格式不同。cc-sync 就是中间的格式转换桥 + 令牌刷新工具。
refresh_token 换新令牌需要调用 Auth0 端点:
POST https://auth0.openai.com/oauth/token
这里有两个问题:
Auth0 的 client_id 参数(app_EMoamEEZ73f0CkXaXp7hrann)不是公开文档里的值 —— 它是从已有的 OAuth id_token 的 aud 声明中提取出来的。没有这个参数,refresh 请求会返回 unauthorized_client。
auth0.openai.com 前面有 Cloudflare 防护。Python 的 urllib / requests 的 TLS 指纹与真实浏览器差异明显,Cloudflare 会直接返回 403 Forbidden。
解决方案是使用 curl(它有更接近浏览器的 TLS 指纹)并通过本地代理中转:
curl -s -x http://127.0.0.1:7897 \
  -H "Content-Type: application/json" \
  -H "User-Agent: Mozilla/5.0 ..." \
  -H "Origin: https://chatgpt.com" \
  -d '{"grant_type":"refresh_token","client_id":"app_EMoam...","refresh_token":"rt_..."}' \
  https://auth0.openai.com/oauth/token
脚本内置了这一逻辑,只需传入 --proxy 参数即可。
不需要代理的情况: 如果只用
--no-refresh导出数据库中已有的令牌,则不需要代理。
- Python 3.12s+
- curl(用于令牌刷新)
git clone https://github.com/hzhsec/cc-sync.git
cd cc-sync
pip install -r requirements.txt # 实际上无外部依赖,仅 Python 标准库python export_codex.py --helppython export_codex.py --no-refresh输出到当前目录:
xx@gmail.com.cpa.2026-05-12_09-26-01.json
xx@gmail.com.sub2api.2026-05-12_09-26-01.json
xx@gmail.com.cockpit.2026-05-12_09-26-01.json
xx@gmail.com.9router.2026-05-12_09-26-01.json
...
python export_codex.py --proxy http://127.0.0.1:7897python export_codex.py --output ./exportspython export_codex.py --formats cpa sub2apipython export_codex.py --account quposev825ddpython export_codex.py --db ~/.cc-switch/cc-switch.db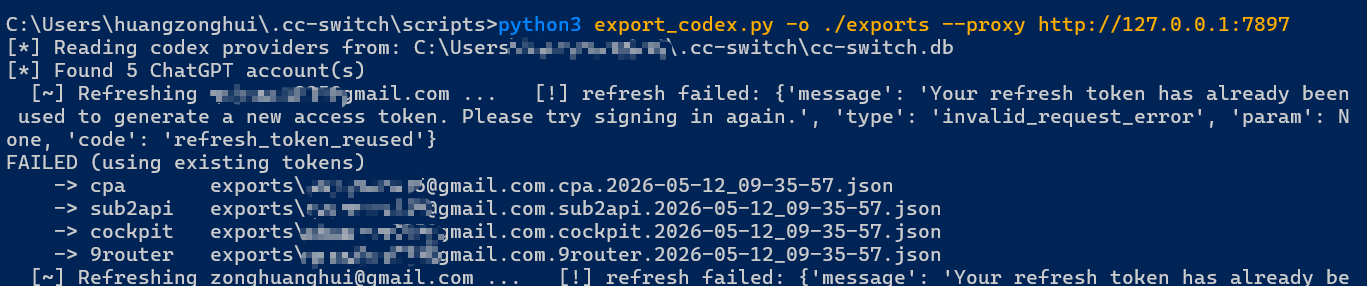
用于 cli-proxy-api 等 OpenAI Codex 代理工具。
{
  "type": "codex",
  "account_id": "00000000-0000-4000-9000-000000000000",
  "email": "mark@example.com",
  "plan_type": "plus",
  "id_token": "eyJhbGciOiJub25l...",
  "id_token_synthetic": true,
  "access_token": "eyJhbGciOiJSUzI1Ni...",
  "session_token": "eyJhbGciOiJkaXIi...",
  "last_refresh": "2026-05-12T04:43:58.105Z",
  "expired": "2026-08-06T14:29:36.155Z"
}
Sub2API 格式 —— 订阅转 API 代理配置。
{
  "accounts": [{
    "platform": "openai",
    "type": "oauth",
    "credentials": {
      "access_token": "eyJ...",
      "chatgpt_account_id": "...",
      "expires_in": 7465538
    }
  }]
}{
"type": "codex",
"id_token": "eyJhbGciOiJub25l...",
"access_token": "eyJ...",
"account_id": "...",
"email": "mark@example.com",
"expired": "2026-08-06T14:29:36.155Z"
}9Router 格式。
{
  "accessToken": "eyJ...",
  "testStatus": "active",
  "providerSpecificData": {
    "chatgptAccountId": "...",
    "chatgptPlanType": "plus"
  },
  "provider": "codex",
  "authType": "oauth"
}
完整示例见 examples/ 目录。
┌──────────────┐     ┌──────────────────┐     ┌─────────────────────┐
│  cc-switch   │────▶│  export_codex.py  │────▶│  Auth0 /oauth/token │
│   SQLite     │     │  (read + parse)   │     │  (refresh_token)   │
└──────────────┘     └──────────────────┘     └─────────────────────┘
                            │                           │
                            │  ┌──────────────────┐     │
                            │  │  synthetic       │     │
                            └─▶│  id_token gen    │     │
                               │  (alg:none)      │     │
                               └──────────────────┘     │
                                                        ▼
                            ┌──────────────────────────────────┐
                            │  Export formats                  │
                            │  CPA / Sub2API / Cockpit / 9Router│
                            └──────────────────────────────────┘
- 从 cc-switch.db 读取
auth_mode: "chatgpt"的 codex 配置 - 解码 id_token 获取
account_id、user_id、plan_type、email - 可选:通过 Auth0
refresh_token轮换access_token(curl + proxy) - 生成 synthetic
id_token(覆盖算法为alg:none,标识cpa_synthetic: true) - 写入 4 种格式的配置文件
注意: Auth0 refresh 不会返回
session_token(那是一个 ChatGPT 网页版 cookie,只能在浏览器登录后获取)。如果session_token为空,某些依赖 session cookie 的工具可能无法使用。
cc-sync/
├── export_codex.py          # 主脚本
├── examples/                # 各格式示例(占位符)
│   ├── mark@example.cpa.2026-05-12_12-44-36.json
│   ├── mark@example.sub2api.2026-05-12_12-44-12.json
│   ├── mark@example.cockpit.2026-05-12_12-44-24.json
│   └── mark@example.9router.2026-05-12_12-44-31.json
├── LICENSE
└── README.md
MIT