USB2Switch is a program designed to allow users to control their Nintendo Switch games via a USB connection.
v0.1.0-alpha adds a new important feature - single looping - to the scripting system in addition to other small changes.
Feature summary
Green is functional, orange is deprecated/broken, red is removed.
+ Added startLine, endLine, and loopCountLine line edits to support creating loops from the GUI.
+ Added loop button to gather line data and add it to the plain text edit.
+ Changed the name of the Status window frame from Frame to Status.+ Added support for single looping to the flashing and execute functions.v0.0.2-alpha focuses on two major changes - adding joystick functionality (previously commented out) and script button compatibility on the arduino end. This release also includes an added mainpage .ui form so users can take a look and modify the ui in Qt Designer.
Feature summary
Green is functional, orange is deprecated/broken, red is removed.
+ Added color animations to all of the preloaded script select buttons+ Added joystick support (previously commented out) and fixed bugs.
+ Added support for ACNH scripts from acnh-tools.
+ Added use cases for script choosing buttons on the GUI.
- Removed simple script function in general to ensure memory availability but did not remove header file
! Now at 91% of program storage.
! Scripts are untested. Most should work but some may not due to string conversion or typo bugs (especially EV, fossil, and egg hatch) that I anticipate may have been introduced. v0.0.1-alpha is the initial release of the program.
Feature summary
Green is functional, orange is deprecated/broken.
+ Created GUI
+ Added joycons for button input
+ Overlayed buttons on joycon for all inputs
+ Overlayed joystick dials for left and right joysticks
+ Created skeleton tab section for preloaded scripts
+ Created duration input
+ Connected duration and inputs to script window
+ Added function and button for flashing scripts to EEPROM
+ Added function and button for clearing EEPROM of all commands
+ Added function and button for executing scripts loaded to the board
+ Added function and button for clearing the script box
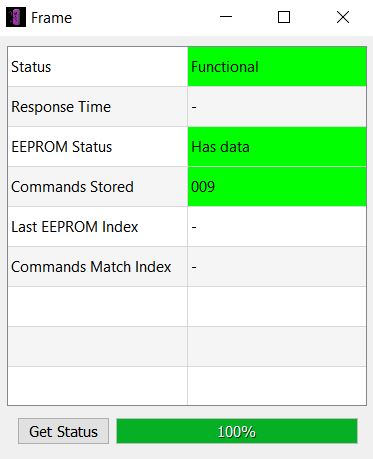
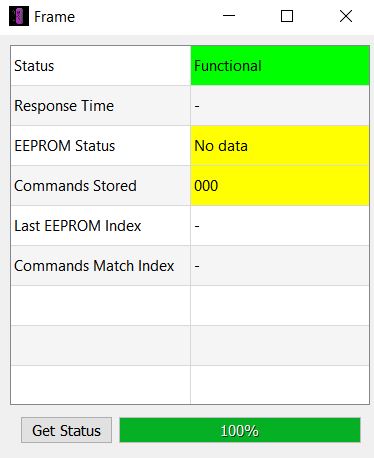
+ Added Status checking window
+ Added function for checking status to Status checking window
+ Added responsive fields for checkoffs in Status window
+ Added task status bar to monitor functions
+ Added skeleton instant checkbox
+ Added monitor checkbox for debug mode (not included in release)
+ Added Custom Message field
+ Added skeleton menu
+ Added handshake functions for all communication between PC and ATmega32u4 board
+ Added error handling for disconnected FTDI chips and timeouts
! Added FTDI test function+ Ported swemu-plus-plus
+ Added handshake implementations for receiving data to every communication function
+ Added function for flashing EEPROM
+ Added function for clearing EEPROM
+ Added function for executing stored script
+ Added function for sending status data to PC
+ Added serial data handlingUSB2Switch is an open-source project developed using
1. C++ 11
C++ 11 handles the FTDI functions and GUI tasks. The Qt framework written in C++ powers the GUI.
2. Qt 5.14.1
Qt 5.14.1 is used for the GUI for the program. Qt handles a majority of the PC-side actions such as inputs, script parsing, and more. Qt Designer is used to auto-generate a layout and most of the stylesheets used in the program.
3. FTDI
The FTDI D2XX drivers are used to handle the communication with the FTDI chip. I develop in Windows using these drivers and that is why the program is Windows-only.
4. Arduino LUFA
Palatis' Arduino-Lufa powers the controller input to the nintendo switch. The original firmware is based on fluffymadness' ATMega32u4-Switch-Fighstick, which is based on several other projects.
Click a category to find out more.
Click a category to find out about how this is better than your average switch scripting system.
No coding required
Many other scripting systems require that scripts be written directly into the code, compiled with the code, and flashed to the board. No coding is required to write and deploy scripts with this system. The hex file only needs to be flashed once to be used with this program.Simple input system
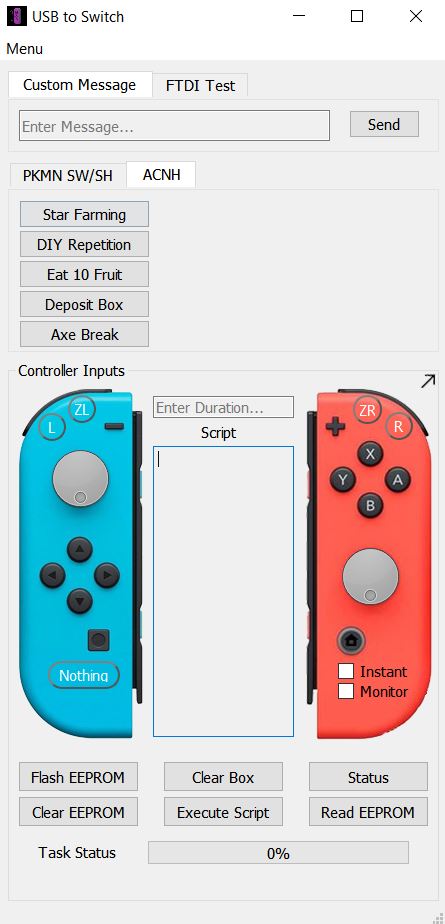
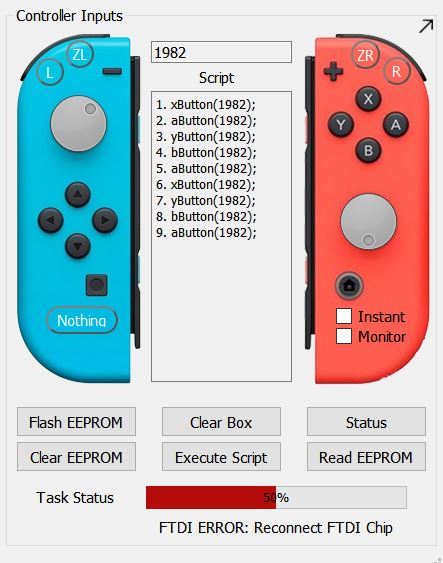
Inputs are performed directly onto a joycon. All of the normal buttons are enabled besides d-pad. Users simply need to input a duration, click the buttons they want to be pressed, and then click the "Flash EEPROM" and "Execute" buttons to deploy their first script.
Preloaded scripts
Several common scripts from previous projects I have worked on are already included in this program (not true in v0.0.1). Users can plug in their FT232R to the PC, their board to the switch, and click one of the PKMN SW/SH or ACNH scripts to begin - no other input required.
Status monitoring
Users are visually updated on the progress of their tasks. There are progress bars for each of the functions in the main menu and in the status bar menu. There are colors and messages attached to errors and completion.
Memory (EEPROM)
Scripts are stored directly in the board's memory. This ensures that the script will continue to be loaded even if the board is unplugged.
Someday this may be fleshed out into a whole PDF, but for now this will due for getting started.
Click to expand.
Script development is available for people who would only like to work on Arduino code. If you would like to work with Arduino exclusively, I recommend my swemu-plus-plus repo. You'll be able to write and call scripts - all you have to do is plug the board into the switch after you've performed the setup. Write your script in the respective file and replace the uartScriptSelect() call with your class object and function call.
Click to expand.
For this one I recommend downloading the source code in the Arduino folder of this repo. You'll have to clone this whole repo for that. You will still need the LUFA setup available here my swemu-plus-plus repo. Write your scripts in the file of your choosing as I did. In the uartScriptSelect() function in main, add a string (length 12 or less) to identify your script with. Open the GUI and use your cusotom send message to send that string and your script will begin.
Click to expand.
I use Qt Creator but you're welcome to use whatever environment suits your needs. If you have Qt Creator you should be able to open the .pro folder and get access to the correct filesystem setup. You'll need to have these drivers downloaded and placed in the base directory including ftd2xx.dll, ftd2xx.lib, and ftd2xx.h. I do not include these because they are not my libraries and I made no changes to them, just calls to them. I will update this more later but I believe these instructions should make this project usable on your windows PC.
-
ATmega32u4 based board with UART pins
- Pro Micro
- Arduino Leonardo
- Teensy 2.0
-
FT232R USB to UART chip
-
Two wires
Click to expand.
-
Solder the Serial1 RX and TX pins of the ATmega32u4 board (on my pro micro these are labeled TX0 and RX1).
-
Connect the TX pin of the ATmega32u4 board to the RX pin of the FT232R connector and vice versa
-
Windows
-
Software such as QMK Toolbox or Atmel flip to flash the ATmega32u4 board
Click to expand.
-
Download the hex and zip file from this release
-
Boot up QMK Toolbox (or other program) and select the hex file you downloaded
-
Put your ATmega32u4 board in DFU mode by connecting GND to RST and letting go
-
Flash the firmware (hex file) to your board
-
Extract the zip into a folder of your choice
-
Plug the board into your switch and the FT232R into your PC.
-
Click the Clear EEPROM button. If you receive an error, plug both the board and FT232R back in. Wait for several seconds before trying to clear again. Most errors occur due to the FT232R needing to be plugged back in, and it often takes several seconds for the device to register and work properly after being pluggd in.
-
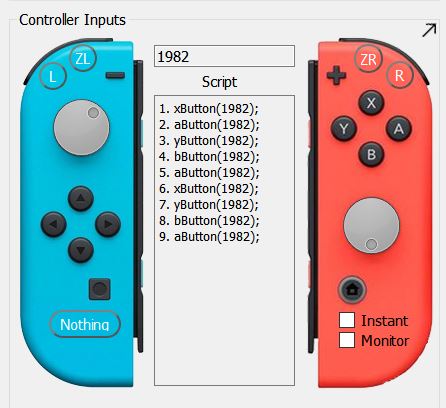
Create a script by entering duration and clicking buttons. The duration can be changed on a per-button basis. The script can be edited directly in the script window as well. Be careful to only use valid names for the buttons - what is generated is what's available. Using unintended messages may have unintended consequences. Loops can be created from the second line onward. They require that the start, end, and count lines be chosen and can be one or more lines and loops in length.
-
Click the flash EEPROM button and wait for the FLASH to complete. It is normal for application freezes in inputs during this.
-
Click the Execute button and watch your script execute. If it's not executing, try plugging the board into a different USB port and try again.
Full Application v0.0.2-alpha
Script Window v0.0.2-alpha
Error Message v0.0.2-alpha
Status Messages v0.0.2-alpha