Photoshop CC - Design Notes

To Learn officially go to.. Photoshop
Designing in 3D has never been easier. Create 3D scenes, edit materials, and model 3D objects. Control the outcome of your design work.
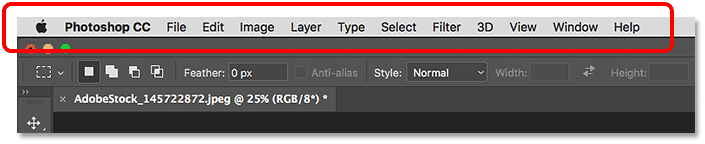
Getting to Know the Photoshop Interface, Photoshop Window consists of the followings:
The menu bar is used to open and save files, adjust the canvas size, access some of the editing tools, open and close various windows, and more. It contains 11 items:
Tools bar appears on the left side of the window. By holding individual tools you will see grouped tools.

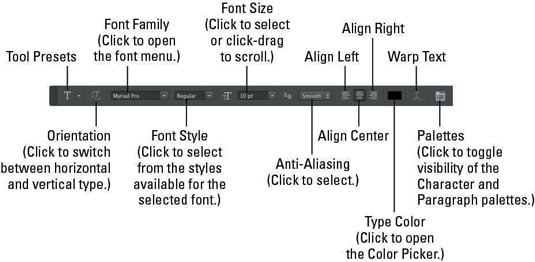
Options bar is a horizontal menu at the top of the main Photoshop window that lets you customize a tool. It changes according to individual tools.
The Document window is the large area in the center of the interface where the image is displayed. It's also where we edit the image. The actual area where the image is visible is known as the canvas.
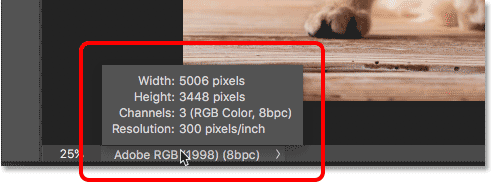
The status bar is located at the bottom of every document window and displays useful information—such as the current magnification and file size.
Panels are available in both Photoshop Elements and Elements Organizer; however, they behave a little differently in each. Panels help you manage, monitor, and modify images. Some panels have menus that provide additional commands and options. You can organize panels in the basic and custom workspaces in Expert mode.
- Color
- Adjustments
- Layers


So far, we've been focusing all of our attention on the main panel column, but there's also a secondary column to its left. This second column can seem a little confusing at first because by default, the panels in this column appear only as icons.

Panels:
- Press Tab to
Hide Panels. Tab+Tabto Toggle.- Save your panel layout to
New Workspace.
There are few keyboard shortcuts of Photoshop. They are:
| Command | Keys |
|---|---|
| New Doc | Ctrl + N |
| Open New Doc | Ctrl + O |
| New Layer | Ctrl + Shift + N |
| Toggle programs | Alt + Tab |
| Cycle Through Documents | Ctrl + Tab |
| Search | Ctrl + F |
| Ruler | Ctrl + R |
| Free Transform | Ctrl + T |
| Deselect | Ctrl + D |
| Move Tool | V |
| Marquee Tool | M |
| Crop Tool | C |
| Hand Tool | H |
| Hide Scroll Bar | F |
| Full Screen | F + F |
| Close tab | Ctrl + W |
| Zoom In | Ctrl + + |
| Zoom Out | Ctrl + - |
| Fit on screen | Ctrl + 0 |
| 100% | Ctrl + 1 |
| Zoom In | Z + Mouse Click |
| Zoom Out | Alt + Mouse Click |
| Image size | Ctrl + Alt + I |
| Match the zoom | Window > Arrange |
| Tile | Ctrl + Shift + L |
| Consolidate All to Tabs | Ctrl + Shift + K |
| Foreground Color Picker | N |
Window > Arrange > Match the zoom
Esc to toggle home
Scrubby zoom
Holding space bar when selected any tool gives you a pan view:
Temporary Hand Tool = Space + click + drag
Crop Tool:
- If
Delete Cropped Pixelsunchecked then you can move the image anytime and re-crop later. - By
Alt+dragyou can change the crop area. - To rotate an image you can select and drag crop corners.
- You can uncrop anytime from Image >> Reveal All.
Eyedropper Tool >> Ruler Tool:
- Now drag a measurement horizontally or vertically then click
Straighten Layerto tilt/rotate image without adding any white space around the corners.
Image >> Image Rotation >> Arbitrary:
- This way Photoshop adds white space around the corners.
Crop Tool:
- with
W x H x Resolutionselected 1024 px & 768 px then enter to apply that. - Selecting
New Crop Presetcan save your aspect ratio for future use.
Marquee Tool:
- In options bar there is a type called
Fixed Sizeof aspect ratio. By putting my aspect ratio here and then click anywhere on my image area of position. Then Image >> Crop to crop image. Then deselect it byCtrl+D.
Crop Tool:
- To add additional canvas area around your image
- To clear previous ratio, right click crop icon in options bar >
Reset Tool. So that it will clear the options bar. - Press
Escto remove crop area. - Then drag your crop area.
Ctrl+-to zoom out andAlt+dragto expand area alsoShiftkey to maintain proportion. Now you see white space around the image. Unlock 🔓 layer. ThenAlt+Shift+dragto see checker board around the image. - Image >> Canvas Size > Relative (checked). Now you can click anywhere you like in the canvas to show up crop area.
- To fill with background color go Layer >> New Fill Layer >> Solid Color to pick a color.
- In options bar
Content-Awarechecked can auto fill any of the white corner by calculating itself. Not always do a perfect job though.
It is quite necessary to master the Photoshop Layers Panel.
- Open new document.
- Bring multiple images as window tiles.
- Drag n drop image from layer panel to New Document.
- Holding
Shiftkey lets you drop it in center. - Bring Ruler. Right click on ruler make to percent.
- Drag it to your desired position
- Marquee Tool > click n drag any area.
- Press delete key to erase that area.
- Then deselect it by
Ctrl+D. - Frame Tool > click n drag any area.
- You can reposition image from layer icon.
- By selecting any image go View >> New Guide Layout to add
Marginboth sides. - By selecting all images go options bar and choose alignment to arrange horizontally or vertically images.
- By selecting all images go options bar and choose More >> Distribute Spacing to give even spaces between images.
- View >> Show >> Guides to hide the guides
- By selecting all images press
Ctrl+Gto group. - You can move all images together by selecting a group.
- Frame Tool > Circle from options bar.
- Select an image from layer panel.
- Dragging out a squire from corner to corner over the image. When you release the curser you get a circle shape of that image.
Layer >> Merge Layers don't let you to reposition individual images. You can't change back to frame shapes to previous state as well.
Layer >> Flatten Image turns everything to one layer which is a background.
File >> Export >> Export Preferences to make my preferable output.
Layer >> Export As to save multiple images at once >> Export.
Edit >> Fill to fill the canvas with white color.
or
Ctrl + Delete to fill the canvas with white color.
- To increase brush size press
] - To decrease brush size press
[ Alt+Right Clickthen drag left or right to resizeAlt+Right Clickthen drag up or down to hardness- To edit brush
Right Clickbrings context menu and pressEnterto hide it again. - Hold
Shiftkey to make a straight line. - To connect dots between two areas click once hold down
shiftkey and click again so Photoshop will draw a straight line. - By selected Brush press 3 to change option bar Opacity to 30%.
- By default overlapping opacity creates darker shades. By changing to Screen Mode to
fffwill lighten the overlapping area. - In option bar Flow defines continuity of points.
- Smoothing smooths the brush trail.
- Smoothing
Pulled String Modechecked you can push beyond the circle and photoshop will start drawing the line.
- Layer Masks are key feature of photoshop that allow us to non-destructible hide and show selected portions of our image.
- After selecting an image layer go to Layer >> Layer Masks >> Reveal All to add a white mask to this layer.
- If the mask is white then it's not transparent. So you can only see the current layer image.
- But the black portions of mask is transparent and let's you see other layer image below the current layer.
- After selecting a image layer go to Layer >> Layer Masks >> Hide All to add a black mask to the current layer.
- While selected mask press
Bkey to initiate brush. Change brush size. - Press
Xkey to change foreground color to black. Then click and paint to reveal the image layer which is below the current image layer. - If you reveal too much area then press
Xkey again to change foreground color to white. Then click and paint to adjust. - If you want to view the mask press
Alt+clickon mask thumbnail in the layer panel. - Click on the eye icon to view the layer again.
One image blend into another
- between two images apply mask on top layer.
- Press
Gto initiate gradient tool - Press
Dto make foreground and background colors default. So the gradient will be white to black. - now click and drag a line over the image. Hold
Shiftkey to make a straight line. - to make gradient from opposite direction press Window >> Properties >> Invert your mask or press Ctrl + I.
- to reposition the image, you need to unlink it from mask in layer Panel.
- bring image
- go to Fill Adjustment layer >> Gradient then choose color with less opacity
- go panel blend Mode >> Overlay to apply it on image
- these are most common selection tools.
- Rectangular Marquee Tool to make a selection.
- From options bar
Subtract From Selectionchecked then select areas you want to remove. - to fill the selected areas with color Layer >> New Fill Layer >> Solid Color then OK and choose color.
- Elliptical Marquee Tool to make a circle selection. To reposition hold
Space+drag. You mayShift+dragto maintain a ratio. - Select >> Transform Selection to resize.
- to fill the selected areas with color Layer >> New Fill Layer >> Solid Color then OK and choose color.
Ctrl+Clickon mask to bring back selection.- then reposition selection area.
- Edit >> Fill to fill it with black.
- now
Ctrl+Dto deselect. - Polygonal Lasso Tool to make a Christmas tree.
- Magnetic Lasso Tool to make a hair style.
- after selecting an area go Select >> Transform Selection to scale the area or you can right click to get more options like Scale, Rotate, Skew, Distort, Perspective.
- after selecting an area hold
Shift+dragto add more area or holdAlt+dragto subtract any area. - press
Qkey to view quick mask in red color window to show areas that are not selected. - after selecting an area from adjustment layer panel >> Brightness/Contrast then go to Properties panel to increase or decrease.
- set mode to Rectangle and select an area then go adjustment layer panel >> Hue/Saturation then go to properties and change hue.
- set mode to Lasso and select an area. To edit areas press Alt + drag to subtract areas then go adjustment layer panel >> Hue/Saturation then go to properties and change hue.
- so that selection areas got new colors
- click and drag so Photoshop can auto select the colored areas.
- To edit areas press Alt + drag to subtract areas then go adjustment layer panel >> Hue/Saturation then go to properties and change hue.
To select a primary subject by Photoshop AI go Select >> Subject then go adjustment layer panel >> Hue/Saturation then go to properties and change hue. Properties >> Mask >> Invert.
- set mode to Rectangle and select an area.
- Lasso Tool to subtract the selection precisely.
- then choose Select And Mask from options bar.
- then we get many tools on left. On right Smart Radius checked to fine tune animal fur.
- then go adjustment layer panel >> Hue/Saturation then go to properties and change Saturation. Then go Properties >> Mask >> Invert.
- To make a selection go Select >> Subject then Lasso Tool and Alt + drag to subtract.
- In options bar press Select and Mask
- Now on the properties panel make a combination between Feather and Shift Edge then click OK
- Now click mask
- from bottom panel press fx >> Drop Shadows then click on image area and reposition that shadow
- change Size and Opaciry if you like then OK
- Ctrl + (plus) to zoom
- Spot Healing Brush in options bar Type: Content-Aware (Which enables nearby image content). Then click and drag.
- You can do this change on a different layer. So make a new layer. Make sure Sample All Layers is checked.
- Healing Brush in options bar Sample: Current & Below checked.
- Here you will tell photoshop where to take the sample from. Hold Alt to take the sample.
- then click where you want to paint
- Patch Tool in options bar Type: Content-Aware checked
- Make a selection
- Drag the selection where you want to take the sample from
- Ctrl + D to deselect
- Lasso Tool to make a selection
- go Edit >> Fill and set the Contents: Content-Aware and Color Adaptation checked
- click OK
- Ctrl + D to deselect More Advance Way:
- Lasso Tool to make a selection
- go Edit >> Content-Aware Fill and we see before and after image.
- set the Sampling Area Options to Custom
- sample area brush to take the sample by myself
- then Output To: New Layer
- click OK
- Ctrl + D to deselect
REMOVE something:
- Lasso Tool to make a selection
- choose Patch Tool and move the selection out
- Ctrl + D to deselect ADD something:
- Lasso Tool to make a selection
- choose Content-Aware Move Tool and move the selection to your desired position
- tap enter to apply the change.
- to get a better view Ctrl + H to hide selection
- in options bar change Structure and Color combination to get better results
- Lasso Tool to make a selection what I want
- go Layer >> New >> Layer Via Copy
- move the selection on top what I want to remove
- go adjustment layer panel and press Mask by holding Alt key in order to get a black mask
- press B key to get a brush and make sure foreground color is white
- now click and drag to remove as you like
- being on an image layer go Layer >> Smart Objects >> Convert to Smart Object
- then go Edit >> Transform >> Scale to resize it
- then reposition it to the center
- press warp icon on options bar and choose warp: Arch you may also change Bend % then click OK
- unlock background to make a layer
- right click on this layer and check Gradient Overlay on layer style
- then choose Gradient color to Black, White
- Opacity 50%
- check Reverse
- style to Radial
- angle to 30° then click OK
- press D to make foreground color Black
- press X to toggle it White
- press T to Horizontal Type Tool
- font elephant, size 454 pt, center
- now click to write text
- right click on this text layer and check Stroke on layer style
- then choose Color to White
- Opacity 50%
- Position to Outside then click OK
- ** Open your Image **
- open image (it will open in another document)
- go Quick Selection Tool in options bar press Select Subject to make auto select portrait
- apply mask to the image layer
- send the layer to previous document
- reposition image with text
- Ctrl + J to duplicate layer
- unchain image from mask
- on the new layer delete the mask
- by selecting image from new layer Ctrl + click on text layer to select the text
- click layer mask to mask the text
- from old layer Ctrl + click on image mask to select the image area
- by selecting image from new layer mask go brush and click the areas you want to reveal
- Ctrl + D to deselect
- ** Text Effects **
- after selecting text go Window >> Character for text editor
- from text layer go to Adjustment >> Hie/Saturation then change color by Colorize checked
- Ctrl + Alt + G to clip it to text layer as clipping mask. So it's only affect text layer but not the image below.
- ** Text Effects **
- create a text
- on text layer double click >> Color Overlay
- on text layer right click >> Rasterize Type
- on text layer right click >> Rasterize Layer Style
- right click on this layer and check Gradient O
- ** Text Effects **
- Select and right a text
- from layer right click >> Convert to Smart Object
- press Ctrl + T to transform
- right click >> Warp to change the shape
- ** Text Effects **
- Select and right a text
- from layer right click >> Convert to Smart Object
- change Fill % to 0
- change stroke 5px white
- from text layer Ctrl + Click to select
- go Select >> Inverse
- to make it a fill go adjustment layer panel >> Solid Color then choose a color.
- it can be Shape/Path
- click and connect the first point makes a line
- click and drag makes a curve
- you can edit points later by pressing Ctrl + click on individual points.
- you can also add points by hover over line or remove a point by hover over a point.
- you can bring handle to a point by pressing Alt + drag
- pressing Alt key turns corner to curve and vice versa.
- pressing Ctrl + Shift selects multiple points
- you can always find your line drawings in Paths panel
- after creating a path to make it a fill go adjustment layer panel >> Solid Color then choose a color to make it a shape.
- shape always makes a new layer
- open image
- go Quick Selection Tool in options bar press Select Subject to make auto select portrait
- apply mask to the image layer
- create a new layer below this
- choose a foreground color
- then press Alt + Option + Delete to fill the layer with that color
- drag n drop an image
- make selection with Pen Tool press P
- from options bar choose mode Shape, Fill none, Stroke white 10 px
- now draw face, hair, eyes etc
- press Ctrl to close drawing
- press A for Path Selection Tool to select any of the shapes and edit them
- to make photo layer a fill go adjustment layer panel >> Solid Color then choose a dark color.
- select all face layers then press Ctrl + G to group
- select all sunglasses layers then press Ctrl + G to group
- now double click on face layer group for layer style
- choose Outer Glow for neon effect
- choose Drop Shadow
- change color of sunglasses layers group from Outer Layer
- from face layers group Alt + drag the sub Effect layer to the sunglasses layers group
- now copy those 3 layer groups
- from new groups delete Drop Shadow
- from new groups selected press Ctrl + E to Rasterize layer
- now right click on this layer >> Convert to Smart Object
- go Filter >> Blur >> Gaussian Blur to radius 114.8
- choose Ellipse Tool
- from options bar choose mode Shape, Fill neon color, Stroke none
- go Properties panel >> Mask >> Feather increase
- now choose brush to darken the corners
- open image
- create a rectangle
- double click on this layer to change color
- right click on layer >> Create Clipping Mask to fit image within the Rectangular shape
- bring image
- create new layer
- go Image >> Image Size then put your desired pixels of width and height (1200 x 716)
- click OK
- bring image
- select Crop Tool then increase any side of the area
- select Rectangular Marquee Tool to select area you want to include
- by selecting image layer go Edit >> Fill then select Contents: Content-Aware to fill area with the color of your image
- drag n drop a jpeg image
- right click and press Rasterize layer
- choose Background Eraser Tool to remove logo background
- double click on this layer and choose Color Overlay layer style
- drag n drop PNG image on a PS document
- from layer right click >> Color Overlay to choose a color.
- open an image
- make selection
- from options bar choose Select And Mask to open an extra menu
- choose Refine Edge Brush Tool to fine select hair from the background. press Alt key to reverse this process in case of mistake.
- change Smooth 5, Feather 1
- below this there's Output Settings >> New Layer with Layer Mask
- then click OK
- now we'll see the transparent alpha channel in our layer mask
- go File >> Save As then choose .psd or .png
- turn background to layer
- go File >> Place Embedded then choose PNG
- go Edit >> Define Brush Preset then give it a brush name
- go File >> Open then choose an image
- now turn image to Convert to Smart Object
- add mask to image
- change mask color to black
- go to Brush Tool and paint with your previously created brush preset
- bring a colorful image
- go Filter >> Pixelate >> Mezzotint with Type: Coarse Dots selected
- go Filter >> Blur >> Radial Blur with Amount: 100, Blur Method: Zoom, Quality: Good/Best then OK
- do this blur effect 3 times
- go Filter >> Distort >> Twirl with Angle: 100° then OK
- now from layer panel double click on double line of this Twirl tab and choose Mode: Lighten
- again go Filter >> Distort >> Twirl with Angle: -100° then OK
- now from layer panel double click on double line of this Twirl tab and choose Mode: Lighten
-
Color Mode
- RGB 8 bit
- RGB 16 bit
- RGB 32 bit
-
Color Space
- sRGB: small color space, great for web graphics and screen display.
- Adobe RGB: larger color space, popular for working in Photoshop.
- ProPhoto: very large color space, contain more colors than a monitor can display.
- CMYK: limited color space, specific to printing to a press.
-
Layers
-
Selection
-
Masking
-
Smart Objects
-
Smart Filters
-
Applying non destructive adjustments
After selecting part of image hit Q. Now you can precise selection by toggling X. Then copy and paste to make new layer out of it.
- Fork it
- Create your feature branch with specs (
git checkout -b my-cute-feature). - Commit your changes (
git commit -m 'Added my cute feature'). - Push to the branch (
git push origin my-cute-feature). - Create your new pull request.
 Jayed Rashid |
Feel free to Contact me on Twitter, send an email to jayed@jayedrashid.com