Settings & Configuration

This page explains every setting on the plugin's Discord Triggers tab in ACT — what it does, what the defaults are, and when you'd want to change it. If you haven't set the bot up yet, start with the First-Time Setup Guide; come back here once the bot is online.
The settings are split across pages, chosen from the list on the left of the plugin tab:
- Main — choose where audio plays: a Discord voice channel, or this PC's speakers.
- General — connect the bot and put it in a voice channel. (Discord-bot mode only.)
- Text-to-Speech — pick the voice engine, voice, and speed for spoken triggers.
- Sound — random effects, auto-leveling, the master limiter, and audio quality.
- Information — version, links, and the diagnostics log.
A Diagnostics panel sits across the bottom on every page (see The Diagnostics panel).
💾 When are settings saved? Your settings are written when you close ACT, and loaded again on the next start — so you only configure them once. The one exception is noted below: the Server / Channel you join is not remembered between sessions.
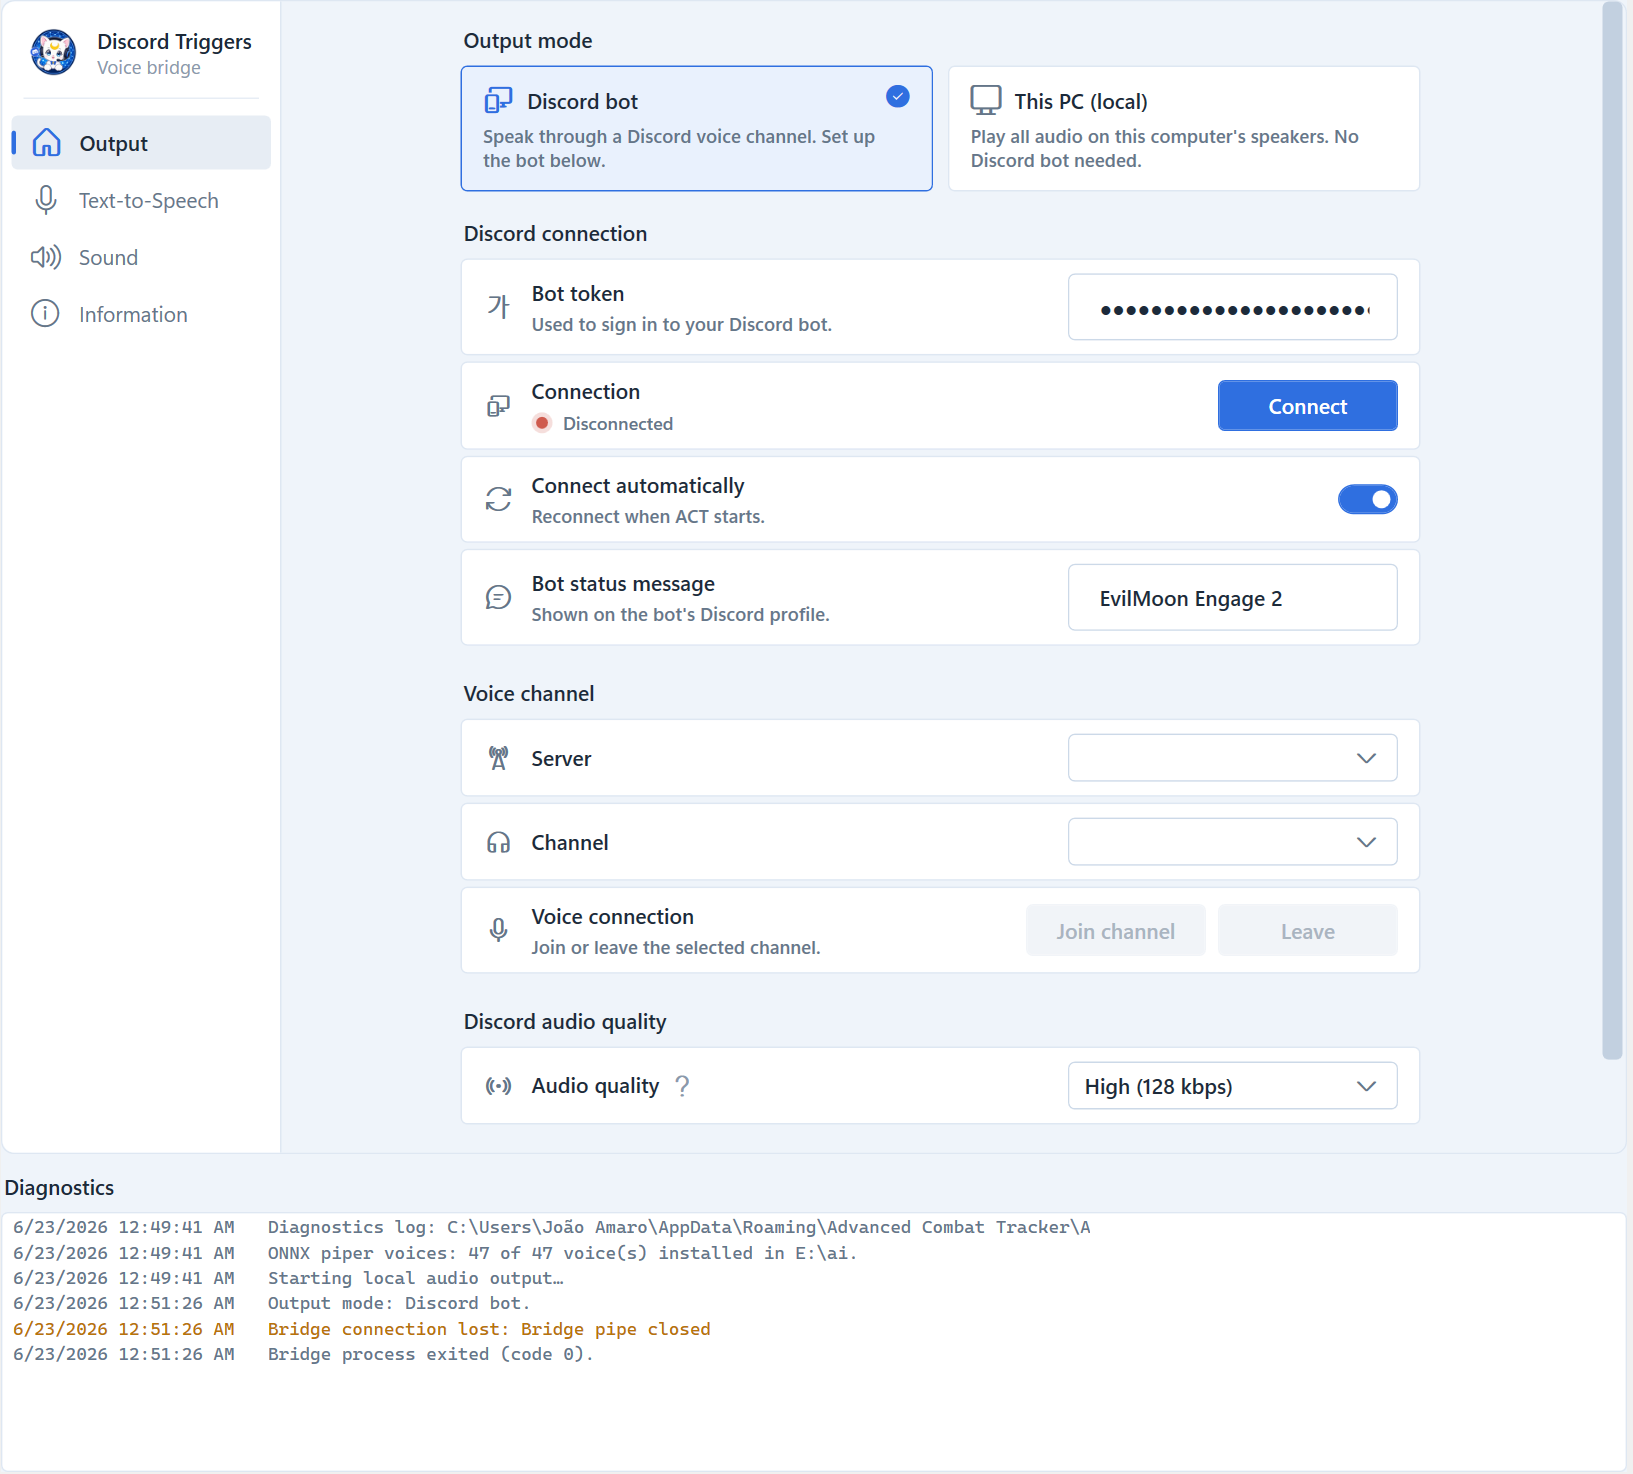
The Main page sets the plugin's top-level choice: where your trigger audio plays. Everything else — voices, effects, leveling — works the same in both modes; only the destination changes. Your choice is remembered between sessions.
| Mode | What it does | When to use it |
|---|---|---|
| 🔊 Discord bot | Streams all TTS and trigger sounds into a Discord voice channel, so your whole party hears them. Requires a bot token and a channel to join — set up on the General page. | You play with a group and want callouts shared in voice chat. (This is the default.) |
| 🖥️ This PC (local) | Plays all TTS and trigger sounds on this computer's default output device (speakers/headset). No Discord bot, token, or login needed. | You play solo, or just want natural neural voices and effects on your own PC without involving Discord. |
When you pick This PC (local), local audio output starts as soon as it's selected — there's nothing to connect or join. All TTS (including neural ONNX voices) and trigger sounds — with the same effects, auto-leveling, and master limiter from the Sound page — play straight to your default Windows playback device.
Because no Discord connection is involved in this mode, the General page (bot token, connection, voice channel) is hidden — you don't need any of it. Switch back to Discord bot and the General page reappears.
💡 Switching modes is instant. Selecting This PC (local) spins up local playback and tears down any Discord voice connection; selecting Discord bot stops local playback and brings the bot back. The diagnostics panel logs each transition.
ℹ️ This page is only shown in Discord bot output mode. In This PC (local) mode it's hidden, since no Discord connection is needed — see the Main page.
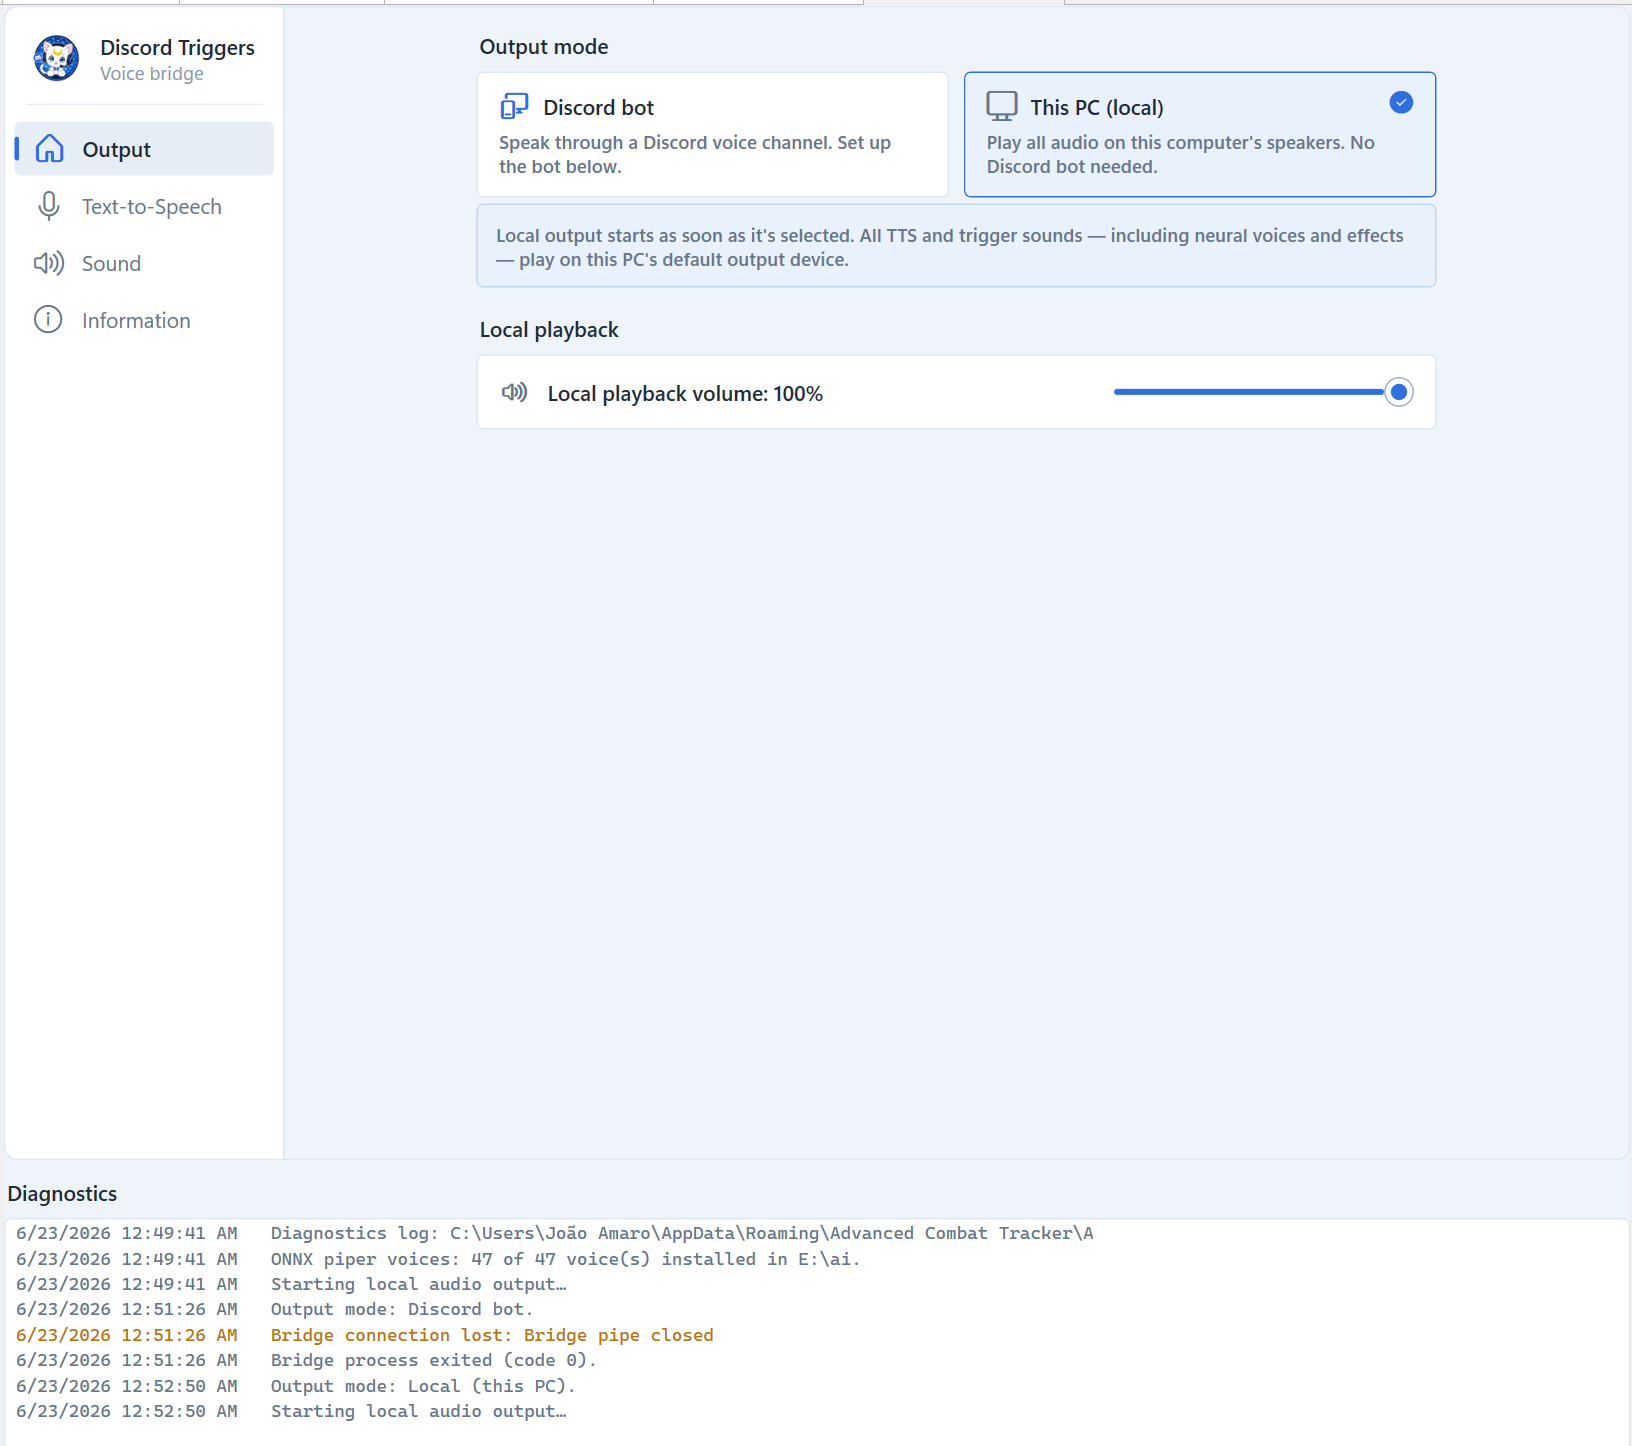
This page has two boxes: Discord connection (logging the bot in) and Voice channel (sending it into a channel).
The secret token that logs your bot in. You get this from the Discord Developer Portal — see Setup Step 4. The field is masked (shown as dots) and is saved between sessions, so you only paste it once.
🔒 Treat the token like a password. Anyone who has it controls your bot. Never share it or post it in screenshots. If it leaks, reset it in the Developer Portal and paste the new one here.
Connect logs the bot in with the token above. The bot should come online in your server within a few seconds. Once it's connected, the Server and Channel dropdowns fill in. You only need to click this once per ACT session.
A small status dot above the button reads Disconnected (red) or Connected (green) so you can tell the bot's state at a glance. Once the bot is online the button turns into Disconnect, which logs the bot out and takes it offline. (If it's in a voice channel, disconnecting also pulls it out.) Click Connect again whenever you want it back.
When ticked, the plugin logs the bot in automatically every time ACT starts, so you don't have to click Connect yourself. This setting is remembered. (It only logs the bot in — it does not auto-join a voice channel; you still press Join Channel when you're ready.)
The "Playing …" activity text shown under the bot's name in Discord's member list. Defaults to Playing with ACT Triggers. Purely cosmetic — set it to whatever you like, or clear it. Changes are pushed to Discord a few seconds after you stop typing, and the text is remembered between sessions.
The Discord server (guild) the bot should operate in. The dropdown lists every server the bot has been invited to. If it's empty, the bot either isn't connected yet or hasn't been invited to any server — see Common Questions & Issues.
The voice channel the bot will join. Only channels the bot has permission to View and Connect to are listed, so if a channel is missing, check the bot's role permissions on that server.
ℹ️ The Server and Channel you pick are not saved between sessions — you choose them each time you start ACT. Everything else on this page is remembered.
Join Channel sends the bot into the selected voice channel and starts routing your triggers to Discord. From that moment, any trigger that plays text-to-speech or a sound is played through the bot so everyone in the channel hears it.
Leave Channel pulls the bot out and stops routing triggers to Discord — TTS and sounds go back to playing only on your own PC, as they normally would. Leaving the channel does not log the bot out; you can re-join without reconnecting.
🎚️ Want some triggers to stay private (only you hear them) while others go to the party? That's controlled per-trigger in Triggernometry, not here — see How do I choose which triggers go to Discord?
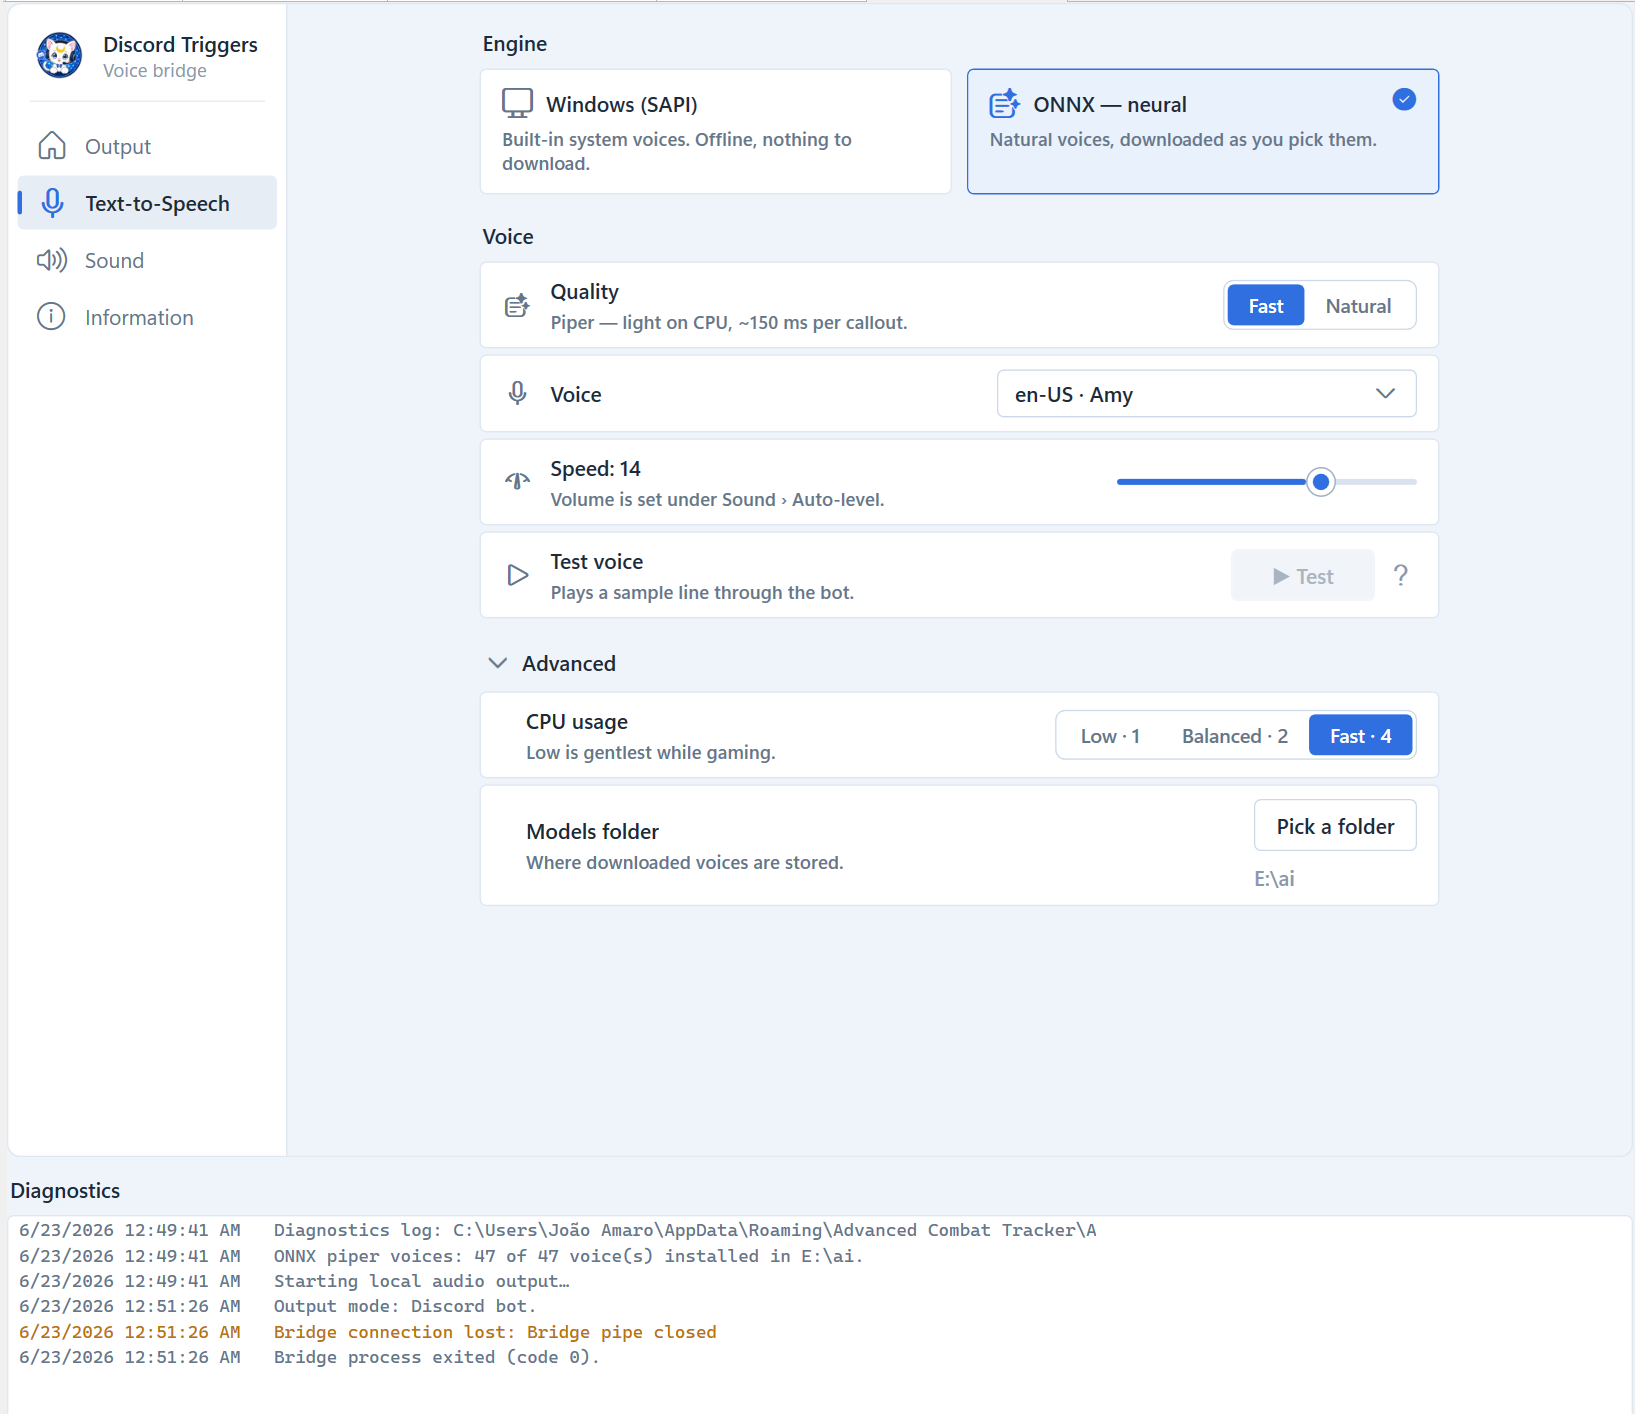
This page controls the voice that reads spoken triggers aloud (callouts). It does not affect triggers that play a .wav or other sound file — those go through the Sound page. Everything here is remembered between sessions.
The first choice on the page is which text-to-speech engine produces the voice. The rest of the page changes depending on which one you pick.
| Engine | What it is | When to use it |
|---|---|---|
| Windows (SAPI) | The built-in text-to-speech voices already on your PC — the same ones ACT itself uses. | You want it to just work offline, with nothing to download. |
| ONNX — neural ⭐ | Modern neural voices that sound far more natural. Each voice is downloaded the first time you pick it. | You want the most natural-sounding callouts and don't mind a one-time download per voice. |
Switching engines is instant and is remembered. A fresh install starts on Windows (SAPI), so nothing changes until you opt into neural voices.
When Windows (SAPI) is selected, the page shows three controls:
The voice used to read out spoken triggers. The dropdown lists the text-to-speech voices installed on your Windows PC. To add more, install them through Windows Settings → Time & Language → Speech; they appear here after you restart ACT.
💾 The selected voice is remembered. If it's ever uninstalled (so it's no longer in the list), the plugin falls back to the first available voice.
How loud the spoken voice is, from 0 (silent) to the maximum, default in the middle. This adjusts only the SAPI voice. (Neural/ONNX voices don't have a volume slider — their loudness is handled by Auto-level on the Sound page instead.)
How fast the voice talks. The middle is normal speed; slide left to slow it down, right to speed it up. Useful if callouts feel rushed or sluggish during a fight.
When ONNX — neural is selected, you get the neural-voice controls. Voices are downloaded on demand — picking one that isn't on your PC yet shows a download button; once it's downloaded it stays on disk for next time.
A toggle between the two neural voice families:
| Option | Family | Notes |
|---|---|---|
| Fast | Piper | Light on CPU (~150 ms per callout). Each voice is a small, separate download (a few MB to ~60 MB). Recommended for most users. |
| Natural | Kokoro | The most realistic voices, but heavier on CPU. All Kokoro voices come from a single 333 MB pack — download it once and every Natural voice is unlocked. |
The description under the toggle updates to remind you of the trade-off.
A searchable, language-grouped list of neural voices (60+ across English, Portuguese, Spanish, French, German, Russian, and more). Click the box to open the picker, then type to filter. Each entry shows:
- ⭐ a star marking the recommended pick for that language,
- the voice name and a muted quality tier,
- on the right, a ✓ if the voice is already downloaded, or its download size if not.
💡 The voice you pick is remembered between sessions. If a saved voice is ever removed from the catalog, the plugin keeps the default for that language and notes it in the diagnostics log.
When you select a neural voice that isn't on your PC yet, a blue strip appears with a Download · MB button:
- Click it to fetch and install the voice. A progress bar tracks the download and extraction.
- When it finishes, the strip briefly confirms " is ready." and the voice flips to ✓ downloaded.
- For Natural (Kokoro) voices, the single 333 MB pack covers every Natural voice — download it once and they're all ready.
Voices are stored under the Models folder (see Advanced). Downloading needs an internet connection; the voices themselves run fully offline once installed.
Same as the SAPI Speed slider — how fast the voice talks, middle is normal. The note underneath reminds you that volume for neural voices is set under Sound › Auto-level, not here.
Shared by both engines. ▶ Test plays a short sample line through the bot so you can hear the current voice and speed.
ℹ️ Because it plays through the bot, Test only works once you've connected and joined a voice channel on the General page — and, for a neural voice, once that voice has finished downloading. The ? next to the button is a reminder of this.
Collapsed by default and only shown for the ONNX engine. Click Advanced to expand it.
How many CPU threads the neural engine uses to synthesize a callout — a trade-off between speed and how much it competes with your game:
| Option | Threads | Notes |
|---|---|---|
| Low | 1 | Gentlest while gaming; slowest synthesis. |
| Balanced | 2 | Middle ground. |
| Fast ⭐ | 4 | Default. Quickest callouts; uses the most CPU. |
This only affects the ONNX engine — Windows (SAPI) voices ignore it.
Where downloaded neural voices are stored. By default this is %AppData%\ACT_DiscordTriggers\models. Click Pick a folder to move it elsewhere — for example, to a drive with more space. The current location is shown beneath the button. After changing it, the plugin re-scans the new folder, so already-downloaded voices there light up as ✓ and anything missing shows its download button again.
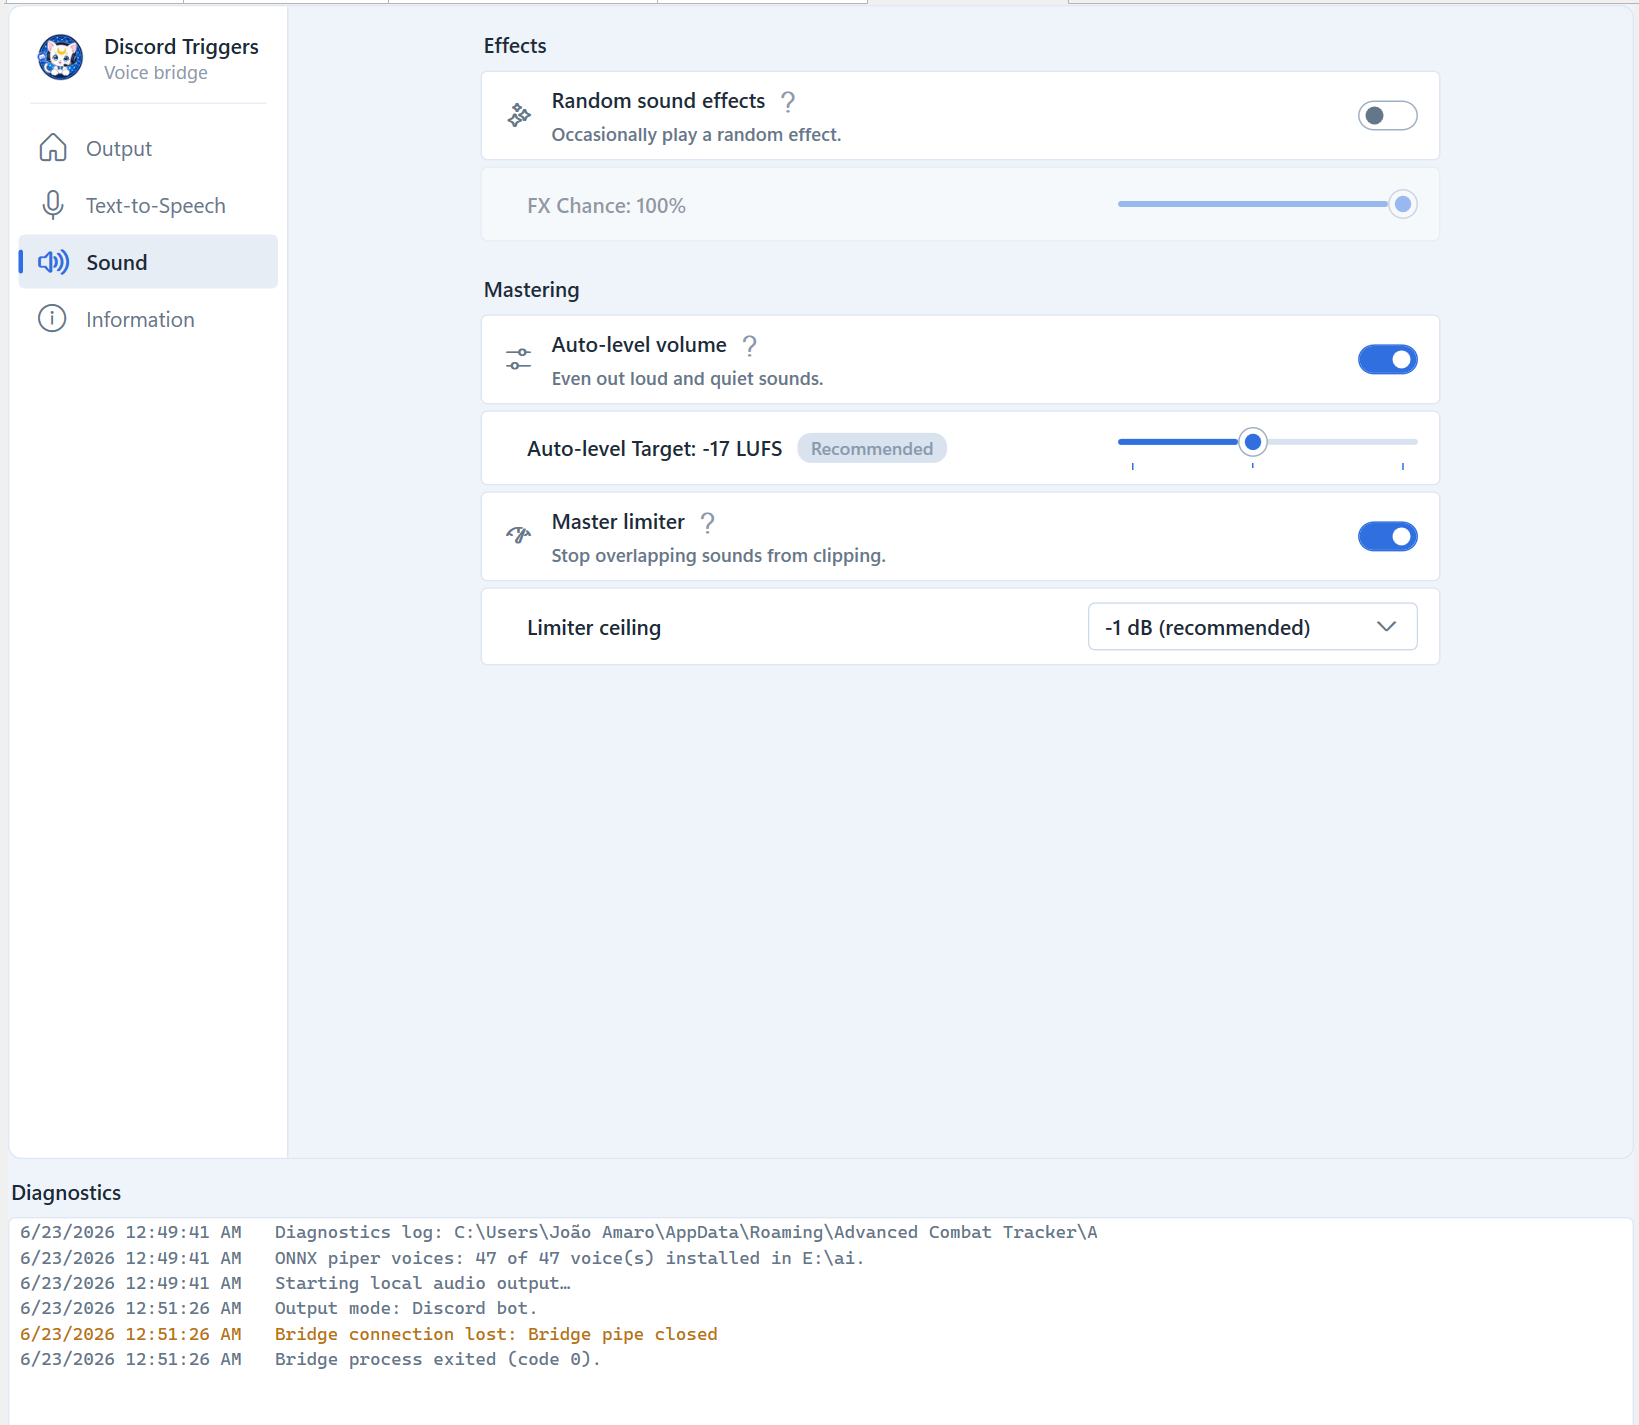
This page controls effects, leveling, and audio quality — settings that shape all trigger audio, both spoken callouts (from either TTS engine) and sound files. All of these settings are remembered between sessions.
When ticked, the plugin randomly applies an audio effect to triggers as they play — things like echo, reverb, distortion, a pitch shift (chipmunk or demon voice), a muffled/"behind a wall" filter, and similar. The effect (and its exact strength) is chosen at random each time, so the same trigger won't sound identical twice. It's a fun, chaotic option for casual play — off by default. Not every trigger is affected; how often it happens is set by FX Chance below.
The probability that any given trigger gets a random effect, from 0% to 100% (default 25%). For example, at 25% roughly one in four triggers comes out with an effect and the rest play clean. This slider only matters when Random Sound FX is ticked.
On by default. Trigger sounds come from all over — some are recorded loud, others are very quiet — which normally means constantly reaching for the volume knob. With this on, the plugin adjusts each clip toward one consistent loudness, so spoken callouts and sound files all land at a similar level. It can quiet down sounds that are too loud and boost quiet ones (up to a safe limit), without letting anything distort. Leaving this on is recommended for most users.
Sets how loud that consistent level is, measured in LUFS (the broadcast loudness standard — a perceptual measure of how loud a sound actually feels, not just its peak). The slider runs from a louder target on the left to a quieter target on the right; the value reads like -17 LUFS, and a smaller number such as -12 is louder while a larger number such as -24 is quieter. The default is −17 LUFS, marked Recommended on the rail. Turn it up (left) if triggers feel too soft over voice chat, or down (right) if they're overpowering. This only has an effect while Auto-level Volume is on.
On by default. When several triggers overlap, their volumes add together and the combined sound can exceed full scale and clip (a harsh, distorted crackle). The master limiter is a look-ahead brickwall limiter that rides the combined mix down to a safe ceiling before it clips, so simultaneous callouts and effects stay clean. It works on the final mix, independently of Auto-level — so it still catches overlap clipping even with auto-leveling turned off. Leave it on unless you have a specific reason not to.
The true-peak ceiling the limiter holds the mix below, in dB below full scale:
| Option | Notes |
|---|---|
| −0.5 dB | Loudest; leaves the least headroom. |
| −1 dB ⭐ | Default. Recommended — a safe margin for almost everyone. |
| −2 dB | More headroom; a touch quieter. |
| −3 dB | Most headroom; quietest, most conservative. |
A lower ceiling (more negative) leaves more safety margin at the cost of a little loudness. −1 dB is the recommended default. This only matters while the Master Limiter is on.
The audio bitrate the bot streams at — higher is clearer but uses more bandwidth:
| Option | Bitrate | Notes |
|---|---|---|
| Low | 48 kbps | Smallest bandwidth; fine for plain voice callouts. |
| Medium ⭐ | 96 kbps | Default. Good balance of clarity and bandwidth; works in any voice channel. |
| High | 128 kbps | Clearest, but needs a voice channel that supports 128 kbps. |
⚠️ High requires a boosted server. A normal Discord voice channel caps out around 96 kbps. If you pick High in a channel that doesn't support it, the plugin shows a red warning — it's harmless (Discord just delivers what the channel allows), but you won't actually get the higher quality unless the server is boosted to raise the channel's bitrate limit. Medium is the safe choice for everyone.
ℹ️ Audio Quality sets the Discord streaming bitrate, so it only applies in Discord bot output mode. In This PC (local) mode audio plays straight to your speakers at full quality regardless of this setting.
A reference page — nothing to configure here. It shows:
- The plugin name and version (handy when reporting a bug).
- Quick links to the project on GitHub, the issue tracker, and the First-Time Setup Guide.
- An Open log folder button that jumps straight to the diagnostics log (see below).
- A short legal disclaimer and credits.
The panel along the bottom of the plugin tab shows a live, timestamped log of what the plugin and bot are doing — connecting, joining channels, playing triggers, and any errors. You can select lines and press Ctrl+C to copy them.
For bug reports, though, the diagnostics log file is far more useful than copying from this panel. It's always on (nothing to enable) and merges the plugin and bot logs into one file:
-
ACT_DiscordTriggers-diagnostics.login your ACT data folder (%AppData%\Advanced Combat Tracker\). - The fastest way to find it: Information page → Open log folder.
Attach that file when you open an issue — it's the single most helpful thing you can include. More detail in Where are the logs?
| Setting | Page | Default | Saved between sessions? |
|---|---|---|---|
| Output mode | Main | Discord bot | ✅ |
| Discord Bot Token | General | (empty) | ✅ |
| Auto Connect | General | Off | ✅ |
| Bot Status | General | Playing with ACT Triggers |
✅ |
| Server | General | — | ❌ pick each session |
| Channel | General | — | ❌ pick each session |
| TTS Engine | Text-to-Speech | Windows (SAPI) | ✅ |
| SAPI Voice | Text-to-Speech | First installed voice | ✅ |
| SAPI Volume | Text-to-Speech | Middle | ✅ |
| Speed | Text-to-Speech | Normal | ✅ |
| Quality (neural family) | Text-to-Speech | Fast (Piper) | ✅ |
| Neural voice | Text-to-Speech | Recommended for the language | ✅ |
| CPU usage (neural) | Text-to-Speech | Fast · 4 | ✅ |
| Models folder | Text-to-Speech | %AppData%\ACT_DiscordTriggers\models |
✅ |
| Random Sound FX | Sound | Off | ✅ |
| FX Chance | Sound | 25% | ✅ |
| Auto-level Volume | Sound | On | ✅ |
| Auto-level Target | Sound | −17 LUFS | ✅ |
| Master Limiter | Sound | On | ✅ |
| Limiter Ceiling | Sound | −1 dB | ✅ |
| Audio Quality | Sound | Medium (96 kbps) | ✅ |
- First-Time Setup Guide — create the bot, install the plugin, connect it.
- Common Questions & Issues — troubleshooting and FAQ.