-
测试驱动开发 TDD
测试驱动开发: 英文全称 Test-Driven Development,简称 TDD,是一种不同于传统 软件开发流程 的新型的开发方法。 它要求在编写某个功能的代码之前先编写测试代码,然后只编写使测试通过的功能代码,通过测试来推动整个开发的进行。
重点:测试先行(未写实现,先写测试)
-
验收测试驱动开发 ATDD Acceptance Test Driven Development
-
行为驱动开发 BDD
行为驱动开发(BDD): 是测试驱动开发的延伸,开发使用简单的,特定于领域的脚本语言。这些 DSL 将结构化自然语言语句转换为可执行测试。结果是与给定功能的验收标准以及用于验证该功能的测试之间的关系更密切。因此,它一般是测试驱动开发(TDD)测试的自然延伸。
-
领域驱动开发 DDD
DDD 指的是 Domain Drive Design,也就是领域驱动开发, DDD 实际上也是建立在这个基础之上,因为它关注的是 Service 层的设计,着重于业务的实现, 将分析和设计结合起来,不再使他们处于分裂的状态,这对于我们正确完整的实现客户的需求,以及建立一个具有业务伸缩性的模型。
对系统中最小可测单元进行测试
归类:白盒测试(想象一个盒子,我们能直接看到盒子的内部结构和逻辑结构)
- 改进实现的设计 开始编写一个功能而不给设计带来太多的思考是开发人员非常常见的错误。使用单元测试将强制思考并重新考虑设计,如果您使用 TDD,则影响会更大。
- 允许重构 既然你已经有测试确保你所有的东西都能按预期工作,你可以很容易地添加对代码的修改,确保你没有添加任何错误。
- 添加新功能而不会破坏任何内容 当您添加新功能时,您可以运行测试以确保您不会破坏应用程序的任何其他部分。
- 测试是很好的文档。
- 测试使开发人员对他们的工作更有信心。
- 单元测试:白盒测试(知悉系统内部)
- 集成测试:黑盒测试(不知悉系统内部的情况下,对系统整体功能进行测试)
- 端到端测试:整体模拟系统与外部的数据交互
- 系统测试:
Step 1:明确需求,设计测试案例
Step 2:根据测试案例,编写单元测试代码
Step 3:编写业务代码
Step 4:根据单元测试运行结果,判断程序正确性
写 Angular 测试使用到的
断言函数,提供了针对值、Spy 等相关的场景的断言
it("object assignment", () => {
  const data = { one: 1 };
  data["two"] = 2;
  expect(data).toEqual({ one: 1, two: 2 });
});单元测试的最小单元, 对应于一个 Case
语法:
/**
 * @param expectation 简短的对此测试样例的描述
 * @param assertion 一个包裹单元测试断言及相关逻辑的函数
 */
function it(expectation: string, assertion: (done: () => void) => void);
通常一个 it() 函数只封装包含对于一个测试点的测试代码,例如对邮箱格式的单元测试,可能某一个此函数,就只封装对于 “邮箱不能少了 @ 符号” 规则的相关测试
代码:async/await
it("does a thing", async function () {
  // Will fail if doSomethingThatMightThrow throws.
  doSomethingThatMightThrow();

  // Will fail if the promise returned by
  // asyncFunctionThatMightFail is rejected.
  const value = await asyncFunctionThatMightFail();
  // ...
});
promise
it("does a thing", function () {
  // Since `.then` propagates rejections, this test will fail if
  // the promise returned by asyncFunctionThatMightFail is rejected.
  return asyncFunctionThatMightFail().then(function (value) {
    // ...
  });
});
callback
it("does a thing", function (done) {
  someAsyncFunction(function (result) {
    expect(result).toEqual(someExpectedValue);
    done();
  });
});多个 it,用 函数封装:describe 应该封装最小测试集
/**
 * @param description 此测试集合的描述
 * @param specDefinitions 测试集合
 */
function describe(description: string, specDefinitions: () => void);
普通使用
describe("HeroesService (with spies)", () => {
  it("should return expected heroes (HttpClient called once)", (done: DoneFn) => {
    // Some statement
  });

  it("should return an error when the server returns a 404", (done: DoneFn) => {
    // Some statement
  });
});
嵌套使用
describe('HeroesService (with spies)', () => {
  let httpClientSpy: { get: jasmine.Spy };
  let heroService: HeroService;

  beforeEach(() => {
    // TODO: spy on other methods too
  });

  it('should return expected heroes (HttpClient called once)', (done: DoneFn) => {
    // Some statement
  });

  describe('HeroesService (with spies)', () => {
    it('should return an error when the server returns a 404', (done: DoneFn) => {
	  // Some statement
    });
  }
});-
beforeAll() -
beforeEach() -
afterEach() -
afterAll()
beforeEach\\afterEach()
写单元测试公共逻辑的地方,分别在每个 it() 执行之前和之后执行,这里可以把 beforeEach()\afterEach() 理解为无副作用的,因为是写单元测试,所以公共逻辑相对于每个 it 都是独立的,不会在多个 case 之间共享任何数据,如果下一个 Case 依赖于上一个 Case 的执行过程,则违背了单元测试的初衷理念。
所以 afterEach 可以用来清除每一个 Case 执行过程中产生的一些副作用,比如测试中需要给全局的服务初始化一些数据,那么就需要在 afterEach 中把初始化的数据清空。
configureTestingModule()配置用于测试的模块createComponent()创建组件get()获取模拟注入类
configureTestingModule():
为测试配置模块 Module,这个需要你像使用普通组件一样,把测试组件用到的依赖 Module、服务、以及测试组件本身的定义统统配置好,否则测试组件是无法正常运行的。
TestBed.configureTestingModule({
  imports: [CommonModule, FormsModule, ThyAutocompleteModule, ThyOptionModule],
  declarations: declarations,
  providers: [UpdateHostClassService],
}).compileComponents();
这里想单独提下 providers,和配置普通 Angualr Module 一样,你也可以在**configureTestingModule()** 中配置测试组件所依赖的提供商,这在测试中是一个极其便利的特性,因为单元测试本身可能只需要聚焦自己的关键特性,比如我们组件库中的一个 ScrollService:
@Injectable({
  providedIn: "root",
})
export class ThyScrollService {
  private document: Document;

  constructor(@Inject(DOCUMENT) document: any) {
    this.document = document;
  }

  setScrollTop(element: Element | Window, topValue: number = 0): void {
    if (element === window) {
      this.document.body.scrollTop = topValue;
      this.document.documentElement.scrollTop = topValue;
    } else {
      (element as Element).scrollTop = topValue;
    }
  }
}
很明显我只需要测试 setScrollTop 中的赋值逻辑,而 setScrollTop 方法依赖全局的 document 对象、还有参数 element,这个是需要真实的 DOM 上下文环境的,而这里单纯测试这个服务方法其实是没必要牵扯那么多上下文的,document 以及 element 完全可以通过 Mock 的方式提供,这个时候就需要用到 providers,通过配置 providers 来提供 mock 对象:
injector = TestBed.configureTestingModule({
  providers: [ThyScrollService, { provide: DOCUMENT, useClass: MockDocument }],
});
MockDocument 只需要模拟 document 对象的实例以及实例属性即可
class MockDocument {
  body = new MockElement();
  documentElement = new MockDocumentElement();
}
class MockDocumentElement {}
class MockElement {}detectChanges()检测更新
测试固件,它是非常重要的,是访问测试组件的入口,这里从使用的角度简单介绍下它
1. 创建固件
并且一般需要在 beforeEach 中创建测试组件的实例,因为每一个 Case 都需要对 Angular 组件进行创建、销毁,Angular 对这些操作进行了封装,通过 TestBed 创建组件口返回的对象就是一个 ComponentFixture 类型的,通常写法:
let fixture: ComponentFixture<BasicSelectComponent>;
beforeEach(fakeAsync(() => {
  fixture = TestBed.createComponent(BasicTestComponent);
  fixture.detectChanges();
}));
在后续的 Case 中就可以使用 fixture 对象测试 Demo 组件进行各种验证。
2. 常用属性
ComponentFixture
| 属性 | 描述 |
| componentInstance: T | The instance of the root component class. 获取测试组件实例 |
| debugElement: DebugElement | The DebugElement associated with the root element of this component 测试组件关联的根元素的DebugElement,通常用它访问测试组件中的HTML Element |
3. 常用方法
| 属性 | 描述 |
| detectChanges() | Trigger a change detection cycle for the component. 强制执行一次测试的组件变化检测,这个非常常用,一般会在组件创建完成后里面强制执行一次变化检测 |
** detectChanges() 检测更新**:
这个是写 Angular 测试中经常遇到的,经常需要调用 fixture.detectChanges() 强制触发变化检测,如果不调用它,模板中绑定的数据就不会更新,这个其实是跟 Angular 的变化检测机制有关。
测试环境跟真实的运行环境还是有很大差别的,变化检测就是其中一个,Angular 其实是通过 NgZone 控制可能造成模板数据更新的点,在合适的时候触发变化检测,而测试环境是没有 NgZone 的,所以需要手动调用变化检测。
.css()通过 css 查找.directive()通过指令查找.all()全部
上面介绍 fixture 时说到了它有一个 debugElement 属性,对应于测试组件的根元素对应的 DebugElement,访问组件的 HTM Element 就需要靠这个 debugElement 实例,它的类型是 DebugElement。
通常用法:
const trigger = fixture.debugElement.query(By.css("input")).nativeElement;需要给 debugElement 的 query 配置一个 Element 查询方法,这就用到了 By ,它提供了三种匹配方法, By.all 、 By.css 、 By.directive ,通常用后两个,下面的注释中简单了进行了介绍:
// Match elements by the given CSS selector.
// css 可以传入css选择器,如标签名称、class name等等
static css(selector: string): Predicate<DebugElement>;
// Match elements that have the given directive present.
// directive 可以传入组件或者指令的类型
static directive(type: Type<any>): Predicate<DebugElement>;
返回类型也是 DebugElement,通过它的 nativeElement 就可以取到原生的 DOM 元素
** fakeAsync() 模拟异步**:
程序中有异步操作是很常见的,比如 setTimeout() 、 Promise.then() 等,如果我需要测试异步执行完成之后的结果就需要用到 tick() ,而 tick() 就必须运行在 fakeAsync() 中


如果使用 tick() 时不使用 fakeAsync() 中就出现如下错误:
Error: The code should be running in the fakeAsync zone to call this function
** tick() 模拟异步时间片的定时器**:
必须运行在**fakeAsync()** 中,它可以设置一个等待时长的参数,单位是毫秒
it("should open the panel when trigger focused", fakeAsync(() => {
  dispatchFakeEvent(trigger, "focusin");
  fixture.detectChanges();
  tick(500);
  expect(fixture.componentInstance.autocomplete.isOpened).toBe(true);
  expect(overlayContainerElement.textContent).toContain("Steak");
}));
上面代码中间一句 tick(500); 就表示等待 500 毫秒,然后再进行相关的验证,加这句话的主要原因是要测试的 Autocomplete 组件的面板弹出有 500ms 的动画,只有动画结束后 DOM 才真正渲染,如果没有 tick() 验证会失败。
** flush() 模拟异步时间片的定时器**:
跟tick类似,同样是模拟异步时间片的定时器,只不过它的结束条件不是一个时间值,而是微任务 队列为空,一些 Promise.then 的场景(ngModel 赋值触发的异步),就可以使用 flush。
** [(ngModel)] 模板绑定(异步)**:
前面说过 ngModel 的赋值过程是异步操作(Promise.then),在测试中赋值完成立马调用变化检测,然后断言,会发现模板中的值没有任何的更新,这个其实是一个坑,一般初次写都会遇到这个问题,下面看下我们业务组件库中一个选人组件的 Case,测试组件绑定了uid 属性(uid 会直接绑定到输入组件的 ngModel 上),测试逻辑如下:
it(`should get member when assign uid`, fakeAsync(() => {
  testComponent.uid = teamMock.members[0].uid;
  const spy = spyOn(userStore, "getUser");
  spy.and.returnValue(teamMock.members[0]);
  fixture.detectChanges();
  tick();
  fixture.detectChanges();
  expect(singleSelectHtmlElement.innerText).toContain(teamMock.members[0].display_name);
}));
可以看到调用了两次 fixture.detectChanges; ,过程如下:
- 第一次调用 detectChanges 会触发 ngModel 的 writeValue(异步)
- 调用 tick 异步等待,其实是等待 ngModel 的异步 writeValue 完成(这种场景可以使用 flush 代替)
- 第二次 detectChanges 才会触发模板的刷新
- 断言验证
createSpy()spyOn()
Spy 意为陷阱,jasmine 用它来模拟和监听函数调用,它有很多种用法,比如:createSpyObj、createSpy、SpyOn,为避免混淆我只介绍我用的较多的 createSpy、spyOn。
Spy 用来追踪函数的调用历史信息(是否被调用、调用参数列表、被请求次数等)。Spy 仅存在于定义它的 describe 和 it 方法块中,并且每次在 spec 执行完之后被销毁。
https://www.cnblogs.com/laixiangran/p/5060922.html
createSpy()
我通常用它测试组件的 Output 事件是否触发,这里以 Autocomplete 组件的面板关闭事件 thyClosed 为例
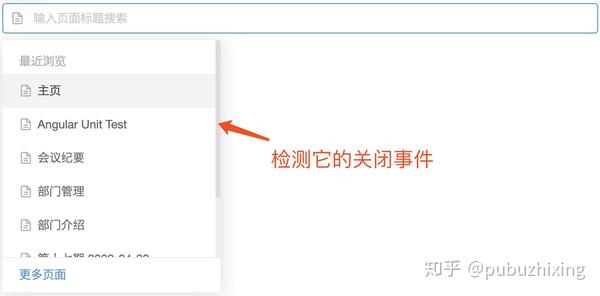
- 创建一个 Spy 对象
const closedSpy = jasmine.createSpy("closed event spy callback");- 订阅组件的 thyClosed 事件
fixture.componentInstance.autocomplete.thyClosed.subscribe(() => {
  closedSpy();
});- 触发关闭,这里代码比较多,因为需要先触发 autocomplete 打开,然后点击 option 选项才能触发到关闭
dispatchFakeEvent(trigger, "focusin");
fixture.detectChanges();
tick(500);
const option = overlayContainerElement.querySelector("thy-option") as HTMLElement;
option.click();
fixture.detectChanges();- 断言
expect(closedSpy).toHaveBeenCalled();到此一个测试组件事件触发的 case 就完成了。
spyOn():
Install a spy onto an existing object.
在一个已经存在的对象上装载 spy,实现对函数执行的监控
这个我用的不是特别多,但是我看其他人用的挺多的,这里也简单介绍下,还以测试 Autocomplete 的 thyClosed 事件触发为例,看看和直接使用 createSpy 的区别。
区别一:
首先需要在测试 Demo 中绑定 thyClosed 事件
# template
<thy-autocomplete #auto [thyEmptyText]="'没有搜索到任何数据'" (thyClosed)="onClosed()">
    <thy-option *ngFor="let item of foods" [thyLabelText]="item.viewValue" [thyValue]="item.value"></thy-option>
</thy-autocomplete>
# TS onClosed() {}
这样正常 thyClosed 事件触发的时候会执行组件中的 onClosed() 方法,
区别二:
给组件实例装载 spy,代码如下
const closedSpy = spyOn(fixture.componentInstance, "onClosed");这个时候当组件中的 onClosed() 执行的时候,就会执行刚刚创建的 closedSpy()
后续验证逻辑就和前面一样了。
这里我对 spyOn 的理解其实就是,拦截对象上已有方法的执行(也可以通过调用 callThrough 告诉 jasmine 除了监控函数的执行,同时也需要执行实际的代码),转而执行 Spy,这样我就可以对 Spy 进行调用的验证。
dispatchFakeEvent()dispatchKeyboardEvent()
** dispatchFakeEvent() 模拟 DOM 事件**:
这个工具方法主要用来在测试中模拟 DOM 事件,比如 click、focus、keydown 等等,其实就是为测试 DOM 事件触发而写的工具函数,我们自己组件库的封装应该是参考 material desgin 的实现,常用的事件肯定是满足了
it("should emit opend event when the panel opened", fakeAsync(() => {
  dispatchFakeEvent(trigger, "focus");
  fixture.detectChanges();
  tick(500);
  expect(fixture.componentInstance.openedSpy).toHaveBeenCalled();
}));
上述代码就使用 dispatchFakeEvent(trigger, 'focus'); 语句模拟触发 trigger 元素的焦点事件,如果直接使用 trigger.foucs(); 语句也是一样的。
** dispatchKeyboardEvent() 模拟键盘事件**:
我在写编辑器的测试时,需要模拟 ctrl+s 、 ctrl+z 等复杂的键盘事件,dispatchFakeEvent 就不太满足了,查了 material design 的最新代码,他们有封装了一个 createKeyboardEvent 事件,最后一个参数 modifiers 提供了组合快捷键的模拟,ModifierKeys 类型定义如下:
export interface ModifierKeys {
  control?: boolean;
  alt?: boolean;
  shift?: boolean;
  meta?: boolean;
}
看下 dispatchKeyboardEvent 的参数:
/**
 * Shorthand to dispatch a keyboard event with a specified key code.
 * @docs-private
 */
export function dispatchKeyboardEvent(
  node: Node,
  type: string,
  keyCode?: number,
  key?: string,
  target?: Element,
  modifiers?: ModifierKeys
): KeyboardEvent {
  return dispatchEvent(node, createKeyboardEvent(type, keyCode, key, target, modifiers)) as KeyboardEvent;
}
这样一来测试中模拟键盘事件就已经很完善了。
测试工具包含了 TestBed 类和 @angular/core/testing 中的一些方法。
- 在每个 spec 之前 ,
TestBed将自己重设为初始状态。
import { Component }   from '@angular/core';

@Component({
  selector: 'app-banner',
  template: '<h1>{{title}}</h1>'
})
export class BannerComponent {
  title = 'Test Tour of Heroes';
}

let comp:    BannerComponent;
let fixture: ComponentFixture<BannerComponent\>;
let de:      DebugElement;
let el:      HTMLElement;

describe('BannerComponent', () => {
  beforeEach(() => {
    TestBed.configureTestingModule({
      declarations: [ BannerComponent ], // declare the test component
    });

    fixture = TestBed.createComponent(BannerComponent);

    comp = fixture.componentInstance; // BannerComponent test instance

    // query for the title <h1> by CSS element selector
    de = fixture.debugElement.query(By.css('h1'));
    el = de.nativeElement;

  });
});- 组件测试
- TestBed.createComponent 创建 BannerComponent 组件的实例,可以用来测试和返回fixture。
- TestBed.createComponent 关闭当前 TestBed 实例,让它不能再被配置。
- query方法接受 predicate 函数,并搜索 fixture 的整个 DOM 树,试图寻找第一个满足 predicate 函数的元素。
- queryAll方法返回一列数组,包含所有 DebugElement 中满足 predicate 的元素。
- By类是 Angular 测试工具之一,它生成有用的 predicate。 它的 By.css 静态方法产生标准 CSS 选择器 predicate,与 JQuery 选择器相同的方式过滤。
- detectChanges:在测试中的 Angular 变化检测。 每个测试程序都通过调用 fixture.detectChanges() 来通知 Angular 执行变化检测。
这个依赖的模拟方式有两种:伪造服务实例(提供服务复制品)、刺探真实服务。这两种方式都不错,只需要挑选一种最适合你当前测试文件的测试方式来做最好。
被测试的组件不一定要注入真正的服务。实际上,服务的复制品(stubs, fakes, spies 或者 mocks)通常会更加合适。 spec 的主要目的是测试组件,而不是服务。真实的服务可能自身有问题。
这个测试套件提供了最小化的 UserServiceStub 类,用来满足组件和它的测试的需求。
userServiceStub = {
  isLoggedIn: true,
  user: { name: 'Test User'}
};
获取注入的服务
测试程序需要访问被注入到组件中的 UserService(stub 类)。
Angular 的注入系统是层次化的。 可以有很多层注入器,从根 TestBed 创建的注入器下来贯穿整个组件树。
最安全并总是有效的获取注入服务的方法,是从被测试的组件的注入器获取。 组件注入器是 fixture 的 DebugElement 的属性。
出人意料的是,请不要引用测试代码里提供给测试模块的 userServiceStub 对象。它是行不通的! 被注入组件的 userService 实例是彻底不一样的对象,是提供的 userServiceStub 的克隆。
- TestBed.get 方法从根注入器中获取服务。 例如:
dataService = testBed.get(DataService);
测试代码
beforeEach(() => {
  // stub UserService for test purposes
  userServiceStub = {
    isLoggedIn: true,
    user: { name: "Test User" },
  };

  TestBed.configureTestingModule({
    declarations: [WelcomeComponent],
    // 重点
    providers: [{ provide: UserService, useValue: userServiceStub }],
  });

  fixture = TestBed.createComponent(WelcomeComponent);
  comp = fixture.componentInstance;

  // UserService from the root injector
  // 重点
  userService = TestBed.get(UserService);

  //  get the "welcome" element by CSS selector (e.g., by class name)
  de = fixture.debugElement.query(By.css(".welcome"));
  el = de.nativeElement;
});注入了真是的服务,并使用 Jasmine 的 spy 替换关键的 getXxxx 方法。
spy = spyOn(remoteService, "getTodos").and.returnValues([Promise.resolve(datas), Promise.resolve(datas2)]);Spy 的设计是,所有调用 getTodos 的方法都会受到立刻解析的承诺,得到一条预设的名言。
写单元测试时,it 里经常会有几个常见的方法, async() , fakeAsync() , tick() , jasmine.done() 方法等。 这几个方法,都帮助我们简化了异步测试程序的代码。但是需要正确的使用这几个方法。
组件
@Component({
  selector: "twain-quote",
  template: '<p class="twain"><i>{{quote}}</i></p>',
})
export class TwainComponent implements OnInit {
  intervalId: number;
  quote = "...";
  constructor(private twainService: TwainService) {}

  ngOnInit(): void {
    this.twainService.getQuote().then((quote) => (this.quote = quote));
  }
}- async
- 是Angular TestBed的一部分。通过将测试代码放到特殊的异步测试区域来运行,async 函数简化了异步测试程序的代码。
- 接受无参数的函数方法,返回无参数的函数方法,变成 Jasmine 的 it 函数的参数。
- 它的参数看起来和普通的 it 参数主体一样。 没有任何地方显示异步特征。 比如,它不返回承诺,并且没有 done 方法可调用,因为它是标准的 Jasmine 异步测试程序。
使用例子:
it("should show quote after getQuote promise (async)", async(() => {
  fixture.detectChanges();

  fixture.whenStable().then(() => {
    // wait for async getQuote
    fixture.detectChanges(); // update view with quote
    expect(el.textContent).toBe(testQuote);
  });
}));- 简单介绍一下 whenStable()方法
- 测试程序必须等待 getQuote 在 JavaScript 引擎的下一回合中被解析。
- ComponentFixture.whenStable 方法返回它自己的承诺,它 getQuote 承诺完成时被解析。实际上,“stable”的意思是当所有待处理异步行为完成时的状态,在“stable”后whenStable承诺被解析。
- 然后测试程序继续运行,并开始另一轮的变化检测(fixture.detectChanges ), 通知 Angular 使用名言来更新 DOM。 getQuote 辅助方法提取出显示元素文本,然后 expect 语句确认这个文本与预备的名言相符。
- fakeAsync
- fakeAsync 是另一种 Angular 测试工具。
- 和async一样,它也接受无参数函数并返回一个函数,变成 Jasmine 的 it 函数的参数。
- fakeAsync 函数通过在特殊的fakeAsync 测试区域运行测试程序,让测试代码更加简单直观。
- 对于 async 来说,fakeAsync 最重要的好处是测试程序看起来像同步的。里面没有任何承诺。 没有 then(...)链来打断控制流。
- tick tick 函数是 Angular 测试工具之一,是 fakeAsync 的同伴。 它只能在 fakeAsync 的主体中被调用。
- 调用 tick()模拟时间的推移,直到全部待处理的异步任务都已完成,在这个测试案例中,包含 getQuote 承诺的解析。
使用例子
it("should show quote after getQuote promise (fakeAsync)", fakeAsync(() => {
  fixture.detectChanges();
  tick(); // wait for async getQuote
  fixture.detectChanges(); // update view with quote
  expect(el.textContent).toBe(testQuote);
}));- jasmine.done 虽然 async 和 fakeAsync 函数大大简化了异步测试,但是你仍然可以使用传统的 Jasmine 异步测试技术。 你仍然可以将接受 done 回调的函数传给 it。 但是,你必须链接承诺、处理错误,并在适当的时候调用 done。 使用例子
it("should show quote after getQuote promise (done)", (done) => {
  fixture.detectChanges();

  // get the spy promise and wait for it to resolve
  spy.calls.mostRecent().returnValue.then(() => {
    fixture.detectChanges(); // update view with quote
    expect(el.textContent).toBe(testQuote);
    done();
  });
});
以上这三个测试例子是等价的,也就是说,你可以随你喜好选择你喜欢的测试方式来进行单元测试的编写。
使用例子
// async beforeEach
beforeEach(async(() => {
  TestBed.configureTestingModule({
    declarations: [DashboardHeroComponent],
  }).compileComponents(); // compile template and css
}));注意 beforeEach 里面对 async 的调用,因为异步方法 TestBed.compileComponents 而变得必要。
- 在本例中,TestBed.compileComponents 编译了组件,那就是 DashbaordComponent。 它是这个测试模块唯一的声明组件。
- 本章后面的测试程序有更多声明组件,它们中间的一些导入应用模块,这些模块有更多的声明组件。 一部分或者全部组件可能有外部模板和 CSS 文件。 TestBed.compileComponents 一次性异步编译所有组件。
- compileComponents 方法返回承诺,可以用来在它完成时候,执行更多额外任务。
测试前期代码
// async beforeEach
beforeEach(async(() => {
  TestBed.configureTestingModule({
    declarations: [DashboardHeroComponent],
  }).compileComponents(); // compile template and css
}));

// synchronous beforeEach
beforeEach(() => {
  fixture = TestBed.createComponent(DashboardHeroComponent);
  comp = fixture.componentInstance;
  heroEl = fixture.debugElement.query(By.css(".hero")); // find hero element

  // pretend that it was wired to something that supplied a hero
  expectedHero = new Hero(42, "Test Name");
  comp.hero = expectedHero;
  fixture.detectChanges(); // trigger initial data binding
});测试代码是将模拟英雄(expectedHero)赋值给组件的 hero 属性的。
// pretend that it was wired to something that supplied a hero
expectedHero = new Hero(42, "Test Name");
comp.hero = expectedHero;
点击事件
it("should raise selected event when clicked", () => {
  let selectedHero: Hero;
  comp.selected.subscribe((hero: Hero) => (selectedHero = hero));

  heroEl.triggerEventHandler("click", null);
  expect(selectedHero).toBe(expectedHero);
});
这个组件公开 EventEmitter 属性。测试程序像宿主组件那样来描述它。
heroEl 是个 DebugElement,它代表了英雄所在的
如果组件想期待的那样工作,click()通知组件的 selected 属性发出 hero 对象,测试程序通过订阅 selected 事件而检测到这个值,所以测试应该成功。
triggerEventHandler
Angular 的 DebugElement.triggerEventHandler 可以用事件的名字触发任何数据绑定事件。 第二个参数是传递给事件处理器的事件对象。
下面都是自己在实际的编写单元测试时,真实遇到的问题,自己真的是在这上面花费了很多时间啊!!!为什么没有说花冤枉时间呢?就是因为是自己对单元测试还没哟掌握,所以出了错,不要紧,重要的是以后不能再犯!
刚刚接触 angular2 吧,对很多 service 的写法不是很了解,以至于真的是白白浪费了很多时间,尤其是在这个 service 的模拟上。可能聪明如你,不会犯我这样简单却又致命的错误吧,只希望,以后的贺贺也可以不再犯这样的错!? 自己一把... ...
首先来看一下,我创建的这个 service 的用法。
@Injectable()
export class BaseDataService {
  remoteService: BaseDataRemoteService;
  private datasMap = {}; // 用于存储所有的数据
  private todosCache = {}; // 待办数据的id的临时存储
  private draftsCache = {}; // 草稿数据临时存储
  private relatedCache = {}; // 已办理数据临时存储

  constructor(private config: any, private http: Http) {
    this.config = config;
    this.config.baseUrl = config.baseUrl || config.name;
    this.remoteService = new BaseDataRemoteService(this.config.baseUrl, this.config.idPropertyName, this.http);
  }

  getTodos(userId: String, pageNo?: number): any {
    pageNo = pageNo || 0;
    return this.remoteService.getTodos(userId, pageNo).then(
      (datas) => {
        let todos = datas.content;
        todos.forEach((element) => {
          this.datasMap[element[this.config.idPropertyName]] = element;
          if (pageNo === 0) {
            this.todosCache = {};
          }
        });

        this.todosCache[pageNo] = this.getRecordIds(todos);
        return todos;
      },
      () => {
        return [];
      }
    );
  }
}
其中的
BaseDataRemoteService我是自己 new 出来的,而且这个BaseDataService也是我自己 new 出来的,所以首先第一点,我应该自己创建,而不能使用 angular 的 DI 系统来帮助我创建。第二点就是在模拟的时候,我竟然傻傻的自己去在 spec 文件中自己去 new 了
BaseDataRemoteService,所以我根本没有办法去执行spyOn(foo, "getBar")这样的模拟,然后就是一直的出错。错样百出了!
正确的单元测试:
 function makeEnvironment() {
   return TestBed.configureTestingModule({
    providers: [
       MockBackend,
       BaseRequestOptions,
       {
         provide: Http,
         useFactory: (backend, options) => {
           return new Http(backend, options);
         }, deps: [MockBackend, BaseRequestOptions],
       },
     ],
     imports: [HttpModule],
   });
 }

 const userId: String = '123';
 let pageNo: number;

 describe('Service: base-data', () => {

   const config = {
     name: 'archives/out',
     baseUrl: '/archives/out',
     idPropertyName: 'outId',
     subflagPropertyName: 'subflag',
   };

   const datas = [];

   const datas2 = [];

   let service: BaseDataService;
   let spy: jasmine.Spy;
   let http: Http; // 还应该是DI系统的

   beforeEach(() => {
     const testBed = makeEnvironment();
     http = testBed.get(Http);

     service = new BaseDataService(config, http); //这是自己new出来的

 // 但是自己不能new出来BaseDataRemoteService
   });

   it('should be created', () => {
     expect(service).toBeTruthy();
   });

     it('获取到的数据为空', async(() => {
       // 这样的使用才是正确的!!!
       spy = spyOn(service.remoteService, 'getTodos').and.returnValue(Promise.resolve({content: []}));
       service.getTodos(userId).then(todos => {
         expect(todos.length).toBe(0);
         expect(todos).toEqual([]);
         expect(service.getTodosCache(0).length).toBe(0);
       });
     }));
下次一定要注意,不要瞎写!!!
相信大家对这段单元测试的代码很熟悉,这里就是模拟多次调用同一个方法时,返回不同的值。
这里是同步方法的模拟返回数据,那么异步方法同样可以。
describe("A spy, when configured to fake a series of return values", function () {
  var foo, bar;

  beforeEach(function () {
    foo = {
      setBar: function (value) {
        bar = value;
      },
      getBar: function () {
        return bar;
      },
    };

    // 多次调用时,返回不同的值!
    spyOn(foo, "getBar").and.returnValues("fetched first", "fetched second");

    foo.setBar(123);
  });

  it("when called multiple times returns the requested values in order", function () {
    expect(foo.getBar()).toEqual("fetched first");
    expect(foo.getBar()).toEqual("fetched second");
    expect(foo.getBar()).toBeUndefined();
  });
});
下面是出错的代码。
it("when the baseUrl is exist and pageNo is exist", async(() => {
  // 模拟多次进行异步调用时的返回值
  spyOn(service.remoteService, "getRelatedList").and.returnValues(
    Promise.resolve({ content: datas }),
    Promise.resolve({ content: datas2 })
  );
  pageNo = 0;
  // 第一次调用
  service.getRelatedList(userId, pageNo).then((relate) => {
    expect(relate.length).toBe(2);
    expect(relate).toEqual(datas);
    expect(service.getRelatedCache(0).length).toBe(2, "the length should be 2.");
  });
  // 第二次调用
  service.getRelatedList(userId).then((relate) => {
    expect(relate.length).toBe(3);
    expect(relate).toEqual(datas2);
    expect(relate.length).not.toBe(2);
    expect(relate).not.toEqual(datas);
    expect(service.getRelatedCache(0).length).toBe(3);
  });
}));
下面是单元测试的结果:

虽然第一个、第二个 expect 通过了,但是第三个无论如何也通不过。其实不是代码写的有问题,是单元测试写的有有问题,在第一个 expect 去判断的时候,第二个
service.getRelatedList已经执行完了,所以才会出错。这个错误,我意识到了,所以我再第二次调用的地方添加了一个延时执行的函数,这样单元测试是完全正确的,但是这并不是一个好的解决办法。
setTimeout(function () {}, 200);最好的解决办法是,是使用
fakeAsync和tick来解决。tick 函数是 Angular 测试工具之一,是 fakeAsync 的同伴。 它只能在 fakeAsync 的主体中被调用。
调用 tick()模拟时间的推移,直到全部待处理的异步任务都已完成。
下面是正确的代码:
it("when the baseUrl is exist and pageNo is exist", fakeAsync(() => {
  spyOn(service.remoteService, "getRelatedList").and.returnValues(
    Promise.resolve({ content: datas }),
    Promise.resolve({ content: datas2 })
  );
  pageNo = 0;

  service.getRelatedList(userId, pageNo).then((relate) => {
    expect(relate.length).toBe(2);
    expect(relate).toEqual(datas);
    expect(service.getRelatedCache(0).length).toBe(2, "the length should be 2.");
  });

  tick(); // 基本的意思就是,前后分开来执行

  service.getRelatedList(userId).then((relate) => {
    expect(relate.length).toBe(3);
    expect(relate).toEqual(datas2);
    expect(relate.length).not.toBe(2);
    expect(relate).not.toEqual(datas);
    expect(service.getRelatedCache(0).length).toBe(3);
  });
}));
其实这之前我是把
tick()方法都看过一遍的,可是还是不理解其中的意思,所以记录下来吧,所谓书读百遍变其义自见,加油啊!???
describe("HeroesService (with spies)", () => {
  let httpClientSpy: { get: jasmine.Spy };
  let heroService: HeroService;

  beforeEach(() => {
    // TODO: spy on other methods too
    httpClientSpy = jasmine.createSpyObj("HttpClient", ["get"]);
    heroService = new HeroService(httpClientSpy as any);
  });

  it("should return expected heroes (HttpClient called once)", (done: DoneFn) => {
    const expectedHeroes: Hero[] = [
      { id: 1, name: "A" },
      { id: 2, name: "B" },
    ];

    httpClientSpy.get.and.returnValue(asyncData(expectedHeroes));

    heroService.getHeroes().subscribe((heroes) => {
      expect(heroes).toEqual(expectedHeroes, "expected heroes");
      done();
    }, done.fail);
    expect(httpClientSpy.get.calls.count()).toBe(1, "one call");
  });

  it("should return an error when the server returns a 404", (done: DoneFn) => {
    const errorResponse = new HttpErrorResponse({
      error: "test 404 error",
      status: 404,
      statusText: "Not Found",
    });

    httpClientSpy.get.and.returnValue(asyncError(errorResponse));

    heroService.getHeroes().subscribe(
      (heroes) => done.fail("expected an error, not heroes"),
      (error) => {
        expect(error.message).toContain("test 404 error");
        done();
      }
    );
  });
});- Angular 单元测试讲解_admans 的专栏-CSDN 博客_angular 单元测试
- Jasmine Documentation
- Karma - Spectacular Test Runner for Javascript (karma-runner.github.io)
- Angular 单元测试 - 知乎 (zhihu.com)
- Getting Started · Jest (jestjs.io)
- Angular - 测试 - 官方中文文档
- Angular2 之 单元测试 - 云+社区 - 腾讯云 (tencent.com)
- 干货| Angular 单元测试_中兴开发者社区-CSDN 博客
- karma.conf.js 的配置