Developer Setup
- Download Eclipse from http://eclipse.org/downloads/. We recommend getting the Eclipse IDE for Java EE Developers version.
- Launch Eclipse. The first time it runs, it will prompt you to choose a workspace location.
- Install Git support
- In Eclipse, select Help->Install New Software....
- In the Work with dropdown, select the Helios link.
- In the text box below the dropdown, enter "git" to filter the available software.
- Click on the checkbox next to Eclipse EGit.
- Click on Next> and follow the prompts to install the component.
Follow this tutorial to retrieve the Maqetta source from GitHub into your Eclipse workspace.
If cloning as read-only, use the URI git://github.com/maqetta/maqetta.git. The Clone Git Repository window should look like this:
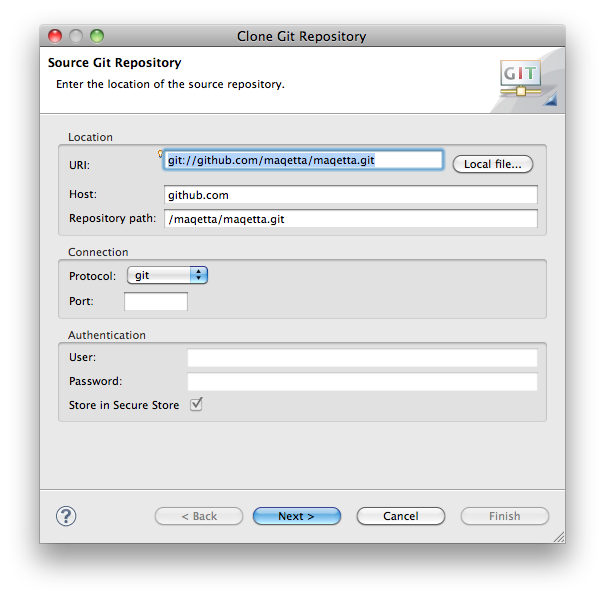
Committers who need read/write access should use the URI git@github.com:maqetta/maqetta.git and set the connection protocol to ssh.
After cloning the repository, make sure the Import Existing Projects radio button is set, click Next>, then Select All to select the projects to import. Click Finish.
Window Users: If you are using Git on the command line, be aware that Git on Windows does not properly handle the executable bit on files. For that reason, you will need to go to the directory that contains your local repository and execute the following line:
git config core.filemode false
These sources are not part of the GitHub source. Therefore, if you wish to test these within Maqetta, you will need to download and install the library sources manually.
Download jQuery UI from http://jqueryui.com. The contents of davinci.jqueryui_1_8/WebContent should look something like this:
    metadata/
    jquery-ui-1/
        css
        jquery-1.4.4.min.js
        jquery-ui-1.8.11.custom.min.js
        ...
Download the YUI full developer kit from http://developer.yahoo.com/yui/2/. The contents of davinci.yui_2_6_0/WebContent should look something like this:
    metadata/
    yui/
        animation/
        assets/
        autocomplete/
        ...
-
Maqetta requires a workspace location on the local file system. The launch configurations look for an environment variable called
MAQETTA_WORKSPACE.-
Windows: set this in the environment variables section under System Settings.
-
Mac OS X: add the following line to /etc/launchd.conf (~/.profile won't work):
setenv MAQETTA_WORKSPACE /yourMaqettaWorkspaceLocation
-
-
Open the launch configurations by clicking the drop-down arrow next to either of the launch options (debug or regular) and selecting "Debug Configurations".
-
Locate the various Maqetta launch configurations. There is a single user mode (no user authentication) or a server/multi-user mode that requires registration.
-
[optional] In the "Arguments" tab, look for the "VM Arguments" text area:
- Chose a port other than 80 (e.g., 55555):
- Edit "-Dorg.eclipse.equinox.http.jetty.http.port=8080" (or 55555)
- Note: 8080 is a fairly common port number. To minimize conflict, pick a port number between 50000 and 59999, such as 55555.
- Chose a port other than 80 (e.g., 55555):
-
[optional] Set the user files directory (current dir will be used if not set) to tell Maqetta where to write users' created applications :
- Edit "-Dmaqetta.baseDirectory=/path/into/which/maqetta/writes/its/output/files"
- Note: Preferable to set with env. variable as in step #1.
-
Run the launch configuration:
- Click on the Run button.
- In the Eclipse console, you should see an "osgi>" prompt. At that point, the Eclipse server is running and browsers can navigate to this server (see instructions in next section)
- If you need to terminate the server, click on the red square in the Eclipse console view.
In a web browser, load http://localhost/maqetta (or http://localhost:55555/maqetta or whichever port you selected above).
If you are going to do JS development in Eclipse, you should install the JSHint Eclipse Plugin. JSHint performs code validation much better than the JS Validator in Eclipse.
Install/usage instructions:
- Install the JSHint Eclipse plugin by following the instructions at http://github.eclipsesource.com/jshint-eclipse/install.html. You'll need to restart Eclipse.
- Make sure JS Validator is turned off. Open Preferences, select JavaScript->Validator->Error/Warnings and make sure "Enable JavaScript semantic validation" is unchecked.
- Show the Problems view. Click on view menu (downward facing triangle at right) and select Show->Errors/Warnings on Selection. This will make it so the Problems view shows JSHint warnings for the current file.
- [OPTIONAL] Also in the view menu select Sort By->Location.
- Turn on auto-build. From the menu, enable Project->Build Automatically.
Best to code with the Problems view open at the bottom. Double-clicking on an entry in the view takes you to the line in the source.