Developer Setup
- Download Eclipse from http://eclipse.org/downloads/. We recommend getting the Eclipse IDE for Java EE Developers version.
- Launch Eclipse. The first time it runs, it will prompt you to choose a workspace location.
- Install Git support
- In Eclipse, select Help->Install New Software....
- In the Work with dropdown, select the Helios link.
- In the text box below the dropdown, enter "git" to filter the available software.
- Click on the checkbox next to Eclipse EGit.
- Click on Next> and follow the prompts to install the component.
Follow this tutorial to retrieve the Maqetta source from GitHub into your Eclipse workspace.
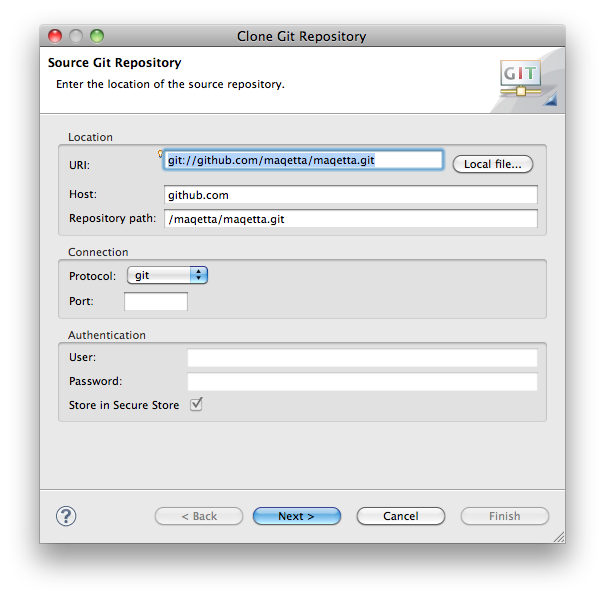
If cloning as read-only, use the URI git://github.com/maqetta/maqetta.git. The Clone Git Repository window should look like this:
Committers who need read/write access should use the URI git@github.com:maqetta/maqetta.git and set the connection protocol to ssh.
After cloning the repository, make sure the Import Existing Projects radio button is set, click Next>, then Select All to select the projects to import. Click Finish.
- Create an OSGi Framework launch configuration
- In Project Explorer, select 'davinci.core'.
- Using the context menu, select Run As > Run Configurations...
- Create a new entry under OSGi Framework
- In the "Bundles" tab:
- De-select all the bundles ("Deselect All").
- Select the following bundles manually:
- davinci.core
- davinci.dojo_1_5
- davinci.html
- org.apache.commons.fileupload
- org.apache.commons.io
- org.eclipse.equinox.http.jetty
- This one is much further down in the list of bundles. You can filter the list by typing "jetty" into the text box above the Bundles list.
- Recommended for typical build scenarios, but technically optional:
- davinci.jqueryui_1_8
- davinci.product
- davinci.review
- davinci.yui_2_6_0
- If above bundles are not visible in the bundles tab within the "run configurations" window, you might have to import each project (davinci.* and org.commons.* projects) manually, adding each project to the workspace.
- Click the "Add Required Bundles" button (important).
- In the "Arguments" tab, look for the "VM Arguments" text area:
- Add "-Dorg.eclipse.equinox.http.jetty.context.path=/maqetta"
- Optionally (highly recommended) use a port other than 80 (e.g., 55555):
- Add "-Dorg.eclipse.equinox.http.jetty.http.port=8080" (or 55555)
- Note: 8080 is a fairly common port number. To minimize conflict, pick a port number between 50000 and 59999, such as 55555.
- Optionally set the user files directory (current dir will be used if not set) to tell Maqetta where to write users' created applications:
- Add "-Dmaqetta.baseDirectory=/path/into/which/maqetta/writes/its/output/files"
- In order to run Maqetta in local/single-user mode (i.e., without login prompts and where local user can access entire local file system):
- Add "-Dmaqetta.localInstall=true"
- Run the launch configuration:
- Click on the Run button.
- In the Eclipse console, you should see an "osgi>" prompt. At that point, the Eclipse server is running and browsers can navigate to this server (see instructions in next section)
- If you need to terminate the server, click on the red square in the Eclipse console view.
In a web browser, load http://localhost/maqetta (or http://localhost:55555/maqetta or whichever port you selected above).