Version 0.95 (2014-04-22)
Out-of-box vim config for everyone. It is well organaized and easy to use.
E.g. open Unite UI interface and find the grep feature, search a string in current folder, preview results, and open selected files.
For Mac OS, you can just run the script. It will install some necessory tools and the latest vim (7.4) with lua support.
curl -L https://raw.github.com/liangxianzhe/oh-my-vim/master/tools/prepare_mac.sh | sh
For Linux, there is no script yet. You need to figure out what the above script does, and install them according (apt-get etc). Please note a vim with lua support is required.
Run: tools/install.sh
curl -L https://raw.github.com/liangxianzhe/oh-my-vim/master/tools/install.sh | sh
It will be installed to ~/.oh-my-vim folder.
For a better looking powerline, you will need setting install a patched font.
If you are using mac, the above script has installed a font DroidSansMono for you. Please set this font for your terminal. (For macvim or gvim, nothing need to be done. For iTerm2, go for Profile - Open Profile - Default - Edit Profile - Text - None-ASCII Font.)
Open your vim, it will install a bunch of plugins at the first time. Close the vim and re-open it, then you are all set.
You can overwrite the default configuration and key bindings by creating one of following files:
~/.before.vimrc will be loaded before everything else.
~/.local.vimrc will be loaded after bundles are initialized and before
the settings take place. The idea was so people could add Bundle lines
without having to worry about conflicts in vimrc when pulling.
~/.after.vimrc will be loaded after all configuration options are set.
This is the best place to change default behaviour (keybindings) or
color scheme.
Obviously I steal a lot work from others. Here is my special thanks to:
Joe Di Castro (joedicastro)'s dotfiles. Most part of this config is copied from Joe, including large amount of this README. His idea of using Unite to create UI is brilliant.
oh-my-zsh. Copied it's name and some scripts.
Most shortcuts start with either , or <space>:
<Leader>key is mapped to,
<LocalLeader>key is mapped to<space>
<LocalLeader>ui.e.<space>uwill trigger the awesome Unite UI
Oh-my-vim features are organized as packages, while each package is just a .vimrc file. Modulization is good because:
- Each package is short and easy to follow.
- You can easily add a new package (such as java or ruby) and send a pull-request.
- You can ignore the package you don't need by setting a parameter
g:oh-my-vim_packagesin local.vimrc.
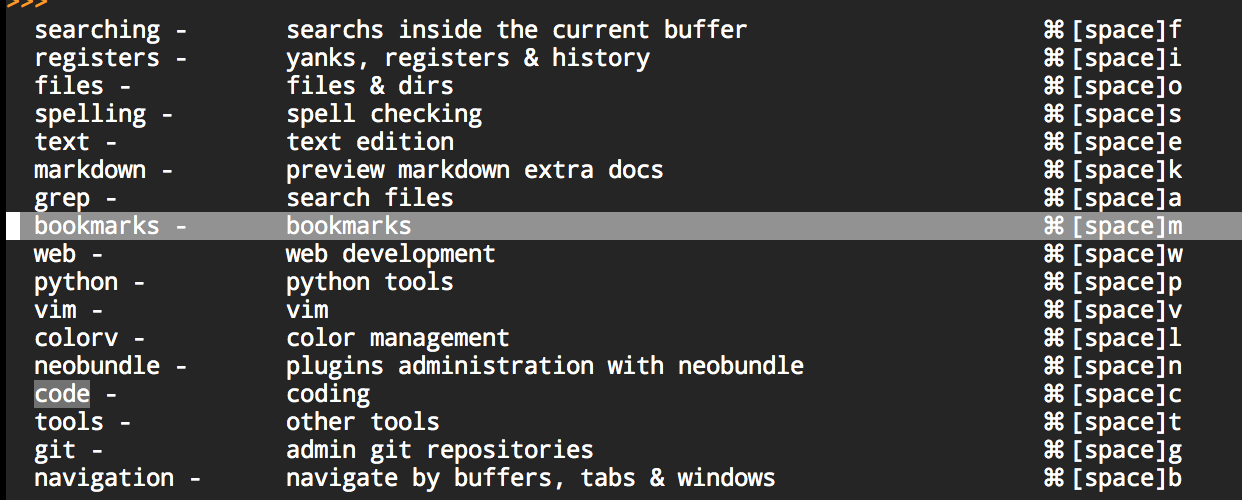
The packages list:
- basic - some basic vim config to make it easy to use
- code - general coding
- text - text edition
- grep - search text in files
- searching - search text in current buffer
- registers - yanks, registers & history
- navigation - navigate by buffers, tabs & windows
- files - files & dirs
- git - git
- python - python
- web - web
- bookmarks - bookmarks
- vim - vim
- neobundle - plugins administration with neobundle
- spelling - spell checking & translation
- markdown - markdown
- tools - some other tools
All the packages are viewalbe in the Unite UI interface.
Unite is an interface that unifies various "query results" under a common aspect and that follows Vim's default behavior (modal). It's almost an API that we can use to build our own solutions. In fact, the author describes it as "unite and create interfaces". With Unite you can open a file, change the buffer, choose a colorscheme, make a regex search (grep, Ack, Ag, ...), etc. Even you can take a look at the Vim registers, messages, help, command, functions, ... In short, it is a Swiss army knife that, well used, allows us to replace several different plugins with only one (in this case: CtrlP, Ack, YankRing, TagmaTasks and Tagbar).
The Unite menu will show what functionality we have and what's their key-mappings. You can always refer the menu for something you don't remember the shortcut.
The main Unite munu:
In Unite, you can filter result in Insert mode, you can select candidates and apply operations to selected candidates in Normal mode. Below are some of the available mappings:
Mappings
Normal mode:
qexit from Unite and submenusQexit from Unite and all submenusichange to insert modevchange to visual mode<Tab>choose an actionachoose an action for the selected candidate or add text at the end of the prompt<C-R>reset the menu<Space>mark the current candidate*mark all candidatesMremoves the candidate number limitgg,G,j,ktypical Vim moves to move around candidates?shows help (mappings)Nadd a new candidate (only where have sense).show hidden files (dotfiles)
*With a candidate selected:*
- `<CR>` execute the default action
- `b` add it to bookmarks
- `d` delete it
- `e` expand the path
- `t` open the candidate in a new tab
- `yy` do a yank
- `p` preview it
- `x` launch the quick selection
Insert mode:
<ESC>change to normal mode<Tab>choose an action<CR>execute the default action<C-G>exit Unite<C-D>delete it<C-E>expand the path<C-T>open the candidate in a new tab<C-Y>do a yank<C-N>,<C-P>,<C-F>y<C-B>Vim motions to move around candidates
*With a candidate selected:*
- `<Space>` mark the current candidate
Visual mode:
<Space>mark the current candidate
Put most basic vim config here, like indent, quick saving, history, backup. There is no Unite menu for this package.
Unite
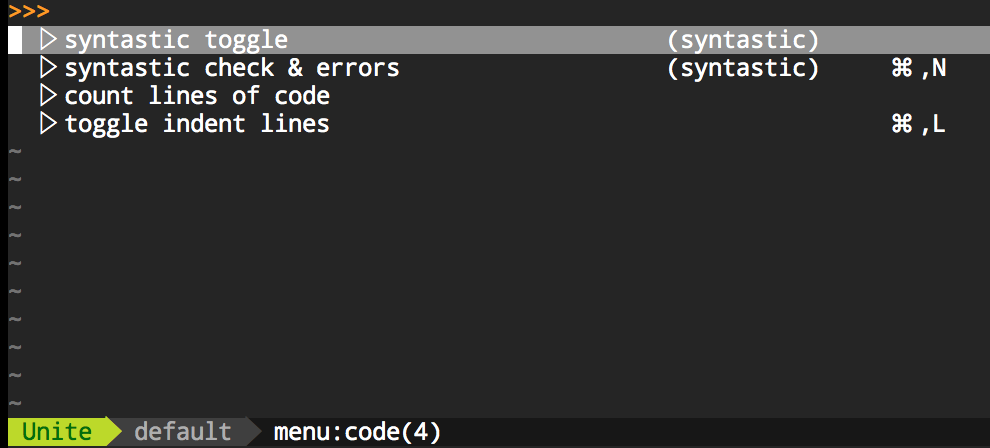
<LocalLeader>cor:Unite menu:code, shows the Code menu
Menu
These are the menu entries in detail:
-
count lines of code count the lines of code of the current file by the external program
$ clocand shows the output in Unite -
toggle indent lines show/hide the indent lines, that works as a visual guide for long nested blocks of code, putting vertical lines for each indentation level. Is disabled by default.
-
syntastic toggle, syntastic check & errors are two options of Syntastic, a plugin for code quality (syntax revision) for various programming and markup languages (python, ruby, lua, haskell, css, html, js, json, ...) via external tools (these tools are required). Show the syntax errors in the signs column (gutter). Also shows the total of errors and the number line of the first in the status line

Other tools
-
Ultisnips is a plugin to manage snippets, the most advanced and powerful for this task that I know for Vim. Snippets are portions of code or text in which certain parts are declared as variable and the rest is fixed. They are very helpful to insert the same code structures again and again without need to write all the text, saving us an important number of keystrokes. To use them we only have to type the snippet keyword and the mapping, the fixed part of text is inserted automatically. Then the cursor moves to the first variable field to enter the desired text interactively, and so on. In the image you can see how it really works.
Ultisnips brings by default a bunch of snippets classified for languages and some globals. The best feature of Ultisnips is that allows us to define our custom snippets with a level of control and automation than any other one offers. To know all the details is essential to read carefully the plugin help. BTW certain features are remarkable, like: nested snippets, embed external commands (shell, vimscript and python) in the snippets, use the snippets over visual selections, and text transformations into the snippets.
Mappings
<Tab>preceded by the snippet keyword, trigger the snippet<C-J>jump to the next field<C-K>jump to the previous field<BS>cancel the text enter in an optional field

This menu groups several options to edit text
Unite
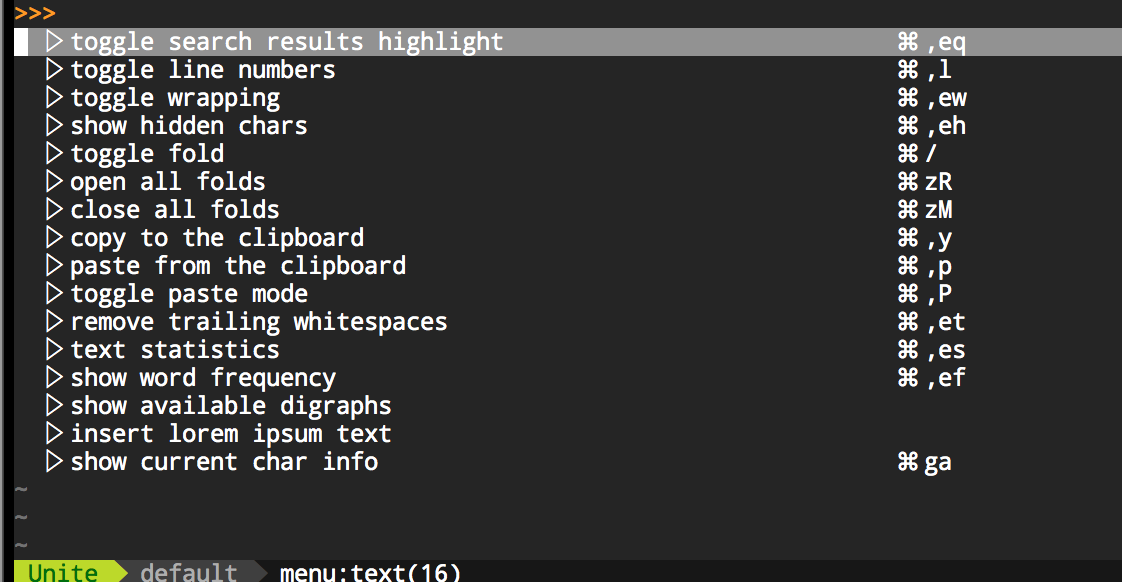
<LocalLeader>e or :Unite menu:text shows the text menu
Menu
-
toggle search results highlight toggle the search results highlight, obviously
-
toggle line numbers toggle between the four possible visualizations of the line numbers column: none, relative (two forms), and absolute
-
toggle wrapping toggle automatic wrapping and the vertical column color. The vertical column that indicates wrapping threshold turns green when the automatic wrapping is disabled
-
show hidden chars show the hidden chars, those that are not printable (tabs, carriage returns, spaces, ...)
-
the next three entries are to fold/unfold the folds in our doc, one by one or all at the same time
-
and the three after those allows us to copy/paste from system clipboard and for toggle the paste mode.
-
remove trailing whitespaces delete those empty and almost never significant spaces at the end of the line
-
text statistics show the number of columns, lines, words, chars and bytes in total and for the current position
-
show word frequency show the number of times that each word appears in the text
-
show available digraphs show a table with all the digraphs available and the pair of chars needed to generate each of them.
-
insert lorem ipsum text insert a text block containing the famous Lorem Ipsum text
-
show current char info show extended info about the current character. The info includes the decimal Unicode value, hexadecimal, octal, Unicode name, HTML entity, Emoji code and any digraph available.
Other text edition tools
Apart from the tools included in the menu, and apart from the Vanilla Vim ones too, we have another bunch of tools available to help us to edit the text more easily.
-
text-objects these are customized text objects that allow us to extend the Vim motions defined by default (word, sentence, paragraph, block, delimiters, and markup tags) and be able to use more efficient text selections. In this config I added the following ones:
- line select a line by
aloril - underscore select the text surrounded by underscores via
a_ori_ - all the buffer select the entire buffer. We can use
aeandie - indent select a indentation level. Options:
ai,ii,aI,iI.iselect the current level and the nested ones,Ionly selects the current indent level - last search select the last search term results. Options::
a/,i/,a?andi? - python class in a Python code file, selects a class by
aC,iCandC - python method or function same as above for methods and functions
via
aM,iMandM
- line select a line by
-
vim-commentary an extremely easy tool to toggle commentary in lines and visual selections. We only need to enter a mapping and a movement to do the action, as simple as that.
Mapping
<Leader>corgctoggle the commentary
-
vim-surround surround a vim text object with a pair of symmetrical chars. We can also remove or change the ones already there
Mappings
ys{motion or text-object}{char}create surround ('your surround')cs{orig_char}{dest_char}change surroundds{char}delete surroundS{char}for create surrounds in visual mode
If we choose the first member of a pair, e.g '(', then the surround is created with a whitespace between the char and the selection. If the last is choosen, e.g. ')', then the extra space is not added.
-
vim-speeddating provides a smart way to increase/decrease time values
Mappings
<C-A>Increase the time value under the cursor<C-X>Decrease the time value under the cursord<C-A>Change the time under the cursor to the current UTC timed<C-X>Change the time under the cursor to the current Local time
-
delimitMate provides smart auto-completion for delimiters like (), {}, [], "", '', ``
This is very easy to use. If we write the first pair of these chars, then the second one is automatically introduced and the cursor moves to the interior thereof. Then, we continue writing and to exit the inside you only have to write the second character or press
<S-Tab>. If you only want the first char, you only have to press the Delete key -
neocomplete auto-completion of keywords, methods, functions, etc by only typing a few letters (normally the first). Well used, this speeds up a lot writing of code or text. It improves the Vanilla Vim auto-completion, with a live fuzzy-logic search. It's powerful and totally customizable.
Mappings
<CR>insert the selected word<C-N>go to the next word (below) in the option list<C-P>go to the previous word (above) in the option list
-
easydigraph easily insert digraphs, especially when trying to insert several simultaneously
Mapping
<Leader>dd {motion}turns in digraph the motion selected text
-
vim-transpose transpose rows & columns. For certain kind of files, like CSV, it can be really helpful to deal with them. It works in visual mode.
Commands
:Transposedo the transposition by default:TransposeCSV {separator} {delimiter}do the transposition by;or by the specified separator & delimiter:TransposeTabtranspose by tabs:TransposeWordstranspose by words (inserts a?where is no one):TransposeInteractivefor complex transpositions


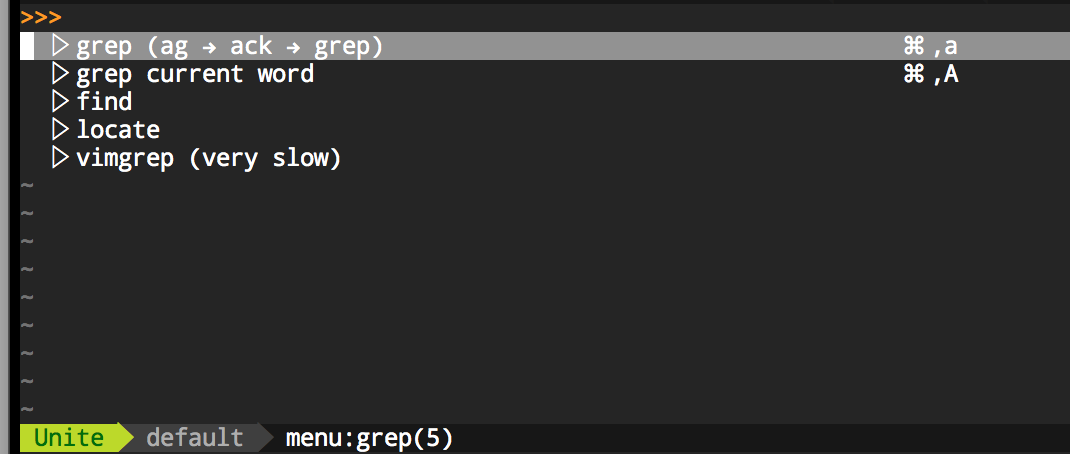
This menu allows us to search files by regular expression engines. I have it
configured to use the ag program first, then ack if ag is not found, and
else the grep program. We can also use other Unix tools like locate and
find from this menu.
Unite
<LocalLeader>aor:Unite menu:grepshows the grep menu
Menu
-
grep (ag → ack → grep) search files by content. Using a regular expression pattern in a target directory, shows us the results in Unite. Between brackets are the list of programs to use sorted by priority. It uses the first available.
-
grep current word grep the word under cursor.
-
find use the known Unix tool
findto search files by name -
locate same as above using the
locatetool instead -
vimgrep as a last resort, in case you don't have any regex search tool installed, you can use the internal Vim grep one. But it is extremely low in comparison with another of the mentioned in the first entry. So, use it only if you are desperate.

Unite
<LocalLeader>for:Unite menu:searchingshows the searching menu
Menu
-
line find all the lines where the introduced string appears
-
word under the cursor find all the lines where the word under the cursor appears. It is a improved version of the
*key behavior -
outlines & tags (ctags) list all the document "outlines" and allow us to navigate between them. Very useful to move around the headers of a Markdown document like this. In code files it shows the source tags (ctags) to move easily to a given point of the code.
-
marks list all the marks
-
folds navigate among folders
-
changes list all the changes made to the file
-
jumps list all the last window jumps
-
undos show the file undo history
-
tasks show all the pending tasks for the current buffer. These tasks (and notes) are defined by the following keywords: TODO, FIXME, NOTE, XXX , COMBAK, and @todo
Other tools
-
vim-signature a plugin that improves the default Vim marks. It shows the marks in the lateral signs column.
Mappings
- Alphabetic marks
m[a-zA-Z]toggle the mark and display it in the signs column (gutter)m,place the next available markm<Space>delete all marks]`jump the next mark[`jmmp the previous mark]'jump to start of next line containing a mark['jump to start of previous line containing a mark
- Symbol marks (markers)
m[0-9]toggle the corresponding marker!@#$%^&*()m<S-[0-9]>remove all markers of the same type]-jump to next line having same marker[-jump to prev line having same markerm<BS>remove all markers


Unite
<LocalLeader>ior:Unite menu:registersshows the registers menu
Menu
-
yanks list all the yanks arranged chronologically starting with the most recent
-
commands show the Ex command history
-
searches list the last searches
-
registers show the vim registers content
-
messages show the messages register (like the
:messagescommand) -
undo launch the Gundo plugin. Gundo makes the Vim undo tree friendlier. We can preview the changes and navigate easily around the tree.


Mappings
In addition to the options available on the menui, I have set a number of mappings that make it much easier to manage windows
<C-H>move to the next window to the left<C-J>move to the lower window<C-K>move to the upper window<C-L>move to the next window to the right
Unite
<LocalLeader>b or :Unite menu:navigation shows the navigation menu
Menu
-
The first three menu entries let us to easily move to the chosen buffer, tab, or window from the candidates
-
location list and quickfix to access these windows content through Unite interface
-
resize windows use the winresizer plugin to easily resize the windows
Mappings
h,j,k,luse vim motions to move the windows separator<ESC>end the resizingqcancel the resizing
-
the next two entries are for creating new windows (horizontal and vertical) and the third one is to close any window (except the last)
-
toggle quickfix window toggle the quickfix window, also close the location list if is opened
-
zoom make zoom in a window
-
delete buffer delete a buffer

Unite
<LocalLeader>oor:Unite menu:filesshow the file menu
Menu
-
open file show a list of files available in the current working directory
-
open more recently used files show the last opened files
-
open file with recursive search same as above but including the files under the subdirectories recursively
-
the next three entries are similar to the preceding ones but working with directories instead of files
-
make new directory make a new directory without opening a file browser
-
change working directory allow us to change the current working directory
-
know current working directory is like running the
:pwdcommand -
junk files to open a new (or a previous one) junk file to make annotations, tests, ...
-
save as root allow us to save a file that only have permissions for
rootwithout need to run Vim under that user (or use$ sudo) and lost our configuration advantages by doing that. -
quick save save quickly the file without need to run the
:wcommand -
open ranger call the external ncurses file manager Ranger to browse the directory hierarchy and choose the file that you want to edit.
-
open vimfiler open the file explorer Vimfiler, Unite based and very powerful. I used mainly in those computers where ranger is not available. It has a safe mode (enabled by default) in which you cannot copy, rename, move, create or delete files and directories.
Mappings
<Tab>open a new vertical window, if is already opened toggle between themj,kandggtypical vim motions to move between the filesh,lmove between the parent and child directories<Space>select/deselect the current line*select/deselect all the lines&select similar linesUdeselect everythingSchange the sort type (by name, date, size, ...)ccopy the file (preceded byCdo it to the clipboard)mmove the file(preceded byCdo it to the clipboard)ddelete the filerrename the fileCppaste file from clipboardKnew directoryNnew filexrun the file's system associated programeedit the fileEedit the file in a new windowvpreview the fileLchange the drive unit~go to thehomedirectory\go to therootdirectory<C-J>open the visited directories history (opened by )<CR>open a directory<BS>return to the parent directorytexpand the directory treeTexpand the directory tree recursively
Ichange to the directory entered in the command line
Mset the current mask (to filter files).show/hide the hidden files (dotfiles)qhide vimfilerQexit vimfilerHexit to the shell (exit from shell to return to vimfiler)-close the current vimfiler window?show the vimfiler help (mappings)osync another vimfiler with this oneOopen a file/directory in another vimfileryyyank the full pathgrmake grep into the current directorygfmake find into the current directorygcmake the current directory in the Vim working directoryachoose the action to apply to the fileYsave the current path in a temporal listPshow the paths saved in the temporal list<C-L>redraw the screengstoggle the safe mode Warning!gStoggle the simple mode


Unite
<localleader>gor:Unite menu:gitshow the git menu
Menu
-
tig open the external application tig, which is a ncurses interface for git. Obviously, this only works when the working directory is into a git repository.
-
git viewer and git viewer - buffer use the gitv plugin that is a clone of the
gitktool for Vim, which is the viewer provided originally bygit. This plugin allows us to view the repository history, to do diffs, checkouts, merges, ... It works atop of Fugitive and requires of it for work, and both have a similar behavior. The first entry will open a viewer relative to the whole repository (explorer mode), while the second one will do it in function of the current buffer or a visual selection (file mode)Mappings
<CR>open a commit, a diff, a tree, a file, more commits, etc, depending of where is used, with a similar behavior that Fugitive
oopen the commit in a new horizontal window
Oopen the commit in a new tab
sopen the commit in a new vertical window
iin "explorer mode" open the file & in "file mode" open the commit details
qexit from gitv
atoggle the-allargument and update the window
uupdate the window content
codo agit checkout. In "explorer mode" dot it over the whole repository and in the "file mode" do it over the current file
Ddo a diff via vimdiff.
Sshow adiffstat
mand<Leader>mdo a merge in visual and normal modes respectively
gitenter the:Gitcommand in the command line to enter a custom git command. If the command changes the repository status, the changes will be updated in gitv
ycyank the commit short hash,sha
Motions
xandXto move around the branch points (where a merge is created)
randRto move around the references
Pjump to the commit tagged asHEAD
-
Almost of the rest of the entries are typical git commands which are executed via the Fugitive tool. Fugitive is a git wrapper, so good that allows us to manage git repositories without leave Vim. It's so complete and powerful that requires a certain amount of time to get used to it and get total control over its particular interface. The author, Tim Pope, says that about it: "A Git wrapper so awesome, it should be illegal" and is almost true.
-
status show the repository status and from this window we can access to multiple options. In this window this mappings are available:
Mappings
<C-N>and<C-P>allow us to move between files
<CR>run the:Geditcommand that allow us to "edit" a revision
-using it over a file that is not included in the 'stage area' (index) it add it, is like run agit addorgit stagein the shell. Using it over a file included in thestage area, remove it from there, like using agit reset
ccorCdo a commit with the command:Gcommitthe same as doing agit commit
cado a commit which add the new changes to the previous commit, useful when we forgot add something in a commit. Same asgit commit --amend
Dmake a diff between the current version and the index one, using vimfiler via the:Gdiffcommand
dsdo a diff with:Gsdiff, same as above but split windows horizontally
dvdo a diff without:Gvdiff, with vertical split windows. A synonym ofD
dphas a dual behavior. On the one hand, if there are changes but those are not in thestage area(index), then show a diff with the changes, like running thegit diffcommand. Then, if we make a:Gwrite(<Leader>gw) the changes are added to the index and we can submit a commit now. On the other hand, if there are files that are not being tracked, try to add them using thegit add --intent-to-add .command
pto submit partial commits, where we choose interactively which changes portions are included in the index and which not. If we use it over a file that is not in the index, we will we asked about what parts we want to index, like runninggit add --patch. If we use it with an already indexed file, we'll choose what parts remove from the index, same asgit reset --patch
oopen the file in a new horizontal window
Oopen the file in a new tab
Sopen the file in a new vertical window
Rupdate the status window
qclose the status window
-
diff make a diff (
:Gdiff) between the current version of the file versus the one in the index. In conflict situations like in a merge, it will we a three-way diff, which makes it a good tool for dealing withmergeandrebase. The mapping available for this window are the following (to know how vimdiff works, look up the help):Mappings
dodo a:diffget, get the changes from the other filedpdo a:diffput, put the changes to the other file<Leader>dudo a:diffupdate, update changes<Leader>dqexit from diffmodeuundoes all changes[cand]cto move between diffs:Gwriteor<Leader>gwwrite the changes to the index
-
commit use the
:Gcommitcommand (same asgit commit). If there is nothing in the index, then do a:Gstatusand show the status window. Warning: Unlike when running the actual git-commit command, it is possible (but unadvisable) to muck with the index with commands like git-add and git-reset while a commit message is pending -
log show all the previous revisions of the current file in a Unite window, starting for the most recent and open the last in the current buffer. To return to the current file, use
:Gedit(<Leader>ge). Within the buffer we can move between revision using the commands:cnext,:cprevious,:cfirstand:clast -
log - all similar as the previous one, but in this case all the repository commits are showed, and what appears in the buffer is something similar to the
git showcommand output -
blame use the
:Gblamecommand that opens a new vertical widow at the left of the current buffer, where is displayed the commit, the author and date for each line of the file. Similar to rungit blame.Mappings
Aresize the blame window to end of author columnCresize the blame window to end of commit columnDresize the blame window to end of date columnqclose the blame windowgqclose the blame window and runs:Geditto restore the current version<CR>close the blame window and open the selected commitoopen the selected commit in a new horizontal windowOopen the selected commit in a new tab-runs a newblamein the selected commit
-
add/stage use the
:Gwritecommand that save the actual file and adds it to the index with the changes made. Is like doing agit addor its synonymgit stage -
checkout do a
:Gread, empty the current buffer and restore the index copy or what is the same, like if we were making agit checkoutto the file. The changes are not permanent until we save the file. -
rm remove the file with the
:Gremovecommand and empty the buffer. We get the same as if we do agit rmin the shell -
mv as for a new path and move the file there, renaming automatically the buffer. The similar git command would be
git mv. The target is relative to the current path, unless is preceded by/in which case is relative to the repository root -
push execute the
:Git! pushcommand, showing the output in the buffer -
pull do a
:Git! pullredirecting the output to the buffer -
command run the git command that we entered in the command line and show the result in a new buffer (exit from there by pressing
q). We can use the current custom alias in our git config. This option by itself is reason enough to use Fugitive. -
edit allow us to "edit" any git object (blobs, trees, commits, tags). It supports auto-completion and we can use a SHA, a branch, a tag, a tree or a commit.
-
grep do a grep over the repository using
:Ggrepwhich in turn usegit grep -
grep (messages) make a grep over the repository using
:Glog --grep=to search into the commit messages -
grep (text) make a grep over the repository using
:Glog -Sto search into the commits where the text had been added or removed -
init create a new git repository or reset a previous one (safe)
-
cd change the working directory to the repository one
-
lcd change the current buffer's working directory to the repository one
-
browse if the remote repository is at GitHub open it in a browser, showing the git object that we have selected in that moment. Otherwise, use
git instawebto display the current selected blob, tree, commit or tag. If a range is given, it is appropriately appended to the URL as an anchor
Fugitive is a very powerful plugin that you only can learn how to use it by using it. And is very advisable to read the help to get a global vision of it.
-
-
github dashboard and github activity are two options to browse events at GitHub. With the first one we can browse the GitHub Dashboard of a given user. The last one allow us to view the public activity of a given user or repository. There is a limit of 60 calls/hour on the GitHub API without authentication.
Mappings
<Tab>&<S-Tab>to navigate back and forth through the links<Enter>open a link in the browser- R refresh the window
- q close the window
-
github issues & PR open the external ncurses application shipit that is an interface for GitHub issues and pull requests. The application is still in development but is an amazing way to manage GitHub issues without leaving Vim and the terminal. If you are inside a git repository that have a remote in GitHub, it will open the app for that repository.


Other tools
- vim-gitgutter show the changes that are made in the buffer versus the git
repository index. It makes a
git diffand shows the status (changed/added/deleted) of each line in the gutter (signs column).
Unite
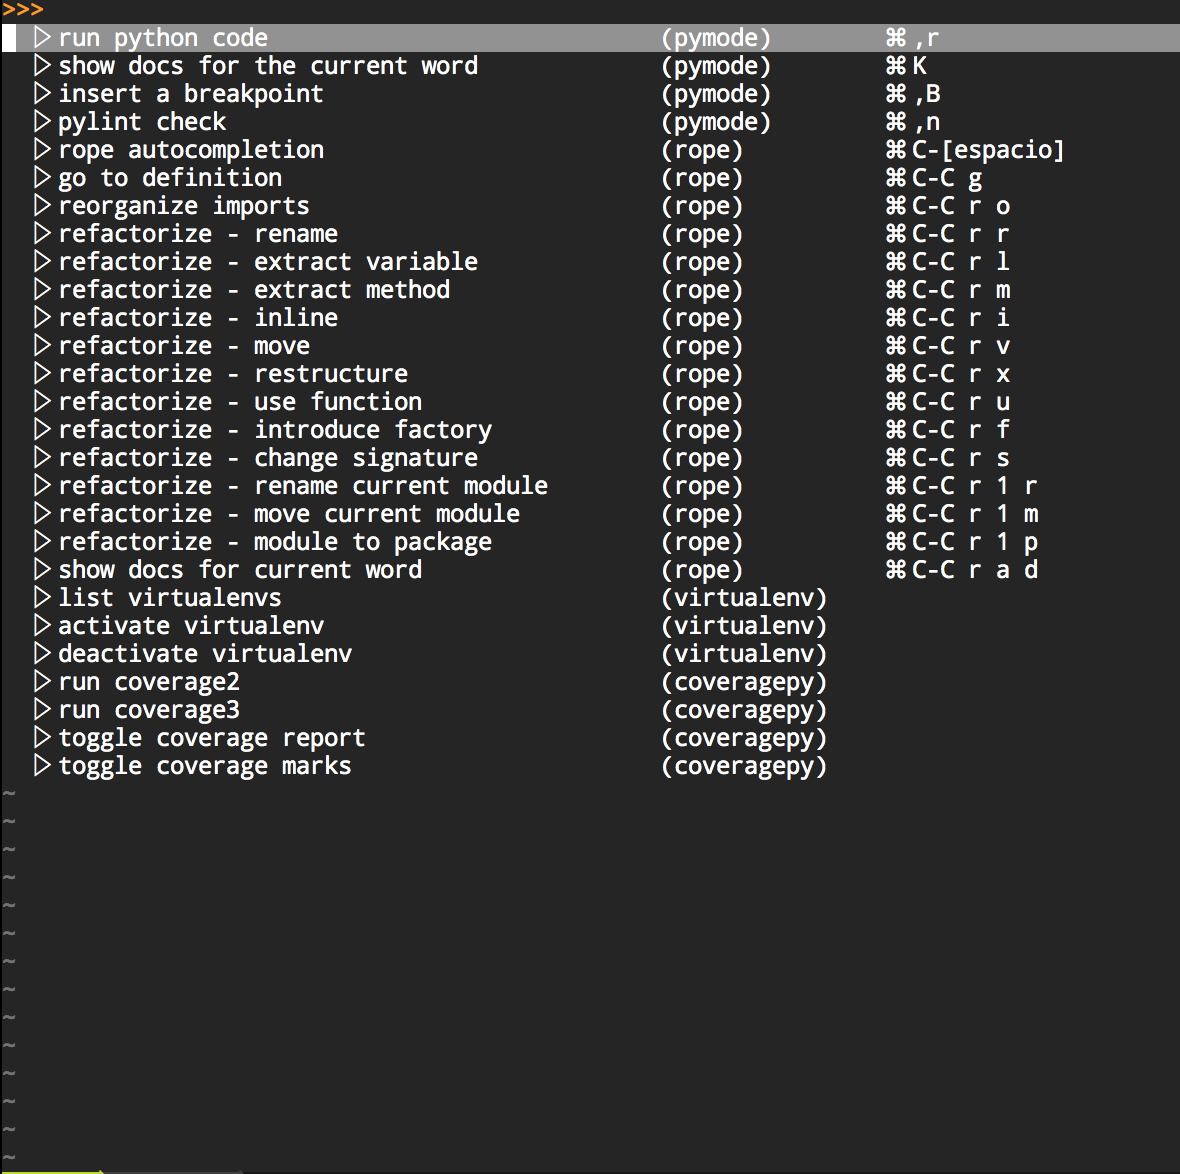
<LocalLeader>por:Unite menu:pythonshows the python menu
Menu
-
run python code run the current buffer python code via pymode. It shows the output in a new vertical window below
-
show docs for the current word show the documentation available for the word under the cursor
-
insert a breakpoint insert a breakpoint in python code. If we have
ipythonorpudbinstalled, it will use one of those instead the pythonpdb -
pylint check do a code revision by pylint by demand
-
rope auto-completion allow us to use the rope auto-completion. Useful for methods auto-completion.
-
jump to definition jump to the location where the word under the cursor (variable, function, class, method, ...) is defined. Open a new window with the location, even if it is in another module or library
-
reorganize imports reorganize automatically the import statements
-
refactorize - x the entries that begin in this way are for refactorize the python code with rope, using the method mentioned in each description
-
show docs for current word use rope to show the available documentation about the word under the cursor. The advantage of this entry against the pymode one is that this one allow us to search in the external libraries documentation
-
list virtualenvs use the virtualenv plugin to list the python virtualenvs.
-
activate virtualenv activate the virtualenv
-
deactivate virtualenv deactivate the virtualenv
-
run coverage2 and run coverage3 use the coverage.py tool for python2 and python3 respectively. It shows us the results in a window and as marks in the signs column (gutter) to know the code coverage of the current code.
-
toggle coverage report and toggle coverage marks toggle the visibility of the marks and report from coverage
HTML5
Provides autocompletion, syntax and indentation for HTML5. For that purpose supports SVG, RDFa, microdata and WAI-AIRA
Emmet

Emmet (former Zen Coding) allow us to write HTML/XML and CSS files more fast and in a more brief and less tedious way. Emmet takes the snippets idea to a whole new level: you can type CSS-like expressions that can be dynamically parsed, and produce output depending on what you type in the abbreviation.
The best way to know how this works is to look at the tutorial (:h emmet-tutorial vimhelp:emmet-tutorial) or read the official documentation,
Emmet docs
Mappings
<C-Y>,expand abbreviation (works as a wraper in visual mode, see the help)<C-Y>dselect the tag inward<C-Y>Dselect the tag outward<C-Y>ngo to the next edit point<C-Y>Ngo to the previous edit point<C-Y>iupdate image size<C-Y>kremove tag<C-Y>jsplit/join tag<C-Y>/toggle comment<C-Y>amake anchor from url<C-Y>Amake quoted text from url<C-Y>ccode pretty

With this menu we can manage the bookmarks easily.
Unite
<LocalLeader>m or :Unite menu:bookmarks shows the bookmarks menu
Unite
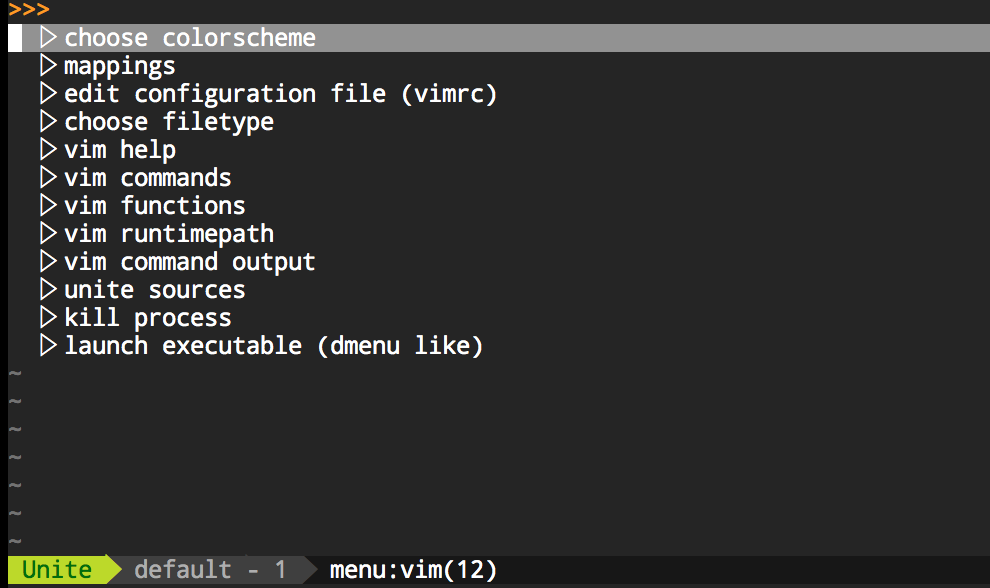
<LocalLeader>vor:Unite menu:vimshows the vim menu
Menu
These are the menu entries in detail:
-
choose color scheme display color scheme with preview support
-
mappings shows all the customized mappings available whit their corresponding associated action. Those ones that corresponds with plugins that are Lazy are not showed unless the plugin is already loaded.
-
edit configuration file (vimrc) edits the vim configuration file
~./.vimrc -
choose filetype choose a filetype from a list to apply to the current buffer
-
vim help search into the vim help (slow)
-
vim commands list all commands available as candidates. For Lazy plugins, these need to be loaded before appears in the list.
-
vim functions same as above for functions instead of commands
-
vim runtimepath shows all paths in the vim runtimepath
-
vim command output shows the output of a Vim command through the Unite interface (e.g.
:ls) -
unite sources all the Unite sources available
-
kill process shows the output of the Unix command
topwhere we can select one or more process to kill them withkill -
launch executable launch an executable from a list, in a similar behavior as
dmenu


A plugin to rule them all! NeoBundle allows us to manage the rest of the plugins, itself included. I have it configured to auto install itself and all of the plugins when Vim is executed for the first time.
The advantages of NeoBundle versus Vundle and other similar plugins are the following:
- Allows to use another VCS other than git (hg, svn), even a local dir
- Allows revision lock or even set a plugin to not be updated
- Supports lazy initialization of plugins to optimizing startup time
- Supports multiple config options per plugin, like automatic building if needed
- and so on...
The best way to use NeoBundle is through Unite:
Unite
<LocalLeader>nor:Unite menu:neobundle, shows the NeoBundle menu
Menu
These are the menu entries in detail:
-
neobundle shows the installed plugins as candidates. Via the actions we can delete them, browse the repository page, ...
-
log shows the last NeoBundle log
-
lazy shows all the installed plugins configured as Lazy. Those are loaded on demand and allow us to have a lot of plugins installed that are not frequently used without delaying the vim startup. I use this option a lot in this configuration.
-
update updates all the plugins automatically (and installs those not already installed)
-
search searches plugins by name on vim.org & GitHub (duplicates prone)
-
install installs all the plugins already present in the
.vimrcfile or in thedirect_bundles.vimfile that are not yet installed -
check checks if all the plugins are already installed, and if not, prompt for their installation
-
docs installs help docs for all plugins manually
-
clean deletes, upon confirmation, those plugin folders that are no longer needed because they are not still installed
-
list lists all the installed plugins
-
direct edit edits the
~/.vim/bundle/.neobundle/direct_bundles.vimfile where NeoBundle stores those plugins installed directly (e.g. via NeoBundle search)
Plugins updating
Since we often install plugins from repositories, we are exposed to error- prone updates. Once in a while, a plugin update introduces a bug and you end up with an unstable configuration until that bug is fixed (which may take a while). If we use Vim for work, that is very inconvenient.
A way to avoid this is by using symbolic links and backups of our vim folder. If we made a backup of our vim config before an update, is easy to restore it to a previous stable state without much effort. But this is tedious and error-prone too. And alternative is managing this via NeoBundle. We can use the revision lock feature to specify what revision we want to install or even say to NeoBundle that a plugin should not be updated. But it is not a perfect solution either, and very manual. Maybe in a future, we could do plugin rollbacks...
Unite
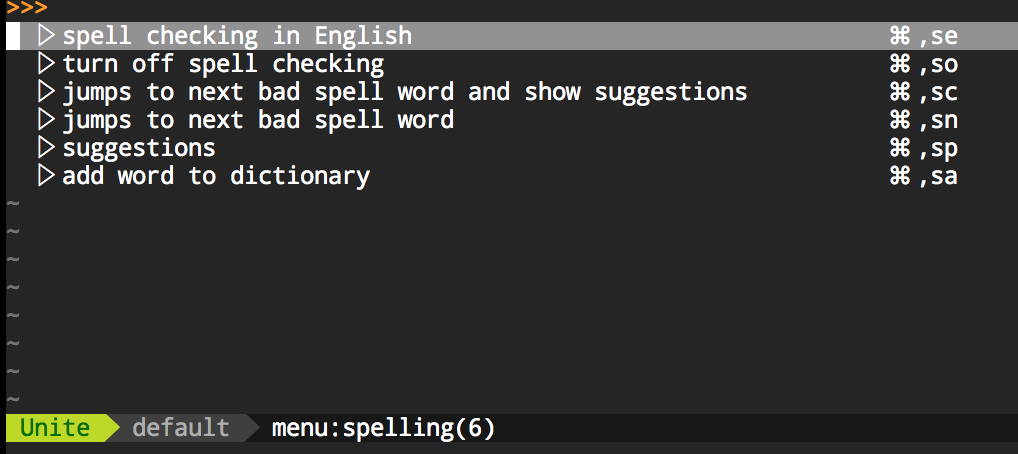
<LocalLeader>sor:Unite menu:spellingshows the spelling menu
Other tools
TTranslate selected text to Chinese.

This allows us to preview the rendering of a Markdown file in the browser,
it supports the Markdown extra extension. The file is rendered by
Python-markdown, creating a temporal html file and open it in a browser tab.
Used in conjunction with a plugin that refresh the browser tab when the html file changes, we get a way to preview your document changes without leaving vim .
Unite
<localleader>kor:Unite menu:markdownshows the markdown menu
Menu
-
preview renders the Markdown document in a temporal html file and open it in a new browser tab (currently only work on Mac)
-
refresh rewrites the html file with the changes


Unite
<LocalLeader>t or :Unite menu:tools shows the tools menu
Menu
These are the menu entries in detail:
-
run with python2 in tmux panel use the Vimux plugin to interact with Tmux. It allows to send commands to a Tmux panel and interact with it without losing focus in Vim. If there are no other tmux panels opened, then a new panel is opened in the 20% lower space. In other case, the command runs in the already opened panel. This specific command run the buffer content with the
python2executable in the tmux panel. In the next image we can see the actual behavior: -
run with python3 in tmux panel same as above but using the
python3interpreter -
run with python2 & time in tmux panel run the python code wrapped by the Unix
timeprogram to know the time consumed in the execution -
run with pypy & time in tmux panel same as above but using
pypyinstead ofpython2 -
command prompt to run in tmux panel open a command line prompt to enter a custom command to run in a tmux panel
-
repeat last command repeat the last vimux command
-
stop command execution in tmux panel stop the execution of the last vimux command
-
inspect tmux panel jump to the tmux panel where the last vimux command was executed and enter in the tmux copy mode allowing us to scroll around the panel and use the vi mode to copy text lines
-
close tmux panel close the tmux panel opened or used by Vimux
-
open link open link under cursor using utl.vim


Other tools
- DirDiff
It has a similar behavior that the vimdiff tool but for directories instead of individual files

Commands
:DirDiff {A:directory 1} {B: directory 2}shows the differences between the two directories:DirDiffQuitexit from DirDiff mode
- Hexadecimal Editor
For this I use the Vinarise plugin, a well thought hexadecimal editor for Vim.
No play with this, is not a toy, this is for grown ups only! If you do not know what you are doing, keep your hands out of it! 😄 If you are all thumbs, this tool is a sure candidate for a disaster.

Mappings
<F6>entry into the Hexadecimal modeVedit the file in ASCII mode with Vim (Vinarise keeps opened)qhide VinariseQquit Vinarise<C-G>show current positionrchange current addressRoverwrite from current addressgGmove to input addressgomove by offset address/search binary value?search binary value reverseg/search string valueg?search string value reversee/search regular expression (search only forward)Echange encoding<C-L>redrawg<C-L>reload
- badwolf https://github.com/sjl/badwolf
- coveragepy.vim https://github.com/alfredodeza/coveragepy.vim
- crontab.vim https://github.com/vim-scripts/crontab.vim
- csapprox https://github.com/godlygeek/csapprox
- delimitMate https://github.com/Raimondi/delimitMate
- DirDiff.vim http://github.com/joedicastro/DirDiff.vim
- easydigraph.vim https://github.com/Rykka/easydigraph.vim
- emmet-vim https://github.com/mattn/emmet-vim
- gitv https://github.com/gregsexton/gitv
- gundo.vim https://github.com/sjl/gundo.vim
- harlequin https://github.com/nielsmadan/harlequin
- html5.vim https://github.com/othree/html5.vim
- indentLine https://github.com/Yggdroot/indentLine
- JSON.vim https://github.com/vim-scripts/JSON.vim
- junkfile.vim https://github.com/Shougo/junkfile.vim
- loremipsum https://github.com/vim-scripts/loremipsum
- molokai https://github.com/tomasr/molokai
- neobundle.vim https://github.com/Shougo/neobundle.vim
- neocomplete.vim https://github.com/Shougo/neocomplete.vim
- po.vim--gray https://github.com/vim-scripts/po.vim--gray
- python-mode https://github.com/klen/python-mode
- summerfruit256.vim https://github.com/vim-scripts/summerfruit256.vim
- syntastic https://github.com/scrooloose/syntastic
- ultisnips https://github.com/SirVer/ultisnips
- unite-colorscheme https://github.com/ujihisa/unite-colorscheme
- unite-filetype https://github.com/osyo-manga/unite-filetype
- unite-fold https://github.com/osyo-manga/unite-fold
- unite-help https://github.com/tsukkee/unite-help?
- unite-locate https://github.com/ujihisa/unite-locate
- unite-mark https://github.com/tacroe/unite-mark
- unite-outline https://github.com/Shougo/unite-outline
- unite-quickfix https://github.com/osyo-manga/unite-quickfix
- unite.vim https://github.com/Shougo/unite.vim
- utl.vim https://github.com/vim-scripts/utl.vim
- vim-airline https://github.com/bling/vim-airline
- vim-characterize https://github.com/tpope/vim-characterize
- vim-commentary https://github.com/tpope/vim-commentary
- vim-fugitive https://github.com/tpope/vim-fugitive
- vim-gitgutter https://github.com/airblade/vim-gitgutter
- vim-github256 https://github.com/joedicastro/vim-github256
- vim-github-dashboard https://github.com/junegunn/vim-github-dashboard
- vim-markdown https://github.com/joedicastro/vim-markdown
- vim-markdown-extra-preview https://github.com/joedicastro/vim-markdown-extra-preview
- vim-molokai256 https://github.com/joedicastro/vim-molokai256
- vim-pentadactyl https://github.com/joedicastro/vim-pentadactyl
- vim-repeat https://github.com/tpope/vim-repeat
- vim-signature https://github.com/kshenoy/vim-signature
- vim-snippets https://github.com/honza/vim-snippets
- vim-speeddating https://github.com/tpope/vim-speeddating
- vim-surround https://github.com/tpope/vim-surround
- vim-textobj-entire https://github.com/kana/vim-textobj-entire
- vim-textobj-indent https://github.com/kana/vim-textobj-indent
- vim-textobj-lastpat https://github.com/kana/vim-textobj-lastpat
- vim-textobj-line https://github.com/kana/vim-textobj-line
- vim-textobj-underscore https://github.com/kana/vim-textobj-underscore
- vim-textobj-user https://github.com/kana/vim-textobj-user
- vim-tmux https://github.com/vimez/vim-tmux
- vim-transpose https://github.com/salsifis/vim-transpose
- vim-unite-history https://github.com/thinca/vim-unite-history
- vim-virtualenv https://github.com/jmcantrell/vim-virtualenv
- vimfiler https://github.com/Shougo/vimfiler.vim
- vimproc https://github.com/Shougo/vimproc.vim
- vimux https://github.com/benmills/vimux
- vinarise.vim https://github.com/Shougo/vinarise.vim
- webapi-vim https://github.com/mattn/webapi-vim
- winresizer https://github.com/jimsei/winresizer
- zoomwintab.vim https://github.com/vim-scripts/zoomwintab.vim