Mapping for navigation
The most basic use of a map is to find out where one is located. After that, one usually wants to use the map to find the best route to another location. On a digital map, this is usually provided with turn by turn navigation using a navigation device.
 Let the computer find the best route for you!
A navigations system has user facing components that interact with the user and back end components that computes the best route based on the user input and available data. In this guide we will focus on the back end components that rely on map data.
User facing components
- User interface controls for setting the the origin and destination
- Map display that visually represents the route to take
- Turn by turn instructions that accurately describe the navigation maneuvers at the appropriate time
- Route status that includes current progress and the estimated time of arrival (ETA) at the destination
Back end components
- A navigation profile that describes the mode of transport to use for the routing algorithm (eg. truck, cycle or foot)
- A route finder that finds the best possible route between the origin and destination for the selected navigation profile
- A guidance system that converts the route into instructions for turn by turn navigation
The navigation profile accurately describes the preferred types of roads to take based on the mode of transport used. A walking profile will have a fairly constant walking speed on any type of road, while a car profile will have avery high traveling speed on a motorway and will be much slower on a residential road. This has a large influence on the route finder.

Different routing profiles: cars, walking, bicycle.
Routing is the process of selecting the best path in a network interconnected of roads on the map. Every road segment on the map has a traveling speed calculated based on various road factors, and the fastest and safest route is selected from all possible combinations.
Finding the route between two points involves complex calculations on a routing graph
The calculation of an accurate route depends on a variety of factors which are taken into account by the routing algorithm:
- Personal factors: fastest route, most scenic route, quietest route, shortest route, facilities needed, toll rates
- Vehicle factors: mode of transport, physical category of vehicle, optimum traveling speed, riding surface requirements, fueling requirements
- Route factors (static): classification of road, access restrictions, speed limits, turn restrictions, oneway rules, number of lanes
- Traffic factors (dynamic): traffic conditions, traffic signal cycle duration, weather conditions
- Riding surface factors: surface material, smoothness, barriers, speed breakers, road width, lane width, age
 A route is converted into a series of easy to follow instructions for the user
Route guidance is used to lead a person through the determined path. Once the routing algorithm determines the best path, that route is converted into a set of human-readable instructions known as guidance. The guidance represents the street names, the turn lanes marked on the roads, exit numbers, and destinations shown on sign boards. Accurate and relevant guidance can greatly enhance the user experience of using the map for navigation.
Providing accurate navigation using maps is dependent on having detailed and updated data about the world. The world is transforming every second and the next generation of navigation will need to have the latest information about the world that will come from various sources.
 _Telemetry traces of Strava users from [Strava Globalheatmap](http://labs.strava.com/heatmap/#14/-74.02871/40.70159/blue/both)_
Telemetry is the remote collection of data which can be physical, environmental or biological. Most internet and GPS enabled phones collect location and other environmental data and reports it to a central service that can aggregate the data to determine traffic conditions on a road.
 Crowdsourced streetview photographs from narrow alleys in India using Mapillary
Street view images from dashcams, mounted cameras in vehicles using apps gives highly detailed 360° view of streets. This can help detect traffic signage, access restrictions, traffic signals, road markings to help add and confirm ground features into a map. Opensource street view photos include Mapillary and OpenStreetView.

High resolution imagery captured from UAVs in Srilanka
Aerial imagery using drones can capture the changing surface of the earth at a much higher resolution and lower cost compared to traditional satellite imagery that is expensive to acquire and are updated less frequently.

Automatic image segmentation by Mapillary
Advances in machine learning opens up opportunities to automate manual tasks like digitization of roads from satellite imagery and can accelerate the creation and maintenance of map data.
A navigation map is influenced by several road characteristics, such as the turn restrictions, improper way of road tracing and road classification. The most important ones among those are:
Roads are the main features that are used for rendering a route in all navigational applications. Correct road mapping leads not only to the well-looking map but also to better navigation experience. With the change in the shape of the traced road, the distance covered will be altered which affects the route. The common approach for road mapping is to trace roads following the center-line from satellite imagery.

Roads on satellite imagery
If you want to travel from point A to point E as shown in the below image, you can either travel from A to B, B to C and then C to E or A to B, B to D and then D to E.

But, if you have a restriction to enter D from A, the only possible route will be A to B, B to C and then C to E. This is where connectivity plays a major role in deciding the final route.
If A to C is a primary road which is crossing through a service road B to D and you want to travel from A to E, the navigation map comes up with the route traveling from A to B, B to C and then C to E and completely avoids A to B, B to D and then D to E because the travel on Primary road is much efficient than a narrow service road. This is how the attributes / properties with which the road is assigned with plays a crucial role in deciding the final route.

The OpenStreetMap data model consists of nodes, ways, relations, and tags. A detailed description of the data model can be found in the The OpenStreetMap Data Model guide.
Navigation data is similarly a combination of nodes, ways, relations, and tags. Some of the examples are illustrated below:
- Nodes:
- Exit numbers:

- Ways:
- Highway=*

An way tagged with highway=secondary tag
- Relations:
- Turn restrictions are a combination of nodes, ways, tags, and relations. It consists of
from wayvia nodeandto way, tied together by arestriction=*relation.

- Tags: All the navigation features are differentiated and defined based on how they are tagged. Tags can be on any element: on nodes, ways, and relations.
Examples are: destination=*, ref=*, turn:lanes=*, restriction=*, etc.
Before tracing, we need to inspect the start and endpoints of the road segment. We need to identify the road direction, general numbers of lanes and the places where there are extra lanes. Based on this we choose our strategy for tracing.
We are not able to draw a road on its center line, especially if roads join/fork or the number of lanes change. Imagine two roads which join: how would you draw the OSM-way around the point where the roads join?
Center line tracing
Tracing based on road direction
There are two cases:
-
Dual carriageway roads

These are bidirectional roads which have a physical separation between the lanes in both the directions. Both the ways will be counted for lanes and will be tagged with lanes=*. Dual carriageways are always oneway roads.
 Placement of nodes of the lines in each direction, opposite to each other
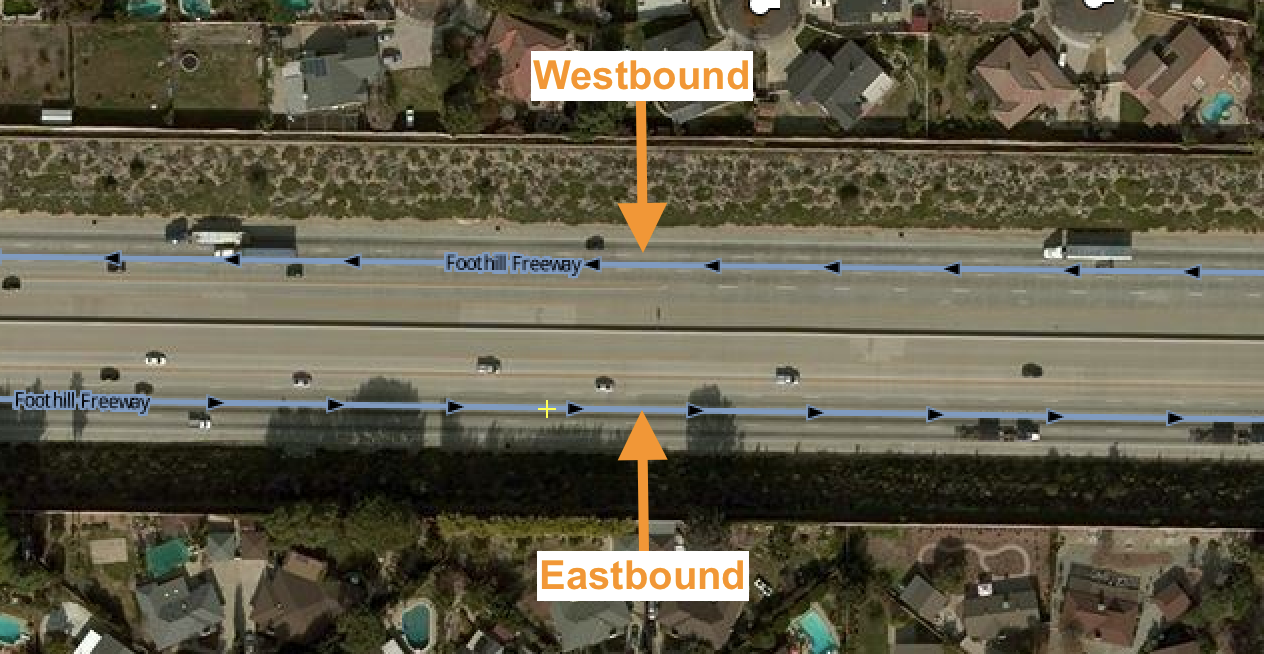
-
Roads which carry traffic in both directions (Bidirectional roads)
 Road carrying traffic in both directions
Detailed guide mapping features for navigation on the OpenStreetMap project. Before you start, please read the guide on Mapping with OpenStreetMap
Query OpenStreetMap for Navigation Data via Overpass
These are features that help the routing engine find the safest and fastest route between two points.
highway=*- OSM Wiki
Roads are categorized according to its order of importance. They are tagged with the highway=*. The general order of importance for way types are:
highway= motorway > trunk > primary > secondary > ... > living streets > ... > footway
highway=primary in San Francisco
The value of the key helps show the importance of the highway within the road network as a whole. The importance ranges from the most important motorway to the least important service. The routing engine takes into account this importance of classification when determining optimum routes.
Road classification may varies from country to country. The country specific use cases can be found in detail on separate wiki pages. For example, when mapping roads in India, the local community refer to the India road tagging wiki.
Examples:
For an example of an area with a good concentration of different classes of roads on OpenStreetMap, look at San Francisco area. This osm query can be used to extract and gather numbers of all the highways present in a given bounding box on OpenStreetMap.
Department of Transportation websites and wikipedia are some of the primary sources for highway information.
oneway=yes- OSM Wiki
Oneways generally refer to road segments which allow traffic in only one direction. There are also streets which have oneway characteristics for only on certain times of the day to regulate traffic.

oneway=yes shown in Mapillary
The best source of mapping oneways are again street level photos.
San Francisco is one area which has been well mapped for oneways in OpenStreetMap. This overpass query can be used to extract oneways from OpenStreetMap data.
type=restriction- OSM Wiki
- Mapping guide
type=restriction is added to a relation in OpenStreetMap which is used to describe turn restrictions at junctions. The relation has a set of tags that describes the type of restriction, for example. no_left_turn, no_right_turn, no_u_turn, etc. These are traffic signs at junctions and this information must be present on the map to find the best route by the routing engine while planning a route.

Turn restriction denoting no left turn along with conditions: opening and closing times
The main resource for turn restriction data is street view level images, local mapping drives, DOT websites
 turn restriction which denotes
 no right turn at the junction
San Francisco in OpenStreetMap has an excellent coverage of turn by turn restrictions at junctions. This overpass query can be used to extract current turn restriction in a bounding box.
-
maxspeed=60ormaxpseed=40 mph - OSM Wiki
The maxspeed=* tag defines the maximum legal speed limit for general traffic on a particular road, railway or waterway. The max speed values will be interpreted as kilometers per hour by default. The maxspeed=* is an important part of routing as it is used in determining the shortest time taken by a specific route to reach a destination. In the case of two routes, the one with the shortest time (higher maxspeed) and shortest distance will be considered as the optimum route.

Maxspeed sign shown in Mapillary
The main data sources for detecting maxspeed signs are: street view photos, wikipedia, DOT documents.
The maxspeed=* data on OpenStreetMap (for example, in London) in an area can be extracted by this overpass query.
access=*- OSM Wiki
Apart from turn restrictions, there are access restrictions for different parts of highways. Some of these tags are access=no, access=private etc which will end up altering the route to be taken during the journey. For more information on the various kinds of access=* tags take a look at Key:access and Conditional restrictions and access restrictions

An access=no for non-motorized traffic, ends up altering the route for bicycle profiles, source: US MUTDC
All the access=private tags on OpenStreetMap ways, which will not allow that segment of the way to be used in a route can be extracted from this overpass query. An example of well-mapped access restrictions in OpenStreetMap can be found in London.
The sources for mapping access restrictions in OpenStreetMap are: street view photos, local mapping drives.
Traffic signals such as: highway=traffic_signals, highway=stop or barrier=toll_booth as well as traffic_calming=* are considered during routing. The type=restriction more commonly referred to as turn restrictions are traffic signage which prohibits certain turns in intersections are also a crucial part of a great routing engine.
More details on mapping traffic signals for cars and pedestrians can be found in the OpenStreetMap wiki.
Street view photos from Mapillary, local mapping drives using OpenStreetMap tracker can be used as sources to map traffic signals in OpenStreetMap.

Traffic signal in a junction
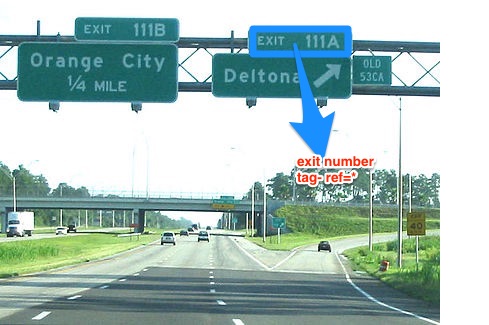
What are exit numbers?
- An exit number is a number assigned to a road junction, usually an exit from a freeway. It is usually marked on the same sign as the destinations of the exit, as well as a sign in the gore.
Different tags for exit numbers:
-
ref=*is used when the exit has a specific number assigned to it. -
noref=yesis used when the exit doesn't have any official number assigned to it.
What are destination tags?
- Destination tags describe the content of signposts or ground writing indicating the names of the locations that a certain exit from the freeway or a highway is heading to.
- The key
destination=*describes where a certain exit leads to. Thus navigation systems can refer to road signs that the driver actually sees.

-
destinationtag refers to the place that the way exiting from the freeway leads to. -
destination:refis the reference of the roads directly ahead. -
destination:ref:tois to specify the reference of a major highway ahead. -
destination:streetrefers to the main street the way exiting from the freeway leads to.
An example of a place with good exit/destination coverage in OpenStreetMap is Ottawa, Canada. These overpass queries for destination and exit numbers can be used to extract exit/destination data from OpenStreetMap.
The detailed guide on adding exit and destination numbers can be followed for adding exit/destinations. This guide is specifically focused on North America (US/Canada) for now.
As discussed in Modeling Roads for navigation page, there are two types of roads: unidirectional and bidirectional. lanes=* tag is used to count the number of lanes in both these type of roads.
To set number of lanes for roads which carry traffic in both directions use :backward and :forward suffixes
Forward means the direction in which the way is drawn in OpenStreetMap, while backward means the opposite direction.
Example:
  highway=tertiary
  lanes=5
  lanes:forward=3
  lanes:backward=2
In the image below, the number of lanes is two - lanes=2. Orange line is the center line of bidirectional way which is the main way direction. When the extra lane starts in a bidirectional way, that segment is tagged as lanes=3+lanes:forward=2+lanes:backward=1. Optionally, we specify placement of the lanes relative to the way.

The below image have two tagging variants:
-
lanes=2- 1 lane for each direction, or -
lanes=3- denote middle lane for left turn as (:point_left: this is discussed)
highway=residential
lanes=3
lanes:forward=1
lanes:backward=1
lanes:both_ways=1
turn:lanes:both_ways=left

IN case the number of lanes is even but numbers of lanes for each direction not equal. 👇

Turn lanes have an influence on the path finding and are one of the most vital components for proper guidance. Choosing the correct turn lane can have a big influence in navigation. Oftentimes, they only help to illustrate a turn better but other times, they are vitally important. In guidance, the aim is to provide a set of instructions, like keep right or keep left by describing the optimum route found by the routing algorithm to a driver.

How a driver views turn lanes from the car. For a single direction way, it will be tagged turn:lanes=left|left;through while for a bidirectional way it will be tagged turn:lanes:forward/turn:lanes:backward=left|left|through depending upon OpenStreetMap way direction
There are three turn lanes tags in OpenStreetMap:
turn:lanes=*
turn:lanes:forward=*
turn:lanes:backward=*
Turn lanes can be mapped from high-resolution satellite imagery sources and street level photos. An example of the high density turn lane area in OpenStreetMap is Los Angeles. This overpass query can be used to extract turn lanes data from OpenStreetMap
Mapping guide for mapping turn lanes: This is a detailed mapping guide for adding turn lanes in general with specific focus on the US. It will be updated as more and more countries are mapped for lane information in OpenStreetMap.
--
The other important attributes in besides turn:lanes and exit/destination data required to provide the better guidance using OpenStreetMap data are:
lanes=*
name=*
ref=*
relation:route
Information for lanes, highway names, highway ref and relation:route can be found in their respective OpenStreetMap wikis.
When navigating a street network, it is important to know which maneuver you are permitted to make. Turn restrictions are communicated through road signage and are placed to regulate traffic flow at intersections by restricting certain maneuver. When mapped in OpenStreetMap data, these restrictions have a dramatic impact on an OpenStreetMap based routing experience.
Example, the routing improvement when a missing Not Left Turn restriction (left), is added to the map (right):

Turn restrictions come in many forms and combinations, and can vary from country to country. To start things off, this guide focuses on mapping turn restrictions in the United States.
Contrary to the name, turn restrictions are not limited to turns you are not allowed make. They can also be used to communicate the single maneuver you are allowed to make. We can categorize these two restriction types as mandatory (ex. you can only go straight) and prohibitory (ex. you cannot go straight).
In the US you will largely find prohibitory turn restriction signage and sometimes mandatory signs. Most often you will see one of these six signs:


In this guide we’ll focus on how to map the six most common US turn restrictions described above, then move into the mapping of conditional turn restrictions and a couple less non-standard turn restrictions you may see.
Every turn restriction is a relation made of ways and node.
A turn restriction is a type of relation which should have a minimum of three members: from, via and to.
- The
frommember is the way which represents driver’s is initial location. - The
tomember is the way which represents driver’s possible end location. - To drive from the
fromway to thetoway a driver would pass through theviamember, which can be either a way or node based on current road geometry.(Note: It is possible to have more than one via member in a turn restriction, but this doc will not detail these particular cases.)
For a turn restriction such as No Left Turn and No Right Turn the via member is typically a node. For No U Turn the via member can be both way and node.

Once you have identified the location of an un-mapped turn restriction you are ready to create a turn restriction relation.

Note: Follow the same instructions listed below for both right and left turn restrictions, Make sure to match the direction of the mapping to the direction of the signage.
-
Check the
toway to ensure that it is not a oneway.- If a oneway exists which prohibits travel down the road in the way the turn restriction sign prohibits, mapping turn restriction is not necessary.
-
Select the
vianode in the map view panel to activate the Turn Restrictions editor on the side bar.
-
Select the
fromway in the Turn Restrictions editor.

- Select the arrow pointing left for the road where the restriction exists.

-
Check that your relation has been added by scrolling down to All relations and clicking on
No Left Turn. There should be three members.
-
If all looks good click Save to upload your turn restriction relation.

Note: do not close your iD tab until the data has been fully uploaded to OSM. Wait until the "Uploading changes to OpenStreetMap..." window disappears.


-
Check the
toway to ensure that it is not a oneway.- If a oneway exists which prohibits travel down the road in the way the turn restriction sign prohibits, mapping turn restriction is not necessary.
-
Select the
vianode in the map view panel to activate the Turn Restrictions editor on the side bar.
-
Select the
fromway in the Turn Restrictions editor. -
Select the straight on arrow.
-
Check that your relation has been added by scrolling down to All relations, clicking on
No Straight Onand inspecting the relation members. -
If all looks good click Save to upload your turn restriction relation.

Note: do not close your iD tab until the data has been fully uploaded to OSM. Wait until the "Uploading changes to OpenStreetMap..." window disappears.


No Turns means Only Straight On restriction.
-
Check the
toway to ensure that it is not a oneway.- If a oneway exists which prohibits travel down the road in the way the turn restriction sign prohibits, mapping turn restriction is not necessary.
-
Select the
vianode in the map view panel to activate the Turn Restrictions editor on the side bar.
-
Select the from way in the Turn Restrictions editor.
-
Select the straight on arrow.
-
Select the straight on arrow again to change
no_straight_ontoonly_straight_onrelation.

-
Check that your relation has been added by scrolling down to All relations, clicking on
Only Straight Onand inspecting the relation members.
-
If all looks good click Save to upload your turn restriction relation.

Note: do not close your iD tab until the data has been fully uploaded to OpenStreetMap. Wait until the "Uploading changes to OpenStreetMap..." window disappears.


Inspect the existing road geometry, if it is a dual carriageway, Follow below steps to add no_u_turn restriction where via will be way.
- Select the node which connects the
toway andviaway to activate Turn Restrictions editor on the side bar.

-
Select the
fromway in the Turn Restrictions editor. -
Select the
toway in the Turn Restrictions editor.
-
Check that your relation has been added by selecting the
fromway, scrolling down to All relations, and clicking onNo U Turn.
-
If all looks good click Save to upload your turn restriction relation.

Note: do not close your iD tab until the data has been fully uploaded to OSM. Wait until the "Uploading changes to OpenStreetMap..." window disappears.

Inspect the existing road geometry, if it is a bidirectional way, Follow below steps to add no_u_turn restriction where via will be a node.
-
Select the node which connects the
toway andviaway to activate Turn Restrictions editor on the side bar.
-
Select the from way in the Turn Restrictions editor.

-
Click the u-turn icon at the junction to apply the restriction.

-
Check that your relation has been added by selecting the from way, scrolling down to All relations, and clicking on
No U Turn.
-
If all looks good click Save to upload your turn restriction relation.

Note: do not close your iD tab until the data has been fully uploaded to OSM. Wait until the "Uploading changes to OpenStreetMap..." window disappears.


When you encounter multiple turn restrictions contained within a single sign, it should be mapped as two separate restriction relations. In the case of No U Turn nor Left Turn, first create a no U Turn Relation, then create a No Left Turn relation.
- Check the
toway to ensure that it is not a oneway.- If a oneway exists which prohibits travel down the road in the way the turn restriction sign prohibits, mapping turn restriction is not necessary.
- Only add No U Turn restriction.
- Select the node which connects the
toway andviaway to activate the Turn Restrictions editor on the side bar.

-
Select the
fromway in the Turn Restrictions editor.
-
Select the
toway in the Turn Restrictions editor.
-
Click on the left arrow of the U turn relation.

-
Check that your relations have been added by selecting the from way, scrolling down to All relations, and clicking on
No Left TurnandNo U Turn. -
If all looks good click Save to upload your turn restriction relations.

Note: do not close your iD tab until the data has been fully uploaded to OSM. Wait until the "Uploading changes to OpenStreetMap..." window disappears.

Some turn restrictions are only applicable under certain conditions. The most common conditions are:
- day(s)
- time(s)
- vehicle type(s)
- traffic signal
- vehicle weight/height
Day, time, weight, height based conditions should be mapped, while traffic signal based conditions should not be mapped.
For all conditional restrictions you map the restriction as you would for a regular restriction. After regular restriction is mapped add the conditions to the tags. The general structure of a conditional turn restriction tag looks like:
restriction:conditional=<regular restriction name> @ <condition>
Day Conditions
A turn restriction containing a day condition specifies on which day(s) the restriction applies and some signage lists the day(s) does not apply. Day conditions are tagged using a single schema regardless of how the signage is phrased.
Day conditions are tagged using the Monday through Sunday calendar and are noted by two-character abbreviations:
| Day | Abbreviation |
|---|---|
| Monday | Mo |
| Tuesday | Tu |
| Wednesday | We |
| Thursday | Th |
| Friday | Fr |
| Saturday | Sa |
| Sunday | Su |
You may also encounter signage which specifies Holiday. In the US this refers to Public Holidays and is abbreviated using PH.
When you come across signage which lists School Days or When children are present (if near a school) tag using Mo-Fr as in the US this is typically when school is in session.
Time Conditions
Conditional turn restrictions sign sometimes list time(s) along with day(s). When no particular days are listed you must include Mo-Su in the tag to specify that the restriction applies throughout the week.
Time conditions are tagged using the 24 hour clock format.
Seperators used in conditional turn-restriction syntax -
- When sign has sequence of day(s) mentioned, separate the day(s) range with
-(Example -Mo-Su). - Use
-to separate individiual time ranges and,to separate multiple time ranges (Example -07:30-09:00,14:00-16:00). - Use
;to list exception days after specifying day and time ranges (Example -07:30-09:00,14:00-16:00; SH off). -
Note - Give extra space while separating between
<days><time>and<exception days>after separator symbol.
The basic syntax of a day/time conditional turn restriction is as follows:
restriction:conditional=<regular restriction type> @ (<day(s)-day(s)> <time-time>,<time-time>; <exceptional days>,<>exceptional days>)


Occasionally you will find signs that specify that a particular vehicle type is excluded from signed turn restriction. In these cases you must add an additional except=<vehicle type> tag.
Vehicle types allowed under except tag are
-
psv- Public service vehicles bicycle-
hgv- Heavy goods vehicles taxischool_buscommercial_vehicle
Adding vehicle exceptions in restriction
-
Select the added relation

-
Click on ➕ to add the
excepttags listed in the sign.
-
Add the vehicle type as exception per shown in the sign. Use
;to separate multiple vehicle types. Note :bus,metrovehicle types are classified aspsv.

In the US there are many situations where a right turn is generally permitted except for when the traffic signal is red. We do not map these turn restrictions.

Weight and height conditions are used to restrict the access of large vehicles, notably trucks from certain roads. The vehicle weight and height will be limited by specifying the number in units which the country follows. This guide more focused on car based restriction. Do not map turn restrictions which limits for height or weight of any vehicle type.

Redundant turn restriction can exist in two ways -
Restriction to oneway street

There are some situation where both restriction and oneway are signed together. In such situation, if to way is a oneway then there is no need to add turn restriction.
Multiple prohibitory = single mandatory turn restriction
To avoid redundant relations it is important to note and check what are the existing turn-restrictions at the junction -
Example - For No Left Turn and No Right Turn
There are cases where Only Straight Turn is added, In such cases there is no need to delete existing restriction as it implies the same.
Note : Always map what is signed at the intersection and do not imply turn restriction. If implied turn restriction is already present, do not delete it and also do not map.


Occasionally you'll find an incorrect turn restriction relation. To remove an incorrect relation you must make sure to delete each member of the relation.
-
Click on the relation node to open the Turn Restrictions editor in the sidebar.

-
Click on the relation you want to delete in the All Relation list.

-
Delete each member of the relation.

-
Click on the relation node in the map view and inspect the Turn Restrictions editor to ensure that the relation has been fully removed.

-
If all looks good, click Save to upload your changes.

Note: do not close your iD tab until the data has been fully uploaded to OSM. Wait until the "Uploading changes to OpenStreetMap..." window disappears.

Exit numbers and destinations are used as a part of guidance in routing engine. They help the driver in navigation guidance through on-ramps and off-ramps while routing on major roads.
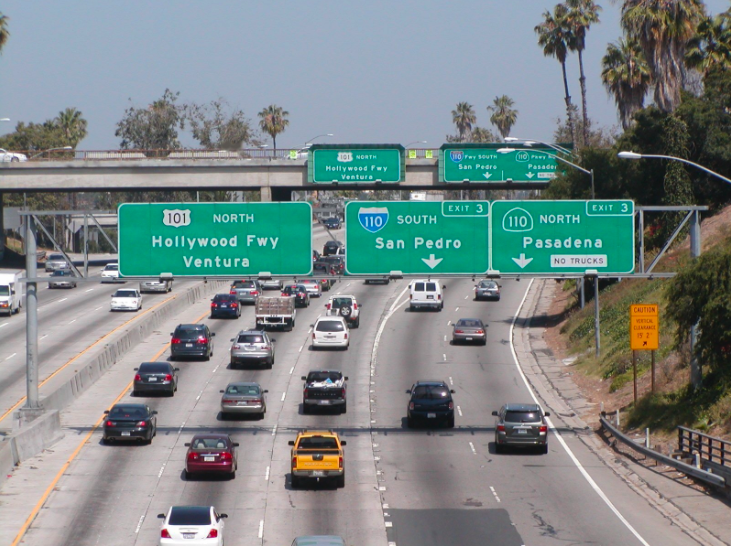
An exit number is a unique alpha-numeric identity assigned to a road junction, usually an exit from where a freeway starts. It is usually marked on the same sign as the destinations of the exit, as well as a sign in the gore. OpenStreetMap based guidance systems such as OSRM can use exit numbers as a way to guide drivers to take the right exit during navigation.
-
highway=motorway_junction→ is used in representing the specific node as a junction where the exiting way starts -
ref=*→ is used when the exit has a specific number assigned to it- Also tag
junction:ref=*on the connectinghighway=motorway_linkway
- Also tag
-
noref=yes→ is used when the exit does not have any official number assigned to it
In California, exit number signage is inconsistent. The state is gradually adding exit numbers. In the meantime, it’s common for a freeway exit to lack any exit number sign, even if Wikipedia provides an exit number. If there’s already a ref tag on the highway=motorway_junction node but no exit number sign appears in Mapillary imagery from within the past year, replace the ref tag with unsigned_ref. Sometimes there’s no exit number at the exit, but an advance guide sign (the one that says “½ mile” or “1 mile”) does display an exit number. In that case, leave the exit number in ref, because a driver would be able to use that information while navigating.
Destination tags describe the content of road signposts or ground information indicating the names of the locations that a certain exit from the freeway or a highway is heading to, or that a certain entrance to the freeway is heading to. The destination tag refers to the place the entering/exiting way is leading to. Thus navigation systems can represent correct guidance with the respect to road signs that the driver actually sees when driving. The destination references are also alpha-numeric identities which changes from state to state in US. For reference check the shield dictionary to understand how highway shields are represented in different states of US. If you can’t figure out how to map a particular highway shield, look at the ref tags on the way that the motorway_link way leads to.

-
destination=*→ is referring to the place/street that the ramp (link way) leads to. -
destination:ref=*→ is the route number of the roads that the ramp leads to -
destination:ref:to=*→ is the route number of the roads that the ramp indirectly leads to -
destination:street=*→ is an alternative name for the numbered route – only use in Florida, Kentucky, and Maryland -
destination:lanes=*,destination:ref:lanes, etc. → Often the destinations of a road differ from lane to lane. To specify those for every lane,destination:lanes=*is used.
Every dual carriage way has two oneways roads having traffic in opposite directions. Considering a dual carriage way as a destination, it is important to provide the cardinal direction of the way to which the route is navigating the user. To get this information we need to add cardinal directions to the destination:ref tags of the exit/entrance ways.
The cardinal direction of the road is the direction in which a road is linearly-referenced in increasing order. It is an important feature in navigation and helps in guiding the user in write direction.
Ground based imagery or a field survey is the only way one can verify freeway junctions and road signs. For imagery, Mapillary imagery can be used as a reference to verify and add exit numbers and destinations to mapped highways on OpenStreetMap. Sometimes the pavement is marked with a route shield in each lane, indicating the destination ref, in which case you can also use aerial imagery.
Exit numbers are mapped as nodes at the junction's on highways where freeways have exit ways.
| S.No | Mapillary Image | JOSM representation | Tags |
|---|---|---|---|
| 1 |  |
 |
{::nomarkdown}
|
| 2 |  |
 |
{::nomarkdown}
|
| 3 | 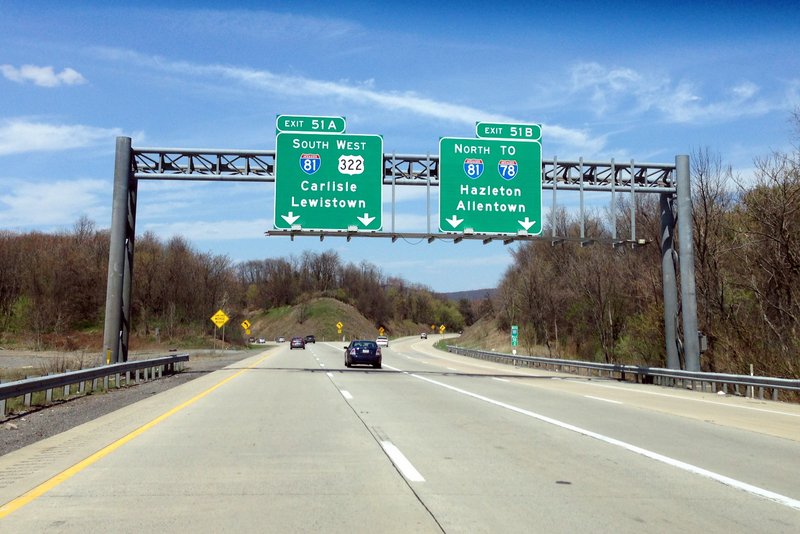 |
 |
{::nomarkdown}
|
| 4 |  |
 |
{::nomarkdown}
|
| 5 | 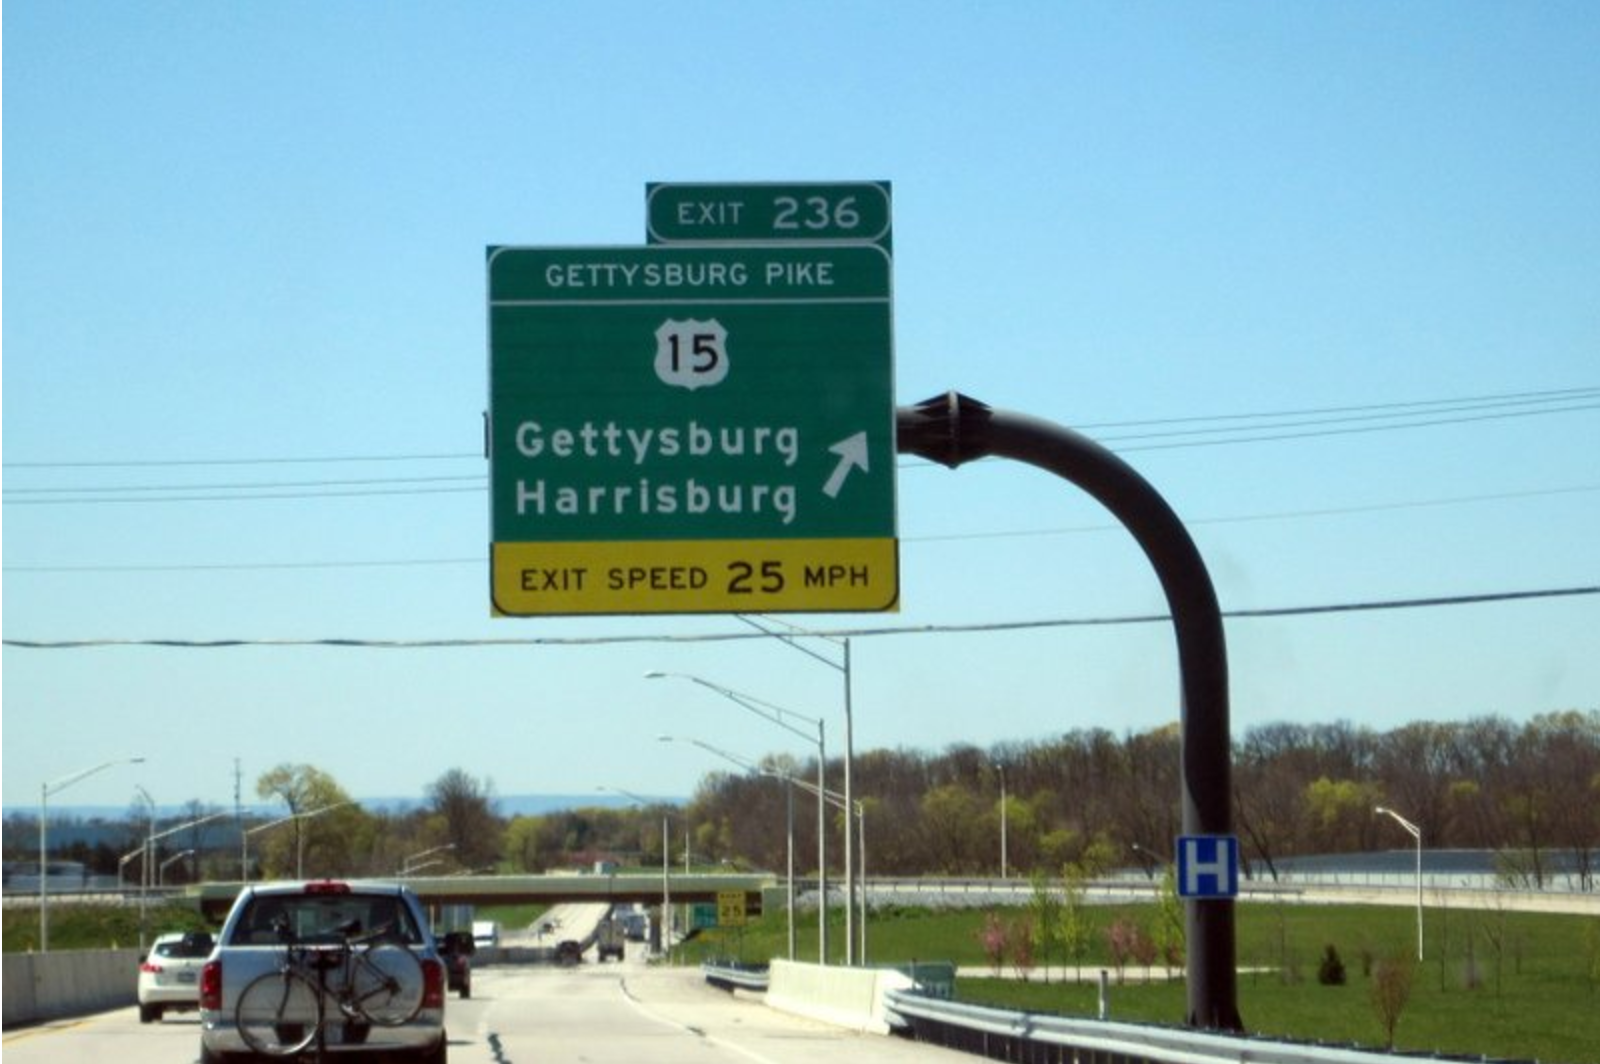 |
 |
{::nomarkdown}
|
Destinations are mapped on the highway=motorway_link ways that start from the highway=motorway_junction node and connect with another road. These are called off-ramps or freeway exits. Destinations are also mapped on the highway=motorway_link ways that start from another road and end on the highway=motorway way (without a highway=motorway_junction node). These are called on-ramps or freeway entrances.
| S.No | Mapillary Image | JOSM representation | OSM tags |
|---|---|---|---|
| 1 | |
 |
{::nomarkdown}
|
| 2 |  |
 |
{::nomarkdown}
M represents that highway belongs to the state trunkline highways of Michigan state |
| 3 |  |
 |
{::nomarkdown}
I represents Interstate highways and US represent U.S. Routes. North and East represent the cardinal direction of the way. Only enter the cardinal direction that is used on the sign; do not guess based on the physical direction of the road. |
| 4 |  |
 |
{::nomarkdown}
KY comes from the state of Kentucky, where oval shields represents state routes. The small letter font represents destination:street and are only available in limited US states |
| 5 |  |
 |
{::nomarkdown}
|
| 6 |  |
 |
{::nomarkdown}
highway=motorway_link way at the intersection, so that the on-ramp and off-ramp are represented by separate ways. |
| 7 |  |
 |
{::nomarkdown}
|
Note:
- Cardinal direction can be found on the sigh boards but this is not the same in all cases. In case, the cardinal direction is missing on the sign board do look into the route relation of the connecting motorway of the exit/entrance way and get the cardinal direction.
- If you come across missing street level imagery, get the
destinationanddestination:refinformation from the connecting motorway of the exit/entrance way along with the cardinal direction of the way.
- Shield marks of state routes changes from state to state. Refer to the shield dictionary.
- Use checkautopista2 for identifying missing junctions
| Short-form | Full-form |
|---|---|
| Rd | Road |
| St | Street |
| Dr | Drive |
| Br | Bridge |
| Ave | Avenue |
| Blvd | Boulevard |
| Pt | Point |
| Pkwy | Parkway |
| Cr | Creek |
| Mtn | Mountain |
| Mt | Mount |
| Jct | Junction |
| Ft | Fort |
| AFB | Air Force Base |
| JR | Junior |
| MLK | Martin Luther King |
| Co | County |
| Tr | Trail |
A turn lane is an auxiliary lane demarcated on the road to specify directions to ongoing vehicles. Turn lanes serve two purposes:
- Provide directional information to the ongoing vehicles and
- Provide the lane information to be chosen for the vehicles changing their direction
There are a total of 12 different turn lanes demarcated on the roads. They are:
| Turn Lane | Representation |
|---|---|
| turn:lanes = left |  |
| turn:lanes = right |  |
| turn:lanes = through |  |
| turn:lanes = left;through |  |
| turn:lanes = right;through |  |
| turn:lanes = left;through;right |  |
| turn:lanes = left;right |  |
| turn:lanes = slight_left |  |
| turn:lanes = slight_right |  |
| turn:lanes = merge_to_left |  |
| turn:lanes = merge_to_right |  |
| turn:lanes:both_ways = * |  |
 road markings on the ground - © pdd.ua
Before mapping turn lanes activate the following preferences in JOSM to visualize the mapped turn lanes: preferences > Map Settings
-
Map Paint Styles > Lane and road attributes
-
Tagging Presets > lane attributes
-
Filter out non-road features with inverse filter:
boundary: | leisure: | landuse: | waterway: | amenity: | natural: | building:
Plugins
- Knife-tool: https://gist.github.com/jothirnadh/a10daeaef1498537ea56f0a65f7fdbc2
- TurnLanes-tagging plugin:
JOSM Preferences > Plugins > turnlanes-tagging
-
Check all roads in the imagery for turn lanes at junction points

-
Split the road into segments based on the total number of lanes for the segment. The easiest way for splitting the road is by using Knife_tool

-
For each road segment tag the turn lanes based on the road markings in the direction of the way. Eg.
turn:lanes=left|left;through|through. Check OSM turn:lanes for reference.
-
For bi-directional segments, use
turn:lanes:backward=andturn:lanes:forward=to specify turn lanes in each direction.
-
Verify correct tagging using the
Lane attributesstyle
-
The simplest way to add turn lanes is by using turnlanes-tagging plugin

We use relations for different purpose – for indicating turn restriction or collect separate ways into solid route. JOSM help us to handle them. But sometimes we are faced with not properly denoted relations. JOSM will inform about it while uploading our changes. You may ignore messages of level "Warnings" (if you only split ways and didn't edit relations manually) but you have to fix all "Errors".
While mapping turn lanes, there are a lot of scenarios are encountered in #153 and #144 mapping repos. All these scenarios are drafted in one place for validation purposes.
In the U.S., when parallel parking spaces are marked, they are marked in one of three ways:

Here’s an example of the box marking style:

If there are no clear cut demarcations on the road and yet cars are parked on either sides of the road, consider them as drive lanes. Case below:

Turn lanes should begin exactly as per the marking in the imagery, not before or after.

Turn lanes should terminate at the first highway junction after the start of the turn lane.

In case of bi-directional ways, the key turn:lanes:forward=* describes only the turning indications on the lanes in the same direction as the osm-way; while adding this we must view the road in the direction to the osm-way(on the direction where the osm-way arrow is pointing).

In case of bi-directional ways, the key turn:lanes:backward=* describes only the turning indications on the lanes in the opposite direction as the osm-way; while adding this we must view the road in the oppoiste direction to the osm-way(opposite to direction where the osm-way arrow is pointing).

Adding a turn:lanes:backward tag
When finding roads mapped as single carriageway while the imagery shows clear separation between roads, split the road where the physical separation starts and add dual carriageways.

When to add dual carriageway?
- Add Dual-carriage when
- you see physical separation betweens roads
- no relation is attached to the way.
- Add
turn:lanestag to both the ways.
Road shoulders and bicycle lanes are ignored from the lane count. Both these roads are lanes=2


lanes=3 for the above example, ignoring the two cycle ways
-
Ignore bicycle lanes even though they are in the middle;example below:

The middle way is also a bicycle lane which is not counted while adding the
lanestag -
Additionally,
Strava global-heat cyclelayer can used to verify if a particular lane is a cycle-way.tms[16]:http://globalheat.strava.com/tiles/cycling/color3/{zoom}/{x}/{y}.png
Do not add turn lanes in these cases where the only turn lane is already a mapped as a separate way.

These are the lanes marked with symbol representing both directions at a time.

Tag used for such lanes are turn:lanes:both_ways=*
Yellow lines on both sides of a lane also gives an indication of turn:lanes:both_ways=*


The imagery at some places is not very clear and at-times the turn-lanes are covered by cars. In situations like these Mapillary plugin can be used. If there is Mapillary imagery coverage in that area, they can used to verify the presence of turn-lanes.
Name of the plugin: Mapillary

These are the areas on streets which are restricted for vehicular traffic.


In the above cases the areas with markings on the roads are not considered as a lane
These are the lanes specifically categorized to take U-turn or reverse-turn.

-
noneitself is valid value but not in conjunction with other -
✅
turn:lanes=none|rightis equal toturn:lanes=|right- we usenonefor "better readability" -
👎
turn:lanes=left||none|merge_to_right- this combination of values is valid but there is mixingnoneand||(empty) - this is not good choice. -
👍
turn:lanes=left|none|none|merge_to_rightorturn:lanes=left|||merge_to_right -
❎
turn:lanes=none|none|noneorturn:lanes=||- in this caseturn:lanes=*tag is redundant, just specifylanes=3or real number of lanes -
❎
turn:lanes=none|none;slight_right- isn't valid combination - "there are no turn indications" on the rightmost lane. Instead, must be used (based on https://github.com/mapbox/mapping/issues/180#issuecomment-225574666)
lanes=2
turn:lanes=none|through;slight_right
transit:lanes=continue|new_on_right
-
using
*right|*leftvalues-
✅
turn:lanes=left|none|noneorturn:lanes=||rightorturn:lanes=merge_to_right||orturn:lanes=left|left;through|none|slight_right|right|right- 👍 -
❎
turn:lanes=|right|left|orturn:lanes=none|right|left|throughorturn:lanes=none|left|none- 👎 lanes that go in one direction should not cross with each other
-
-
using
reversevalue -
reverse(u-turn) have to be on the leftmost lane for right-hand traffic or on the rightmost lane for right-hand
to be continued …
- Mapping turn lanes: OSM wiki
- Mapping turn lanes in OpenStreetMap by Andrey Golovin
- Diary post by @Andygol : Mapping turn lanes in OpenStreetMap
Mapbox navigation mapping projects
Navigation mapping forms a large part of Mapbox's mapping sprints in recent times. Given below are a few examples of some of the latest navigation mapping efforts across US, Canada, and Europe. To get an idea about all our historical mapping projects related to navigation in OSM, look into the mapping repository. Our mapping projects are conducted in the open with active participation, feedback, and validation from the community.
| Location | Description | Start | End(ETA) | Validation |
|---|---|---|---|---|
| Mapping turn lanes in 30 US cities | Mapping all the turn lanes from satellite imagery in 30 US cities from secondary and above | 04/05/2016 | Continuing | Continuing |
| Updating turn restrictions in Germany | Updating missing turn restriction coverage in 3 german cities: Berlin, Stuttgart, Wolfsburg | 29/08/2016 | Continuing | Continuing |
| Mapping turn restrictions in Canada | Mapping turn restrictions from mapillary in top 5 cities in Canada | 22/07/2016 | 05/08/2016 | Completed |
| Exit and destination mapping in Canada | Map the exit and destination numbers in top 5 Canada cities using mapillary | 11/08/2016 | 17/08/2016 | Completed |
Navigation data tools
- Mapillary Explorer: Explore navigation related traffic signs automatically detected from crowdsourced street level imagery.
-
OpenStreetMap navigation map: This map is used to add turn restrictions in OSM. It has a detected signage mapillary layer for easy detection of turn restrictions, oneways and a dataset which displays all the valid, invalid and redundant turn restrictions added. Get more instructions on
how to use the OSM navigation map. -
CheckAutopista2: It is a tool to investigate and add highway signboard features on motorways and freeways. For more details look into the github repository for
checkautopista. - Overpass: The place to query and extract all OSM data related to a specific feature. It has a simple query builder feature that helps in querying each and every feature in OSM. Details about overpass can be found here and here.
- Knife tool: The knife tool can be used for quick splitting of ways while adding navigation features such as turn lanes. For more details, look here
- Turn lanes tagging plugin: With this plugin, you can add complex tag combinations for turn lanes at road junctions with ease, and minimize errors. For more details, look here
Country specific navigation guide
- Images of traffic signs and road markings : Traffic signs and road markings may undergo small changes and specific cases when mapping turn restrictions using Mapillary. There are subtle differences in turn restrictions between Canada, US, and Germany. (This section is to be kept updated with new signages every time mapping is done in a separate country with new conventions)
For more details on cases for turn restrictions and signages in different countries take a look at QA for mapping turn restrictions
Data sources and references for navigation data
-
DOT documents/websites: Local official websites, documents released by local
Department of Transportationbodies. - Wikipedia: Exit and destination numbers, highways, highway refs. (must be verified on ground or with official sources)
- High resolution satellite imagery: Bing, Mapbox, USGS, open satellite datasets (Landsat, Sentinel2, LISS, government opendata portals).
Implicit turn restrictions are turn restrictions that are implied by local laws, safe driving norms, or the real-world physical layout of roads, but are not accompanied by explicit signs (posts or road paint). When a junction is missing an implicit turn restriction, a routing engine may direct the driver to make an illegal or dangerous maneuver.
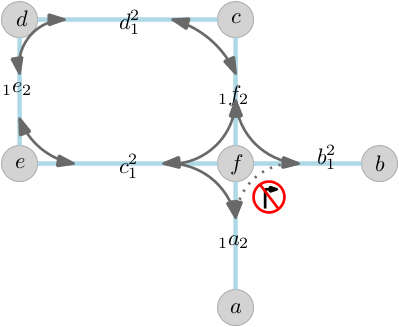
Where highway exit ramps join a road implicit turn restrictions are often need. Often a highway off-ramp enters a road from one direction, and an on-ramp branches off in the opposite direction at the same spot or very close by. In these situations, it is sometimes logically possible in the road network to navigate from an off-ramp directly onto an opposing on ramp:

A similar situation can occur at the node where slip roads from a dual carriageway intersect a single carriageway:

In these situations a turn-restriction is needed to prevent us from routing from one ramp or slip-road directly onto the other. This maneuver is almost never legal or safe.
Here's another example, where the highway off-ramp and the on-ramp meet the road from the same direction.

Where a slip road leaves or meets a main road, you will usually need to add up to two turn restrictions.
The first restriction is from the slip road to the main road to prevent the sharp turn counter to the intended use of the slip road -- for example, a left from a right-hand-turn slip road.
The second restriction is from the main road to the slip road to prevent the sharp turn against the intended direction of the slip road -- for example, driving past an intersection, and then taking a sharp left/U-turn onto a slip road intended for use from the opposite direction:
These are a little tricky, make sure you understand both restrictions in the diagrams below.


In general, U-turns are allowed on dual carriageways. However, things get a little tricky when dual carriageways transition to single carriageways.
Sometimes a dual carriageway transitions to a single carriageway because without a real intersection -- the road is simply narrowing. In these cases a routing engine will interpret the node as an intersection and allow U-turns. We need to override that behavior by mapping a no-u-turn restriction at the intersection.

In contrast, where a dual carriageway becomes a single carriageway at an intersection with other roads, it is treated just like any other dual carriageway intersection. In these cases, no implicit turn restriction is needed.

Sometimes, dual carriageway intersections is modeled like "sausage links", meaning a mapper has collapsed the road down to a single link at each intersection. This looks like a dual-carriageway to single-carriageway transition, but really nothing has changed.
We should remodel these as proper dual-carriageway intersections.


Once the road has been remodeled, apply turn restrictions for highway ramps and slip roads as normal.
Where multiple dual carriageways, ramps, slip roads, and/or single carriageways join, the complex network of crossing ways can create unpredictable routes. For example, "micro-loops" can enable unintended U-turn options:

When working with an intersection like this, keep a close eye on all possible maneuvers at each node, and see if each should be permitted or restricted. Test your work in the routing engine to make sure it behaves as you expect, and don't hesitate to ask for a second set of eyes.
Mapping implicit turn restrictions is the same as adding a regular turn-restriction with one addition: we add an extra implicit=yes tag to implicit turn restrictions to differentiate them from explicitly signed restrictions.

Just as for regular turn restrictions, there are situations where implicit turn restrictions can be added as either no or only restrictions. In these circumstances, feel to free to use whichever approach you find most clear.

An Intersection is where two or more highways meet or cross each other. The traced highway should represent the traffic flow for a navigation software to provide turn-by-turn instruction.

Over the history of OpenStreetMap, mappers have used different approaches to model various types of intersections. The more the number of roads intersect, the more complex the intersection becomes. In this guide we are capturing different cases of intersections with some best practices and recommendations to follow during mapping.
A bi-directional highway allows traffic flow in both directions without any physical separation. All the ways passing through the intersection should intersect at a common point to form a junction.

Bi-directional highway intersection with small traffic island do not require separation in the road geometry. Instead, add the traffic_calming=island tag on the node where the divider begins.

A dual-carriageway is a physically divided highway where the traffic flows in opposite directions. When a dual-carriageway and a bi-directional highway intersect at a junction, they should be modeled to follow the traffic flow rule by intersecting in parallel and perpendicular to each other. Merging the highway nodes (in a sausage shape) in the middle of the junction leads to confusing turn announcement and route line.

An intersection where two dual-carriageways intersect should be perpendicular to each other (in the form of #). Avoid merging the two ways in the middle of the junction.

A three-way intersection has three arms meeting at a single point forming a T-shape (perpendicular connection) or Y-shape (non-perpendicular connection). It is not necessary that the highways meeting this junction should be perpendicular to each other but they should not be merged in the middle of the junction.


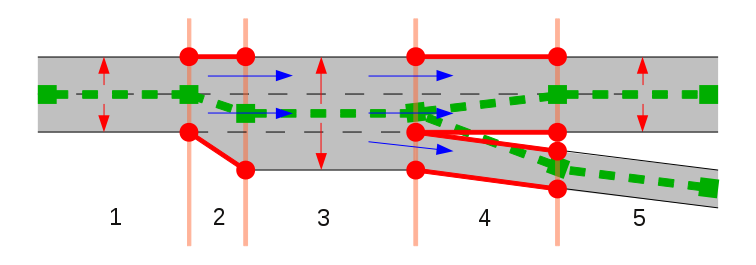
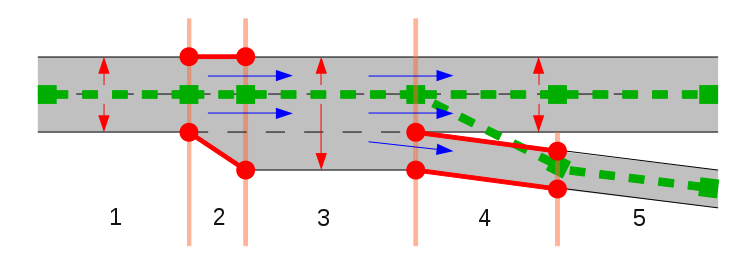
In the real world, there are dual-carriageway which becomes a bi-directional highway after crossing the junction. These intersectiona are tricky to map as there are many ways of modeling such intersection which will replicate the actual traffic flow. After testing different models, merging the junction after crossing the intersection worked well in cases of turn announcement and guidance.
The merging of dual to bi-directional highway shouldn't make a sharp angle too close to junction - keep a distance of 10-20 meters from the intersection. This type of modeling keeps the balance between cartography and navigation approach to mapping. (Based on the discussion in the US-Talk mailing list)
Here are several examples of highways changing from dual-carriageway to bi-directional highway. Best practice is to form a # in the middle of the junction then merge the dual-carriageway afterwards.


On a four-way intersection where there are two dual-carriageways changing to a bi-directional highway, form a # at the intersection then merge both the dual-carriageways after the crossing.

A roundabout is a type of circular junction where multiple roads meet and vehicles are directed around an island at the center of the junction in a one-way traffic flow.

💡 Studies by the Federal Highway Administration have found that roundabouts can increase traffic capacity by 30 to 50 percent compared to traditional intersections.
* https://www.wsdot.wa.gov/Safety/roundabouts/BasicFacts.htm
Mini-roundabouts, are smaller than typical roundabouts, have a right of way and a traversable center island. The center island can be a painted circle or a low dome but must be fully traversable by vehicles. They are also often replaced by stop signs at four-way intersections to slow traffic speeds and reduce accidents in residential neighborhoods that are not designed to accommodate larger vehicles. Vehicles are required to treat the center island as if it were a solid island and drive around it.

Mini-roundabouts are sometimes grouped in pairs (a double mini-roundabout) or in "chains", simplifying navigation or otherwise awkward junctions.

Pictured along Brookmount Road. It is intersected by Tamlaght Road. © Copyright Kenneth Allen and licensed for reuse under Creative Commons Licence.
💡 In the UK – as well as other highway jurisdictions – the maximum size for a mini-roundabout is 28 meters ICD (inscribed circle diameter).
How to map a mini-roundabout

Select the intersection node and add highway=mini_roundabout tag. The default direction of a mini-roundabout is counterclockwise 🔄. Please specify the direction=* only if the flow of the traffic is in clockwise 🔁 direction.
As the wiki suggests, we mark mini-roundabouts at the place of the traversable center point. In the case of roundabouts with a traffic island in the center, if there is a roundabout sign, tag it with junction=roundabout and traffic_calming=island tags on the node of the intersection, otherwise put only traffic_calming=island tag.

Mini-roundabouts are always have to be represented by a node. Alternatively, one can draw the roundabout as a circular line in the direction of traffic flow and tag it with highway=residential|unclassified, oneway=yes and junction=roundabout tags.
Common Misconceptions
What is not a mini-roundabout?
- Traffic calming island in the center of a junction – traffic_calming=island
- Turning circle – this is a circular feature with a traversable center point, which allows vehicles to turn around – highway=turning_circle
- Turning loop – this has the same function as a turning circle but with non-traversable center point – highway=turning_loop
- Smaller roundabout, but not a mini-roundabout. Treat it the same as a large roundabout, and for consistency put junction=roundabout tag on the node of the junction.
See examples of mini-roundabouts in the OpenStreetMap Wiki.
A roundabout is a generally circular road junction where the traffic inside circle has right of way. These are tagged with junction=roundabout tag. This tag is only used for road intersections where traffic in the roundabout has right of way in the absence of a traffic signal.

To indicate a roundabout — draw a closed line in the direction of the traffic flow, which aligns to satellite imagery just as one would while tracing a road. Tag the line with junction=roundabout tag and the appropriate highway=* tag.
Roundabouts are implied to be one-way roads, but you may specify this explicitly by adding oneway=yes tag. Additionally the number of lanes=* in the circle (typically 2, where long vehicles will need to use both) can also be tagged.
Connect all the highways which meets the roundabout based on traffic flows. If a dual carriageway shares traffic with the roundabout, connect each its direction (one arriving, one departing) separately to the respective exit and entrance nodes on the roundabout.
Don’t use the same node as entrance to and exit from a roundabout. Each road has to be connected with the roundabout in a separate node.

When two roads share the same exit/entrance node connect them before the roundabout and not at the roundabout.

Roundabout shapes
Roundabouts are not necessarily circular in shape: there are roundabouts that are oval-shaped or D-shaped (with a straight segment – often created on a square whose one side is along an avenue).

See examples of roundabouts in the OpenStreetMap Wiki.
A traffic circle is a type of intersection that directs both turning and through traffic onto a one-way circular roadway. Contrary to a roundabout, where entering traffic always yields to traffic already in the circle and merges in directly, the entrances to traffic circles are three-way intersections often controlled either by stop signs or traffic signals, but not in all cases.

The size of circular junctions can vary from small to very large with several lanes. However, generally the circular junction should not contain a road network within itself. This means circular ring roads around a city are not circular junctions. To designate a circular junction use junction=circular tag.
How to map a circular junction
To add a circular junction, use the same approach as you would for drawing a roundabout. Draw a circle line and tag it according to the roadclass of connected roads. Mark all nodes that correspond to traffic lights or traffic signs that control traffic flow within the roundabout.
If a traffic circle or roundabout is bisected by further roads that use different parts of the circle, you may split the closed line into segments with similar tagging and add each segment to its respective route relation.

In spite of their name, Hamburger roundabouts, also known as throughabout or cut-through, are not roundabouts. In this situation the tag junction=roundabout has to be avoided..

A Turning circle is a circular feature with a traversable center point, which allows vehicles to turn around – highway=turning_circle

A turning loop is similar to a turning circle but with a non-traversable center point.

The tag highway=turning_loop is used for a node to indicate a widened area of a highway with a non-traversable island for turning around. These loops are often circular and located at the end of a road.

"Magic roundabouts" direct traffic in both directions around the central island. In order to connect the inner and outer ring with the adjacent roads, small roundabouts or mini-roundabouts are used. Drivers on mini-roundabouts have the right of way, unlike those who are on the inner or outer ring of the magic roundabout. Each nodal element of such a structure, represented by a roundabout, can be considered as an independent intersection that is connected to the rest of the intersections (roundabouts) via link roads.


- Wikipedia article about roundabouts
- UK Highways Agency Design Manual for Roads and Bridges – Volume 6, Section 2, Part 3: Geometric Design of Roundabouts
- US Federal Highway Administration Safety Program - Technical Summary – Roundabouts
- Wiki OpenStreetMap
- Mini-roundabouts (highway=mini_roundabout)
- Roundabouts (junction=roundabout)
- Rotaries and traffic-circles (junction=circular)
- Turning circles (highway=turning_circle)
- Turning loops (highway=turning_loop)

A divided highway (also separated highway) is any highway where traffic flows are physically separated by a barrier (example : grass, concrete, steel), which prevents movements between said flows.
We oftentimes come across cases where a bi-directional highway should be mapped as a dual-carriageway to better represent what's on the ground. OpenStreetMap mappers have adopted different approaches to mapping dual-carriageways based on the source of data, local community best practices and personal preference.
Our basic rule of thumb are:
- Keep things simple, add complexity only when necessary.
- Dual-carriageway should have a physical barrier visible from imagery or a road marking that shows its illegal to pass on the other side.
- Enough length of the physical divider is present.
- During remapping, all other elements (for example, turn lanes, turn restrictions, route relation, etc.) associated to the road should be re-tagged based on remodelled road.
Satellite imagery is the common reference to identify the physical barriers present between highways. There are two types of separators identifiable in satellite imagery.

This guide distills best practices in identifying these road separators and improving road network in OpenStreetMap by re-mapping bi-directional highways to dual-carriageways under various scenarios of existing data.

In the above example, physical barrier is present at East Weber Avenue from North Stanislaus to Aurora Street. This highway section should be modelled as dual-carriageway. As the highway don't have any special tags like turn lanes or turn restriction, re-mapping to a dual-carriageway is straightforward. There are two different ways to remap a bi-directional highway to a dual carriageway.
Option 1
- Select the bi-directional highway.
- Align the existing highway to one side of the dual-carriageway.
- Trace the other segment of the dual-carriageway.
- Copy the tags from the original highway to the newly created way.
- Add
oneway=yesfor both ways (mandatory). - Make sure all the highways issues associated with remodelled road are fixed like - alignment based on Satellite imagery, crossing, overlapping or unconnected highways.
Option 2
- Align the existing highway to one side of the dual-carriageway.
- Select the original way.
- Use the Make parallel copies of ways - (Shift+P) to create parallel highways.
- Click the Make parallel copies of ways (Shift+P).
- Drag to create a new way parallel to the selected way. This copies all the tags from the reference way.
- Connect and align both ways to the road network. Use Merge Nodes (M) or Join Node to Way (J).
- Add oneway=yes to both ways.
- Reverse (R) way direction of the copied way.

Powell street was mapped as a bi-directional road. Turn lanes were added later on as turn:lanes:forward and turn:lanes:backward. When re-mapping as dual-carriageway, we will change the turn:lanes:forward and turn:lanes:backward to turn:lanes. To visualize and edit turn lanes, we will use the Lanes and road attributes map style and the Turnlanes tagging plugin in JOSM. Check our guide on how to activate the style and plugin in JOSM.
- Change the bi-directional highway to a dual-carriageway using the Make parallel copies of ways
(Shift+P).

- Remove
turn:lanes:\**added before.
- Add the
oneway=yestag. Reverse (R) the way direction to follow the traffic flow.
- Select the highway that needs turn lanes update. In this example, we will add
turn:lanes=left||**.
- In the menu, click Data > Turn lanes tagging - editor (Cmd+T) to activate the
Turn lanes editor dialog.

- Use Turn lanes editor dialog to specify Number of lanes and
turn:lanesdirections. Use the satellite imagery for the reference.
- Add the turn-lanes for all the other highways.

Taking a U-turn along Griffin Road is illegal. Griffin Road was mapped as bi-directional road with a no_u_turn restriction relation. After re-mapping as dual-carriageway, we need to make sure that the relation have the correct members and roles.
- Create the dual-carriageway by using the Make parallel copies of ways (Shift+P). Make sure all relevant tags are copied to the other way (i.e. oneway=yes).

- Verify the turn-restrictions from street-level photos (i.e. Mapillary plugin
or OpenStreetCam plugin) in JOSM.

- Edit the members of the turn-restriction relation. In this case, we make the recently created
highway=tertiaryas the newviaand thehighway=primaryhighway going east as the newtomember. - Select the relation in the list. In the Relations dialog, click the Call relation editor for selected relation
to open the Relation editor.

- Delete the existing
toandviamembers by selecting them in the Members. Click the Remove the currently selected members from this relation (⌥+⌦) to delete.

- Add the new members by selecting in the main map view to show in Selection. Click Add all object selected ... to include them in the relation.

- In the Members dialog, add the roles. Once completed, click OK.

Route relation describes a predetermined route for different type of transport like state routes, bus routes, bicycle routes and many more (OpenStreetMap Wiki). These are oftentimes long and affects many feature along the route.
Before re-mapping any highway as dual-carriageway, check the tags and relations the highway is part of.
- Select the highway segment which needs remodeling as dual-carriageway and check the tags/relations highway contains.

-
If the selected highway contains route/bus relations, download all the members of the relation.
- Right Click on the relation.
- Select Download Members from the options to download all the members which are part of selected relation.

-
Once all the members of relation are downloaded, extend the downloaded area around the intersections where re-mapping is required.

- Change the bi-directional highway to a dual-carriageway using the Make parallel copies of ways (Shift+P).

The re-mapping added new segments which should be part of the existing relation. All members of the relation should be connected and not broken in the middle.
Examine the relation
- Select the relation and inspect the start/end and the missing members in the middle.
- Right Click on the highway segment with relation and select Select Relation from the options. This will select the relation and will be able to visualize the missing members in the relation which are breaking the continuity.

- Zoom out in the map view of Data Layer to see the selected relation.
- The highlighted pink segments are all the members which are part of the relation and all the segments in the middle are missing members of the relation.

JOSM setup to fix relation
- After identifying the missing members in the relation, download the area around the around the missing members to help in better relation fixing.
- Download Relation Toolbox plugin which helps in interfacing with relation members.

Add members to relation
- In case of multiple relation, keep note of the relation
refandnameto make sure members are added to right relation. - Adding members
- Select relation in Relation Toolbox to which new members to be added.

- Select the above identified missing highway segments one at a time and click ➕ to add it into selected relation. Yellow halo around the highway indicated it to be part of select relation.
- Select relation in Relation Toolbox to which new members to be added.

- Follow the above step until you all the missing segments identified.
- After adding all missing members, select the relation and check if the there any any missing pieces.
- Completely connected relation.

- If there are more than one relation, make sure to follow the above steps by downloading each relation members and adding members to the right relation.
Dual-carriageway crossroads are important to provide turns where there are available turns in longer stretches of highways. If these roads are left unmapped the routing engine often recommends longer routes instead of using the crossroads to reach destination faster.
Crossroads found in areas that is not a intersection serves as a channel to take a U-turn or to connect to a nearby highway.
Common type of crossroad

-
Trace the road based on satellite imagery (refer to Mapping roads and paths guide).
-
Tagging of crossroad must follow the
*_linkof the highway it is connects.Example - If main highway is
highway=secondary, the crossroad should be tagged withhighway=secondary_link.

-
Trace the road based on satellite imagery.
-
Directional lane bay crossroads must be oneway.
-
Tagging of crossroad must follow the
*_linkof the highway it is connects.Example - If main highway is
highway=secondary, the crossroad should be tagged withhighway=secondary_link.
