Custom firmware for Tidbit Numpad.
Has 2 Layers/Modes: Default and RGB
- Current layer displayed on OLED display
- To change layers, rapidly tap the rotary encoder twice
Default Layer
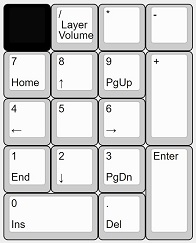
- Default numberpad functions
- Rotary encoder serves as Backslash, unless rapidly tapped twice
- Turning rotary encoder changes volume
- Bit-C LED is off when Num-Lock is off, on when Num-Lock is on
- Num-Lock is toggled in the RGB Layer
RGB Layer
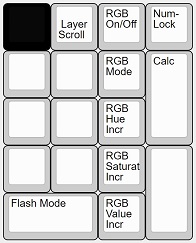
- Has multiple RGB modes and setting selections
- Turning rotary encoder scrolls up/down
- Subtract key toggles Num-Lock
- Add key launches Calculator app and automatically moves to Default Layer
https://www.youtube.com/watch?v=_d1RjwxExso&t=190s
Starting Reference: https://docs.qmk.fm/#/newbs_getting_started
- Install MSYS2 and update its packages: https://www.msys2.org/
- Download qmk_firmware: https://github.com/qmk/qmk_firmware
- Download nullbits tidbit firmware: https://github.com/qmk/qmk_firmware/tree/master/keyboards/nullbitsco/tidbit
- Move the tidbit folder into the qmk_firmware folder, under keyboards
- Download Mechbits tidbit folder (this repo) and rename as "oledd" so that it doesn't replace the original "oled" file in the nullbits tidbit firmware
- Move the oledd folder into the keymaps folder of the nullbits tidbit folder (which should now be inside the qmk_firmware)
- Open MSYS2 MinGW 64-bit (BLUE LOGO)
- Set-up with commands "pacman --needed --noconfirm --disable-download-timeout -S git mingw-w64-x86_64-toolchain mingw-w64-x86_64-python3-pip", "python3 -m pip install qmk", and "qmk setup"
- Navigate to the qmk_firmware folder using cd (change directory)
- When inside the qmk_firmware, use the compile command "qmk compile -kb tidbit -km oledd"
- (Delete some keyboard folders if MSYS2 has trouble compiling)
- The tidbit_oledd.hex file has been created in the qmk_firmware folder
- Download QMK Toolbox: https://github.com/qmk/qmk_toolbox/releases
- In QMK Toolbox, navigate to the tidbit_oledd.hex file
- Have MCU set to atmega32u4
- Connect numpad and put in flashing mode
- Flash!