ESP8266 Wifi setup using SoftAP, Captive Portal and EEPROM. Michael Li's revision of repo to create UART passthrough server for Monarch Project (Build18 2019) This is used on the black ESP8266 chip from Sparkfun, which has GPIO0/2, RX, TX, 3V3, GND, RST, EN pins. It uses the Arduino core library on the ESP8266 chip.
This code will have the ESP8266 create a soft access point, which you can then access to reach the Wi-Fi setup page in this video from the original poster:

Note that you can't access the reset page that the OP has in the video. After connecting and setting up the Wi-Fi, the ESP8266 will restart and deploy a UART passthrough so that any client can connect and type stuff to echo across Serial to another device.
One great thing this program has is that once you input the SSID and password of the wifi, the ESP chip will write it into EEPROM memory, so that it can remember next time you boot it up.
If you want to reset memory, just power up the chip, connect IO2 to GND and then reconnect it to power. This resets memory and restarts the chip. Make sure you reconnect IO2 to power before you actually enter new Wi-Fi info into memory! Note that if your laptop remains connected to wifi without interruption, restart your computer's wifi connections, as it probably didn't register that the ESP chip turned off and then back on, and it may not work until you reconnect to it.
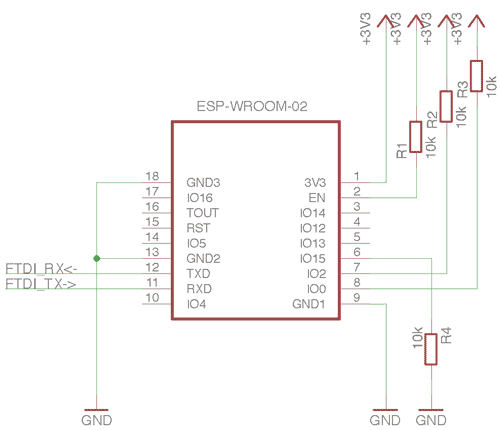
The wiring config for this is actually to an Arduino and a power source (3.3V).
3v3, GND <---> Power source 3.3V, GND TX <---> Arduino TX
RX <---> Arduino RX
EN <----> Power source 3.3V
Arduino GND <----> Power source GND
IO2 <---> Power source 3.3V, as it's pulled up high for memory reset.
IO0 <---> When flashing code, to power source GND, as that lets the ESP8266 go into flash mode.
When running the code, restart it, take out the IO0 from GND and leave it floating.
From original author:
- booting and read Wifi config from EEPROM.
- if Wifi config is not found, starting SoftAP at SSID "ESP8266_SETUP".
- connect this Access point with your devices. (ex. iPhone, Android...)
- Wifi Settings page will automatically open by Captive Portal.
- select the SSID, enter the password.
- writing SSID and password to EEPROM, then reboot ESP8266 automatically.
- booting with STA(client) mode and get IP address from DHCP, then start web server.
- now you can connect from within the same LAN.
日本語の解説はブログを参照してください。
Boot from flash memory:
- GPIO 0 - Pulled HIGH with a 10k resistor
- GPIO 2 - Pulled HIGH with a 10k resistor
- GPIO 15 - Pulled LOW with a 10k resistor
If GPIO 0 pin is pulled low during power-up it will start firmware flashing mode.
See also official documents.
