In this hands-on lab, you will learn how to embed and extend Copilot Studio agents across both pro-code and low-code application scenarios, using the Microsoft 365 Agents SDK and Power Platform capabilities. While Copilot Studio provides a powerful low-code experience for building AI agents, real-world enterprise solutions often require a combination of custom development and low-code extensibility. This lab is designed to address both.
The primary focus of the lab is a code-first, pro-developer integration model, where you embed a Copilot Studio agent into a custom Blazor web application using the "Connect to Copilot Studio with Agents SDK - User sign-in" pattern. This approach enables interactive user authentication (for example, via Microsoft Entra ID) and allows authenticated users to securely interact with the agent from within your own UI, supporting identity-aware, personalized, and enterprise-ready experiences.
As the client foundation, we will use a modified version of the Microsoft sample AgentFx-AIWebChatApp-Simple (Link), implemented as a Blazor Web Application. Starting from this baseline, we will incrementally enhance the application and evolve it into a richer, extensible chat experience by integrating MCP (Model Context Protocol) servers, Adaptive Cards, and other custom components.
In parallel, the lab will also review low-code integration patterns, specifically how to embed custom Copilot experiences in Power Platform Canvas Apps. This comparison helps illustrate when to use:
- Low-code approaches (Canvas Apps + Copilot Studio) for rapid business app development
- Pro-code approaches (Blazor + Agents SDK) for advanced UI control, custom logic, and deeper integrations.
Throughout the lab, you will:
- Connect a Blazor web application to Copilot Studio using the Microsoft 365 Agents SDK
- Implement user sign-in-based authentication for secure agent access
- Integrate MCP servers, including Dataverse-backed MCP scenarios
- Build, customize, and debug a Copilot Studio chat client
- Extend the experience with Adaptive Cards, consent management, and custom components
- Review how custom Copilot experiences can be embedded in Power Platform Canvas Apps
- Compare low-code vs pro-code architectures, tradeoffs, and best-fit scenarios
This lab is organized as a progressive, hands-on walkthrough. Each step builds on the previous one, starting from a simple baseline and gradually evolving into a secure, extensible, enterprise-ready Copilot Studio integration.
This lab includes optional sections marked with an alert. Please read the note before each optional section to decide whether to skip it.
Example:
[!alert] This part is optional.
[!alert] End of the optional section.
A fully functional blazor web application and all instructions are also available here. You can cross-check the application if you experience any issues, or use it to finish the lab later if you don't have enough time. The Starter App contains the starting point of the project, and the Final App contains the completed lab, but without the optional parts.
Sections 1-8 focus on building and extending a Blazor web app In this part, we work mainly as developers. We explore the starter Blazor project, create and connect a Copilot Studio agent, configure authentication, and implement a fully functional Copilot client using the Microsoft 365 Agents SDK. We progressively add advanced capabilities such as streaming responses, Markdown rendering, Dataverse MCP integration, Adaptive Cards, and secure token persistence using cookie-based distributed caching. By the end of step 8, you will have a production-style Copilot client running in a custom Blazor application.
Sections 9 focuses on low-code configuration and canvas apps In the final step, we switch perspective to low-code/no-code. We try to connect another Copilot Studio agent to a Power Apps canvas app, add a Copilot control, and customize its behavior using Copilot Studio-without changing the app's UI or writing code.
-
Review and understand the starter project structure Explore the modified CopilotStudioClient Blazor application, review its architecture, and understand how the client, and chat components are organized.
-
Create a simple Copilot Studio agent Build a basic Copilot Studio agent that will serve as the backend conversational engine for the lab scenarios.
-
Configure app registration to access the Copilot Studio agent Set up the required Azure App Registration, permissions, and configuration needed to securely connect your application to Copilot Studio.
-
Implement basic authentication and authorization in the Blazor app Add user sign-in and authorization logic using the Agents SDK user sign-in pattern to enable secure, identity-aware access.
-
Implement a basic Copilot Studio client using the Microsoft 365 Agents SDK Connect the Blazor application to Copilot Studio using the Direct-to-Engine approach.
-
Implement markdown rendering and streaming responses Extend the Copilot Studio client to support Markdown rendering and streaming responses. We will use Markdig on the backend to format and sanitize assistant output into HTML. You will also learn how to use activity.ChannelData to detect response metadata and handle streaming updates correctly in the UI (typing/partial chunks vs final message).
-
Add a Dataverse MCP server and Adaptive Cards with custom input parameters Extend the Copilot Studio agent by integrating a Dataverse-backed MCP server and enrich the user experience with Adaptive Cards that accept structured input.
-
Implement cookie-based distributed token caching (optional) Add a cookie-based implementation of distributed cache to store MSAL tokens in encrypted, chunked cookies, enabling secure token persistence across requests.
-
Add a Copilot control to a canvas app (preview) & Customize the copilot using Copilot Studio You can integrate a custom Copilot created in Microsoft Copilot Studio and enable it for your canvas app. This lets users interact with Copilot to ask questions about the data in your app. With just a few simple steps, you can embed a custom Copilot across all your canvas app screens without changing the app's design.
After completing the lab, you will be well positioned to:
- Build a production-ready chat experience powered by the Microsoft 365 Agents SDK, including streaming responses, Adaptive Cards, and consent handling.
- Experience implementing secure delegated authentication for Copilot Studio clients.
- A solid understanding of different Copilot Studio integration approaches.
- Reuse the Blazor + M365 Agents SDK pattern in real customer or internal projects
- Learn how to use the out-of-the-box Copilot control in a Canvas app to embed and integrate a Copilot Studio experience into your application.
This structure is intentionally modular, allowing you to stop at any point or selectively reuse parts of the lab depending on your project needs.
- Integrate Copilot Studio with web/native apps using Microsoft 365 Agents SDK
- Agents SDK (.NET tab) + "User sign-in" connection flow
- Base sample (we use a modified version): AgentFx-AIWebChatApp-Simple
- Low-code: Add custom Copilot to Power Platform Canvas Apps
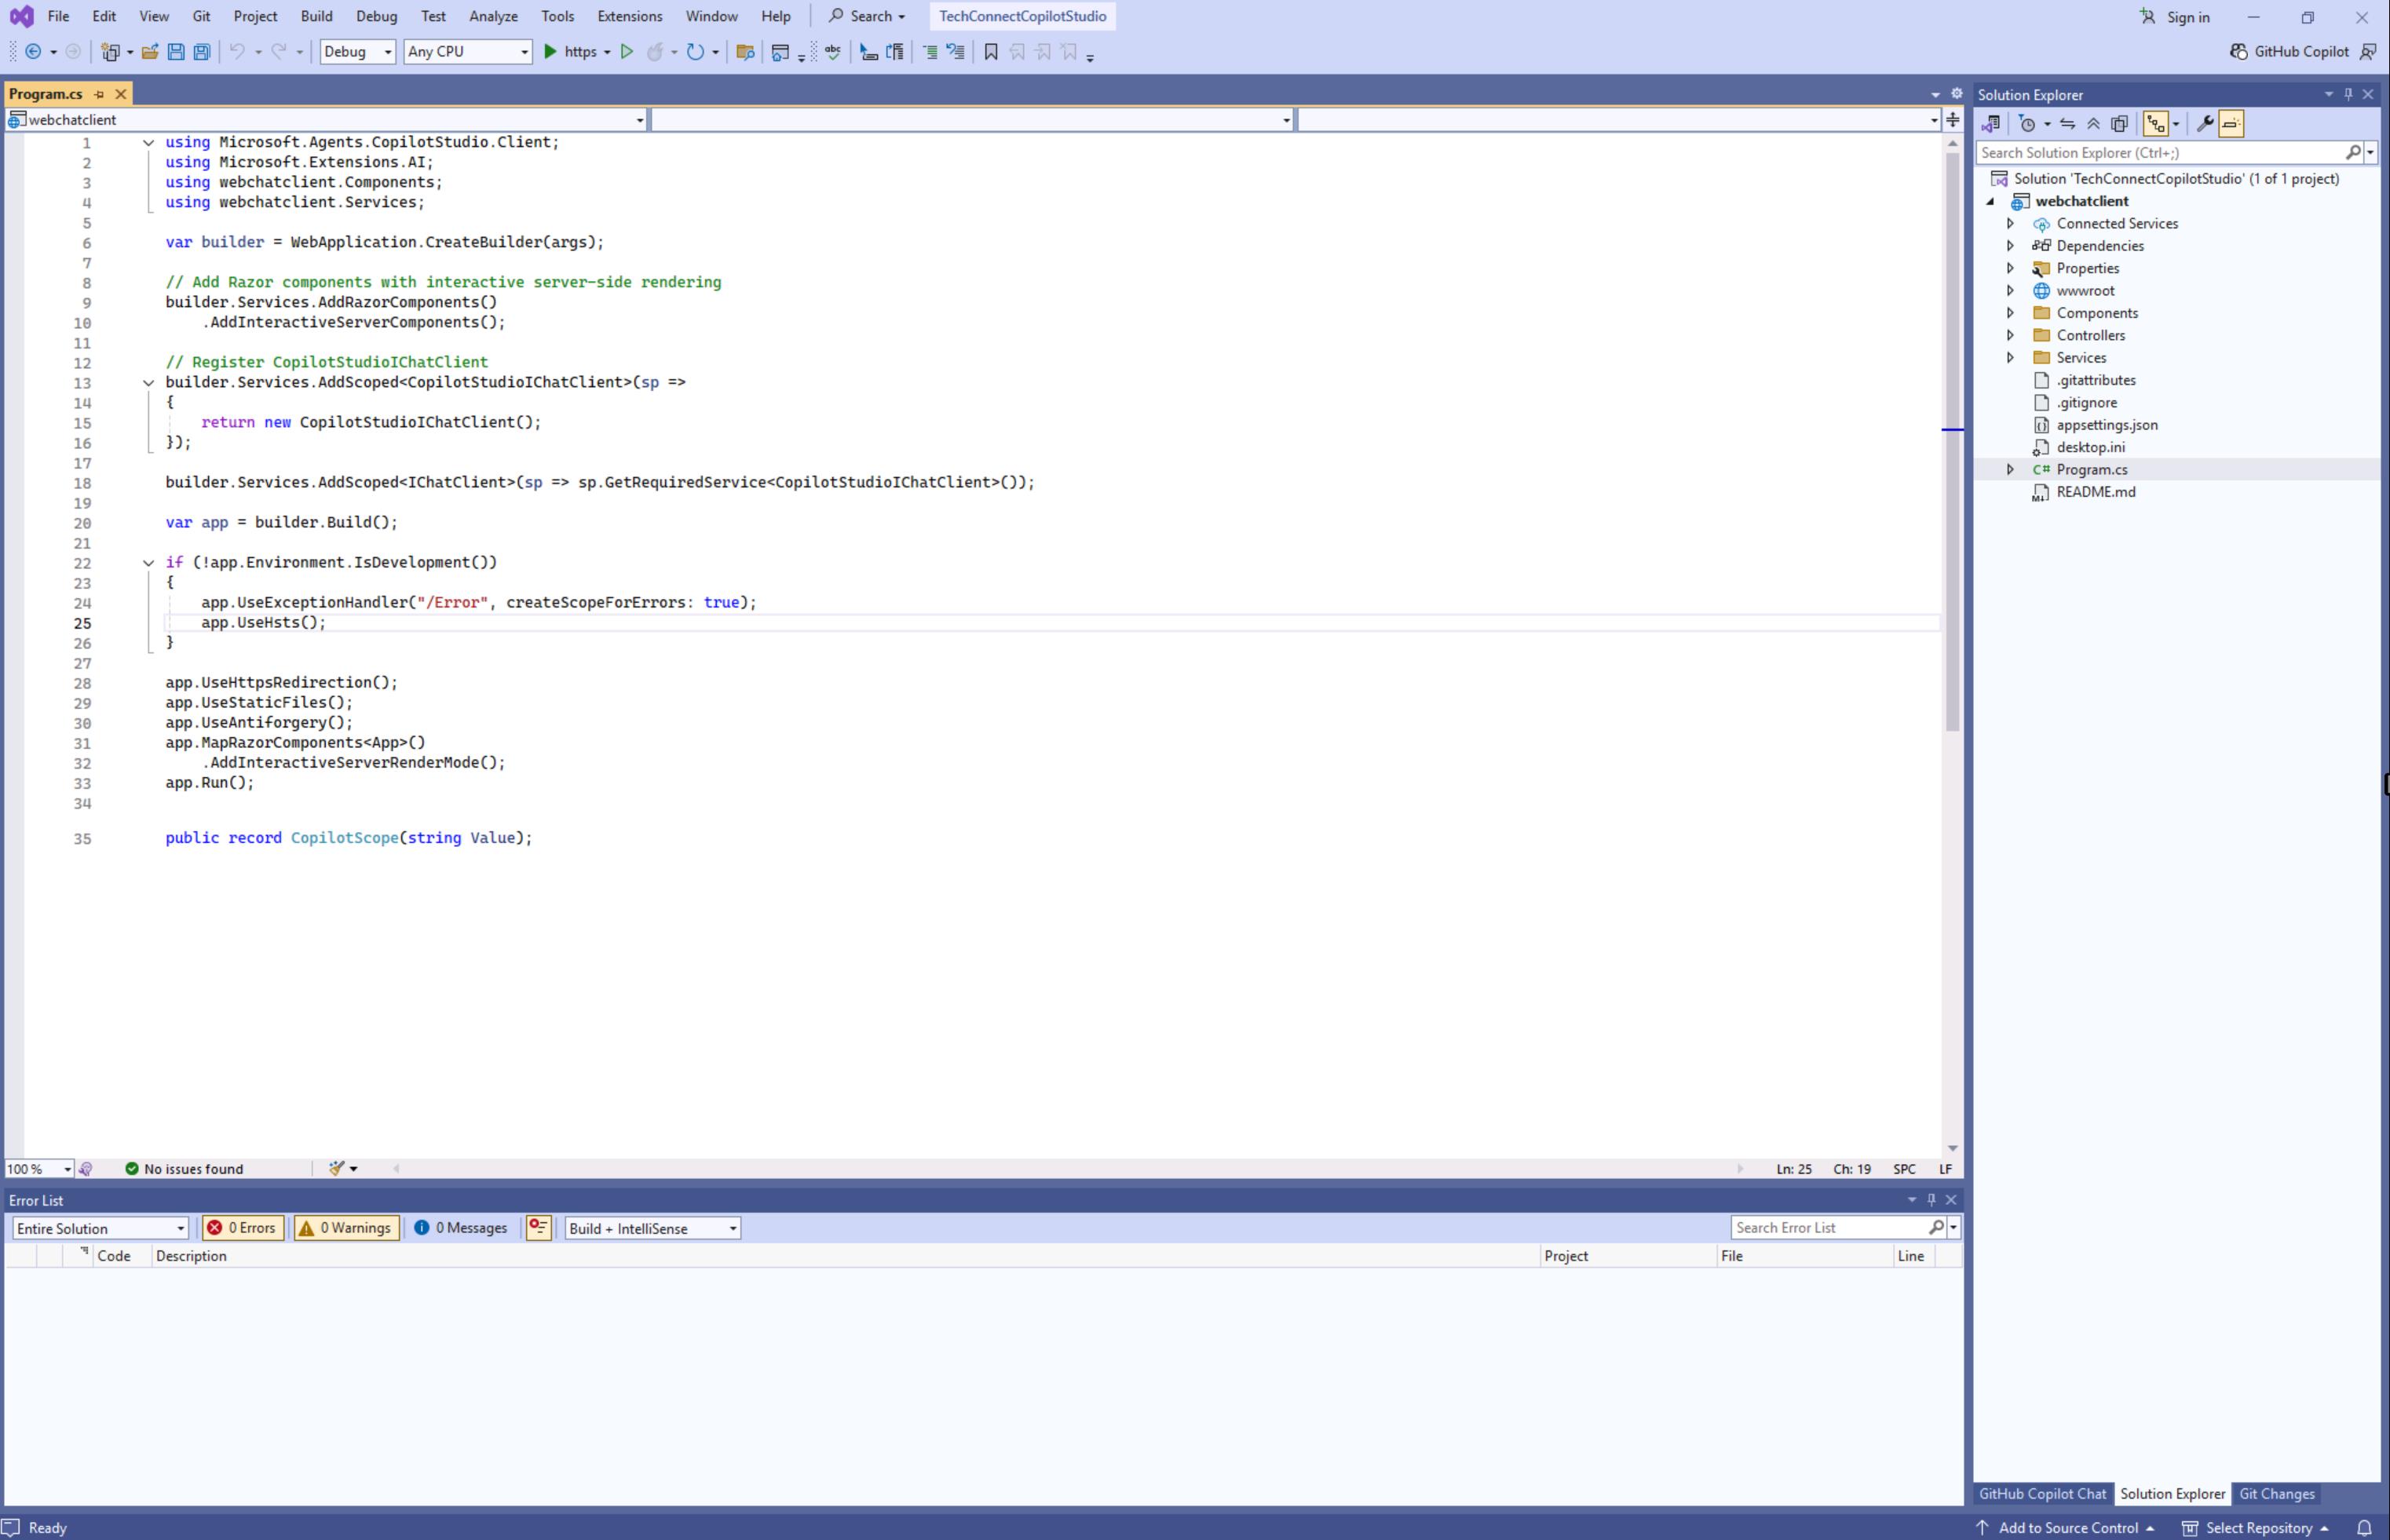
##1. Review and understand the starter project structure You have a starting point in the form of a Blazor Server web application (.NET 9.0) that provides a ready-to-use chat UI for interacting with Microsoft Copilot Studio agents. The user interface is already implemented, allowing you to focus entirely on extending the backend integration.
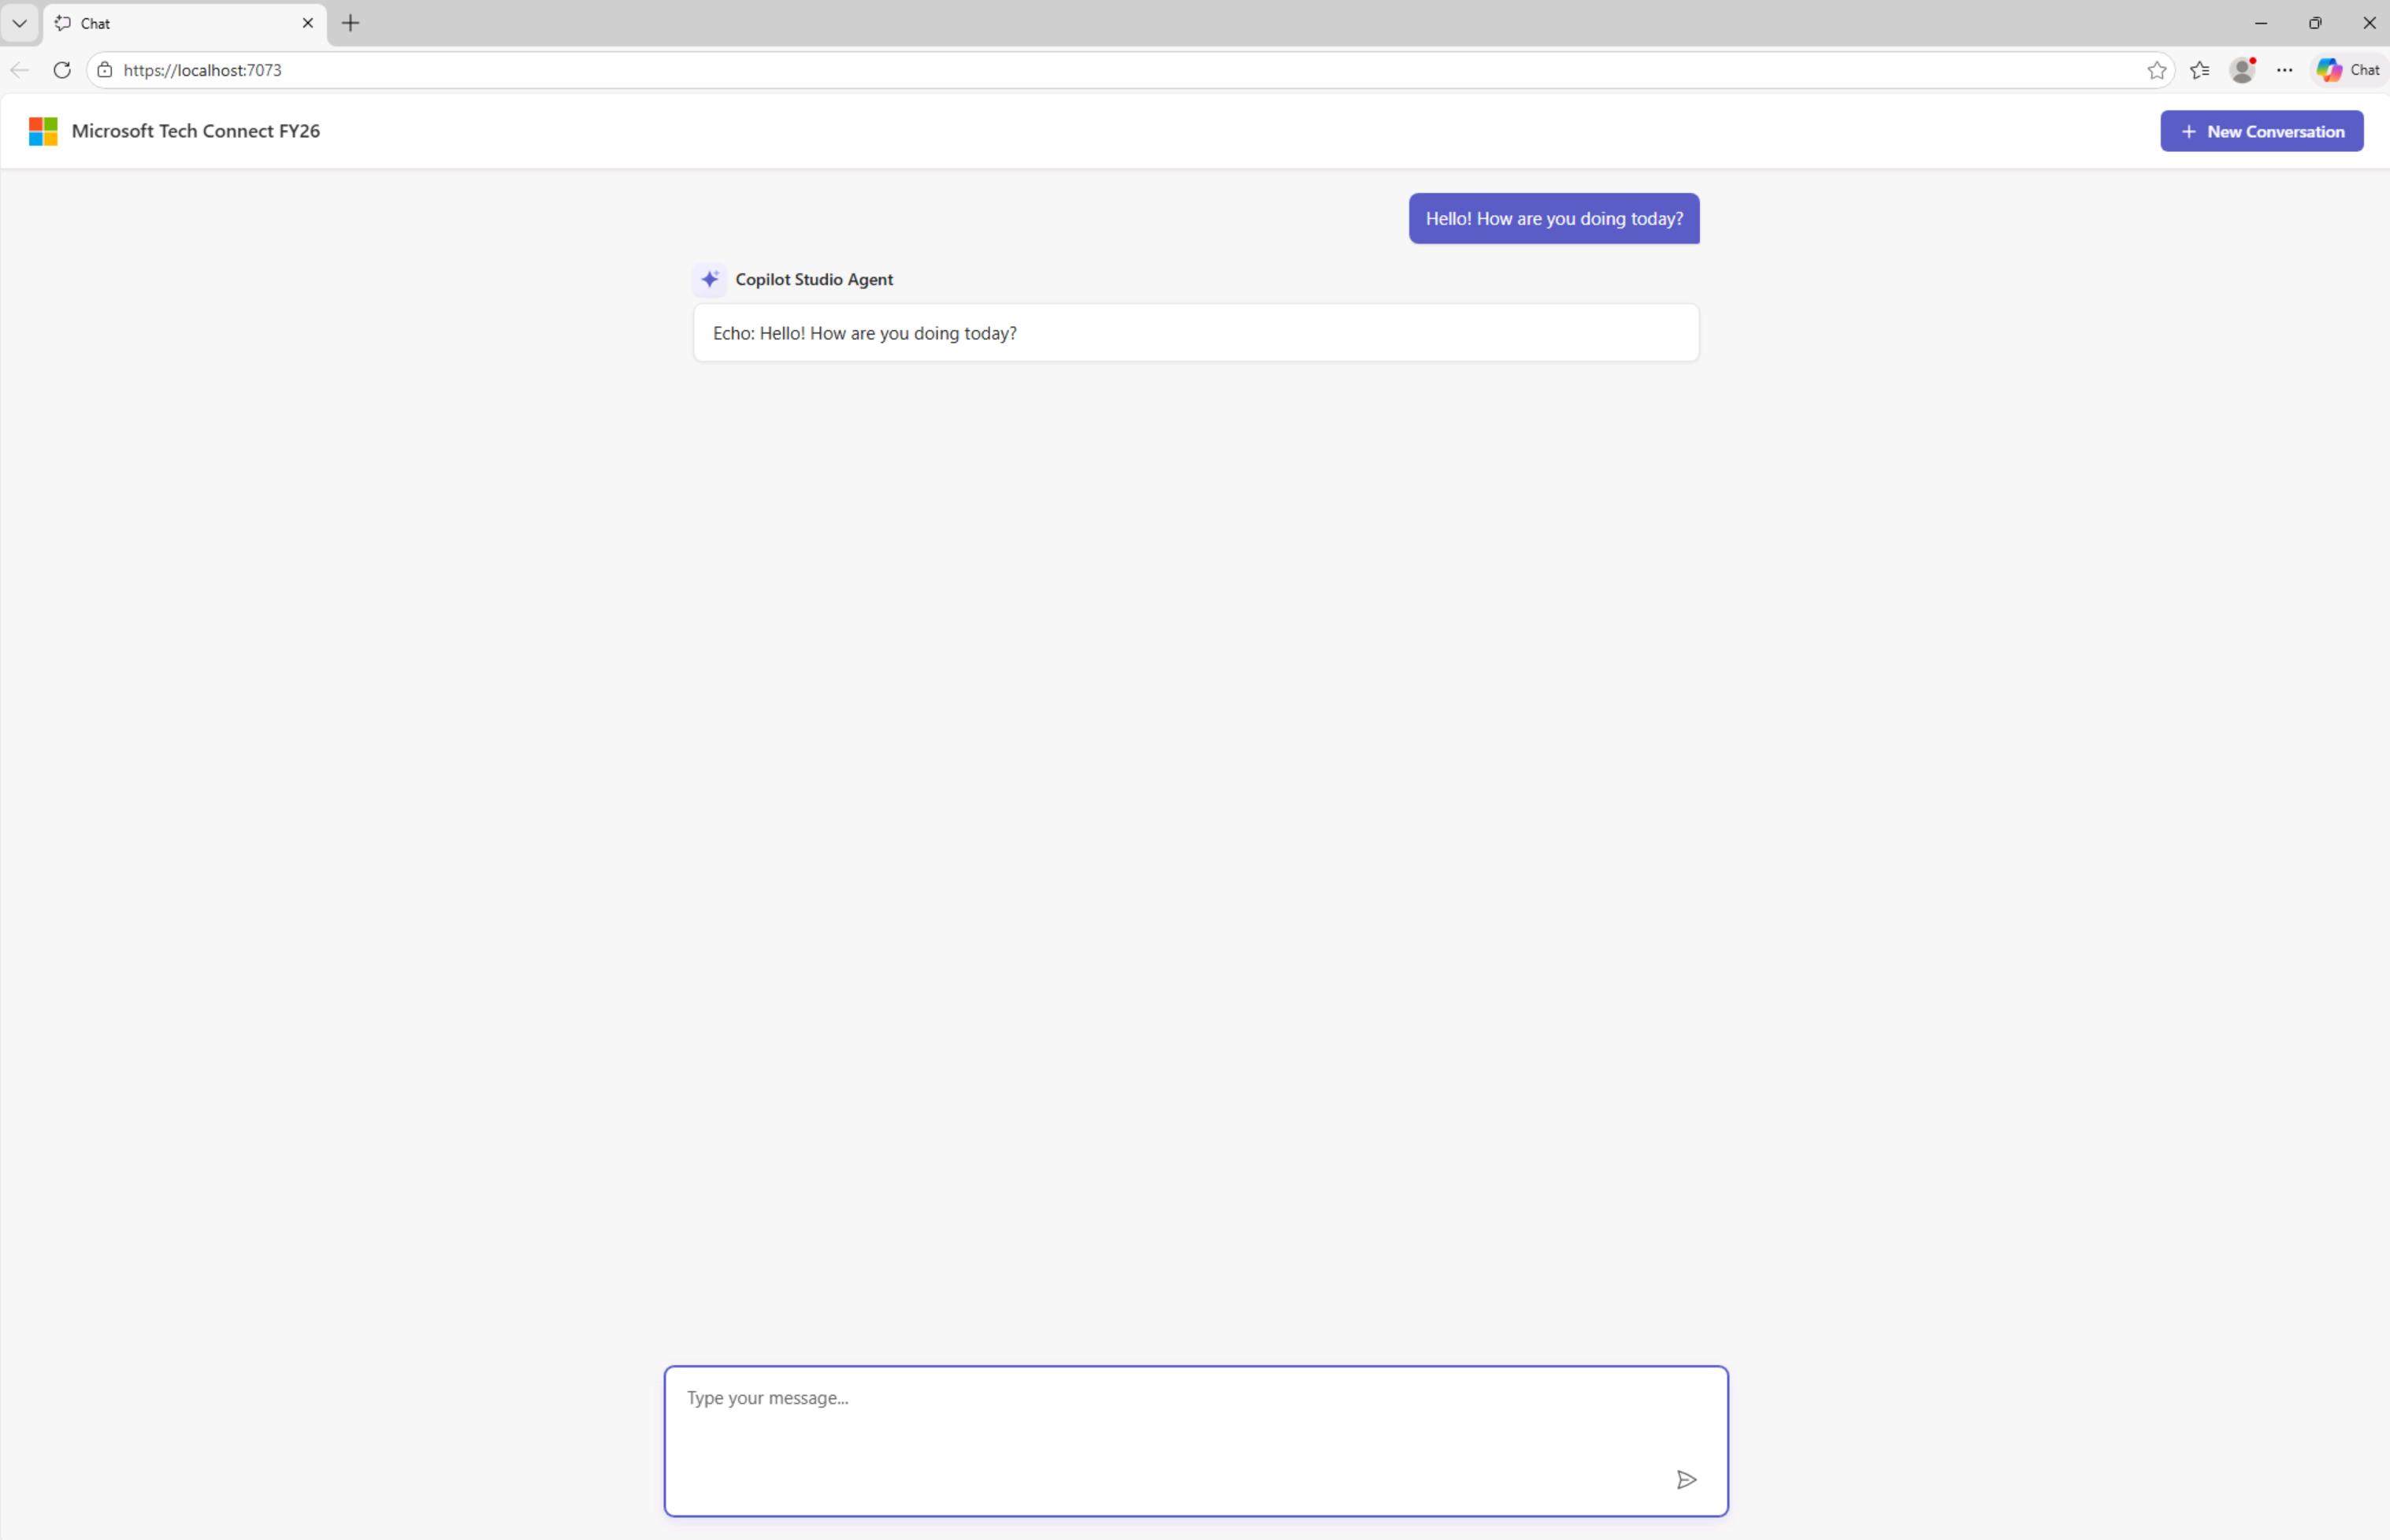
To illustrate the basic request/response flow, the solution includes a simple echo service that you can use as an initial reference.
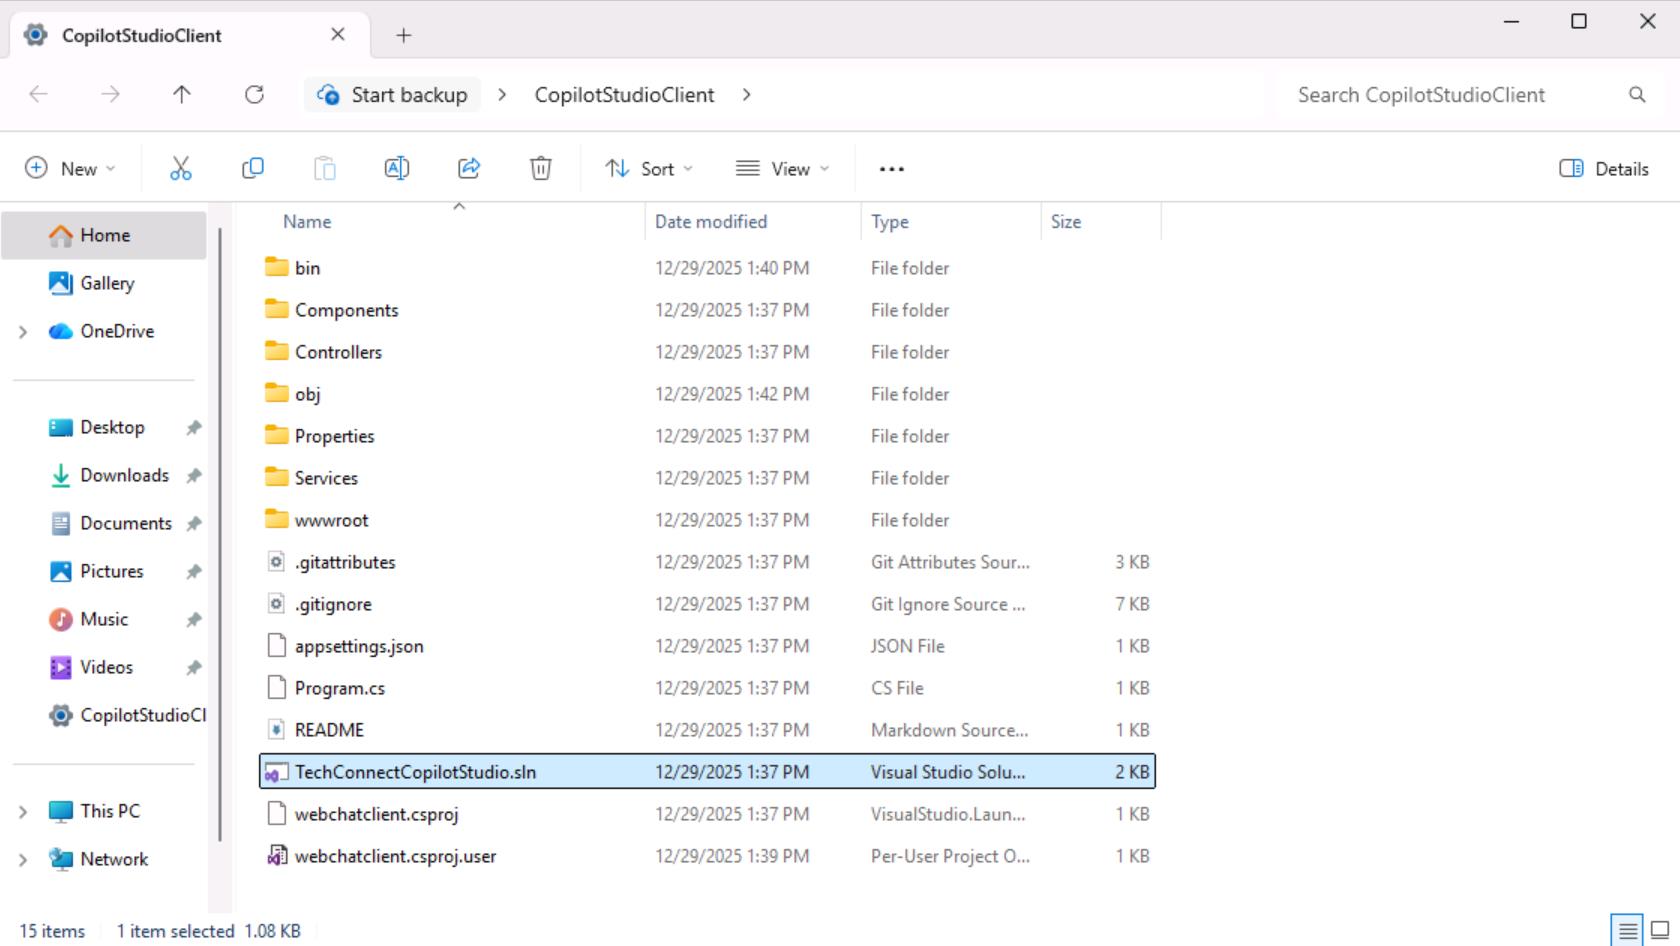
Once the virtual machine is available, navigate to the CopilotStudioClient folder. This project serves as the foundation for the lab and will be extended throughout the exercises to build a fully functional Copilot Studio client application.
You can find the project inside the CopilotStudioClient folder.
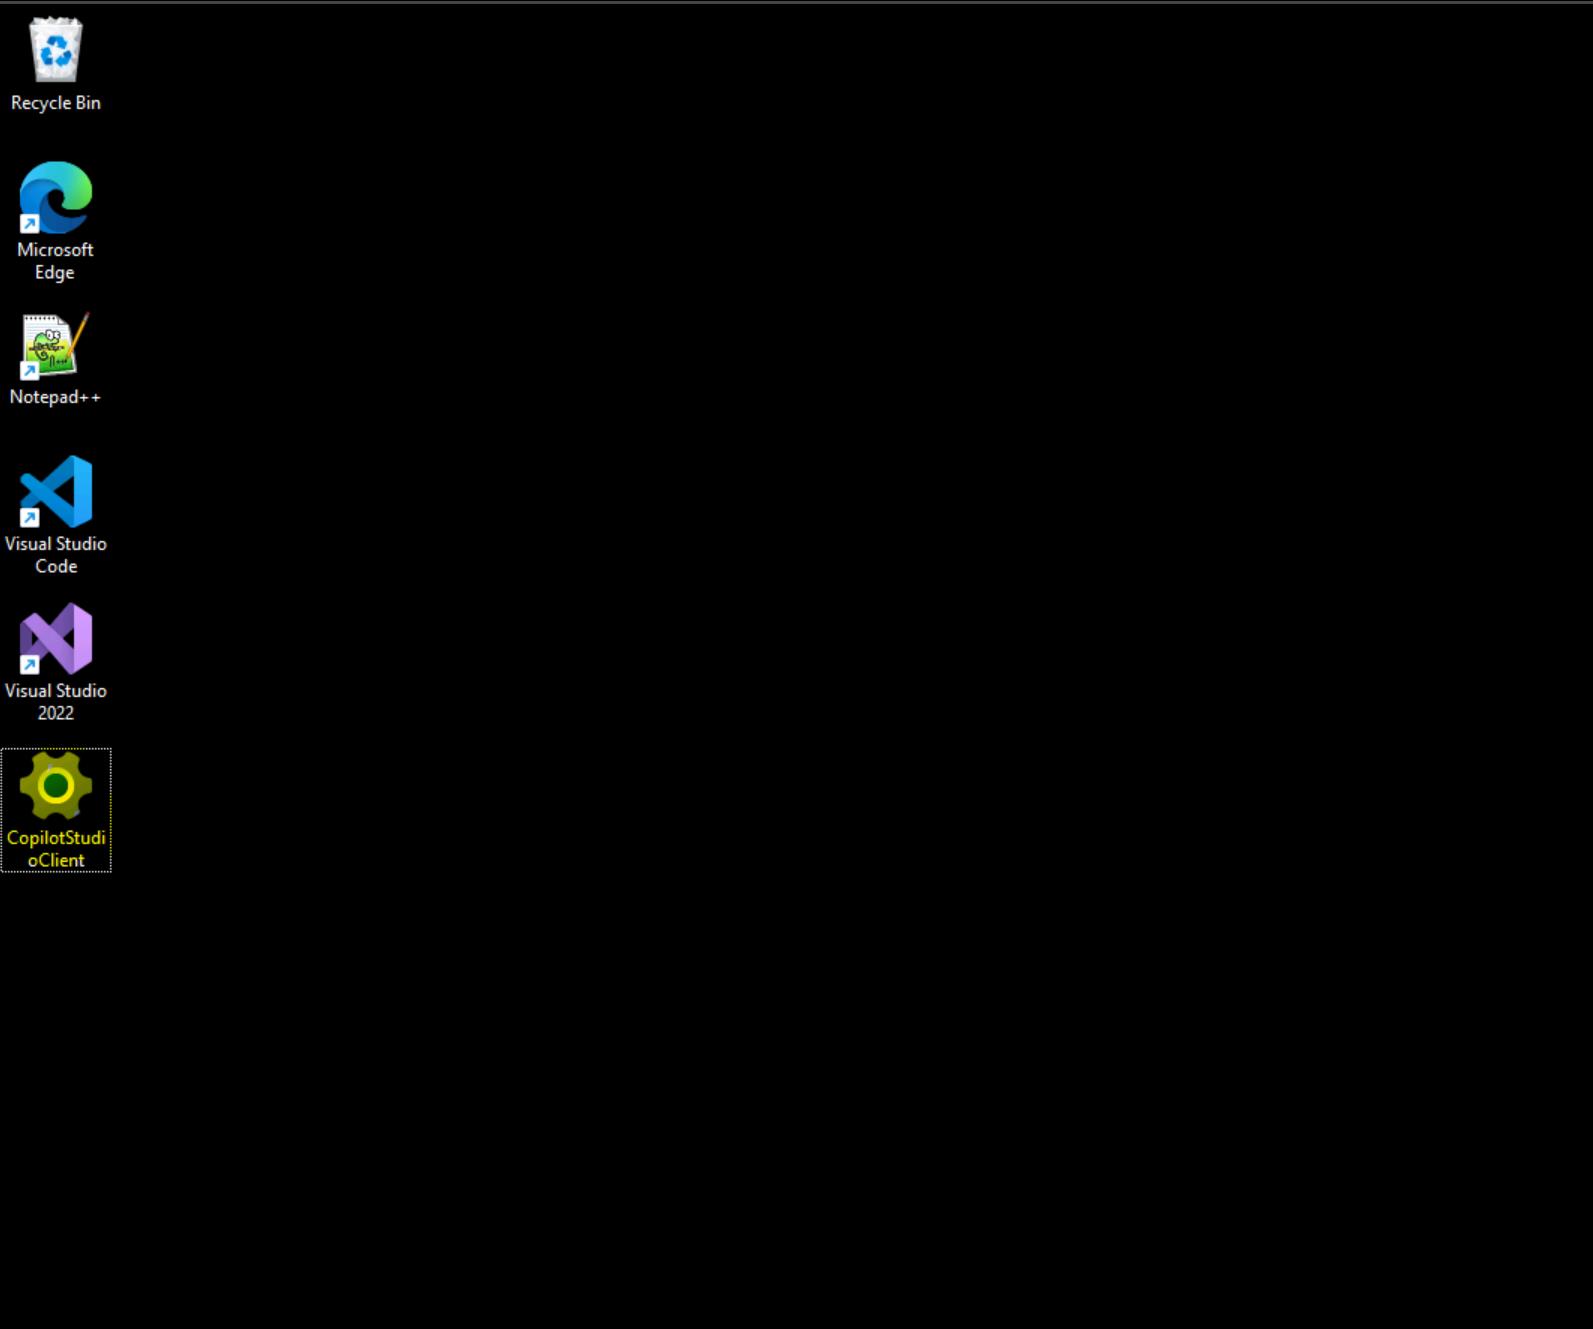
Open the CopilotStudioClient folder and run the TechConnectCopilotStudio solution.
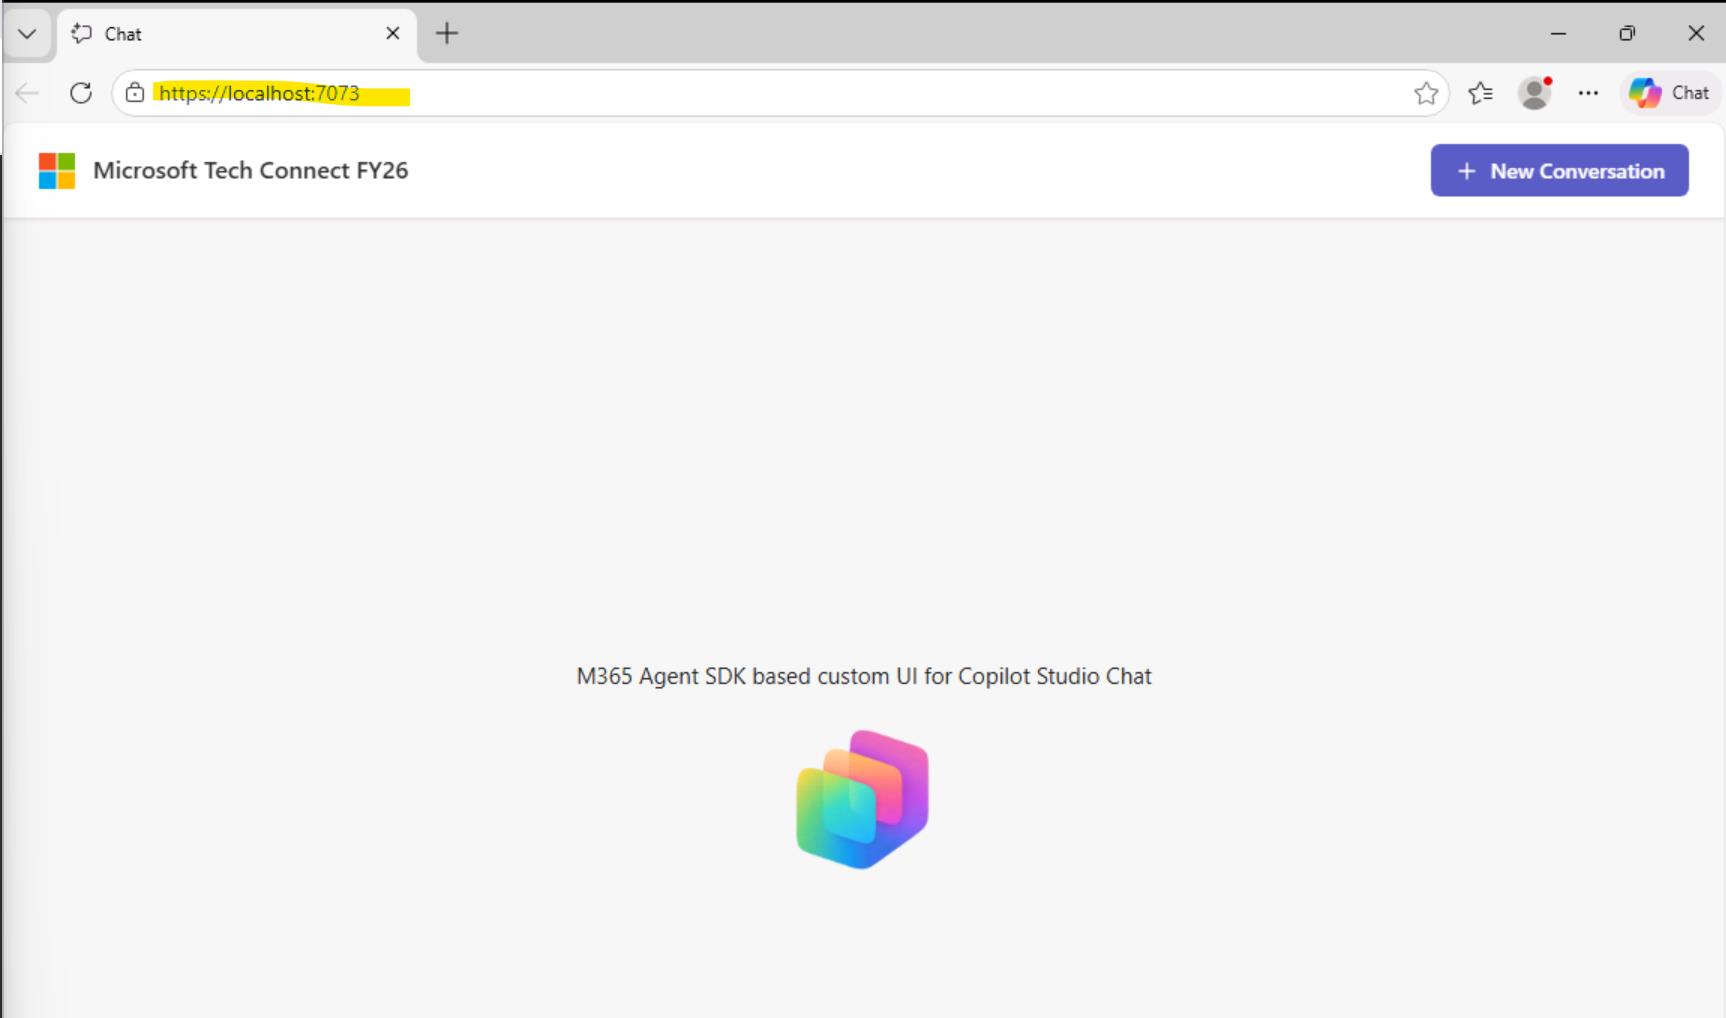
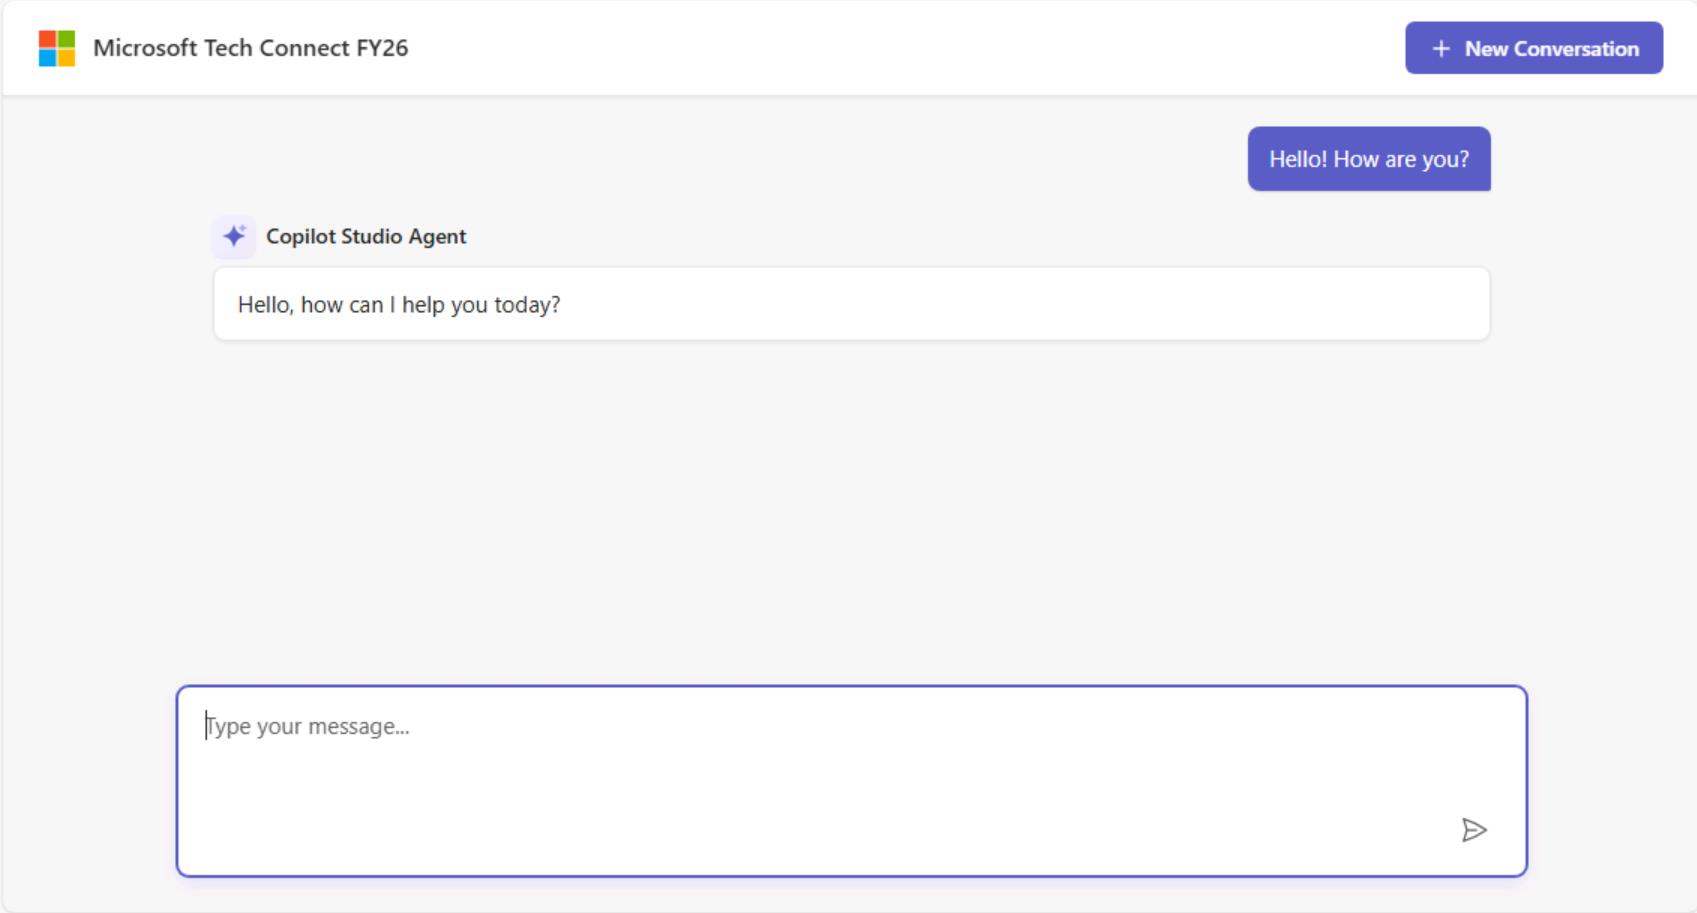
Once the solution is loaded, rebuild it first, and then run it to verify that the echo service is working correctly.
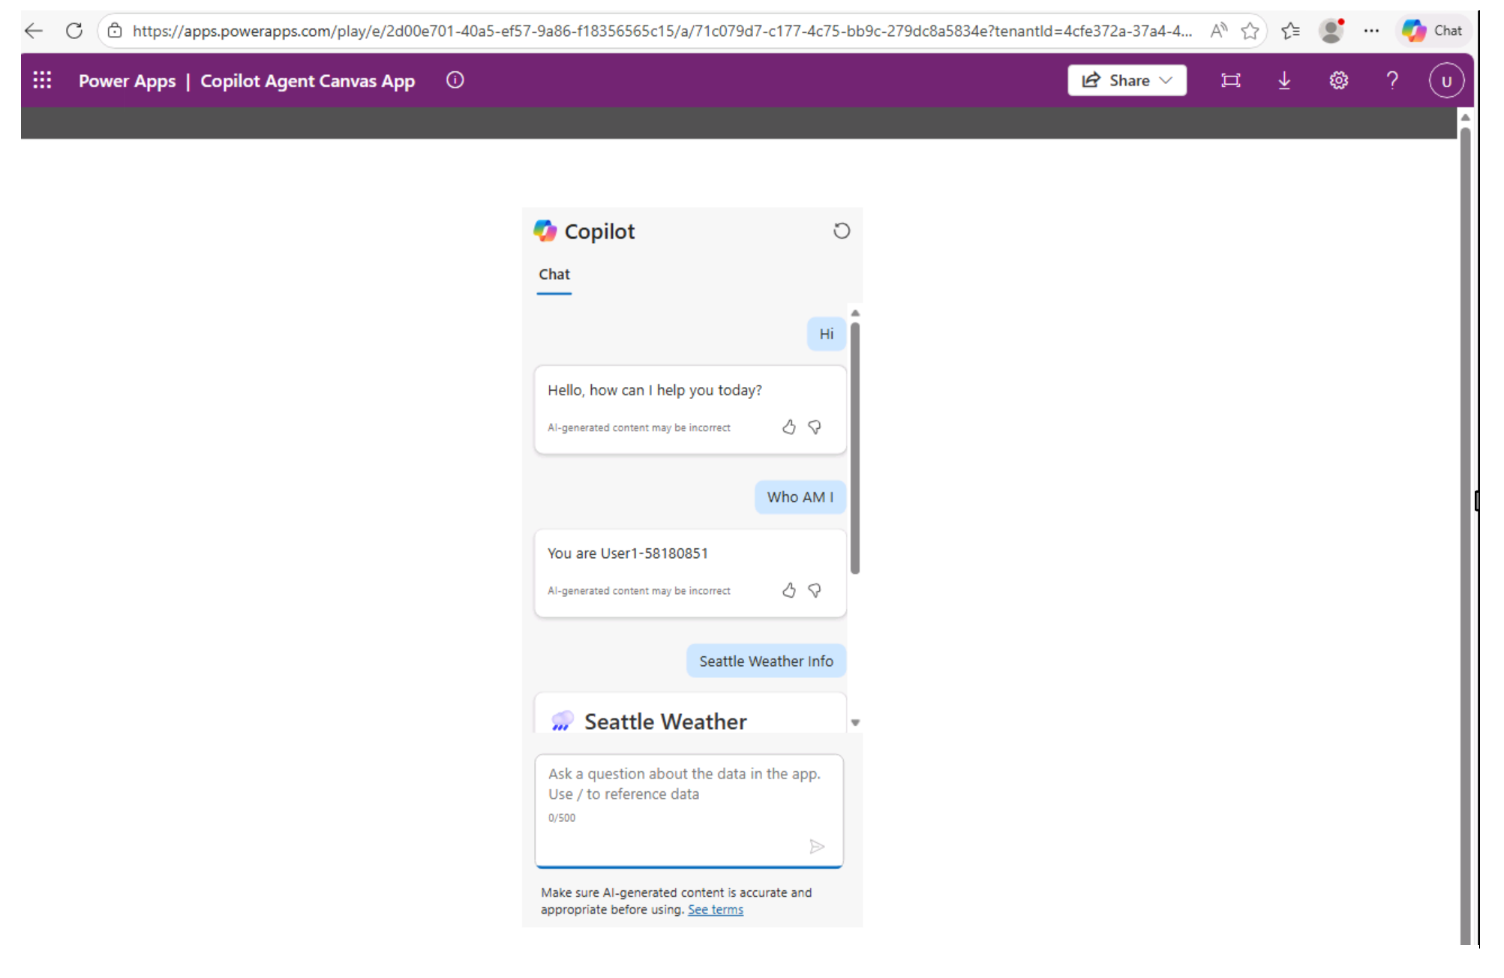
Here is what you should see after the app starts. Try typing a message and verify that the echo bot is working correctly.
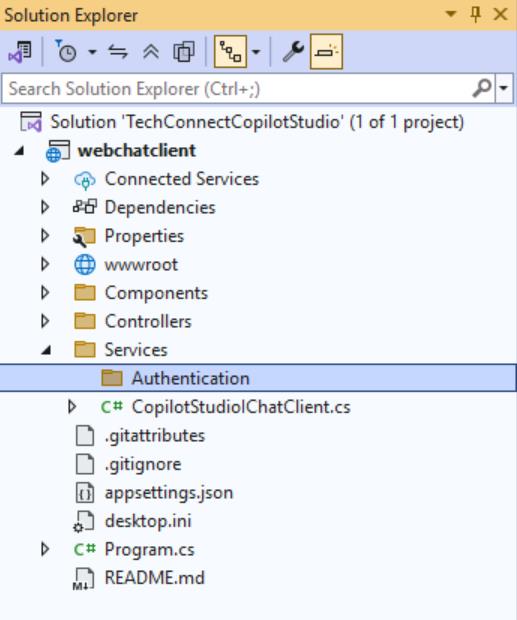
Before we continue, let's quickly review the project structure and setup.
CopilotClientStarter/
├── Program.cs                      ← App entry point & DI setup
├── appsettings.json                ← Configuration (empty placeholders)
├── Components/
│   ├── App.razor                   ← Root HTML template
│   ├── Routes.razor                ← Routing configuration
│   ├── Layout/MainLayout.razor     ← Page layout wrapper
│   └── Pages/Chat/                 ← Complete chat UI
│       ├── Chat.razor              ← Main chat page (homepage)
│       ├── ChatHeader.razor        ← Header with "New Chat" button
│       ├── ChatMessageList.razor   ← Message display container
│       ├── ChatMessageItem.razor   ← Individual message bubbles
│       └── ChatInput.razor         ← Text input + send button
├── Services/
│   └── CopilotStudioIChatClient.cs ← Currently Echo Bot
└── wwwroot/
    └── app.css                     ← M365-themed styles
Program.cs
This is the ASP.NET Core application entry point. It configures Blazor Server with interactive server-side rendering, registers the CopilotStudioIChatClient as both a scoped service and as the IChatClient abstraction from Microsoft.Extensions.AI. The app uses standard middleware for HTTPS redirection, static files, and antiforgery protection.
CopilotStudioIChatClient.cs
This is the chat service implementation that implements Microsoft's IChatClient interface. Currently, it functions as a simple echo bot that simulates streaming by returning the user's message prefixed with "Echo:" in small chunks with delays. The class contains TODO comments indicating where real Copilot Studio integration should be implemented. It provides both streaming (GetStreamingResponseAsync) and non-streaming (GetResponseAsync) methods, with the non-streaming version internally reusing the streaming logic for consistency.
Chat.razor The main page component that orchestrates the entire chat experience. It manages the message history list, handles user input events, processes streaming responses from the chat client, and coordinates cancellation when users send new messages mid-stream. It composes the header, message list, and input components together. Key state includes the messages collection, current in-progress response, and waiting flags.
ChatHeader.razor
A fixed-position header component displaying the Microsoft logo, application title ("Microsoft Tech Connect FY26"), and a "New Conversation" button. It exposes an OnNewChat event callback that the parent component uses to reset the conversation state.
ChatInput.razor
The message input component featuring a textarea with a send button. It uses Blazor's EditForm for form handling and integrates JavaScript for auto-resizing the textarea and handling Enter key submission. The component exposes an OnSend callback that passes ChatMessage objects to the parent and provides a FocusAsync method for programmatic focus control.
ChatMessageList.razor
A scrollable container that renders the conversation history. It iterates over messages and renders each via ChatMessageItem, handles in-progress streaming messages, displays a loading spinner while waiting for responses, and shows a welcome state with a Copilot Studio logo when empty. It uses a custom HTML element (<chat-messages>) that hooks into JavaScript for auto-scroll behavior.
ChatMessageItem.razor
Renders individual chat messages with role-based styling (user messages vs. assistant messages). User messages appear as purple bubbles on the right; assistant messages display with a Copilot icon header and white card-style container. It includes Markdig integration for markdown rendering (though not actively used in the current echo implementation) and uses a ConditionalWeakTable pattern to allow parent components to trigger re-renders during streaming updates.
public class CopilotStudioIChatClient() : IChatClientThis class implements IChatClient from the Microsoft.Extensions.AI namespace, which is Microsoft's abstraction for AI chat clients. This interface is part of the unified AI abstractions that allow swapping between different AI backends (OpenAI, Azure OpenAI, Copilot Studio, etc.) without changing consuming code.
The IChatClient interface requires these members:
| Member | Purpose |
|---|---|
ChatClientMetadata Metadata |
Provides metadata about the chat client (model name, provider info) |
GetResponseAsync() |
Non-streaming single response |
GetStreamingResponseAsync() |
Streaming response via IAsyncEnumerable |
GetService<TService>() |
Service locator pattern for extensions |
Dispose() |
Resource cleanup |
public ChatClientMetadata Metadata { get; } = new("EchoBot");Simple metadata declaration identifying this as an "EchoBot". In a real implementation, this would contain the Copilot Studio agent identifier or model information.
public async Task<ChatResponse> GetResponseAsync(
    IEnumerable<ChatMessage> messages,
    ChatOptions? options = null,
    CancellationToken cancellationToken = default)
Key Design Decision: This method reuses the streaming implementation rather than having separate logic:
// Reuse streaming logic to ensure consistent behavior
await foreach (var update in GetStreamingResponseAsync(messages, options, cancellationToken))
{
    foreach (var content in update.Contents)
    {
        if (content is TextContent textContent && !string.IsNullOrEmpty(textContent.Text))
        {
            responseBuilder.Append(textContent.Text);
        }
    }
}
Return structure:
return new ChatResponse(responseMessages)
{
    Usage = new UsageDetails
    {
        InputTokenCount = EstimateTokenCount(lastUserMessage),
        OutputTokenCount = EstimateTokenCount(fullText)
    },
    CreatedAt = DateTimeOffset.UtcNow,
    ModelId = Metadata.DefaultModelId
};private async IAsyncEnumerable<ChatResponseUpdate> StreamResponseAsync(
string userText,
[EnumeratorCancellation] CancellationToken cancellationToken)This is the isolated core logic that simulates streaming:
var createdAt = DateTimeOffset.UtcNow;
var echoText = $"Echo: {userText}";
var accumulatedText = new StringBuilder();
foreach (var chunk in ChunkString(echoText, 5))
{
await Task.Delay(50, cancellationToken); // Simulate network latency
accumulatedText.Append(chunk);
yield return new ChatResponseUpdate
{
CreatedAt = createdAt,
Contents = [new TextContent(accumulatedText.ToString())],
Role = ChatRole.Assistant
};
}Key streaming behavior:
| Aspect | Implementation | Real-World Implication |
|---|---|---|
| Chunk size | 5 characters | Simulates token-by-token delivery |
| Delay | 50ms per chunk | Simulates network/processing latency |
| Accumulation | StringBuilder appends | Each update contains FULL text so far, not just the delta |
You can review the code, try to debug it, and then move on to the next section to start configuring Copilot Studio and the connected Azure components.
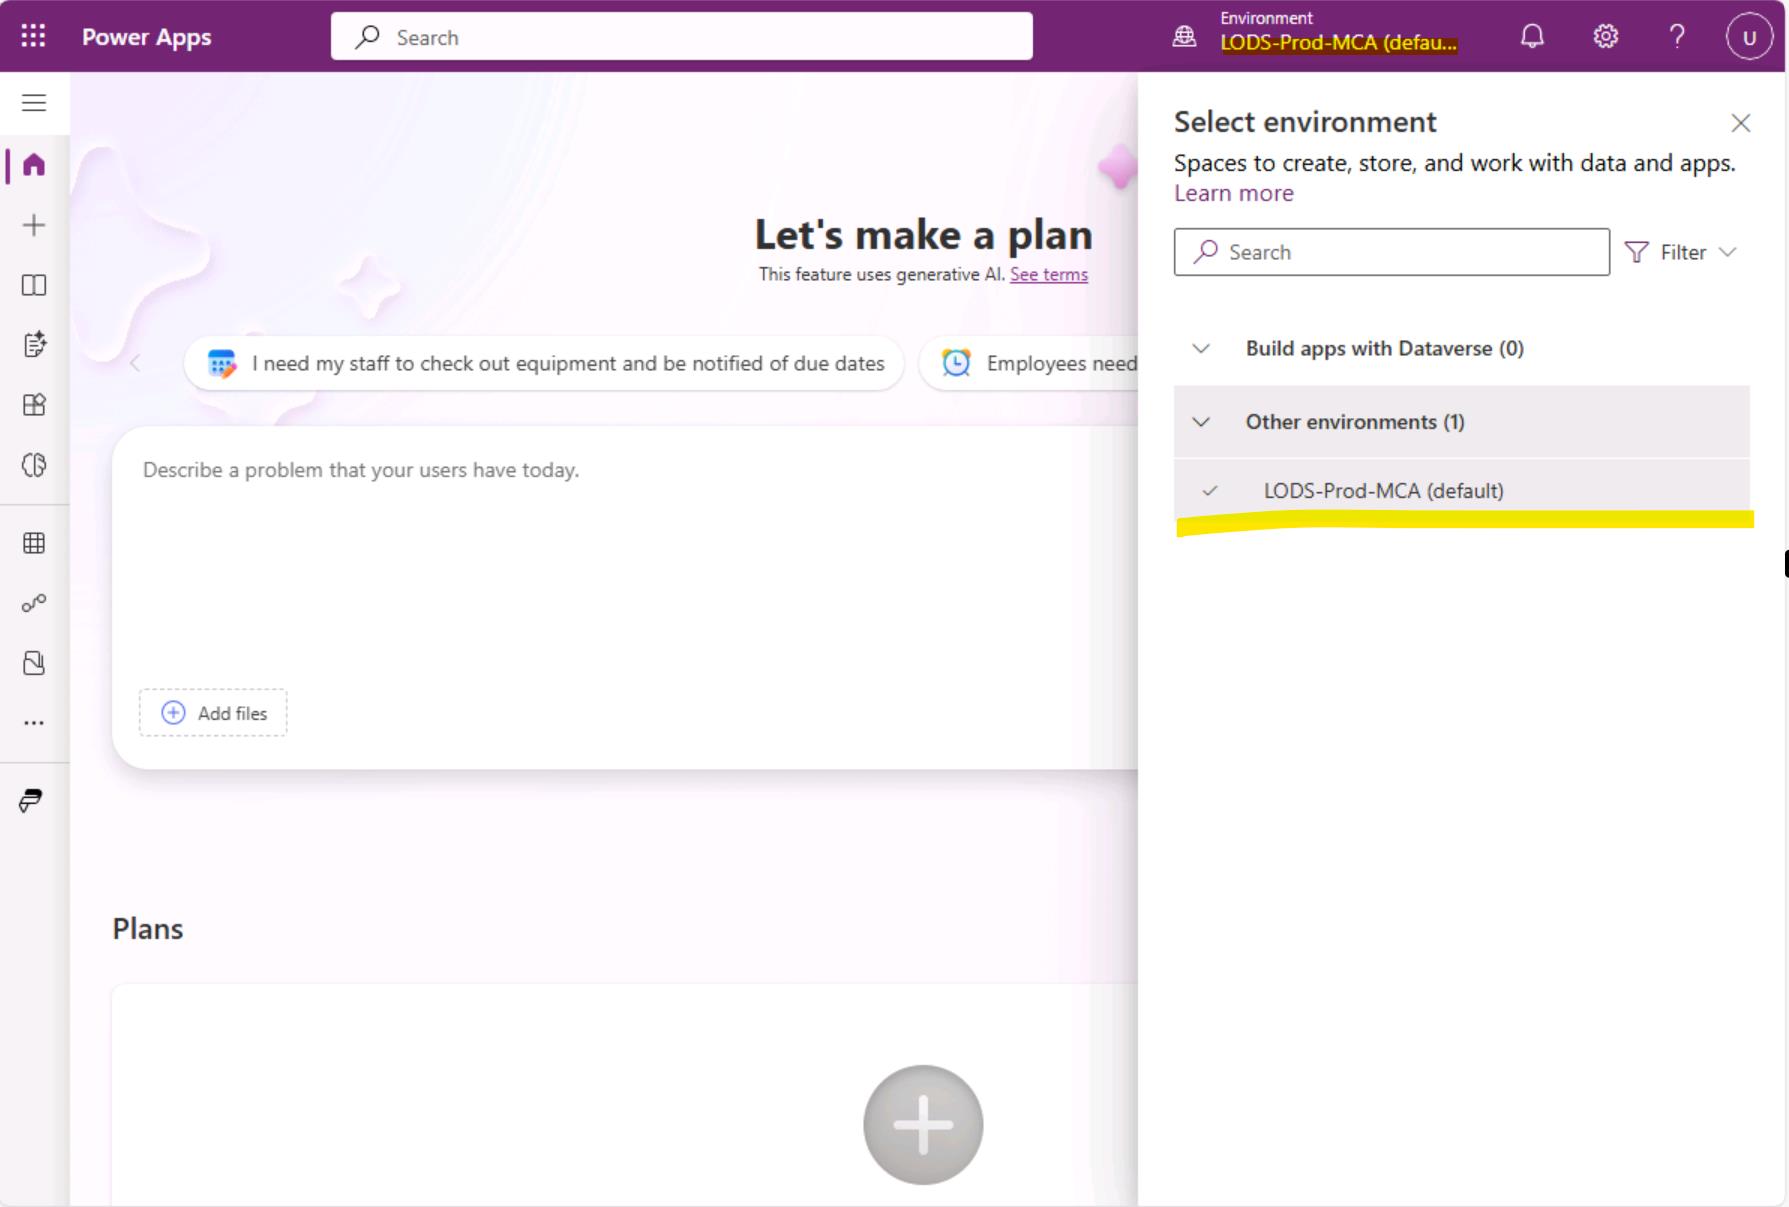
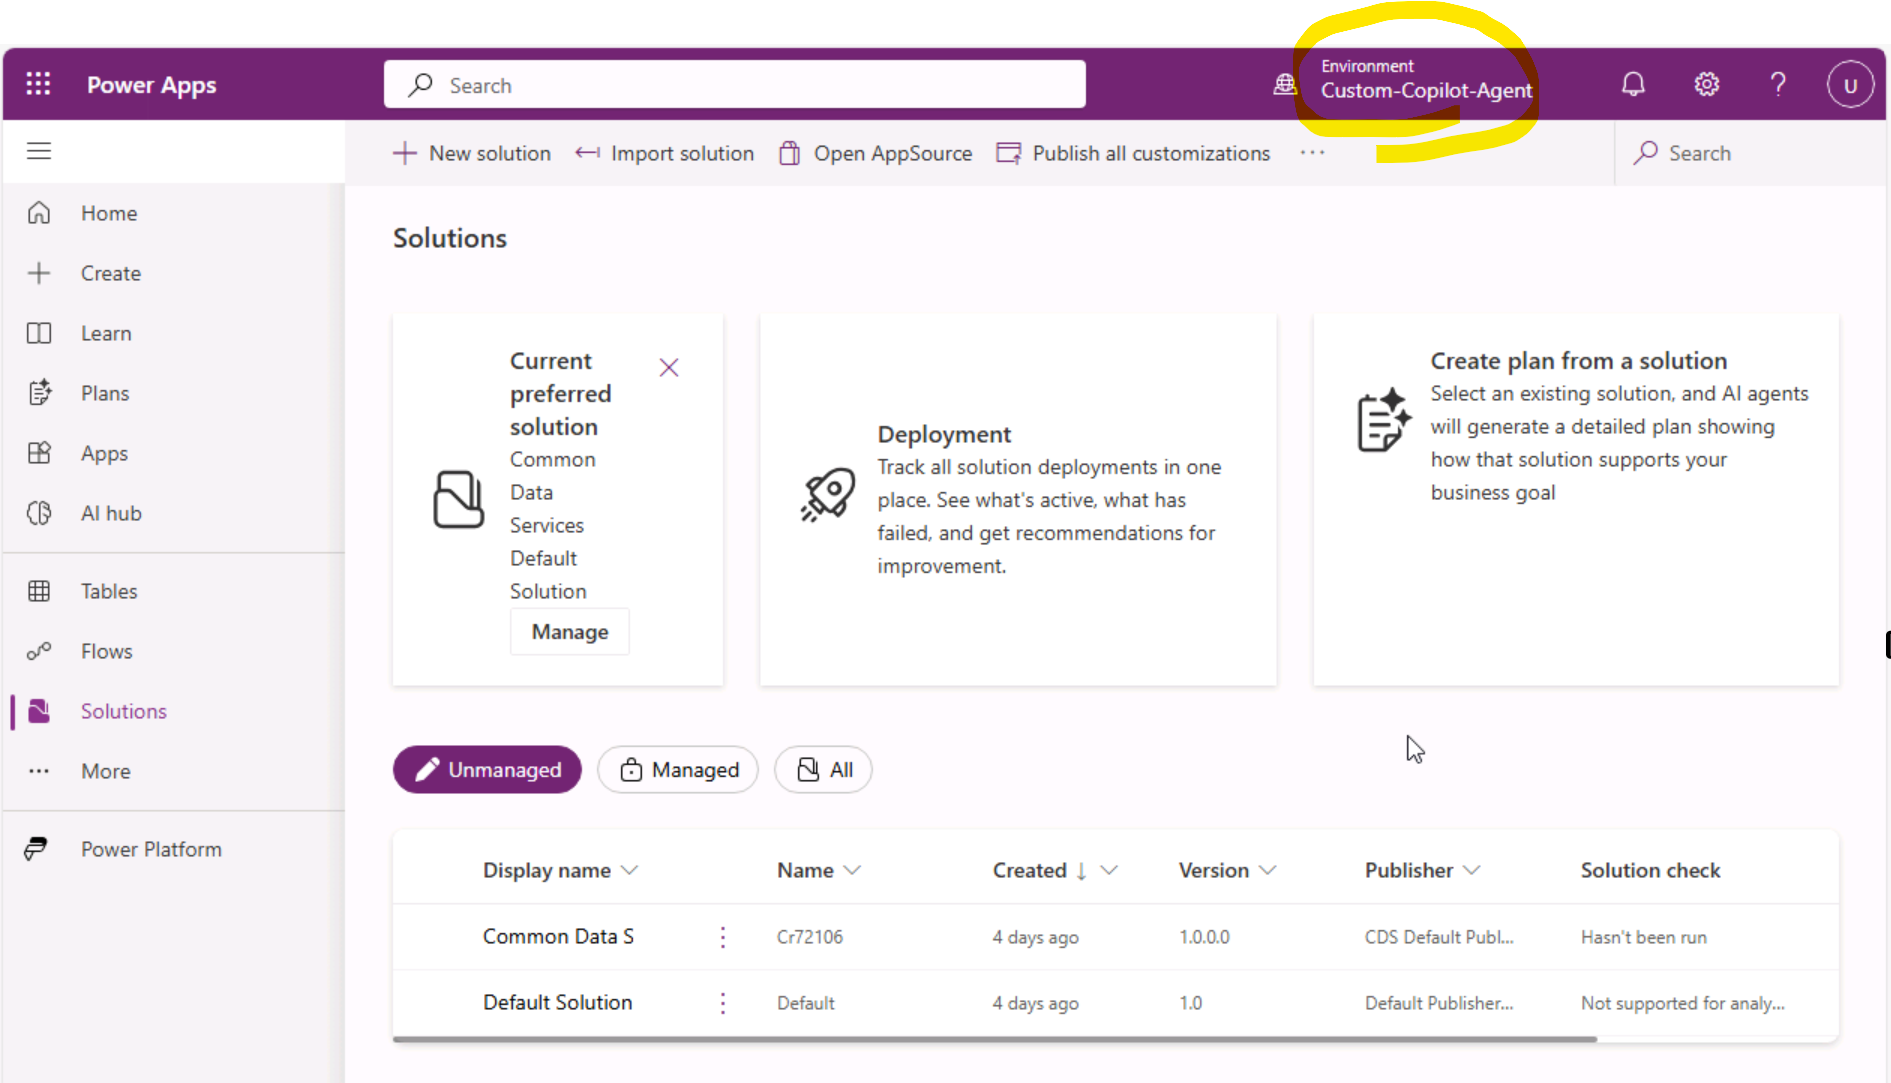
Note: Before executing the steps below, please review the list of environments. Go to +++https://make.powerapps.com+++ (Use the credentials from the Resources tab. Sign in using the Temporary Access Password (TAP)) and check whether there are environments other than Default. If there is only the Default environment, then skip the optional section.
If multiple environments are present, and to avoid unintentionally overriding existing changes, it is recommended to create a new Dataverse environment using the manual steps described below.
[!alert] This part is optional. It allows you to create a new dataverse environment. **Don't run this optional section if you only have the Default environment. **
-
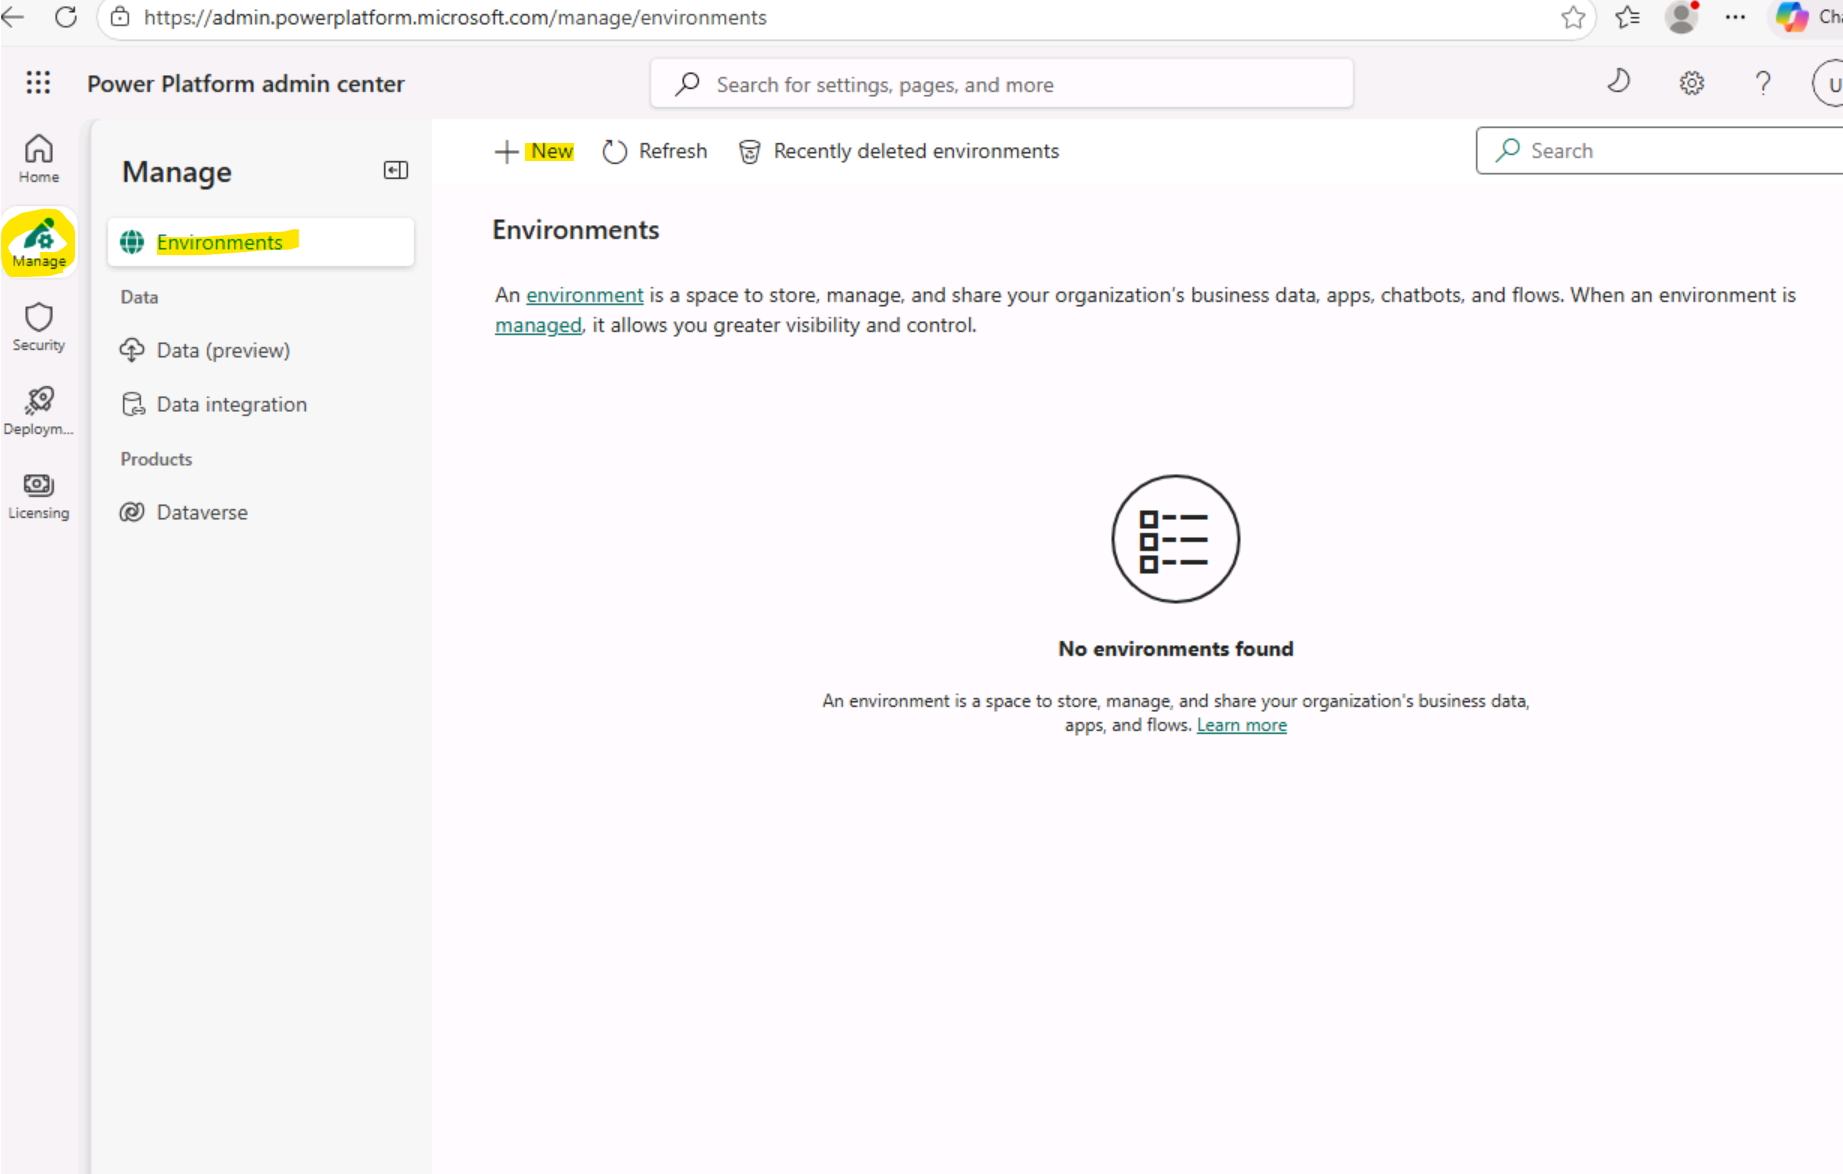
Go To Power Platform Admin Center. Type: +++https://admin.powerplatform.microsoft.com/home+++
-
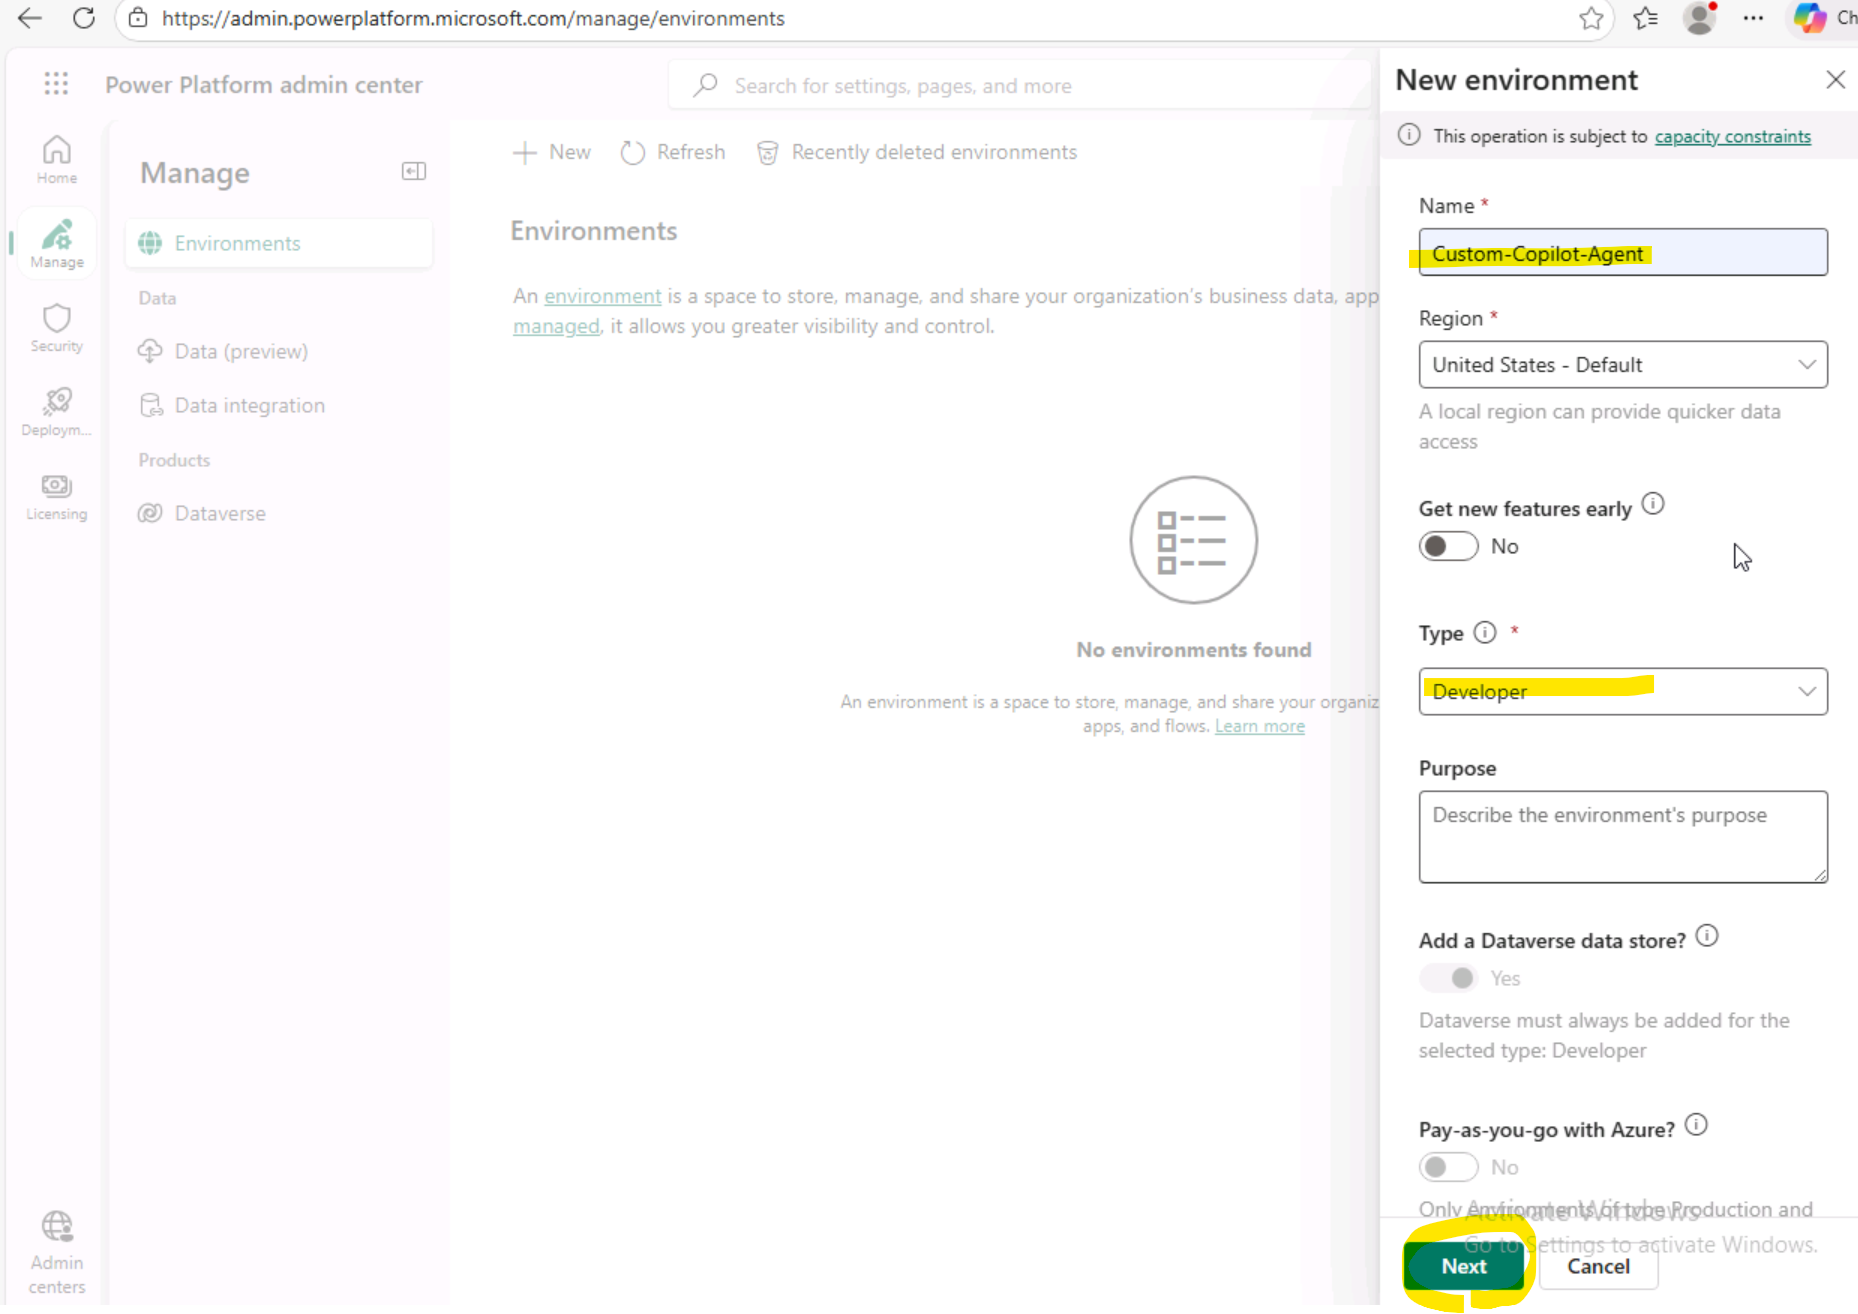
Go To Manage -> Environments -> Click on New to create an environment
-
Give the Environment Name, Select Type as "Developer" & Click on Next.
-
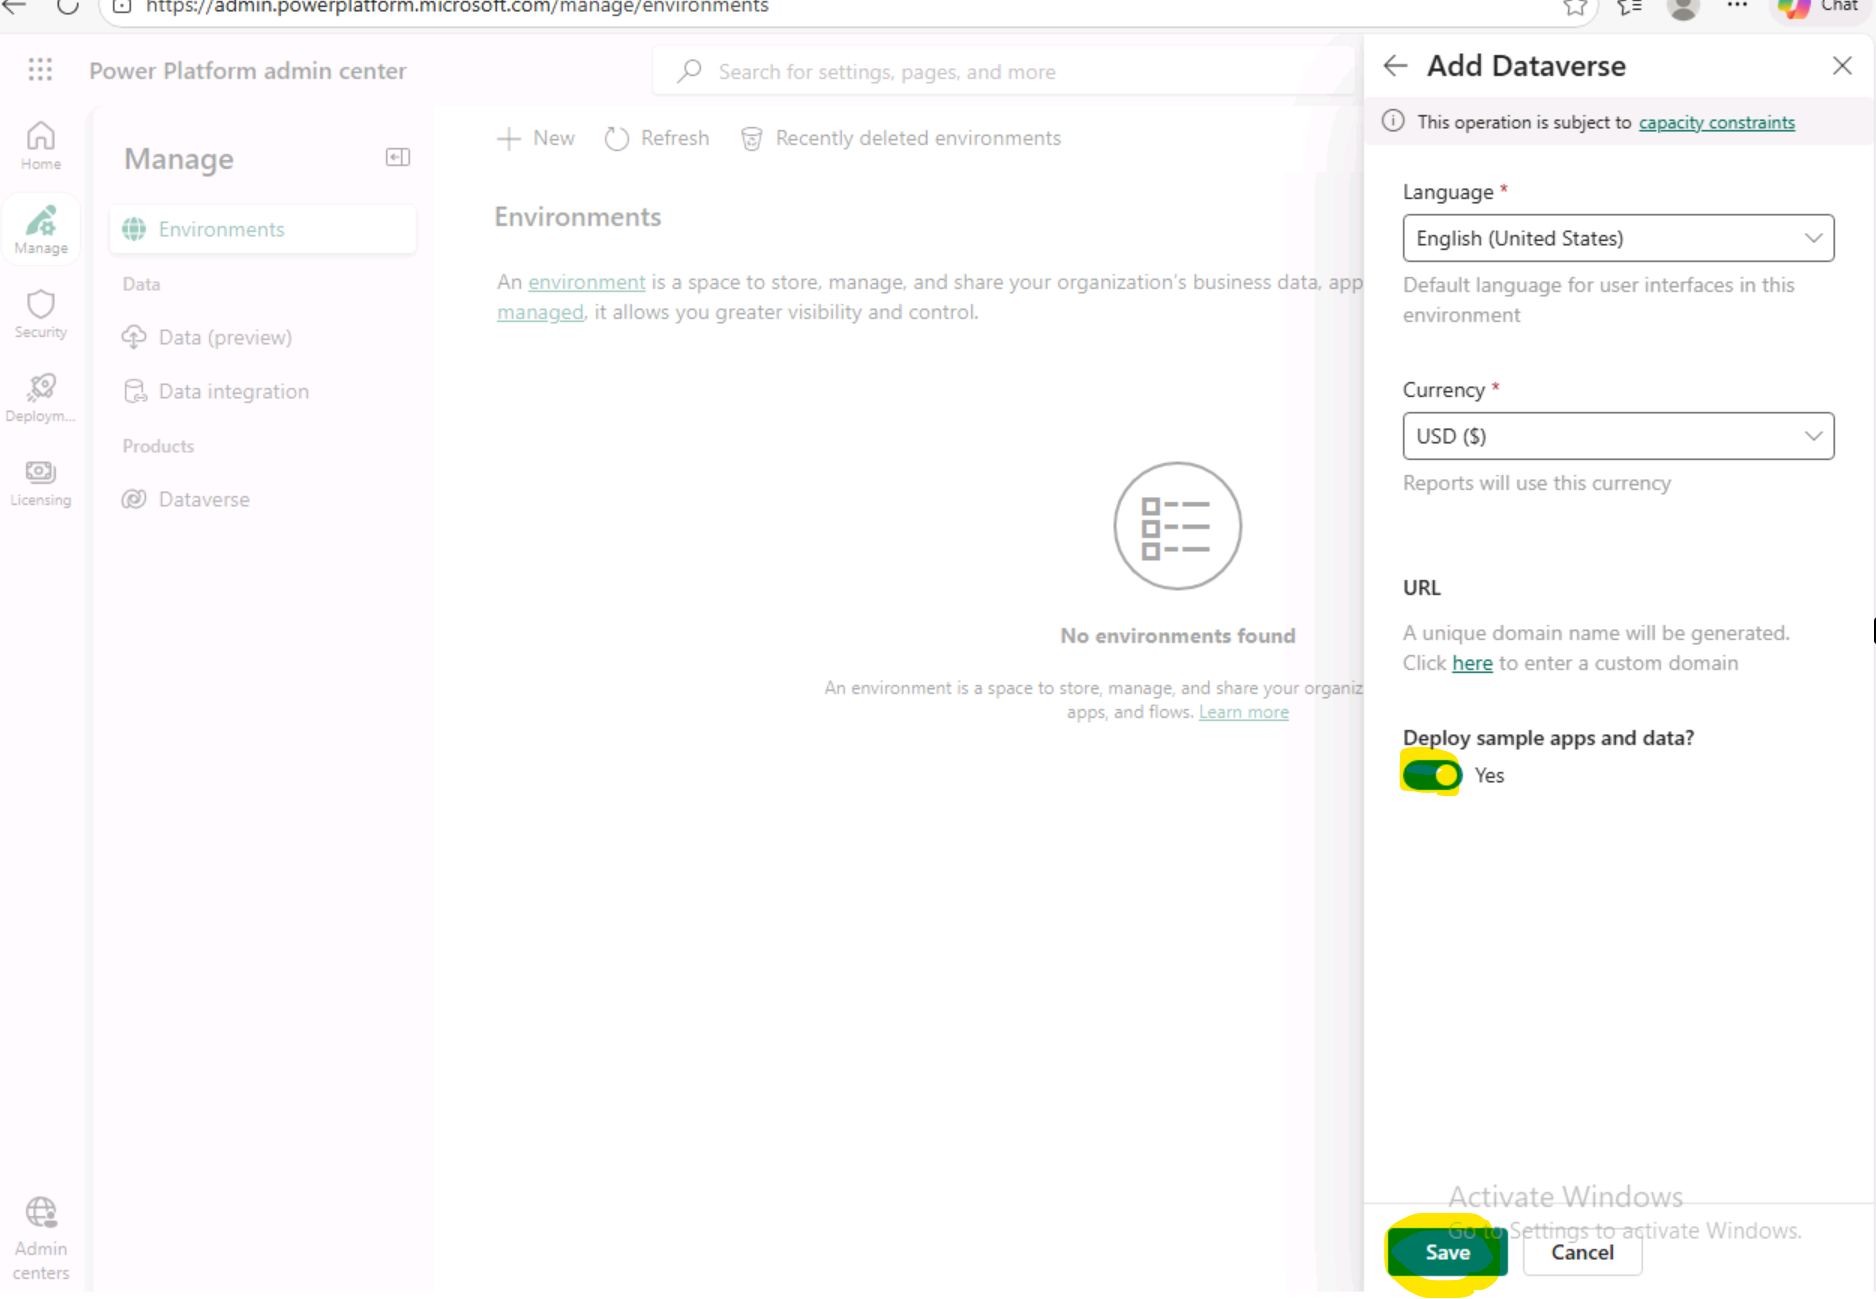
Click on Save.
-
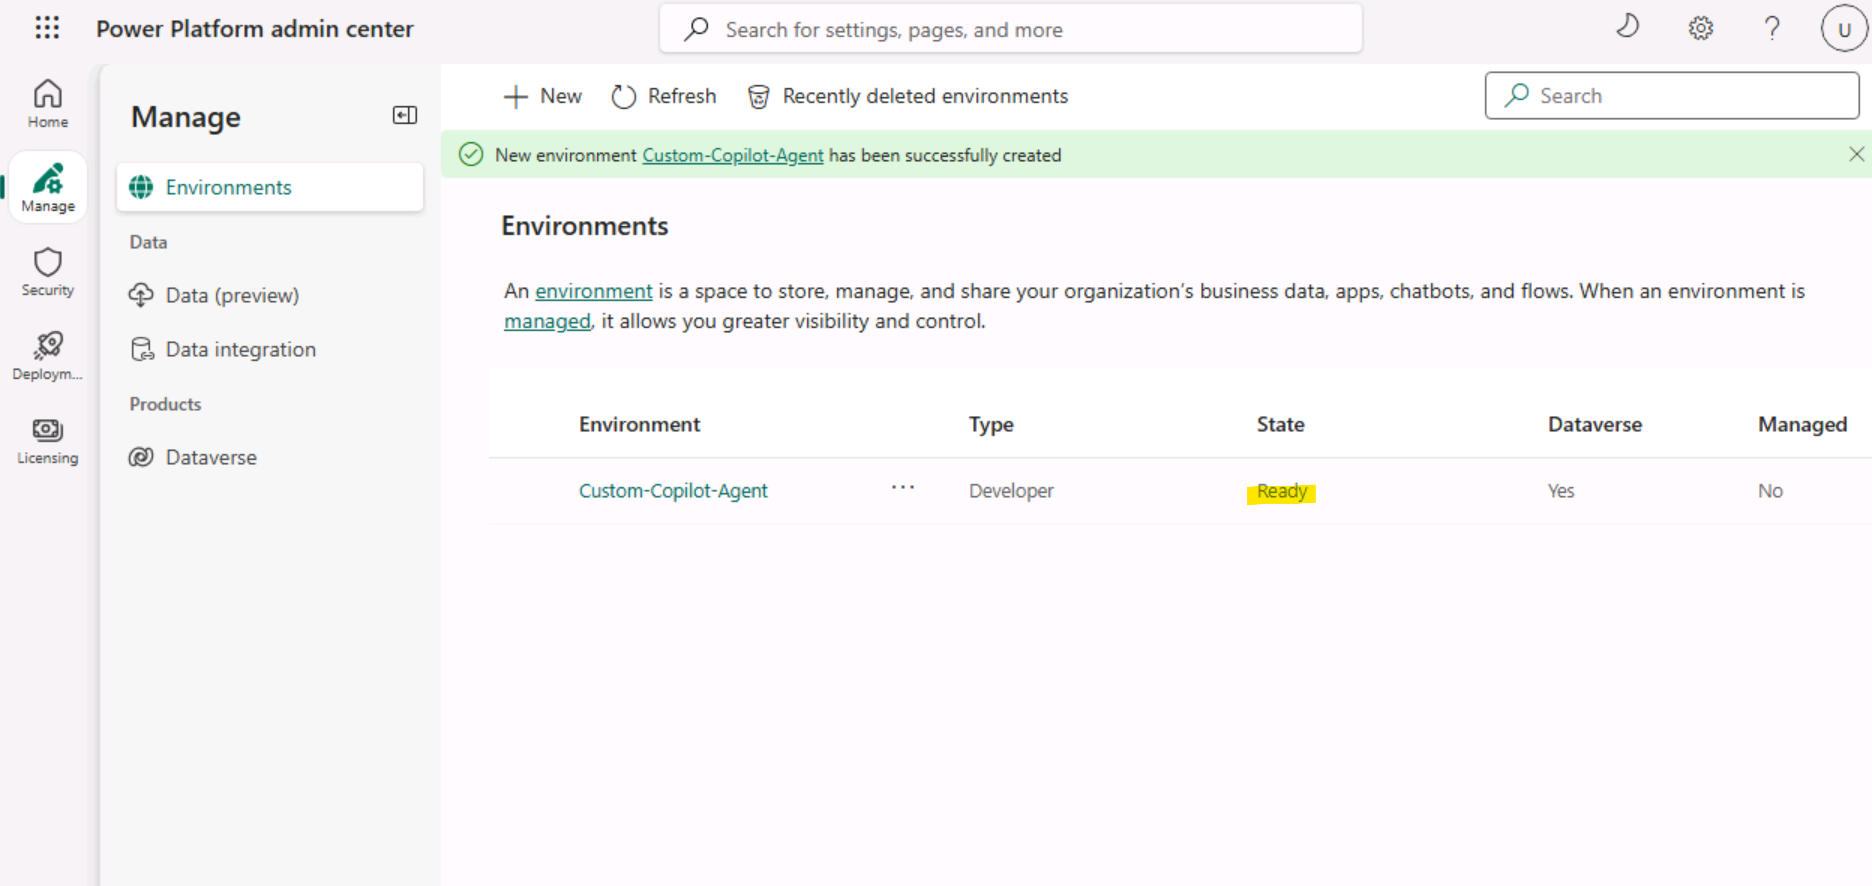
Wait for the environment status to be "Ready".
-
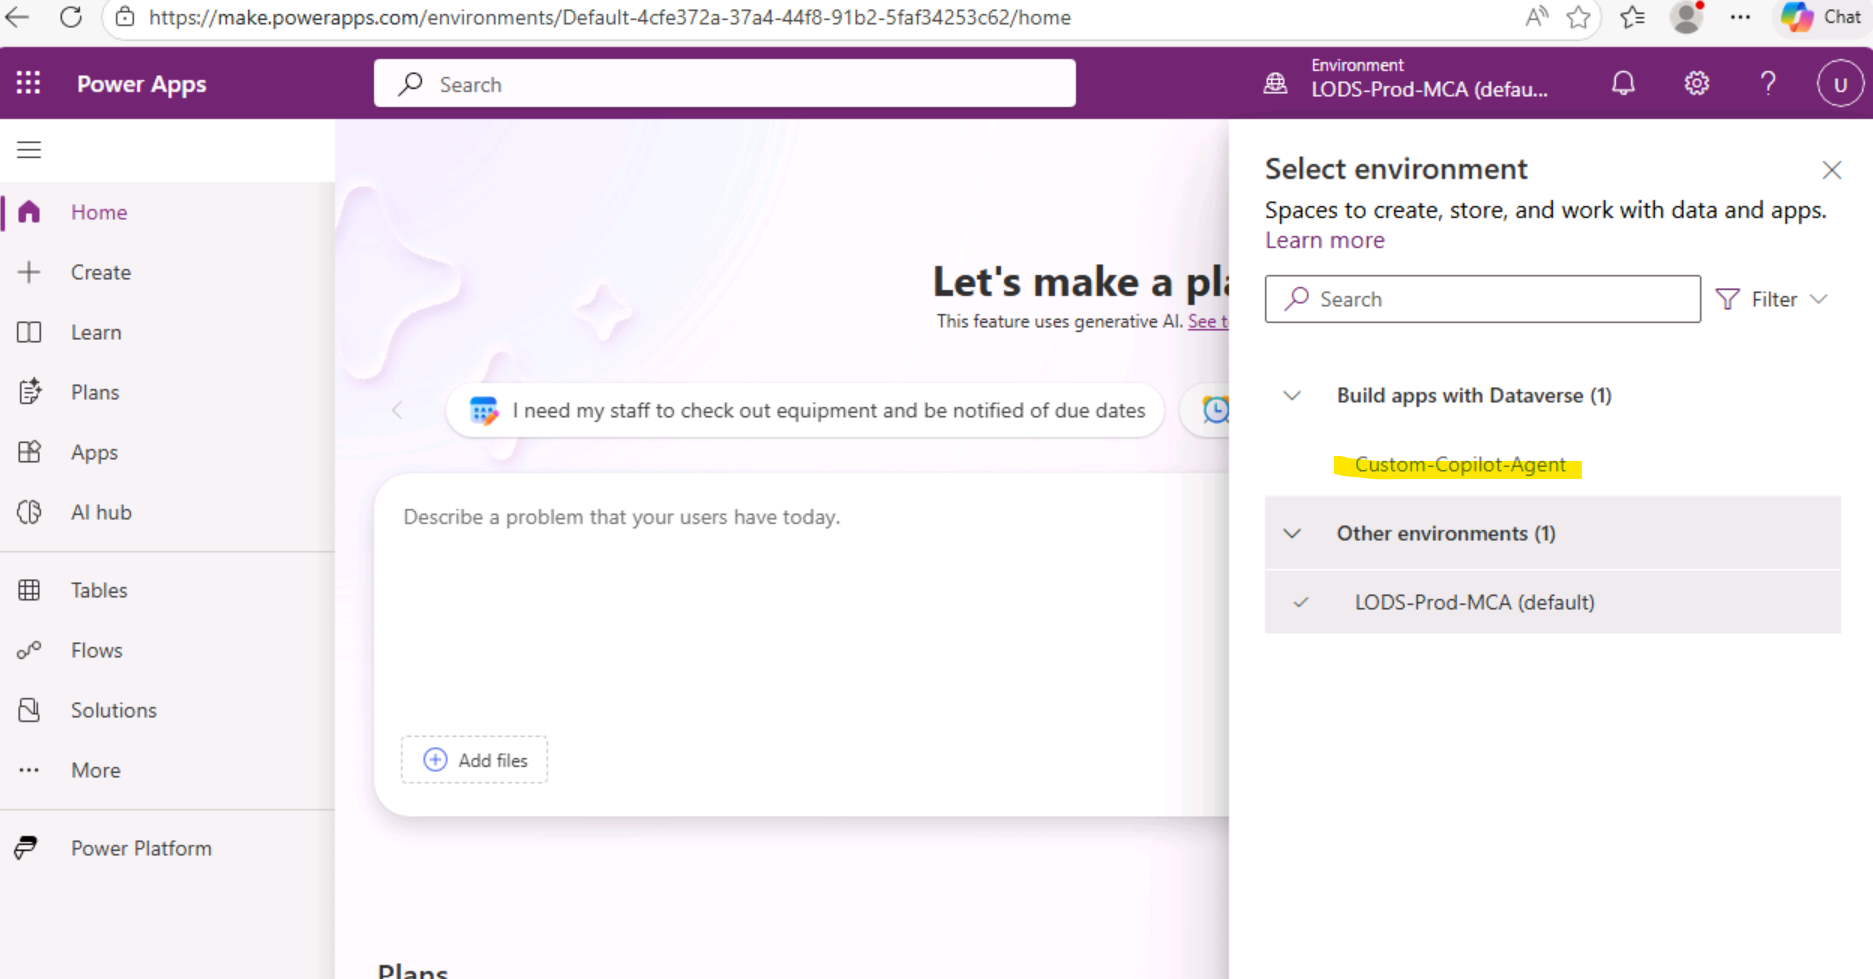
Once the above step is done. Go To maker portal Maker Portal. +++https://make.powerapps.com+++ Select the created environment.
-
Proceed with all lab exercises using this newly created environment. Go to Agents and create a new blank agent. Make sure that your newly created environment is selected.
[!alert] End of the optional section.
##2. Create a simple Copilot Studio agent
Let's create a Copilot Studio agent that we will be using as a backend for our client application
-
Go to Copilot Studio Portal
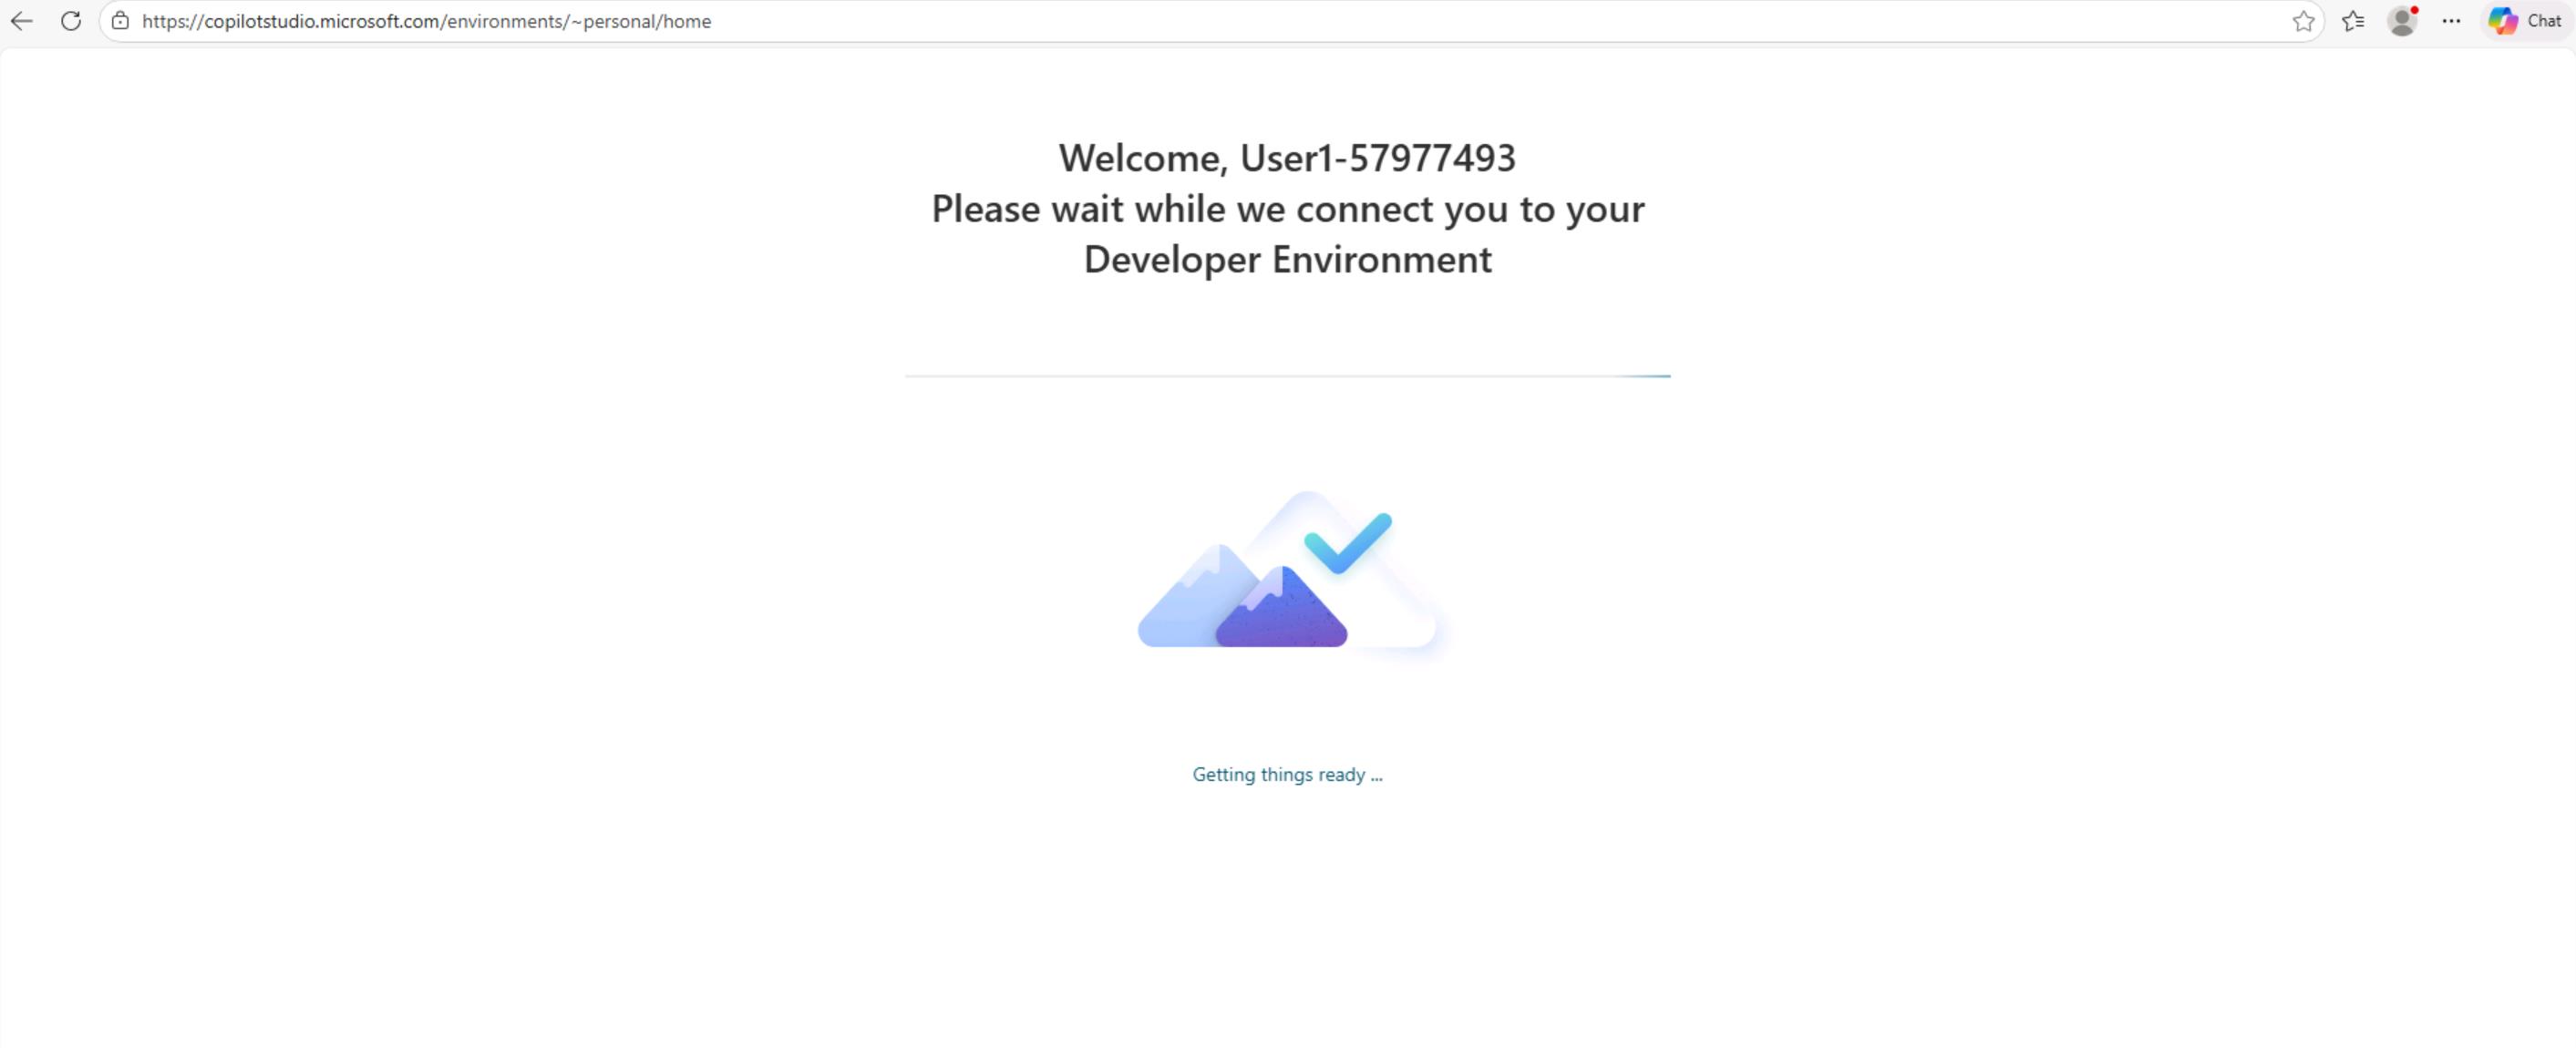
https://copilotstudio.microsoft.com/and create a new agent (Start from Blank). Use the credentials from the Resources tab. Sign in using the Temporary Access Password (TAP). -
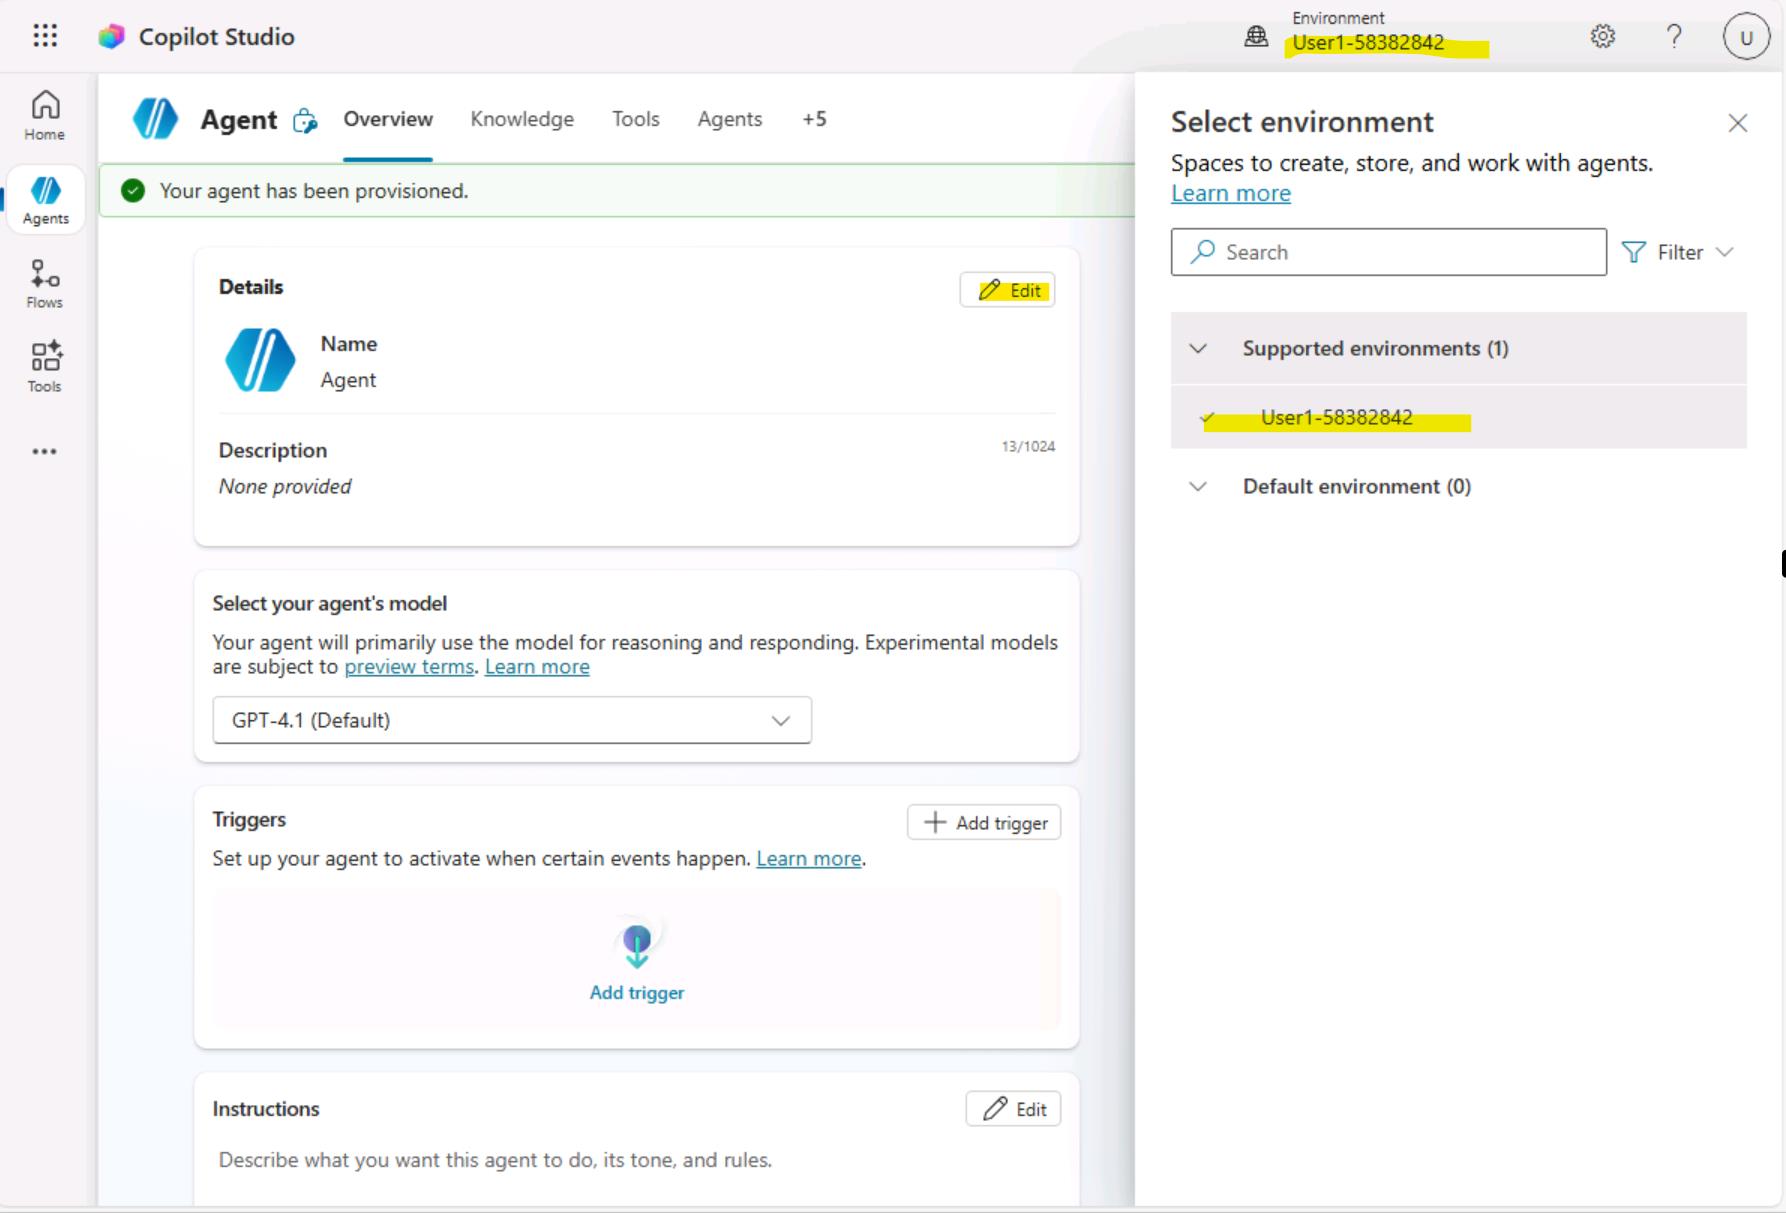
You will see something like below. It should provision a development environment for you. This process can take some time.
-
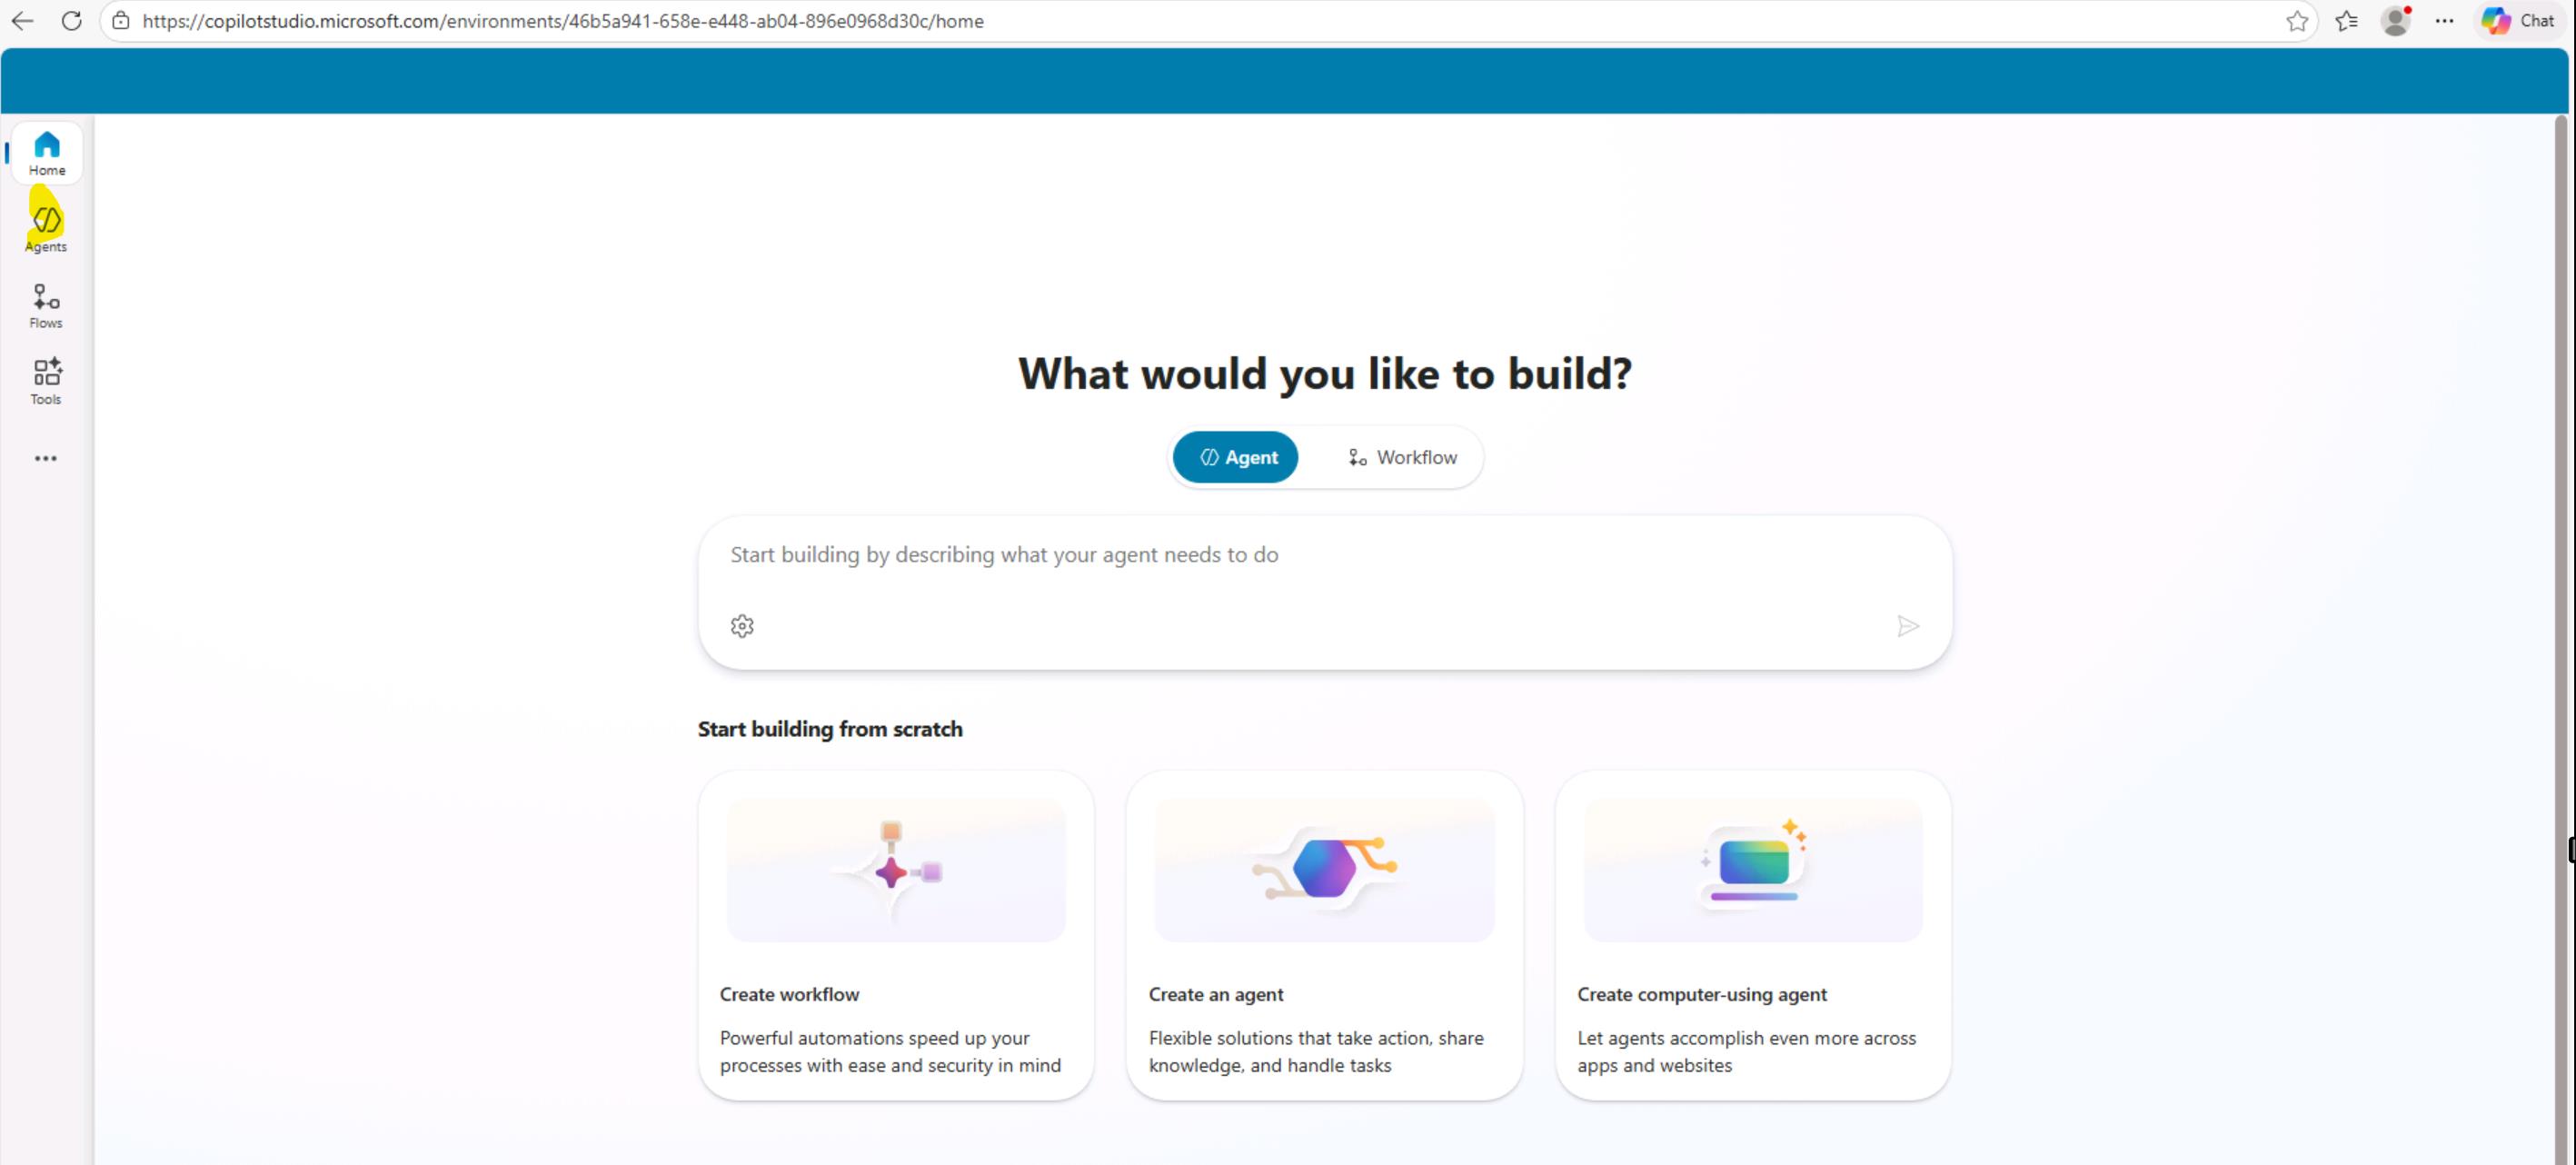
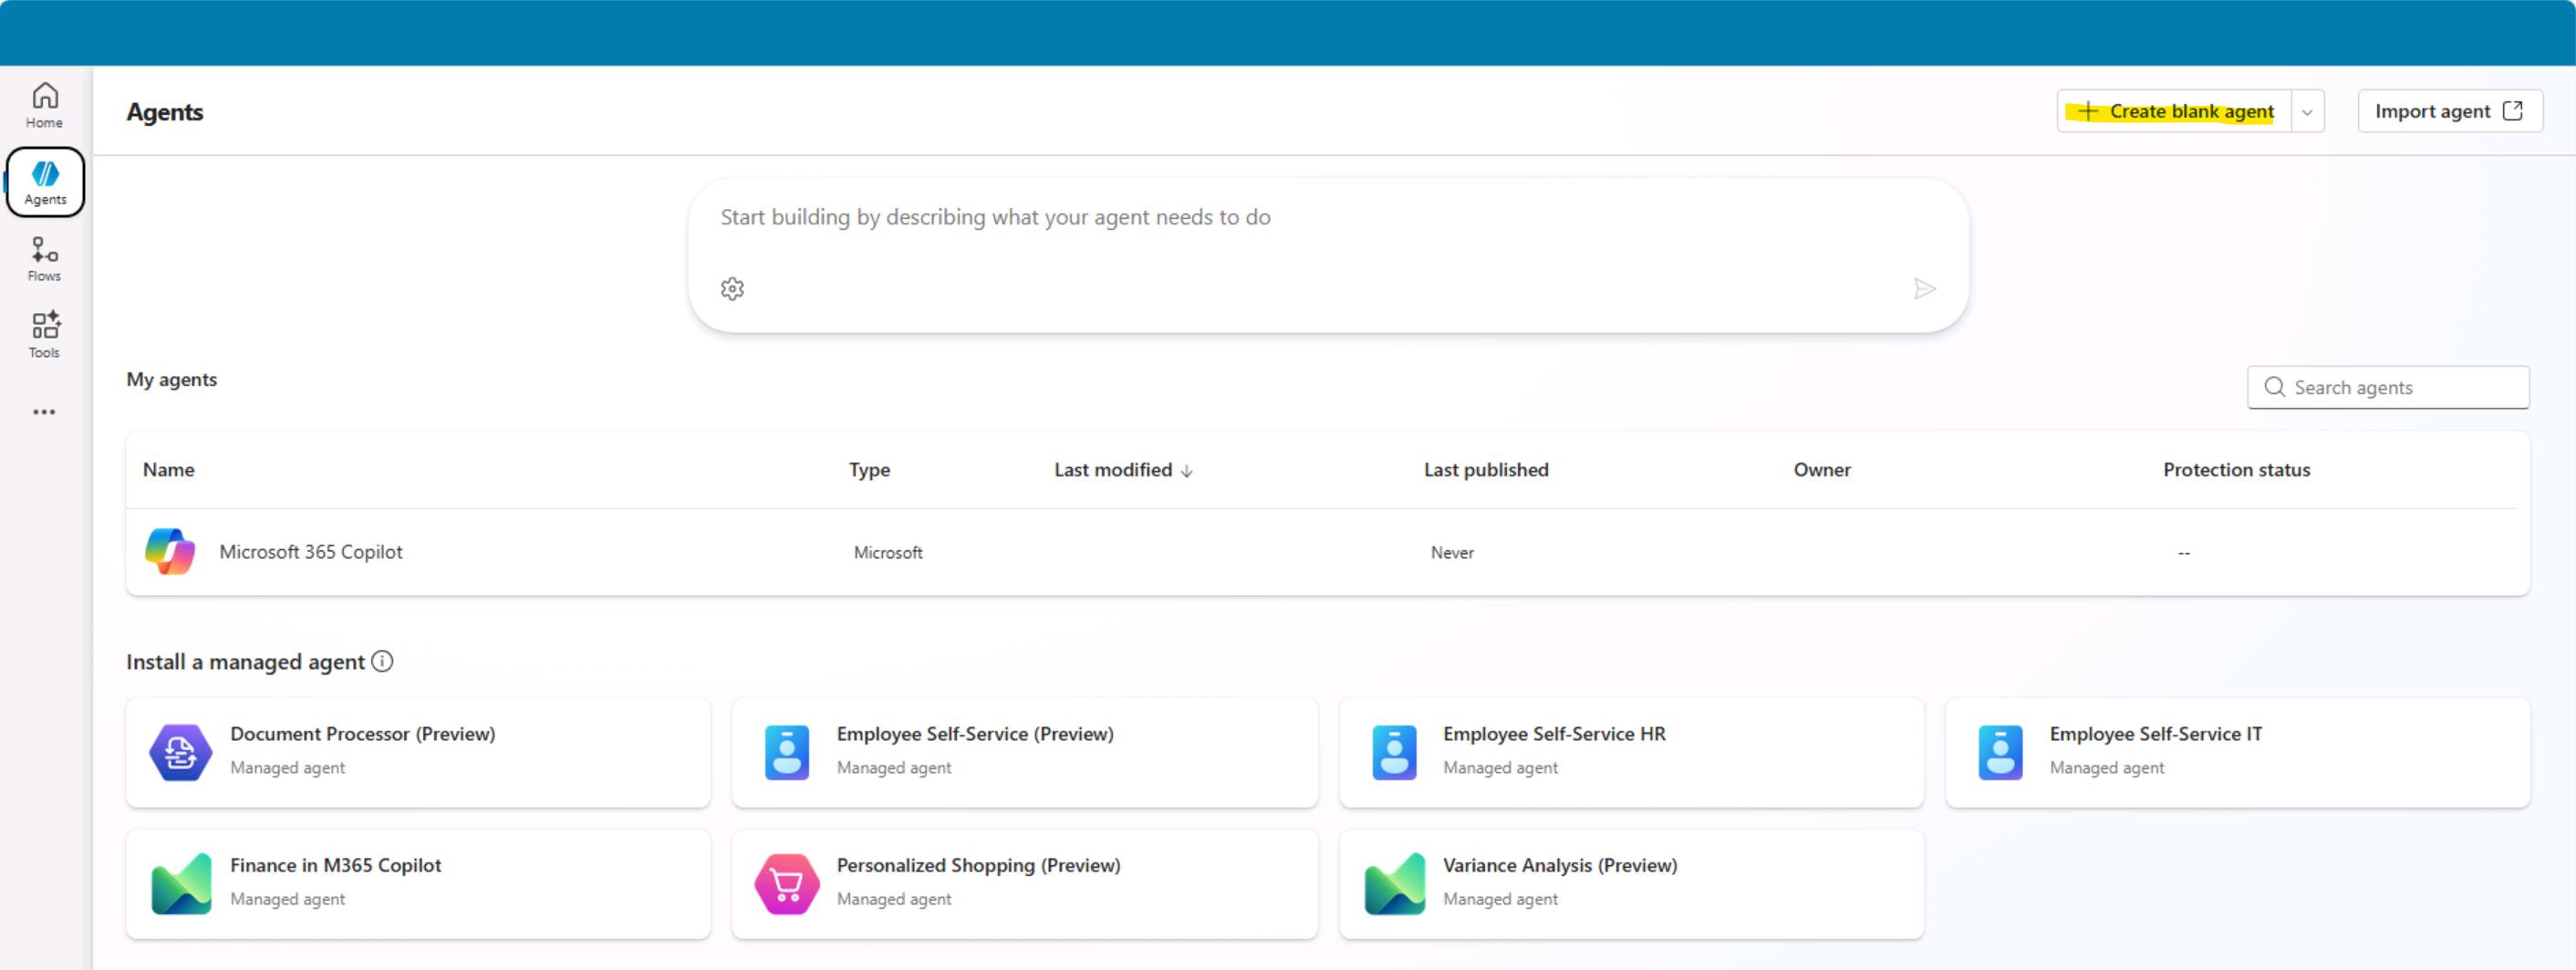
Once the environment is provisioned. Go to Agents and create a new one. Click on "Create blank agent"
If what you see on the screen is different from the screenshot and you do not see the "Create blank agent" button, try opening
https://copilotstudio.microsoft.com/again. This should take you to the correct page. -
Please wait untill your agent is ready. Make sure you are in the correct environment. Not Default one.
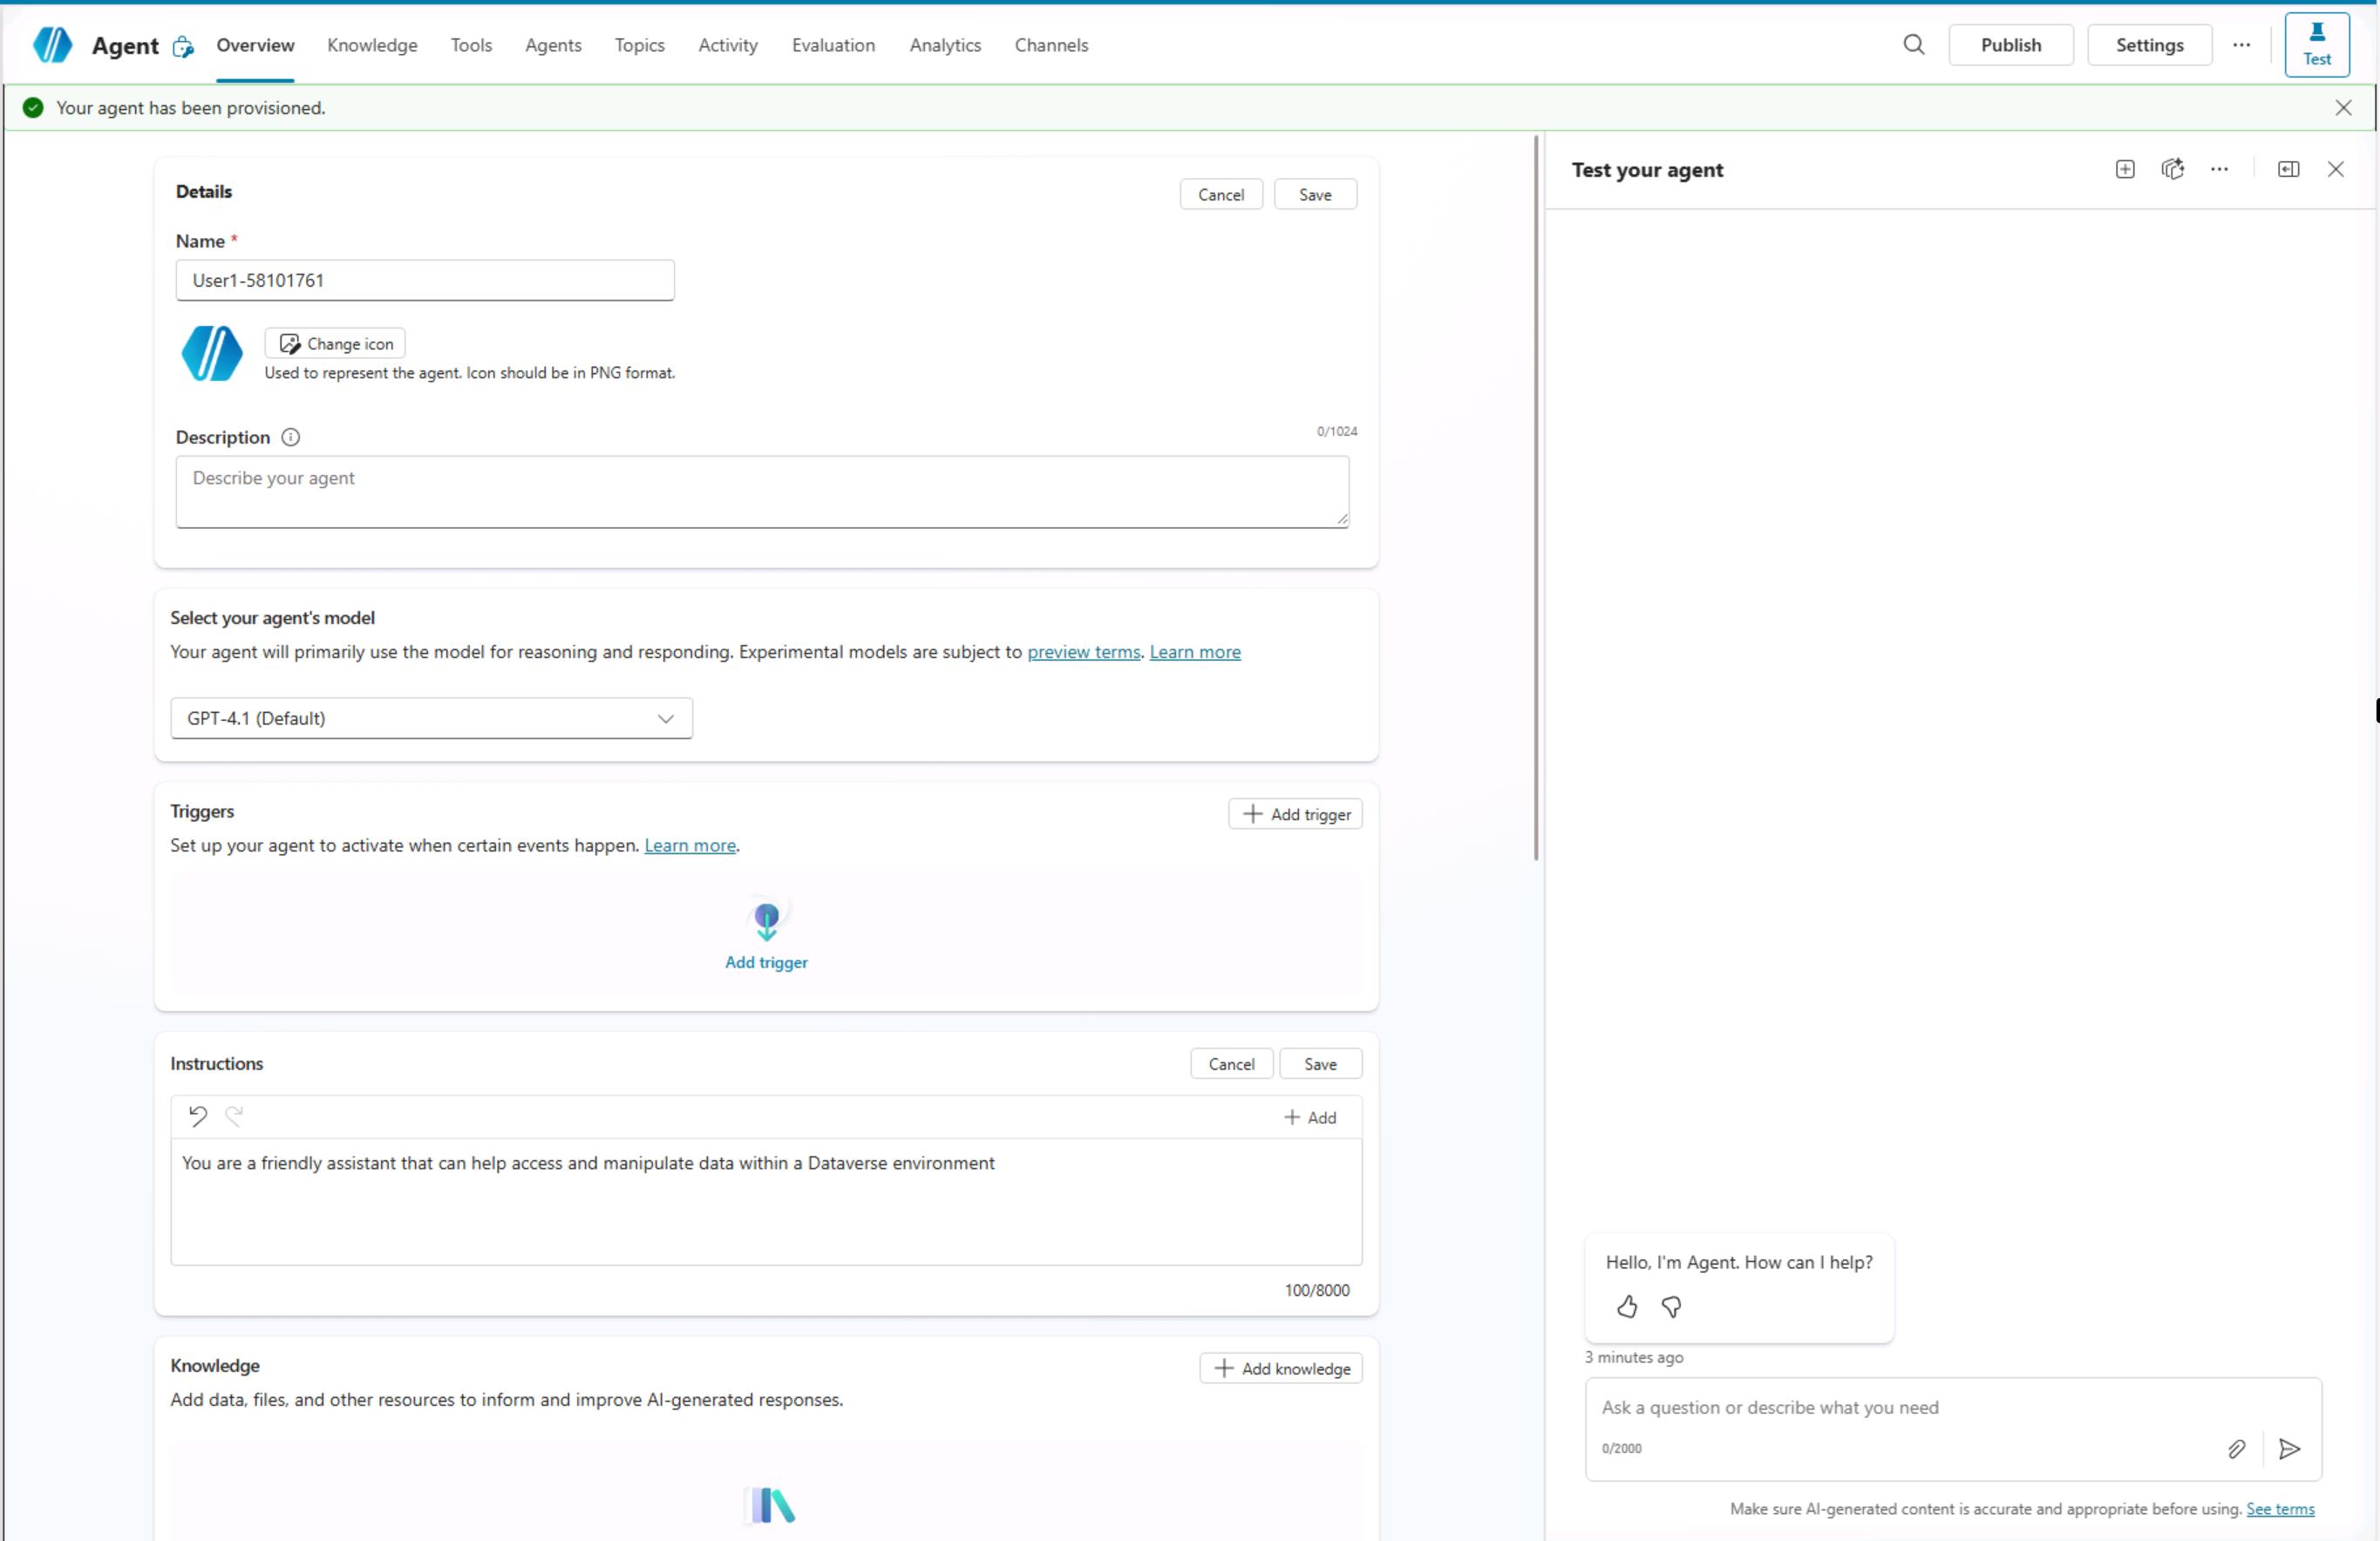
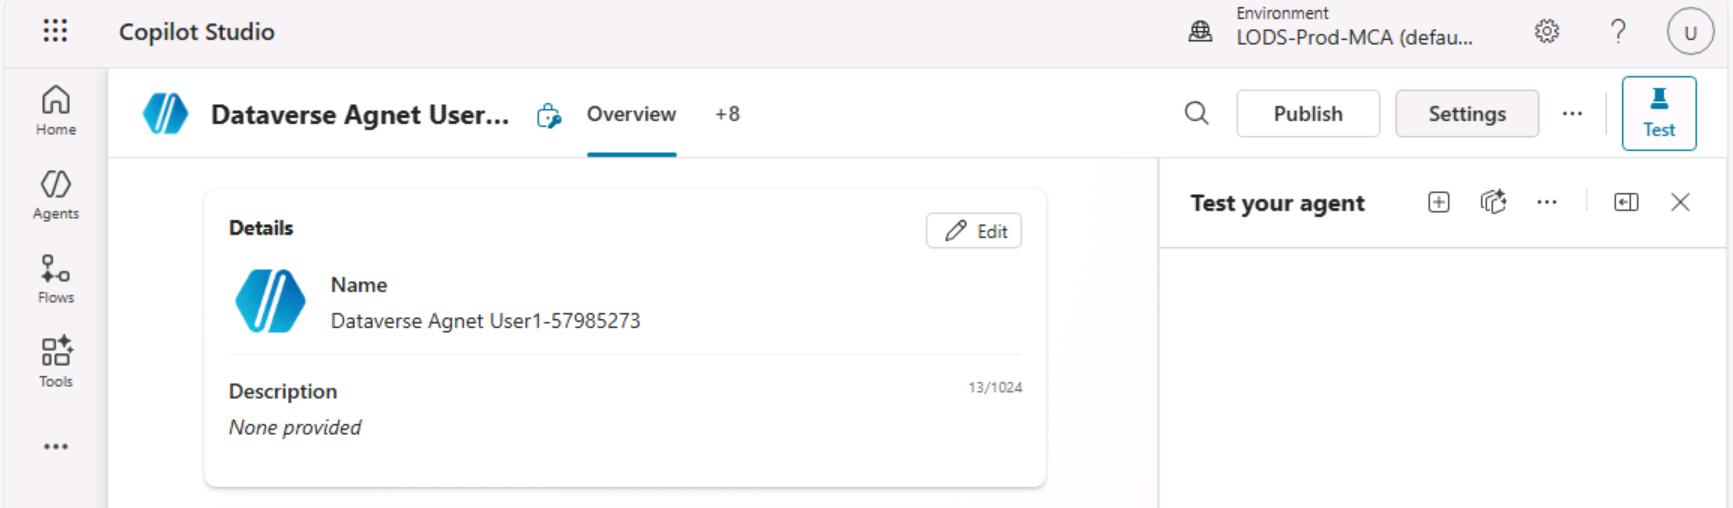
Click Edit to rename the agent.
-
You can call it with your user name like User1-58101761. Click Save.
-
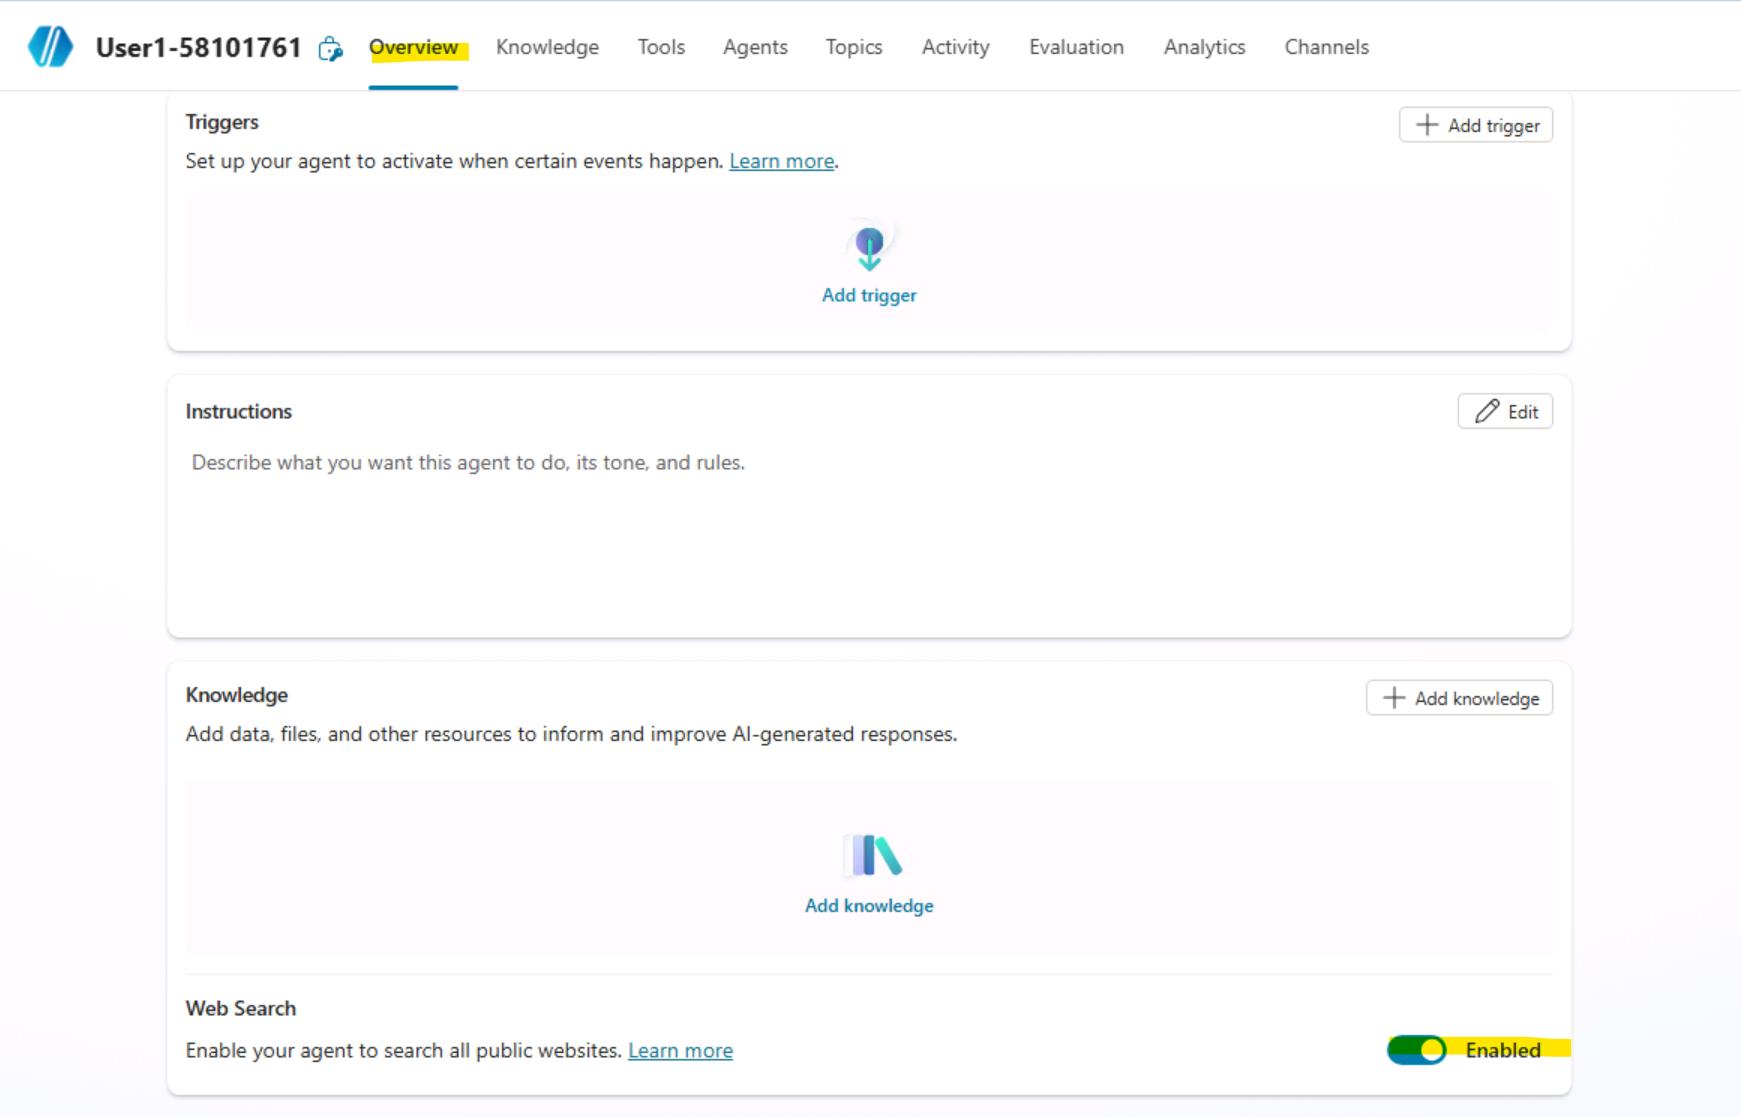
Provide instructions and click Save.** Instructions:** +++You are a friendly assistant that can help access and manipulate data within a Dataverse environment.+++. Validate that agent name is correct one more time. If it is not correct, please fix the name. Enable web search. You might need to click twice to enable it.🙂 Don't forget to save the agent.
-
Make sure that your agent is using Authenticate with Microsoft authentication. You can verify this by going to Settings → Security → Authentication.
-
**Publish your agent. **
-
Test your agent by asking some simple question. For example: "What can you do?"


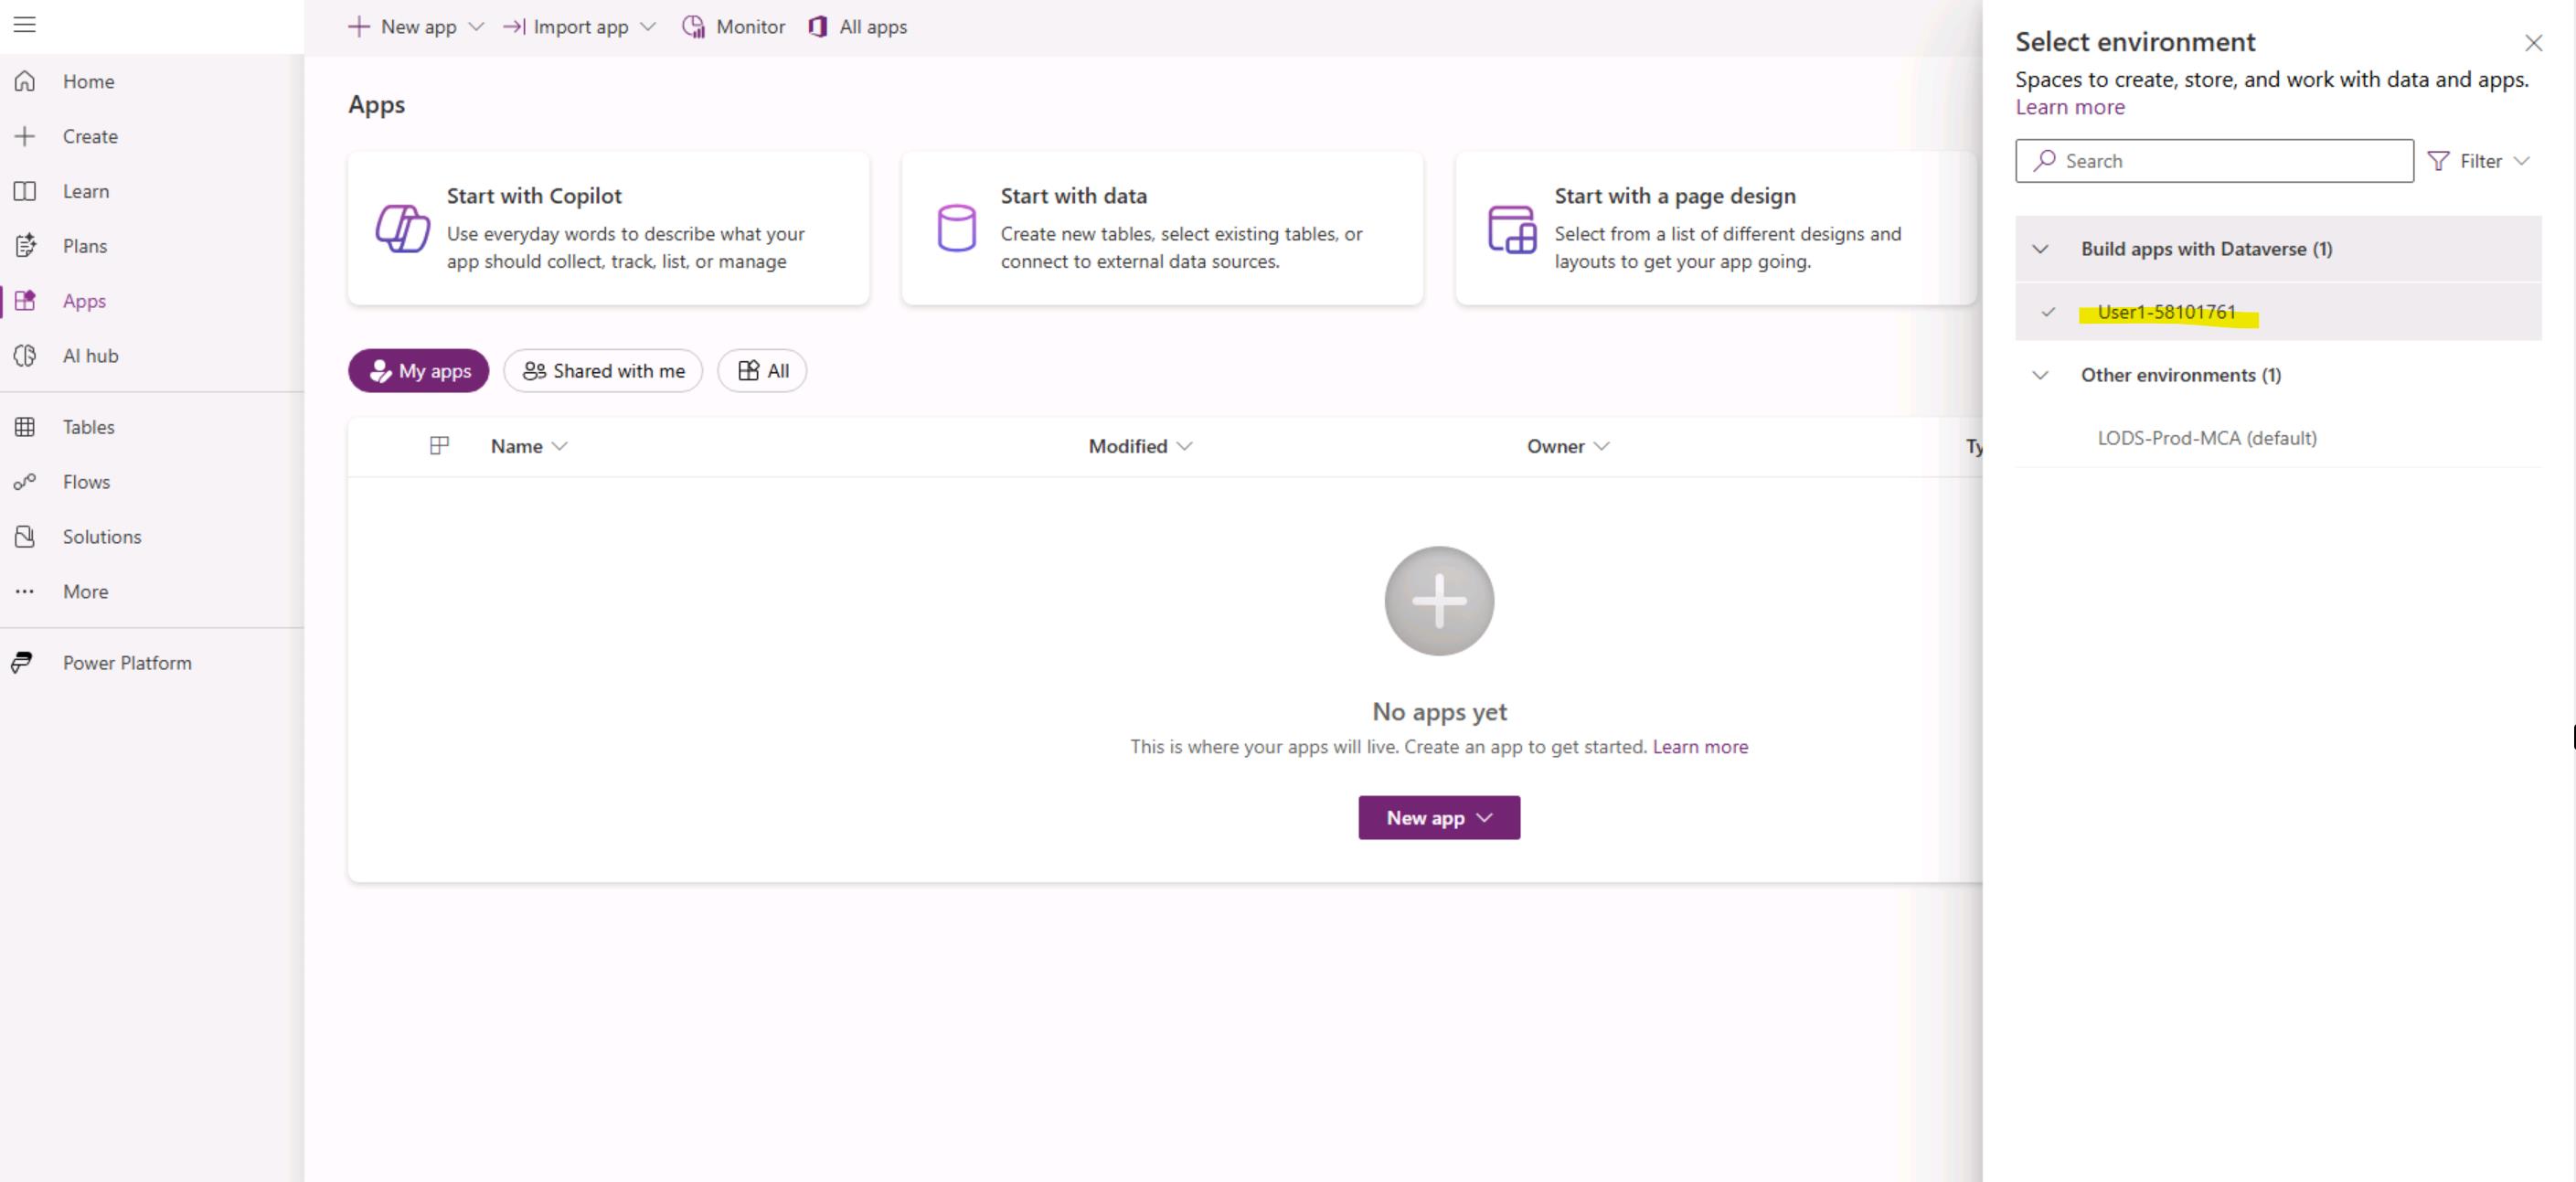
Now we have a fully functional Copilot Studio agent and a connected Dataverse organization. We will use this agent as the backend and connect to via the M365 Agent SDK. The Dataverse organization should be visible in your Maker Portal, but it might take a bit of time 🙂. You can open maker portal and verify this https://make.powerapps.com/ . Please be aware that this can take some time to be provisioned, so please continue with the lab. You can validate this later.
##3. Configure app registration to access the Copilot Studio agent
Before your web application can communicate with a Copilot Studio agent on behalf of signed-in users, you need to configure an app registration in Microsoft Entra ID. This registration establishes your application's identity and defines how it authenticates users and acquires tokens.
In this section, you'll:
- Register a new application in the Azure portal
- Configure authentication settings for the OpenID Connect hybrid flow
- Add the required API permissions to call your Copilot Studio agent
- Create a client secret for secure server-side token acquisition
Once configured, your application will be able to authenticate users against your organization's directory and obtain access tokens scoped to your Copilot Studio agent.
-
First step is to create an app registration. Please open
https://portal.azure.com/. Use the credentials from the Resources tab. Sign in using the Temporary Access Password (TAP). -
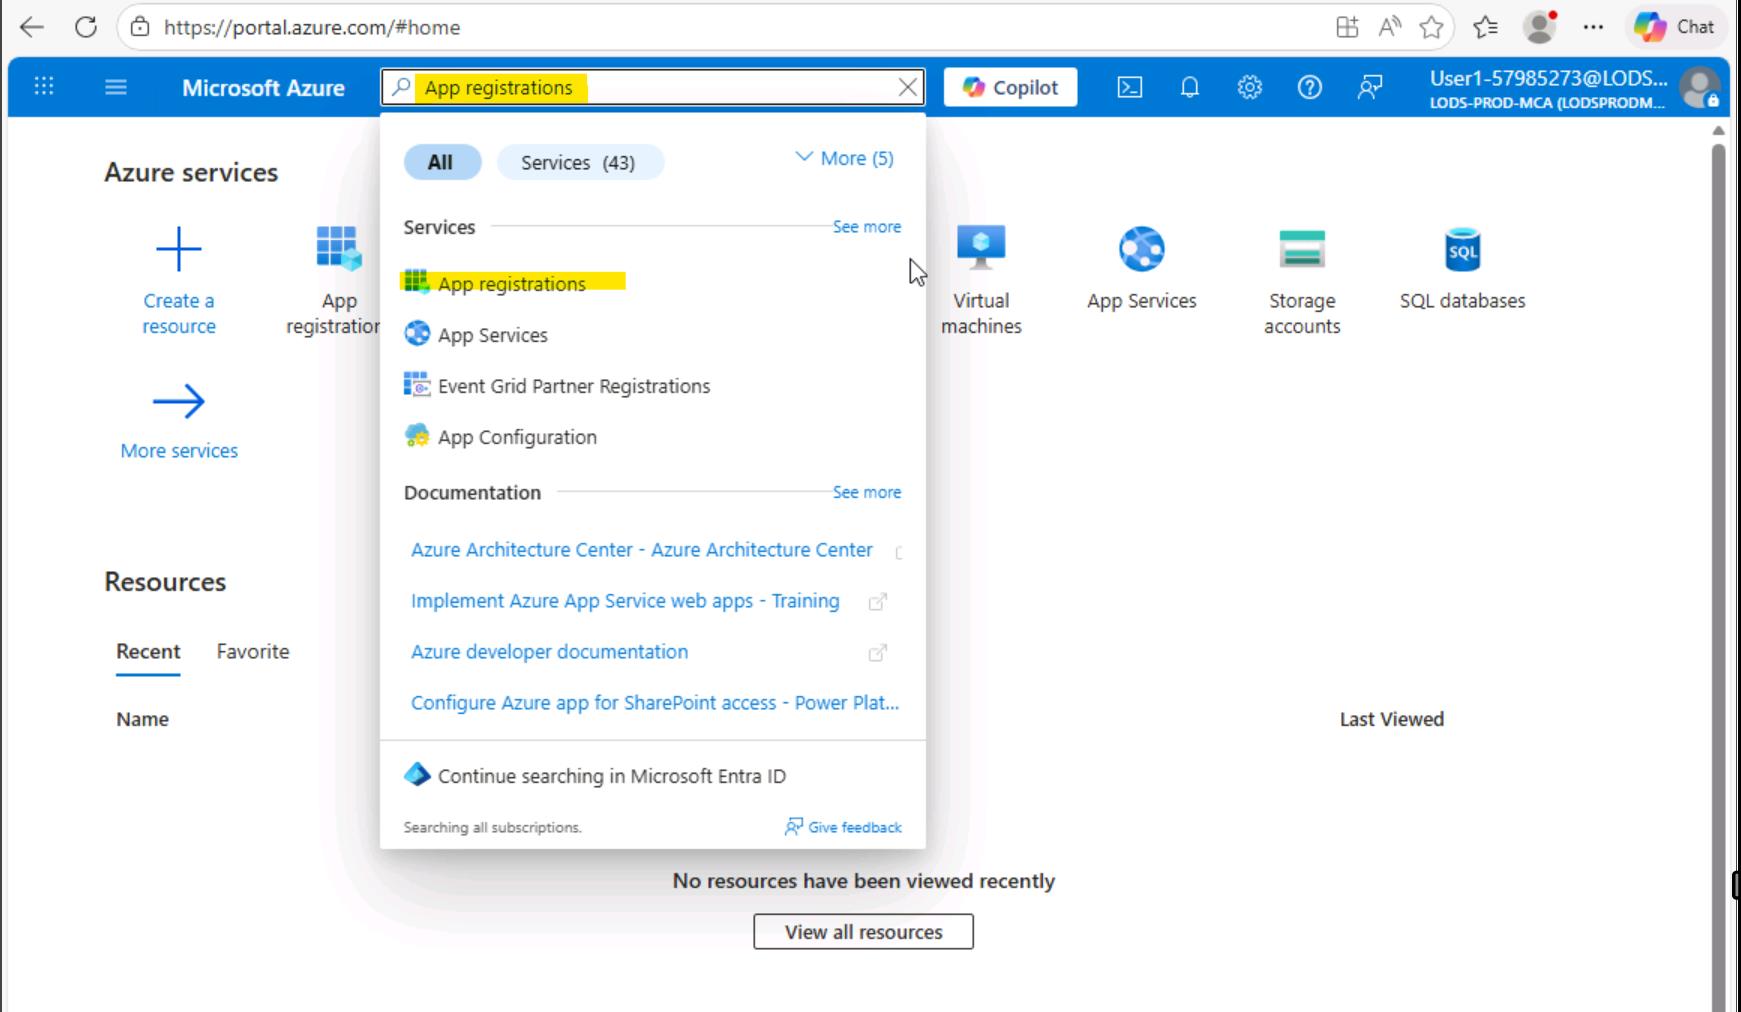
Type
App registrationsin the search box and open "App registrations" area from the Services section. -
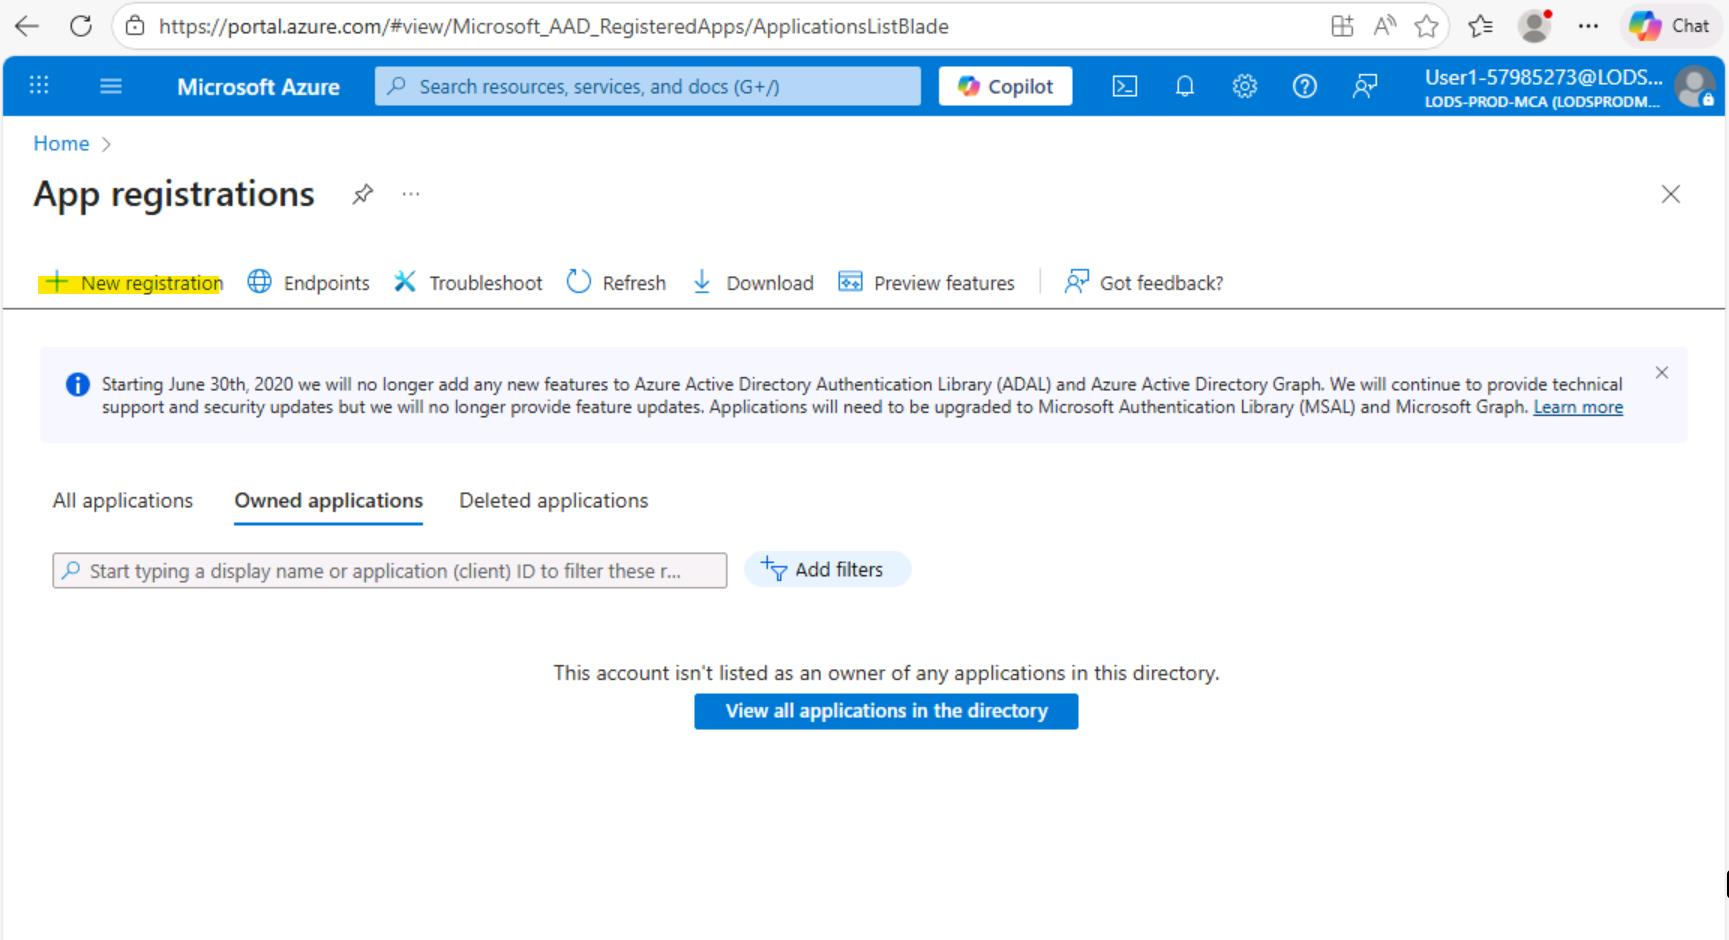
Create a new App registration
-
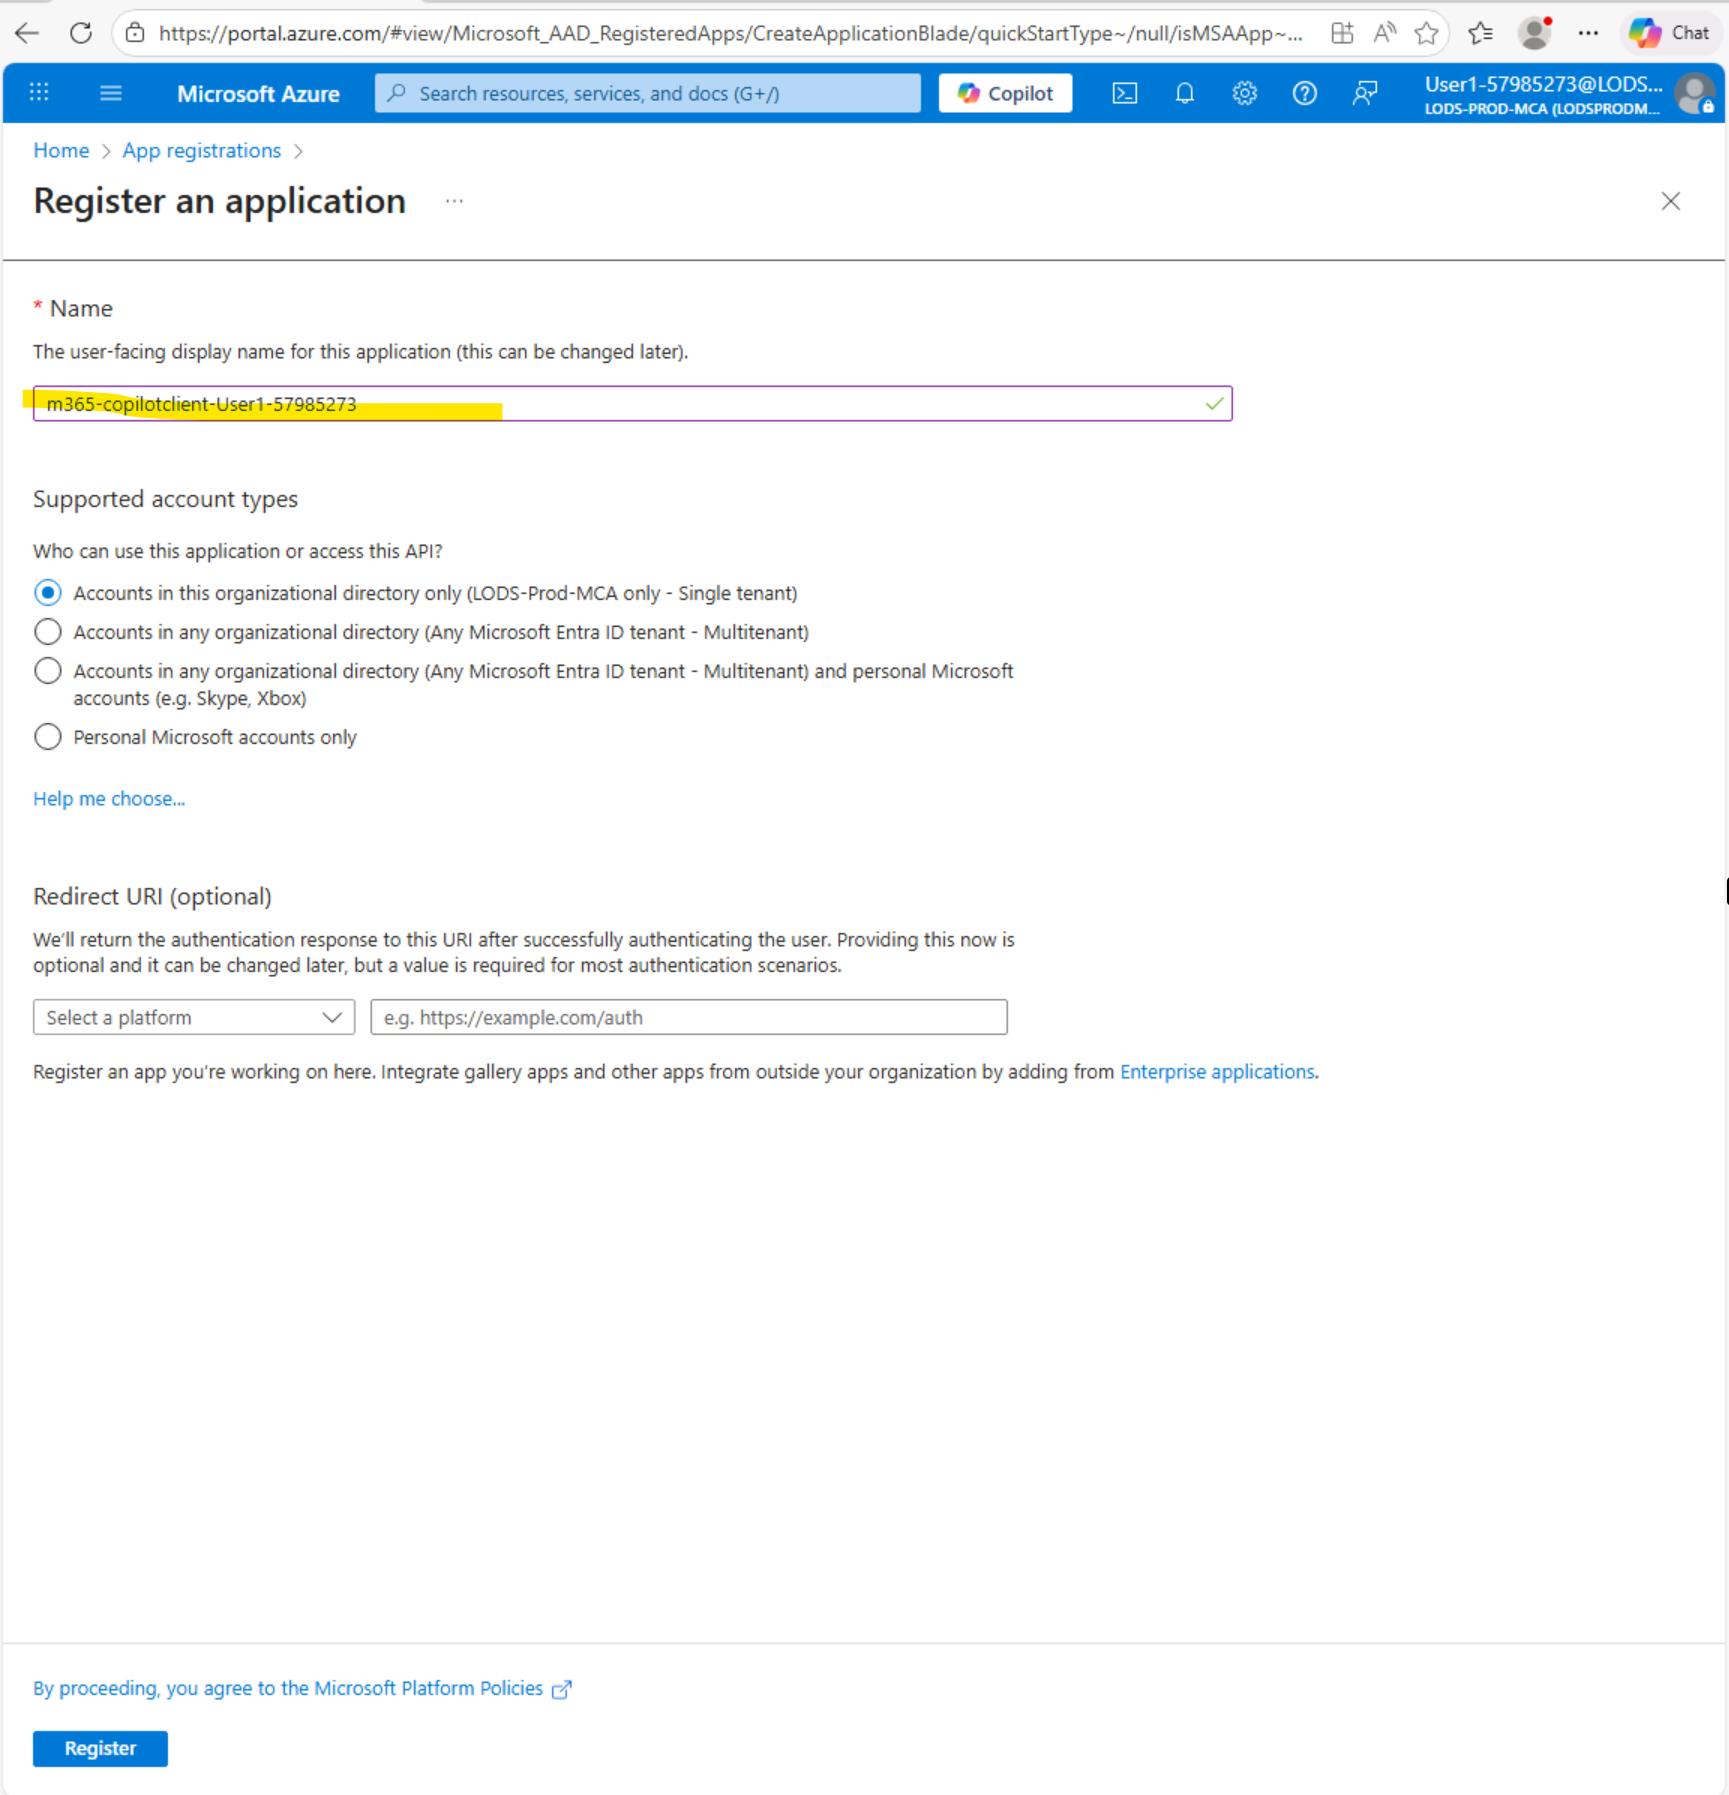
Enter appication registration name. You can use m365-copilotclient-{YOUR_USERNAME}
-
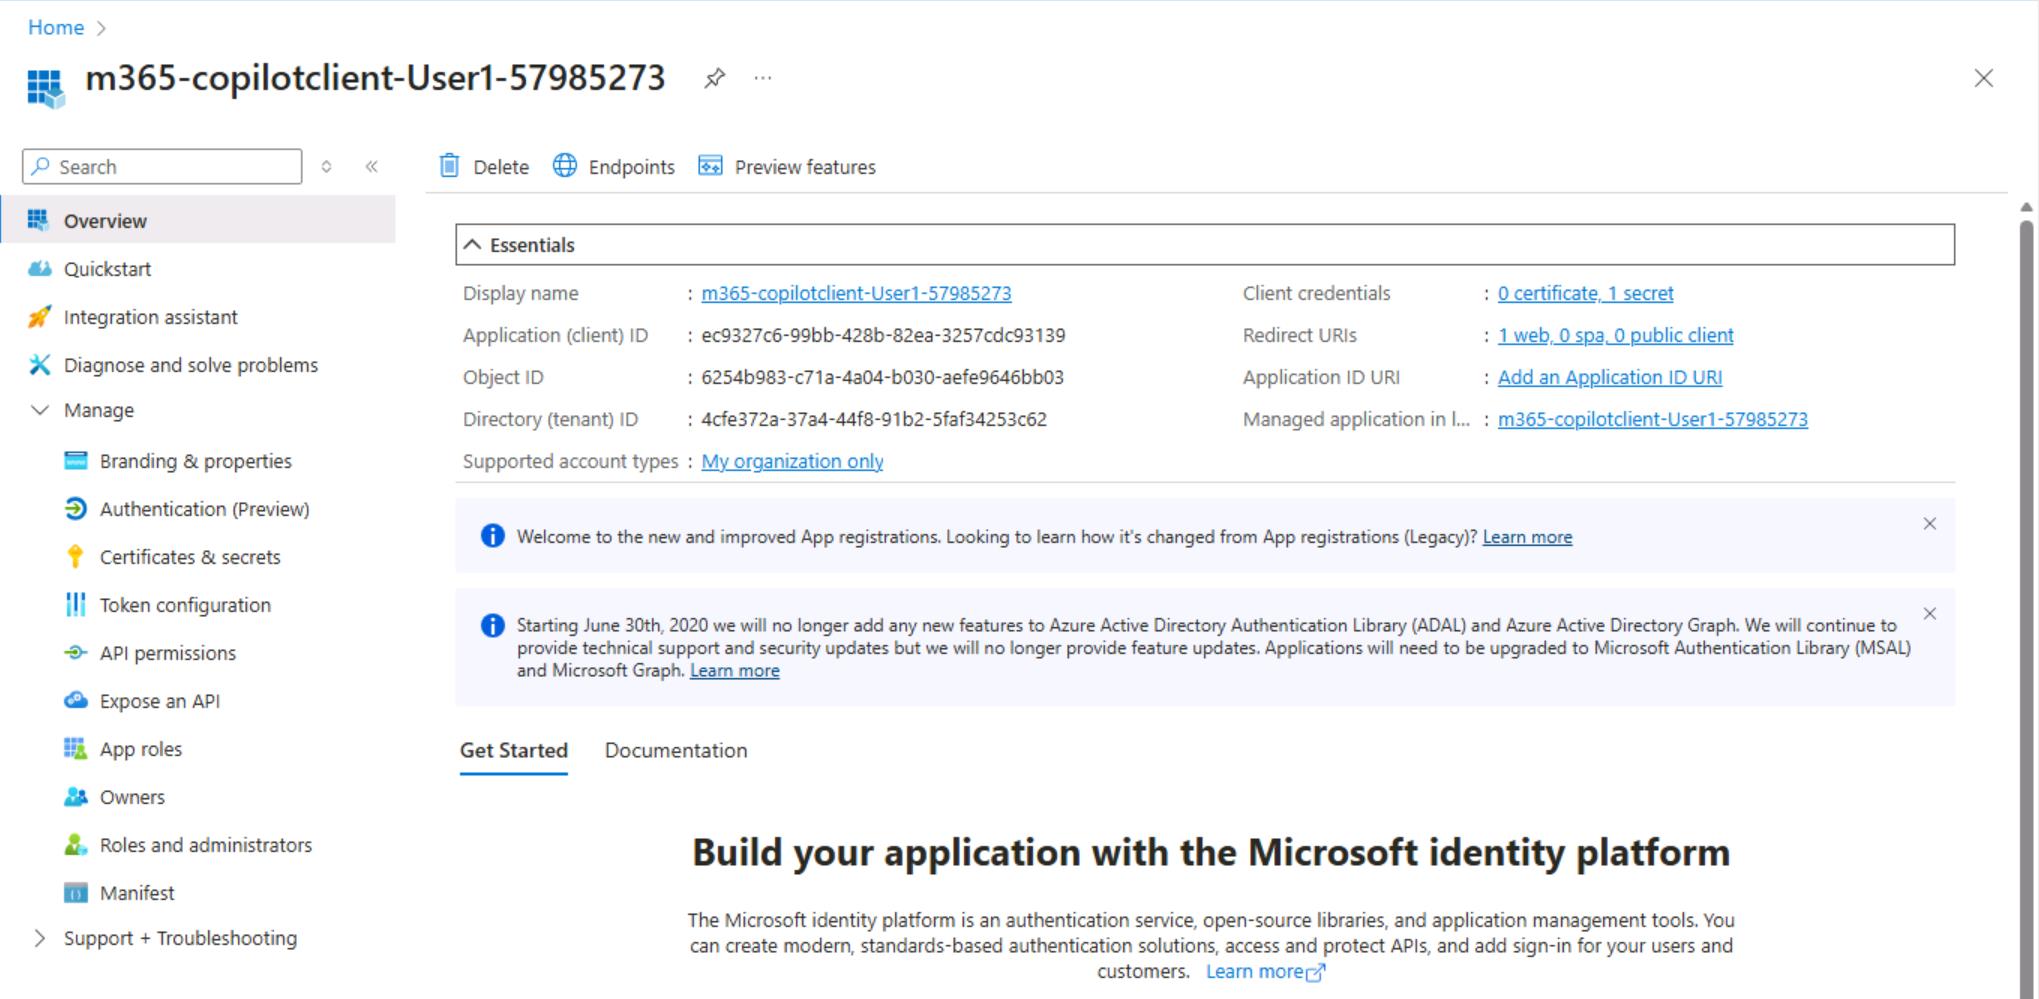
Click Register to create the new app registration. Once app is created you should the screen below:
-
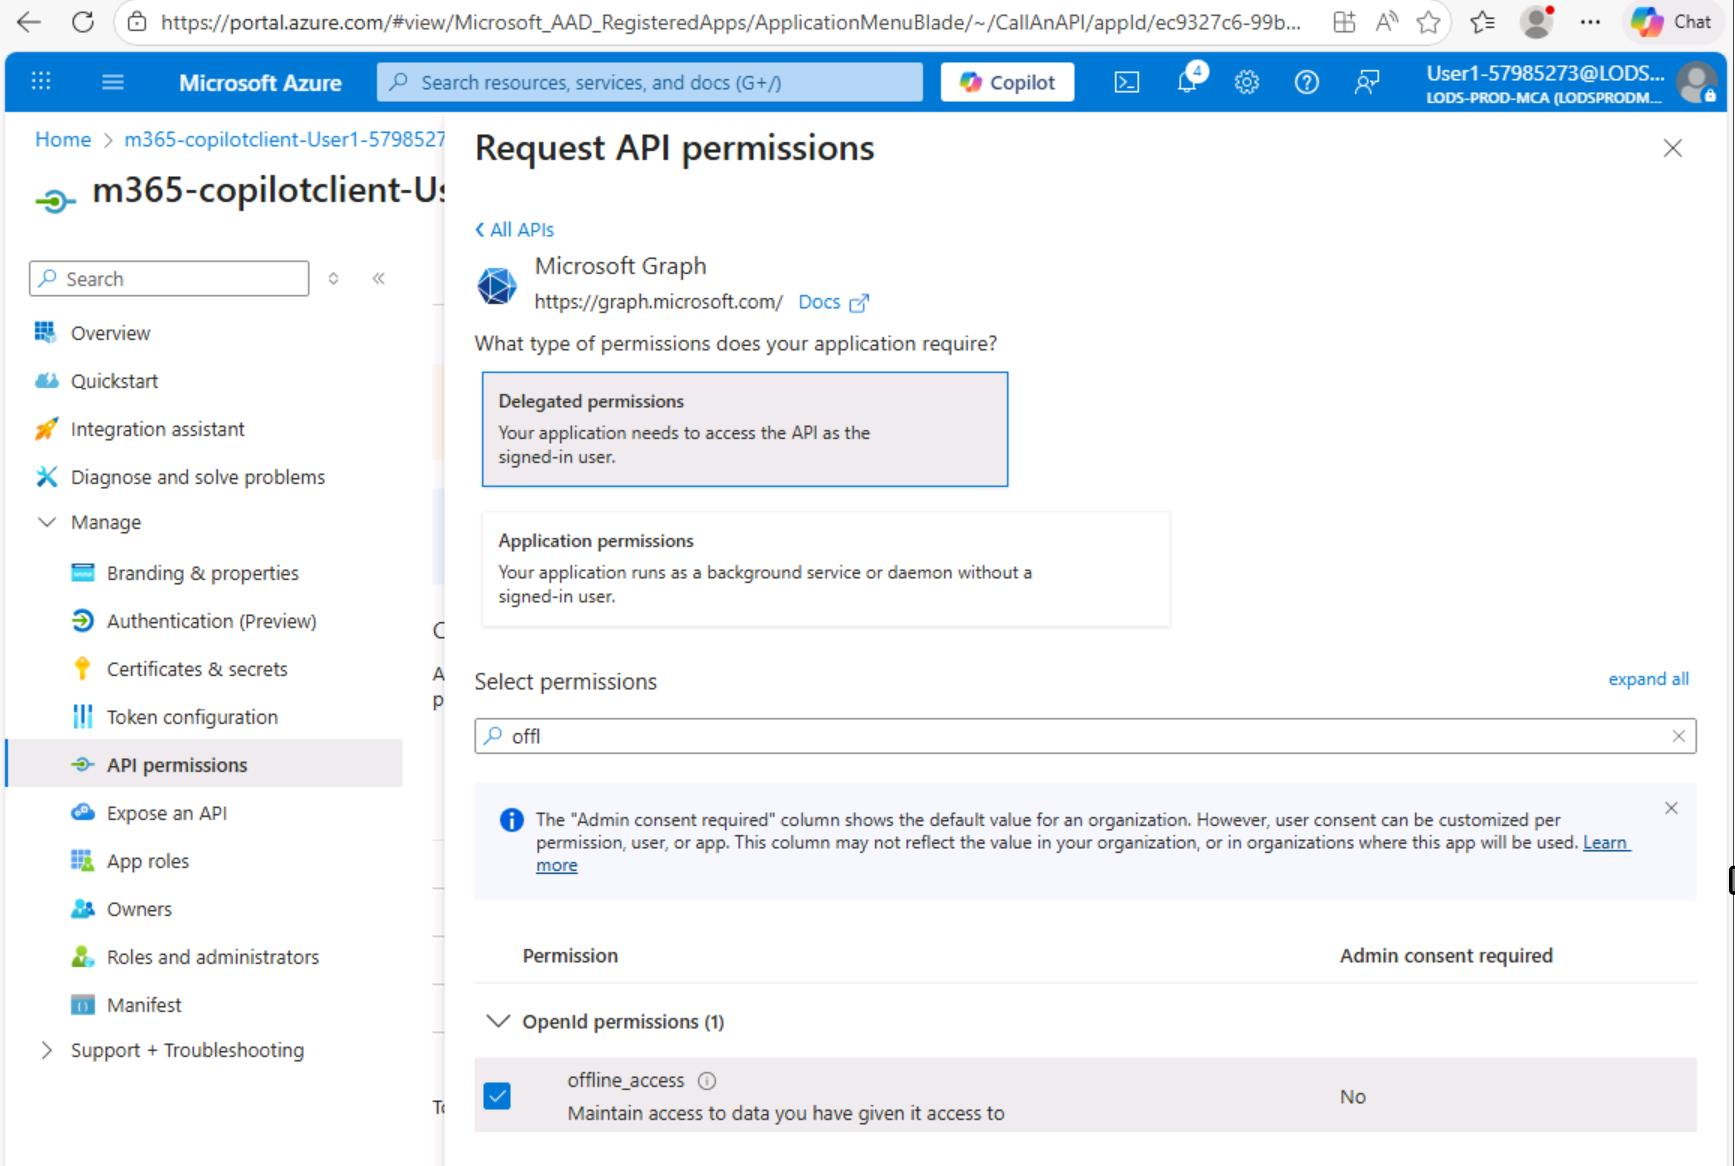
Let's first add api permissions. Expand "Manage" section and Click "API permissions". You will be navigated to the "API permissions" section.


Your application requires the following permissions to authenticate users and communicate with Copilot Studio:
| Permission | API | Type | Purpose |
|---|---|---|---|
User.Read |
Microsoft Graph | Delegated | Sign in and read basic user profile |
offline_access |
Microsoft Graph | Delegated | Obtain refresh tokens for long-lived sessions |
CopilotStudio.Copilots.Invoke |
Power Platform API | Delegated | Send messages to Copilot Studio agents on behalf of the user |
All permissions are delegated and do not require admin consent, meaning users can consent to these permissions themselves when signing in for the first time.
-
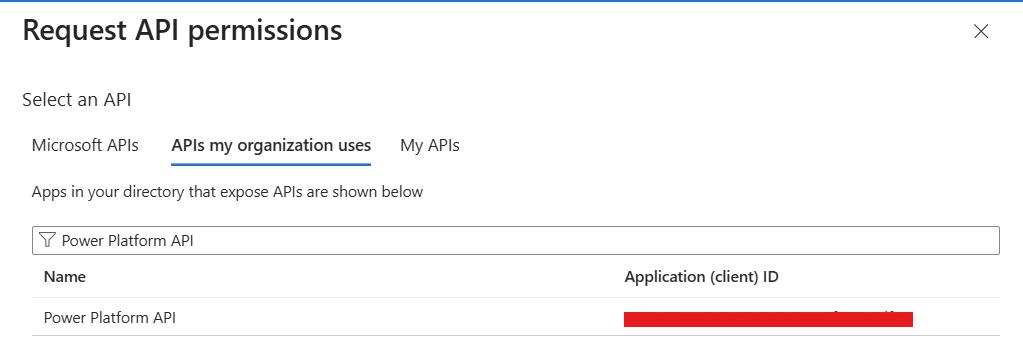
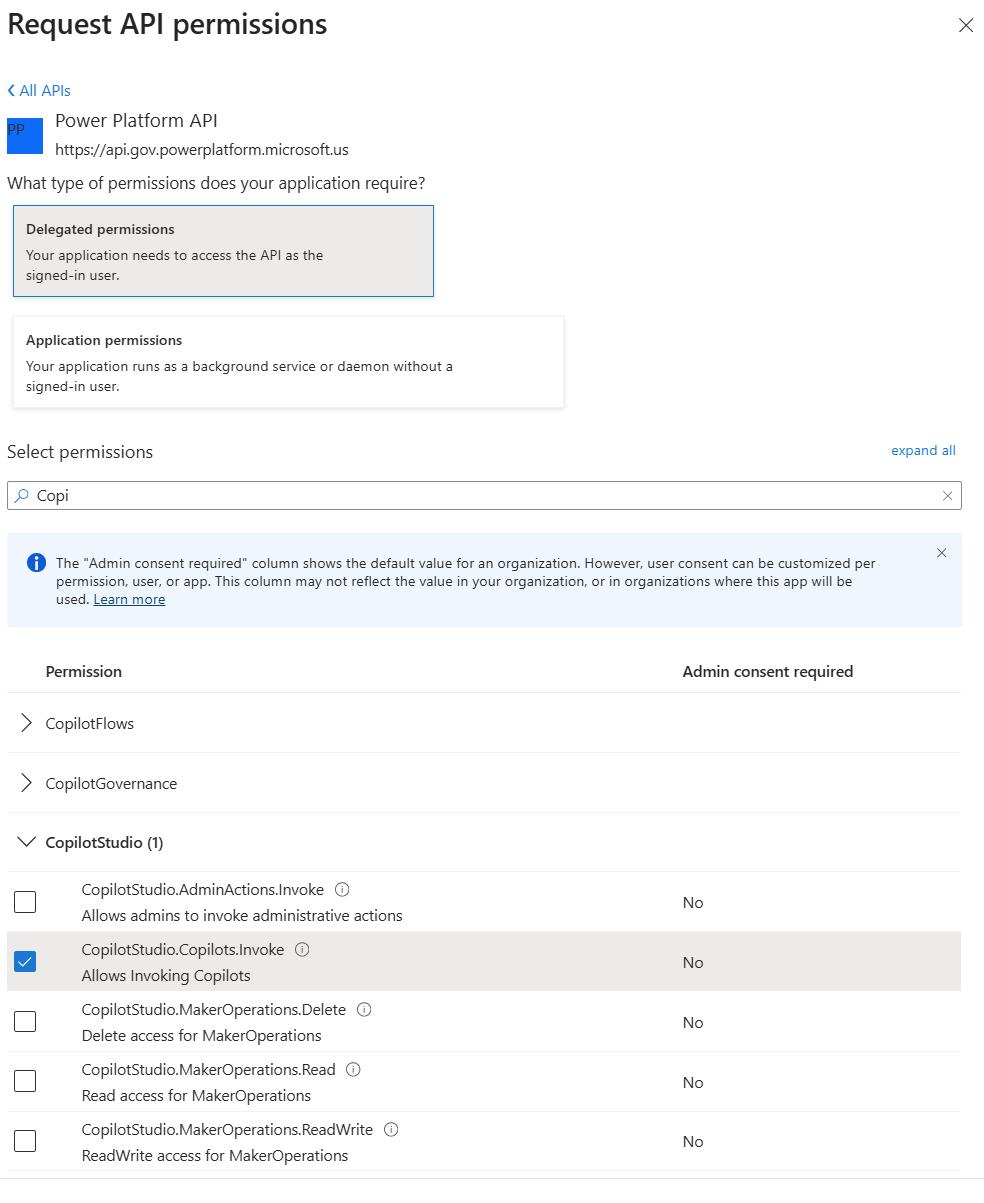
Click on "Add Permission", then switch to "APIs my organization uses". Try to search "Power Platform API".
Power Platform API -
Once you find the Power Platform API, select it, choose Delegated permissions, and then add the
CopilotStudio.Copilots.Invokepermission to your app. -
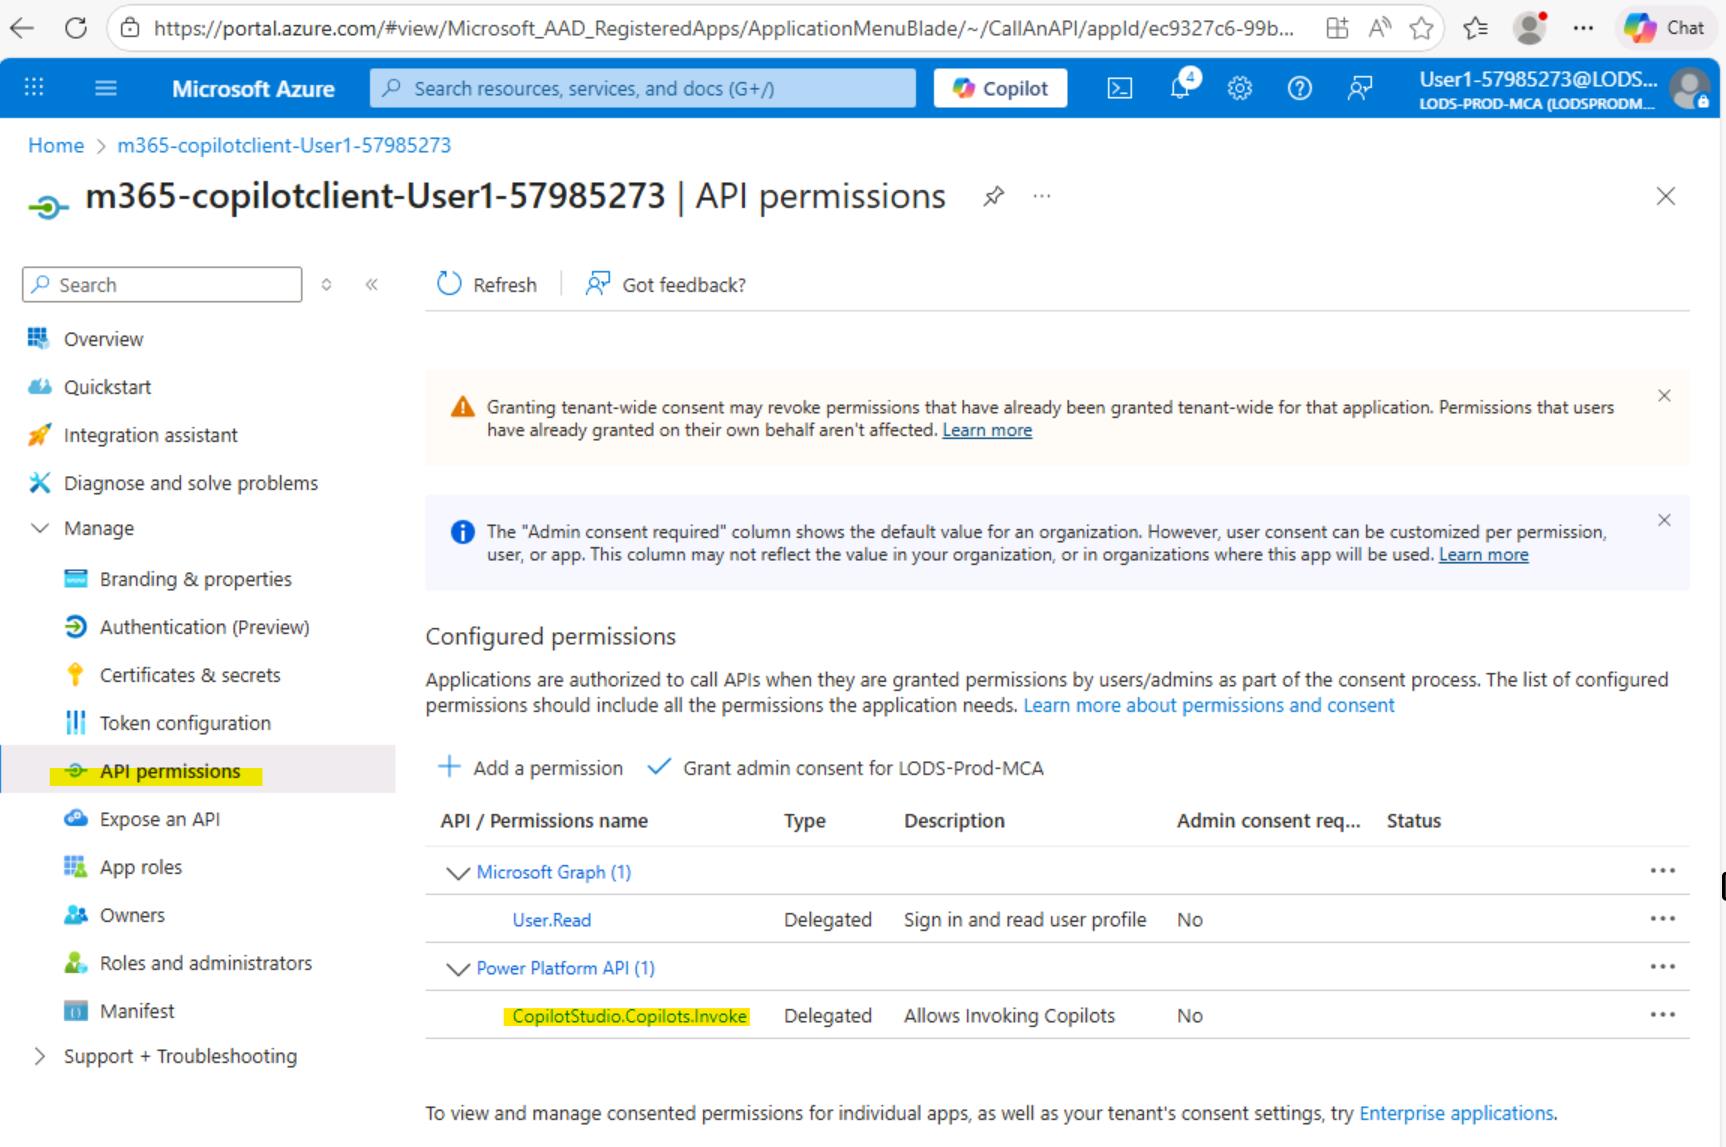
The next step is to validate that our setup is correct. Navigate back to the "API permissions" section and verify that CopilotStudio.Copilots.Invoke is now listed among your API permissions.
-
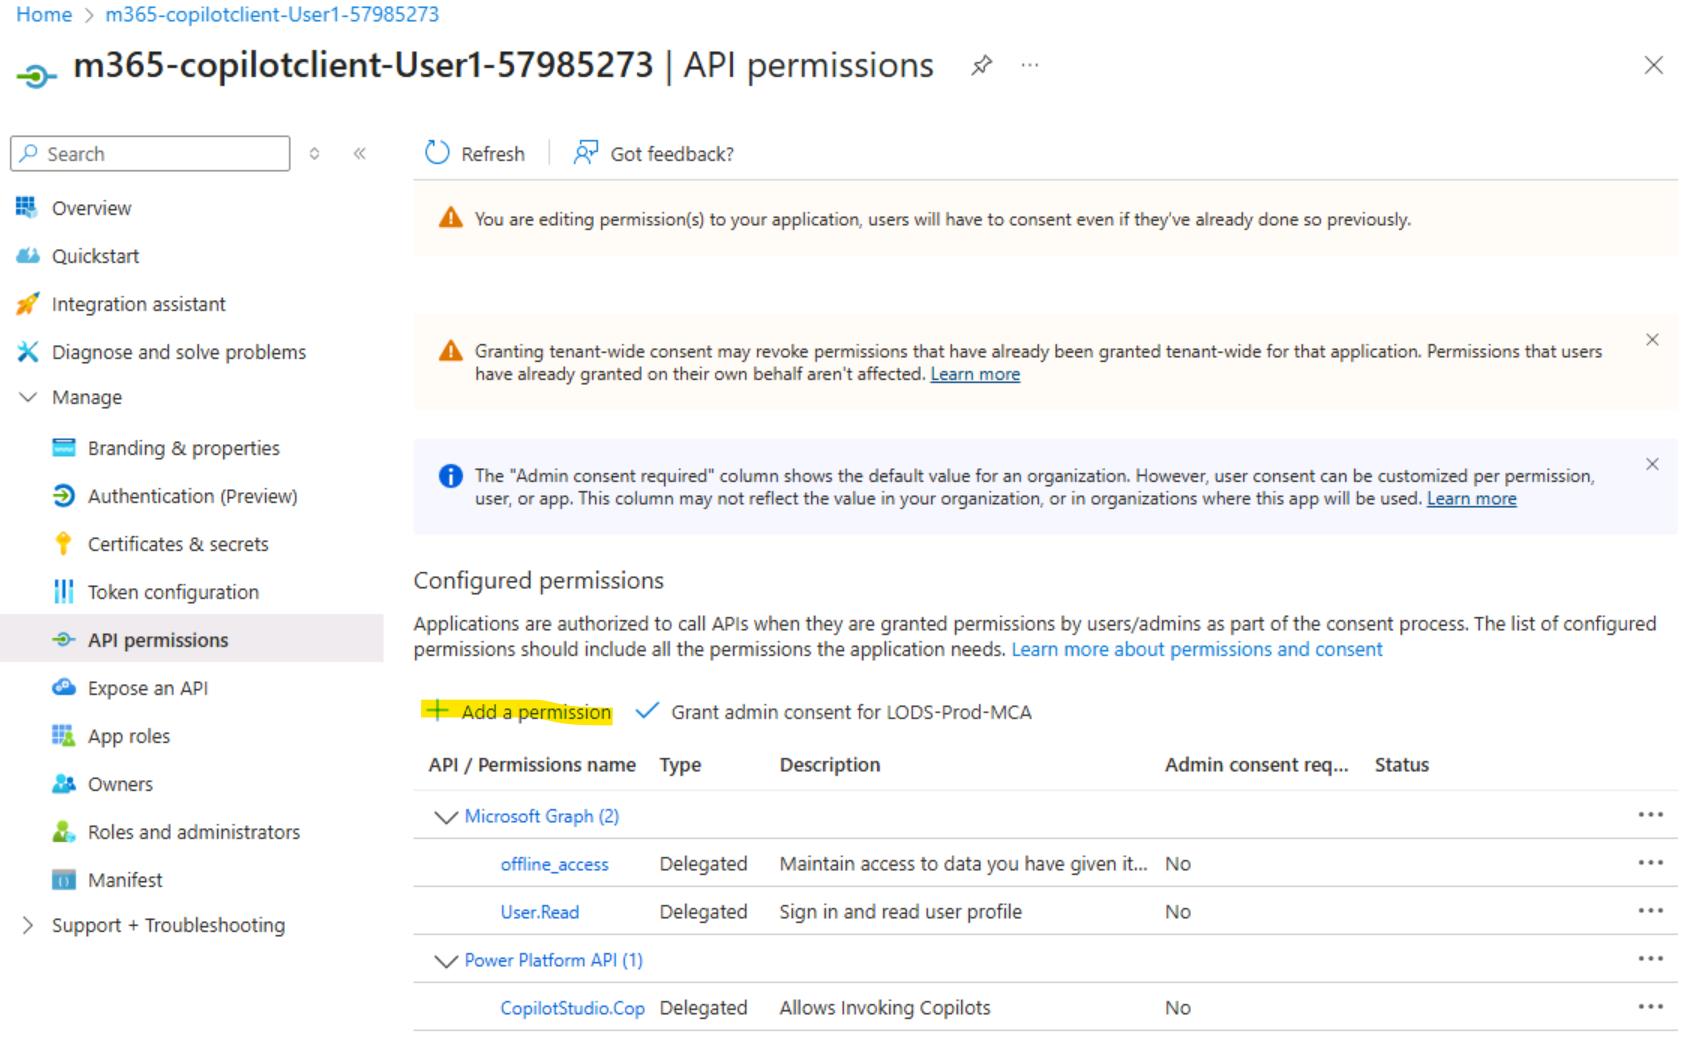
Now that both permissions (User.Read and CopilotStudio.Copilots.Invoke) are in place, complete the setup by adding the offline_access permission.
-
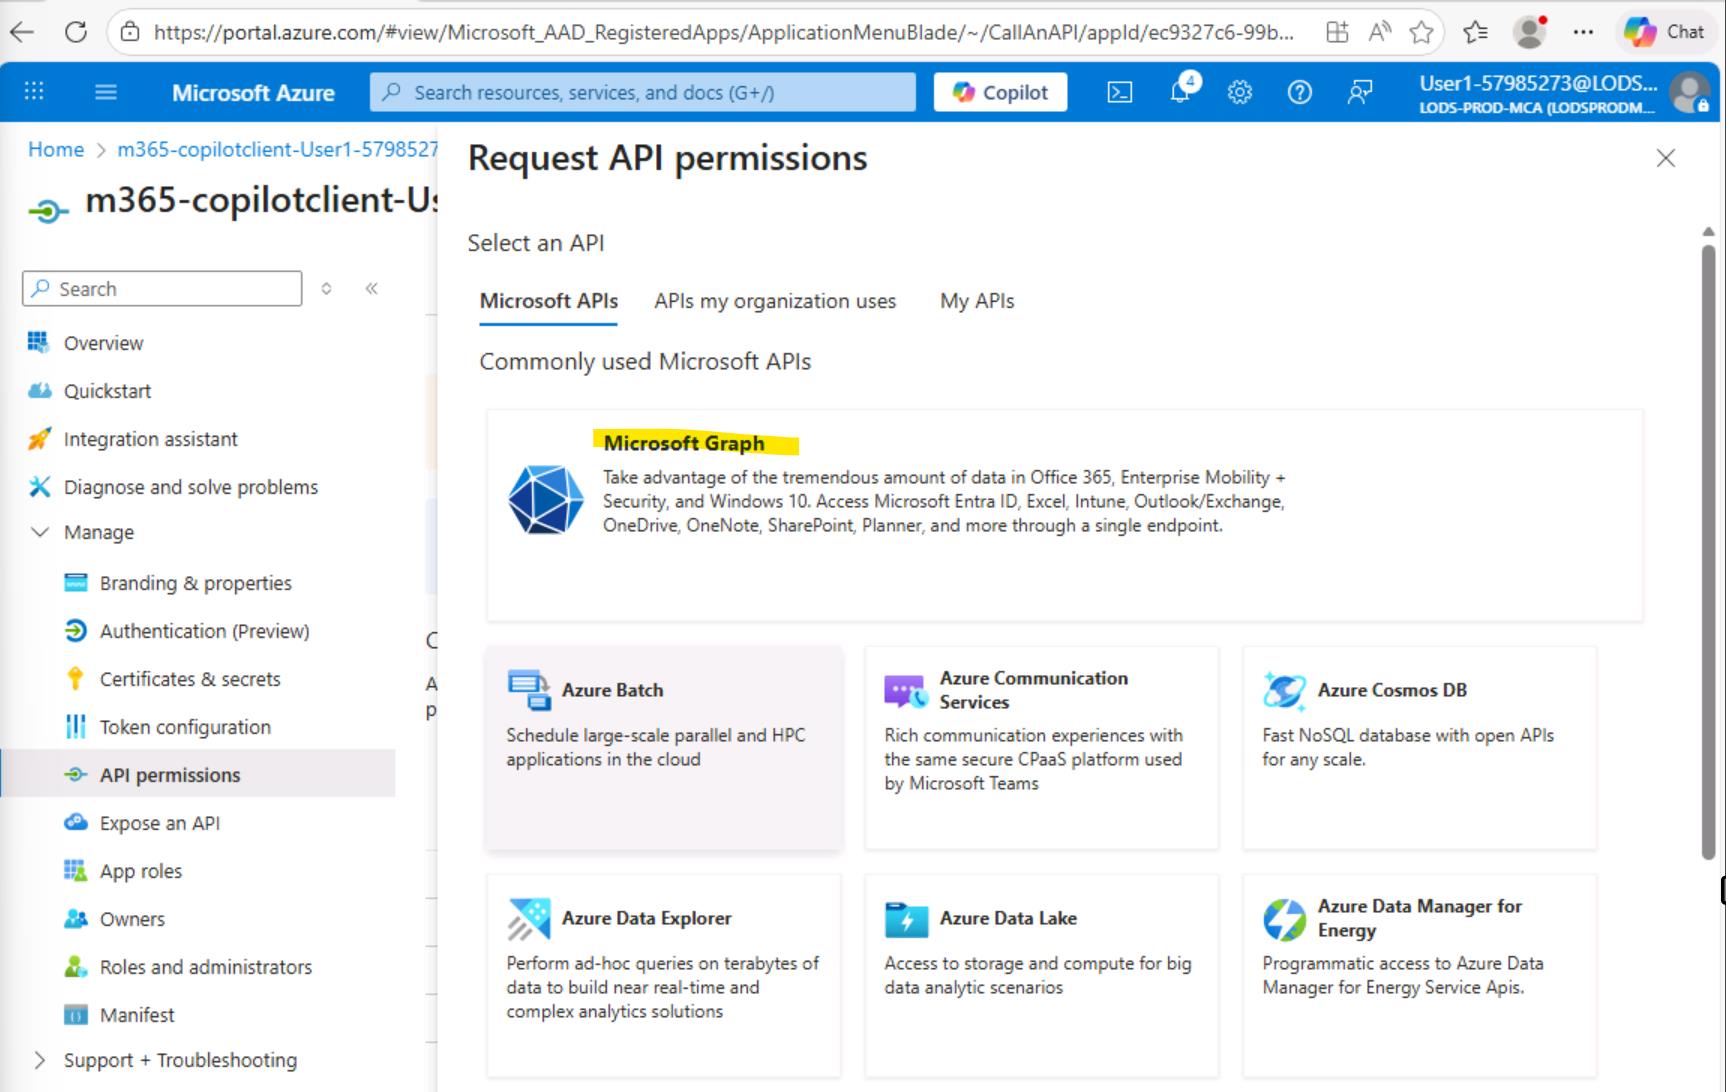
Click "Add a permission" and select "Microsoft Graph."
-
Select "Delegated permissions," then find and select "offline_access.". Click "Add permissions".
-
Now we have all needed permissions
-
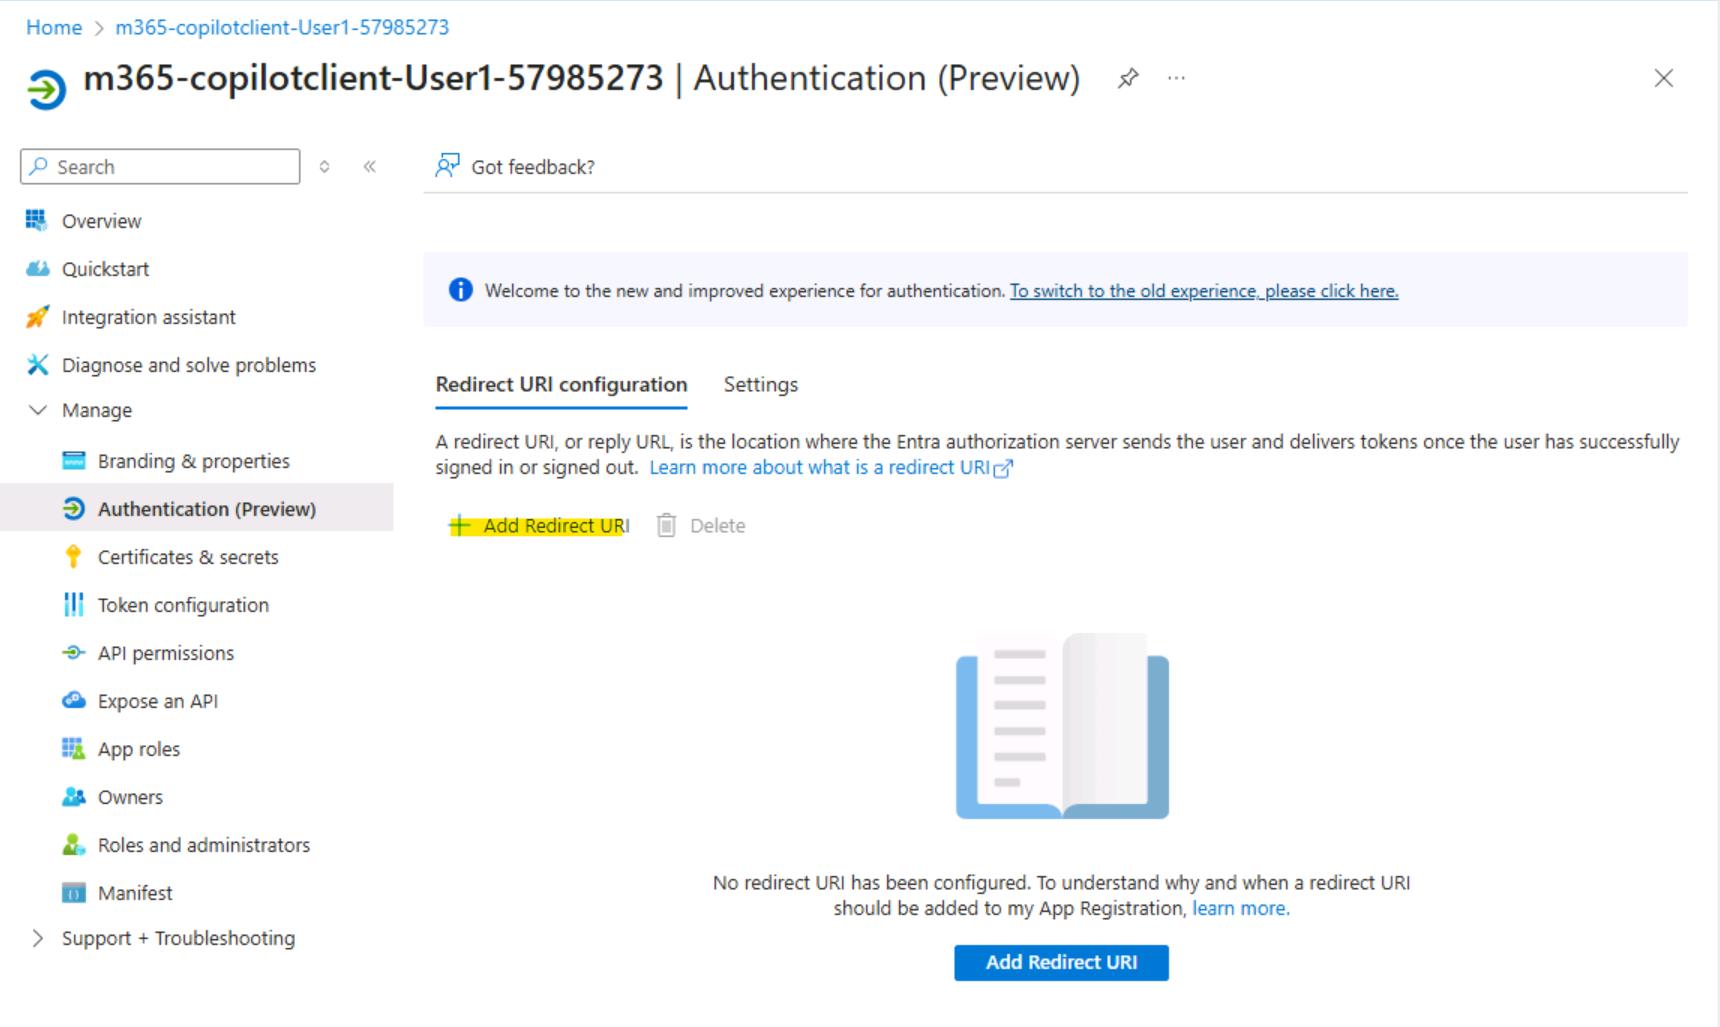
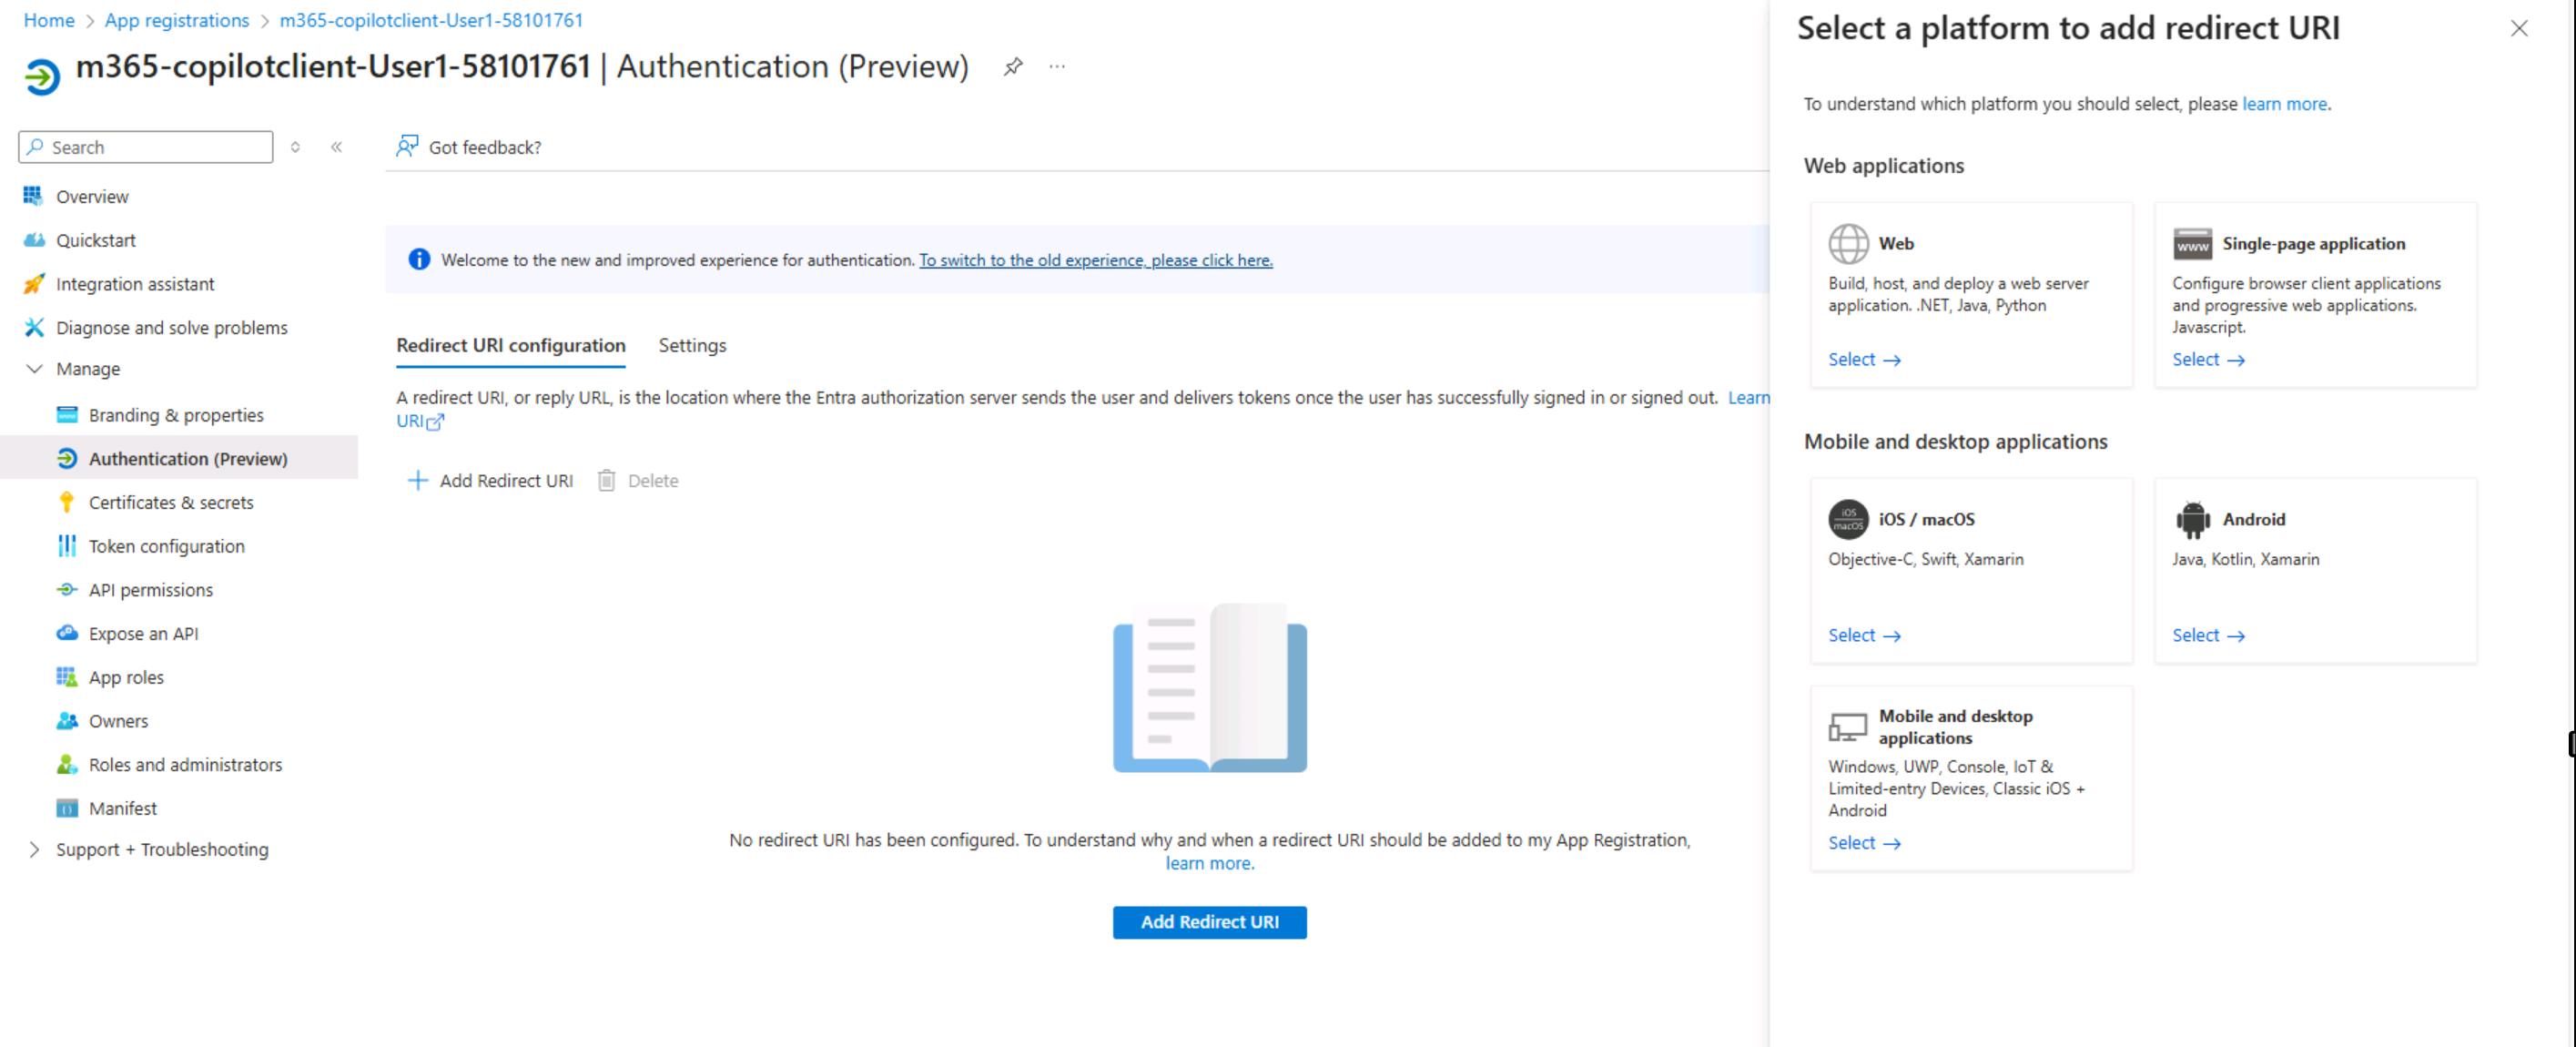
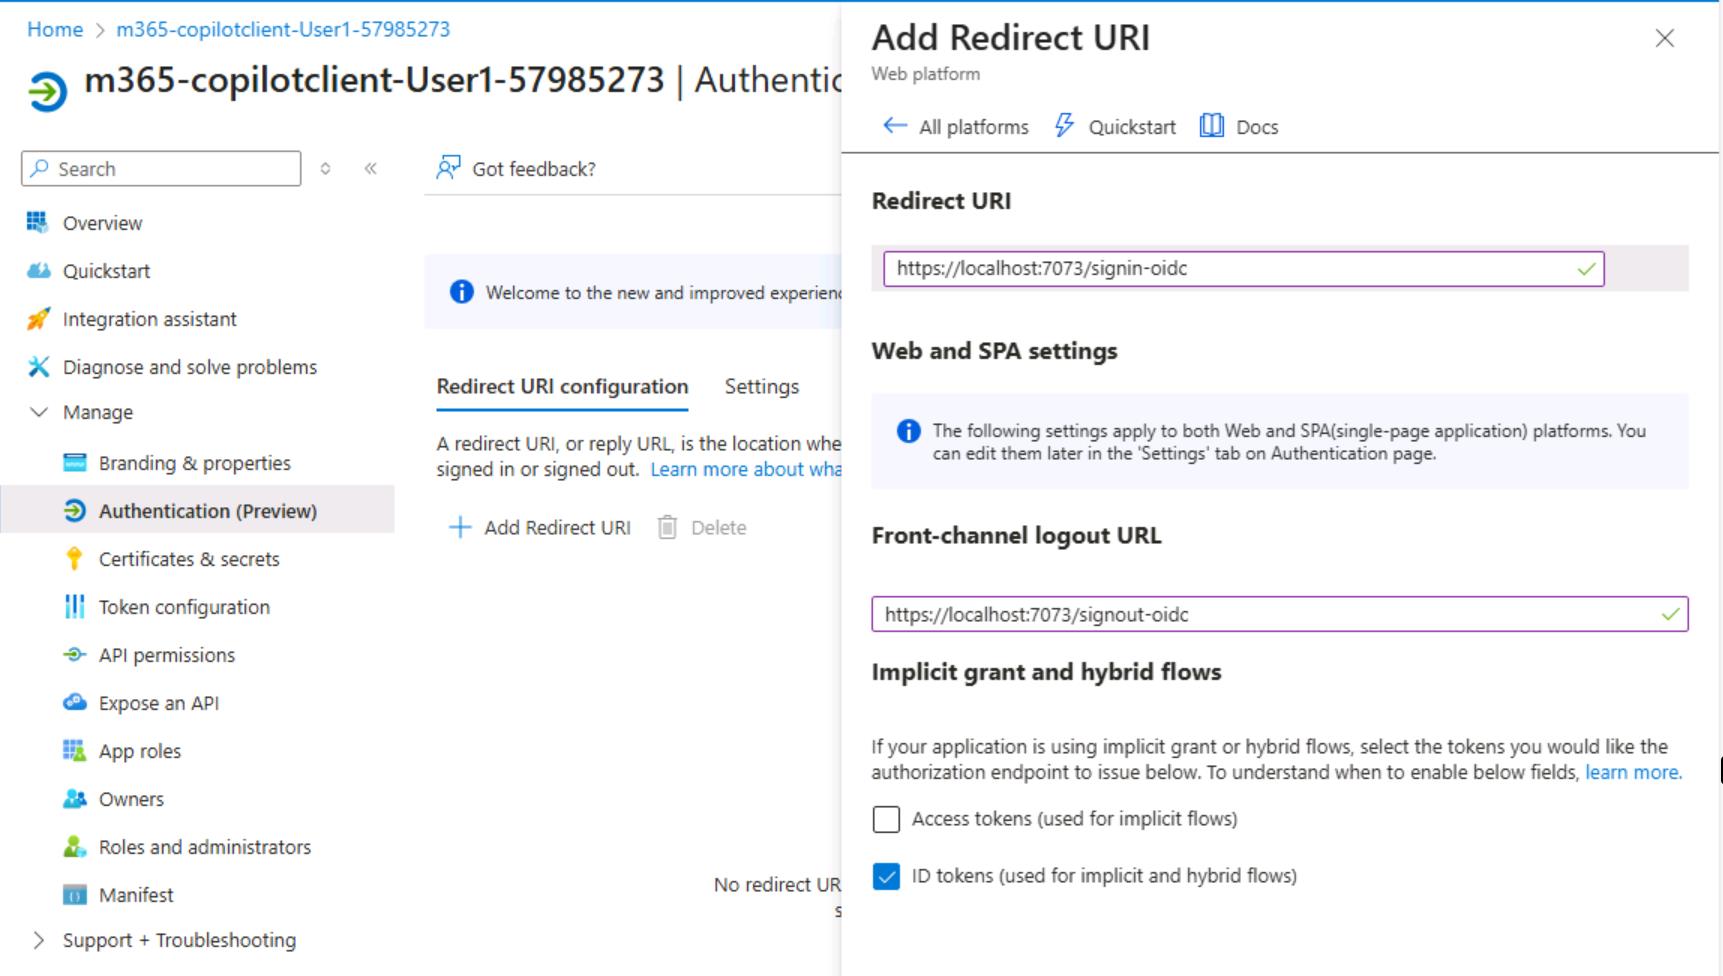
The next step is to configure the app registration authentication settings. Go to the "Authentication (Preview)" section and click "Add a platform" to add a redirect URI.
-
Select Web
-
Since we will test and host the application locally, you need to add a redirect URI that is generated when the application starts. You may need to start the Visual Studio application again to determine the correct URL.
-
Next step is to configure the setup as shown in the screen below. See the explanation section for more details.

Authentication Configuration explanation
https://localhost:7073/signin-oidc
The redirect URI is where Azure AD sends users after they successfully authenticate. The /signin-oidc path is the default endpoint provided by the ASP.NET Core OpenID Connect middleware-it automatically processes the authentication response and establishes the user's session.
https://localhost:7073/signout-oidc
This URL enables single sign-out. When a user signs out from any application in your Azure AD tenant, Microsoft Entra ID notifies your application by calling this endpoint. The middleware then clears the local session cookies, ensuring the user is signed out everywhere.
Note: Both
/signin-oidcand/signout-oidcendpoints are automatically generated by the Microsoft Identity Web middleware. You don't need to create any controllers or pages for these routes-they are handled out-of-the-box when you configureAddMicrosoftIdentityWebApp()in your application.
| Setting | Value | Reason |
|---|---|---|
| Access tokens | ☐ Unchecked | Not needed-access tokens are obtained securely via the back-channel token endpoint |
| ID tokens | ☑ Checked | Required for the hybrid flow used by Microsoft Identity Web |
The hybrid flow (response_type=code id_token) returns an ID token directly in the browser redirect for immediate user identification, while the access token is fetched separately through a secure server-to-server call.
Browser → Azure AD → Browser → Your App → Azure AD Token Endpoint
↓ ↓
(code + ID token) (exchange code for
access token + refresh token)
response_type=code id_token- Best of both worlds:
- ID token arrives immediately → you know who the user is right away
- Access token comes via secure back-channel → protected from browser exposure
- Refresh token available → enables long-lived sessions
| Benefit | Explanation |
|---|---|
| Faster sign-in UX | App can greet the user by name immediately without waiting for token exchange |
| Access token security | Sensitive access tokens never touch the browser |
| Refresh token support | Enables offline_access for session persistence |
-
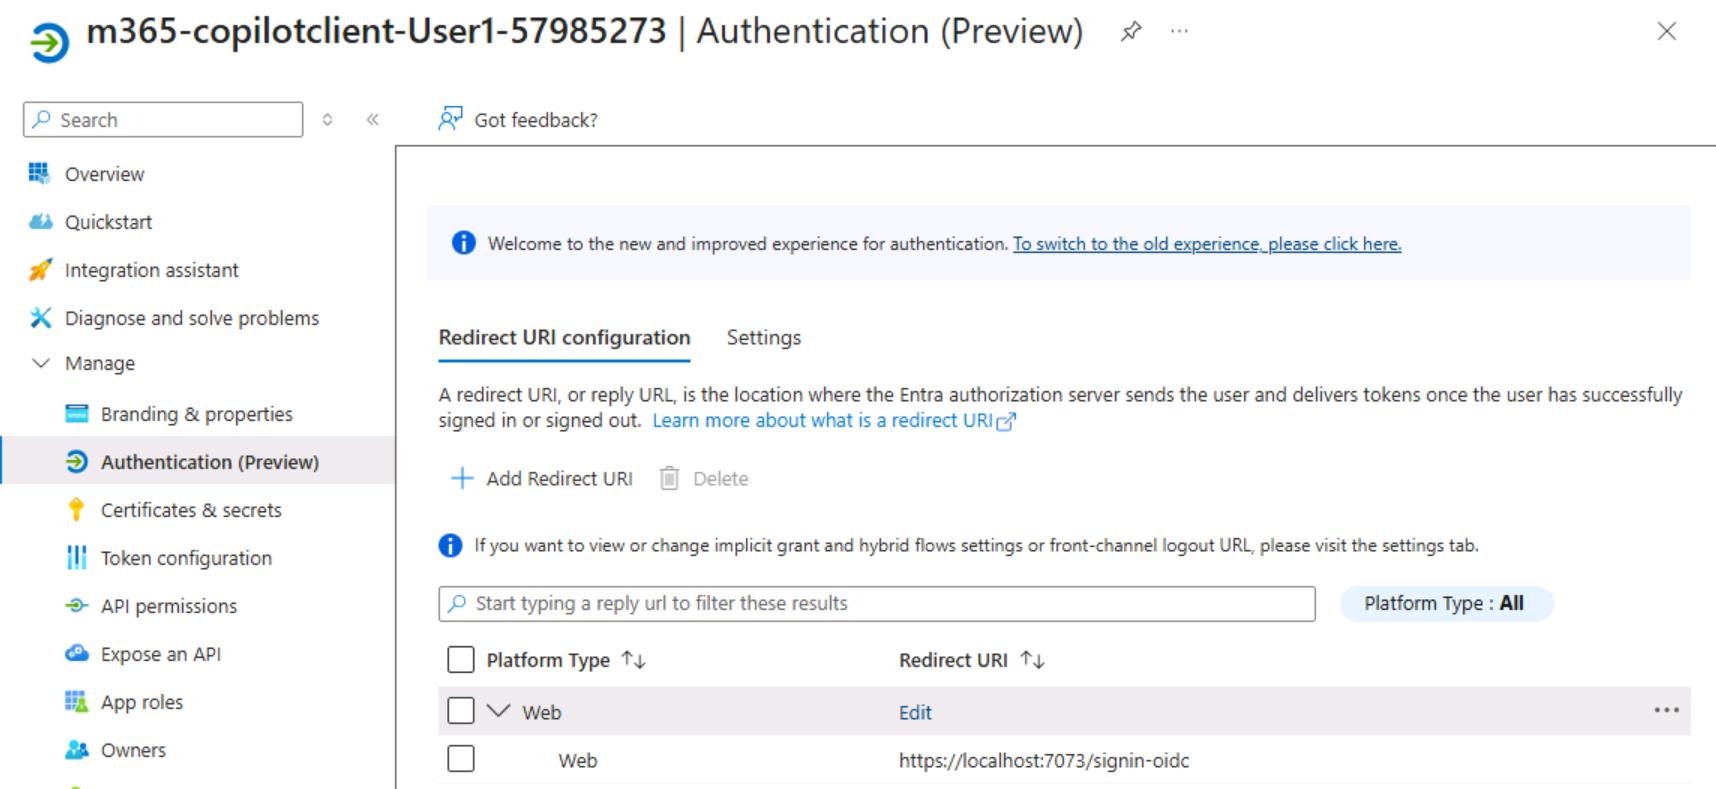
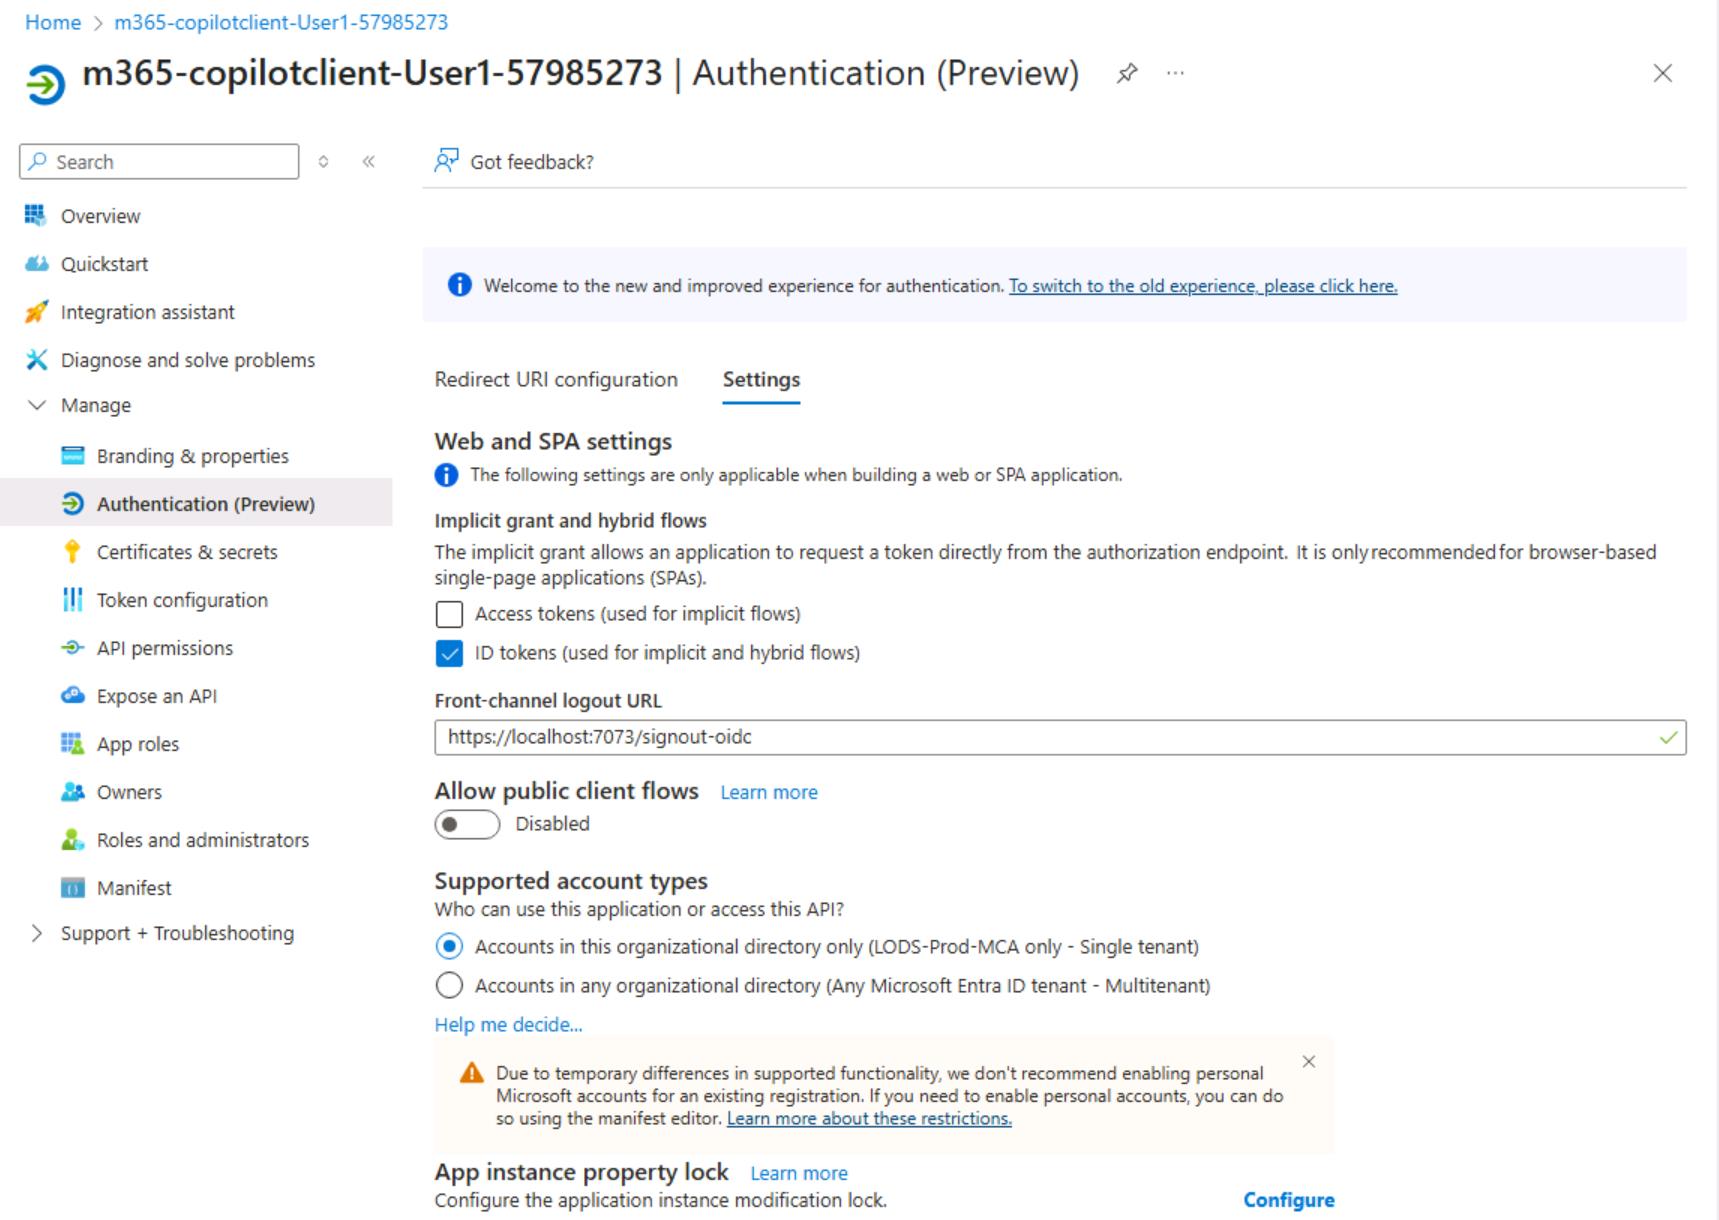
Verify your setup. Check both sections "Redirect URI configuration" and "Settings"
-
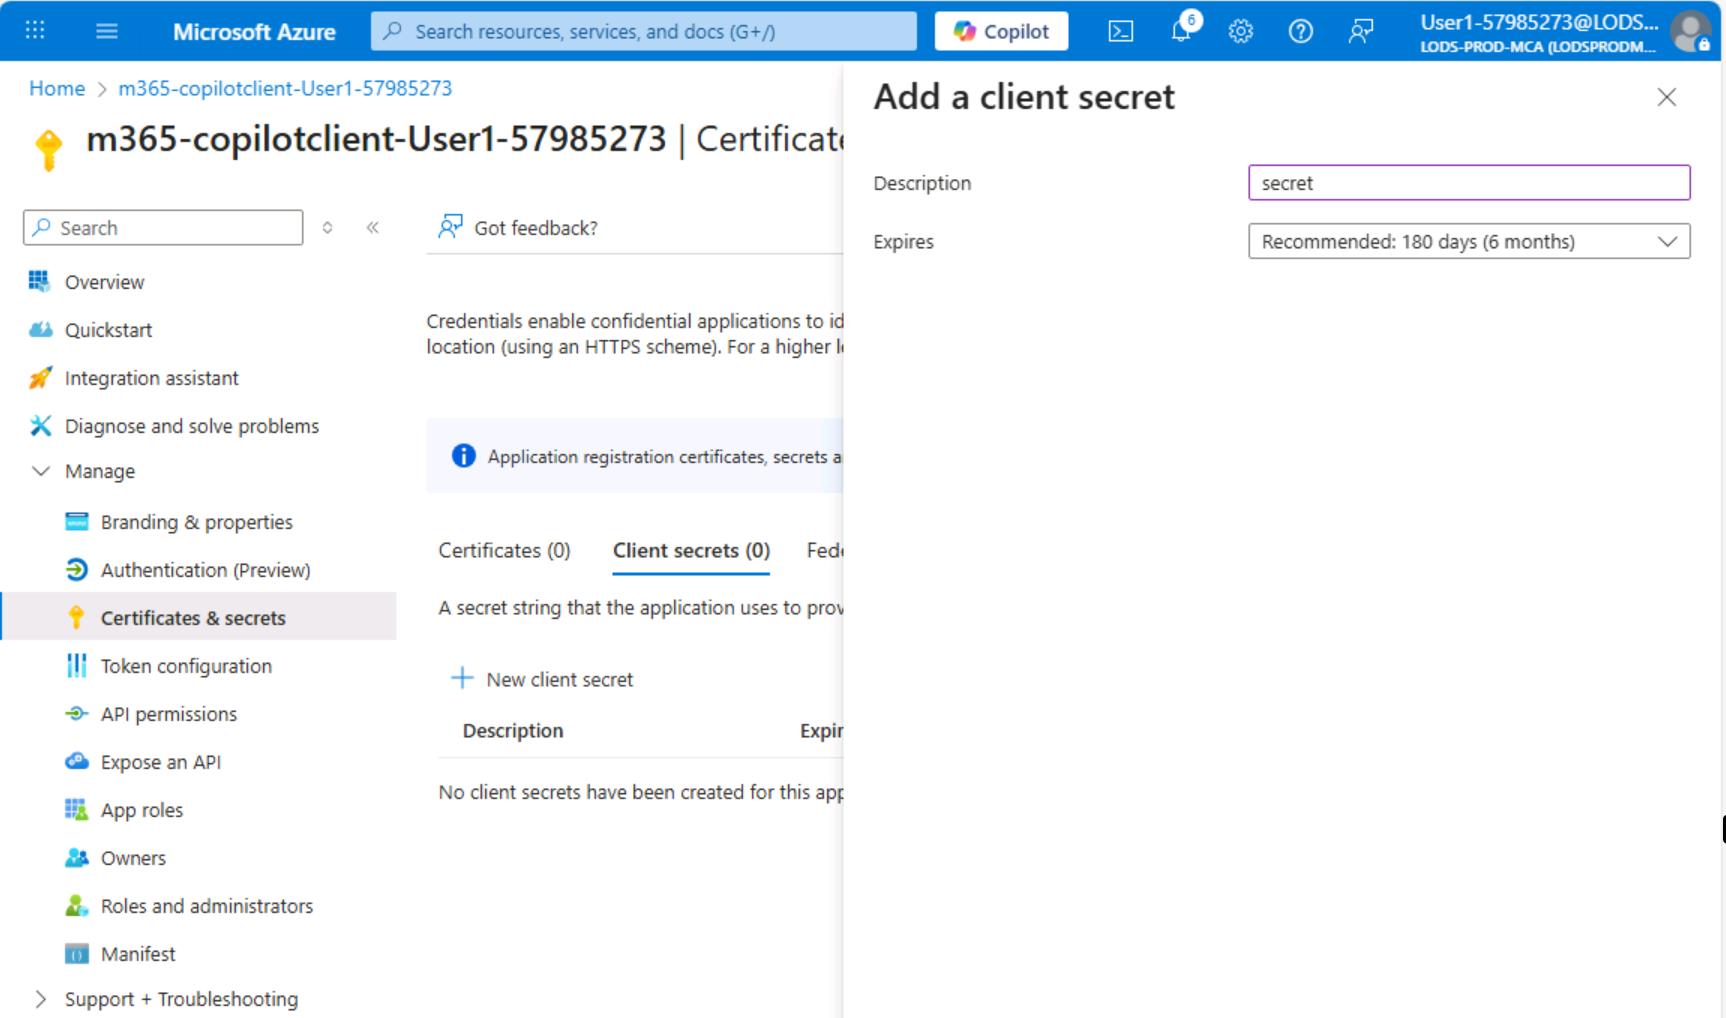
The final step is to create a client secret. Go to the "Client secrets" section and create a new secret.
-
Once the secret is generated, store it somewhere, as you will need it for further configuration.
##4. Implement basic authentication and authorization in the Blazor app
With the app registration configured in Microsoft Entra ID, you can now integrate authentication into your Blazor Server application. This section uses Microsoft Identity Web, a library that simplifies integrating Azure AD authentication with ASP.NET Core applications.
In this section, you'll:
- Configure OpenID Connect authentication using Microsoft Identity Web
- Enable token acquisition to call downstream APIs (Copilot Studio)
- Set up token caching for session persistence
- Add authorization to protect your application routes
- Configure the authentication state provider for Blazor components
Once complete, users will be required to sign in with their organizational account before accessing the chat interface, and your application will be able to acquire access tokens to communicate with Copilot Studio on their behalf.
- Open Visual Studio and let's prepare appsettings.json file. Here is how your appsettings.json should look like
{
"Logging": {
"LogLevel": {
"Default": "Information",
"Microsoft.AspNetCore": "Warning",
"Microsoft.EntityFrameworkCore": "Warning"
}
},
"CopilotStudio": {
"EnvironmentId": "",
"SchemaName": ""
},
"AzureAd": {
"Instance": "https://login.microsoftonline.com/",
"TenantId": "",
"ClientId": "",
"ClientSecret": "",
"CallbackPath": "/signin-oidc",
"SignedOutCallbackPath": "/signout-oidc"
},
"AllowedHosts": "*"
}-
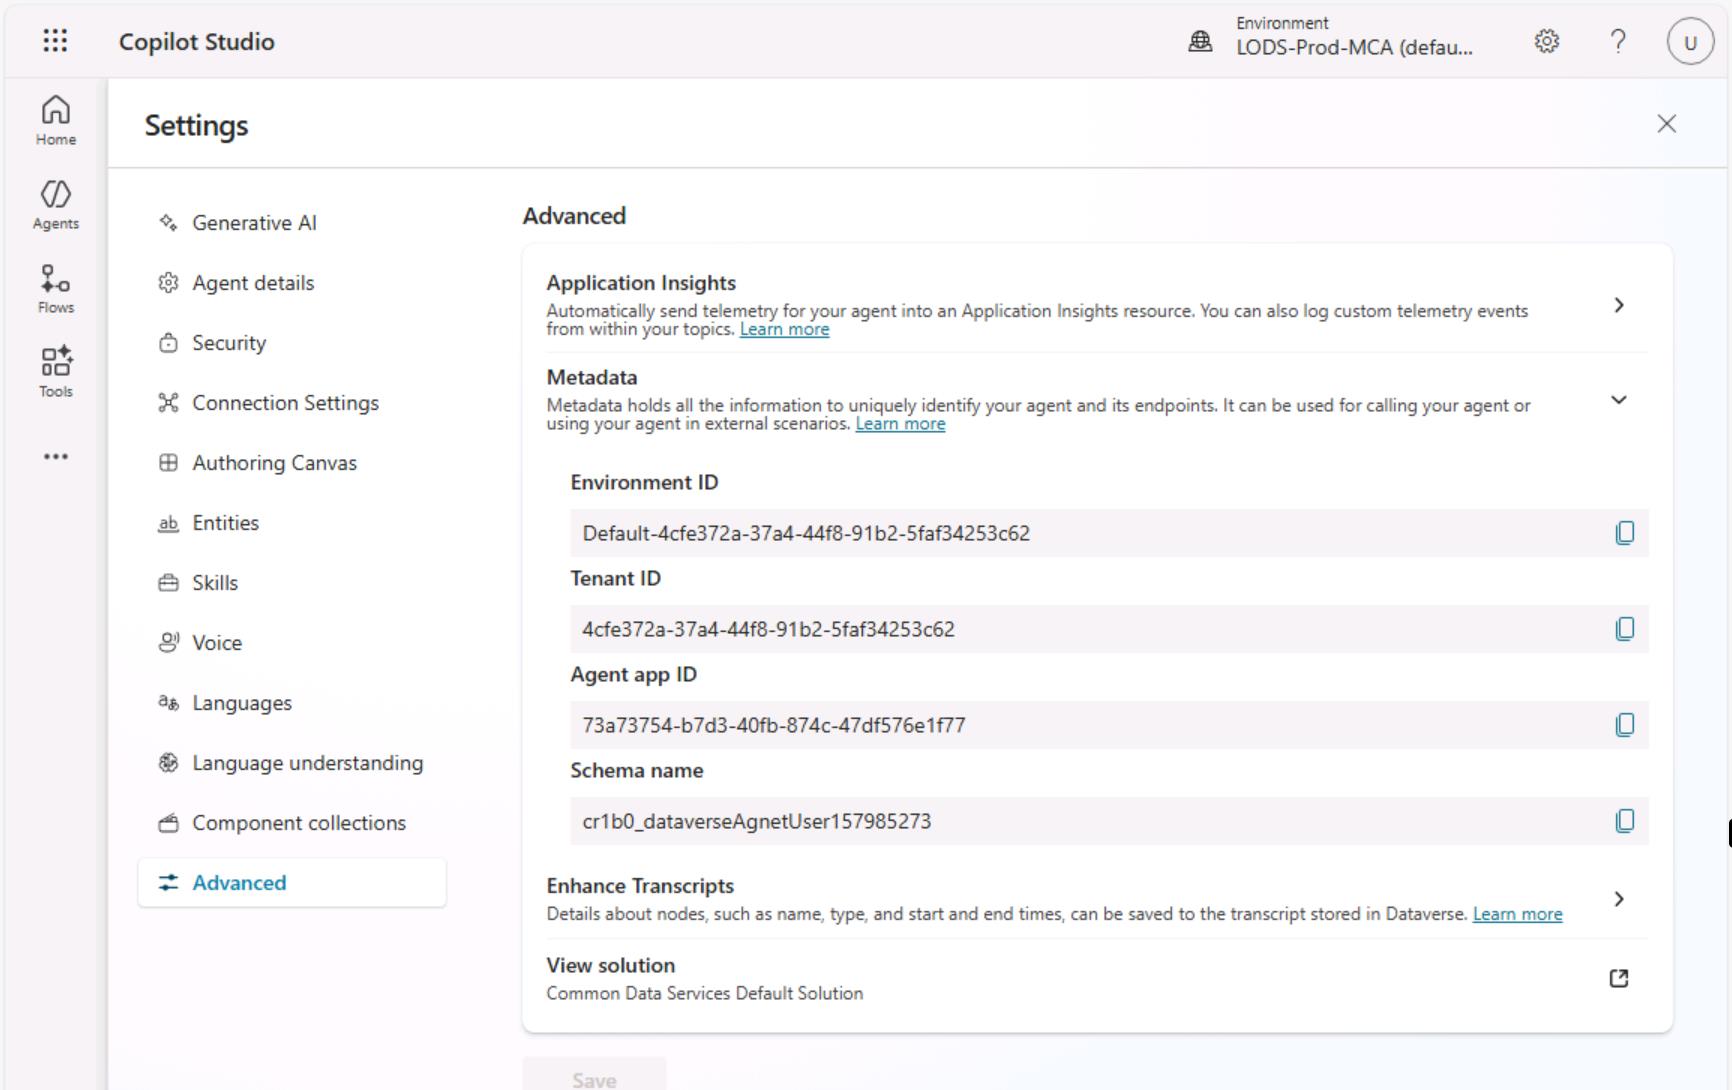
Let's identify all the required parameters. We'll start with the Copilot Studio configuration. Go back to the agent you created in Copilot Studio in Section 2 of this lab. Open Settings, navigate to the Advanced section, and then click Metadata.
-
The rest you can take from the application registration that we've created in section 3.
-
Use the secret you saved after it was created. If you've lost the previous one, you can always generate a new secret. In the end, your appsettings.json should look like the example below.
{
"Logging": {
"LogLevel": {
"Default": "Information",
"Microsoft.AspNetCore": "Warning",
"Microsoft.EntityFrameworkCore": "Warning"
}
},
"CopilotStudio": {
"EnvironmentId": "Default-4cfe372a-37a4-44f8-91b2-5faf34253c62",
"SchemaName": "cr1b0_dataverseAgnetUser157985273"
},
"AzureAd": {
"Instance": "https://login.microsoftonline.com/",
"TenantId": "4cfe372a-37a4-44f8-91b2-5faf34253c62",
"ClientId": "ec9327c6-99bb-428b-82ea-3257cdc93139",
"ClientSecret": "your_secret_form_app_registration",
"CallbackPath": "/signin-oidc",
"SignedOutCallbackPath": "/signout-oidc"
},
"AllowedHosts": "*"
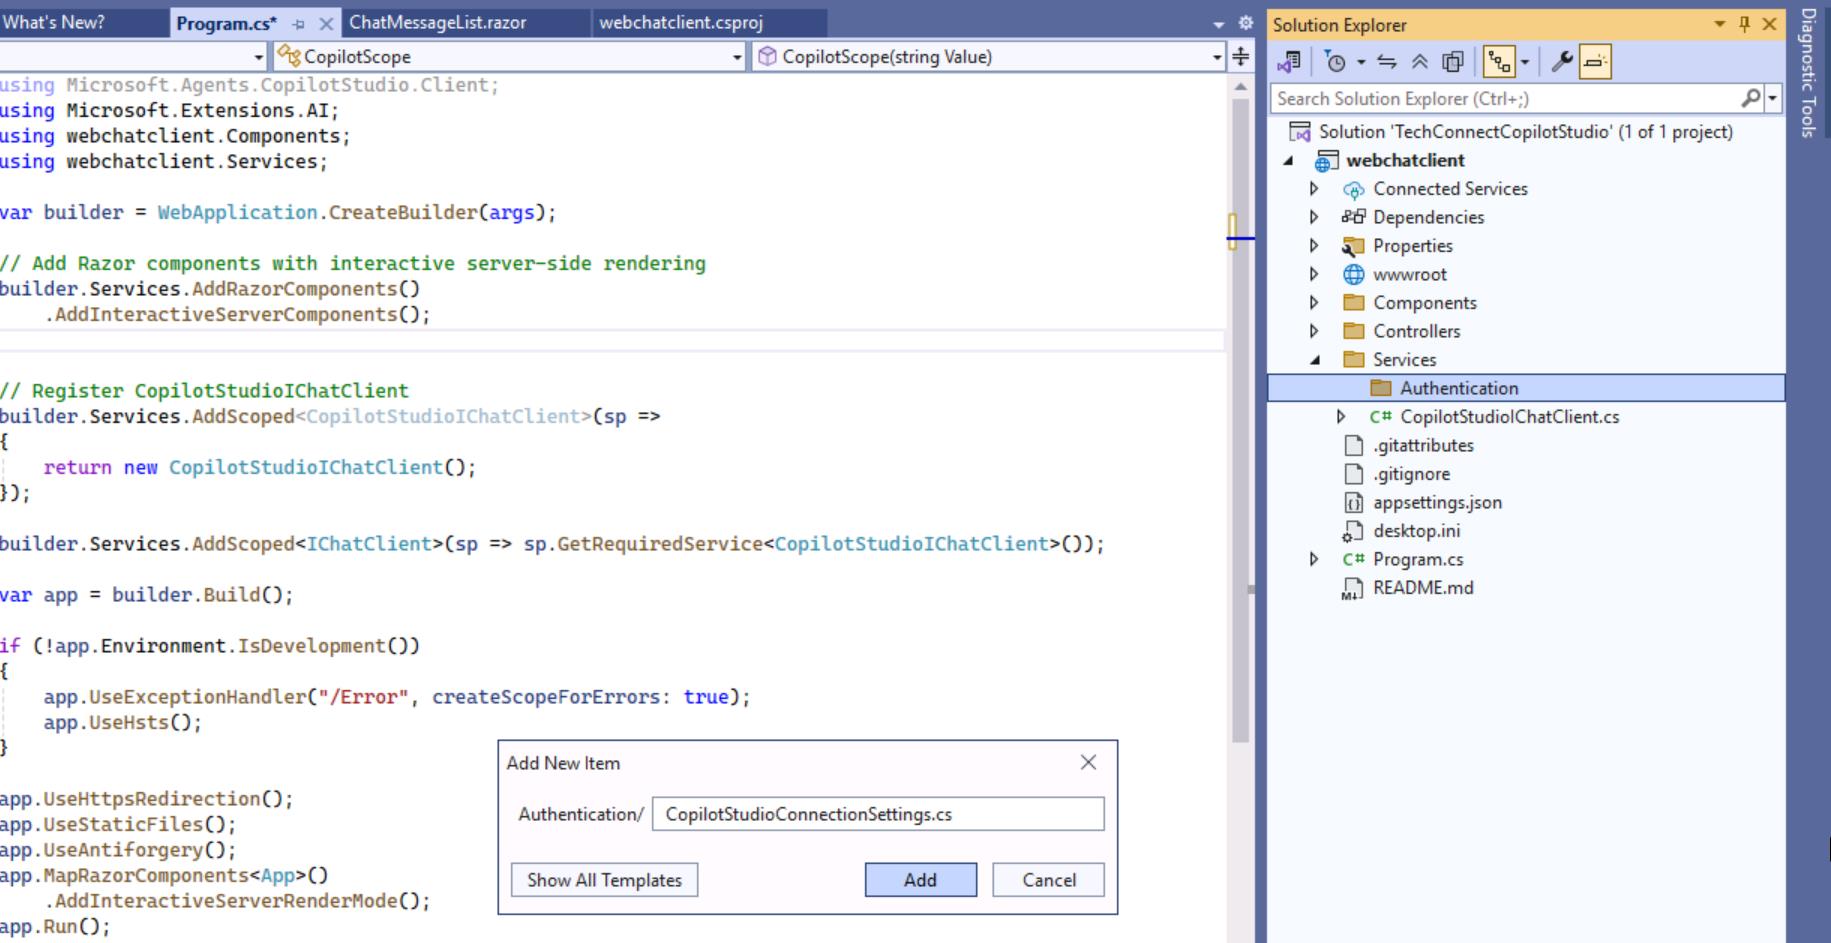
}- Now we're ready to start updating the code. Create an Authentication folder under Services.
-
Add new C# file in that folder called
CopilotStudioConnectionSettings.csOpen context menu and click "Add" -> "New Item" -
Update the file with the code below
using Microsoft.Agents.CopilotStudio.Client;
namespace webchatclient.Services.Authentication
{
internal class CopilotStudioConnectionSettings : ConnectionSettings
{
public string TenantId { get; }
public string AppClientId { get; }
public string? AppClientSecret { get; }
public bool UseS2SConnection { get; }
public CopilotStudioConnectionSettings(
IConfigurationSection copilotConfig,
IConfigurationSection azureAdConfig)
: base(copilotConfig)
{
TenantId = azureAdConfig["TenantId"]
?? throw new ArgumentException("TenantId not found in AzureAd config");
AppClientId = azureAdConfig["ClientId"]
?? throw new ArgumentException("ClientId not found in AzureAd config");
AppClientSecret = azureAdConfig["ClientSecret"];
UseS2SConnection = copilotConfig.GetValue<bool>("UseS2SConnection", false);
}
}
}
This class extends the ConnectionSettings base class from the Microsoft Copilot Studio SDK and combines configuration from two sources: Copilot Studio settings and Azure AD settings.
The base ConnectionSettings class (from the SDK) handles Copilot Studio-specific settings like AgentId and EnvironmentId. By extending it, we add the Azure AD properties needed for authentication while keeping all connection settings in a single object that can be passed to the CopilotClient.
-
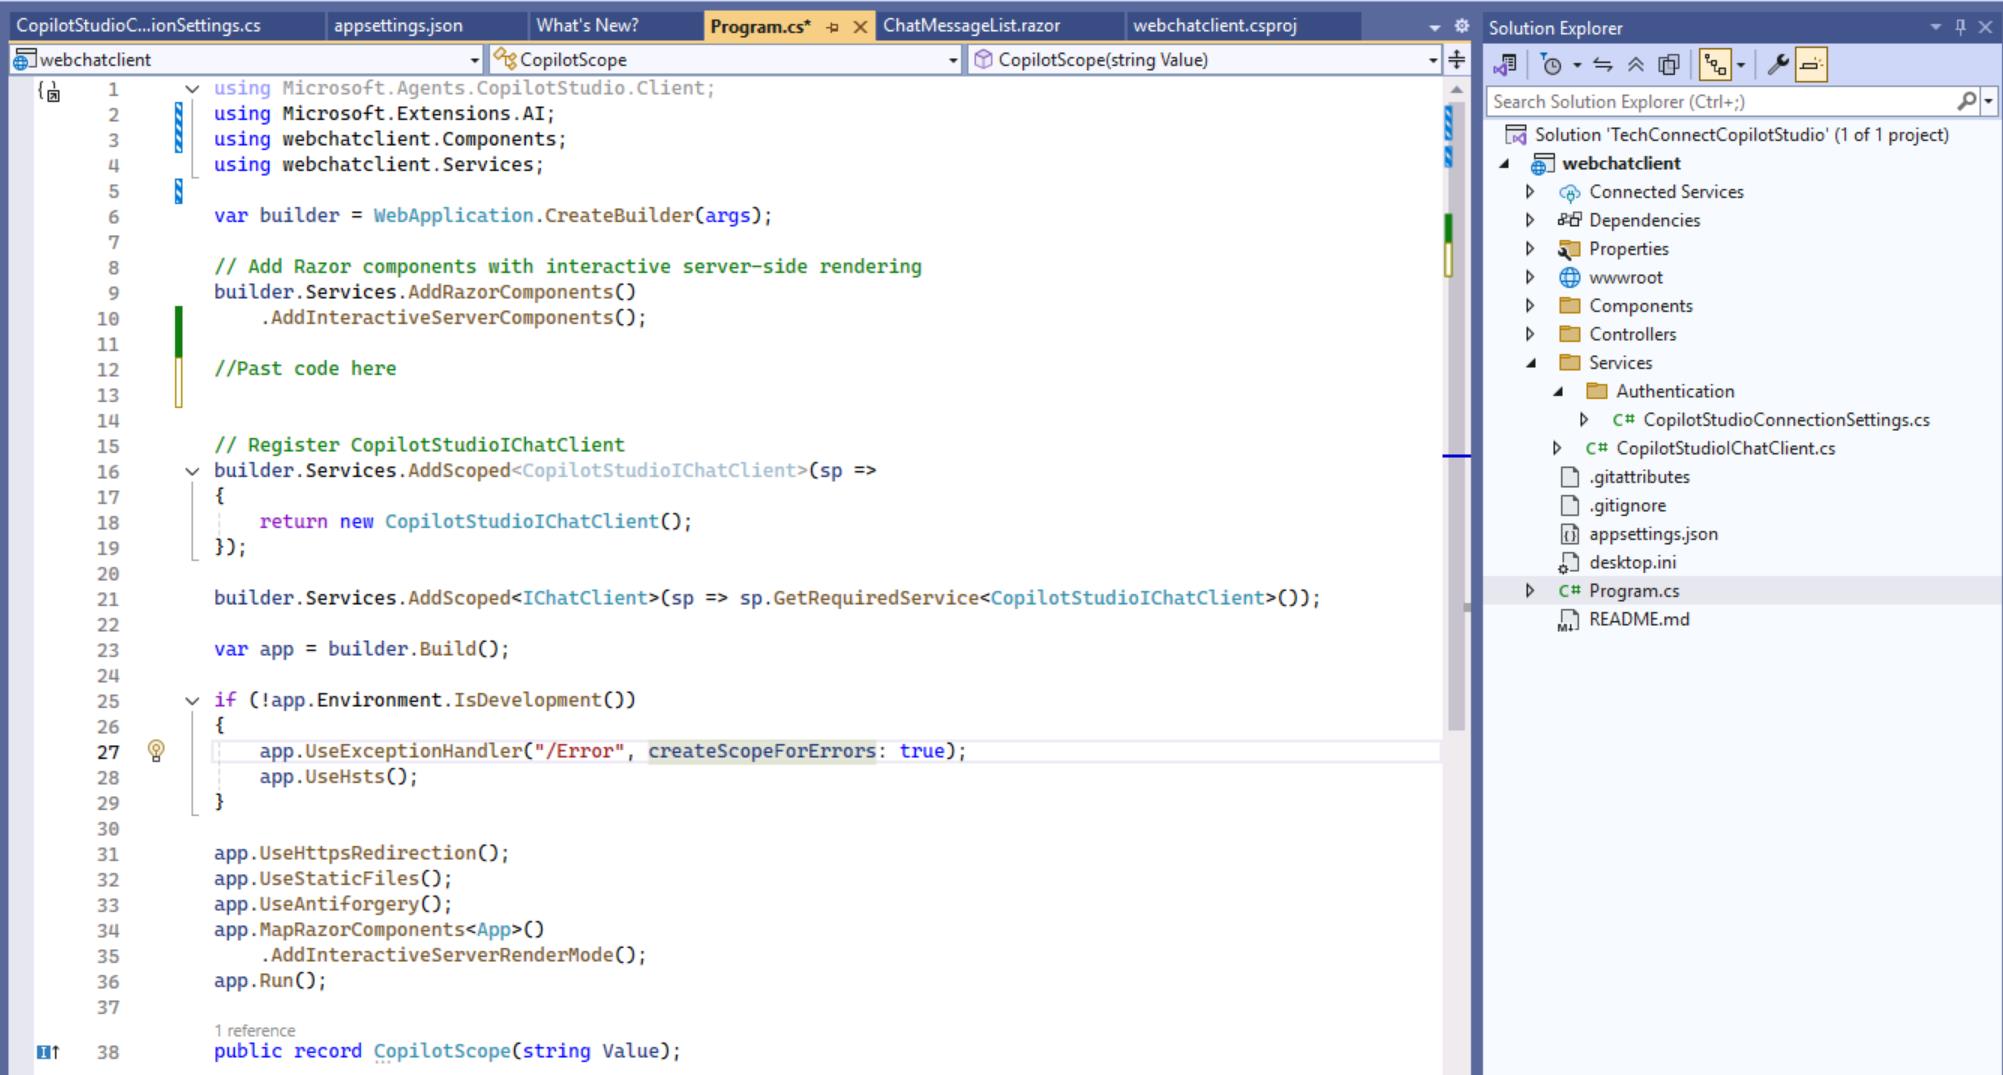
Now let's add authentication to our project. Please extend Program.cs
-
Past below code after builder.Services.AddRazorComponents().AddInteractiveServerComponents();
builder.Services.AddDataProtection()
.UseEphemeralDataProtectionProvider();
// Build connection settings
var copilotSettings = new CopilotStudioConnectionSettings(
builder.Configuration.GetSection("CopilotStudio"),
builder.Configuration.GetSection("AzureAd"));
string copilotScope = CopilotClient.ScopeFromSettings(copilotSettings);
builder.Services.AddHttpContextAccessor();
// Configure authentication with MSAL using in memory cache
builder.Services.AddAuthentication(OpenIdConnectDefaults.AuthenticationScheme)
.AddMicrosoftIdentityWebApp(builder.Configuration.GetSection("AzureAd"))
.EnableTokenAcquisitionToCallDownstreamApi(new[] { copilotScope })
.AddInMemoryTokenCaches();
// Add offline_access to get refresh tokens
builder.Services.Configure<OpenIdConnectOptions>(OpenIdConnectDefaults.AuthenticationScheme, options =>
{
options.Scope.Add("offline_access");
});
// Add controllers with Microsoft Identity UI
builder.Services.AddControllersWithViews()
.AddMicrosoftIdentityUI();
// Add authorization
builder.Services.AddAuthorization();
builder.Services.AddCascadingAuthenticationState();
builder.Services.AddScoped<AuthenticationStateProvider, ServerAuthenticationStateProvider>();
Don't forget to add following namespaces as well: using Microsoft.Identity.Web; and
using Microsoft.Identity.Web.UI;. To keep things simple for now, we will store the authentication tokens in memory using AddInMemoryTokenCaches, so they will not survive on application restart.
[!hint] Explanation seciton. No changes needed.
Program.cs - Adding Authentication
The updated Program.cs adds Microsoft Entra ID authentication to your Blazor application. Here's what each new section does:
Ephemeral data protection: cookie encryption keys are stored in-memory only, so authentication cookies become invalid after app restart. This also ensures the MSAL token cache is refreshed on each restart, avoiding stale token issues. Users will see an automated redirect to login.microsoft.com and be seamlessly re-authenticated via Microsoft SSO (no password prompt).
builder.Services.AddDataProtection()
.UseEphemeralDataProtectionProvider();
var copilotSettings = new CopilotStudioConnectionSettings(
builder.Configuration.GetSection("CopilotStudio"),
builder.Configuration.GetSection("AzureAd"));
string copilotScope = CopilotClient.ScopeFromSettings(copilotSettings);Creates the connection settings object and extracts the API scope needed to call Copilot Studio. The scope is derived from your Copilot Studio configuration (environment and agent).
builder.Services.AddHttpContextAccessor();Enables access to the current HTTP context from services. This is required by the authentication middleware to read cookies and manage user sessions.
builder.Services.AddAuthentication(OpenIdConnectDefaults.AuthenticationScheme)
.AddMicrosoftIdentityWebApp(builder.Configuration.GetSection("AzureAd"))
.EnableTokenAcquisitionToCallDownstreamApi(new[] { copilotScope })
.AddInMemoryTokenCaches();| Method | Purpose |
|---|---|
AddAuthentication |
Sets OpenID Connect as the default authentication scheme |
AddMicrosoftIdentityWebApp |
Configures Microsoft Entra ID authentication using settings from appsettings.json |
EnableTokenAcquisitionToCallDownstreamApi |
Enables acquiring access tokens for the Copilot Studio API |
AddInMemoryTokenCaches |
Stores tokens in memory for reuse during the session |
builder.Services.Configure<OpenIdConnectOptions>(OpenIdConnectDefaults.AuthenticationScheme, options =>
{
options.Scope.Add("offline_access");
});Adds the offline_access scope to receive refresh tokens, allowing the application to refresh expired access tokens without requiring the user to sign in again.
builder.Services.Configure<CookieAuthenticationOptions>(CookieAuthenticationDefaults.AuthenticationScheme, options =>
{
options.ExpireTimeSpan = TimeSpan.FromHours(8);
options.SlidingExpiration = true;
});Configures session cookies to expire after 8 hours of inactivity. With sliding expiration enabled, the cookie lifetime resets with each request, keeping active users signed in.
builder.Services.AddControllersWithViews()
.AddMicrosoftIdentityUI();Adds pre-built controllers for sign-in, sign-out, and error handling. This provides routes like /MicrosoftIdentity/Account/SignIn and /MicrosoftIdentity/Account/SignOut out-of-the-box.
builder.Services.AddAuthorization();
builder.Services.AddCascadingAuthenticationState();
builder.Services.AddScoped<AuthenticationStateProvider, ServerAuthenticationStateProvider>();| Service | Purpose |
|---|---|
AddAuthorization |
Enables the [Authorize] attribute and authorization policies |
AddCascadingAuthenticationState |
Makes authentication state available to all Blazor components |
ServerAuthenticationStateProvider |
Provides user identity information to Blazor Server components |
Now we are ready to finalize the configuration of the app.
[!hint] We continue to make changes from here!
- After app.UseStaticFiles();, but before app.UseAntiforgery(); section please also add
app.UseAuthentication();
app.UseAuthorization();
Antiforgery depends on authentication - it needs to know the user's identity to validate that the token belongs to them. If authentication runs after antiforgery, the identity isn't available when it's needed.
These two middleware components enable the authentication and authorization pipeline:
| Middleware | Purpose |
|---|---|
UseAuthentication |
Reads authentication cookies and tokens, establishes the user's identity (HttpContext.User) |
UseAuthorization |
Enforces authorization policies and [Authorize] attributes on routes and components |
┌─────────────────────────────────────────────────────────┐
│ builder.Services.AddAuthorization() │
│ ───────────────────────────────────── │
│ Registers: │
│ • Authorization policies │
│ • Handlers │
│ • IAuthorizationService │
└─────────────────────────────────────────────────────────┘
↓
Used by
↓
┌─────────────────────────────────────────────────────────┐
│ app.UseAuthorization() │
│ ────────────────────── │
│ On each request: │
│ • Gets authorization services from DI │
│ • Evaluates policies against current user │
│ • Allows or denies access │
└─────────────────────────────────────────────────────────┘
- Here is how Program.cs looks now. Please make sure your version includes the same changes, or simply copy the implementation below to avoid any issues.
using Microsoft.Agents.CopilotStudio.Client;
using Microsoft.AspNetCore.Authentication.OpenIdConnect;
using Microsoft.AspNetCore.Components.Authorization;
using Microsoft.AspNetCore.Components.Server;
using Microsoft.Extensions.AI;
using Microsoft.Identity.Web;
using Microsoft.Identity.Web.UI;
using webchatclient.Components;
using webchatclient.Services;
using webchatclient.Services.Authentication;
var builder = WebApplication.CreateBuilder(args);
// Add Razor components with interactive server-side rendering
builder.Services.AddRazorComponents()
.AddInteractiveServerComponents();
builder.Services.AddDataProtection()
.UseEphemeralDataProtectionProvider();
// Build connection settings
var copilotSettings = new CopilotStudioConnectionSettings(
builder.Configuration.GetSection("CopilotStudio"),
builder.Configuration.GetSection("AzureAd"));
string copilotScope = CopilotClient.ScopeFromSettings(copilotSettings);
builder.Services.AddHttpContextAccessor();
// Configure authentication with MSAL using in memory cache
builder.Services.AddAuthentication(OpenIdConnectDefaults.AuthenticationScheme)
.AddMicrosoftIdentityWebApp(builder.Configuration.GetSection("AzureAd"))
.EnableTokenAcquisitionToCallDownstreamApi(new[] { copilotScope })
.AddInMemoryTokenCaches();
// Add offline_access to get refresh tokens
builder.Services.Configure<OpenIdConnectOptions>(OpenIdConnectDefaults.AuthenticationScheme, options =>
{
options.Scope.Add("offline_access");
});
// Add controllers with Microsoft Identity UI
builder.Services.AddControllersWithViews()
.AddMicrosoftIdentityUI();
// Add authorization
builder.Services.AddAuthorization();
builder.Services.AddCascadingAuthenticationState();
builder.Services.AddScoped<AuthenticationStateProvider, ServerAuthenticationStateProvider>();
// Register CopilotStudioIChatClient
builder.Services.AddScoped<CopilotStudioIChatClient>(sp =>
{
return new CopilotStudioIChatClient();
});
builder.Services.AddScoped<IChatClient>(sp => sp.GetRequiredService<CopilotStudioIChatClient>());
var app = builder.Build();
if (!app.Environment.IsDevelopment())
{
app.UseExceptionHandler("/Error", createScopeForErrors: true);
app.UseHsts();
}
app.UseHttpsRedirection();
app.UseStaticFiles();
app.UseAuthentication();
app.UseAuthorization();
app.UseAntiforgery();
app.MapRazorComponents<App>()
.AddInteractiveServerRenderMode();
app.Run();
public record CopilotScope(string Value);
- Now let's add an authorization marker to our main chat window so that authorizatoin is enforced every time a user attempts to open the chat window.
You only need to add
@attribute [Authorize]to Chat.razor, as shown below. You can find Chat.razor by expanding the Components folder, then Pages, and opening Chat folder. Alternatively, you can use the code snippet below to completely replace the header section of Chat.razor.
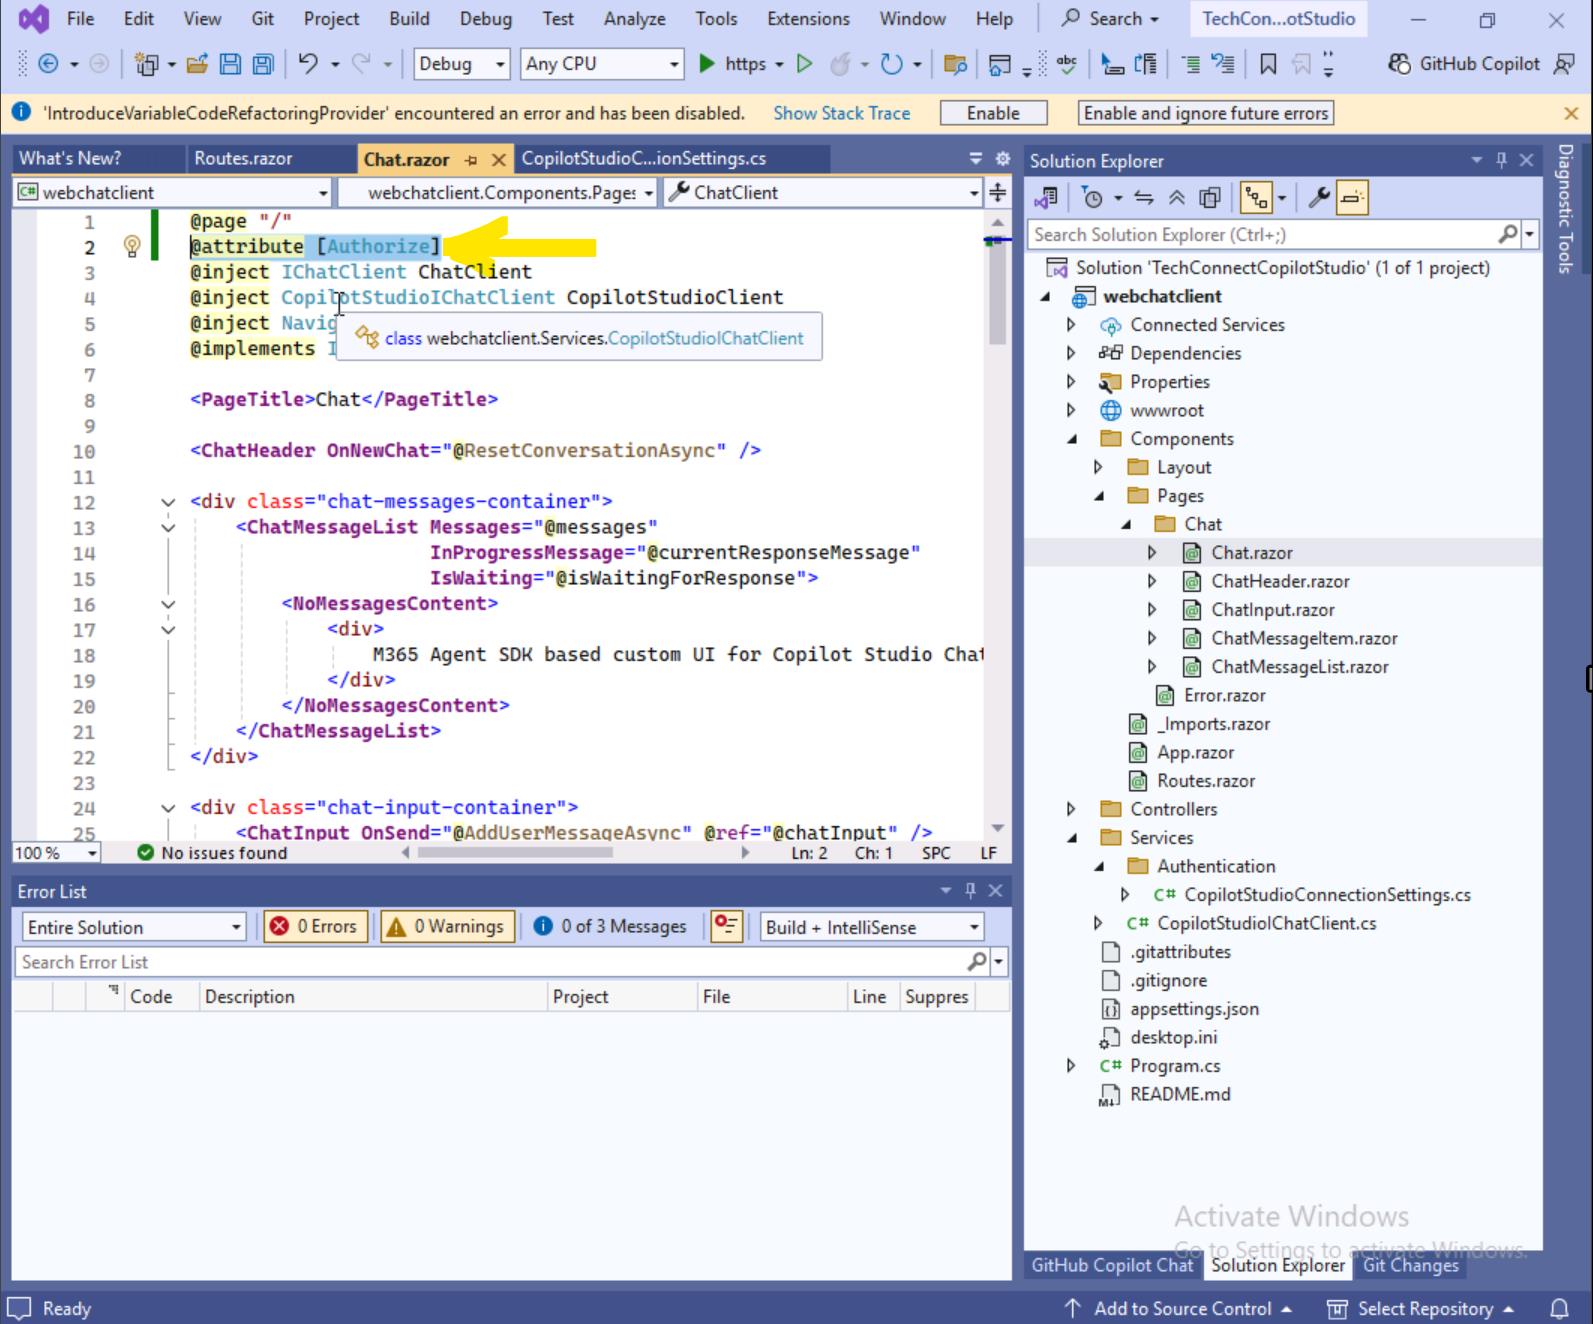
@page "/"
@attribute [Authorize]
@inject IChatClient ChatClient
@inject CopilotStudioIChatClient CopilotStudioClient
@inject NavigationManager Nav
@implements IDisposable
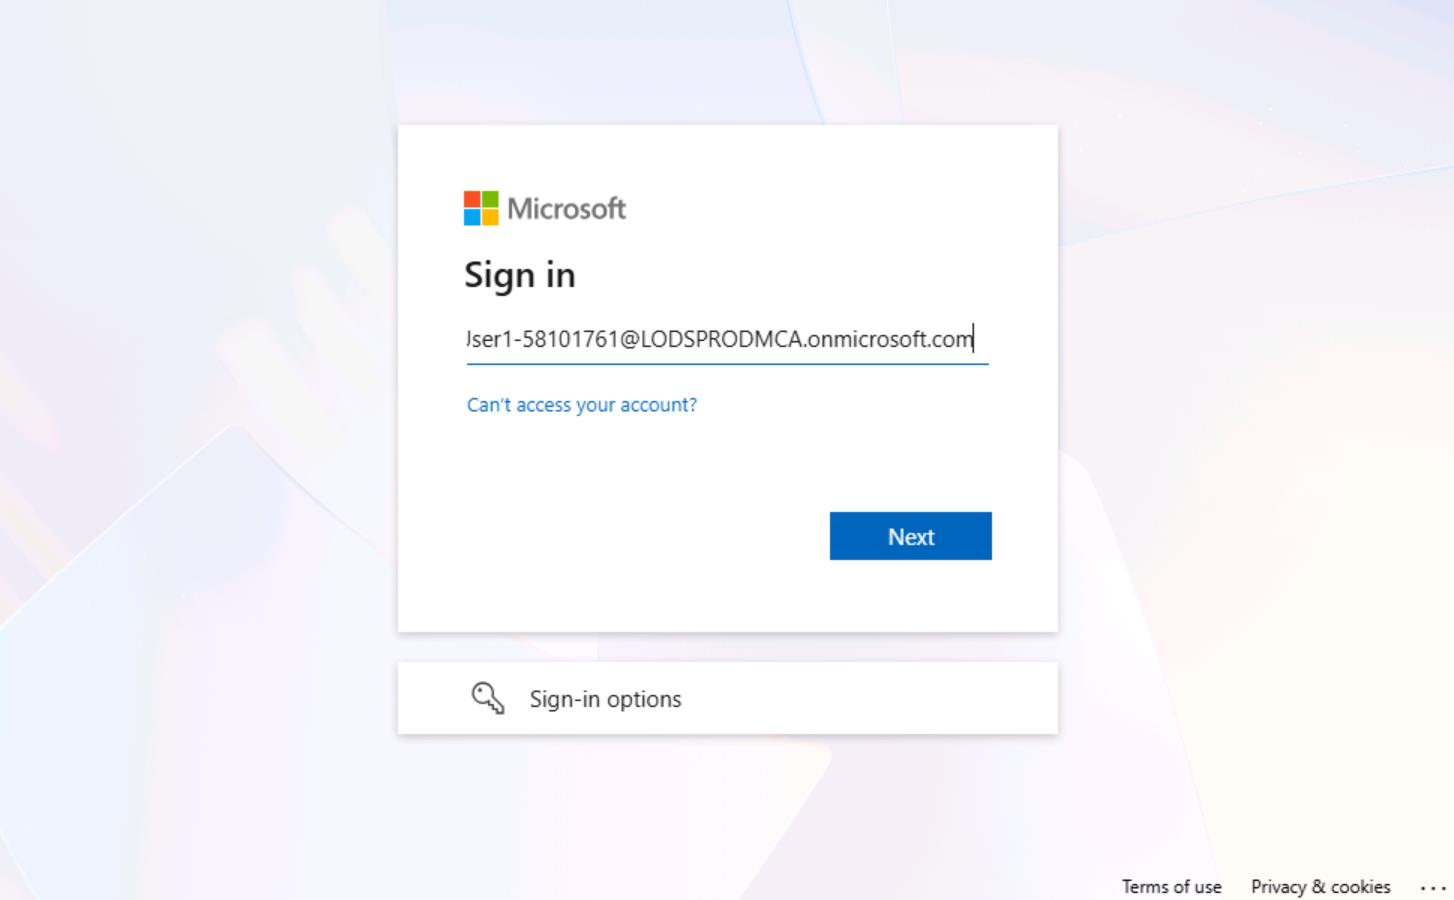
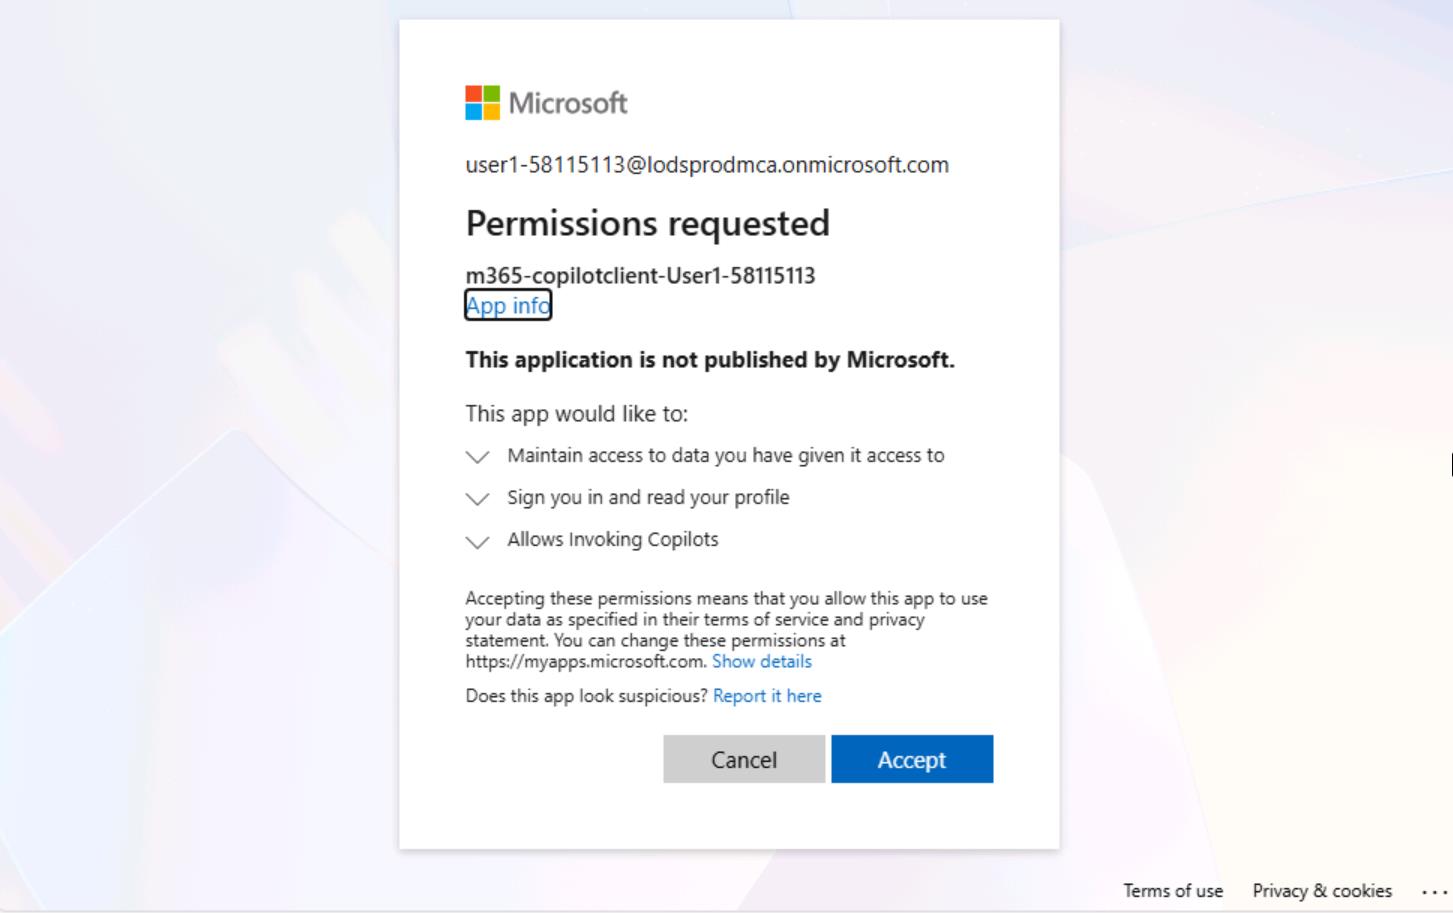
- Now, when you run the application again, you should see the authentication window. Use the credentials from the Resources tab. Sign in using the Temporary Access Password (TAP). Review the permissions required and click "Accept".
In this section, you'll learn how to connect your application to a Copilot Studio agent using the Microsoft 365 Agents SDK. This SDK provides a streamlined way to integrate conversational AI capabilities into your applications by establishing a direct communication channel with agents built in Copilot Studio. The Microsoft 365 Agents SDK handles the complexities of:
- Delegated Authentication
- Connection management through Direct to Engine protocol
- Message exchange between your application and the Copilot agent
- Activity handling for real-time conversations
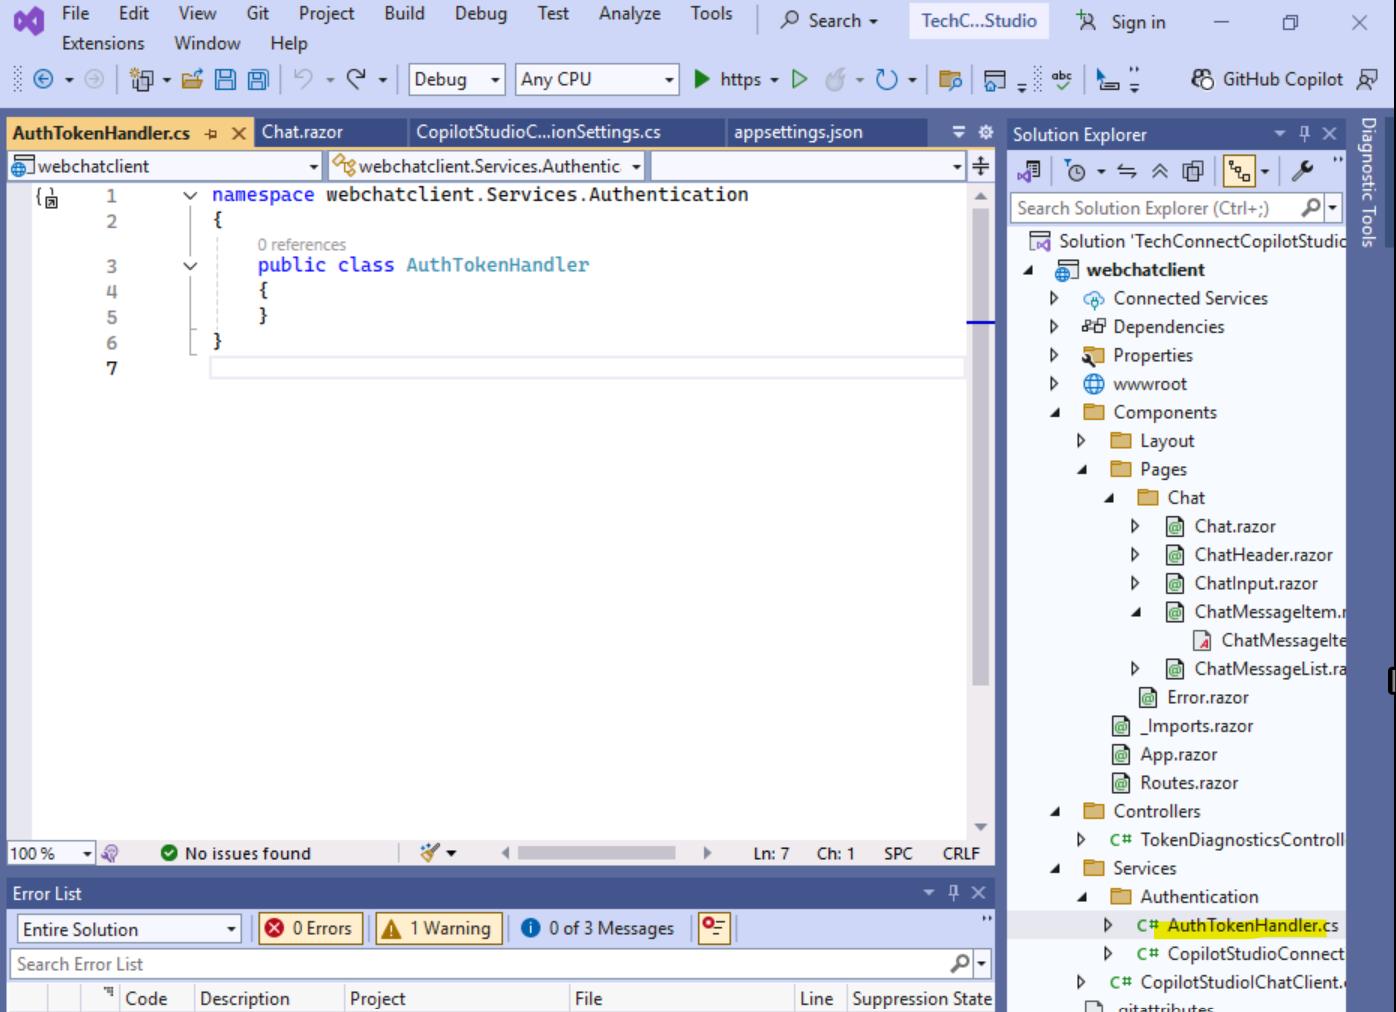
- The next step is to add Copilot Studio delegated authorization so we can use it from our M365 Agent SDK Copilot Studio client. To do this, we will add a class called AuthTokenHandler (a
DelegatingHandler) that attaches the user access token to outgoing requests.
Please create a new file under the Authentication folder named AuthTokenHandler.cs.
- Update the code
internal class AuthTokenHandler : DelegatingHandler
{
private readonly IHttpContextAccessor _httpContextAccessor;
private readonly ITokenAcquisition _tokenAcquisition;
private readonly string _scope;
private readonly ILogger<AuthTokenHandler> _logger;
public AuthTokenHandler(
IHttpContextAccessor httpContextAccessor,
ITokenAcquisition tokenAcquisition,
CopilotScope copilotScope,
ILogger<AuthTokenHandler> logger)
{
_httpContextAccessor = httpContextAccessor;
_tokenAcquisition = tokenAcquisition;
_scope = copilotScope.Value;
_logger = logger;
}
protected override async Task<HttpResponseMessage> SendAsync(
HttpRequestMessage request, CancellationToken cancellationToken)
{
if (request.Headers.Authorization is null)
{
var context = _httpContextAccessor.HttpContext
?? throw new InvalidOperationException("No HttpContext available");
if (context.User.Identity?.IsAuthenticated != true)
{
throw new InvalidOperationException("User is not authenticated");
}
try
{
var accessToken = await _tokenAcquisition
.GetAccessTokenForUserAsync(new[] { _scope });
request.Headers.Authorization =
new AuthenticationHeaderValue("Bearer", accessToken);
}
catch (MicrosoftIdentityWebChallengeUserException ex)
{
_logger.LogWarning(ex, "Token acquisition failed - user needs to re-authenticate");
throw new InvalidOperationException("Session expired. Please sign out and sign back in.");
}
}
return await base.SendAsync(request, cancellationToken);
}
}
Explanation of AuthTokenHandler
This is a delegating handler that automatically attaches OAuth 2.0 bearer tokens to outgoing HTTP requests. It's designed to work with Microsoft Identity (Entra ID) authentication in an ASP.NET Core application.
We will use it in our CopilotStudioIChatClient in the following way:
┌────────────────────────────────────────────────────────────────────────────┐
│ Request Flow │
├────────────────────────────────────────────────────────────────────────────┤
│ │
│ Blazor Component │
│ │ │
│ ▼ │
│ IChatClient (interface) │
│ │ │
│ ▼ │
│ CopilotStudioIChatClient │
│ │ │
│ ▼ │
│ CopilotClient ───► IHttpClientFactory.CreateClient("mcs") │
│ │ │
│ ▼ │
│ ┌─────────────────────────┐ │
│ │ HttpClient Pipeline │ │
│ │ ┌───────────────────┐ │ │
│ │ │ AuthTokenHandler │ │ ◄── Intercepts & adds token │
│ │ └─────────┬─────────┘ │ │
│ │ ▼ │ │
│ │ ┌───────────────────┐ │ │
│ │ │ HttpClientHandler │ │ ◄── Actual HTTP call │
│ │ └───────────────────┘ │ │
│ └─────────────────────────┘ │
│ │ │
│ ▼ │
│ Copilot Studio API │
│ │
└────────────────────────────────────────────────────────────────────────────┘
The "mcs" name creates an isolated HttpClient configuration. This means: Only requests through CopilotClient get the AuthTokenHandler. Other HttpClients in your app aren't affected. The handler configuration is encapsulated.
Now let's update our CopilotStudioIChatClient. Currently we have only Echo bot. We will replace it with the Copilot Studio integration.
CopilotStudioIChatClient is an adapter that makes CopilotClient compatible with Microsoft's IChatClient interface from Microsoft.Extensions.AI.
We implement IChatClient for Copilot Studio so our app gets the benefits of Microsoft.Extensions.AI (abstraction, middleware, consistency) while still leveraging Copilot Studio's unique features.
┌─────────────────────────────────────────────────────────────────┐
│ Your Application Code │
│ │
│ IChatClient │
│ │ │
│ ┌────────────────┼────────────────┐ │
│ ▼ ▼ ▼ │
│ ┌──────────┐ ┌──────────┐ ┌──────────────┐ │
│ │ Copilot │ │ Azure │ │ OpenAI │ │
│ │ Studio │ │ OpenAI │ │ Direct │ │
│ └──────────┘ └──────────┘ └──────────────┘ │
│ │
│ Swap providers without changing your application code │
└─────────────────────────────────────────────────────────────────┘
- Let's update the header part of the CopilotStudioIChatClient class, everything before the fist method. You can find CopilotStudioIChatClient.cs if you expand Services folder.
public class CopilotStudioIChatClient(CopilotClient copilotClient) : IChatClient
{
private readonly CopilotClient _copilotClient = copilotClient
?? throw new ArgumentNullException(nameof(copilotClient));
private bool _conversationStarted = false;
public ChatClientMetadata Metadata { get; } =
new("CopilotStudio", new Uri("https://copilotstudio.microsoft.com"));
Metadata provides information about the chat client implementation:
public ChatClientMetadata Metadata { get; } =
new("CopilotStudio", new Uri("https://copilotstudio.microsoft.com"));
| Property | Value | Purpose |
|---|---|---|
ProviderName |
"CopilotStudio" |
Identifies which AI provider this client uses |
ProviderUri |
https://copilotstudio.microsoft.com |
The provider's base URL |
DefaultModelId |
null (optional) |
Could specify a model like "gpt-4" |
- Now let's add one more method to our CopilotStudioIChatClient class. This method ensures that a Copilot Studio conversation is initialized exactly once before any messages are sent.
private async Task EnsureConversationStartedAsync(CancellationToken cancellationToken)
{
if (_conversationStarted) return;
// Drain the start conversation activities
await foreach (var _ in _copilotClient.StartConversationAsync(
emitStartConversationEvent: true,
cancellationToken))
{
// Deliberately empty
}
_conversationStarted = true;
}
- Copilot Studio sends metadata along with each activity to indicate the type of message and how streaming should be handled. This metadata is embedded in the ChannelData property. The next step is to add a method that helps parse this metadata coming from Copilot Studio and determine what type of message we are dealing with.
Here is the method to parse this metadata.
/// <summary>
/// Parses the ChannelData to extract streaming metadata
/// </summary>
private static StreamingMetadata? ParseStreamingMetadata(object? channelData)
{
if (channelData == null) return null;
try
{
JsonElement jsonElement;
if (channelData is JsonElement je)
{
jsonElement = je;
}
else
{
// Try to serialize and deserialize to get JsonElement
var json = JsonSerializer.Serialize(channelData);
jsonElement = JsonSerializer.Deserialize<JsonElement>(json);
}
var metadata = new StreamingMetadata();
if (jsonElement.TryGetProperty("streamType", out var streamTypeProp))
{
metadata.StreamType = streamTypeProp.GetString();
}
if (jsonElement.TryGetProperty("streamId", out var streamIdProp))
{
metadata.StreamId = streamIdProp.GetString();
}
if (jsonElement.TryGetProperty("streamSequence", out var streamSeqProp))
{
metadata.StreamSequence = streamSeqProp.GetInt32();
}
return metadata;
}
catch
{
return null;
}
}
You also need to add StreamingMetadata class. You can embed it directly into our CopilotStudioIChatClient
/// <summary>
/// Represents the parsed streaming metadata from ChannelData
/// </summary>
private class StreamingMetadata
{
public string? StreamType { get; set; }
public string? StreamId { get; set; }
public int StreamSequence { get; set; }
}
- Now we are ready to rewrite StreamResponseAsync so that it uses Copilot Studio client to handle the conversation.
Let's also change the first input parameter from plain text to Activity. Currently, this method contains an Echo bot implementation that we want to replace. For an Echo bot, using text as the input is sufficient, but if we want to extend our agent and support additional input types-such as attachments and others-we need to make this change.
Before our arguments looked like this
private async IAsyncEnumerable<ChatResponseUpdate> StreamResponseAsync(
    string userText,
    [EnumeratorCancellation] CancellationToken cancellationToken)
Please replace the whole method with the following implementaiton. Here is how we should update this (StreamResponseAsync) method.
private async IAsyncEnumerable<ChatResponseUpdate> StreamResponseAsync(
Activity activityToSend,
[EnumeratorCancellation] CancellationToken cancellationToken)
{
var createdAt = DateTimeOffset.UtcNow;
await foreach (var activity in _copilotClient.SendActivityAsync(activityToSend, cancellationToken))
{
// Parse streaming metadata from ChannelData
var metadata = ParseStreamingMetadata(activity.ChannelData);
if (metadata?.StreamType == "final" || metadata?.StreamType == null)
{
// Final message or no metadata - use as-is (complete message)
// Don't accumulate, just yield the full text
yield return new ChatResponseUpdate
{
CreatedAt = createdAt,
Contents = [new TextContent(activity.Text)],
Role = ChatRole.Assistant
};
}
}
}
Please fully override your current StreamResponseAsync with the above implementation. You may also need to add a new namespace "Microsoft.Agents.Core.Models". Add the following using statement to the top of the CopilotStudioIChatClient.cs file: +++using Microsoft.Agents.Core.Models+++

The activityToSend parameter is the input going TO the Copilot. Using Activity there allows you to send:
- Plain text messages
- Adaptive Card responses (e.g., user submitted a form/action from a card)
- File attachments
- Events
- Invokes
- etc.
So when a user interacts with an Adaptive Card (clicks a button, submits a form), that interaction comes back as an Activity with specific properties, and you can forward it directly to the Copilot client.
For now we will keep it simple and only utlize the text data.
- To make this work, we also need to update GetStreamingResponseAsync. Previously, it used plain text as input, but now we've replaced that with an Activity. Please replace the entire GetStreamingResponseAsync method with the following implementation.
public async IAsyncEnumerable<ChatResponseUpdate> GetStreamingResponseAsync(
IEnumerable<ChatMessage> messages,
ChatOptions? options = null,
[EnumeratorCancellation] CancellationToken cancellationToken = default)
{
var lastMessage = messages.LastOrDefault();
if (lastMessage == null)
throw new ArgumentException("At least one message is required", nameof(messages));
await EnsureConversationStartedAsync(cancellationToken);
var messageActivity = new Activity
{
Type = "message",
Text = lastMessage.Text ?? string.Empty
};
await foreach (var update in StreamResponseAsync(messageActivity, cancellationToken))
{
yield return update;
}
}
- And the last step is to register everything in Program.cs so we can start chatting with Copilot Studio. Replace the following code in Program.cs. It is now highlighted with an error because we changed the constructor signature of this class.
builder.Services.AddScoped<CopilotStudioIChatClient>(sp =>
{
return new CopilotStudioIChatClient();
});
with the following code. The code below registers all the necessary components and connects them with each other.
builder.Services.AddSingleton(copilotSettings);
builder.Services.AddSingleton(new CopilotScope(copilotScope));
// Register HttpClient for Copilot Studio with token handler
builder.Services.AddScoped<AuthTokenHandler>();
builder.Services.AddHttpClient("mcs")
.AddHttpMessageHandler<AuthTokenHandler>();
// Register CopilotClient
builder.Services.AddScoped<CopilotClient>(sp =>
{
var logger = sp.GetRequiredService<ILoggerFactory>().CreateLogger<CopilotClient>();
return new CopilotClient(copilotSettings, sp.GetRequiredService<IHttpClientFactory>(), logger, "mcs");
});
// Register CopilotStudioIChatClient
builder.Services.AddScoped<CopilotStudioIChatClient>(sp =>
{
var copilotClient = sp.GetRequiredService<CopilotClient>();
return new CopilotStudioIChatClient(copilotClient);
});
First, we register an AuthTokenHandler and attach it to a named HttpClient called "mcs". The AuthTokenHandler is responsible for automatically adding authentication tokens to every request sent to Copilot Studio. This way, we don't have to manually handle authentication each time we make a request.
Next, we register the CopilotClient. This is the low-level client that knows how to communicate with the Copilot Studio API. It receives the Copilot settings such as the endpoint URL and bot identifier, an HttpClientFactory to create HTTP clients, a logger for logging, and the name "mcs" so it uses the HttpClient that has the authentication handler attached.
Then, we register CopilotStudioIChatClient. This is an adapter that wraps the CopilotClient and implements the IChatClient interface. Its purpose is to translate between the standard IChatClient interface and the Copilot Studio specific API.
Here is the full updated version of Program.cs
using Microsoft.Agents.CopilotStudio.Client;
using Microsoft.AspNetCore.Authentication.OpenIdConnect;
using Microsoft.AspNetCore.Components.Authorization;
using Microsoft.AspNetCore.Components.Server;
using Microsoft.AspNetCore.DataProtection;
using Microsoft.Extensions.AI;
using Microsoft.Identity.Web.UI;
using Microsoft.Identity.Web;
using webchatclient.Components;
using webchatclient.Services;
using webchatclient.Services.Authentication;
var builder = WebApplication.CreateBuilder(args);
// Add Razor components with interactive server-side rendering
builder.Services.AddRazorComponents()
.AddInteractiveServerComponents();
builder.Services.AddDataProtection()
    .UseEphemeralDataProtectionProvider();

// Build connection settings
var copilotSettings = new CopilotStudioConnectionSettings(
    builder.Configuration.GetSection("CopilotStudio"),
    builder.Configuration.GetSection("AzureAd"));

string copilotScope = CopilotClient.ScopeFromSettings(copilotSettings);

builder.Services.AddHttpContextAccessor();

// Configure authentication with MSAL using in memory cache
builder.Services.AddAuthentication(OpenIdConnectDefaults.AuthenticationScheme)
    .AddMicrosoftIdentityWebApp(builder.Configuration.GetSection("AzureAd"))
    .EnableTokenAcquisitionToCallDownstreamApi(new[] { copilotScope })
    .AddInMemoryTokenCaches();

// Add offline_access to get refresh tokens
builder.Services.Configure<OpenIdConnectOptions>(OpenIdConnectDefaults.AuthenticationScheme, options =>
{
    options.Scope.Add("offline_access");
});

// Add controllers with Microsoft Identity UI
builder.Services.AddControllersWithViews()
    .AddMicrosoftIdentityUI();

// Add authorization
builder.Services.AddAuthorization();
builder.Services.AddCascadingAuthenticationState();
builder.Services.AddScoped<AuthenticationStateProvider, ServerAuthenticationStateProvider>();
// Register CopilotStudioIChatClient
builder.Services.AddSingleton(copilotSettings);
builder.Services.AddSingleton(new CopilotScope(copilotScope));
// Register HttpClient for Copilot Studio with token handler
builder.Services.AddScoped<AuthTokenHandler>();
builder.Services.AddHttpClient("mcs")
.AddHttpMessageHandler<AuthTokenHandler>();
// Register CopilotClient
builder.Services.AddScoped<CopilotClient>(sp =>
{
var logger = sp.GetRequiredService<ILoggerFactory>().CreateLogger<CopilotClient>();
return new CopilotClient(copilotSettings, sp.GetRequiredService<IHttpClientFactory>(), logger, "mcs");
});
// Register CopilotStudioIChatClient
builder.Services.AddScoped<CopilotStudioIChatClient>(sp =>
{
var copilotClient = sp.GetRequiredService<CopilotClient>();
return new CopilotStudioIChatClient(copilotClient);
});
builder.Services.AddScoped<IChatClient>(sp => sp.GetRequiredService<CopilotStudioIChatClient>());
var app = builder.Build();
if (!app.Environment.IsDevelopment())
{
app.UseExceptionHandler("/Error", createScopeForErrors: true);
app.UseHsts();
}
app.UseHttpsRedirection();
app.UseStaticFiles();
app.UseAuthentication();
app.UseAuthorization();
app.UseAntiforgery();
app.MapRazorComponents<App>()
.AddInteractiveServerRenderMode();
app.Run();
public record CopilotScope(string Value);
-
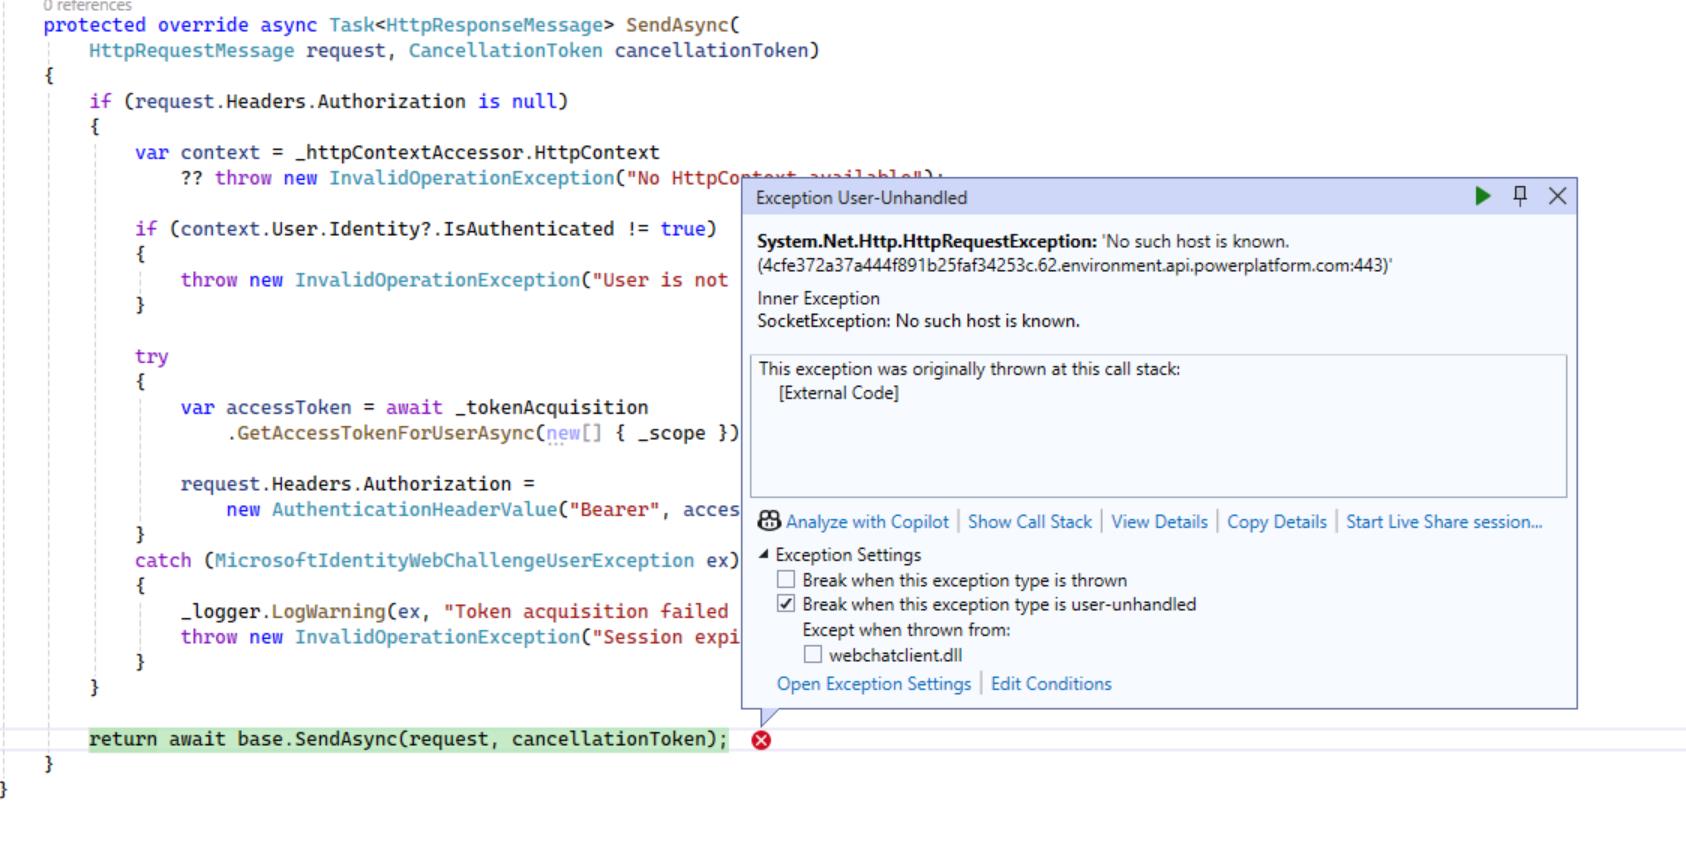
Try to run the application. In case you have below error, then you need to validate that your appsettings.json is correct
-
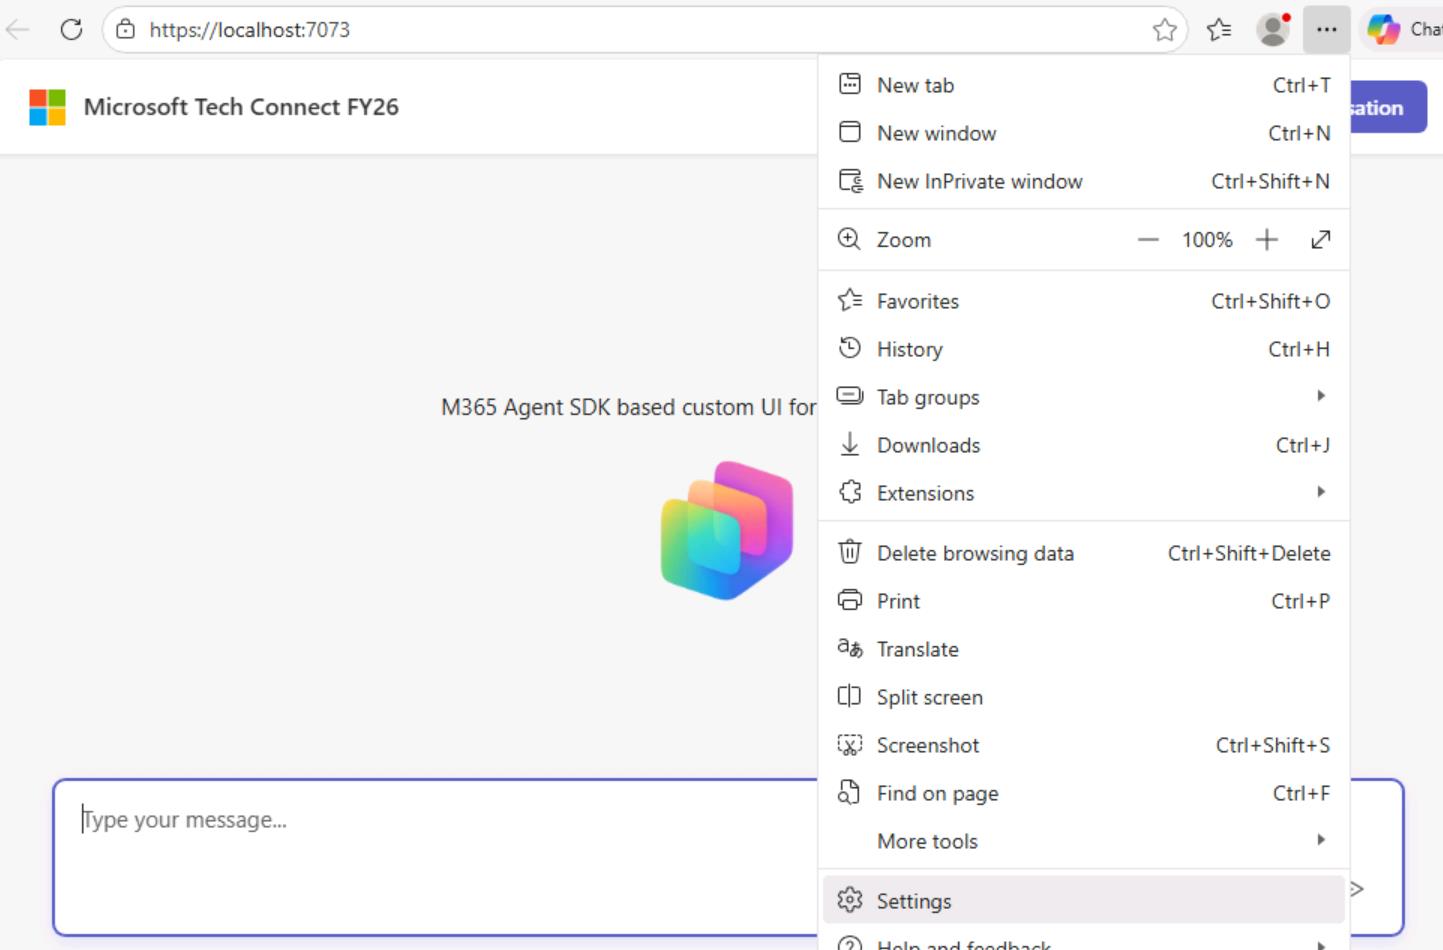
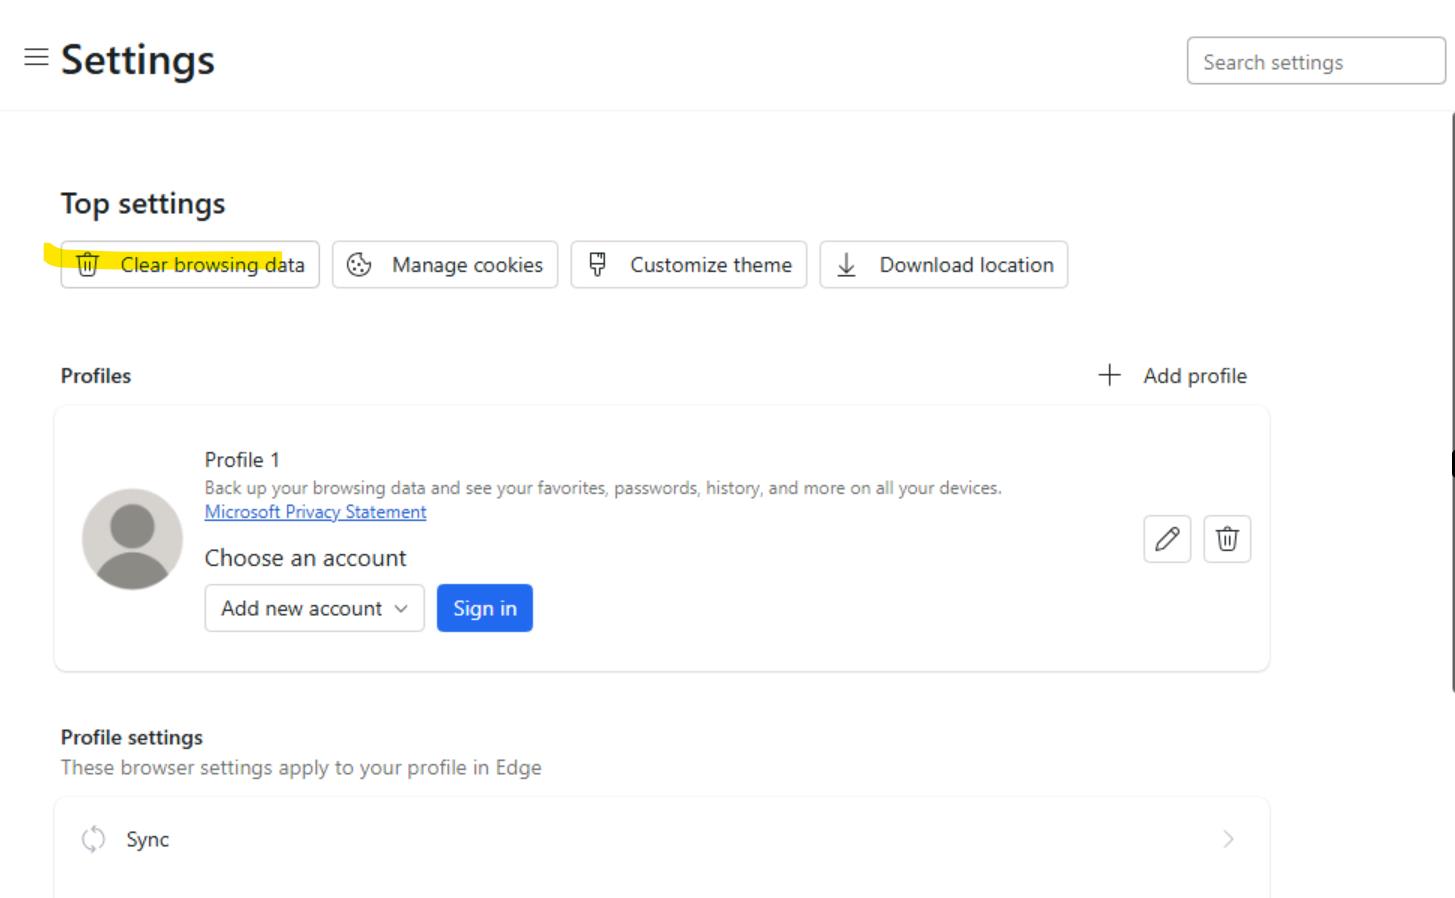
You might still encounter issues with authentication tokens or expired session errors. If this happens, please clear your browser cache and try again.
Click on Clear bowsing data.
Clear the cache.
-
Reload the page and login again. Now you should have a proper connection with Copilot Studio. Chat with the bot.
In this lab section, you will enhance your Copilot Studio chat client to support streaming output and markdown rendering.
What you'll learn:
-
Streaming Output - Instead of waiting for the complete response, you'll display text progressively as it arrives from Copilot Studio. This creates a more responsive, "typing" experience similar to ChatGPT or other modern AI chat interfaces.
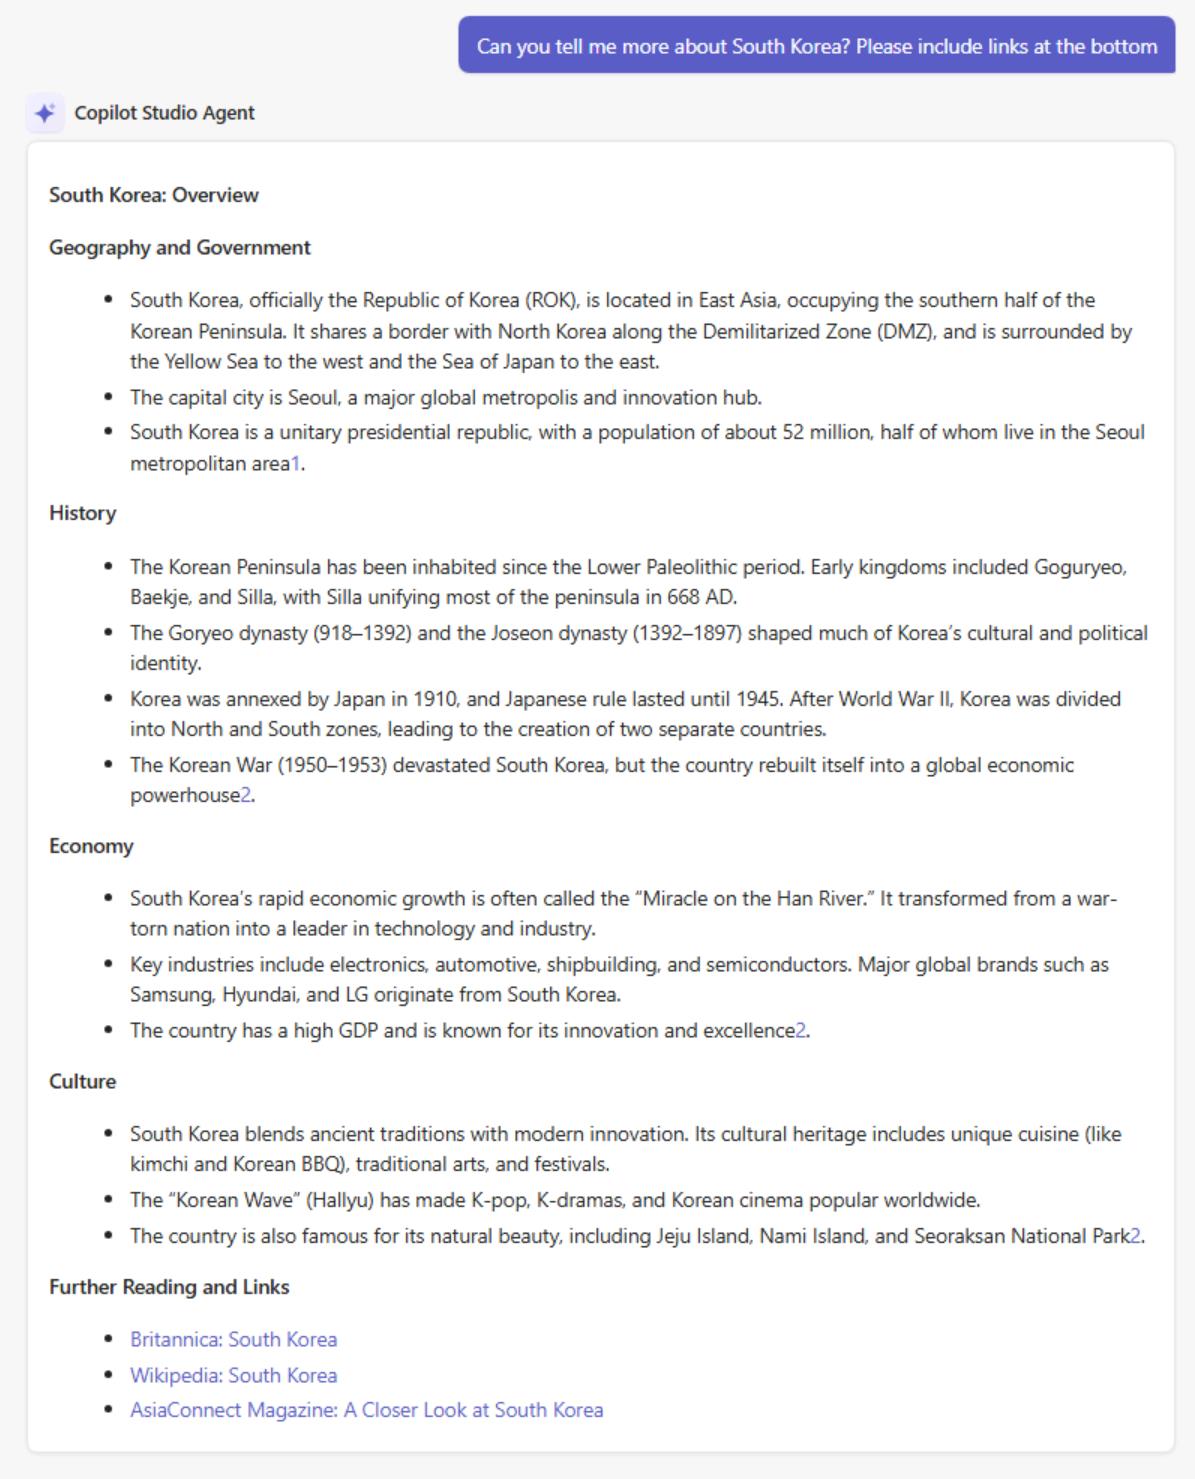
-
Markdown Rendering - Bot responses often contain formatted text (headers, lists, links, code blocks). You'll use the Markdig library to convert Markdown to HTML for rich text display.
Why this matters:
- Better UX: Users see immediate feedback rather than waiting for complete responses
- Rich Content: Markdown support enables formatted responses with links, lists, and emphasis
- Real-time Feel: Streaming creates an engaging, conversational experience
Before starting, ensure you have:
- A working Blazor chat application with basic message sending/receiving
- Validate that
MarkdigNuGet package is installed.
Copilot Studio sends responses with metadata in the ChannelData property. The streamType field indicates the message type:
| Stream Type | Description |
|---|---|
"streaming" |
Partial content chunk - accumulate these |
"final" |
Complete message - use as-is |
"informative" |
"informative update" (status/reasoning-style updates) |
null |
No streaming metadata - treat as complete |
Your current CopilotStudioIChatClient.cs handles only final messages:
private async IAsyncEnumerable<ChatResponseUpdate> StreamResponseAsync(
Activity activityToSend,
CancellationToken cancellationToken)
{
var createdAt = DateTimeOffset.UtcNow;
await foreach (var activity in _copilotClient.SendActivityAsync(activityToSend, cancellationToken))
{
var metadata = ParseStreamingMetadata(activity.ChannelData);
//Current: Only handles final messages
if (metadata?.StreamType == "final" || metadata?.StreamType == null)
{
yield return new ChatResponseUpdate
{
CreatedAt = createdAt,
Contents = [new TextContent(activity.Text)],
Role = ChatRole.Assistant
};
}
}
}
This approach waits for the complete response, providing no visual feedback during processing.
- Replace your current
StreamResponseAsyncmethod inCopilotStudioIChatClient.cswith the enhanced version that handles streaming chunks:
private async IAsyncEnumerable<ChatResponseUpdate> StreamResponseAsync(
Activity activityToSend,
[EnumeratorCancellation] CancellationToken cancellationToken)
{
var createdAt = DateTimeOffset.UtcNow;
// NEW: Accumulate streaming text chunks
var accumulatedText = new StringBuilder();
await foreach (var activity in _copilotClient.SendActivityAsync(activityToSend, cancellationToken))
{
// Parse streaming metadata from ChannelData
var metadata = ParseStreamingMetadata(activity.ChannelData);
// Only process messages with text content
if (!string.IsNullOrEmpty(activity.Text) &&
(activity.Type == "message" || activity.Type == "typing"))
{
if (metadata?.StreamType == "streaming")
{
// NEW: Streaming chunk - accumulate and yield the full text so far
accumulatedText.Append(activity.Text);
yield return new ChatResponseUpdate
{
CreatedAt = createdAt,
Contents = [new TextContent(accumulatedText.ToString())],
Role = ChatRole.Assistant
};
}
else if (metadata?.StreamType == "final" || metadata?.StreamType == null)
{
// Final message or no metadata - use as-is (complete message)
yield return new ChatResponseUpdate
{
CreatedAt = createdAt,
Contents = [new TextContent(activity.Text)],
Role = ChatRole.Assistant
};
}
}
}
}
- At the top of your
CopilotStudioIChatClient.csfile, ensure you have:
using System.Text;
Why accumulate text?
Copilot Studio sends streaming chunks as incremental pieces (e.g., "Hello", " world", "!"). Each ChatResponseUpdate should contain the complete text so far, not just the latest chunk. This allows the UI to simply replace the displayed text rather than append.
The streaming flow:
Chunk 1: "Hello" → UI shows: "Hello"
Chunk 2: " world" → UI shows: "Hello world"
Chunk 3: "!" → UI shows: "Hello world!"
Final: (empty) → Response complete
- There is another important method to review. This method is implemented as part of the starter project and is located in Chat.razor.
[!alert] This method is already implemented, so you don't need to change it. The details below are provided to give you a complete end-to-end overview of how the functionality works.
/// <summary>
/// Common method to process streaming responses
/// </summary>
private async Task ProcessStreamingResponseAsync(IAsyncEnumerable<ChatResponseUpdate> updates)
{
// Setup response state (but NOT the cancellation token - it's already created)
isWaitingForResponse = true;
var responseText = new TextContent("");
var responseContents = new List<AIContent> { responseText };
currentResponseMessage = new ChatMessage(ChatRole.Assistant, responseContents);
StateHasChanged();
try
{
await foreach (var update in updates)
{
ProcessUpdateContents(update, responseText, responseContents);
ChatMessageItem.NotifyChanged(currentResponseMessage);
StateHasChanged();
await Task.Yield();
}
}
catch (OperationCanceledException)
{
// Expected when user starts a new message while streaming
// Don't treat as an error
}
catch (Exception ex)
{
responseText.Text = $"Error: {ex.Message}";
}
finally
{
isWaitingForResponse = false;
}
// Cleanup: remove informative messages
responseContents.RemoveAll(c => c is FunctionCallContent { CallId: "InformativeMessage" });
// Store final response
messages.Add(currentResponseMessage!);
currentResponseMessage = null;
}
This method is the heart of the streaming implementation. It receives an async stream of updates and progressively displays them to the user. Let's break it down:
isWaitingForResponse = true;
var responseText = new TextContent("");
var responseContents = new List<AIContent> { responseText };
currentResponseMessage = new ChatMessage(ChatRole.Assistant, responseContents);
StateHasChanged();Before any content arrives, we create an empty message shell:
responseText- A mutableTextContentobject that will hold the streaming text. We create it once and update its.Textproperty as chunks arrive.responseContents- A list containing ourresponseText. This list is passed by reference to theChatMessage, so updates toresponseText.Textare immediately reflected in the message.currentResponseMessage- The "in-progress" message displayed in the UI with a loading indicator.StateHasChanged()- Tells Blazor to re-render, showing the empty assistant message bubble.
Why this pattern? By using a mutable object (TextContent) inside the message, we can update the displayed text without creating new ChatMessage instances. This is more efficient and maintains the component's identity for animations.
await foreach (var update in updates)
{
ProcessUpdateContents(update, responseText, responseContents);
ChatMessageItem.NotifyChanged(currentResponseMessage);
StateHasChanged();
await Task.Yield();
}This loop consumes the IAsyncEnumerable<ChatResponseUpdate> - an async stream that yields updates as they arrive from Copilot Studio:
| Line | Purpose |
|---|---|
await foreach |
Async iteration - waits for each update without blocking the UI thread |
ProcessUpdateContents(...) |
Extracts text from the update and assigns it to responseText.Text |
ChatMessageItem.NotifyChanged(...) |
Signals the specific ChatMessageItem component to re-render (since we're mutating an existing object, Blazor won't detect the change automatically) |
StateHasChanged() |
Triggers a re-render of the parent Chat component |
await Task.Yield() |
Critical for UI responsiveness - yields control back to the Blazor renderer, allowing the UI to actually paint the update before processing the next chunk |
Without Task.Yield(), updates would batch together and the user might see text appear in large jumps rather than smoothly streaming.
catch (OperationCanceledException)
{
// Expected when user starts a new message while streaming
}
catch (Exception ex)
{
responseText.Text = $"Error: {ex.Message}";
}OperationCanceledException- This is expected behavior, not an error. It occurs when the user sends a new message while the previous response is still streaming. The cancellation token triggers this exception, cleanly stopping the stream.- Other exceptions - Display the error message in the response bubble so the user knows something went wrong.
finally
{
isWaitingForResponse = false;
}
messages.Add(currentResponseMessage!);
currentResponseMessage = null;isWaitingForResponse = false- Hides any loading indicators (always runs, even after errors)messages.Add(...)- Moves the completed message from "in-progress" to the permanent message historycurrentResponseMessage = null- Clears the in-progress slot, ready for the next response
[!alert] We continue implementation from here.
- Create the Markdown Rendering Method
In your
ChatMessageItem.razorcomponent ( Located under Components/Pages/Chat ), add the Markdig pipeline and rendering method. You need to add it inside the @code block. Find the @code block, it is located in the bottom part of the file.
// Static pipeline - reuse for performance
private static readonly MarkdownPipeline MarkdownPipeline = new MarkdownPipelineBuilder()
.UseAdvancedExtensions()
.UseSoftlineBreakAsHardlineBreak()
.Build();
private string RenderMarkdown(string markdown)
{
if (string.IsNullOrEmpty(markdown))
return string.Empty;
// Remove citation tags if present
var cleanedMarkdown = Regex.Replace(markdown, @"<citation.*?</citation>", "", RegexOptions.Singleline);
// Convert markdown to HTML using Markdig
var html = Markdown.ToHtml(cleanedMarkdown, MarkdownPipeline);
// Basic HTML sanitization (remove script tags, etc.)
html = Regex.Replace(html, @"<script.*?</script>", "", RegexOptions.Singleline | RegexOptions.IgnoreCase);
html = Regex.Replace(html, @"on\w+\s*=\s*[""'][^""']*[""']", "", RegexOptions.IgnoreCase);
// Convert number-only links to superscript footnotes with brackets FIRST
html = Regex.Replace(
html,
@"<a\s+([^>]*?)>(\d+)</a>",
@"<sup><a $1 class=""footnote"">[$2]</a></sup>",
RegexOptions.IgnoreCase
);
// Make ALL links open in new tab LAST (applies to all links including footnotes)
html = Regex.Replace(
html,
@"<a\s+",
@"<a target=""_blank"" rel=""noopener noreferrer"" ",
RegexOptions.IgnoreCase
);
return html;
}
- Add the required imports, or verify that they already exist.
At the top of
ChatMessageItem.razor:
@using System.Text.RegularExpressions
@using Markdig- Render Markdown in the Template. Let's update your message display template to use the markdown renderer. Find below code in your ChatMessageItem.razor file:
else if (Message.Role == ChatRole.Assistant)
{
foreach (var content in Message.Contents)
{
if (content is TextContent { Text: { Length: > 0 } text })
{
<div class="assistant-message @(InProgress ? "is-streaming" : "streaming-complete")">
<div class="assistant-message-header">
<div class="assistant-message-icon">
@CopilotIcon
</div>
<span>Copilot Studio Agent</span>
</div>
<div class="assistant-message-text">
@text
</div>
</div>
}
}
}- Replace only following part:
@if (content is TextContent { Text: { Length: > 0 } text })
{
<div class="assistant-message @(InProgress ? "is-streaming" : "streaming-complete")">
<div class="assistant-message-header">
<div class="assistant-message-icon">
@CopilotIcon
</div>
<span>Copilot Studio Agent</span>
</div>
<div class="assistant-message-text">
@* Convert markdown to HTML and render *@
@((MarkupString)RenderMarkdown(text))
</div>
</div>
}Important: The (MarkupString) cast tells Blazor to render the string as HTML rather than escaping it.
- Run your application and check that streaming and rendering works as expected.
Let's display real-time status updates showing what Copilot Studio is doing (e.g., "Searching for information...", "Dynamic Plan Received"). This includes both informative stream messages and event activities from the execution chain.
- Replace your current StreamResponseAsync method in CopilotStudioIChatClient.cs with the enhanced version that handles streaming chunks, informative messages, and event activities:
private async IAsyncEnumerable<ChatResponseUpdate> StreamResponseAsync(
Activity activityToSend,
[EnumeratorCancellation] CancellationToken cancellationToken)
{
var createdAt = DateTimeOffset.UtcNow;
// NEW: Accumulate streaming text chunks
var accumulatedText = new StringBuilder();
await foreach (var activity in _copilotClient.SendActivityAsync(activityToSend, cancellationToken))
{
// Parse streaming metadata from ChannelData
var metadata = ParseStreamingMetadata(activity.ChannelData);
// Case 1: Event activities (execution chain status)
if (activity.Type == "event" && !string.IsNullOrEmpty(activity.Name))
{
// Convert PascalCase to readable text: "DynamicPlanReceived" → "Dynamic Plan Received"
var readableName = AddSpacesToPascalCase(activity.Name);
yield return new ChatResponseUpdate
{
CreatedAt = createdAt,
Role = ChatRole.Assistant,
Contents =
[
new FunctionCallContent("InformativeMessage", readableName)
{
Arguments = new Dictionary<string, object?>
{
["message"] = readableName,
["sequence"] = 0
}
}
]
};
continue;
}
if (metadata?.StreamType == "streaming")
{
// Streaming chunk - accumulate and yield the full text so far
accumulatedText.Append(activity.Text);
yield return new ChatResponseUpdate
{
CreatedAt = createdAt,
Contents = [new TextContent(accumulatedText.ToString())],
Role = ChatRole.Assistant
};
}
else if (metadata?.StreamType == "final" || metadata?.StreamType == null)
{
// Final message or no metadata - use as-is (complete message)
yield return new ChatResponseUpdate
{
CreatedAt = createdAt,
Contents = [new TextContent(activity.Text)],
Role = ChatRole.Assistant
};
}
}
}
- Add this helper method to convert PascalCase names to readable text:
/// <summary>
/// Converts PascalCase to readable text by adding spaces before capital letters.
/// Example: "DynamicPlanReceived" → "Dynamic Plan Received"
/// </summary>
private static string AddSpacesToPascalCase(string text)
{
if (string.IsNullOrEmpty(text))
return text;
var result = new StringBuilder();
foreach (char c in text)
{
// Add space before uppercase letters (except at the start)
if (char.IsUpper(c) && result.Length > 0)
{
result.Append(' ');
}
result.Append(c);
}
return result.ToString();
}
The event activities provide visibility into the agent's internal processing, showing users what's happening at each step of the execution plan.
- Add the Informative Message Template In ChatMessageItem.razor, add handling for informative messages within the assistant message loop. Replace below code:
else if (Message.Role == ChatRole.Assistant)
{
foreach (var content in Message.Contents)
{
@if (content is TextContent { Text: { Length: > 0 } text })
{
<div class="assistant-message @(InProgress ? "is-streaming" : "streaming-complete")">
<div class="assistant-message-header">
<div class="assistant-message-icon">
@CopilotIcon
</div>
<span>Copilot Studio Agent</span>
</div>
<div class="assistant-message-text">
@* Convert markdown to HTML and render *@
@((MarkupString)RenderMarkdown(text))
</div>
</div>
}
}
}
Using the following code:
else if (Message.Role == ChatRole.Assistant)
{
foreach (var content in Message.Contents)
{
if (content is TextContent { Text: { Length: > 0 } text })
{
<div class="assistant-message @(InProgress ? "is-streaming" : "streaming-complete")">
<div class="assistant-message-header">
<div class="assistant-message-icon">
@CopilotIcon
</div>
<span>Copilot Studio Agent</span>
</div>
<div class="assistant-message-text">
@((MarkupString)RenderMarkdown(text))
</div>
</div>
}
else if (content is FunctionCallContent { CallId: "InformativeMessage" } infoMsg &&
infoMsg.Arguments?.TryGetValue("message", out var msgObj) is true &&
msgObj is string infoText)
{
<!-- Informative message - status/search indicator -->
<div class="assistant-search">
<div class="assistant-message-header">
<div class="assistant-search-icon">
@LoadingIcon
</div>
<div class="assistant-search-content">
<span class="assistant-search-phrase">@infoText</span>
</div>
</div>
</div>
}
}
}
As you see we added one more section to support informative messages.
- Add the Loading Icon. Add this static RenderFragment in the @code block:
// Loading/Processing Icon for informative messages
private static RenderFragment LoadingIcon => __builder =>
{
<div class="loading-icon-container">
<svg class="loading-sparkle" viewBox="0 0 28 28" fill="none" xmlns="http://www.w3.org/2000/svg">
<!-- Main sparkle with animation -->
<path class="sparkle-main" d="M14 3C14 3 15.5 8.5 17.5 10.5C19.5 12.5 25 14 25 14C25 14 19.5 15.5 17.5 17.5C15.5 19.5 14 25 14 25C14 25 12.5 19.5 10.5 17.5C8.5 15.5 3 14 3 14C3 14 8.5 12.5 10.5 10.5C12.5 8.5 14 3 14 3Z"
fill="url(#loadingGradient)" />
<defs>
<linearGradient id="loadingGradient" x1="3" y1="3" x2="25" y2="25" gradientUnits="userSpaceOnUse">
<stop offset="0%" stop-color="#7B83EB" />
<stop offset="50%" stop-color="#5B5FC7" />
<stop offset="100%" stop-color="#6264A7" />
</linearGradient>
</defs>
</svg>
<div class="loading-dots">
<span class="dot"></span>
<span class="dot"></span>
<span class="dot"></span>
</div>
</div>
};
- Your Chat.razor component needs to handle streaming updates including informative messages. Here's the key method. Just replace ProcessUpdateContents competely with the below code.
private void ProcessUpdateContents(
ChatResponseUpdate update,
TextContent responseText,
List<AIContent> responseContents)
{
foreach (var content in update.Contents)
{
switch (content)
{
case TextContent { Text: { Length: > 0 } text }:
// Hide the waiting indicator once we have content
isWaitingForResponse = false;
// Update the response text (replaces previous content)
responseText.Text = text;
break;
case FunctionCallContent { CallId: "InformativeMessage" } infoContent:
// Add informative message to the response contents
// These are displayed as status indicators in the UI
responseContents.Add(infoContent);
break;
}
}
}
- Here is the updated version of ProcessStreamingResponseAsync from Chat.razor
private async Task ProcessStreamingResponseAsync(IAsyncEnumerable<ChatResponseUpdate> updates)
{
// Setup response state
isWaitingForResponse = true;
var responseText = new TextContent("");
var responseContents = new List<AIContent> { responseText };
currentResponseMessage = new ChatMessage(ChatRole.Assistant, responseContents);
StateHasChanged();
try
{
await foreach (var update in updates)
{
// Process each streaming update
ProcessUpdateContents(update, responseText, responseContents);
// Notify the ChatMessageItem to re-render
ChatMessageItem.NotifyChanged(currentResponseMessage);
StateHasChanged();
// Allow UI to update between chunks
await Task.Yield();
}
}
catch (OperationCanceledException)
{
// Expected when user sends a new message while streaming
}
catch (Exception ex)
{
responseText.Text = $"Error: {ex.Message}";
}
finally
{
isWaitingForResponse = false;
}
// Cleanup: remove informative messages from final response
responseContents.RemoveAll(c => c is FunctionCallContent { CallId: "InformativeMessage" });
// Store the completed message
messages.Add(currentResponseMessage!);
currentResponseMessage = null;
}
Let's discuss how it works. When Copilot Studio sends an event activity or an informative stream message, the CopilotStudioIChatClient wraps it in a FunctionCallContent object. This is a creative use of the Microsoft.Extensions.AI abstraction - we're not actually calling a function, but using FunctionCallContent as a typed container to carry metadata through the streaming pipeline.
Purpose: Convert raw Copilot Studio activities into a standardized format.
Method: StreamResponseAsync()
When we receive an event or informative message, we create a FunctionCallContent with:
CallIdset to"InformativeMessage"- this acts as a discriminator/tagNameset to the display textArgumentsdictionary containing the message and sequence number
This gets yielded as part of a ChatResponseUpdate and travels through the async stream to the UI layer.
Helper Method: AddSpacesToPascalCase() - Converts event names like DynamicPlanReceived to readable "Dynamic Plan Received"
Data flow: Raw Activity → FunctionCallContent → ChatResponseUpdate → async stream
Purpose: Receive streaming updates and organize content for display.
Method: ProcessStreamingResponseAsync() - Main loop that consumes the async stream and coordinates updates
Method: ProcessUpdateContents() - Extracts content from each update
The ProcessUpdateContents method iterates through each content item in the update. The pattern FunctionCallContent { CallId: "InformativeMessage" } is C# pattern matching that:
- Checks if the content is of type
FunctionCallContent - Checks if its
CallIdproperty equals"InformativeMessage" - If both match, assigns the object to
infoContent
When matched, we add infoContent to the responseContents list. This list is the backing collection for currentResponseMessage.Contents, so adding to it immediately makes the informative message available to the UI component.
Data flow: ChatResponseUpdate → extract FunctionCallContent → add to responseContents → notify ChatMessageItem to re-render
Purpose: Display the content to the user.
Method: OnInitialized() - Registers the component instance in SubscribersLookup so it can receive change notifications
Static Method: NotifyChanged() - Called from Chat.razor to trigger a re-render when content updates
Razor Template: The foreach loop in the markup iterates through Message.Contents and uses pattern matching to find FunctionCallContent items with CallId: "InformativeMessage". It extracts the "message" value from the Arguments dictionary and renders it with the loading icon and animated dots.
Data flow: Message.Contents → pattern match FunctionCallContent → extract message text → render HTML with loading indicator
- Test the functionality. You should be able to see additional details about the Copilot Studio execution pipeline.
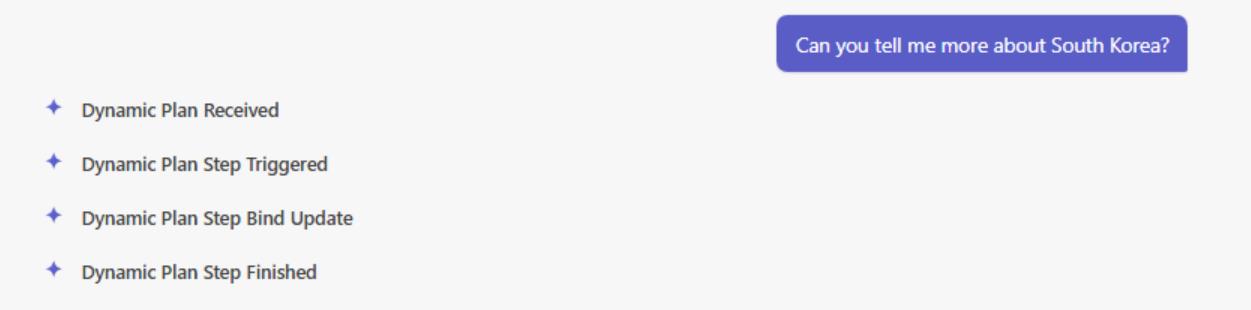
In this section, you will attach an MCP server to your agent and create a simple Adaptive Card with custom input parameters. After that, you will extend your Blazor web app to add support for Adaptive Card functionality and handle the submitted inputs as part of the interaction flow.
- Go to Copilot Studio Portal +++https://copilotstudio.microsoft.com/+++ and open our existing agent. Use the credentials from the Resources tab. Sign in using the Temporary Access Password (TAP). You can find it if you check "Recent agents" area.
- Go to "Tools" section
- Click "Add a tool"
- Switch to "Model Context Protocol"
- Find Dataverse MCP Server and click on it
- Click on "Not connected" and then click on Create new connection
- Choose Authentication type as "Oauth" and click "Create"
- Use the credentials from the Resources tab. Sign in using the Temporary Access Password (TAP). You can find it if you check "Recent agents" area.
- Click on "Add and configure"
- Now you have Dataverse MCP added to your agent.
- Try to ask the question like *"How many contacts are there in Dataverse?" *
As you can see, the agent requires your consent to access the Dataverse service. This consent request is displayed as an adaptive card. If your client does not support adaptive cards, you will not be able to use MCP servers.
- Publish your agent.
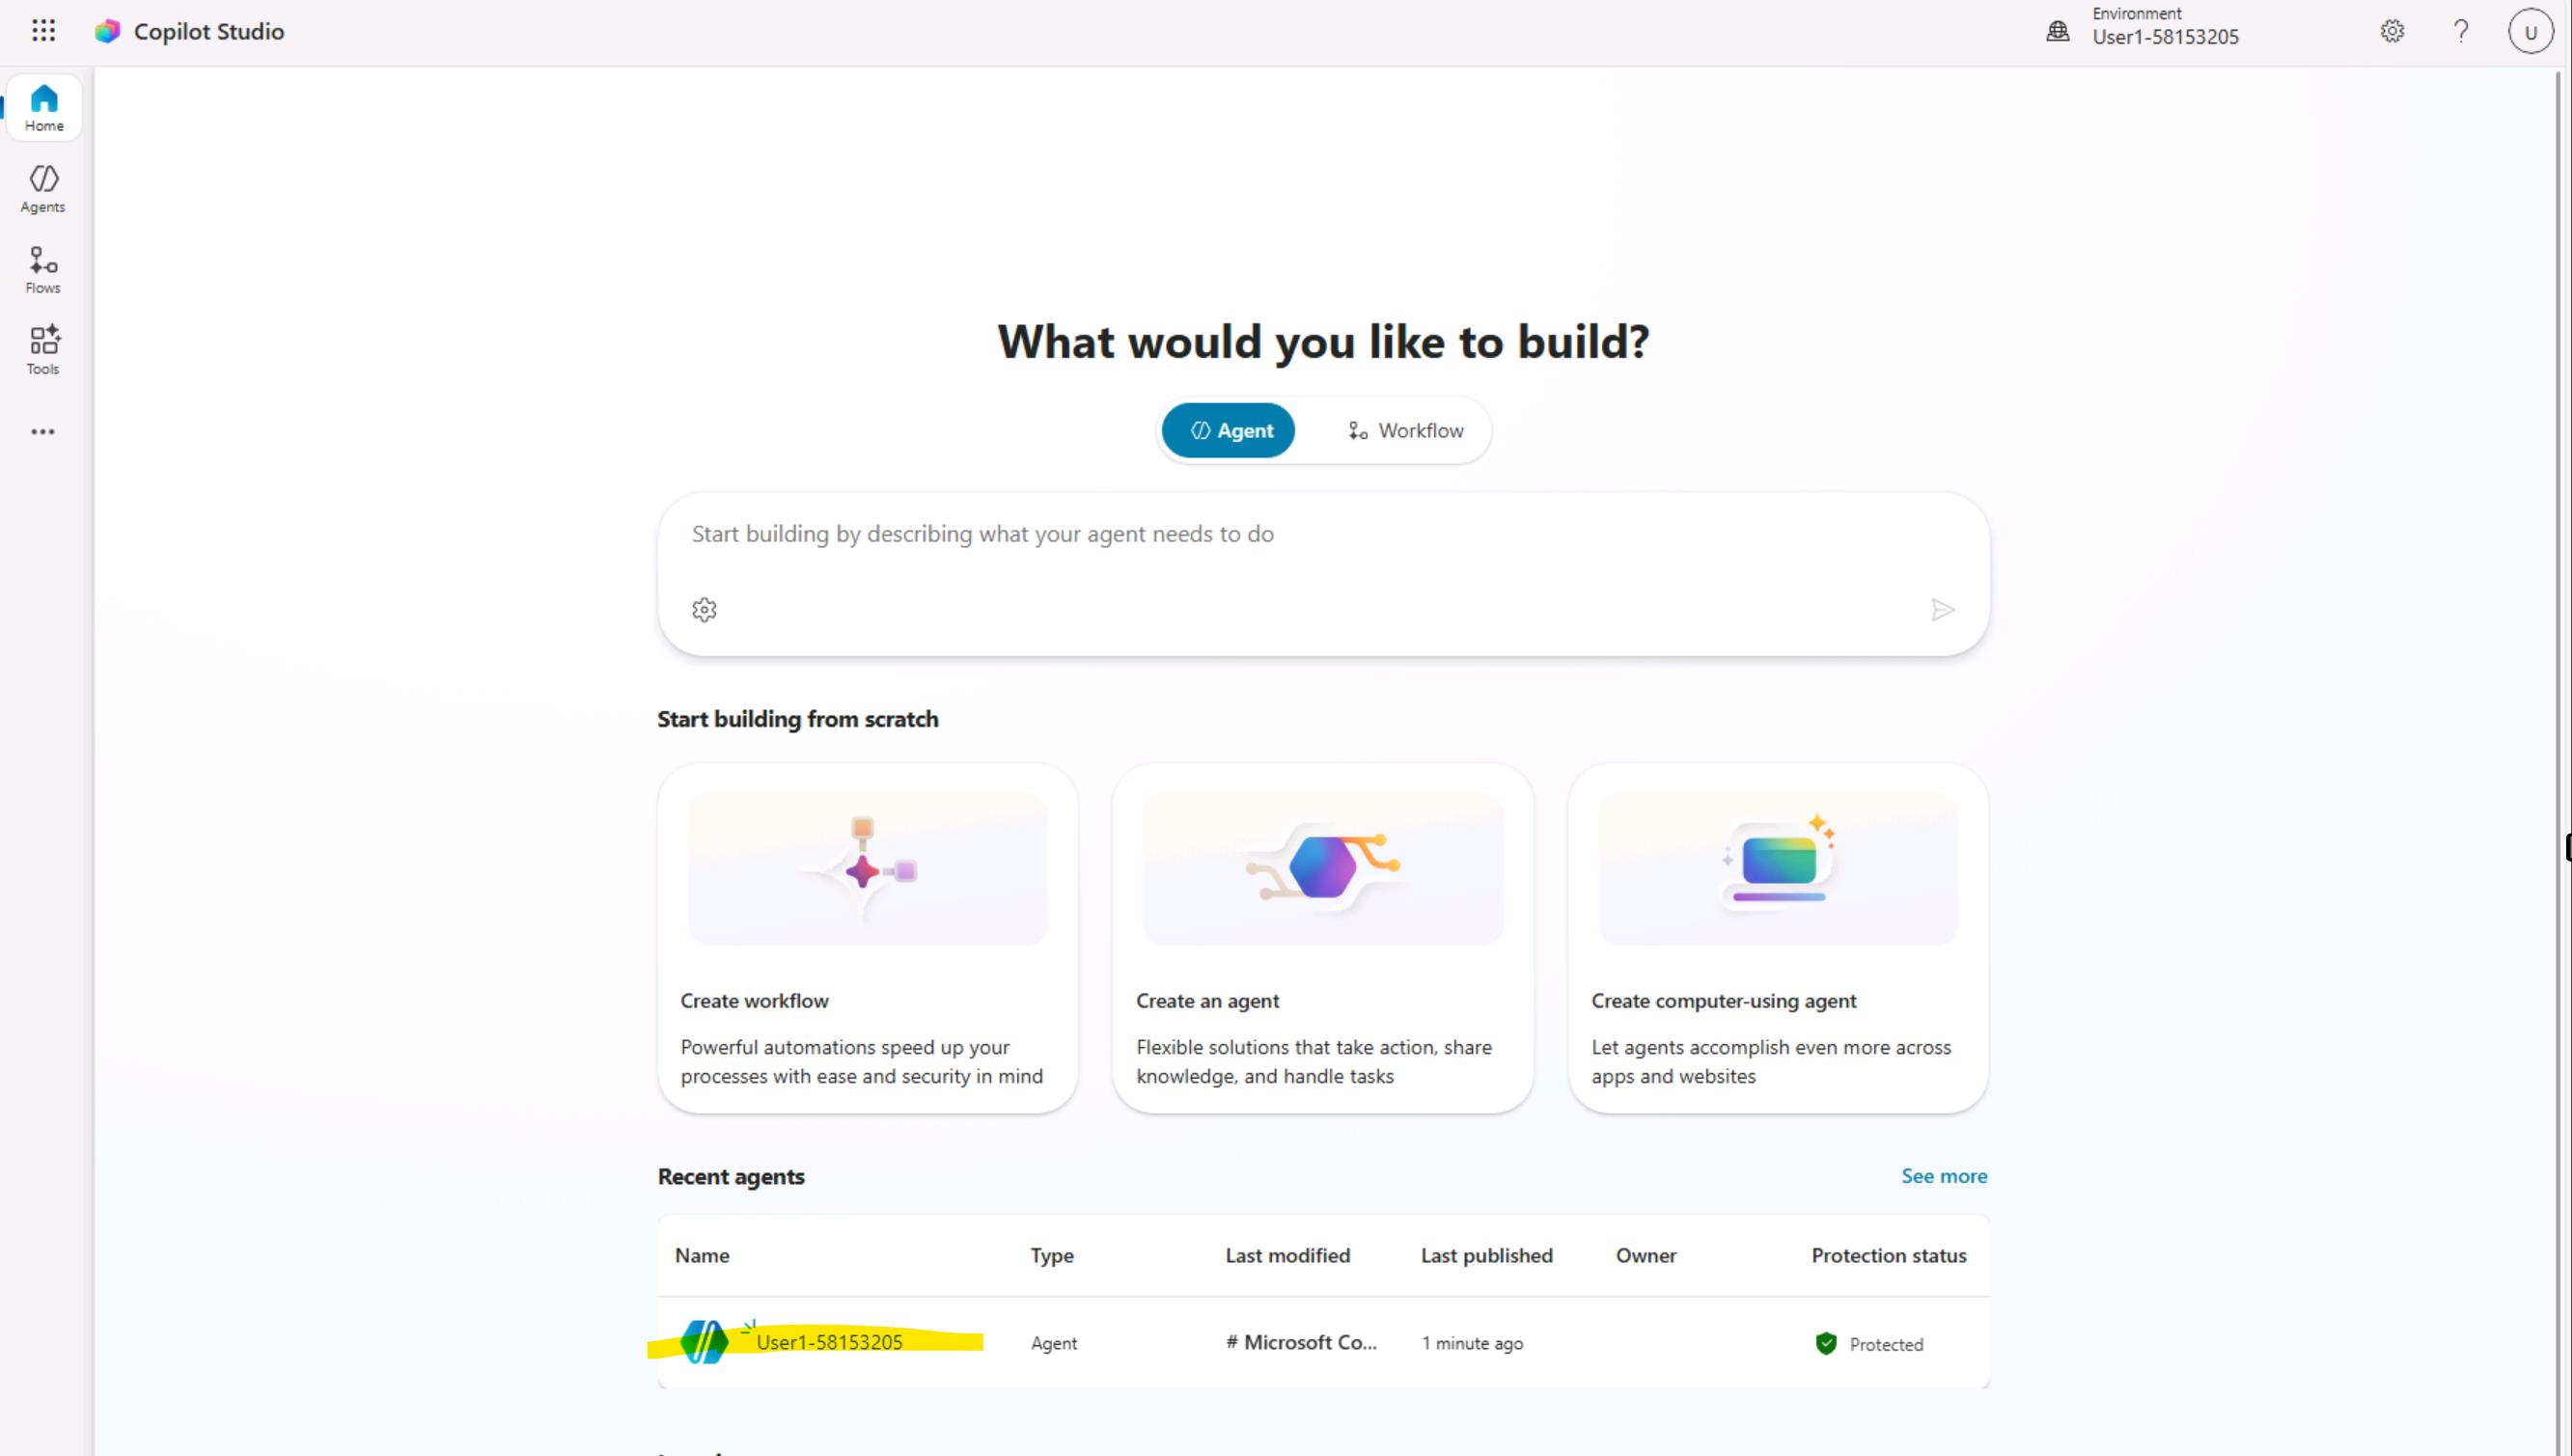
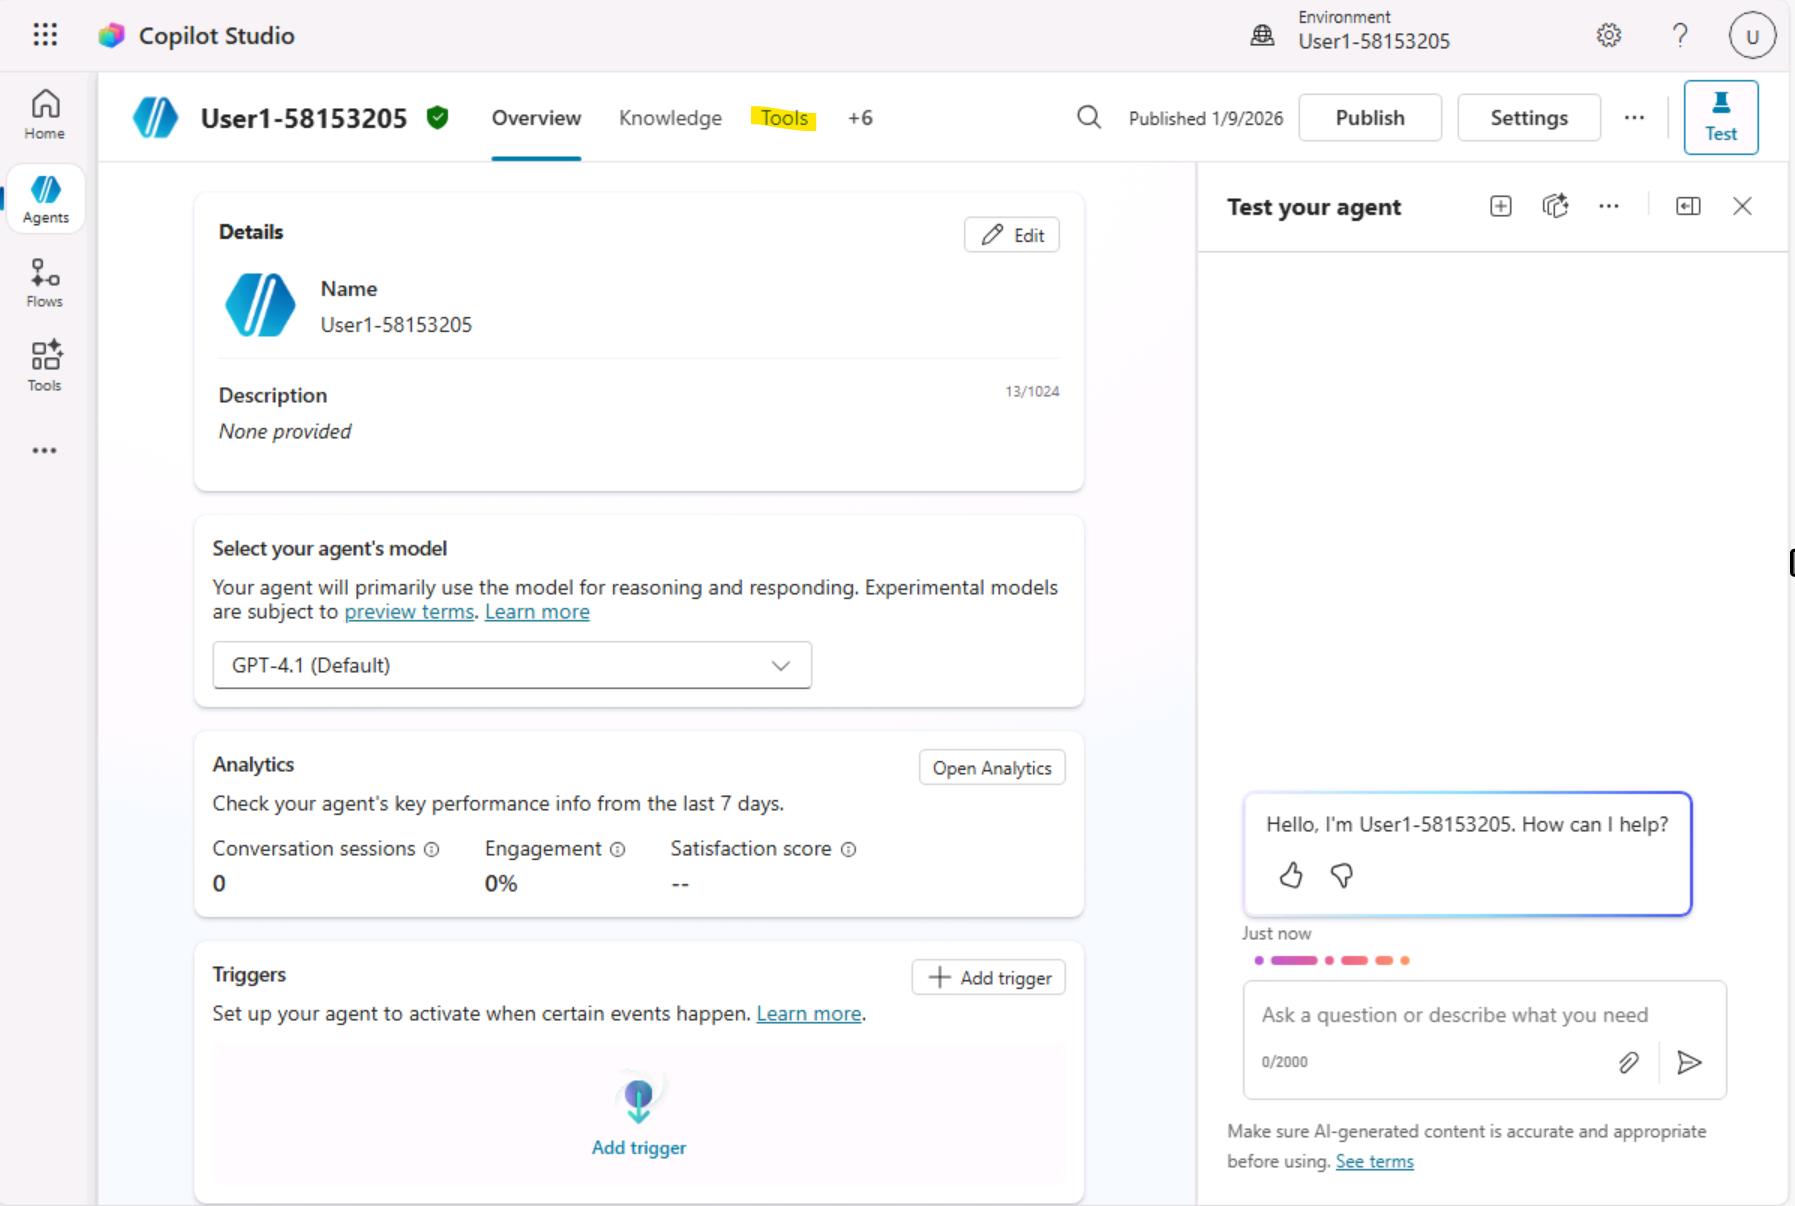
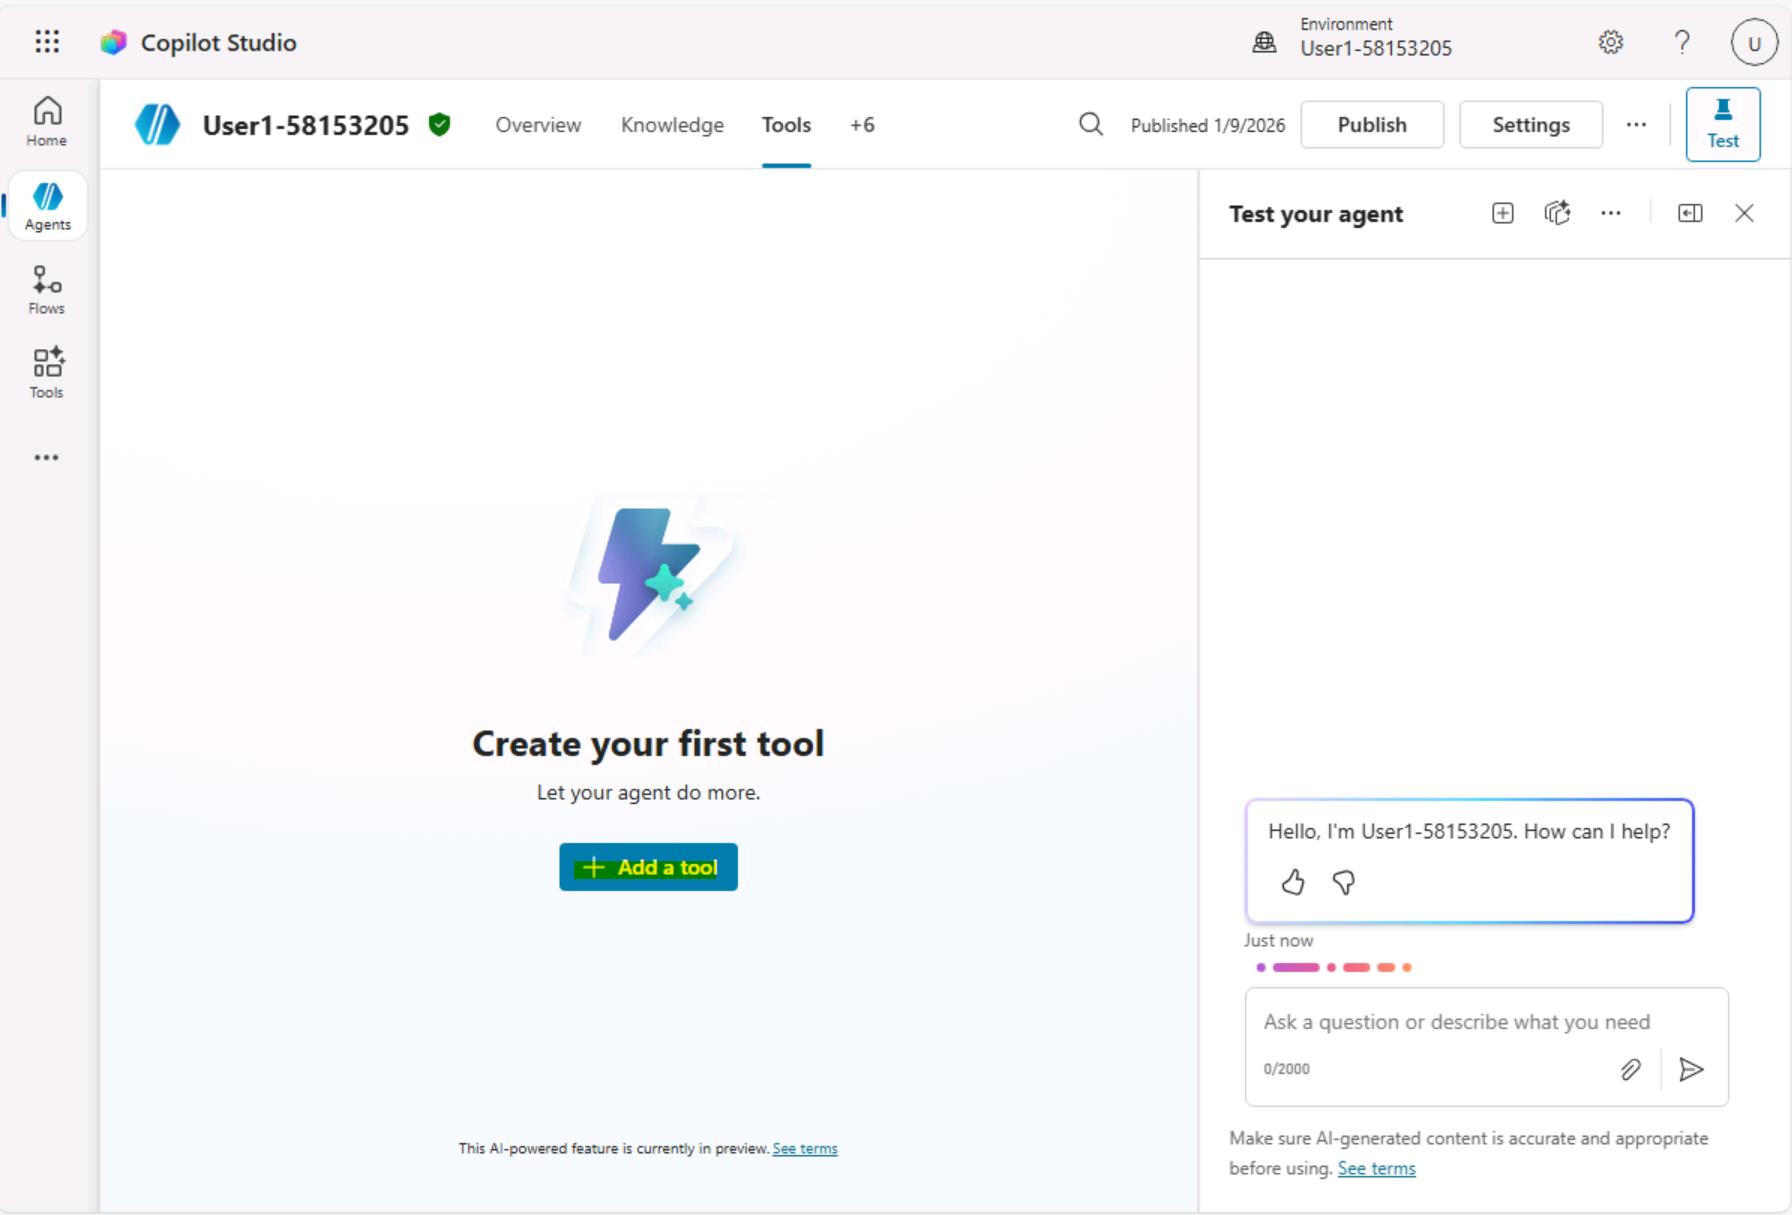
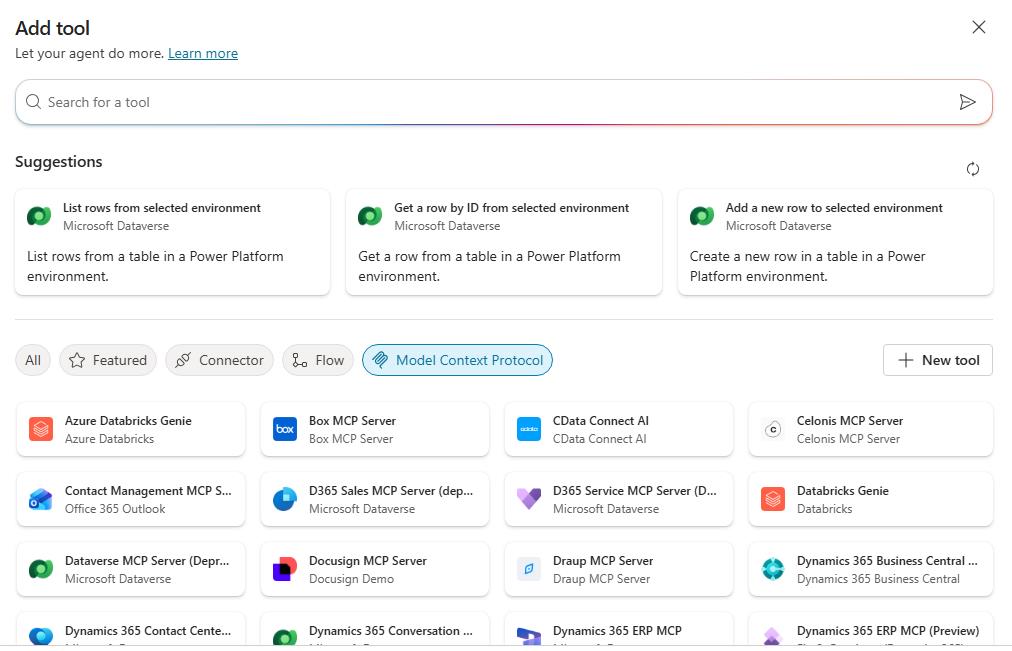
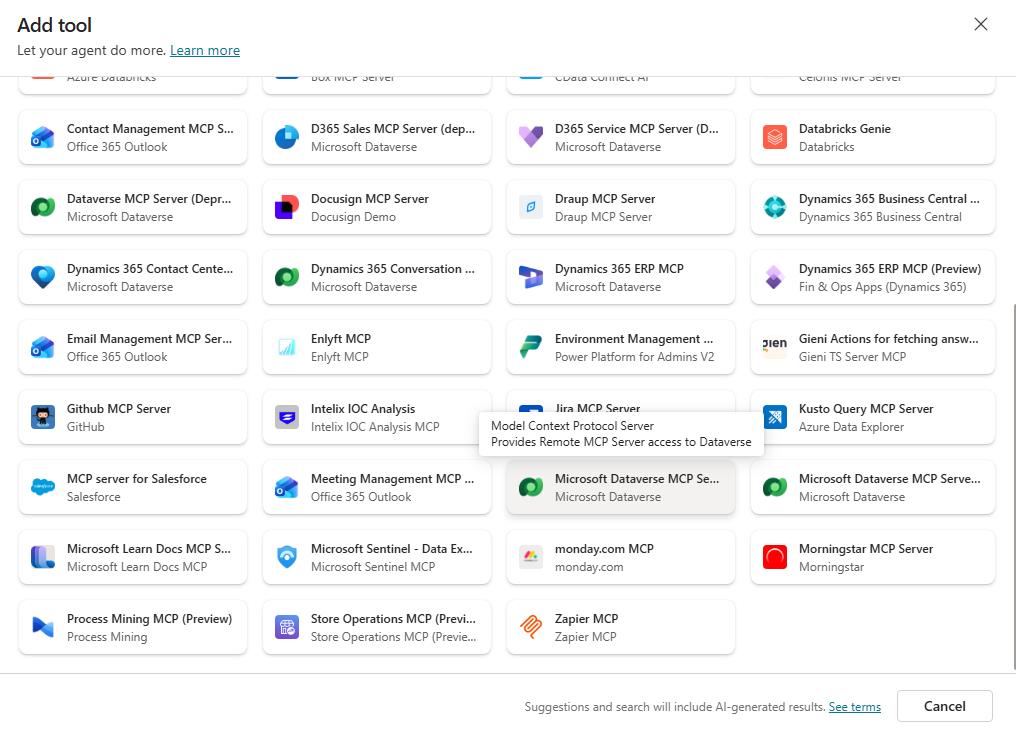
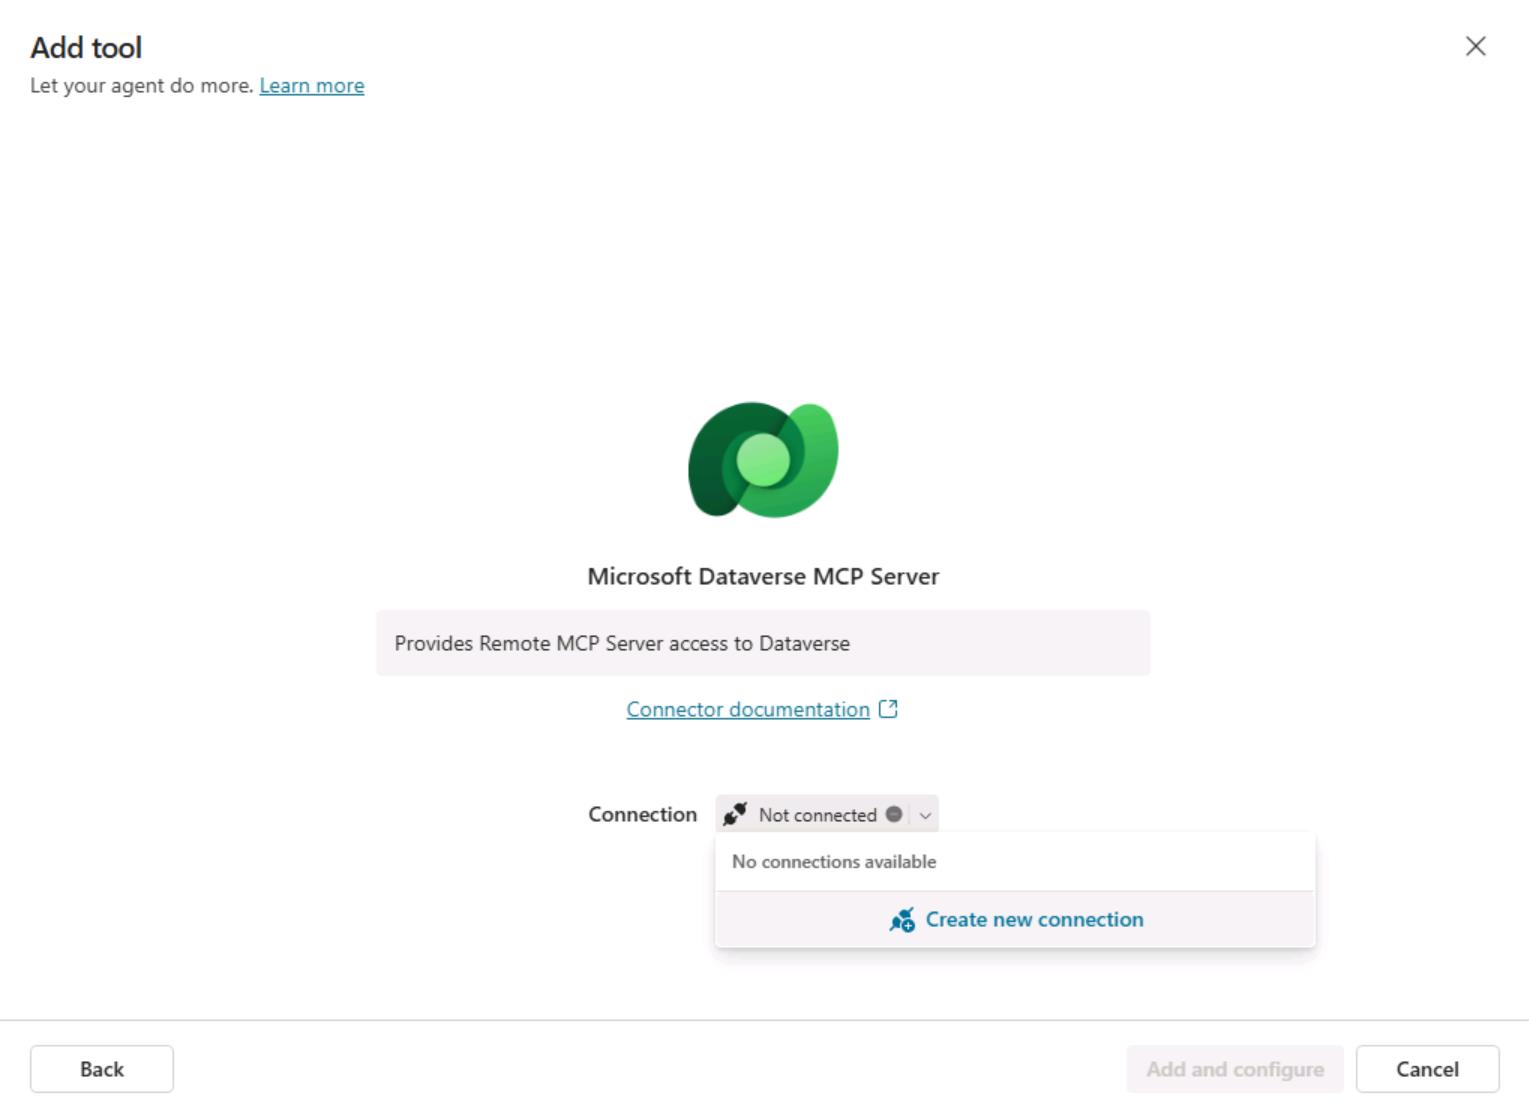
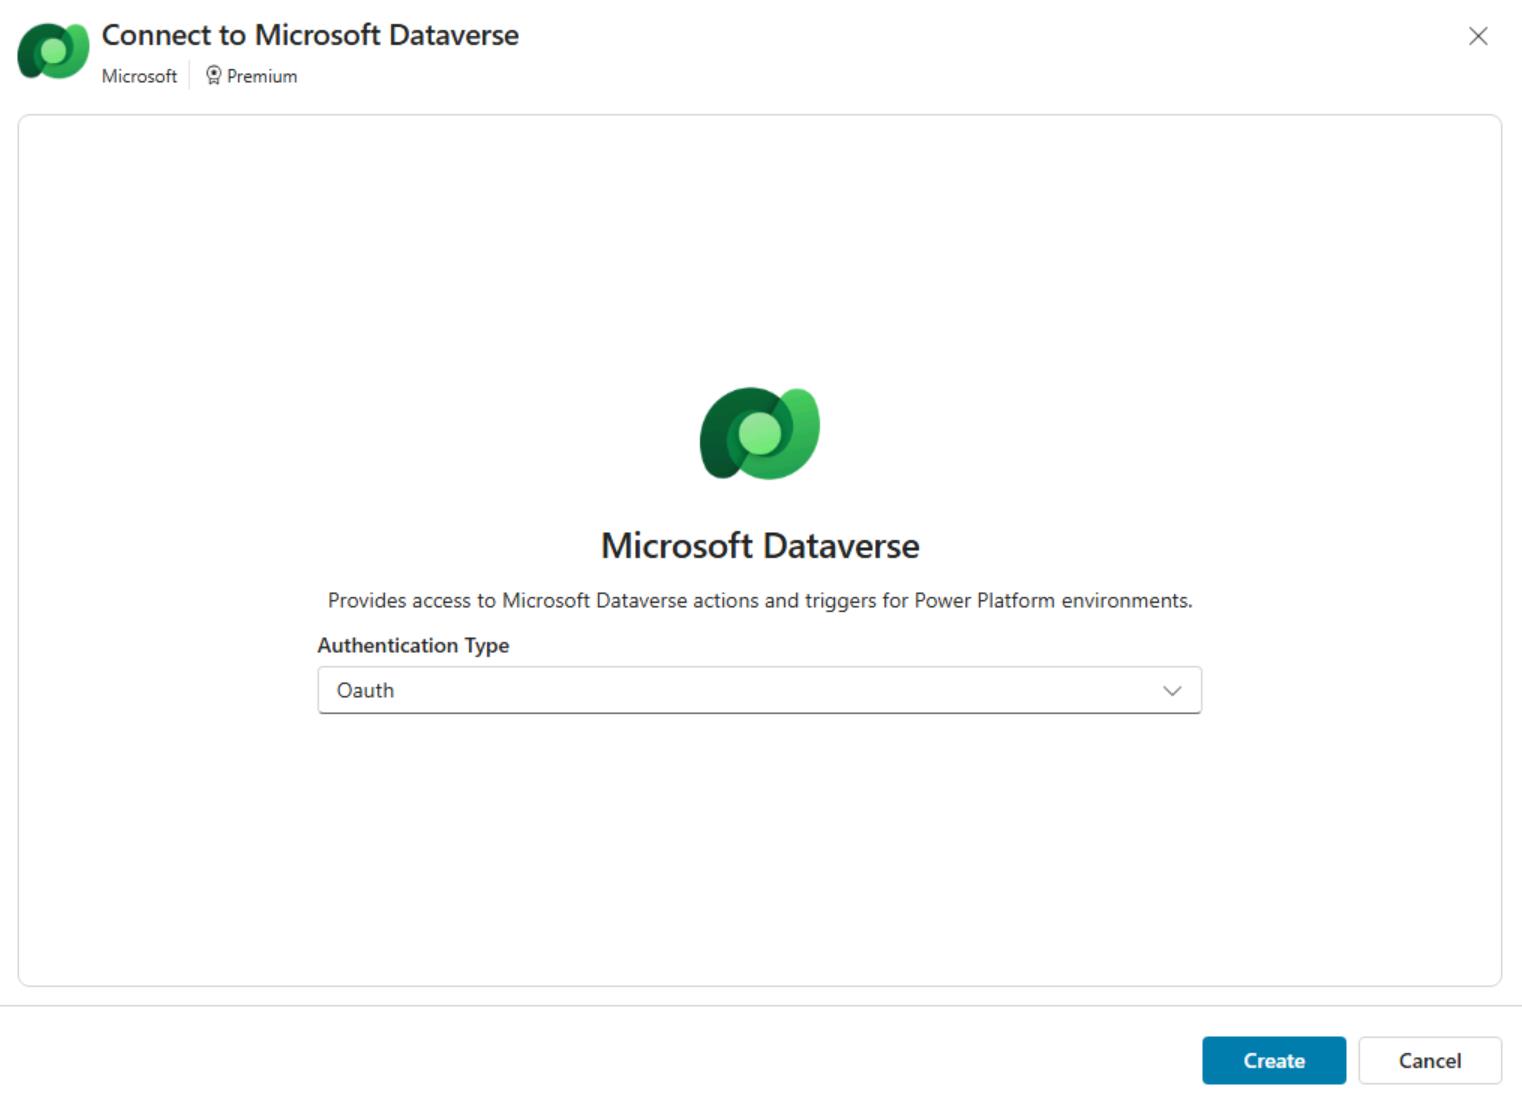
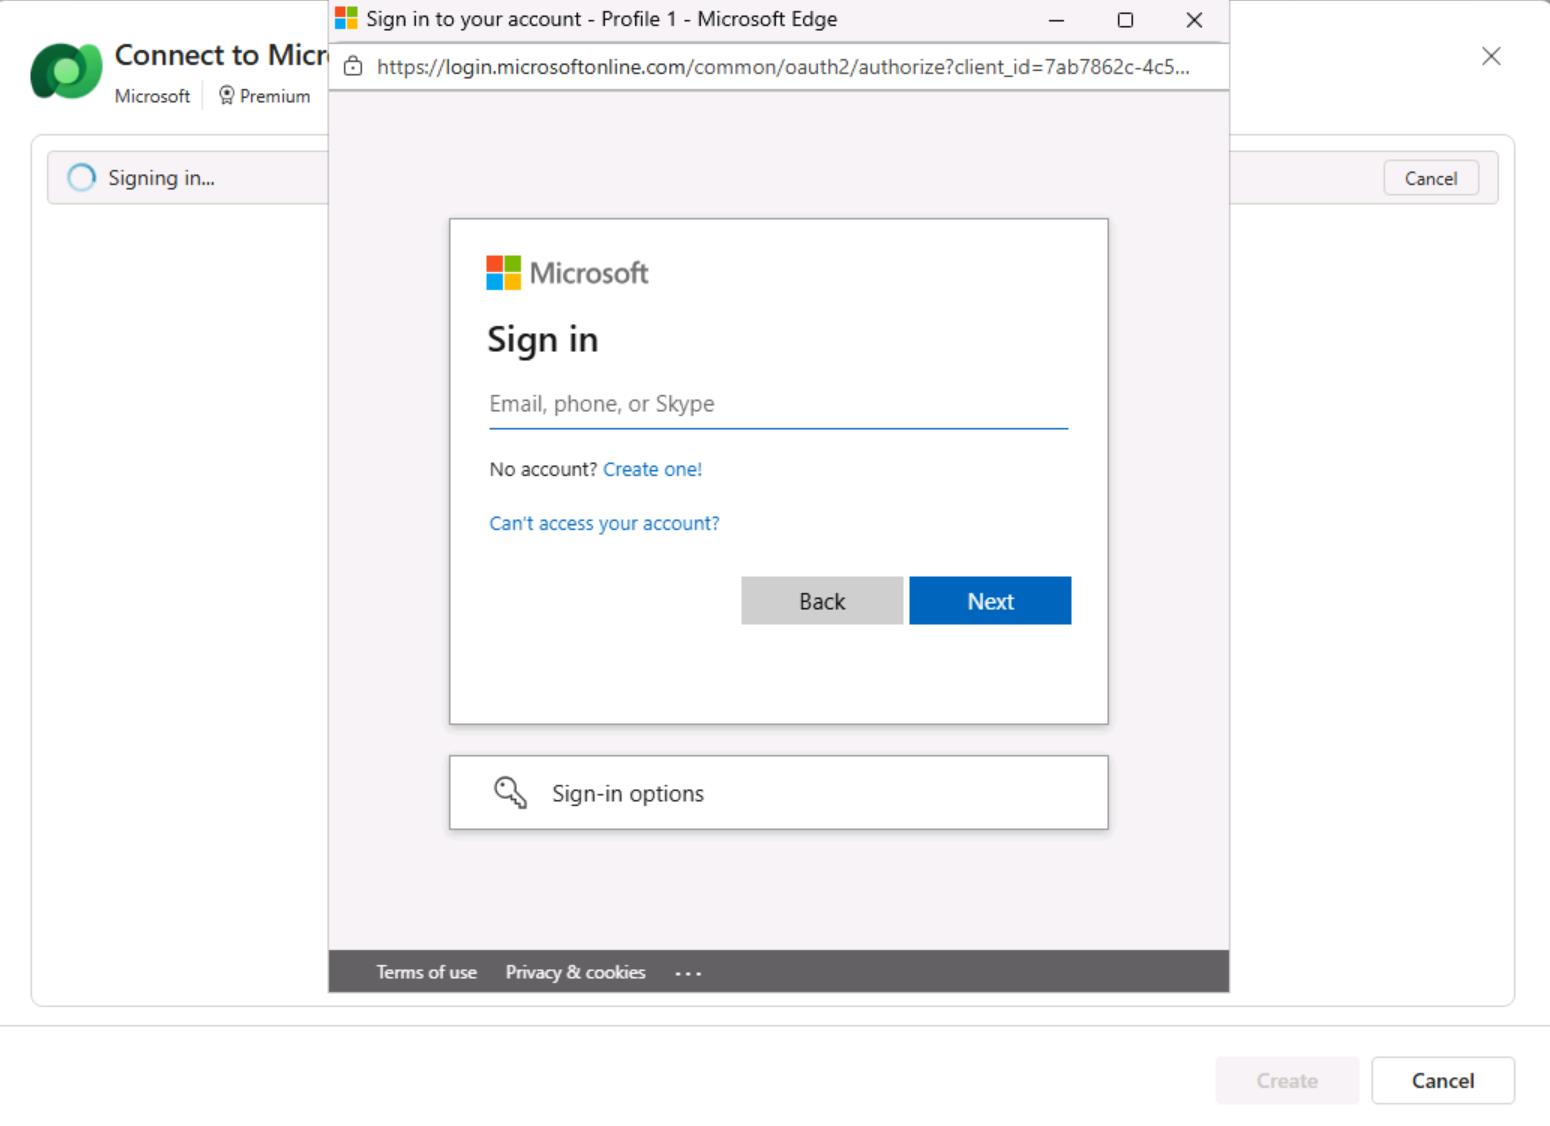
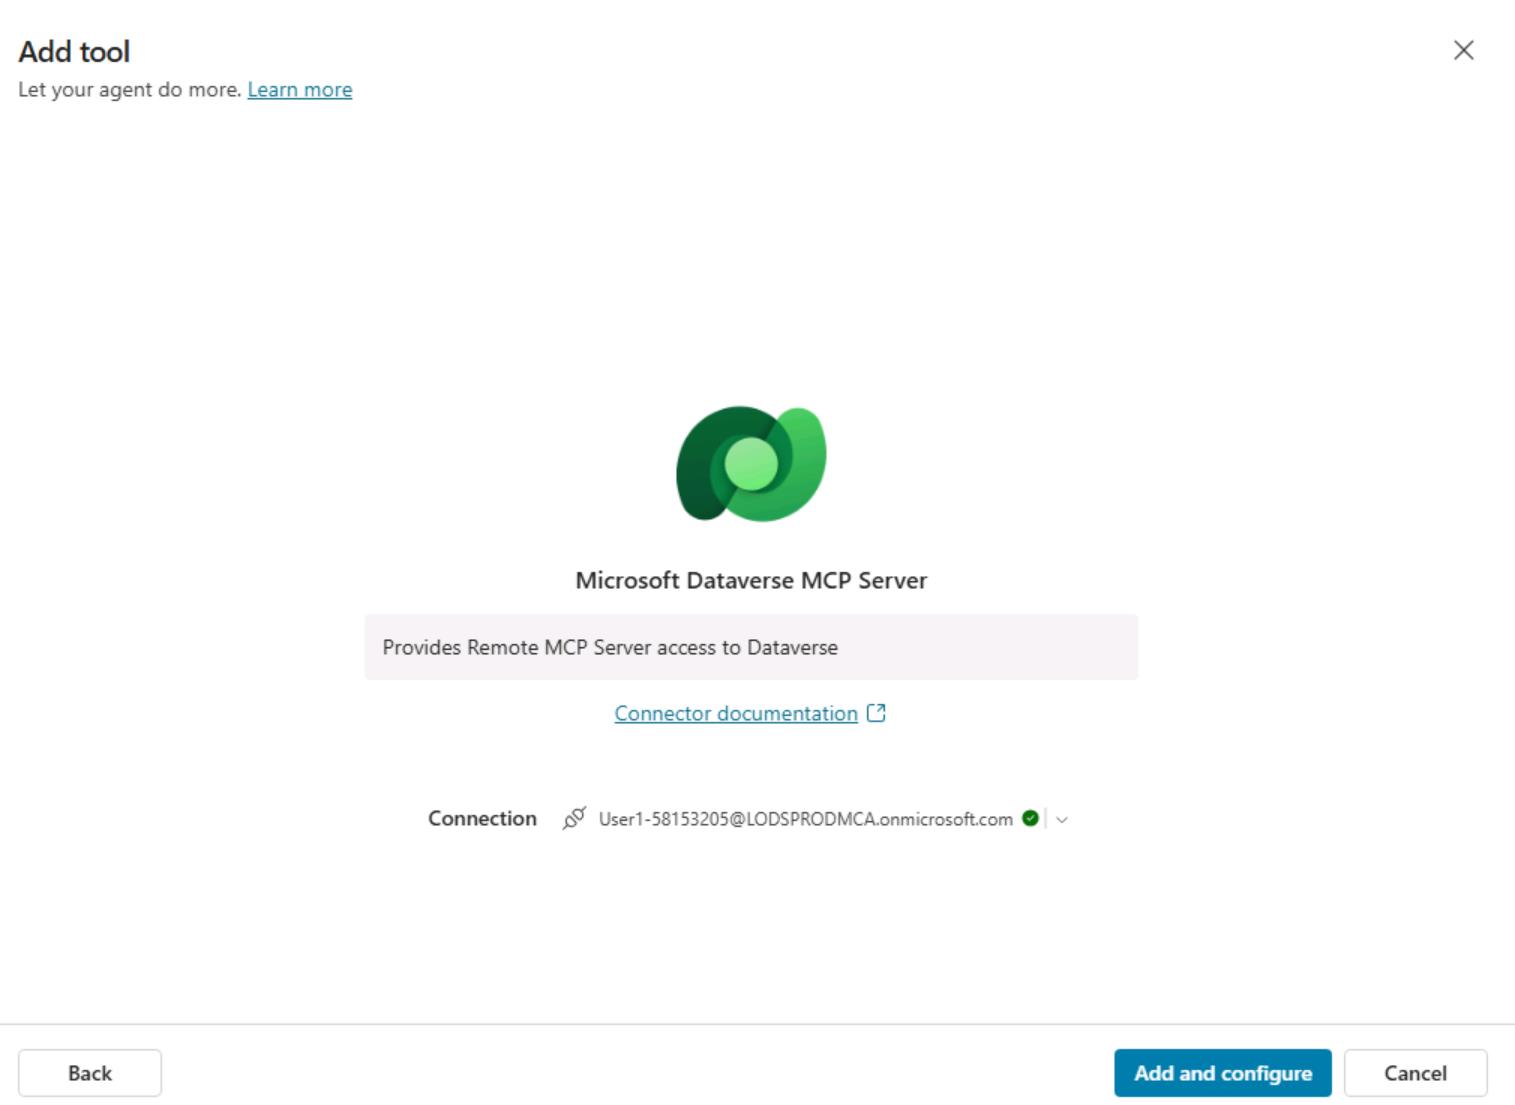
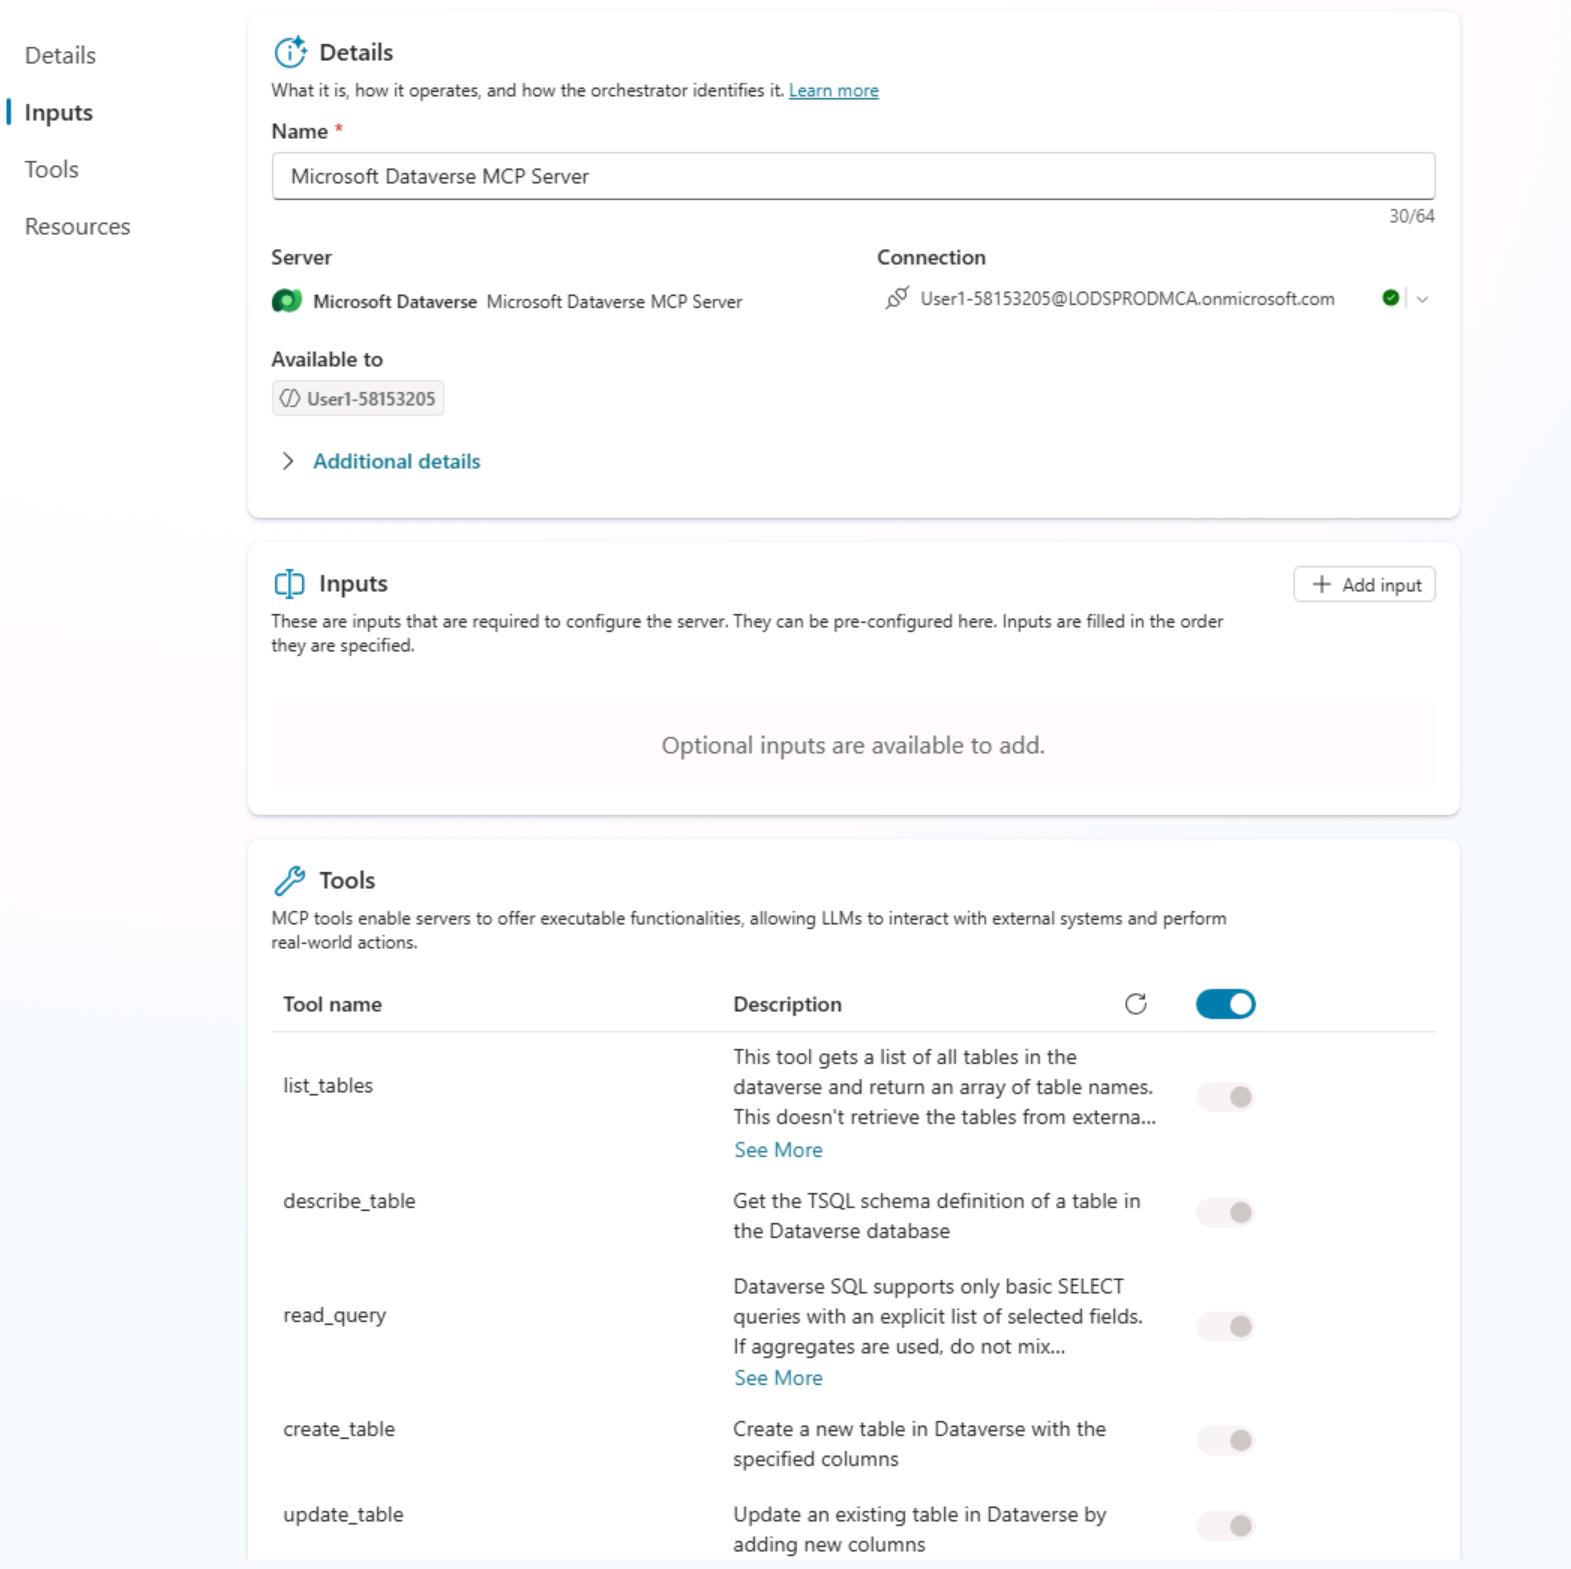
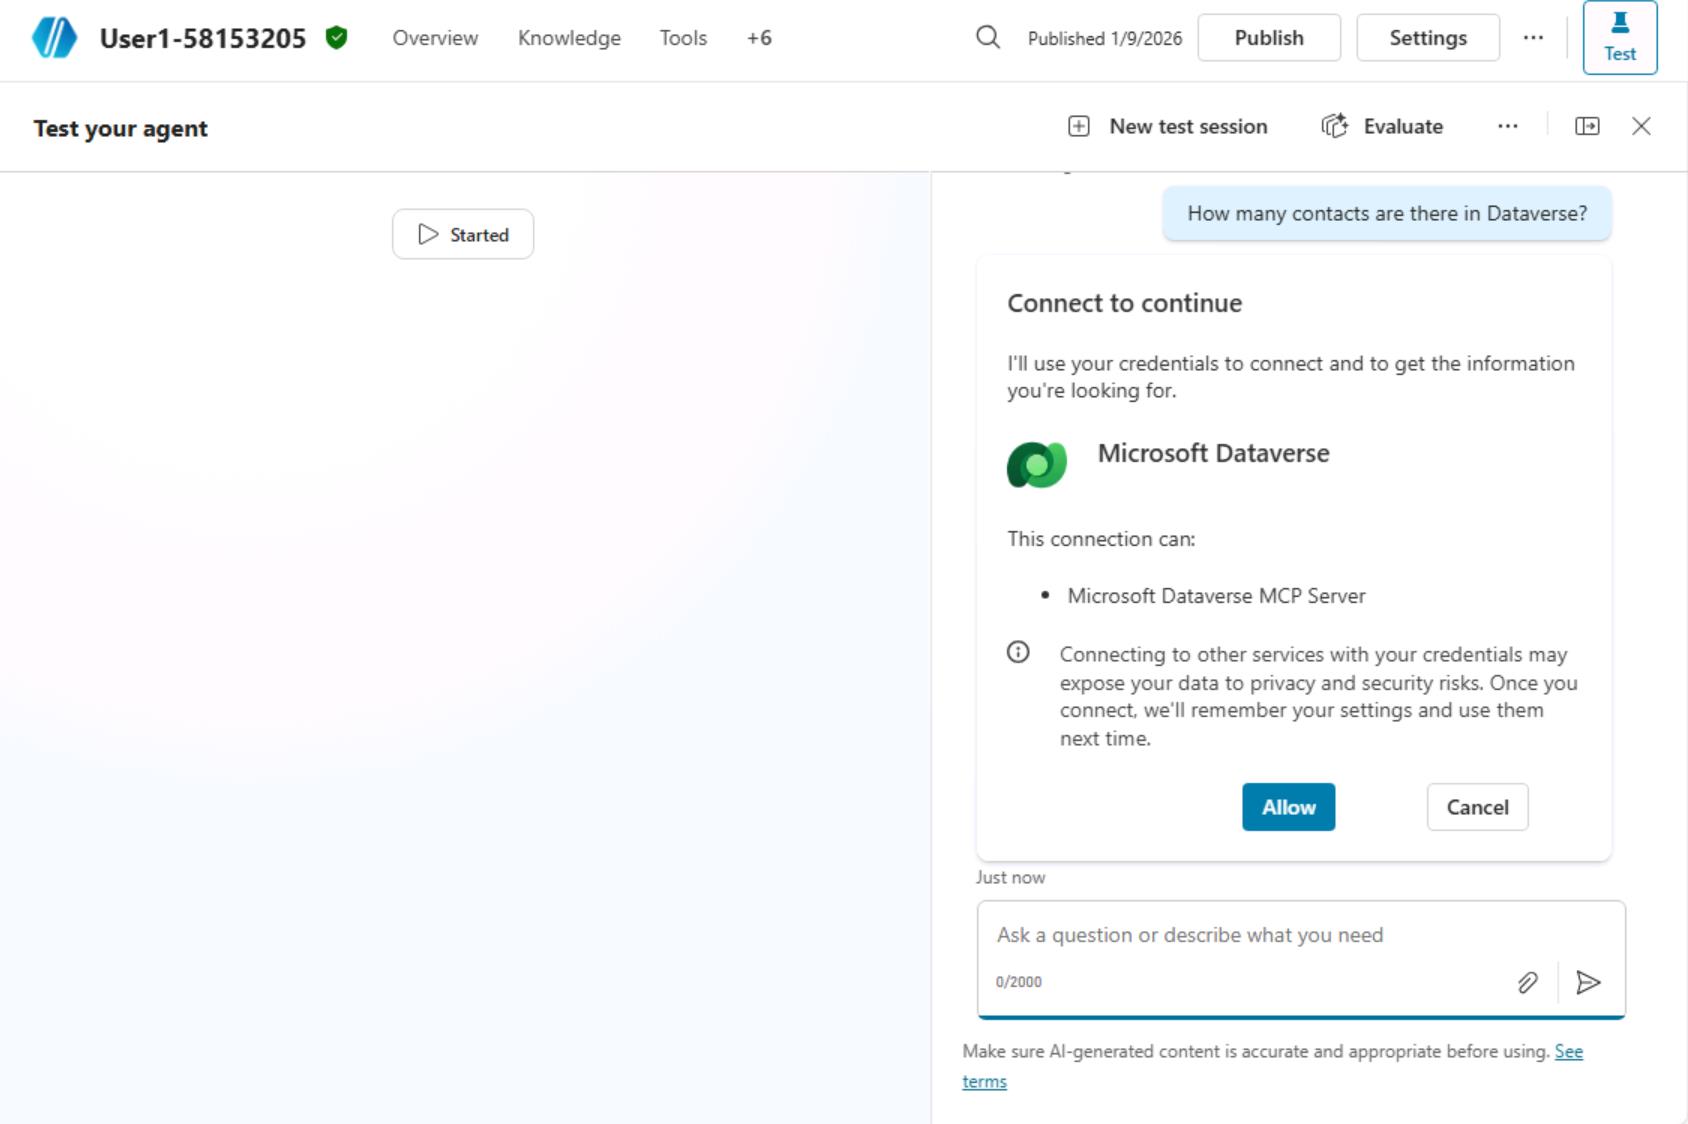
[!alert] This part is optional. It allows you to see how a custom-created Adaptive Card can be rendered in our custom application.
In this part, we will create a simple Adaptive Card that can be used to create a new contact in Dataverse.
Create a Topic that collects Contact First Name & Last Name via an Adaptive Card in Copilot Studio.
- Click on the Topic -> Add a topic -> From blank.
- Give the name of the Topic as "Create Contact" & edit Describe what the topic does as "Create Contact".
- Click on + icon to add an An adpative card. Select "Ask with adaptive card".
- Click on the Adpative card -> Edit adpative card.
- Replace the Adaptive card json on Card payload editor. Once added click on Save & Close.
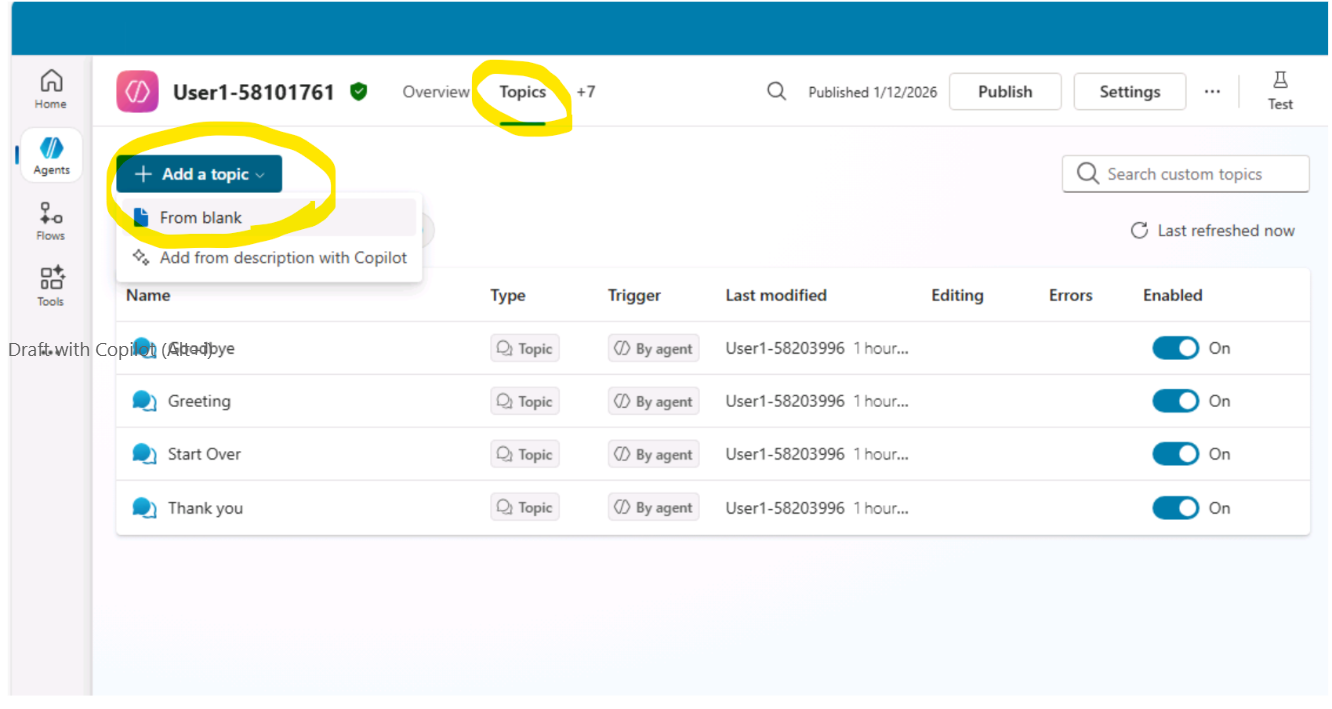
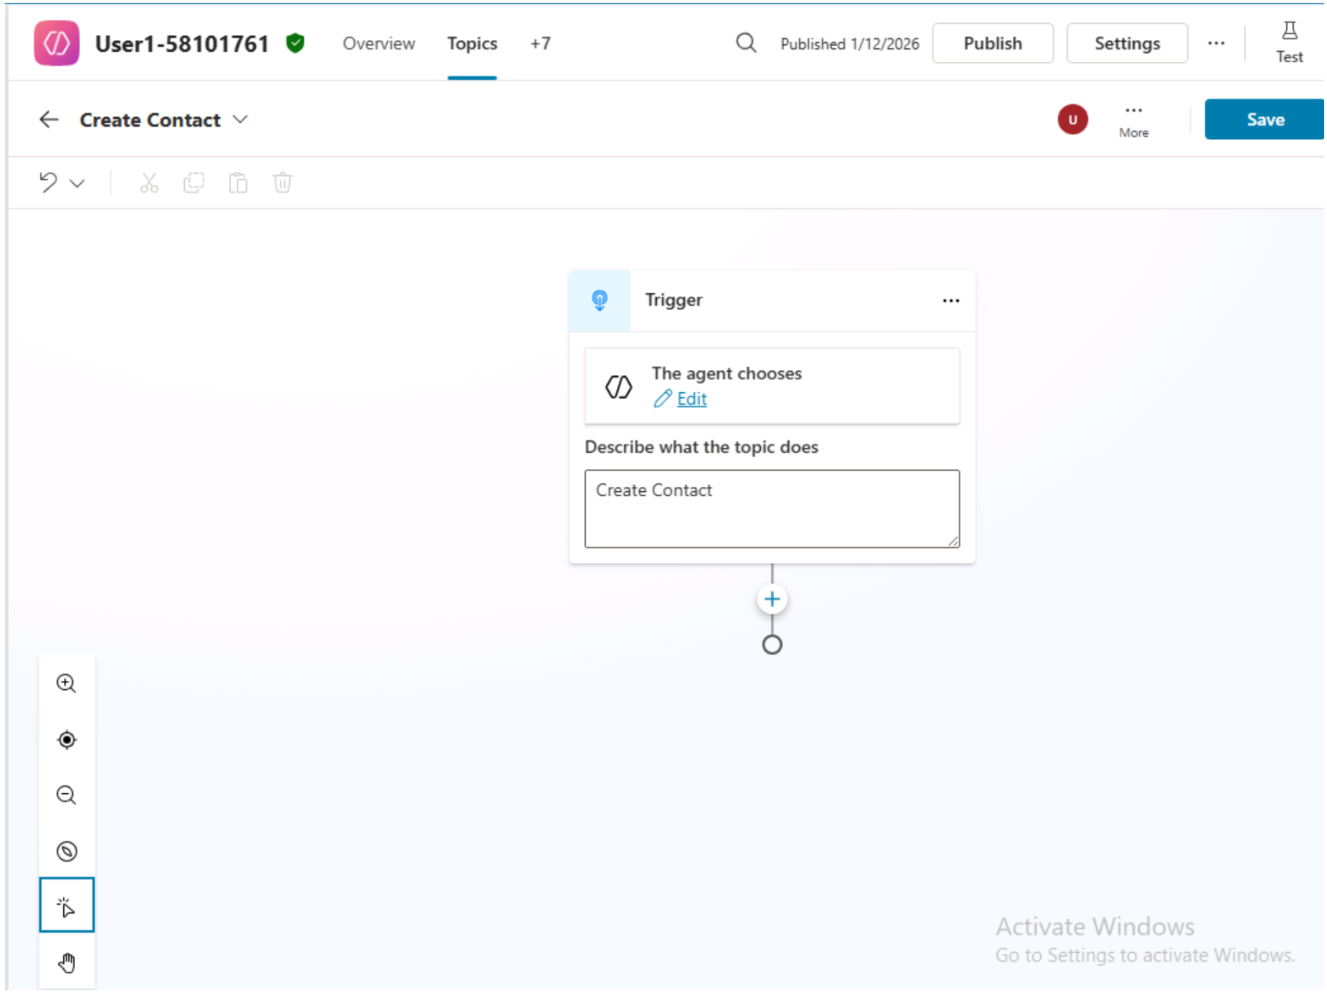
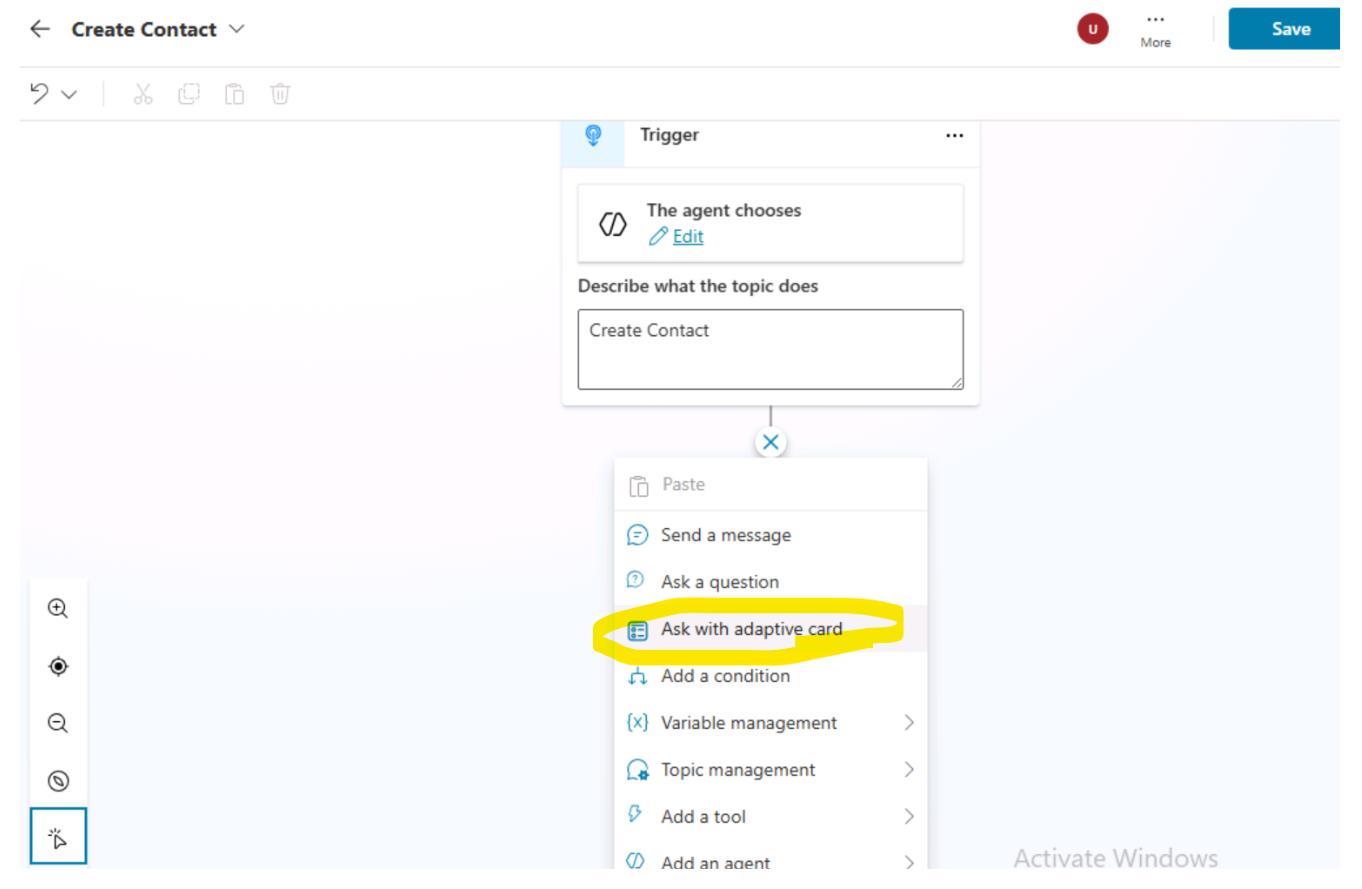
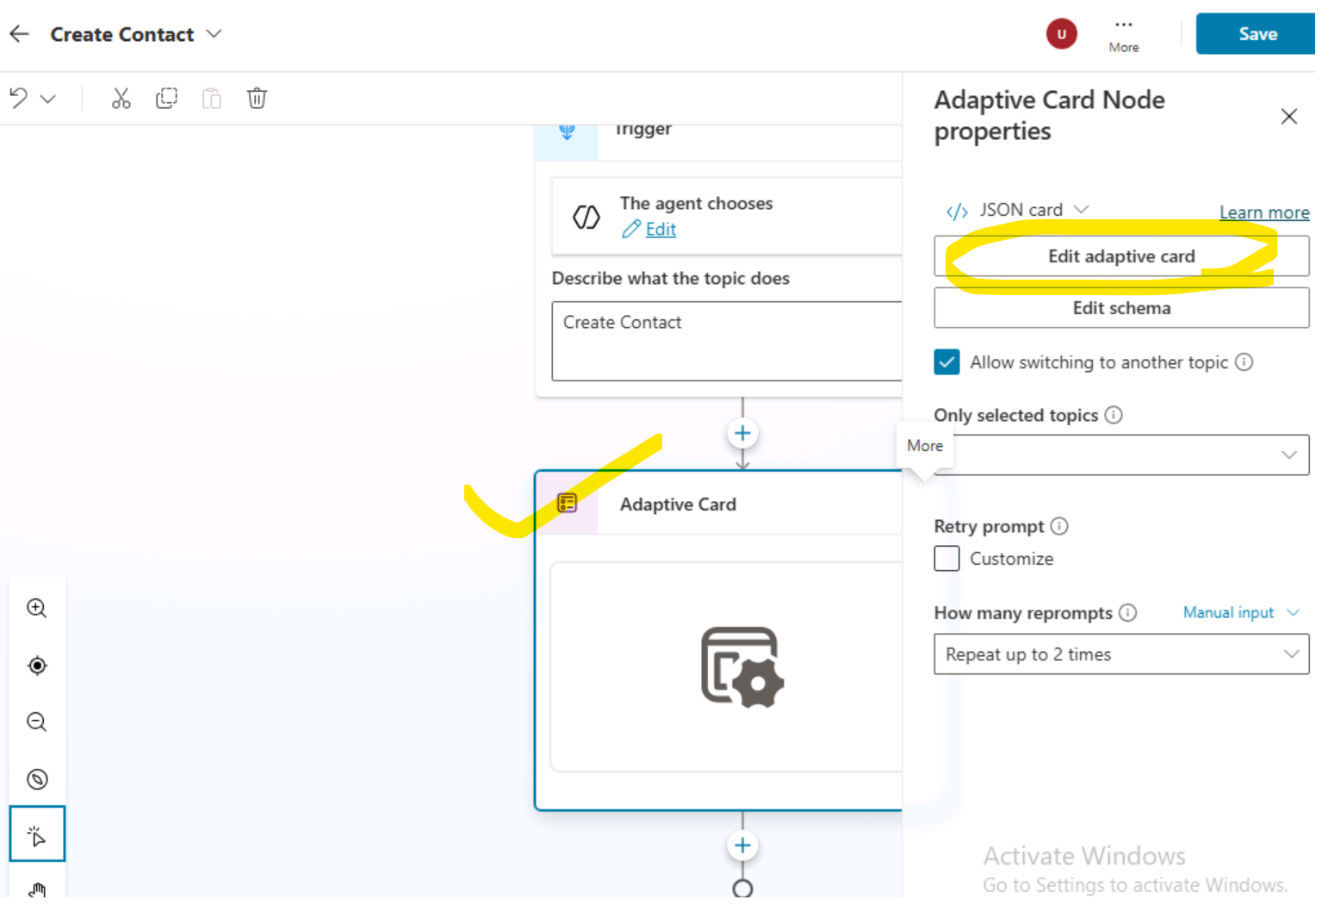
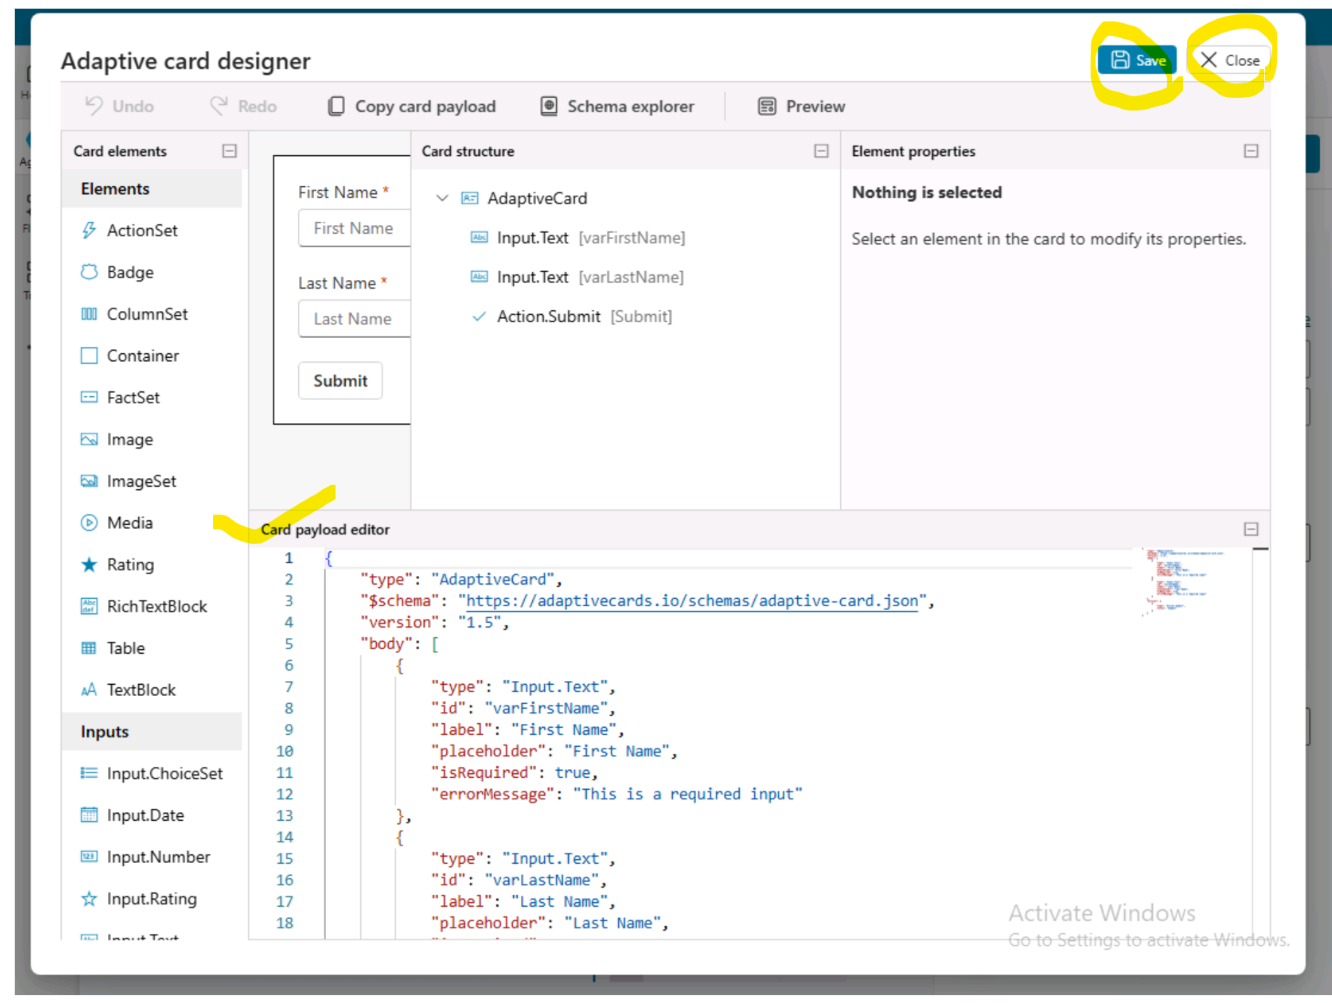
{
"type": "AdaptiveCard",
"$schema": "https://adaptivecards.io/schemas/adaptive-card.json",
"version": "1.5",
"body": [
{
"type": "Input.Text",
"id": "varFirstName",
"label": "First Name",
"placeholder": "First Name",
"isRequired": true,
"errorMessage": "This is a required input"
},
{
"type": "Input.Text",
"id": "varLastName",
"label": "Last Name",
"placeholder": "Last Name",
"isRequired": true,
"errorMessage": "This is a required input"
}
],
"actions": [
{
"type": "Action.Submit",
"title": "Submit"
}
]
}
- Click on Edit schema & Remove actionSubmitId as we do not need this output for our processing.
- The final card will be as shown on below image. Click on save to Save the topic.
- Next step to add an Action to create an Agent flow. Click on + icon -> Add a tool -> New Agent flow
- It will open the flow designer. Click on When an agent calls the flow Add 2 text inputs as "First Name" & "Last Name".
- Add a new step for Add a new row (for MS dataverse)
- Select Table name as "Contacts". Provide Last Name & First Name from added inputs from previous step
- Click on Respond to the Agent -> Add an output (text output as "Success Value" & description as "Record created successfully".
- Click on Publish & Go back to your agent.
- Select the input variable as shown below to pass the input to the Agent flow.
- Add a Message on next step & select the ouput from flow step and save the topic.
- You can quickly test your created topic from Test.
- Once you will configure the below "Adaptive Card support to our Blazor web app", you can now test the same from Blazor web app.
- Don't forget to publish your agent.
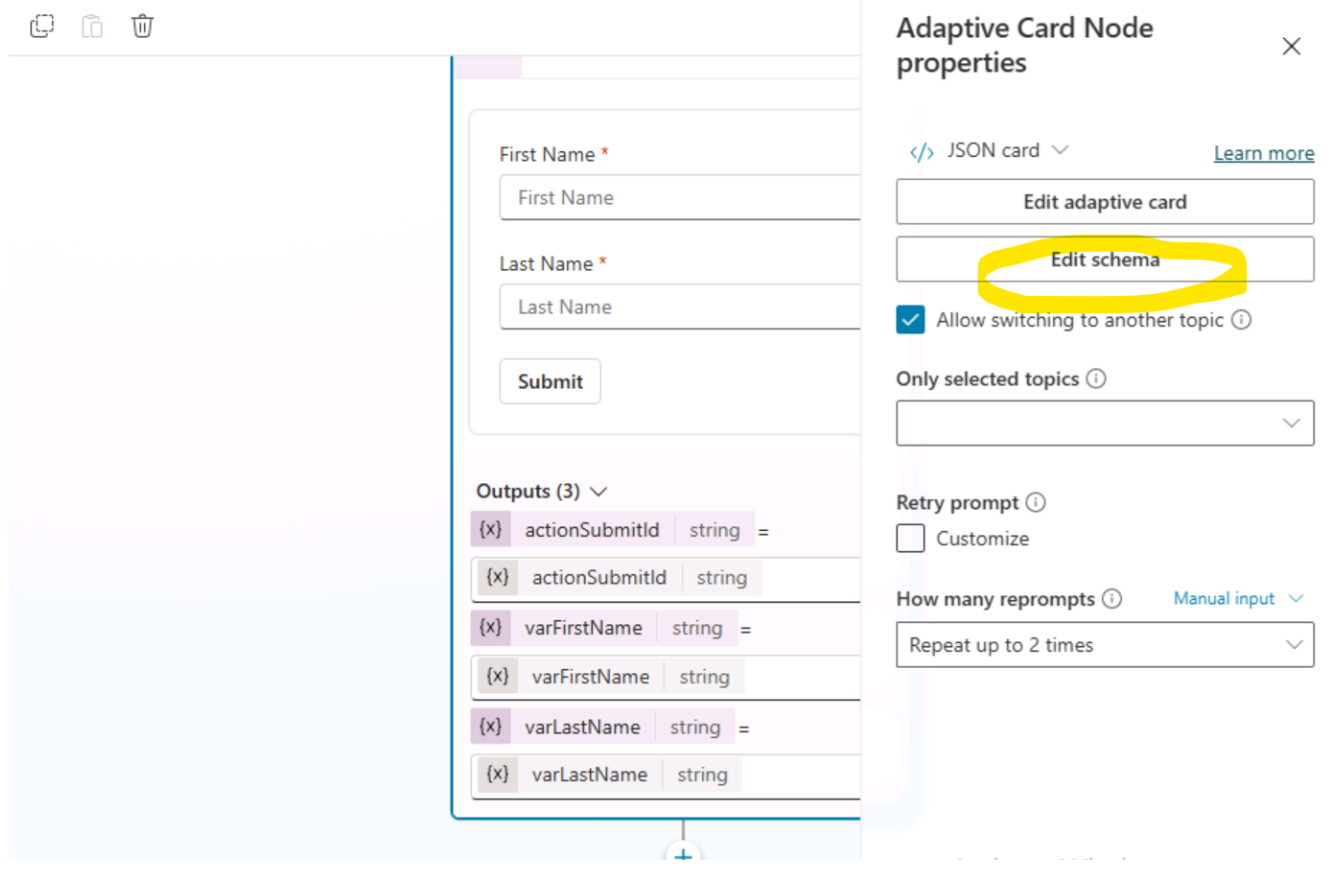
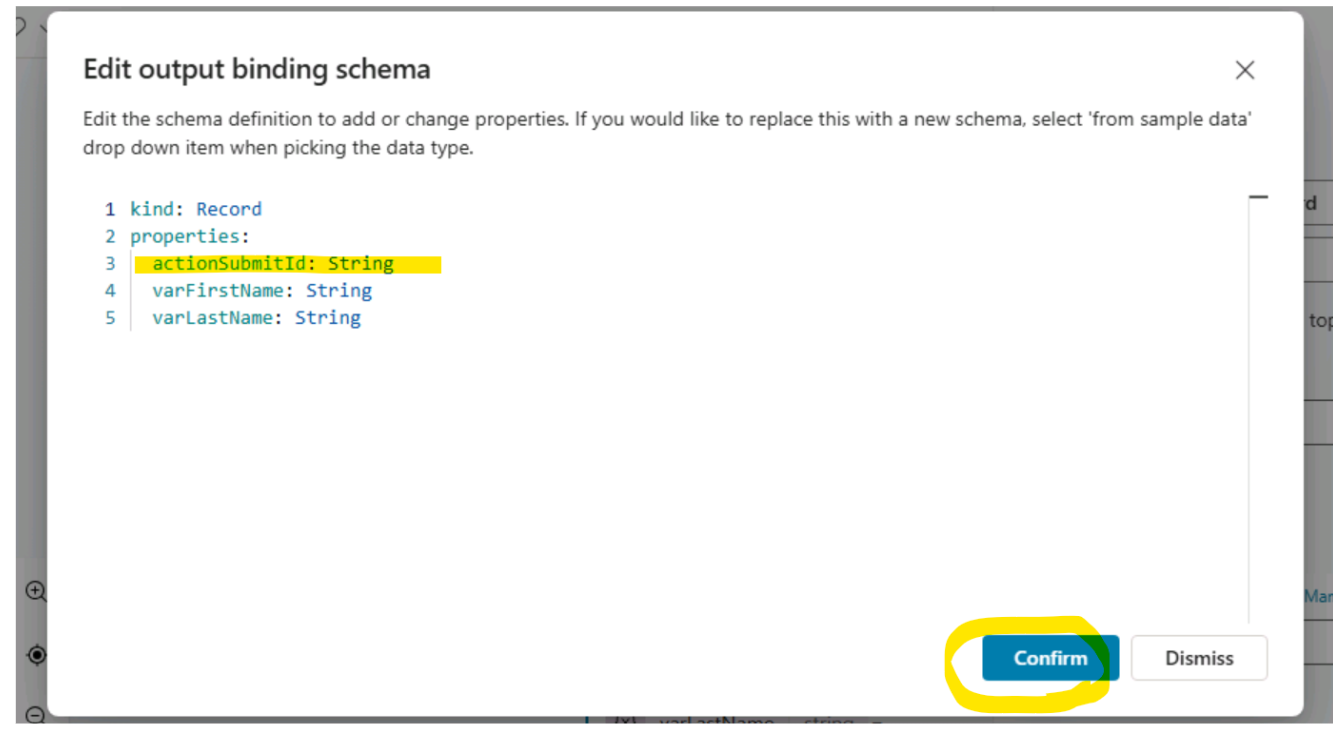

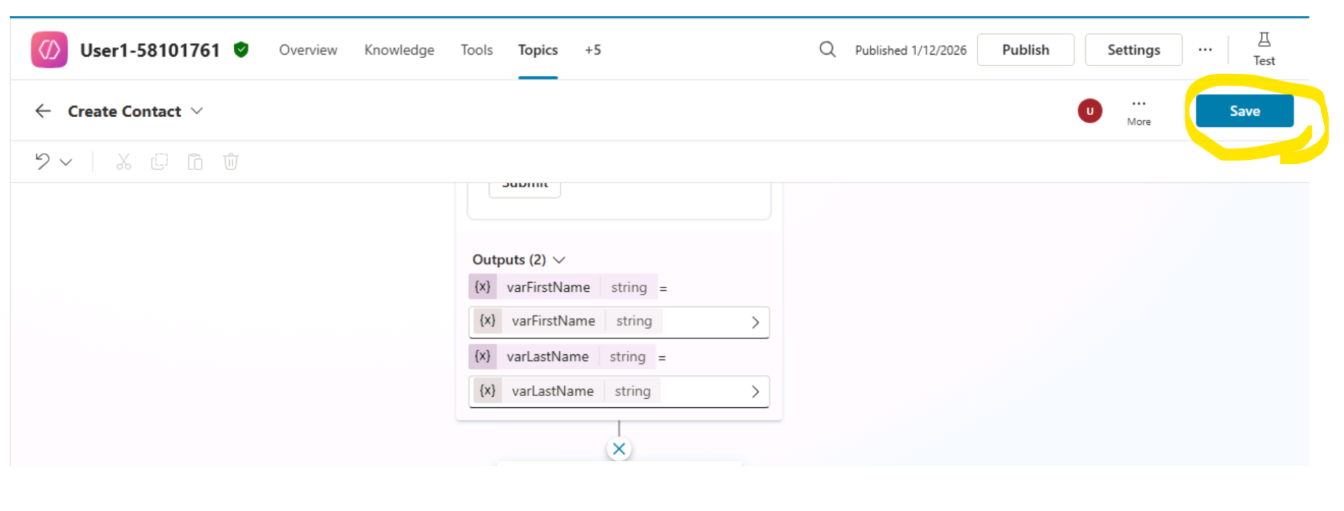
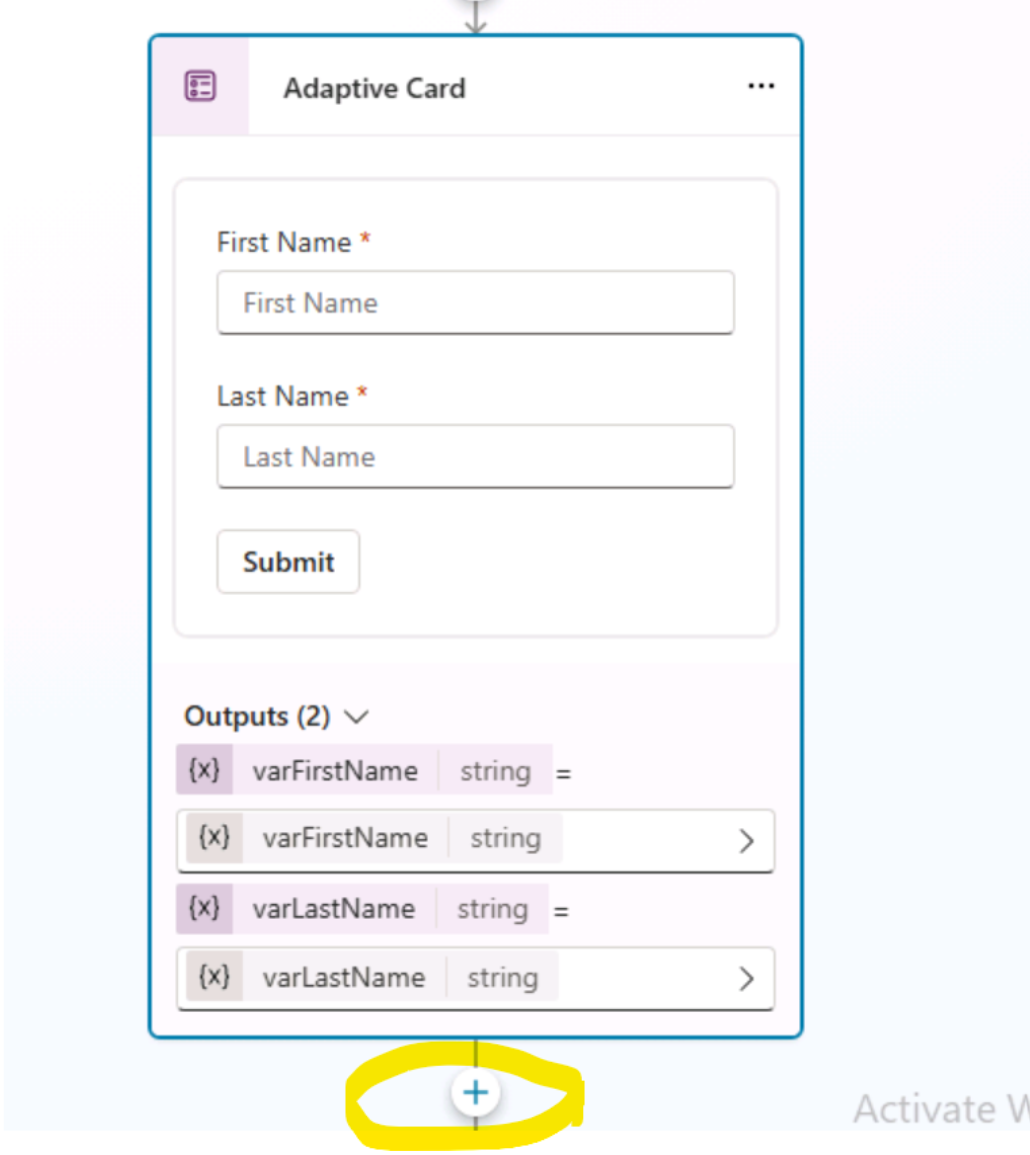
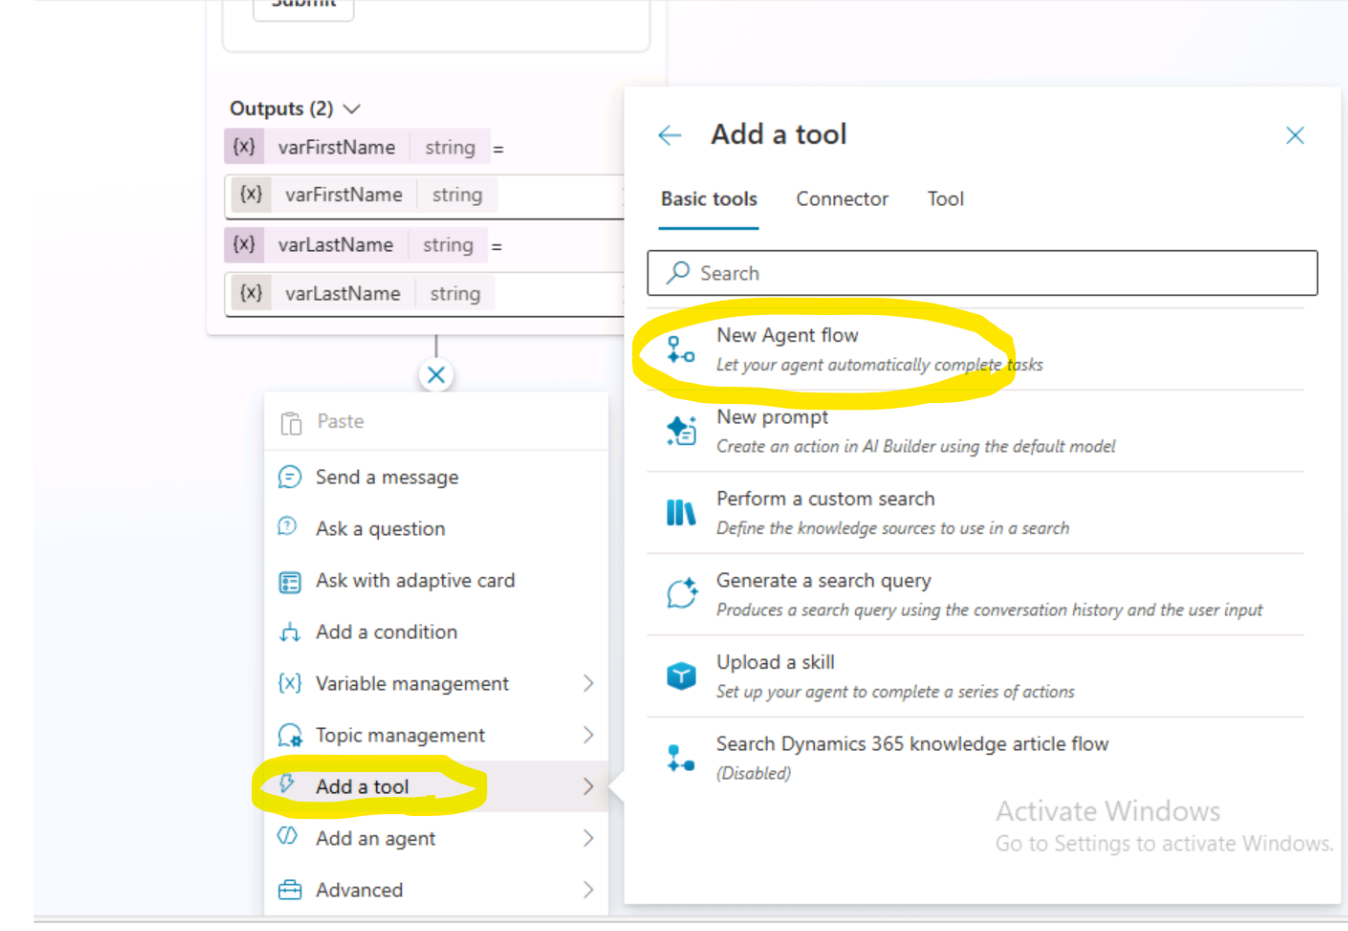
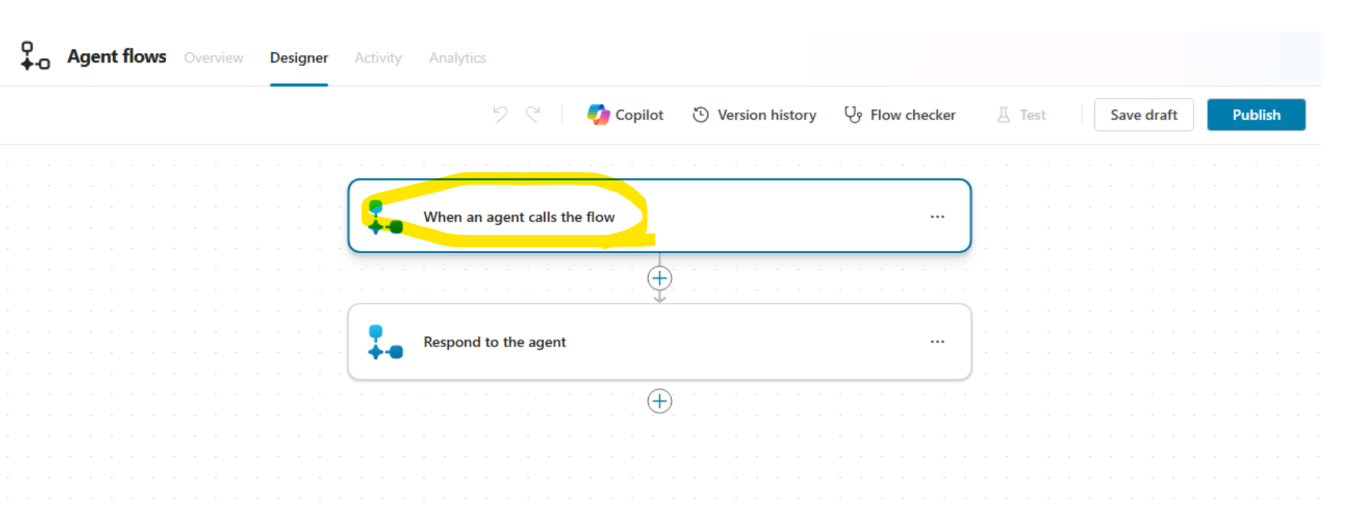
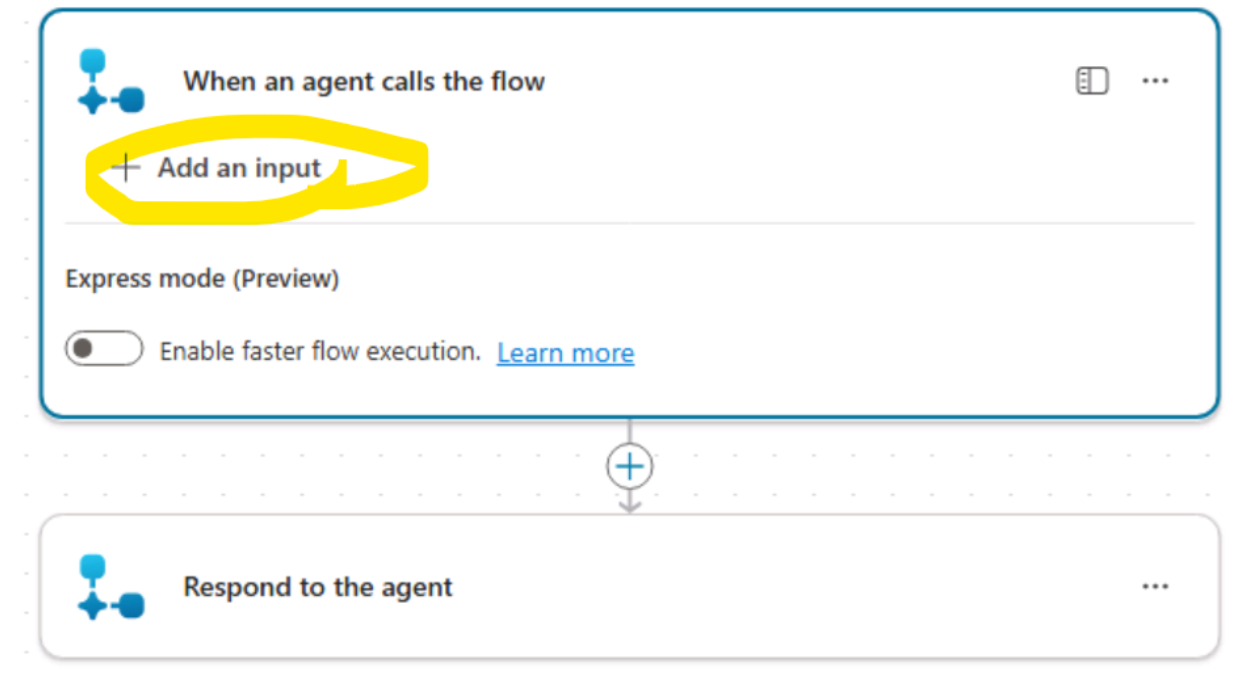
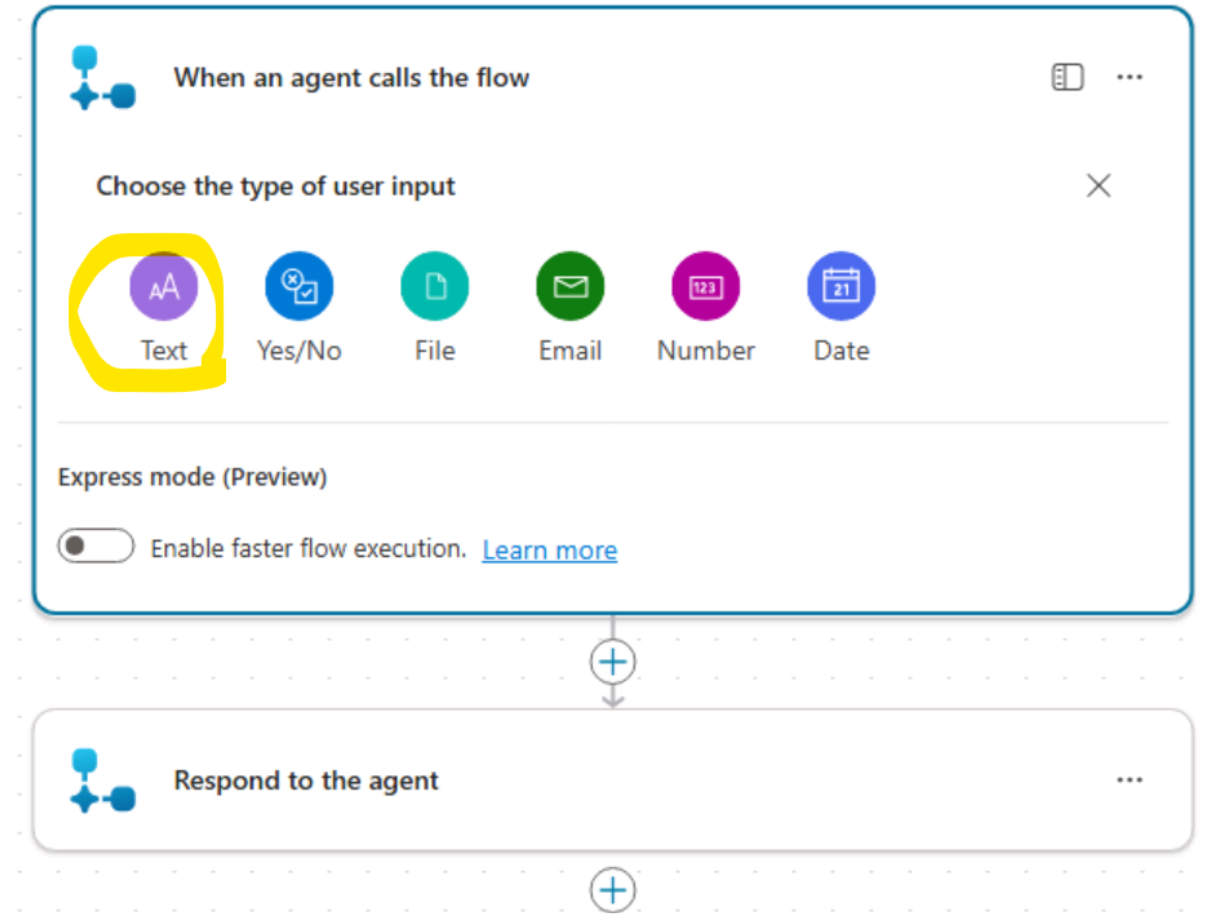
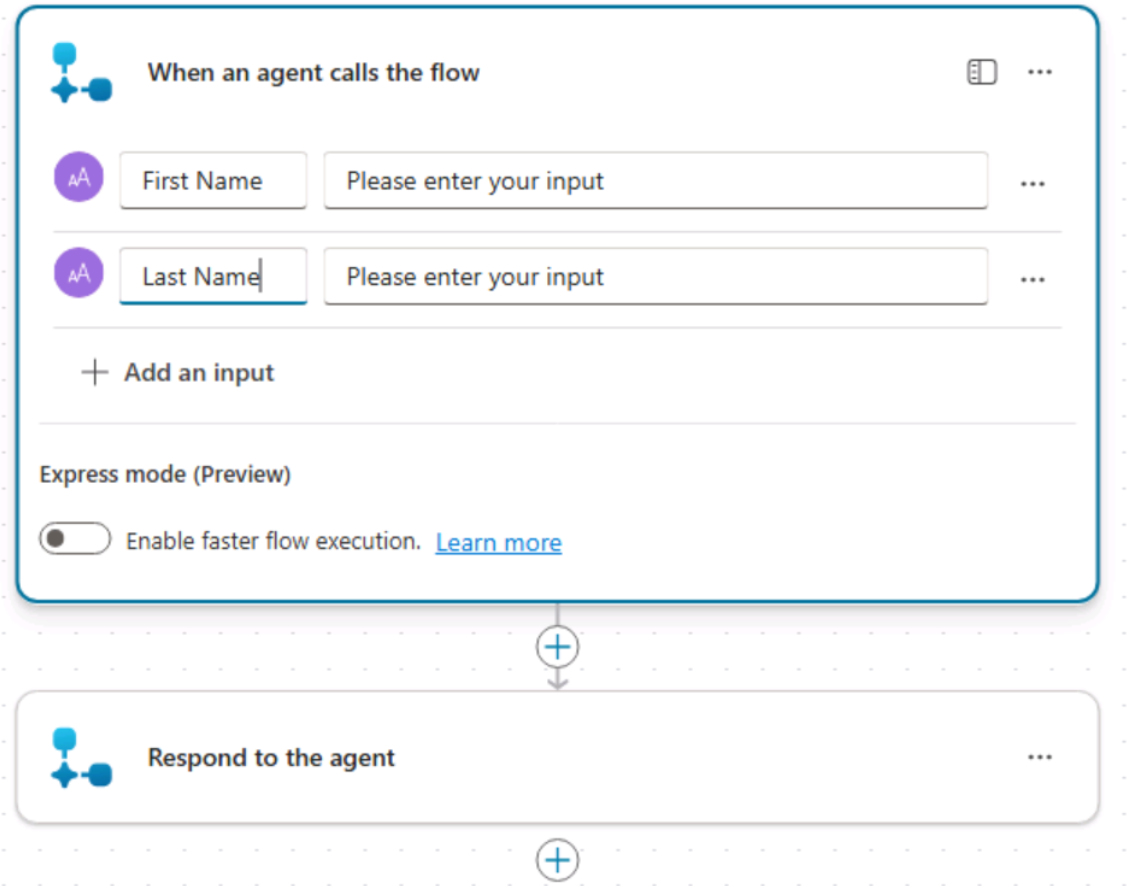
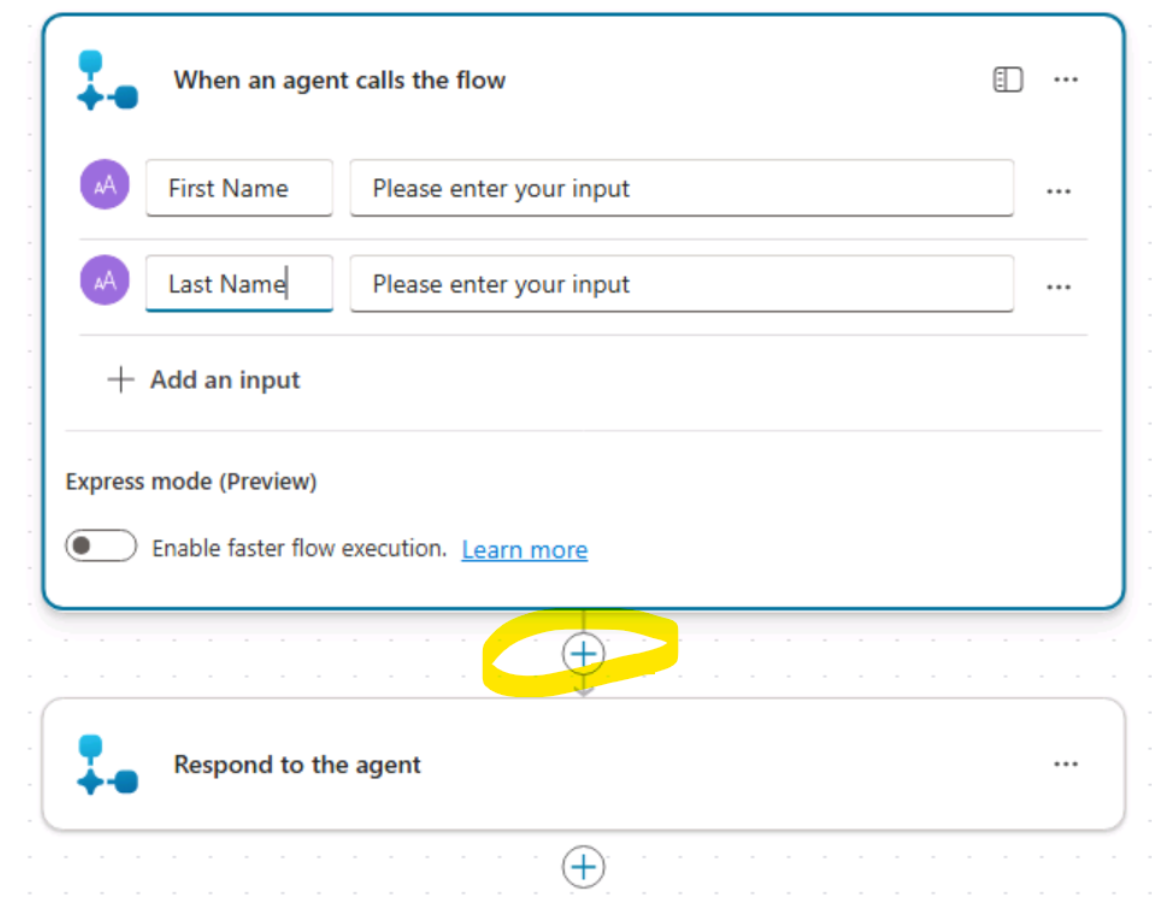
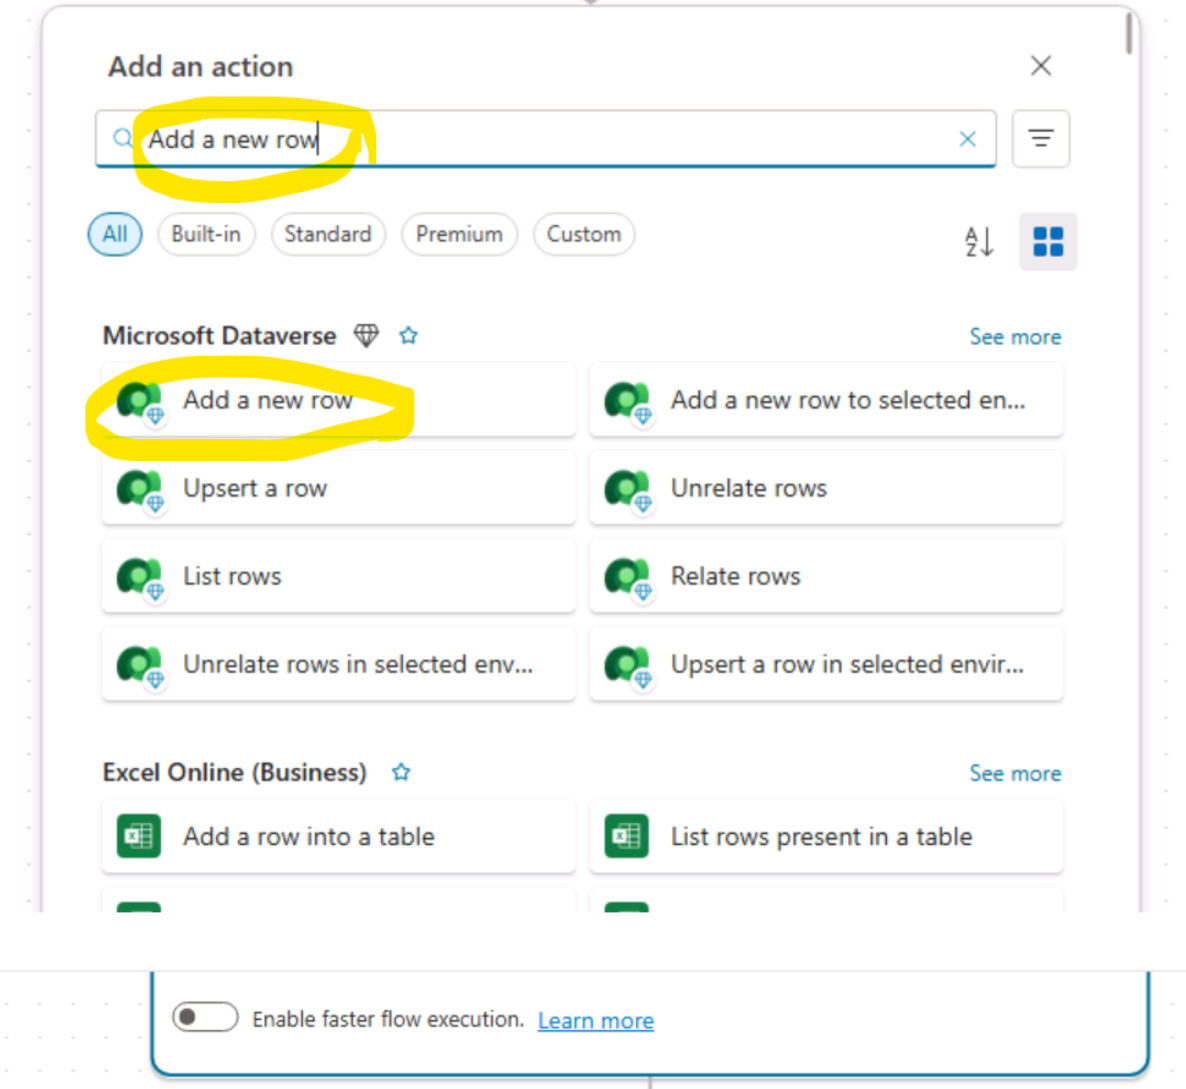
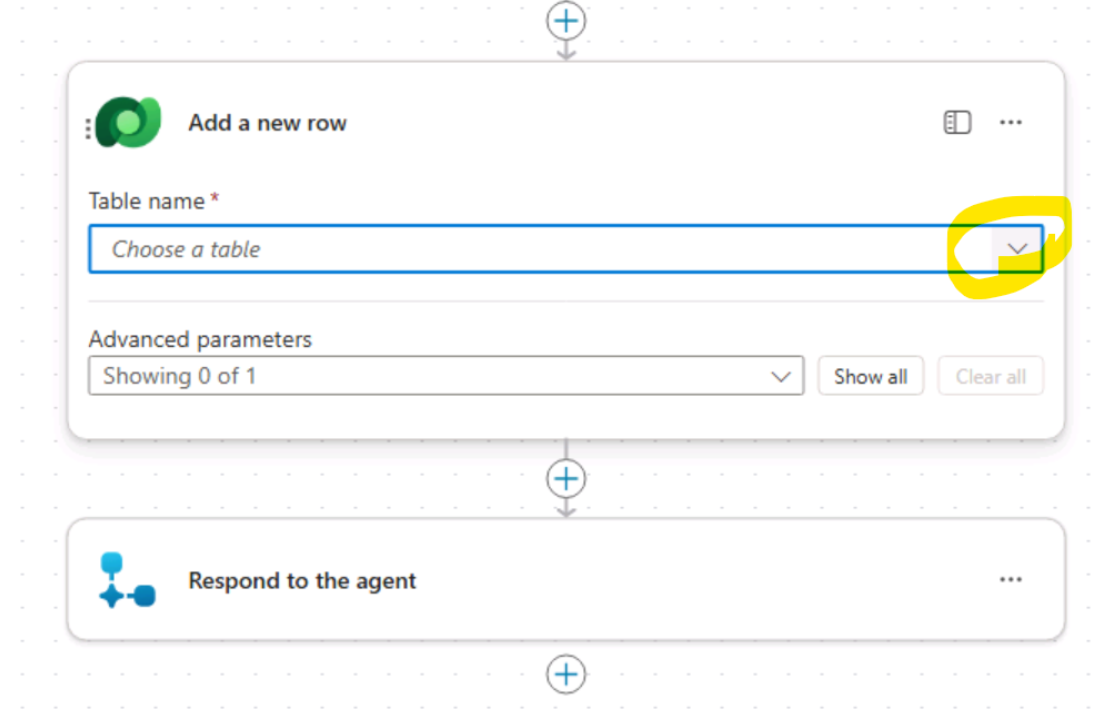
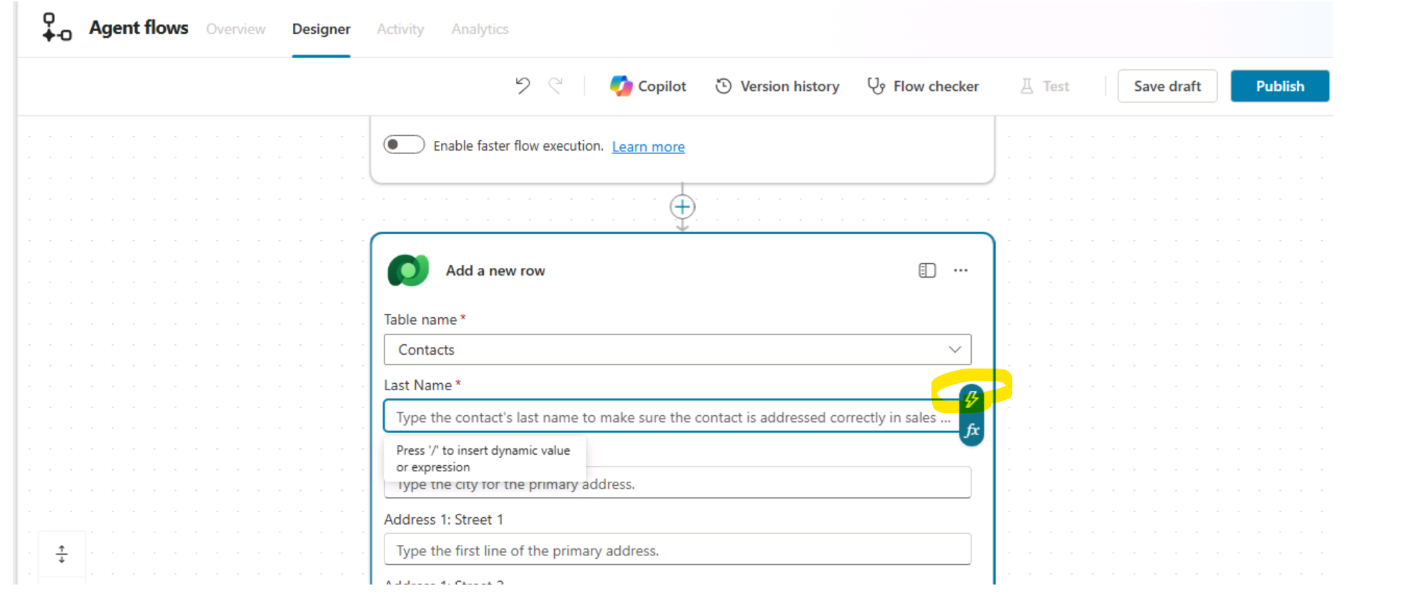
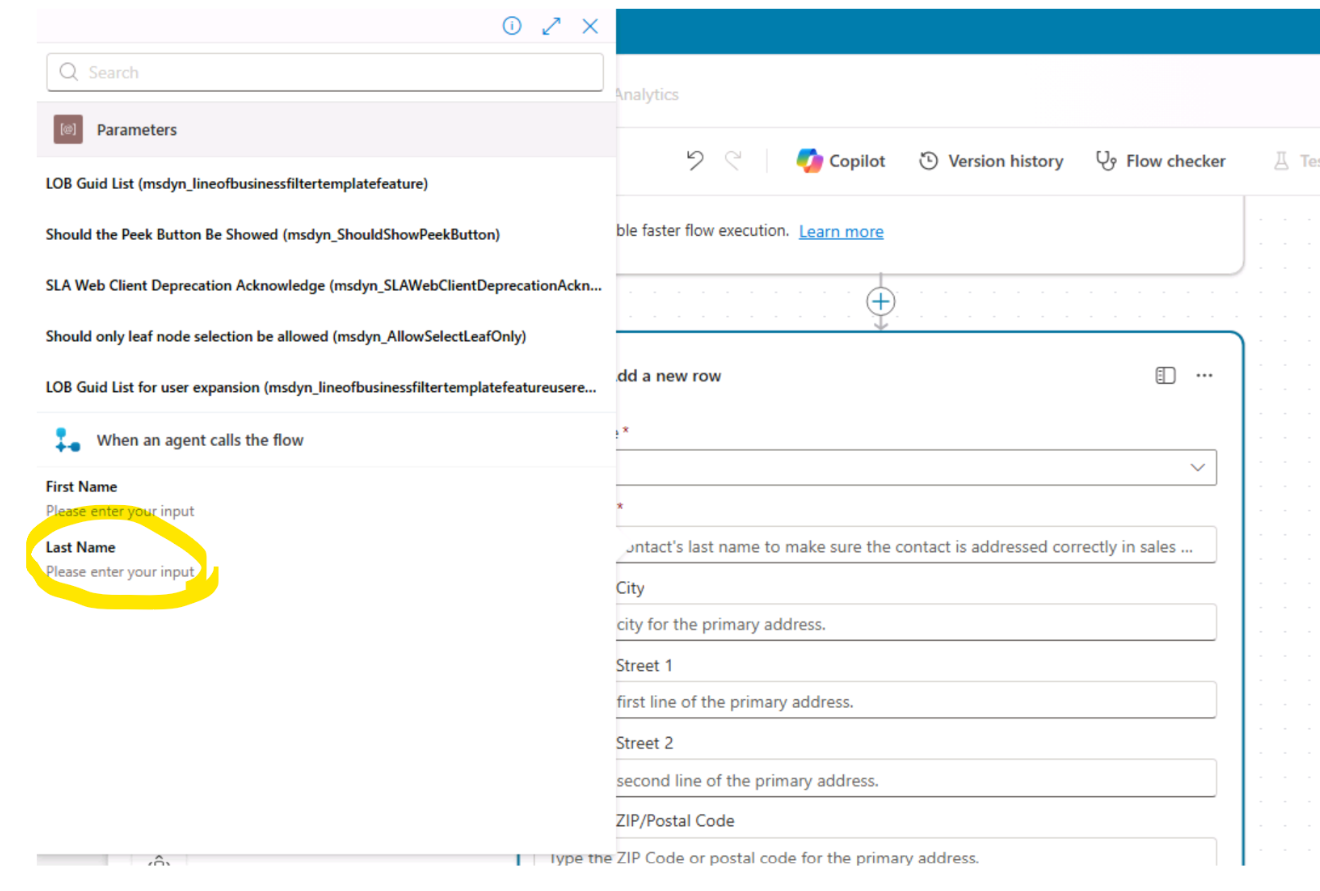
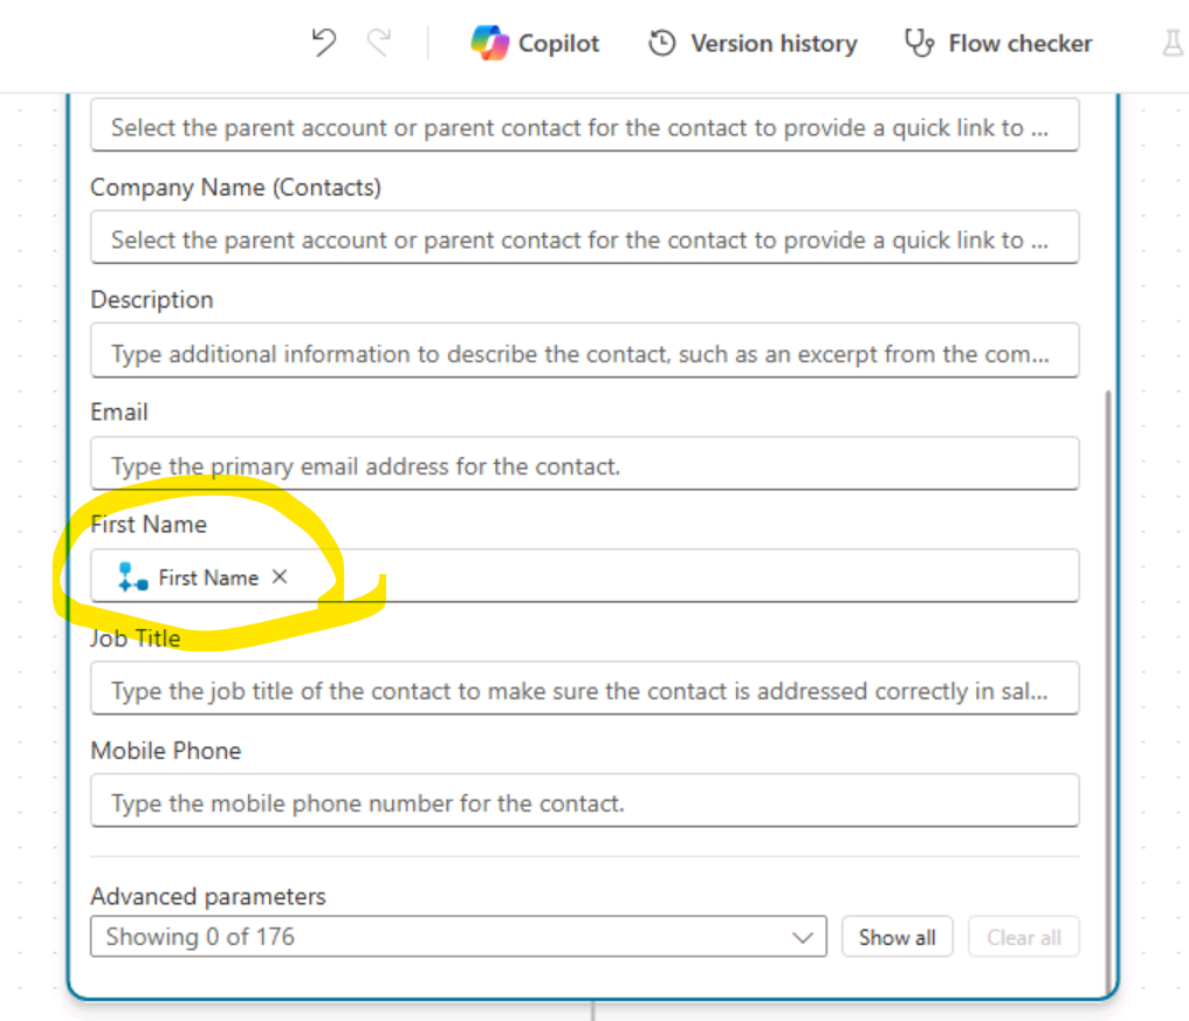
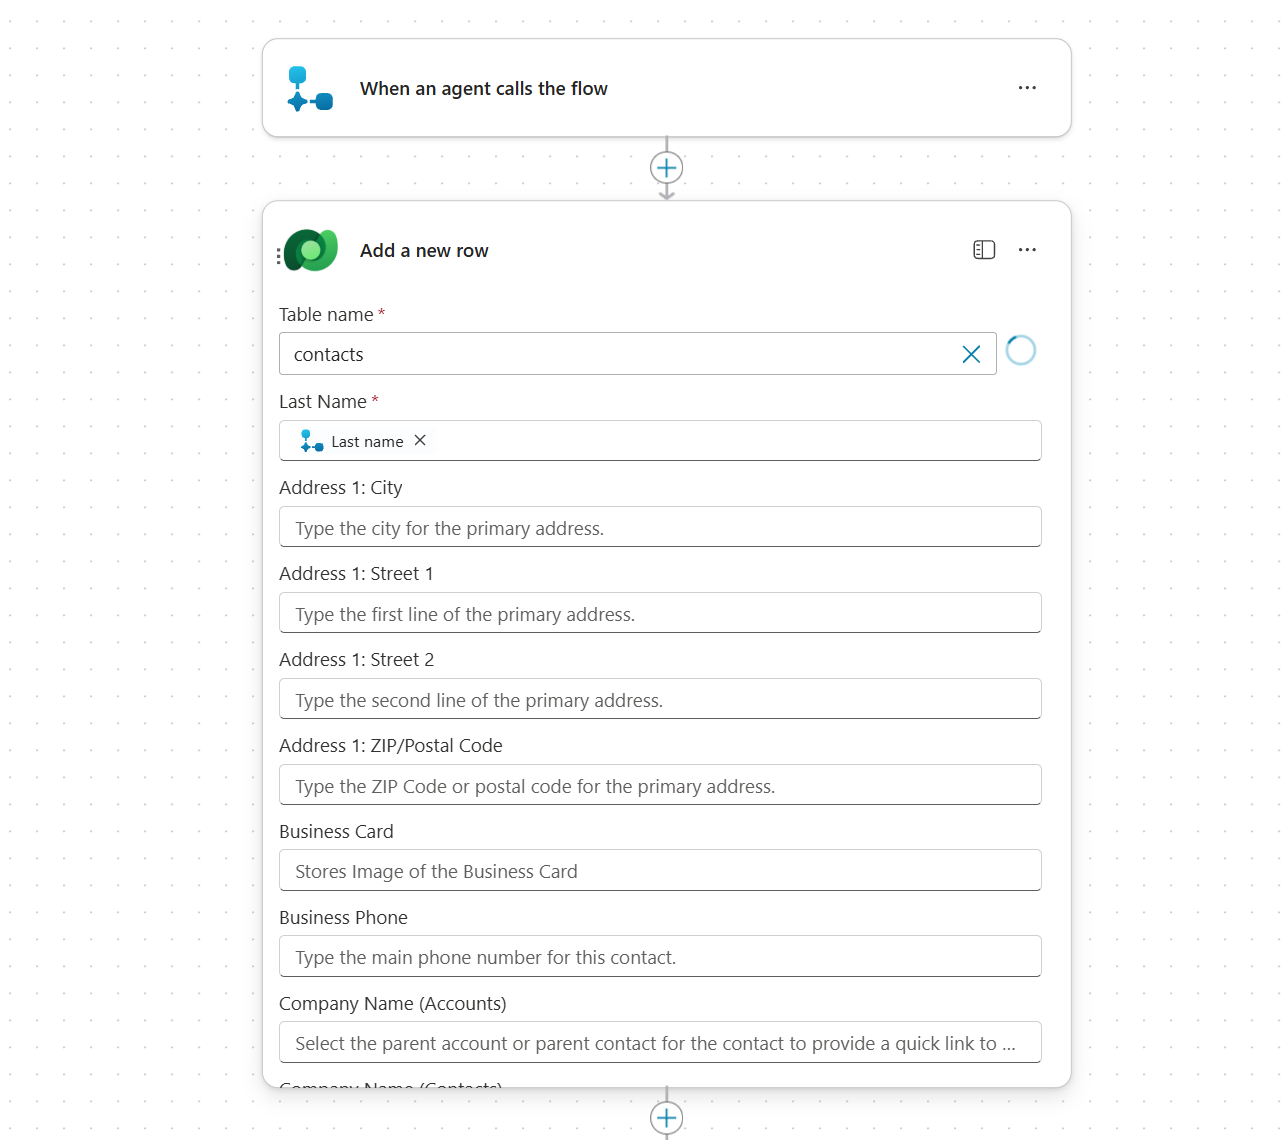
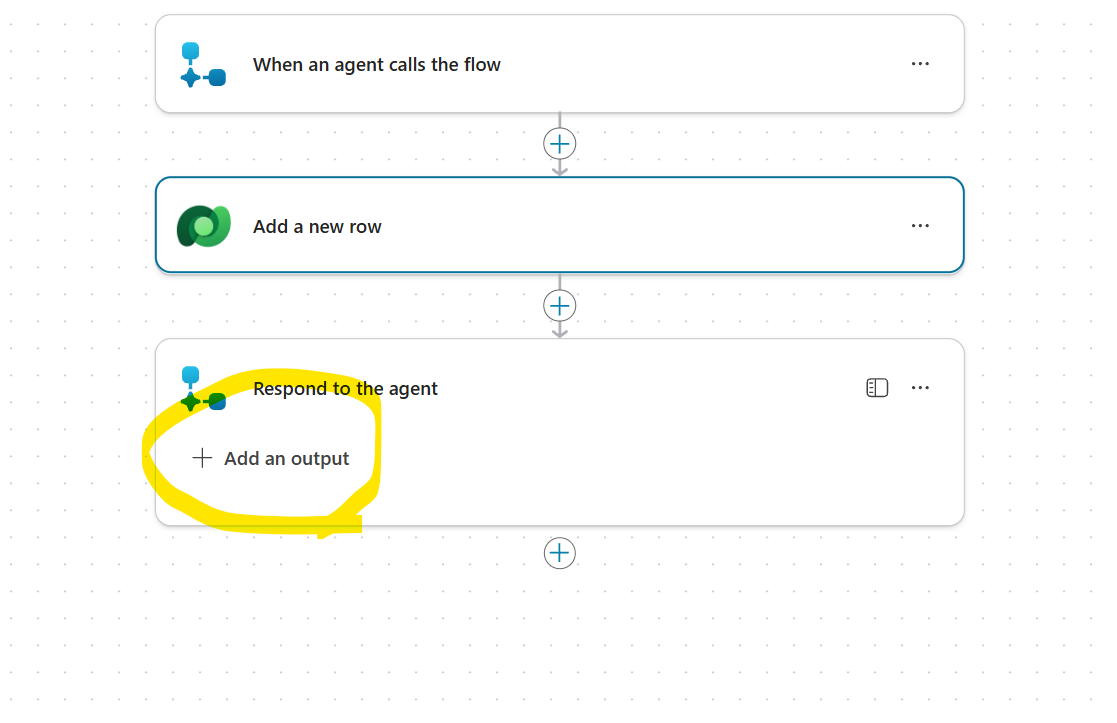
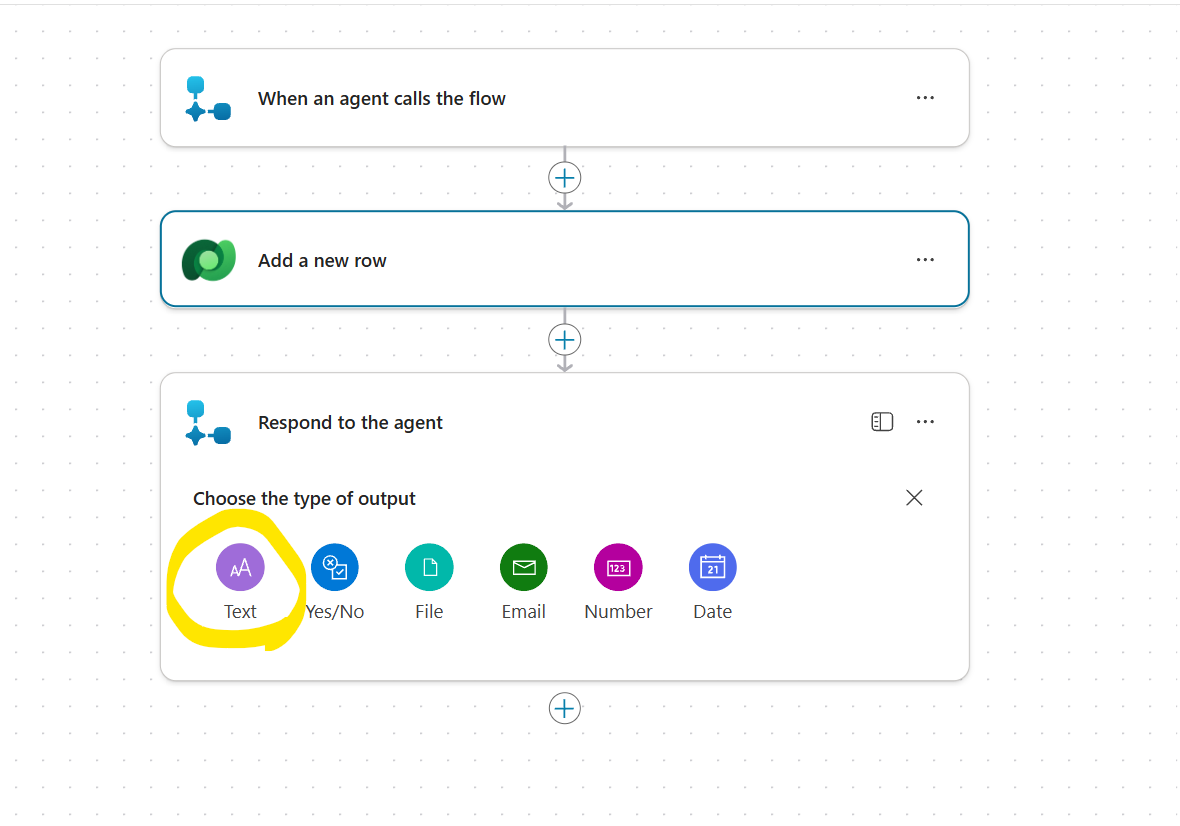

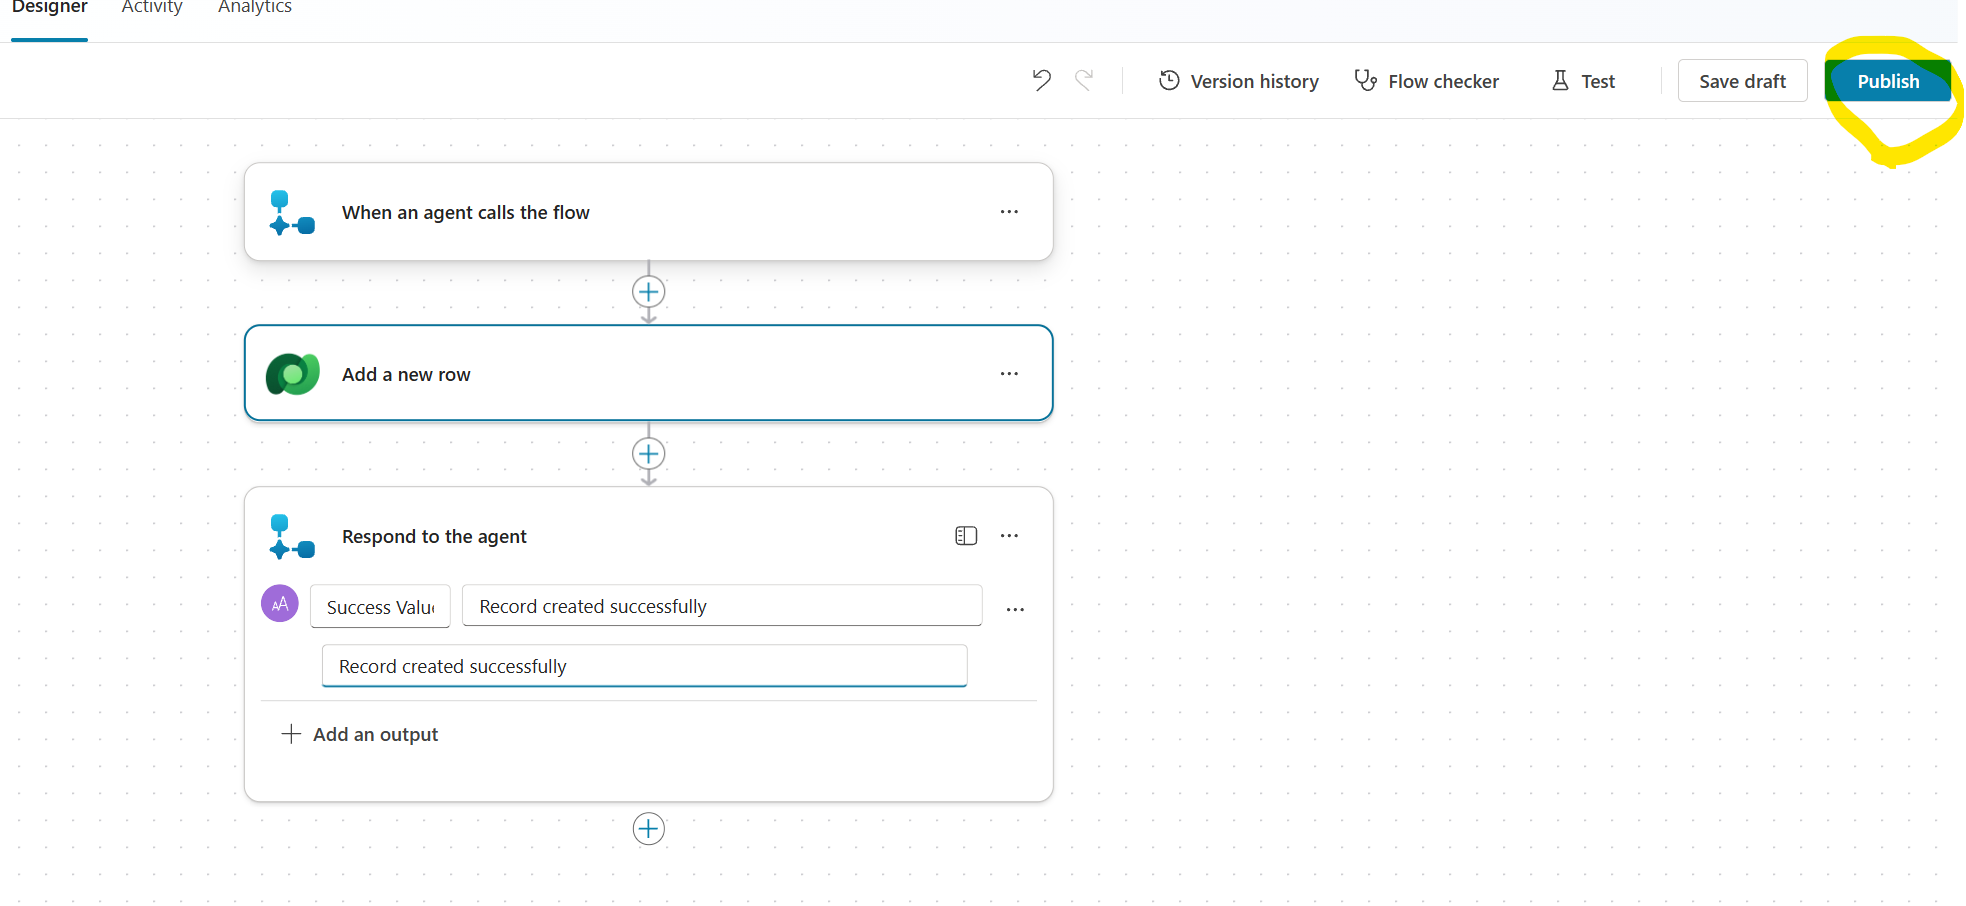
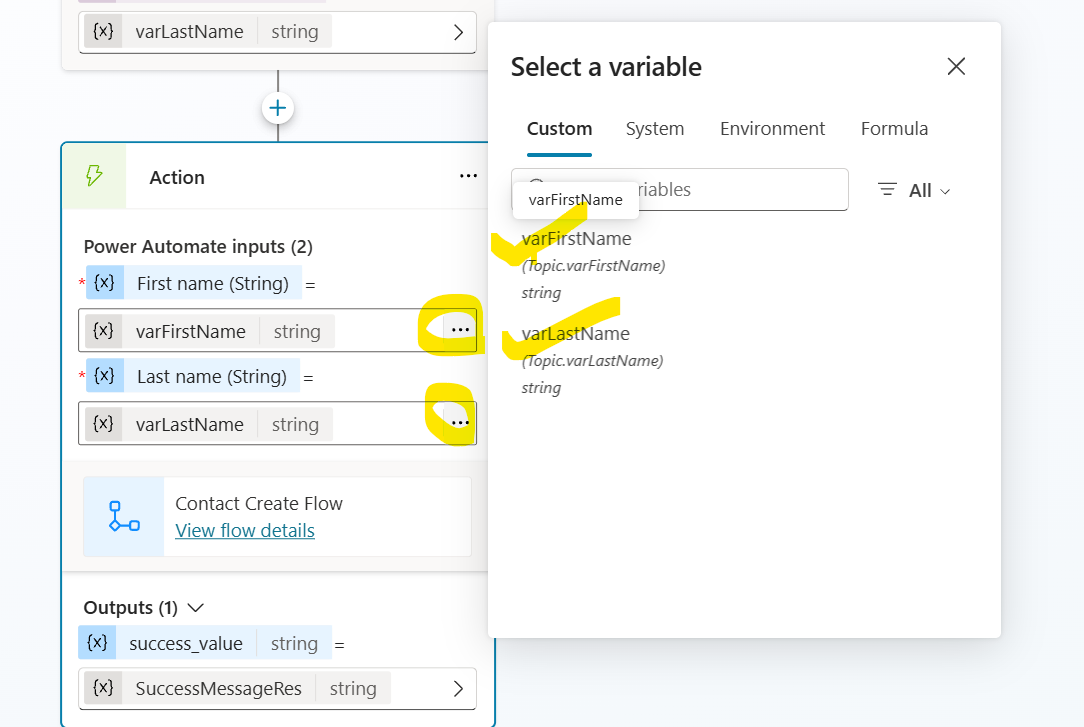
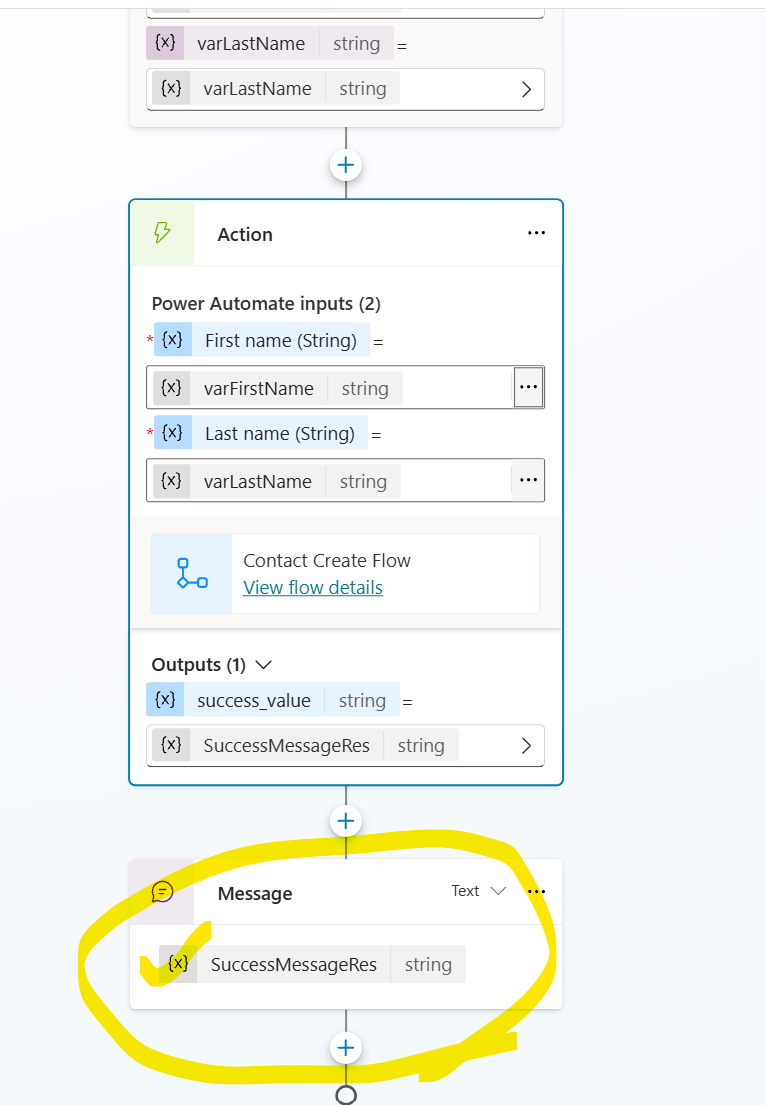
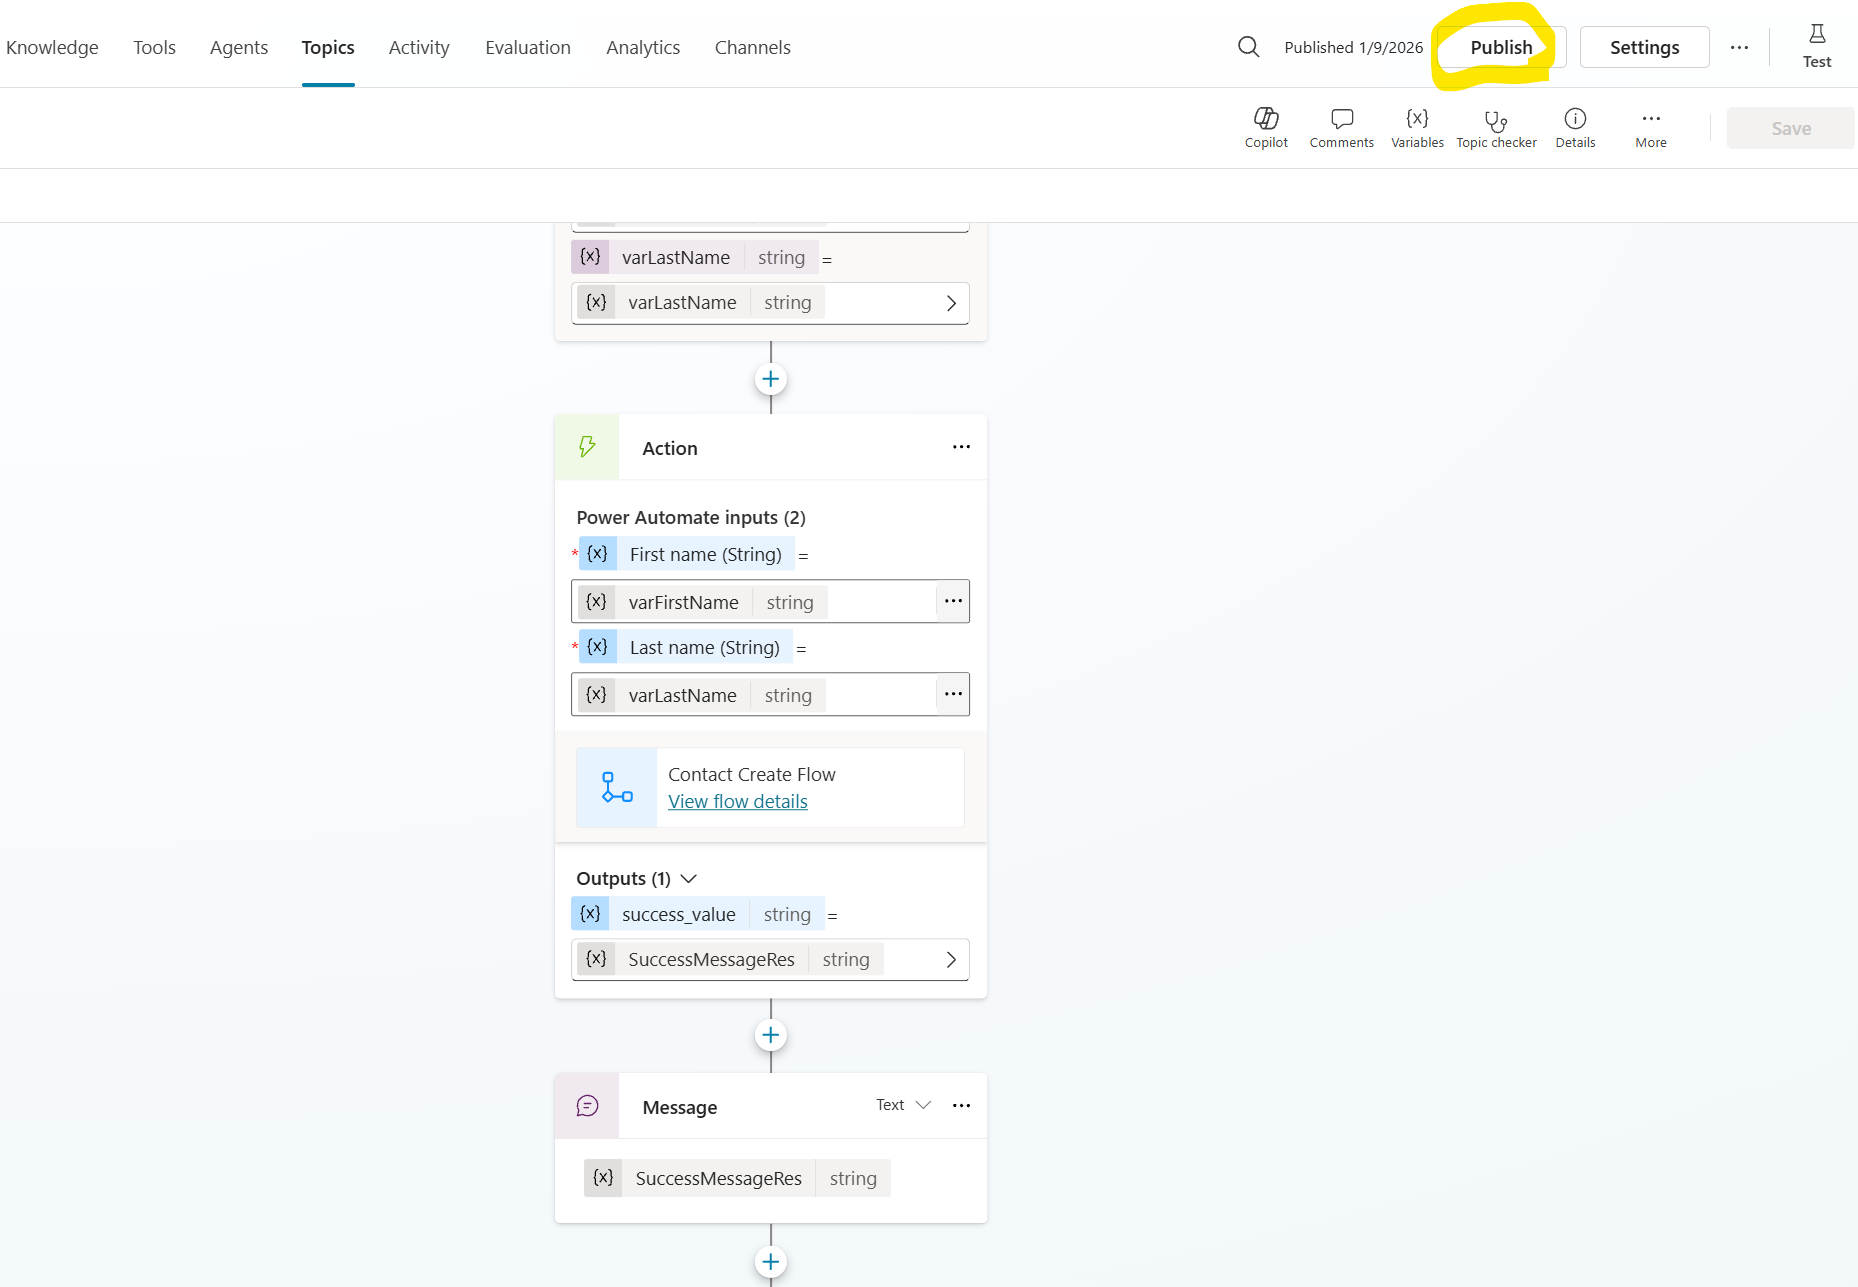
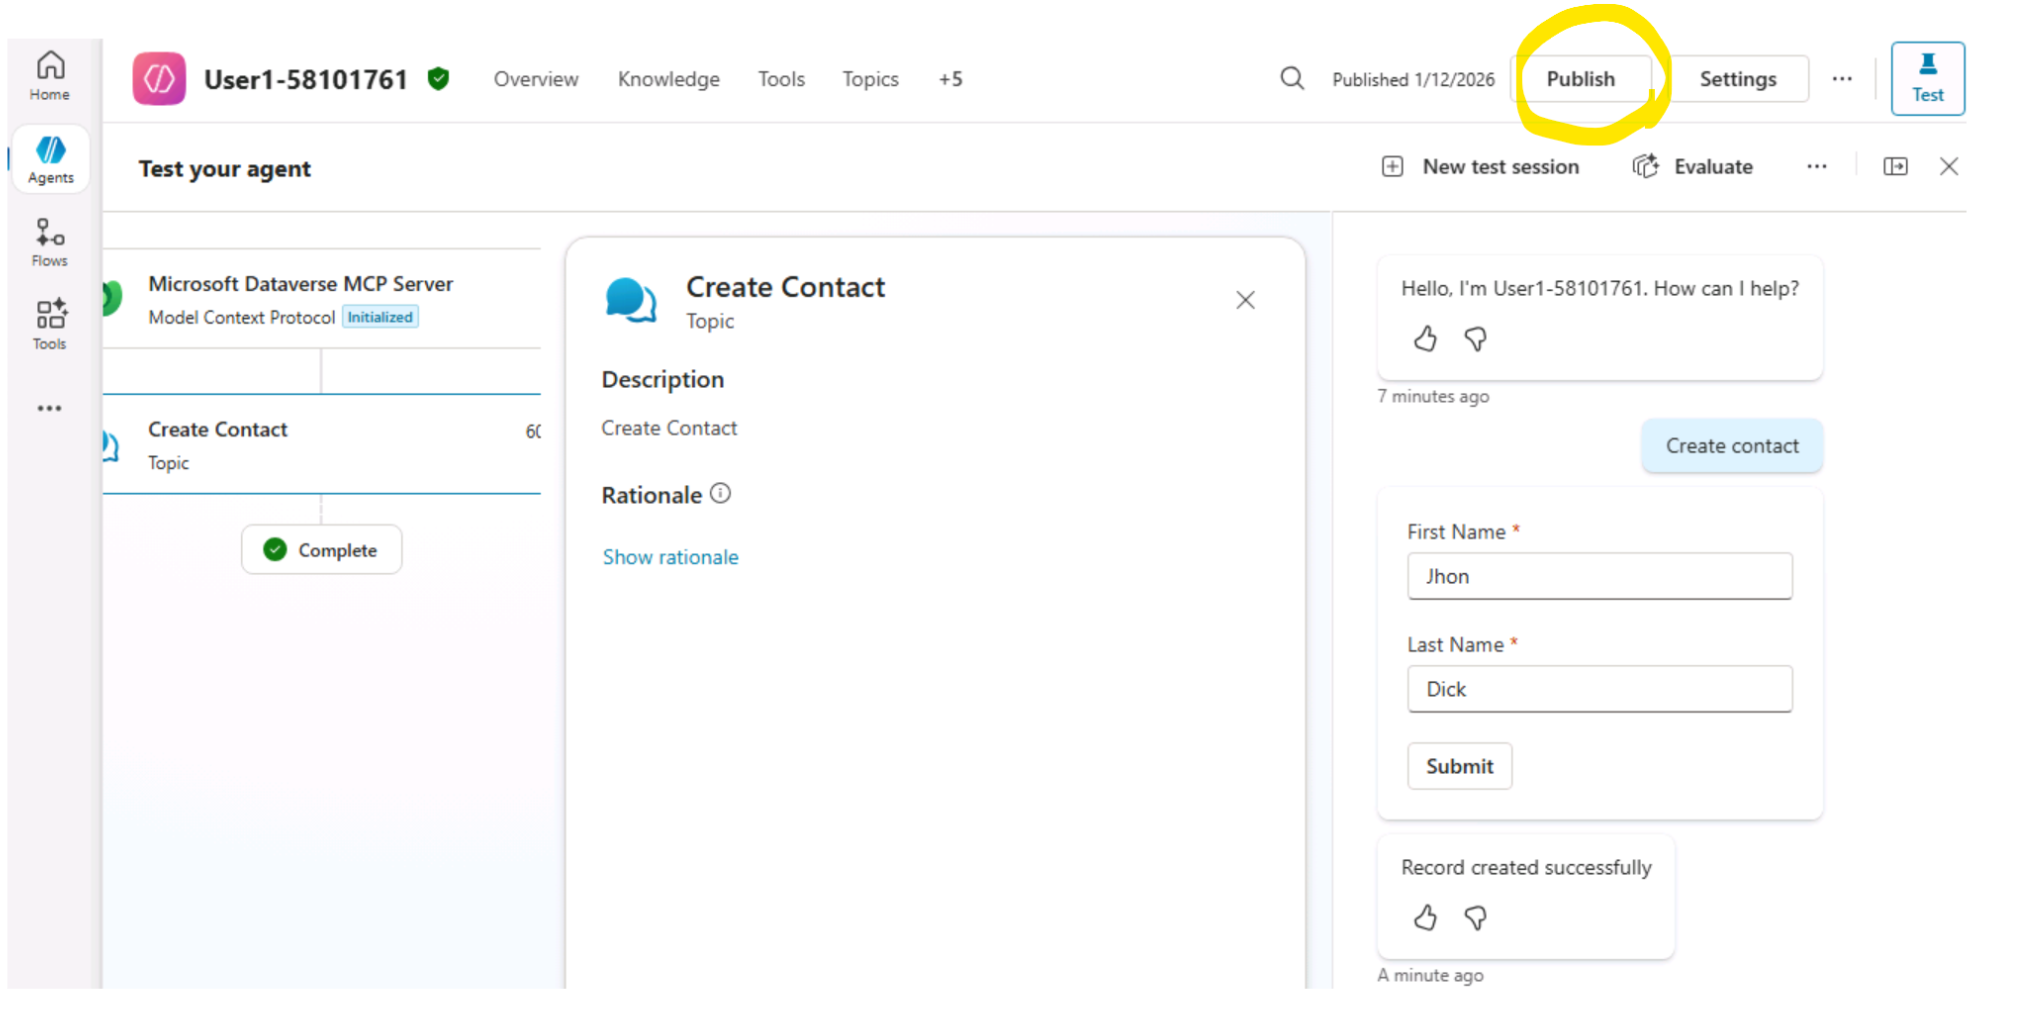
[!alert] End of the optional section.
In this lab section, you will add Adaptive Cards support to your Copilot Studio chat client. Adaptive Cards are a Microsoft standard for creating rich, interactive UI cards that can contain forms, buttons, images, and more.
What you'll learn:
- Adaptive Cards Rendering - Display rich interactive cards with forms, buttons, and formatted content
- Action Handling - Process user interactions like button clicks and form submissions
- Two-way Communication - Send card action responses back to Copilot Studio
Why this matters:
- Rich Interactions: Cards enable forms, choices, and structured data collection
- Consistent UX: Adaptive Cards render consistently across Microsoft platforms
- Agent Capabilities: Many Copilot Studio features use Adaptive Cards for complex interactions
Before starting, ensure you have completed the previous lab sections:
- Streaming output implementation
- Markdown rendering
- Status notifications
Copilot Studio Your App User
───────────── ──────── ────
│ │ │
│ Activity with Attachment │ │
│ (Adaptive Card JSON) │ │
│──────────────────────────────►│ │
│ │ │
│ │ Render Card (JS) │
│ │─────────────────────────────►│
│ │ │
│ │ User clicks button │
│ │◄─────────────────────────────│
│ │ │
│ Invoke Activity │ │
│ (action data) │ │
│◄──────────────────────────────│ │
│ │ │
│ Response Activity │ │
│──────────────────────────────►│ │
| Component | Purpose |
|---|---|
AdaptiveCardRenderer.razor |
Blazor component that hosts the card |
adaptiveCards.js |
JavaScript renderer with M365 theming |
adaptiveCards.css |
Styles for card appearance |
CopilotStudioIChatClient.cs |
Detects and wraps card attachments |
ChatMessageItem.razor |
Displays cards in the message list |
Chat.razor |
Handles card action callbacks |
- Update your
App.razorto include the Adaptive Cards JavaScript library. Just replace the content of the file with the code provided below:
@using Microsoft.AspNetCore.Components.Authorization
<!DOCTYPE html>
<html lang="en">
<head>
<meta charset="utf-8" />
<meta name="viewport" content="width=device-width, initial-scale=1.0" />
<base href="/" />
<link rel="stylesheet" href="@Assets["app.css"]" />
<link rel="stylesheet" href="@Assets["webchatclient.styles.css"]" />
<!-- Adaptive Cards Dependencies -->
<script src="https://cdn.jsdelivr.net/npm/adaptivecards/dist/adaptivecards.min.js"></script>
<script src="@Assets["adaptiveCards.js"]"></script>
<link rel="stylesheet" href="@Assets["adaptiveCards.css"]" />
<script src="@Assets["_framework/blazor.web.js"]"></script>
<ImportMap />
<HeadOutlet @rendermode="@renderMode" />
</head>
<body>
<Routes @rendermode="@renderMode" />
</body>
</html>
@code {
private readonly IComponentRenderMode renderMode = new InteractiveServerRenderMode(prerender: false);
}InteractiveServerRenderMode configuration
This tells Blazor to use Server-Side Blazor - your components run on the server, and UI updates travel over a SignalR (WebSocket) connection to the browser. This is required for:
- Real-time streaming updates
- Server-side state management
- Secure API calls (Copilot Studio credentials stay on server)
With prerender: false
Components render only once, when the SignalR connection is established:
- OnInitialized runs exactly once
- JavaScript interop is always available
- No state synchronization issues
- DotNetObjectReference works reliably
- Conversation starts only once
The downside is users see a blank page (or loading indicator) until the SignalR connection establishes, rather than seeing static content immediately. For a real-time chat app, this trade-off is worth it.
Key additions:
adaptivecards.min.js- Microsoft's official Adaptive Cards rendereradaptiveCards.js- Custom renderer with M365 theming (you'll create this)adaptiveCards.css- Custom styles for cards (you'll create this)
- Create adaptiveCards.js. Add a new file
adaptiveCards.jsunder wwwroot folder.
// Adaptive Cards Renderer with M365 Theme
// This configuration ensures Adaptive Cards match the app's Microsoft 365 styling
window.adaptiveCardRenderer = {
// M365-themed Host Configuration
hostConfig: {
// Font configuration matching Segoe UI
fontFamily: "'Segoe UI', -apple-system, BlinkMacSystemFont, 'Roboto', 'Helvetica Neue', sans-serif",
// Font sizes matching M365 typography
fontSizes: {
small: 12,
default: 14,
medium: 15,
large: 18,
extraLarge: 22
},
// Font weights
fontWeights: {
lighter: 300,
default: 400,
bolder: 600
},
// Spacing values
spacing: {
small: 8,
default: 12,
medium: 16,
large: 20,
extraLarge: 28,
padding: 16
},
// Line heights
lineHeights: {
small: 16,
default: 20,
medium: 22,
large: 26,
extraLarge: 30
},
// Separator styling
separator: {
lineThickness: 1,
lineColor: "#e5e5e5"
},
// Image sizes
imageSizes: {
small: 40,
medium: 80,
large: 160
},
// Container styles matching M365 cards
containerStyles: {
default: {
backgroundColor: "#ffffff",
foregroundColors: {
default: {
default: "#242424",
subtle: "#616161"
},
accent: {
default: "#5b5fc7",
subtle: "#7B83EB"
},
attention: {
default: "#d13438",
subtle: "#e74c3c"
},
good: {
default: "#107c10",
subtle: "#2ecc71"
},
warning: {
default: "#ffb900",
subtle: "#f39c12"
}
}
},
emphasis: {
backgroundColor: "#f5f5f5",
foregroundColors: {
default: {
default: "#242424",
subtle: "#616161"
},
accent: {
default: "#5b5fc7",
subtle: "#7B83EB"
},
attention: {
default: "#d13438",
subtle: "#e74c3c"
},
good: {
default: "#107c10",
subtle: "#2ecc71"
},
warning: {
default: "#ffb900",
subtle: "#f39c12"
}
}
},
accent: {
backgroundColor: "#f0f0ff",
foregroundColors: {
default: {
default: "#242424",
subtle: "#616161"
},
accent: {
default: "#5b5fc7",
subtle: "#4a4eb5"
},
attention: {
default: "#d13438",
subtle: "#e74c3c"
},
good: {
default: "#107c10",
subtle: "#2ecc71"
},
warning: {
default: "#ffb900",
subtle: "#f39c12"
}
}
},
good: {
backgroundColor: "#f0fff0",
foregroundColors: {
default: {
default: "#242424",
subtle: "#616161"
},
accent: {
default: "#107c10",
subtle: "#2ecc71"
},
attention: {
default: "#d13438",
subtle: "#e74c3c"
},
good: {
default: "#107c10",
subtle: "#2ecc71"
},
warning: {
default: "#ffb900",
subtle: "#f39c12"
}
}
},
attention: {
backgroundColor: "#fff8e6",
foregroundColors: {
default: {
default: "#242424",
subtle: "#616161"
},
accent: {
default: "#5b5fc7",
subtle: "#7B83EB"
},
attention: {
default: "#d13438",
subtle: "#e74c3c"
},
good: {
default: "#107c10",
subtle: "#2ecc71"
},
warning: {
default: "#ffb900",
subtle: "#f39c12"
}
}
},
warning: {
backgroundColor: "#fff8e6",
foregroundColors: {
default: {
default: "#6b5b35",
subtle: "#8a6d3b"
},
accent: {
default: "#5b5fc7",
subtle: "#7B83EB"
},
attention: {
default: "#d13438",
subtle: "#e74c3c"
},
good: {
default: "#107c10",
subtle: "#2ecc71"
},
warning: {
default: "#ffb900",
subtle: "#f39c12"
}
}
}
},
// Action button styling
actions: {
maxActions: 5,
spacing: "default",
buttonSpacing: 8,
showCard: {
actionMode: "inline",
inlineTopMargin: 12
},
actionsOrientation: "horizontal",
actionAlignment: "right"
},
// Adaptive card specific settings
adaptiveCard: {
allowCustomStyle: true
},
// Text block defaults
textBlock: {
headingLevel: 2
},
// Input styling
inputs: {
label: {
inputSpacing: 8,
requiredInputs: {
weight: "bolder",
color: "attention",
suffix: " *"
},
optionalInputs: {
weight: "default",
color: "default"
}
},
errorMessage: {
weight: "default",
color: "attention"
}
}
},
// Render function with host config applied
render: function (containerId, cardJson, activityId, dotNetRef) {
const container = document.getElementById(containerId);
if (!container) {
console.error('Adaptive Card container not found:', containerId);
return;
}
// Clear any existing content
container.innerHTML = '';
try {
// Create and configure the Adaptive Card
const adaptiveCard = new AdaptiveCards.AdaptiveCard();
// Apply the M365-themed host config
adaptiveCard.hostConfig = new AdaptiveCards.HostConfig(this.hostConfig);
// Parse the card JSON
const cardPayload = typeof cardJson === 'string' ? JSON.parse(cardJson) : cardJson;
adaptiveCard.parse(cardPayload);
// Handle action execution
adaptiveCard.onExecuteAction = function (action) {
if (action instanceof AdaptiveCards.SubmitAction ||
action instanceof AdaptiveCards.ExecuteAction) {
const data = action.data || {};
// Add verb for ExecuteAction if present
if (action instanceof AdaptiveCards.ExecuteAction && action.verb) {
data.verb = action.verb;
}
// This ensures each card's actions go to the correct Blazor component
if (dotNetRef) {
dotNetRef.invokeMethodAsync('OnCardActionAsync', data)
.catch(err => console.error('Error invoking card action:', err));
} else {
// Fallback for backwards compatibility (not recommended)
console.warn('No dotNetRef provided - using legacy static invocation');
DotNet.invokeMethodAsync(
"webchatclient",
"OnSubmitAsync",
data,
activityId
).catch(err => console.error('Error invoking submit action:', err));
}
} else if (action instanceof AdaptiveCards.OpenUrlAction) {
// Handle URL actions - open in new tab
if (action.url) {
window.open(action.url, '_blank', 'noopener,noreferrer');
}
}
};
// Render the card
const renderedCard = adaptiveCard.render();
if (renderedCard) {
// Add M365 styling class to the rendered card
renderedCard.classList.add('ac-m365-theme');
container.appendChild(renderedCard);
// Apply additional DOM-based styling enhancements
this.applyM365Enhancements(container);
}
} catch (error) {
console.error('Error rendering Adaptive Card:', error);
container.innerHTML = '<div class="ac-error">Unable to render card</div>';
}
},
// Apply additional M365 styling enhancements after render
applyM365Enhancements: function (container) {
// Add ripple effect to buttons (optional enhancement)
const buttons = container.querySelectorAll('.ac-pushButton');
buttons.forEach(button => {
button.addEventListener('mousedown', function (e) {
const ripple = document.createElement('span');
ripple.classList.add('ac-button-ripple');
this.appendChild(ripple);
const rect = this.getBoundingClientRect();
ripple.style.left = (e.clientX - rect.left) + 'px';
ripple.style.top = (e.clientY - rect.top) + 'px';
setTimeout(() => ripple.remove(), 600);
});
});
// Enhance inputs with focus states
const inputs = container.querySelectorAll('.ac-input, .ac-textInput, .ac-choiceSetInput-expanded');
inputs.forEach(input => {
input.addEventListener('focus', function () {
this.closest('.ac-input-container')?.classList.add('ac-input-focused');
});
input.addEventListener('blur', function () {
this.closest('.ac-input-container')?.classList.remove('ac-input-focused');
});
});
}
};Method: render(containerId, cardJson, activityId, dotNetRef)
| Parameter | Purpose |
|---|---|
containerId |
DOM element ID where the card will be rendered |
cardJson |
The Adaptive Card JSON from Copilot Studio |
activityId |
The original activity ID (for reply correlation) |
dotNetRef |
Reference to the Blazor component for callbacks |
Action handling:
SubmitAction/ExecuteAction- Calls back to Blazor viadotNetRefOpenUrlAction- Opens URLs in a new browser tab
- Create a new file named
AdaptiveCardRenderer.razorunder the Components/Pages/Chat path.
@using Microsoft.Agents.Core.Models
@inject IJSRuntime JS
@implements IDisposable
<div class="adaptive-card-container">
<div id="@_containerId"></div>
</div>
@code {
[Parameter, EditorRequired]
public string CardJson { get; set; } = default!;
[Parameter]
public string? IncomingActivityId { get; set; }
[Parameter]
public EventCallback<Activity> OnInvoke { get; set; }
private readonly string _containerId = $"ac-{Guid.NewGuid()}";
private DotNetObjectReference<AdaptiveCardRenderer>? _objRef;
protected override async Task OnAfterRenderAsync(bool firstRender)
{
if (firstRender)
{
_objRef = DotNetObjectReference.Create(this);
await JS.InvokeVoidAsync(
"adaptiveCardRenderer.render",
_containerId,
CardJson,
IncomingActivityId,
_objRef
);
}
}
/// <summary>
/// Called from JavaScript when an adaptive card action is submitted.
/// </summary>
[JSInvokable]
public async Task OnCardActionAsync(Dictionary<string, object> data)
{
var activity = new Activity
{
Type = ActivityTypes.Invoke,
Name = "adaptiveCard/action",
Value = data,
ReplyToId = IncomingActivityId
};
if (OnInvoke.HasDelegate)
{
await OnInvoke.InvokeAsync(activity);
}
}
public void Dispose()
{
_objRef?.Dispose();
}
}Purpose: Bridge between Blazor and JavaScript for rendering and handling Adaptive Cards.
Parameters:
| Parameter | Type | Purpose |
|---|---|---|
CardJson |
string |
The Adaptive Card JSON to render |
IncomingActivityId |
string? |
Original activity ID for reply correlation |
OnInvoke |
EventCallback<Activity> |
Callback when user submits the card |
Method: OnAfterRenderAsync(bool firstRender)
This runs after the component renders to the DOM. On first render:
- Creates a
DotNetObjectReferencepointing to this component instance - Calls the JavaScript renderer, passing the reference
- The reference allows JavaScript to call back to this specific instance
Method: OnCardActionAsync(Dictionary<string, object> data) - Marked with [JSInvokable]
Called by JavaScript when the user clicks a button or submits a form:
- Receives the action data from the card
- Creates an
Activitywith typeInvokeand nameadaptiveCard/action - Sets
ReplyToIdto correlate with the original card - Fires the
OnInvokecallback to notify the parent component
Method: Dispose()
Cleans up the DotNetObjectReference to prevent memory leaks.
- Update StreamResponseAsync method in CopilotStudioIChatClient.cs
. Add handling for Adaptive Card attachments in the
StreamResponseAsyncmethod:
private async IAsyncEnumerable<ChatResponseUpdate> StreamResponseAsync(
Activity activityToSend,
[EnumeratorCancellation] CancellationToken cancellationToken)
{
var createdAt = DateTimeOffset.UtcNow;
var accumulatedText = new StringBuilder();
await foreach (var activity in _copilotClient.SendActivityAsync(activityToSend, cancellationToken))
{
// Parse streaming metadata from ChannelData
var metadata = ParseStreamingMetadata(activity.ChannelData);
// Case 1: Event activities (execution chain status)
if (activity.Type == "event" && !string.IsNullOrEmpty(activity.Name))
{
// Convert PascalCase to readable text: "DynamicPlanReceived" → "Dynamic Plan Received"
var readableName = AddSpacesToPascalCase(activity.Name);
yield return new ChatResponseUpdate
{
CreatedAt = createdAt,
Role = ChatRole.Assistant,
Contents =
[
new FunctionCallContent("InformativeMessage", readableName)
{
Arguments = new Dictionary<string, object?>
{
["message"] = readableName,
["sequence"] = 0
}
}
]
};
continue;
}
// Case 2: Adaptive Card Attachment
if (activity.Type == "message" &&
activity.Attachments?.Count > 0 &&
activity.Attachments[0].ContentType == "application/vnd.microsoft.card.adaptive")
{
var adaptiveCardJson = JsonSerializer.Serialize(activity.Attachments[0].Content);
yield return new ChatResponseUpdate
{
CreatedAt = createdAt,
Role = ChatRole.Assistant,
Contents =
[
new FunctionCallContent("RenderAdaptiveCardAsync", adaptiveCardJson)
{
Arguments = new Dictionary<string, object?>
{
["adaptiveCardJson"] = adaptiveCardJson,
["incomingActivityId"] = activity.Id
}
}
]
};
continue;
}
if (metadata?.StreamType == "streaming")
{
// Streaming chunk - accumulate and yield the full text so far
accumulatedText.Append(activity.Text);
yield return new ChatResponseUpdate
{
CreatedAt = createdAt,
Contents = [new TextContent(accumulatedText.ToString())],
Role = ChatRole.Assistant
};
}
else if (metadata?.StreamType == "final" || metadata?.StreamType == null)
{
// Final message or no metadata - use as-is (complete message)
yield return new ChatResponseUpdate
{
CreatedAt = createdAt,
Contents = [new TextContent(activity.Text)],
Role = ChatRole.Assistant
};
}
}
}- Add the SendAdaptiveCardResponseAsync Method.
Add this new method to
CopilotStudioIChatClient.csfor handling card action responses:
/// <summary>
/// Sends an adaptive card invoke response back to Copilot Studio
/// </summary>
public async IAsyncEnumerable<ChatResponseUpdate> SendAdaptiveCardResponseAsync(
Activity invokeActivity,
[EnumeratorCancellation] CancellationToken cancellationToken = default)
{
await EnsureConversationStartedAsync(cancellationToken);
await foreach (var update in StreamResponseAsync(invokeActivity, cancellationToken))
{
yield return update;
}
}How we identify Adaptive Cards:
activity.Type == "message" &&
activity.Attachments?.Count > 0 &&
activity.Attachments[0].ContentType == "application/vnd.microsoft.card.adaptive"This checks:
- The activity is a message (not an event or typing indicator)
- It has at least one attachment
- The first attachment's content type is the Adaptive Card MIME type
Why use FunctionCallContent?
Similar to informative messages, we use FunctionCallContent as a carrier:
CallId: "RenderAdaptiveCardAsync"- Discriminator tagArguments["adaptiveCardJson"]- The card JSON to renderArguments["incomingActivityId"]- For correlating responses
- Add the Adaptive Card Action Handler to Chat.razor. You may also need to add @using Microsoft.Agents.Core.Models at the top of the file to use the Activity class.
The method should be added to the @code section.
Add the method below to handle Adaptive Card action callbacks:
private async Task OnAdaptiveCardInvokeAction(Activity invokeActivity)
{
CancelAnyCurrentResponse();
// Create cancellation token FIRST
currentResponseCancellation = new CancellationTokenSource();
var streamingUpdates = CopilotStudioClient.SendAdaptiveCardResponseAsync(
invokeActivity,
currentResponseCancellation.Token
);
await ProcessStreamingResponseAsync(streamingUpdates);
}- Update ProcessUpdateContents method from Chat.razor . Add handling for Adaptive Card content:
private void ProcessUpdateContents(
ChatResponseUpdate update,
TextContent responseText,
List<AIContent> responseContents)
{
foreach (var content in update.Contents)
{
switch (content)
{
case TextContent { Text: { Length: > 0 } text }:
isWaitingForResponse = false;
responseText.Text = text;
break;
case FunctionCallContent { CallId: "InformativeMessage" } infoContent:
responseContents.Add(infoContent);
break;
// NEW: Handle Adaptive Cards
case FunctionCallContent { CallId: "RenderAdaptiveCardAsync" } cardContent:
// Add card as a separate message immediately
messages.Add(new ChatMessage(ChatRole.Assistant, [cardContent]));
break;
}
}
}- Pass the Callback to ChatMessageList. Update your chat template to pass the callback. Here is the template that we use currnely in our Chat.razor. You can scroll to the top of the file to find this template.
<ChatMessageList Messages="@messages"
InProgressMessage="@currentResponseMessage"
IsWaiting="@isWaitingForResponse">
<NoMessagesContent>
<div>
M365 Agent SDK based custom UI for Copilot Studio Chat
</div>
</NoMessagesContent>
</ChatMessageList>Replace it with the follwoing template:
<ChatMessageList Messages="@messages"
InProgressMessage="@currentResponseMessage"
IsWaiting="@isWaitingForResponse"
OnAdaptiveCardInvokeAction="@OnAdaptiveCardInvokeAction">
<NoMessagesContent>
<div>M365 Agent SDK based custom UI for Copilot Studio Chat</div>
</NoMessagesContent>
</ChatMessageList>Let's talk a bit about OnAdaptiveCardInvokeAction.
Purpose: Handle user interactions with Adaptive Cards.
When a user clicks a button or submits a form in an Adaptive Card:
- Cancel any current response - Stops any in-progress streaming
- Create new cancellation token - For the new response stream
- Send the invoke activity - Calls
SendAdaptiveCardResponseAsync - Process the response - Uses the same streaming logic as regular messages
Why add cards as separate messages?
case FunctionCallContent { CallId: "RenderAdaptiveCardAsync" } cardContent:
messages.Add(new ChatMessage(ChatRole.Assistant, [cardContent]));
break;Adaptive Cards are added directly to messages (not responseContents) because:
- Cards are complete, standalone content (not streaming)
- They should persist in the chat history
- Multiple cards can arrive in a single response
The OnAdaptiveCardInvokeAction callback needs to travel from Chat.razor down to AdaptiveCardRenderer.razor. However, these components aren't directly connected - ChatMessageList sits between them and must pass the callback through.
Chat.razor ← Defines the callback handler
│
▼
ChatMessageList.razor ← Must receive and forward the callback
│
▼
ChatMessageItem.razor ← Must receive and forward the callback
│
▼
AdaptiveCardRenderer.razor ← Fires the callback when user clicks
Without updating ChatMessageList, the callback never reaches the card renderer.
- Update ChatMessageList.razor Parameters
Add the callback parameter to accept it from Chat.razor:
We need to add below parameter to ChatMessageList.razor. Please find code section and add it there.
[Parameter]
public EventCallback<Activity> OnAdaptiveCardInvokeAction { get; set; }
Here is the code example:
@code {
[Parameter]
public List<ChatMessage>? Messages { get; set; }
[Parameter]
public ChatMessage? InProgressMessage { get; set; }
[Parameter]
public bool IsWaiting { get; set; }
[Parameter]
public RenderFragment? NoMessagesContent { get; set; }
// NEW: Add this parameter to receive the callback
[Parameter]
public EventCallback<Activity> OnAdaptiveCardInvokeAction { get; set; }
}- In the
ChatMessageList.razortemplate, forward the callback to everyChatMessageItem:
You can find the code below. Please scroll to the top of the file to locate it.
@foreach (var message in Messages)
{
<ChatMessageItem @key="@message" Message="@message" />
}
@if (InProgressMessage is not null)
{
<ChatMessageItem Message="@InProgressMessage" InProgress="true" />
<LoadingSpinner />
}
and replace it with the following code
@foreach (var message in Messages)
{
<ChatMessageItem @key="@message" Message="@message" OnAdaptiveCardInvokeAction="@OnAdaptiveCardInvokeAction" />
}
@if (InProgressMessage is not null)
{
<ChatMessageItem Message="@InProgressMessage" InProgress="true" OnAdaptiveCardInvokeAction="@OnAdaptiveCardInvokeAction" />
<LoadingSpinner />
}
Blazor uses a unidirectional data flow - data and callbacks flow down from parent to child components. Since Chat.razor owns the method that sends responses to Copilot Studio, it must provide that method as a callback. Each intermediate component must explicitly pass it along.
This pattern is common in component-based frameworks:
- React calls it "prop drilling"
- Blazor requires explicit
[Parameter]declarations at each level
| Component | Receives From | Passes To |
|---|---|---|
Chat.razor |
(defines the handler) | ChatMessageList |
ChatMessageList.razor |
Chat.razor |
ChatMessageItem |
ChatMessageItem.razor |
ChatMessageList |
AdaptiveCardRenderer |
AdaptiveCardRenderer.razor |
ChatMessageItem |
(fires the callback) |
- Add the Adaptive Card callback parameter. Please add it to the top of your @code section in ChatMessageItem.razor
@code {
[Parameter]
public EventCallback<Activity> OnAdaptiveCardInvokeAction { get; set; }
// ... existing code ...
}- Replace your rendering logic with the code below, which now supports Adaptive Cards. Scroll to the top of ChatMessageItem.razor to find the rendering piece - it should start with else if (Message.Role == ChatRole.Assistant). Replace it with the below code.
else if (Message.Role == ChatRole.Assistant)
{
foreach (var content in Message.Contents)
{
if (content is TextContent { Text: { Length: > 0 } text })
{
<div class="assistant-message @(InProgress ? "is-streaming" : "streaming-complete")">
<div class="assistant-message-header">
<div class="assistant-message-icon">
@CopilotIcon
</div>
<span>Copilot Studio Agent</span>
</div>
<div class="assistant-message-text">
@((MarkupString)RenderMarkdown(text))
</div>
</div>
}
else if (content is FunctionCallContent { CallId: "RenderAdaptiveCardAsync" } acc &&
acc.Arguments?.TryGetValue("adaptiveCardJson", out var cardJsonObj) is true &&
cardJsonObj is string cardJson)
{
var incomingActivityId = acc.Arguments.TryGetValue("incomingActivityId", out var idObj) && idObj is string idStr ? idStr : null;
<!-- Wrap Adaptive Card in assistant message structure -->
<div class="assistant-message">
<div class="assistant-message-header">
<div class="assistant-message-icon">
@CopilotIcon
</div>
<span>Copilot Studio Agent</span>
</div>
<div class="assistant-message-card">
<AdaptiveCardRenderer CardJson="@cardJson"
IncomingActivityId="@incomingActivityId"
OnInvoke="@OnAdaptiveCardInvokeAction" />
</div>
</div>
}
else if (content is FunctionCallContent { CallId: "InformativeMessage" } infoMsg &&
infoMsg.Arguments?.TryGetValue("message", out var msgObj) is true &&
msgObj is string infoText)
{
<!-- Informative message - status/search indicator -->
<div class="assistant-search">
<div class="assistant-message-header">
<div class="assistant-search-icon">
@LoadingIcon
</div>
<div class="assistant-search-content">
<span class="assistant-search-phrase">@infoText</span>
</div>
</div>
</div>
}
}
}- Create adaptiveCards.css. Create
adaptiveCards.cssunder wwwroot folder.
This stylesheet re-skins Adaptive Cards to match the Microsoft 365 look and feel. It overrides default Adaptive Card styles to provide consistent typography, M365-style buttons, inputs, and layouts, fixes common UX issues (like red required labels), and adds proper focus, hover, and responsive behavior. The goal is to make Copilot Studio-generated cards feel like native M365 UI inside our Blazor app.
/* ==========================================================================
Adaptive Cards - M365 Theme Stylesheet
==========================================================================
This stylesheet overrides the default Adaptive Cards styling to match
the Microsoft 365 design language used throughout the application.
========================================================================== */
/* ==========================================================================
Card Container
========================================================================== */
.adaptive-card-container {
max-width: 100%;
margin: 0.5rem 0;
}
/* Main Adaptive Card wrapper - multiple selectors for compatibility */
.ac-adaptiveCard,
.ac-m365-theme,
div[class*="ac-adaptiveCard"] {
font-family: 'Segoe UI', -apple-system, BlinkMacSystemFont, 'Roboto', 'Helvetica Neue', sans-serif !important;
background: #ffffff !important;
border: 1px solid #e5e5e5 !important;
border-radius: 8px !important;
box-shadow: 0 2px 8px rgba(0, 0, 0, 0.08) !important;
padding: 1.25rem !important;
overflow: hidden;
transition: box-shadow 0.2s ease, border-color 0.2s ease;
}
.ac-adaptiveCard:hover,
.ac-m365-theme:hover {
box-shadow: 0 4px 12px rgba(0, 0, 0, 0.1) !important;
}
/* ==========================================================================
Fix Required Field Labels (Red → M365 Style)
========================================================================== */
/* Override red required labels to use M365 styling */
.ac-textBlock[style*="color: rgb(255"],
.ac-textBlock[style*="color: #ff"],
.ac-textBlock[style*="color: #FF"],
.ac-textBlock[style*="color: rgb(209, 52, 56)"],
.ac-textBlock[style*="attention"],
div[class*="ac-"] p[style*="color: rgb(255"],
div[class*="ac-"] p[style*="color: #ff"] {
color: #242424 !important;
font-weight: 600 !important;
}
/* Style the asterisk for required fields */
.ac-textBlock[style*="color: rgb(255"]::after,
.ac-textBlock[style*="attention"]::after {
color: #d13438 !important;
}
/* ==========================================================================
Typography - Fix red labels and improve text styling
========================================================================== */
/* Text blocks */
.ac-textBlock,
div[class*="ac-"] p,
div[class*="ac-"] span {
font-family: 'Segoe UI', -apple-system, BlinkMacSystemFont, 'Roboto', 'Helvetica Neue', sans-serif !important;
line-height: 1.5 !important;
}
/* Fix ALL red/attention colored text to be proper label color */
/* These selectors target the inline styles Adaptive Cards applies */
.ac-textBlock[style*="color: rgb(255, 0, 0)"],
.ac-textBlock[style*="color: rgb(209, 52, 56)"],
.ac-textBlock[style*="color: rgb(196, 49, 75)"],
.ac-textBlock[style*="color:#ff"],
.ac-textBlock[style*="color: #ff"],
.ac-textBlock[style*="color:#FF"],
.ac-textBlock[style*="color: #FF"],
.ac-textBlock[style*="color: #d13438"],
.ac-textBlock[style*="color: #D13438"],
.ac-textBlock[style*="color:rgb(255"],
.ac-textBlock[style*="color: rgb(255"],
p[style*="color: rgb(255"],
p[style*="color: rgb(209, 52, 56)"],
span[style*="color: rgb(255"],
span[style*="color: rgb(209, 52, 56)"] {
color: #242424 !important;
font-weight: 600 !important;
font-size: 0.875rem !important;
}
/* Default text color */
.ac-textBlock {
color: #242424 !important;
}
/* Headings */
.ac-textBlock[style*="font-size: 22px"],
.ac-textBlock[style*="font-size: 24px"],
.ac-textBlock[style*="font-size: 26px"] {
font-weight: 600 !important;
color: #242424 !important;
margin-bottom: 0.375rem !important;
}
/* Large text - card titles */
.ac-textBlock[style*="font-size: 18px"],
.ac-textBlock[style*="font-size: 20px"] {
font-weight: 600 !important;
color: #242424 !important;
}
/* Subtle/secondary text */
.ac-textBlock[style*="color: rgb(97, 97, 97)"],
.ac-textBlock[style*="color: #616161"],
.ac-textBlock.subtle {
color: #616161 !important;
}
/* ==========================================================================
Buttons / Actions - Enhanced selectors
========================================================================== */
/* Action set container */
.ac-actionSet {
margin-top: 1rem !important;
padding-top: 1rem !important;
display: flex !important;
gap: 0.5rem !important;
justify-content: flex-end !important;
}
/* Base button styling - comprehensive selectors */
.ac-pushButton,
button.ac-pushButton,
div[class*="ac-"] button,
.ac-actionSet button,
.ac-action-submit,
.ac-action-openUrl,
.ac-action-showCard,
.ac-action-execute {
font-family: 'Segoe UI', -apple-system, BlinkMacSystemFont, 'Roboto', 'Helvetica Neue', sans-serif !important;
font-size: 0.875rem !important;
font-weight: 600 !important;
padding: 0.5rem 1.25rem !important;
border-radius: 6px !important;
cursor: pointer !important;
transition: all 0.15s ease !important;
min-width: 80px !important;
text-align: center !important;
position: relative;
overflow: hidden;
/* Default to primary style */
background: #5b5fc7 !important;
color: #ffffff !important;
border: 1px solid #5b5fc7 !important;
}
/* Button hover state */
.ac-pushButton:hover,
button.ac-pushButton:hover,
div[class*="ac-"] button:hover,
.ac-actionSet button:hover {
background: #4a4eb5 !important;
border-color: #4a4eb5 !important;
box-shadow: 0 2px 6px rgba(91, 95, 199, 0.3) !important;
}
/* Button active state */
.ac-pushButton:active,
button.ac-pushButton:active,
div[class*="ac-"] button:active,
.ac-actionSet button:active {
background: #3d4099 !important;
border-color: #3d4099 !important;
transform: translateY(1px);
}
/* Button focus state */
.ac-pushButton:focus,
button.ac-pushButton:focus,
div[class*="ac-"] button:focus,
.ac-actionSet button:focus {
outline: none !important;
box-shadow: 0 0 0 2px rgba(91, 95, 199, 0.4) !important;
}
/* Primary button style (first/main action) */
.ac-pushButton.style-positive,
.ac-actionSet > .ac-pushButton:first-child,
.ac-pushButton[style*="background-color: rgb(91, 95, 199)"] {
background: #5b5fc7 !important;
color: #ffffff !important;
border: 1px solid #5b5fc7 !important;
}
.ac-pushButton.style-positive:hover,
.ac-actionSet > .ac-pushButton:first-child:hover,
.ac-pushButton[style*="background-color: rgb(91, 95, 199)"]:hover {
background: #4a4eb5 !important;
border-color: #4a4eb5 !important;
box-shadow: 0 2px 6px rgba(91, 95, 199, 0.3) !important;
}
.ac-pushButton.style-positive:active,
.ac-actionSet > .ac-pushButton:first-child:active,
.ac-pushButton[style*="background-color: rgb(91, 95, 199)"]:active {
background: #3d4099 !important;
border-color: #3d4099 !important;
transform: translateY(1px);
}
/* Secondary/Default button style - when there are multiple buttons */
.ac-pushButton.style-default,
.ac-actionSet > .ac-pushButton:not(:first-child) {
background: #ffffff !important;
color: #242424 !important;
border: 1px solid #d1d5db !important;
}
.ac-pushButton.style-default:hover,
.ac-actionSet > .ac-pushButton:not(:first-child):hover {
background: #f5f5f5 !important;
border-color: #a3a3a3 !important;
box-shadow: none !important;
}
.ac-pushButton.style-default:active,
.ac-actionSet > .ac-pushButton:not(:first-child):active {
background: #e5e5e5 !important;
transform: translateY(1px);
}
/* Destructive button style */
.ac-pushButton.style-destructive {
background: #ffffff !important;
color: #d13438 !important;
border: 1px solid #d13438 !important;
}
.ac-pushButton.style-destructive:hover {
background: #fef1f1 !important;
border-color: #a82a2d !important;
}
.ac-pushButton.style-destructive:active {
background: #fde4e4 !important;
transform: translateY(1px);
}
/* Button ripple effect */
.ac-button-ripple {
position: absolute;
background: rgba(255, 255, 255, 0.3);
border-radius: 50%;
transform: scale(0);
animation: ac-ripple 0.6s ease-out;
pointer-events: none;
width: 100px;
height: 100px;
margin-left: -50px;
margin-top: -50px;
}
@keyframes ac-ripple {
to {
transform: scale(4);
opacity: 0;
}
}
/* ==========================================================================
Inputs - Enhanced selectors for Adaptive Cards
========================================================================== */
/* Input container */
.ac-input-container {
margin-bottom: 0.75rem !important;
}
/* Text inputs - comprehensive selectors */
.ac-input,
.ac-textInput,
.ac-input input,
.ac-input textarea,
.ac-textInput input,
.ac-textInput textarea,
input.ac-input,
textarea.ac-input,
div[class*="ac-"] input[type="text"],
div[class*="ac-"] input[type="email"],
div[class*="ac-"] input[type="tel"],
div[class*="ac-"] input[type="url"],
div[class*="ac-"] input[type="password"],
div[class*="ac-"] input[type="number"],
div[class*="ac-"] textarea {
font-family: 'Segoe UI', -apple-system, BlinkMacSystemFont, 'Roboto', 'Helvetica Neue', sans-serif !important;
font-size: 0.9375rem !important;
padding: 0.625rem 0.875rem !important;
border: 1px solid #d1d5db !important;
border-radius: 6px !important;
background: #ffffff !important;
color: #242424 !important;
transition: border-color 0.2s ease, box-shadow 0.2s ease !important;
width: 100% !important;
box-sizing: border-box !important;
outline: none !important;
}
.ac-input:focus,
.ac-textInput:focus,
.ac-input input:focus,
.ac-input textarea:focus,
.ac-textInput input:focus,
.ac-textInput textarea:focus,
input.ac-input:focus,
textarea.ac-input:focus,
div[class*="ac-"] input:focus,
div[class*="ac-"] textarea:focus,
.ac-input-focused .ac-input,
.ac-input-focused input {
outline: none !important;
border-color: #5b5fc7 !important;
box-shadow: 0 0 0 2px rgba(91, 95, 199, 0.25) !important;
}
.ac-input::placeholder,
.ac-textInput::placeholder,
div[class*="ac-"] input::placeholder,
div[class*="ac-"] textarea::placeholder {
color: #a3a3a3 !important;
}
/* Input labels */
.ac-input-label,
div[class*="ac-"] label {
font-family: 'Segoe UI', -apple-system, BlinkMacSystemFont, 'Roboto', 'Helvetica Neue', sans-serif !important;
font-size: 0.875rem !important;
font-weight: 600 !important;
color: #242424 !important;
margin-bottom: 0.375rem !important;
display: block !important;
}
/* Required field indicator */
.ac-input-label-required::after {
content: " *";
color: #d13438 !important;
}
/* Error messages */
.ac-input-validation-failed,
.ac-input-error {
border-color: #d13438 !important;
}
.ac-input-error-message {
color: #d13438 !important;
font-size: 0.8125rem !important;
margin-top: 0.25rem !important;
}
/* ==========================================================================
Choice Sets (Radio buttons & Checkboxes)
========================================================================== */
.ac-choiceSetInput-expanded {
display: flex !important;
flex-direction: column !important;
gap: 0.5rem !important;
}
.ac-choiceSetInput-expanded .ac-input {
display: flex !important;
align-items: center !important;
gap: 0.5rem !important;
padding: 0 !important;
border: none !important;
background: transparent !important;
}
/* Radio buttons */
.ac-choiceSetInput-expanded input[type="radio"] {
appearance: none !important;
width: 18px !important;
height: 18px !important;
border: 2px solid #616161 !important;
border-radius: 50% !important;
cursor: pointer !important;
transition: all 0.15s ease !important;
position: relative !important;
flex-shrink: 0 !important;
}
.ac-choiceSetInput-expanded input[type="radio"]:checked {
border-color: #5b5fc7 !important;
}
.ac-choiceSetInput-expanded input[type="radio"]:checked::after {
content: '' !important;
position: absolute !important;
width: 10px !important;
height: 10px !important;
background: #5b5fc7 !important;
border-radius: 50% !important;
top: 50% !important;
left: 50% !important;
transform: translate(-50%, -50%) !important;
}
.ac-choiceSetInput-expanded input[type="radio"]:focus {
outline: none !important;
box-shadow: 0 0 0 2px rgba(91, 95, 199, 0.4) !important;
}
/* Checkboxes */
.ac-choiceSetInput-expanded input[type="checkbox"] {
appearance: none !important;
width: 18px !important;
height: 18px !important;
border: 2px solid #616161 !important;
border-radius: 4px !important;
cursor: pointer !important;
transition: all 0.15s ease !important;
position: relative !important;
flex-shrink: 0 !important;
}
.ac-choiceSetInput-expanded input[type="checkbox"]:checked {
background: #5b5fc7 !important;
border-color: #5b5fc7 !important;
}
.ac-choiceSetInput-expanded input[type="checkbox"]:checked::after {
content: '' !important;
position: absolute !important;
width: 5px !important;
height: 9px !important;
border: 2px solid white !important;
border-top: none !important;
border-left: none !important;
top: 1px !important;
left: 5px !important;
transform: rotate(45deg) !important;
}
.ac-choiceSetInput-expanded input[type="checkbox"]:focus {
outline: none !important;
box-shadow: 0 0 0 2px rgba(91, 95, 199, 0.4) !important;
}
/* Dropdown/Select inputs */
.ac-choiceSetInput-compact select,
select.ac-input {
appearance: none !important;
background: #ffffff url("data:image/svg+xml,%3Csvg xmlns='http://www.w3.org/2000/svg' width='12' height='12' viewBox='0 0 12 12'%3E%3Cpath fill='%23616161' d='M6 8L1 3h10z'/%3E%3C/svg%3E") no-repeat right 0.75rem center !important;
padding-right: 2.5rem !important;
cursor: pointer !important;
}
/* ==========================================================================
Date/Time Inputs
========================================================================== */
.ac-dateInput input,
.ac-timeInput input {
font-family: 'Segoe UI', -apple-system, BlinkMacSystemFont, 'Roboto', 'Helvetica Neue', sans-serif !important;
font-size: 0.9375rem !important;
padding: 0.625rem 0.875rem !important;
border: 1px solid #d1d5db !important;
border-radius: 6px !important;
background: #ffffff !important;
color: #242424 !important;
}
.ac-dateInput input:focus,
.ac-timeInput input:focus {
outline: none !important;
border-color: #5b5fc7 !important;
box-shadow: 0 0 0 1px #5b5fc7 !important;
}
/* ==========================================================================
Toggle Inputs
========================================================================== */
.ac-toggleInput {
display: flex !important;
align-items: center !important;
gap: 0.75rem !important;
}
.ac-toggleInput input[type="checkbox"] {
appearance: none !important;
width: 44px !important;
height: 24px !important;
background: #c4c4c4 !important;
border-radius: 12px !important;
position: relative !important;
cursor: pointer !important;
transition: all 0.2s ease !important;
flex-shrink: 0 !important;
}
.ac-toggleInput input[type="checkbox"]::after {
content: '' !important;
position: absolute !important;
width: 20px !important;
height: 20px !important;
background: #ffffff !important;
border-radius: 50% !important;
top: 2px !important;
left: 2px !important;
transition: transform 0.2s ease !important;
box-shadow: 0 1px 3px rgba(0, 0, 0, 0.2) !important;
}
.ac-toggleInput input[type="checkbox"]:checked {
background: #5b5fc7 !important;
}
.ac-toggleInput input[type="checkbox"]:checked::after {
transform: translateX(20px) !important;
}
.ac-toggleInput input[type="checkbox"]:focus {
outline: none !important;
box-shadow: 0 0 0 2px rgba(91, 95, 199, 0.4) !important;
}
/* ==========================================================================
Images
========================================================================== */
.ac-image {
border-radius: 6px !important;
overflow: hidden !important;
}
.ac-image img {
display: block !important;
max-width: 100% !important;
height: auto !important;
}
/* ==========================================================================
Containers & Column Sets
========================================================================== */
.ac-container {
padding: 0 !important;
}
.ac-container.style-emphasis {
background: #f5f5f5 !important;
border-radius: 6px !important;
padding: 0.875rem !important;
border: 1px solid #e5e5e5 !important;
}
.ac-container.style-accent {
background: #f0f0ff !important;
border-radius: 6px !important;
padding: 0.875rem !important;
border: 1px solid #d8d8f0 !important;
}
.ac-container.style-attention,
.ac-container.style-warning {
background: #fff8e6 !important;
border-radius: 6px !important;
padding: 0.875rem !important;
border: 1px solid #ffd966 !important;
}
.ac-container.style-good {
background: #f0fff0 !important;
border-radius: 6px !important;
padding: 0.875rem !important;
border: 1px solid #107c10 !important;
}
.ac-columnSet {
display: flex !important;
gap: 1rem !important;
}
.ac-column {
flex: 1 !important;
}
/* ==========================================================================
Fact Sets
========================================================================== */
.ac-factSet {
display: grid !important;
grid-template-columns: auto 1fr !important;
gap: 0.5rem 1rem !important;
padding: 0.75rem !important;
background: #f9f9f9 !important;
border-radius: 6px !important;
border: 1px solid #e5e5e5 !important;
}
.ac-fact-title {
font-weight: 600 !important;
color: #242424 !important;
}
.ac-fact-value {
color: #424242 !important;
}
/* ==========================================================================
Separators
========================================================================== */
.ac-separator {
border: none !important;
height: 1px !important;
background: #e5e5e5 !important;
margin: 0.75rem 0 !important;
}
/* ==========================================================================
Media Elements
========================================================================== */
.ac-media-poster {
border-radius: 6px !important;
overflow: hidden !important;
}
.ac-media-playButton {
background: rgba(91, 95, 199, 0.9) !important;
border-radius: 50% !important;
width: 56px !important;
height: 56px !important;
display: flex !important;
align-items: center !important;
justify-content: center !important;
cursor: pointer !important;
transition: all 0.2s ease !important;
}
.ac-media-playButton:hover {
background: rgba(74, 78, 181, 0.95) !important;
transform: scale(1.05) !important;
}
.ac-media-playButton svg {
fill: white !important;
}
/* ==========================================================================
Rich Text Block
========================================================================== */
.ac-richTextBlock {
font-family: 'Segoe UI', -apple-system, BlinkMacSystemFont, 'Roboto', 'Helvetica Neue', sans-serif !important;
line-height: 1.6 !important;
color: #242424 !important;
}
.ac-richTextBlock a {
color: #5b5fc7 !important;
text-decoration: none !important;
}
.ac-richTextBlock a:hover {
text-decoration: underline !important;
}
/* ==========================================================================
Icon styling (for cards with icons like the connection card)
========================================================================== */
.ac-icon {
width: 32px !important;
height: 32px !important;
border-radius: 6px !important;
}
/* Service info styling */
.ac-columnSet[data-ac-type="service-info"],
.service-info {
background: #f9f9f9 !important;
padding: 0.875rem !important;
border-radius: 6px !important;
border: 1px solid #e5e5e5 !important;
}
/* ==========================================================================
Warning/Notice Styling
========================================================================== */
.ac-container[style*="background-color: rgb(255, 248, 230)"],
.ac-container.warning-container {
background: #fff8e6 !important;
border: 1px solid #ffd966 !important;
border-radius: 6px !important;
padding: 0.875rem !important;
}
/* ==========================================================================
Error State
========================================================================== */
.ac-error {
padding: 1rem;
background: #fef1f1;
border: 1px solid #f5c2c2;
border-radius: 6px;
color: #d13438;
font-family: 'Segoe UI', -apple-system, BlinkMacSystemFont, 'Roboto', 'Helvetica Neue', sans-serif;
font-size: 0.875rem;
}
/* ==========================================================================
Animation - Card entrance
========================================================================== */
.ac-adaptiveCard,
.ac-m365-theme {
animation: ac-fadeIn 0.2s ease-out;
}
@keyframes ac-fadeIn {
0% {
opacity: 0;
transform: translateY(8px);
}
100% {
opacity: 1;
transform: translateY(0);
}
}
/* ==========================================================================
Responsive Adjustments
========================================================================== */
@media (max-width: 640px) {
.ac-adaptiveCard,
.ac-m365-theme {
padding: 1rem !important;
border-radius: 6px !important;
}
.ac-columnSet {
flex-direction: column !important;
gap: 0.75rem !important;
}
.ac-actionSet {
flex-direction: column !important;
}
.ac-pushButton {
width: 100% !important;
}
}
/* ==========================================================================
Print Styles
========================================================================== */
@media print {
.ac-adaptiveCard,
.ac-m365-theme {
box-shadow: none !important;
border: 1px solid #ccc !important;
}
.ac-pushButton {
display: none !important;
}
}
At this point, we have all the required components to properly render Adaptive Cards in our application. Since we added a Dataverse MCP server earlier in this chapter, Copilot Studio will request your consent to use the Dataverse MCP server. This consent request will be presented using an Adaptive Card.You can start the conversation and verify that the Adaptive Card containing the consent request is rendered correctly.
You can also interact with the Dataverse MCP server and ask questions such as: "How many accounts are available in my Dataverse environment?"
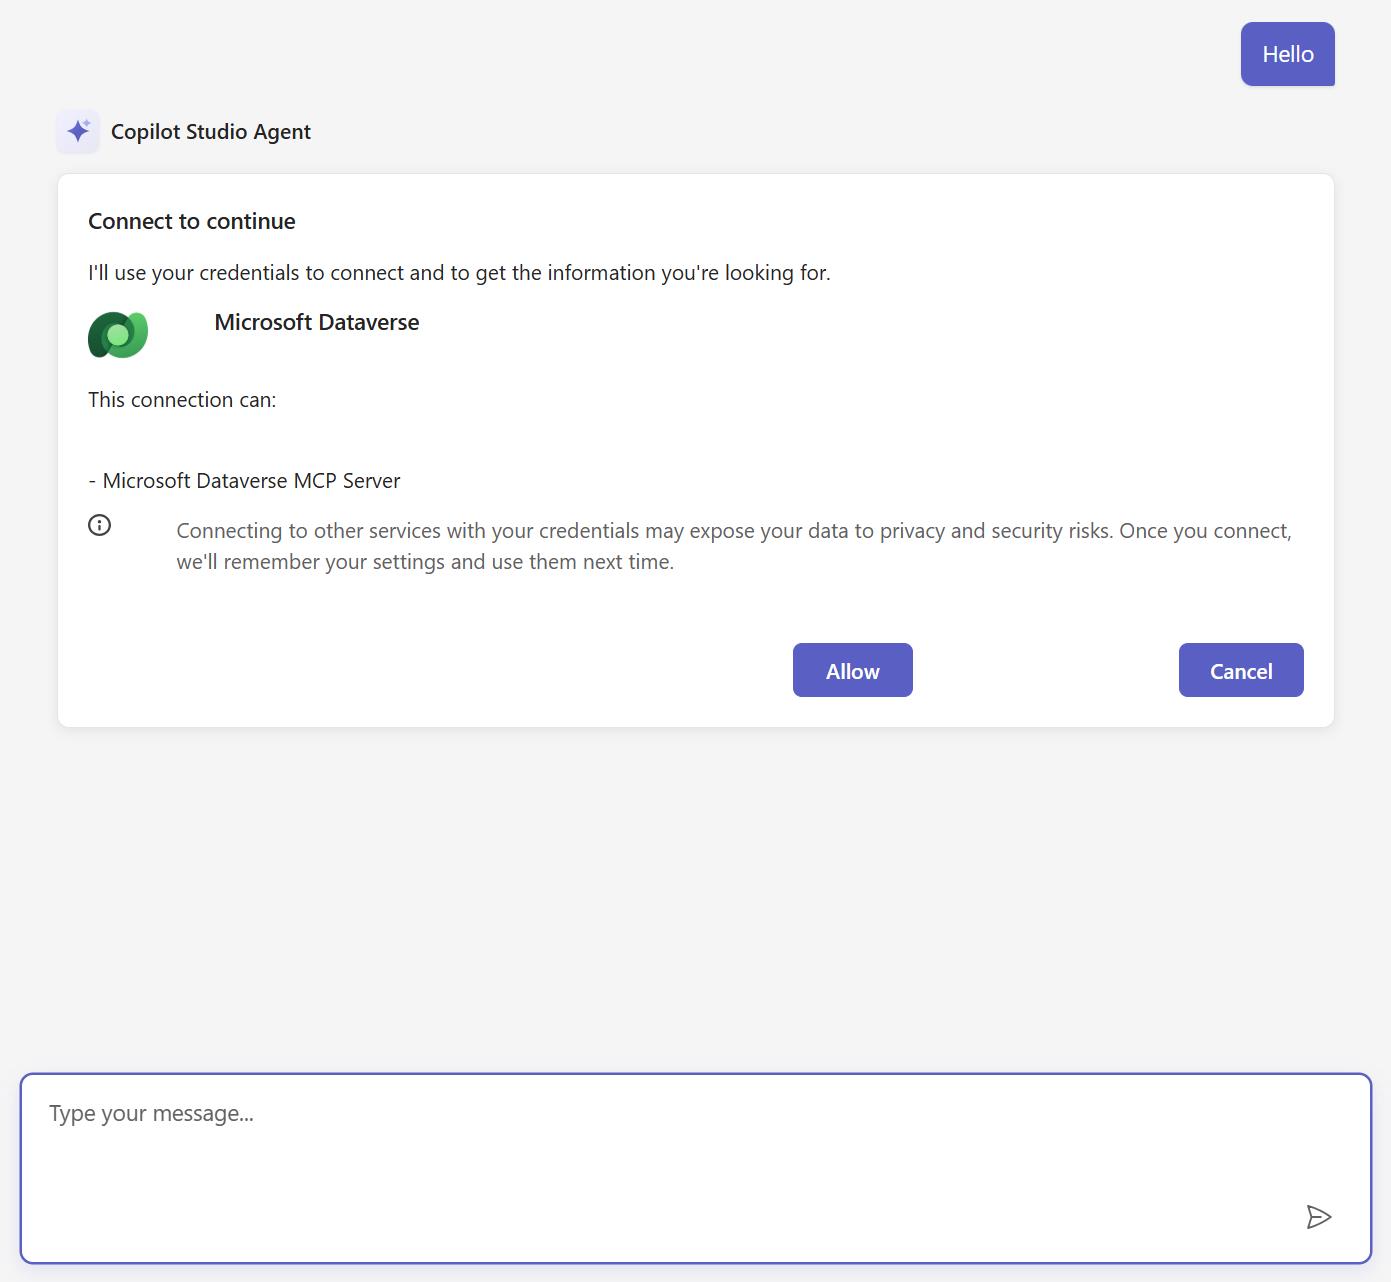
- Since you have created an Adaptive Card topic for your agent in Copilot Studio, let's test it by providing a prompt.
- Prompt: Create Contact
- It will display Adpative card with First Name & Last Name as input.
- Provide the details and click on Submit. You will get the response as "Record created successfully".
- You can verify the contact is created or not by asking to provide you the details on the created contact.
[!alert] This part is optional. It helps you better understand how to use or implement custom token storage using IDistributedCache.
By default, MSAL (Microsoft Authentication Library) stores authentication tokens in an in-memory cache. While this works well during a single session, it presents a significant challenge: every time your application restarts, all cached tokens are lost. This forces users to re-authenticate and can disrupt the user experience, especially during development or when deploying updates.
A common solution is to use a distributed cache like Redis or SQL Server, but this adds infrastructure complexity and cost-overkill for many scenarios, particularly single-server deployments or development environments.
In this section, you'll implement a custom IDistributedCache that stores MSAL tokens directly in encrypted HTTP cookies on the user's browser. This approach offers several benefits:
| Benefit | Description |
|---|---|
| Survives Restarts | Tokens persist in the browser, not server memory |
| No External Infrastructure | No Redis, SQL Server, or other distributed cache needed |
| Per-User Storage | Each user's tokens are stored in their own browser |
| Secure by Design | Tokens are encrypted using ASP.NET Core Data Protection |
The CookieDistributedCache class handles several challenges:
- Encryption - All token data is encrypted using
IDataProtectionProviderbefore being stored - Cookie Size Limits - Browsers limit cookie size (~4KB), so large tokens are automatically chunked across multiple cookies
- Expiration Handling - Cache entries respect MSAL's expiration settings and are automatically cleaned up
- HTTP Context Awareness - Gracefully handles scenarios where cookies cannot be modified (e.g., after response has started)
By the end of this section, your application will maintain authenticated sessions across restarts without requiring any external caching infrastructure.
- Create a new C# file under Authentication folder called CookieDistributedCache.cs
Here is the code that you need to past into CookieDistributedCache.cs
using Microsoft.AspNetCore.DataProtection;
using Microsoft.Extensions.Caching.Distributed;
using System.Text;
using System.Text.Json;
namespace webchatclient.Services.Authentication
{
/// <summary>
/// A cookie-based implementation of IDistributedCache that stores MSAL tokens
/// in encrypted, chunked cookies. This allows tokens to survive app restarts
/// without requiring external distributed cache infrastructure.
/// </summary>
public class CookieDistributedCache : IDistributedCache
{
private readonly IHttpContextAccessor _httpContextAccessor;
private readonly IDataProtector _protector;
private readonly ILogger<CookieDistributedCache> _logger;
// Cookie size limit (leaving room for overhead)
private const int MaxChunkSize = 3500;
private const string CookiePrefix = ".MSAL.Token.";
private const string ChunkCountSuffix = ".Count";
public CookieDistributedCache(
IHttpContextAccessor httpContextAccessor,
IDataProtectionProvider dataProtectionProvider,
ILogger<CookieDistributedCache> logger)
{
_httpContextAccessor = httpContextAccessor;
_protector = dataProtectionProvider.CreateProtector("MSAL.TokenCache.v1");
_logger = logger;
}
public byte[]? Get(string key)
{
var context = _httpContextAccessor.HttpContext;
if (context == null) return null;
try
{
var cookieKey = GetCookieKey(key);
var countKey = cookieKey + ChunkCountSuffix;
// Check if we have chunked data
if (context.Request.Cookies.TryGetValue(countKey, out var countStr)
&& int.TryParse(countStr, out var chunkCount))
{
var chunks = new List<string>();
for (int i = 0; i < chunkCount; i++)
{
var chunkKey = $"{cookieKey}.{i}";
if (context.Request.Cookies.TryGetValue(chunkKey, out var chunk))
{
chunks.Add(chunk);
}
else
{
_logger.LogWarning("Missing chunk {ChunkIndex} for key {Key}", i, key);
return null;
}
}
var combined = string.Join("", chunks);
var decrypted = _protector.Unprotect(combined);
var entry = JsonSerializer.Deserialize<CacheEntry>(decrypted);
if (entry == null) return null;
// Check expiration
if (entry.AbsoluteExpiration.HasValue &&
entry.AbsoluteExpiration.Value < DateTimeOffset.UtcNow)
{
_logger.LogDebug("Cache entry expired for key {Key}", key);
// Only attempt to remove if response hasn't started
if (!context.Response.HasStarted)
{
Remove(key);
}
else
{
_logger.LogDebug("Cannot remove expired entry for key {Key} - response already started, will be cleaned up on next request", key);
}
return null;
}
_logger.LogDebug("Retrieved token cache entry for key {Key}, size: {Size} bytes",
key, entry.Value?.Length ?? 0);
return entry.Value;
}
// Try single cookie (backward compatibility or small data)
if (context.Request.Cookies.TryGetValue(cookieKey, out var value))
{
var decrypted = _protector.Unprotect(value);
var entry = JsonSerializer.Deserialize<CacheEntry>(decrypted);
if (entry == null) return null;
if (entry.AbsoluteExpiration.HasValue &&
entry.AbsoluteExpiration.Value < DateTimeOffset.UtcNow)
{
// Only attempt to remove if response hasn't started
if (!context.Response.HasStarted)
{
Remove(key);
}
else
{
_logger.LogDebug("Cannot remove expired entry for key {Key} - response already started, will be cleaned up on next request", key);
}
return null;
}
return entry.Value;
}
}
catch (Exception ex)
{
_logger.LogWarning(ex, "Failed to retrieve cache entry for key {Key}", key);
}
return null;
}
public Task<byte[]?> GetAsync(string key, CancellationToken token = default)
{
return Task.FromResult(Get(key));
}
public void Set(string key, byte[] value, DistributedCacheEntryOptions options)
{
var context = _httpContextAccessor.HttpContext;
if (context == null)
{
_logger.LogWarning("Cannot set cache entry - no HttpContext available");
return;
}
// Can't modify cookies after response has started
if (context.Response.HasStarted)
{
_logger.LogWarning("Cannot set cache entry for key {Key} - response already started", key);
return;
}
try
{
var entry = new CacheEntry
{
Value = value,
AbsoluteExpiration = options.AbsoluteExpiration ??
(options.AbsoluteExpirationRelativeToNow.HasValue
? DateTimeOffset.UtcNow.Add(options.AbsoluteExpirationRelativeToNow.Value)
: DateTimeOffset.UtcNow.AddHours(24)) // Default 24 hours
};
var json = JsonSerializer.Serialize(entry);
var encrypted = _protector.Protect(json);
var cookieKey = GetCookieKey(key);
var cookieOptions = CreateCookieOptions(entry.AbsoluteExpiration);
// Clear any existing chunks first
ClearChunks(context, cookieKey);
if (encrypted.Length <= MaxChunkSize)
{
// Single cookie
context.Response.Cookies.Append(cookieKey, encrypted, cookieOptions);
_logger.LogDebug("Stored token cache entry for key {Key} in single cookie, size: {Size} bytes",
key, value.Length);
}
else
{
// Chunk the data
var chunks = ChunkString(encrypted, MaxChunkSize);
for (int i = 0; i < chunks.Count; i++)
{
var chunkKey = $"{cookieKey}.{i}";
context.Response.Cookies.Append(chunkKey, chunks[i], cookieOptions);
}
// Store chunk count
var countKey = cookieKey + ChunkCountSuffix;
context.Response.Cookies.Append(countKey, chunks.Count.ToString(), cookieOptions);
_logger.LogDebug(
"Stored token cache entry for key {Key} in {ChunkCount} chunks, total size: {Size} bytes",
key, chunks.Count, value.Length);
}
}
catch (Exception ex)
{
_logger.LogError(ex, "Failed to set cache entry for key {Key}", key);
}
}
public Task SetAsync(string key, byte[] value, DistributedCacheEntryOptions options,
CancellationToken token = default)
{
Set(key, value, options);
return Task.CompletedTask;
}
public void Refresh(string key)
{
// For cookie-based cache, refresh is a no-op as we don't support sliding expiration
_logger.LogDebug("Refresh called for key {Key} - no-op for cookie cache", key);
}
public Task RefreshAsync(string key, CancellationToken token = default)
{
Refresh(key);
return Task.CompletedTask;
}
public void Remove(string key)
{
var context = _httpContextAccessor.HttpContext;
if (context == null) return;
// Can't modify cookies after response has started
if (context.Response.HasStarted)
{
_logger.LogDebug("Cannot remove cache entry for key {Key} - response already started", key);
return;
}
var cookieKey = GetCookieKey(key);
ClearChunks(context, cookieKey);
// Also delete the main cookie
context.Response.Cookies.Delete(cookieKey);
_logger.LogDebug("Removed token cache entry for key {Key}", key);
}
public Task RemoveAsync(string key, CancellationToken token = default)
{
Remove(key);
return Task.CompletedTask;
}
private void ClearChunks(HttpContext context, string cookieKey)
{
// Can't modify cookies after response has started
if (context.Response.HasStarted)
{
_logger.LogDebug("Cannot clear chunks for {CookieKey} - response already started", cookieKey);
return;
}
var countKey = cookieKey + ChunkCountSuffix;
if (context.Request.Cookies.TryGetValue(countKey, out var countStr)
&& int.TryParse(countStr, out var chunkCount))
{
for (int i = 0; i < chunkCount; i++)
{
context.Response.Cookies.Delete($"{cookieKey}.{i}");
}
context.Response.Cookies.Delete(countKey);
}
}
private static string GetCookieKey(string key)
{
// Create a shorter, safe cookie name from the cache key
// MSAL keys can be quite long, so we hash them
using var sha = System.Security.Cryptography.SHA256.Create();
var hash = sha.ComputeHash(Encoding.UTF8.GetBytes(key));
var shortKey = Convert.ToBase64String(hash)
.Replace("+", "-")
.Replace("/", "_")
.TrimEnd('=')
.Substring(0, 16);
return CookiePrefix + shortKey;
}
private static CookieOptions CreateCookieOptions(DateTimeOffset? expiration)
{
return new CookieOptions
{
HttpOnly = true,
Secure = true,
SameSite = SameSiteMode.Lax,
IsEssential = true,
Expires = expiration ?? DateTimeOffset.UtcNow.AddHours(24)
};
}
private static List<string> ChunkString(string str, int chunkSize)
{
var chunks = new List<string>();
for (int i = 0; i < str.Length; i += chunkSize)
{
chunks.Add(str.Substring(i, Math.Min(chunkSize, str.Length - i)));
}
return chunks;
}
private class CacheEntry
{
public byte[]? Value { get; set; }
public DateTimeOffset? AbsoluteExpiration { get; set; }
}
}
}
The constructor takes three dependencies. The IHttpContextAccessor gives us access to the current HTTP request and response so we can read and write cookies. The IDataProtectionProvider lets us encrypt token data before storing it in cookies, which is critical because cookies are visible in browser developer tools and we don't want tokens exposed in plain text. The ILogger helps with debugging by recording what the cache is doing.
When we create the protector, we use a purpose string "MSAL.TokenCache.v1" which acts like a namespace for encryption. This means data encrypted with this purpose can only be decrypted with the same purpose string, adding an extra layer of security.
When retrieving data, the method first checks if the data was stored in chunks by looking for a count cookie. If it finds one, it reads all the chunk cookies, combines them back into a single string, decrypts that string, and deserializes it into a cache entry object. If there's no count cookie, it tries to read a single cookie instead, which handles cases where the data was small enough to fit in one cookie.
After decryption, the method checks if the entry has expired. If it has, it tries to remove the expired cookies and returns null. However, if the HTTP response has already started being sent to the browser, we can't modify cookies anymore, so we just log a message and let it be cleaned up on the next request.
The reason we need chunking is that browsers impose size limits on cookies, typically around 4KB per cookie. MSAL tokens, especially when they include refresh tokens and multiple access tokens, can easily exceed this limit. By splitting large data across multiple cookies, we can store tokens of any reasonable size.
These methods store a token in cookies. First, we check that we have an HTTP context and that the response hasn't started yet. Once the server begins sending the response to the browser, we can no longer set cookies, so we have to bail out early if that's the case.
The method creates a cache entry that wraps the token value along with its expiration time. If the caller didn't specify an expiration, we default to 24 hours. We then serialize this entry to JSON and encrypt it.
Before storing new data, we clear any existing chunks for this key. This prevents a situation where we previously stored 5 chunks but now only need 3, which would leave orphaned chunk cookies containing stale data.
After clearing, we check the size of the encrypted data. If it fits within 3500 characters, we store it in a single cookie. We use 3500 instead of 4000 to leave room for the cookie name, attributes, and encoding overhead. If the data is larger, we split it into chunks and store each chunk in a separate cookie, plus a count cookie that tells us how many chunks to expect when reading.
These methods exist only because the IDistributedCache interface requires them. They're supposed to extend the lifetime of a cache entry for sliding expiration scenarios. However, our cookie-based implementation doesn't support this because updating the expiration would require reading the entire cookie, decrypting it, updating the expiration, re-encrypting, and writing it back. This is expensive and MSAL primarily uses absolute expiration anyway, so we simply do nothing and log that refresh was called.
These methods delete a cached token from cookies. We first check if the response has started because we can't delete cookies after that point. Then we call ClearChunks to remove any chunk cookies that might exist, and finally delete the main cookie itself.
This gets called when tokens expire and need cleanup, when a user logs out, or when MSAL determines that cached tokens are no longer valid and need to be removed.
This private helper removes all chunk cookies for a given key. It reads the count cookie to find out how many chunks exist, then loops through and deletes each one, and finally deletes the count cookie itself. This ensures we don't leave orphaned cookies when overwriting or removing cached data.
This private helper converts MSAL cache keys into safe cookie names. MSAL cache keys can be quite long and contain characters that aren't allowed in cookie names. We hash the key using SHA256 and take the first 16 characters of the base64-encoded hash, replacing any characters that might cause problems. The result is a short, consistent, safe cookie name prefixed with ".MSAL.Token." so we can identify our cookies.
This helper creates the cookie options used when storing tokens. We set HttpOnly to true so JavaScript can't access the cookies, which protects against XSS attacks. Secure is true so cookies are only sent over HTTPS. SameSite is set to Lax to provide some CSRF protection while still allowing the cookies to be sent on navigation. IsEssential is true because these cookies are required for the application to function, not just for tracking or preferences.
This simple helper splits a long string into a list of smaller strings of a specified maximum size. It just loops through the string and takes substrings of the chunk size until it reaches the end.
This private class is a simple container that holds the actual token bytes and the expiration timestamp. We serialize this to JSON before encrypting, so when we decrypt we get back both the token data and information about when it should expire.
-
Next step is to update our Program.cs file so that it can use our Cookie-Based Distributed Token Caching.
-
Add New Using Statements At the top of your Program.cs file, add these two using statements alongside your existing ones:
using Microsoft.AspNetCore.Authentication.Cookies;
using Microsoft.Extensions.Caching.Distributed;
The first namespace is needed because we will be configuring cookie authentication options to control how long authentication cookies live and whether they use sliding expiration. The second namespace contains the IDistributedCache interface that our custom cache class implements. Without these using statements, the compiler won't recognize the types we reference later in the file.
- Update the Data Protection service. We need to remove
UseEphemeralDataProtectionProvidernow, since we don't want our cookie encryption keys to be stored in memory anymore.
// Remove UseEphemeralDataProtectionProvider
builder.Services.AddDataProtection();
Our CookieDistributedCache class uses IDataProtectionProvider to encrypt tokens before storing them in cookies. Cookies are visible to users in browser developer tools and can be intercepted, so we never want to store sensitive token data in plain text. The data protection service provides cryptographic APIs that handle encryption and decryption. Without this registration, the dependency injection container won't be able to provide the IDataProtectionProvider that our cache class needs in its constructor.
- Change Token Cache Method Find this block of code:
builder.Services.AddAuthentication(OpenIdConnectDefaults.AuthenticationScheme)
.AddMicrosoftIdentityWebApp(builder.Configuration.GetSection("AzureAd"))
.EnableTokenAcquisitionToCallDownstreamApi(new[] { copilotScope })
.AddInMemoryTokenCaches();
Change .AddInMemoryTokenCaches() to .AddDistributedTokenCaches():
It should look like this:
builder.Services.AddAuthentication(OpenIdConnectDefaults.AuthenticationScheme)
.AddMicrosoftIdentityWebApp(builder.Configuration.GetSection("AzureAd"))
.EnableTokenAcquisitionToCallDownstreamApi(new[] { copilotScope })
.AddDistributedTokenCaches();
The original AddInMemoryTokenCaches() method tells MSAL to store tokens in memory. When the server restarts, all token data is lost, which means users have to re-authenticate. The AddDistributedTokenCaches() method tells MSAL to use whatever IDistributedCache implementation is registered in dependency injection. By itself, this method doesn't know where tokens will go. It just delegates storage to the registered cache. This is the hook that allows us to plug in our custom cookie-based implementation.
- Add Cookie Authentication Options
After the OpenIdConnect options configuration, add the cookie authentication options. Find this block:
builder.Services.Configure<OpenIdConnectOptions>(OpenIdConnectDefaults.AuthenticationScheme, options =>
{
options.Scope.Add("offline_access");
});
Add this block right after it:
builder.Services.Configure<CookieAuthenticationOptions>(CookieAuthenticationDefaults.AuthenticationScheme, options =>
{
options.ExpireTimeSpan = TimeSpan.FromHours(8);
options.SlidingExpiration = true;
});
This configures how long the authentication cookie itself lasts. The ExpireTimeSpan of 8 hours means users stay logged in for up to 8 hours. The SlidingExpiration setting means the 8-hour window resets every time the user makes a request, so active users don't get logged out unexpectedly. This configuration ensures the authentication cookie and our token cache cookies have compatible lifetimes. Without this, you could end up in strange situations where the auth cookie expires but cached tokens still exist, or where tokens expire but the user appears to still be logged in.
- Register the Cookie Distributed Cache Find the section where you register your singletons:
builder.Services.AddSingleton(copilotSettings);
builder.Services.AddSingleton(new CopilotScope(copilotScope));
Add the cache registration right after:
builder.Services.AddSingleton(copilotSettings);
builder.Services.AddSingleton(new CopilotScope(copilotScope));
// Add CookieDistributedCache
builder.Services.AddSingleton<IDistributedCache, CookieDistributedCache>();
This is the most important change. It registers our custom CookieDistributedCache class as the implementation for the IDistributedCache interface. When MSAL needs to store or retrieve tokens (because we called AddDistributedTokenCaches in step 3), it asks the dependency injection container for an IDistributedCache. The container then provides our CookieDistributedCache instance. We register it as a singleton because the class doesn't hold any request-specific state. All the actual token data lives in cookies on the user's browser. The class just needs access to the current HTTP context via IHttpContextAccessor to read and write those cookies, and that accessor is designed to work correctly even when the cache itself is a singleton.
- Add Controller Mapping Find this section near the end of your middleware pipeline:
app.UseAntiforgery();
app.MapRazorComponents<App>()
.AddInteractiveServerRenderMode();
app.Run();
- Add
app.MapControllers();before the Razor components mapping:
app.UseAntiforgery();
// Add this line
app.MapControllers();
app.MapRazorComponents<App>()
.AddInteractiveServerRenderMode();
app.Run();
When we added AddMicrosoftIdentityUI() through the AddControllersWithViews().AddMicrosoftIdentityUI() call, it registered MVC controllers that handle authentication endpoints like sign-in and sign-out. However, those controllers won't actually respond to requests unless we map them in the middleware pipeline. The MapControllers() call tells ASP.NET Core to route incoming requests to these controllers. Without this line, clicking "Sign In" or "Sign Out" buttons would result in 404 errors because the routes wouldn't be mapped.
- Add the CookieDistributedCache Class
Make sure you have the
CookieDistributedCache.csfile in your project under theServices/Authenticationfolder. This is the class that actually implements the cookie-based storage.
After these changes, your application will store MSAL tokens in encrypted cookies on the user's browser instead of in server-side session memory. This means tokens survive application restarts because they live on the client side. Users won't need to re-authenticate when you deploy updates or when the server recycles. The trade-off is slightly larger HTTP requests since cookies are sent with every request, but for most applications this is negligible and well worth the improved user experience.
Here is the final version of our Program.cs
using Microsoft.Agents.CopilotStudio.Client;
using Microsoft.AspNetCore.Authentication.Cookies;
using Microsoft.AspNetCore.Authentication.OpenIdConnect;
using Microsoft.AspNetCore.Components.Authorization;
using Microsoft.AspNetCore.Components.Server;
using Microsoft.Extensions.AI;
using Microsoft.Extensions.Caching.Distributed;
using Microsoft.Identity.Web;
using Microsoft.Identity.Web.UI;
using webchatclient.Components;
using webchatclient.Services;
using webchatclient.Services.Authentication;
var builder = WebApplication.CreateBuilder(args);
// Add Data Protection (required for encrypting token cache in cookie)
builder.Services.AddDataProtection();
// Add Razor components
builder.Services.AddRazorComponents().AddInteractiveServerComponents();
// Build connection settings
var copilotSettings = new CopilotStudioConnectionSettings(
    builder.Configuration.GetSection("CopilotStudio"),
    builder.Configuration.GetSection("AzureAd"));

string copilotScope = CopilotClient.ScopeFromSettings(copilotSettings);
// Register the cookie-based distributed cache BEFORE authentication
builder.Services.AddHttpContextAccessor();
// Configure authentication with MSAL using our cookie-based distributed cache
builder.Services.AddAuthentication(OpenIdConnectDefaults.AuthenticationScheme)
.AddMicrosoftIdentityWebApp(builder.Configuration.GetSection("AzureAd"))
.EnableTokenAcquisitionToCallDownstreamApi(new[] { copilotScope })
.AddDistributedTokenCaches();
// Add offline_access to get refresh tokens
builder.Services.Configure<OpenIdConnectOptions>(OpenIdConnectDefaults.AuthenticationScheme, options =>
{
    options.Scope.Add("offline_access");
});
builder.Services.Configure<CookieAuthenticationOptions>(CookieAuthenticationDefaults.AuthenticationScheme, options =>
{
    options.ExpireTimeSpan = TimeSpan.FromHours(8);
    options.SlidingExpiration = true;
});
// Add controllers with Microsoft Identity UI
builder.Services.AddControllersWithViews()
    .AddMicrosoftIdentityUI();
// Add authorization
builder.Services.AddAuthorization();
builder.Services.AddCascadingAuthenticationState();
builder.Services.AddScoped<AuthenticationStateProvider, ServerAuthenticationStateProvider>();
// Register settings and scope
builder.Services.AddSingleton(copilotSettings);
builder.Services.AddSingleton(new CopilotScope(copilotScope));
builder.Services.AddSingleton<IDistributedCache, CookieDistributedCache>();
// Register HttpClient for Copilot Studio with token handler
builder.Services.AddScoped<AuthTokenHandler>();
builder.Services.AddHttpClient("mcs")
.AddHttpMessageHandler<AuthTokenHandler>();
// Register CopilotClient
builder.Services.AddScoped<CopilotClient>(sp =>
{
var logger = sp.GetRequiredService<ILoggerFactory>().CreateLogger<CopilotClient>();
return new CopilotClient(copilotSettings, sp.GetRequiredService<IHttpClientFactory>(), logger, "mcs");
});
// Register CopilotStudioIChatClient
builder.Services.AddScoped<CopilotStudioIChatClient>(sp =>
{
var copilotClient = sp.GetRequiredService<CopilotClient>();
return new CopilotStudioIChatClient(copilotClient);
});
builder.Services.AddScoped<IChatClient>(sp => sp.GetRequiredService<CopilotStudioIChatClient>());
var app = builder.Build();
if (!app.Environment.IsDevelopment())
{
app.UseExceptionHandler("/Error", createScopeForErrors: true);
app.UseHsts();
}
app.UseHttpsRedirection();
app.UseStaticFiles();
app.UseAuthentication();
app.UseAuthorization();
app.UseAntiforgery();
app.MapControllers();
app.MapRazorComponents<App>()
.AddInteractiveServerRenderMode();
app.Run();
public record CopilotScope(string Value);
- The last step in this section is to restart the app several times. You should see that there are no redirects to
login.microsoft.comanymore.
[!alert] End of the optional section.
You can integrate a custom Copilot created in Microsoft Copilot Studio and enable it for your canvas app. This lets users interact with Copilot to ask questions about the data in your app. With just a few simple steps, you can embed a custom Copilot across all your canvas app screens without changing the app's design.
Note : As part of the instructions below, you cannot use the already created agent. This is because the agent has Dataverse MCP Server configured as a tool, which is not supported by the Copilot control in Canvas Apps. Additionally, the Copilot control in Power Apps Studio does not support enabling an existing Copilot created in Copilot Studio. Therefore, you will create a new agent using canvas app copilot control.
- Go to Maker Portal & Click on the already created environment from above steps
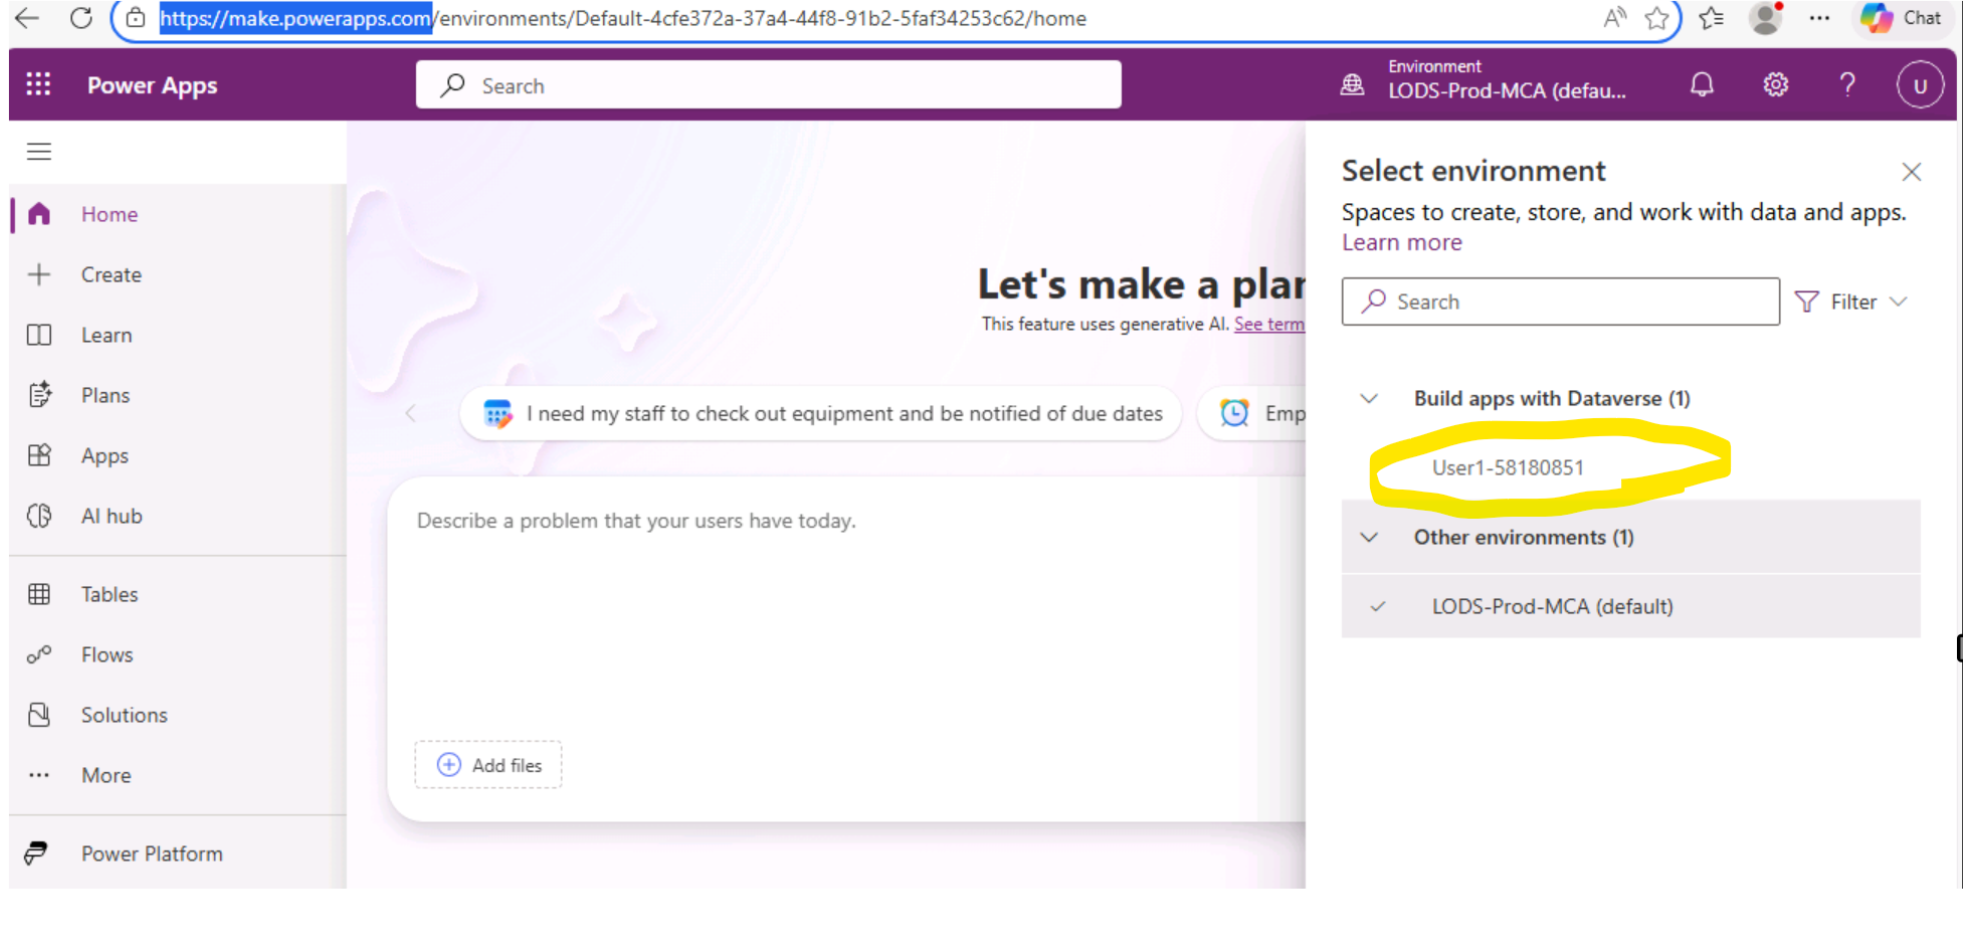
- Click on Apps -> Start with a page design.
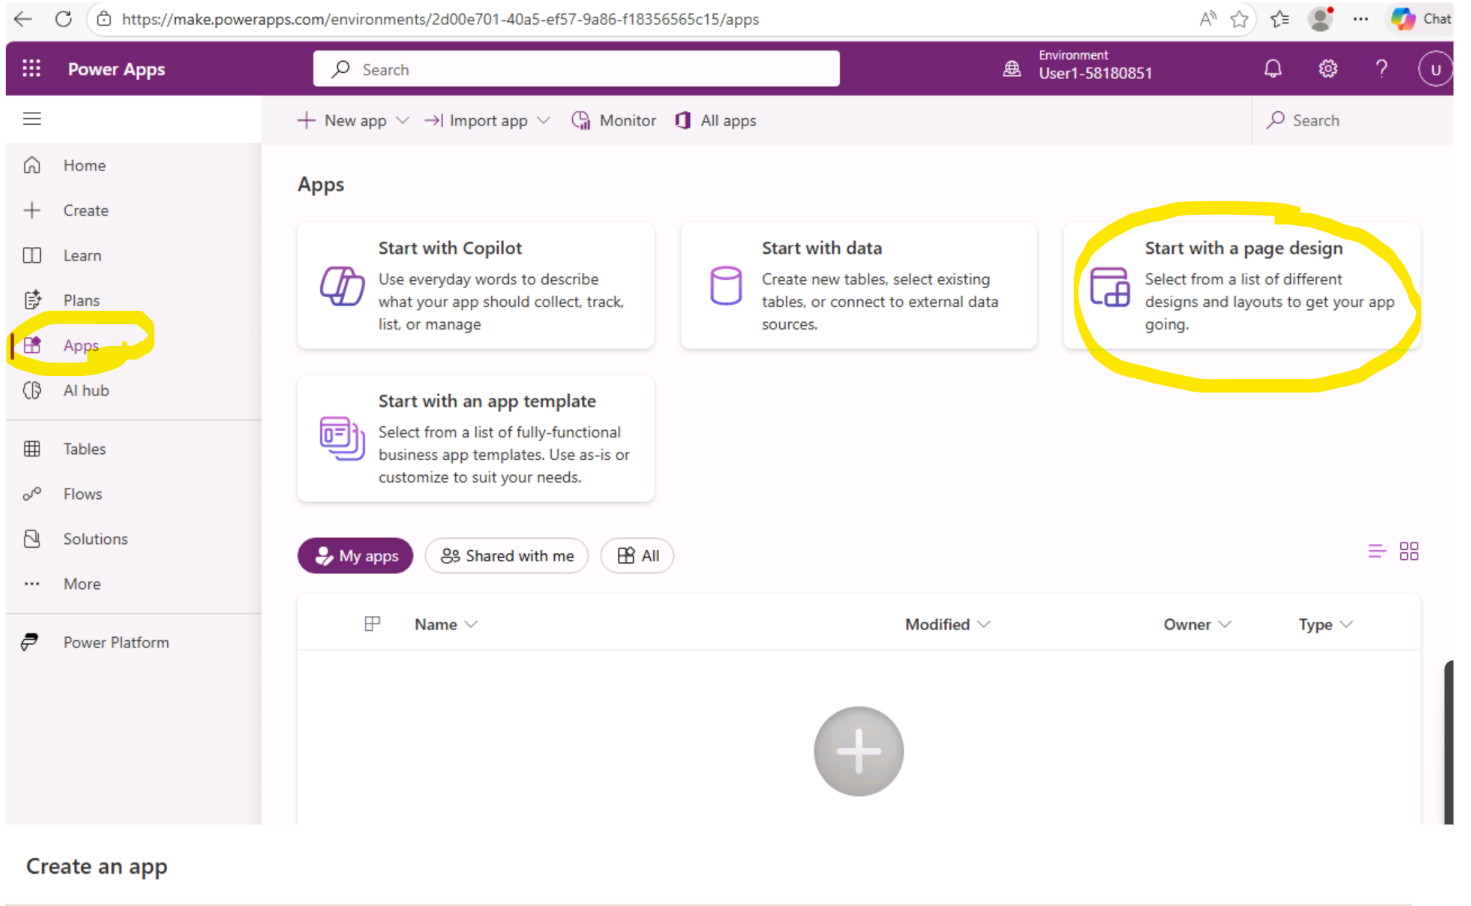
- Click on Blank canvas.
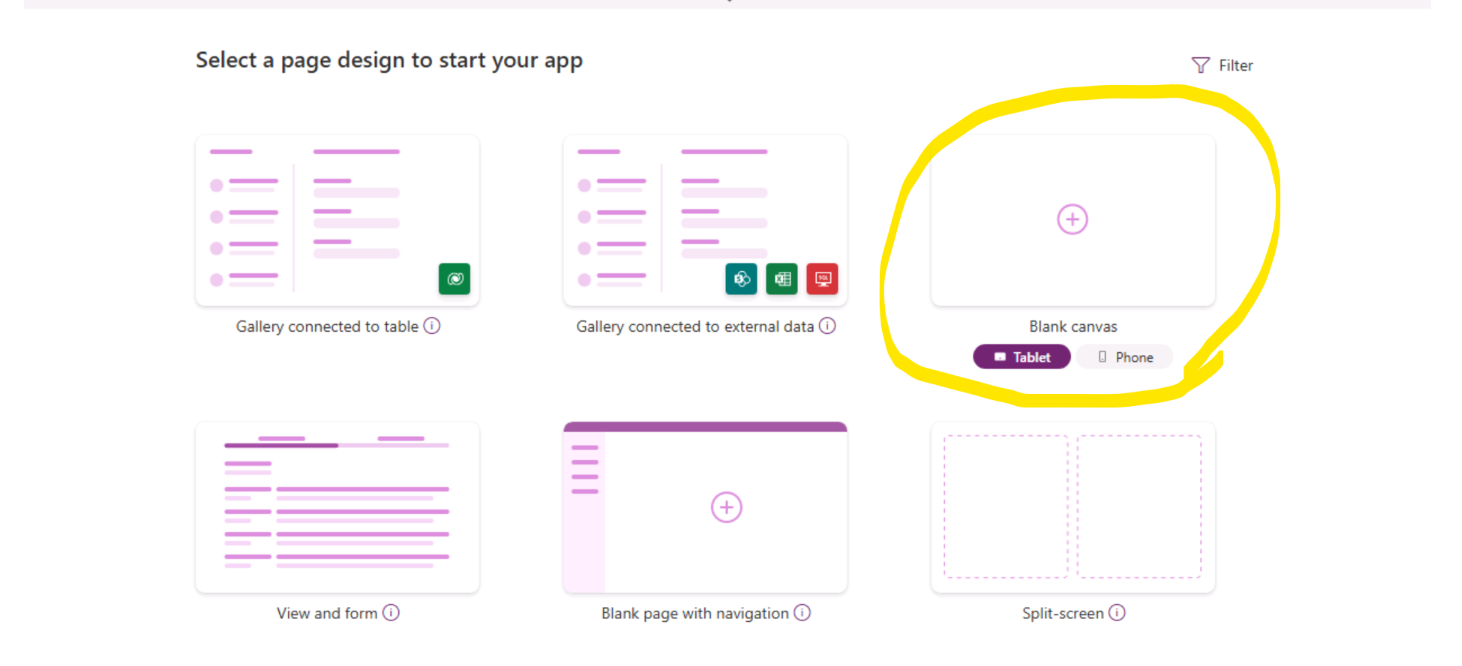
- Once Aop has been loaded. Click on Skip.

- Click on Insert & Add Copilot (Preview) Control
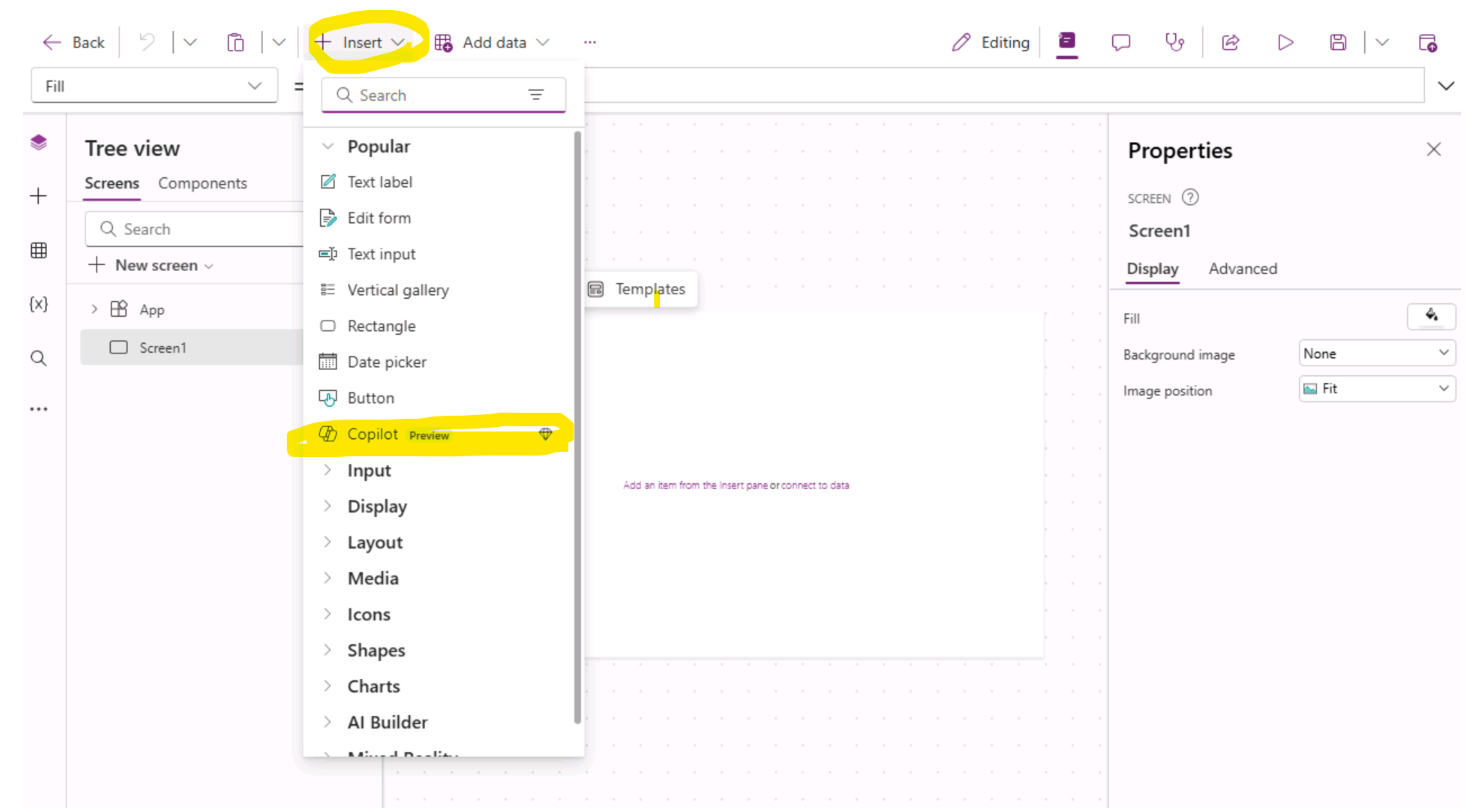
- When prompted to add a data source to Copilot, select a Dataverse table as the data source.
Notes : The Copilot control only supports Dataverse tables for the data source.
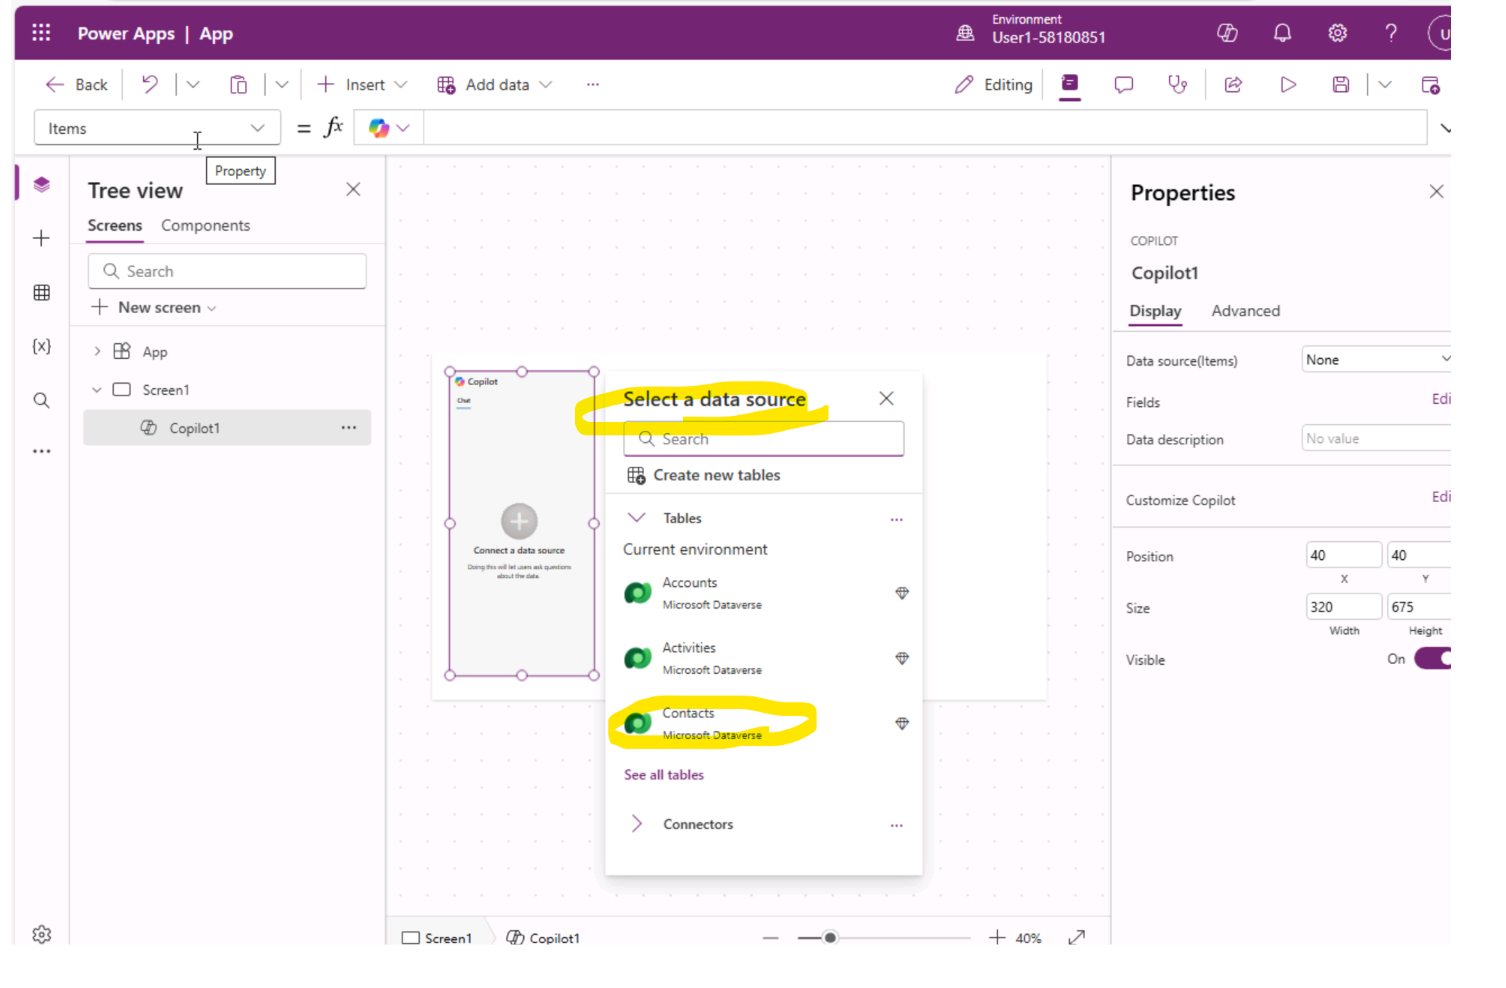
- Drag Copilot control to middle and click on Save.
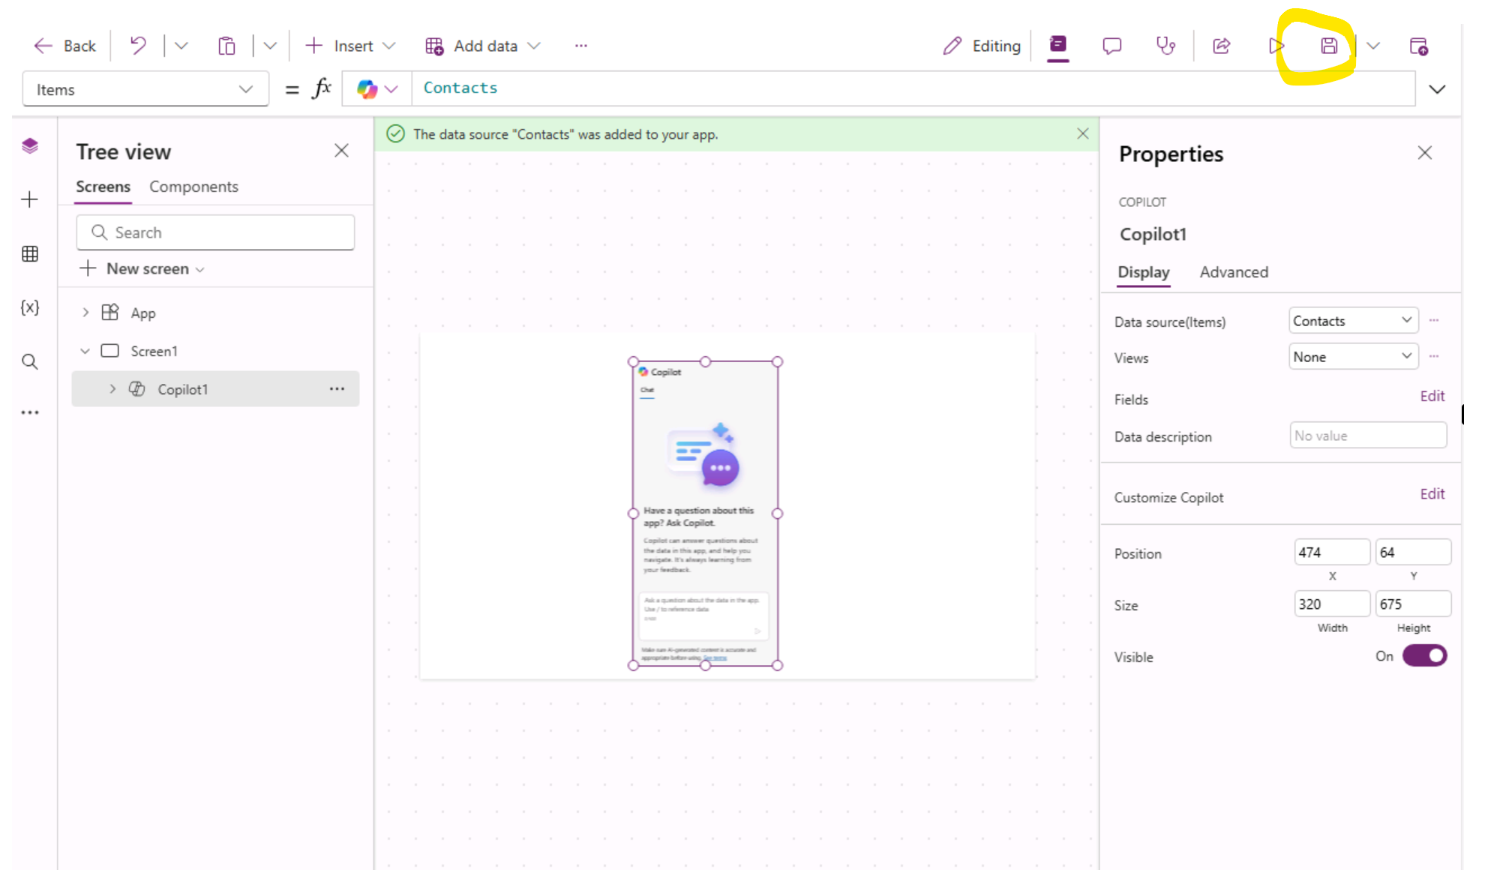
- Provide a name for your canvas app (Such as : Copilot Agent Canvas App ) & then Save:
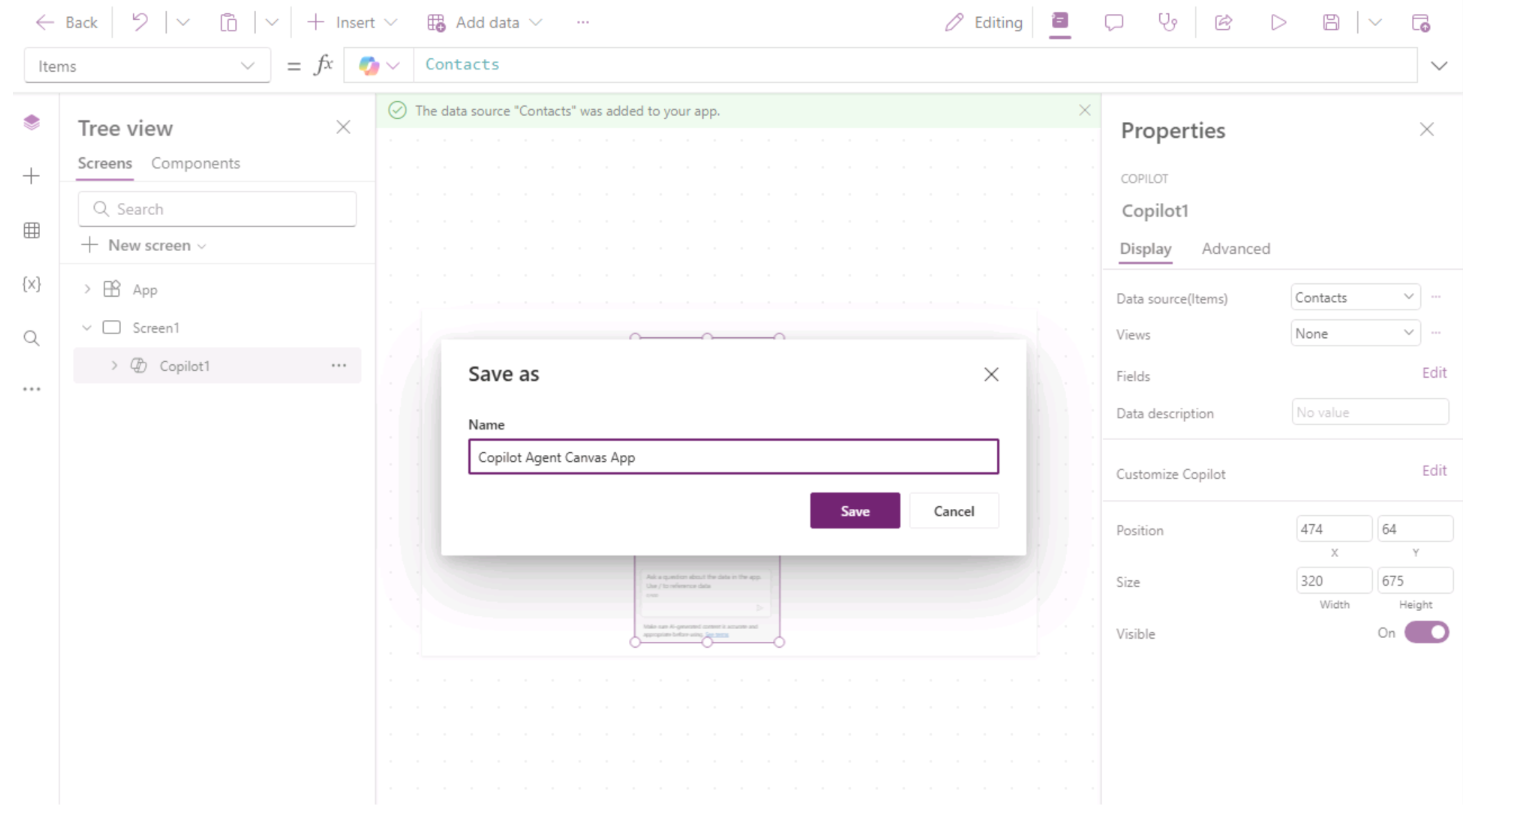
- Now customize your above created copilot app using Copilot Studio. Customize your newly connected copilot in Power Apps through the properties menu. With the Copilot control on your canvas selected, select Edit next to the Customize copilot field in Properties.
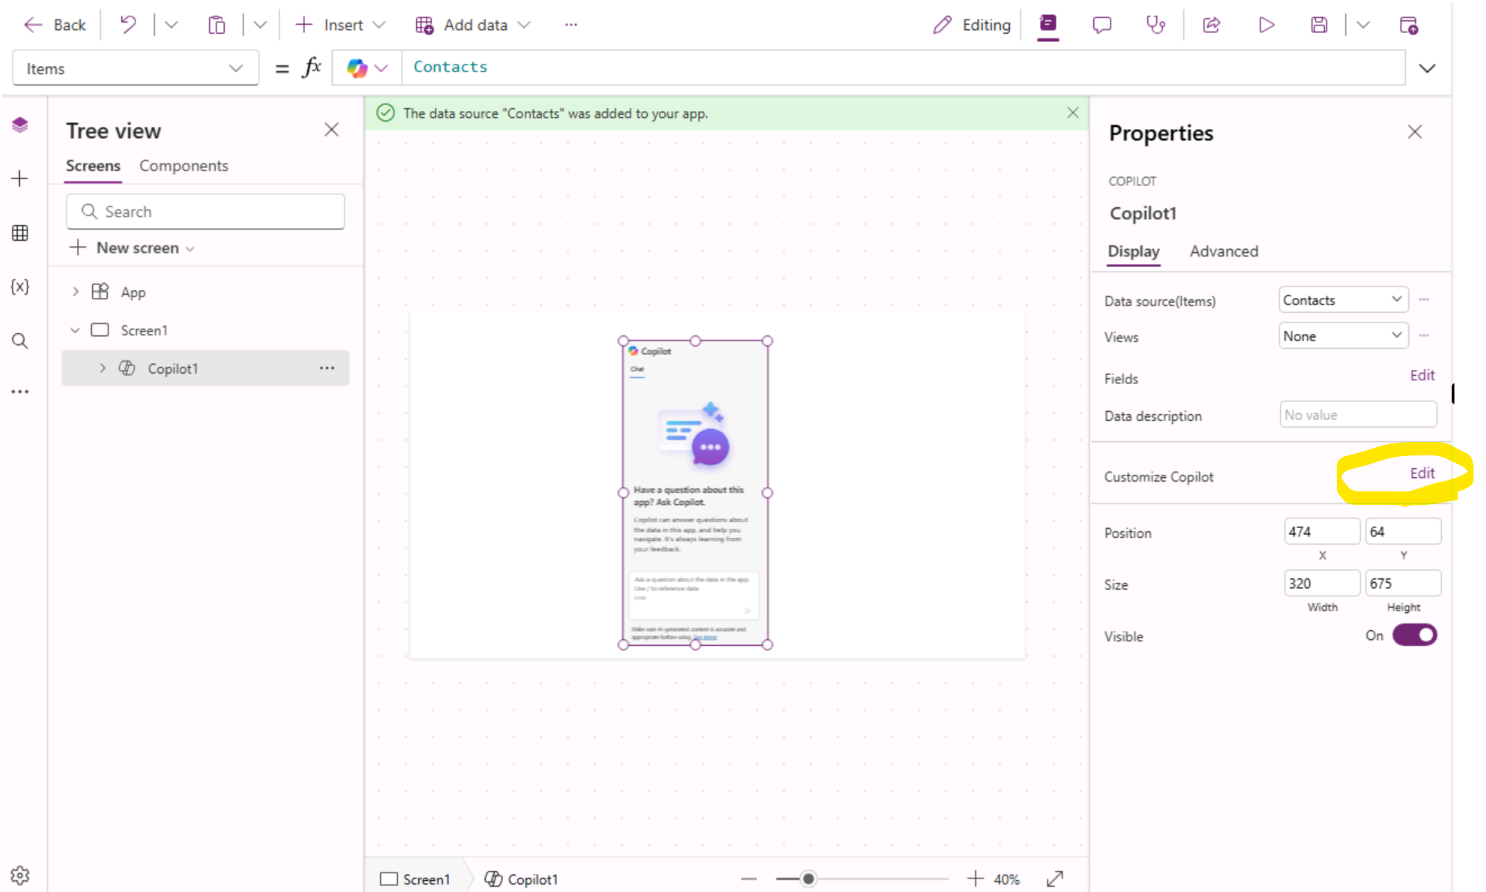
- Click on Create new copilot. Note: The Copilot control in Power Apps Studio doesn't support enabling an existing Copilot from Copilot Studio.
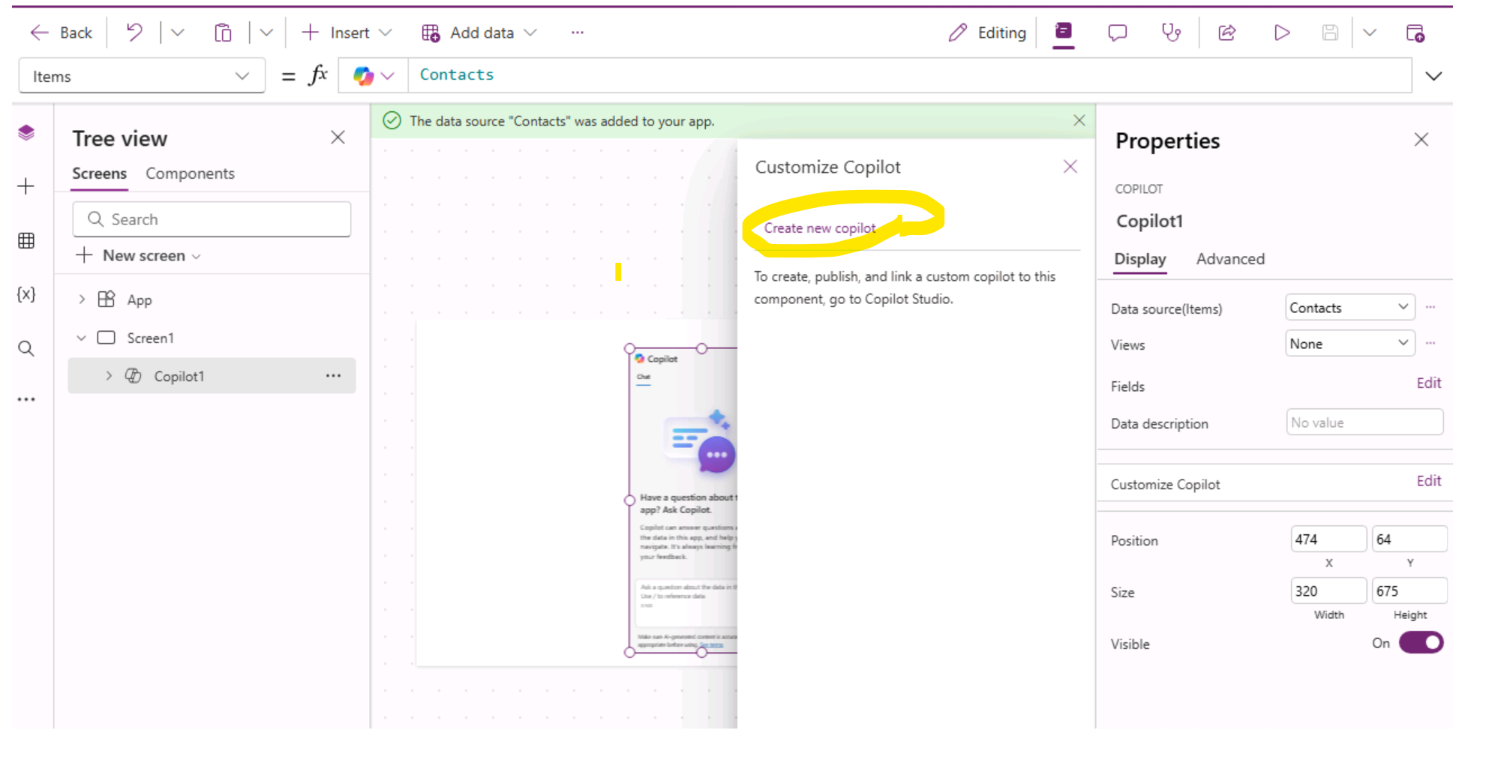
- Click on Edit in Copilot Studio. It will open in a new tab. Any changes you make in Copilot Studio appear in your connected copilot in your canvas app.
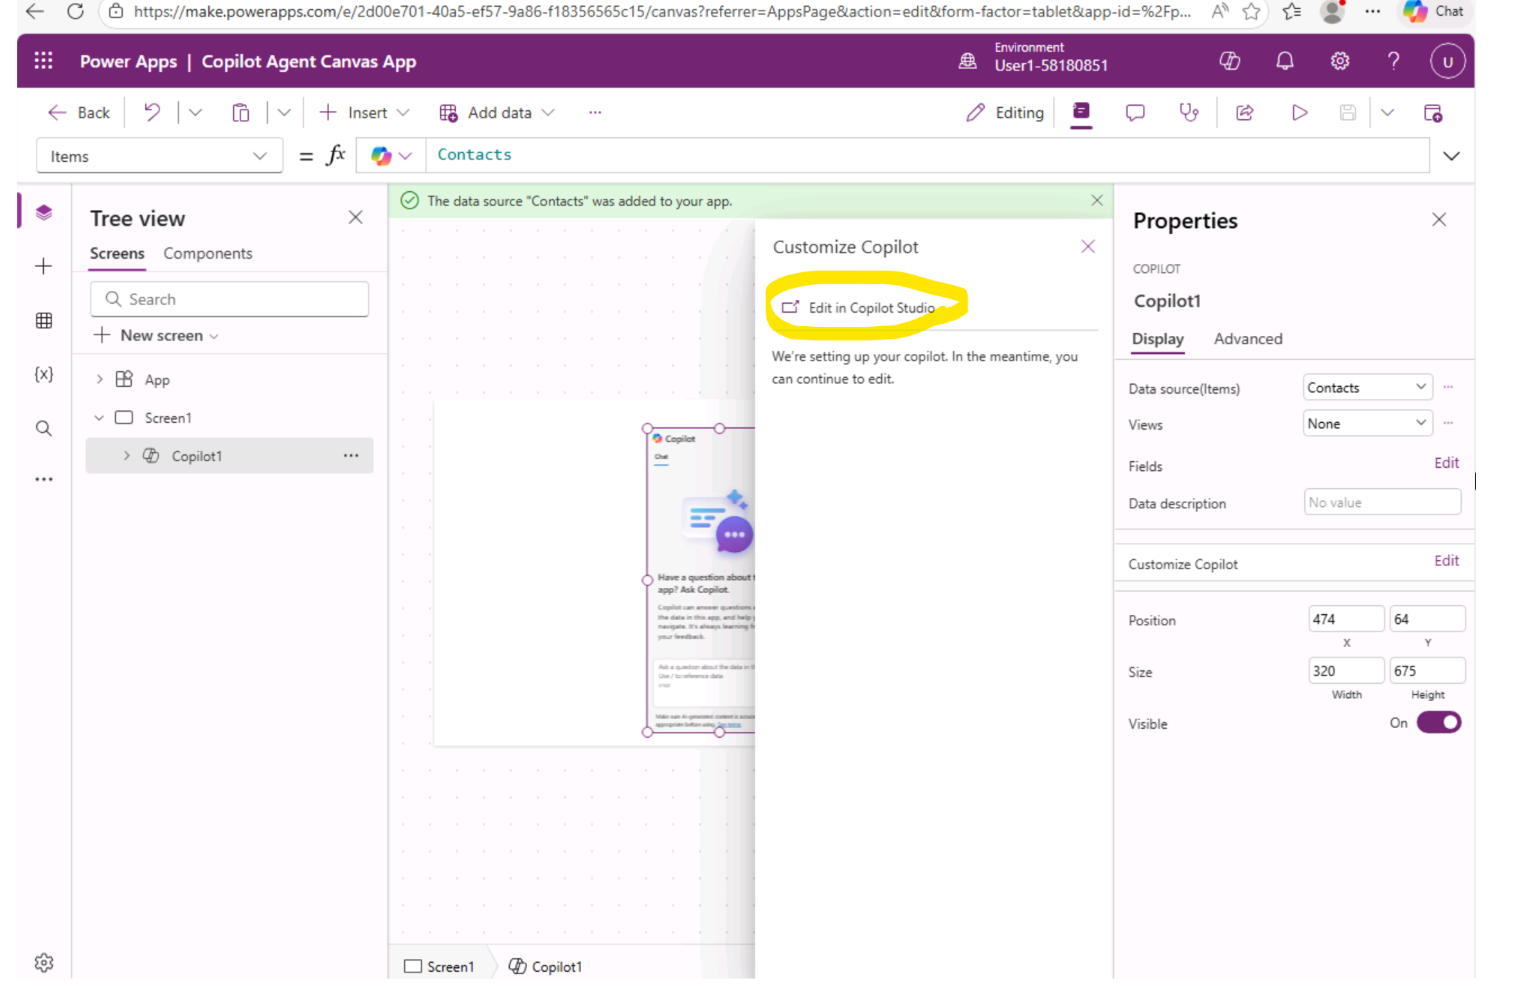
-
Next step to Create 2 Topic to test our created Canvas App.
- Add a WhoAMI topic to get the logged in user name.
- Add a sample Adpative card "Seattle Weather Info" (This is just a static Adpative card)
-
Steps to Create WhoAMI Topic
- Go to Topic. Click on Add a topic -> From Blank
- Give the topic name as Who AM I. On the Trigger Click on Edit. Add a Phrase as "Who AM I" & Click on "+"
- Add a new step as "Send a message"
- Type in the box as "You are" & Click on {x} to add variable.
- Under System Search for User.DisplayName. Select it and Save the topic.
-
Steps to Create Adpative card "Seattle Weather Info".
- Go To Topic. Click on Add a topic -> From Blank
- Give the topic name as Seattle Weather Info. Edit Phrase as "Seattle Weather Info".
- Add a new step as "Send a message". Click on Add to add Adaptive Card.
- Edit Adaptive card. & Paste the below Adpataive card json. Click on Save & Close Adaptive card window. Save the Topic.
{
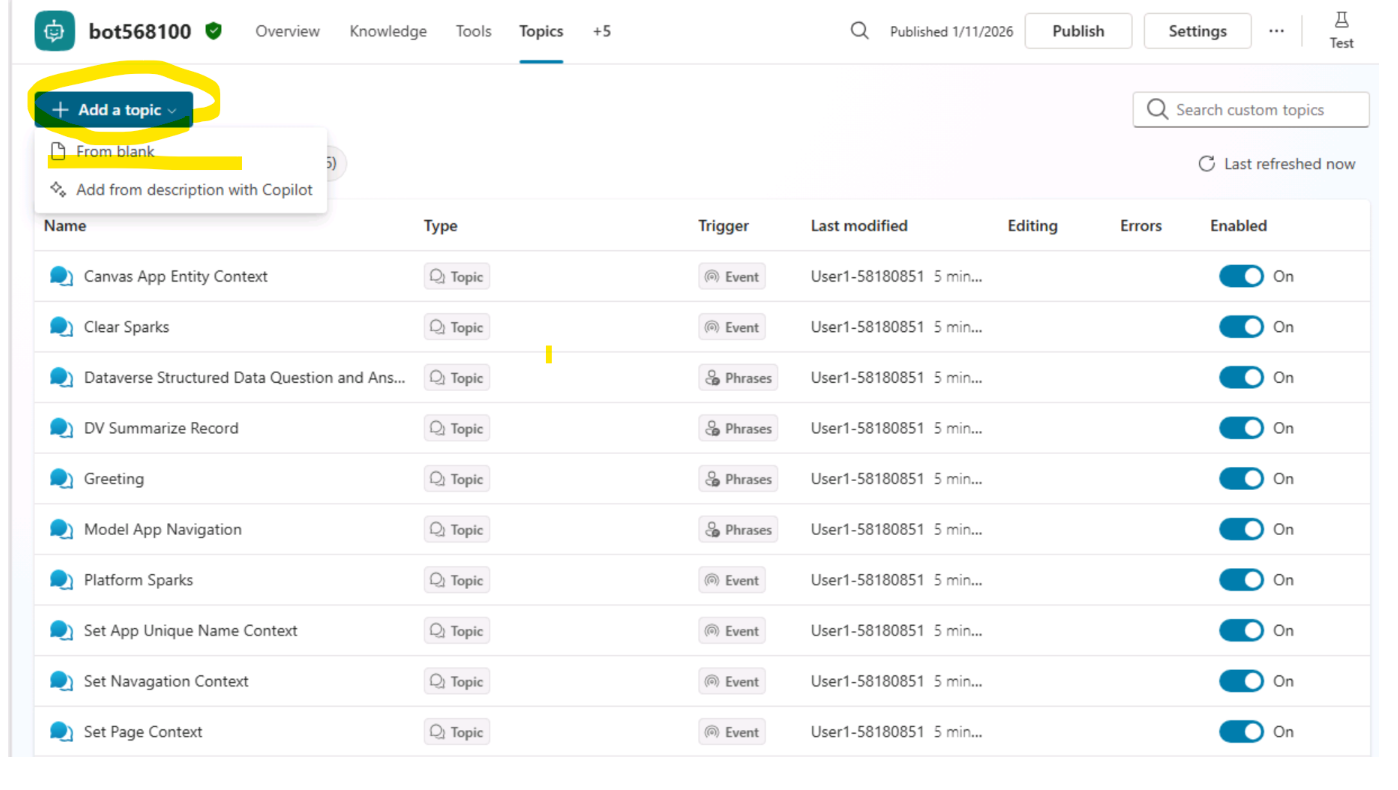
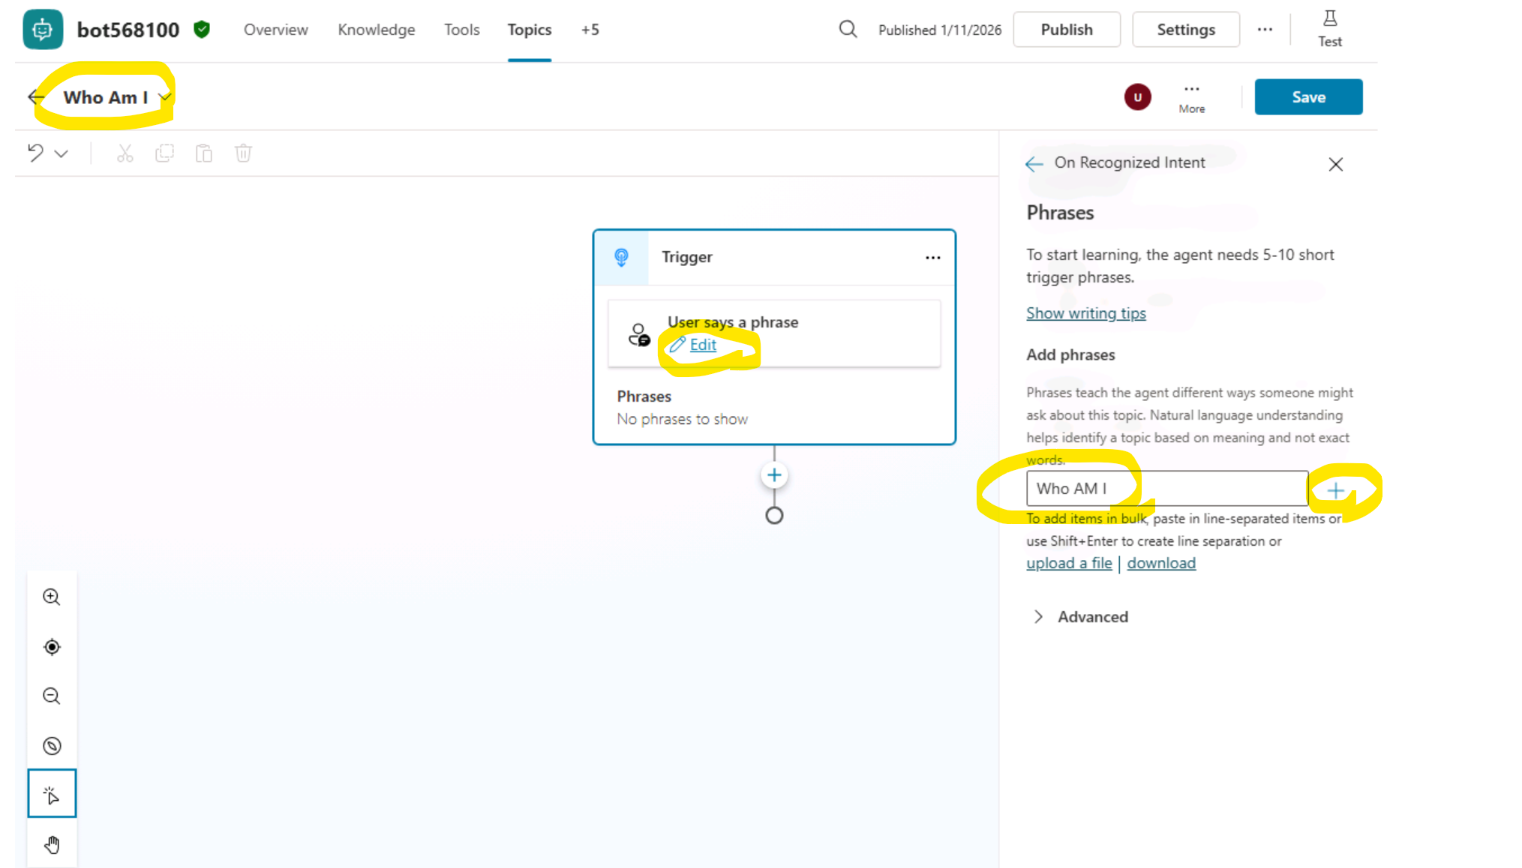
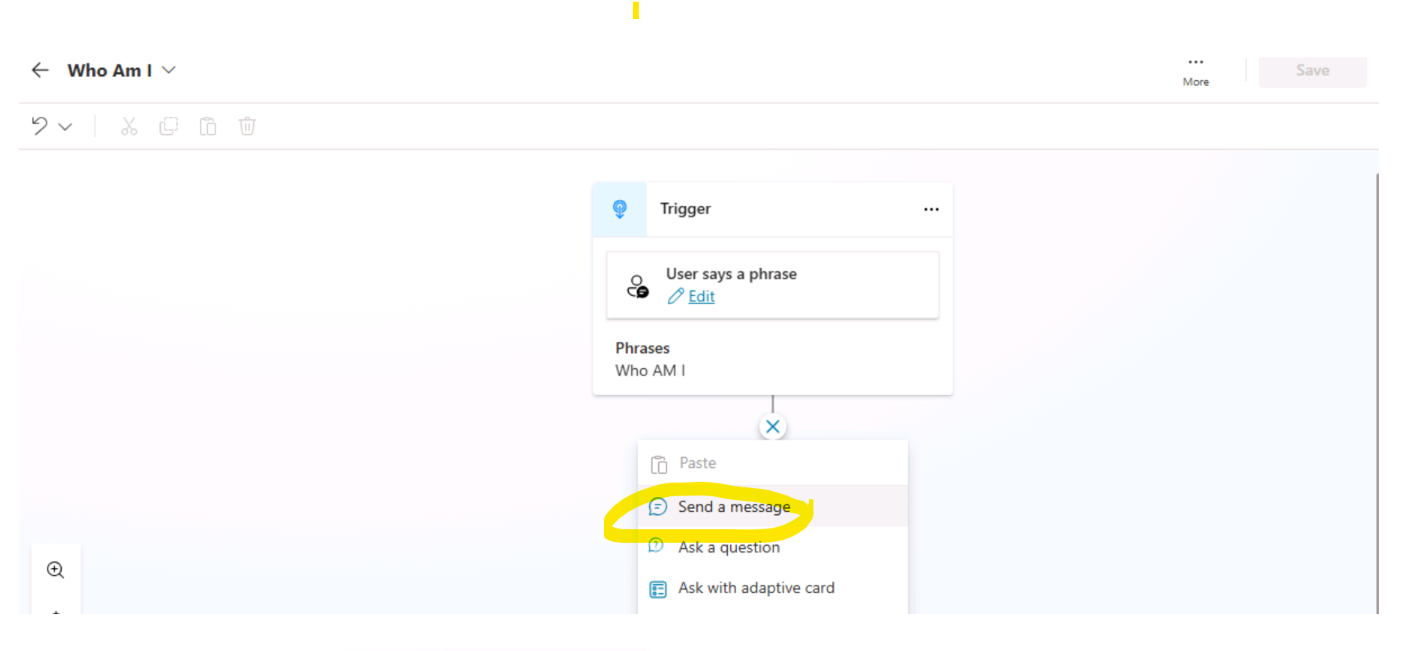
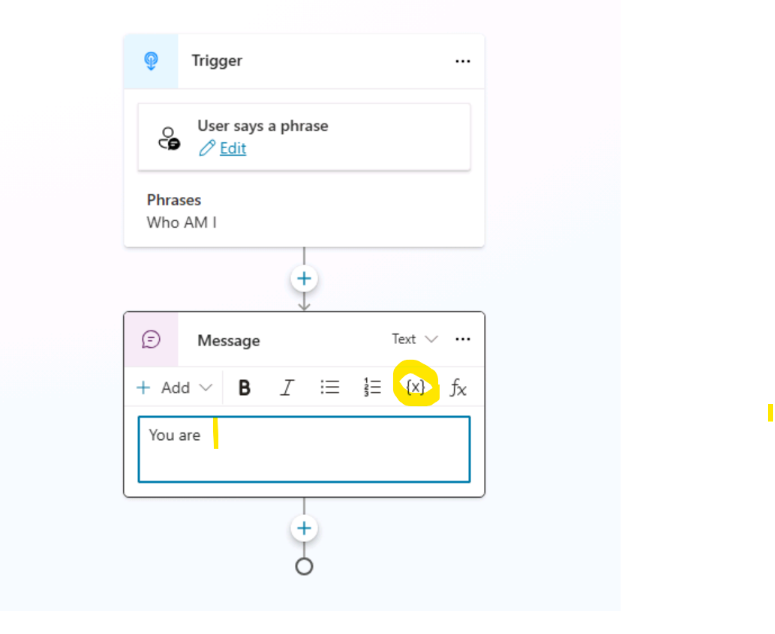
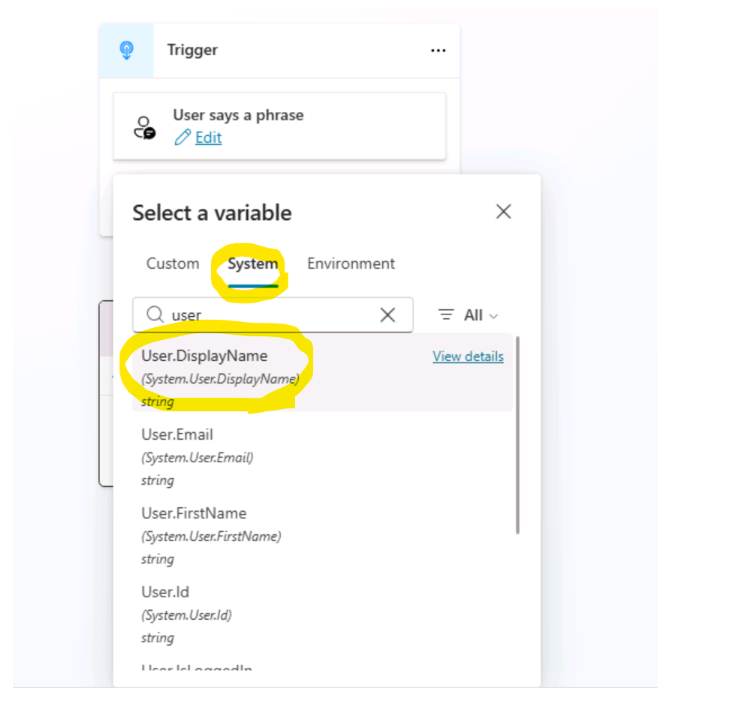

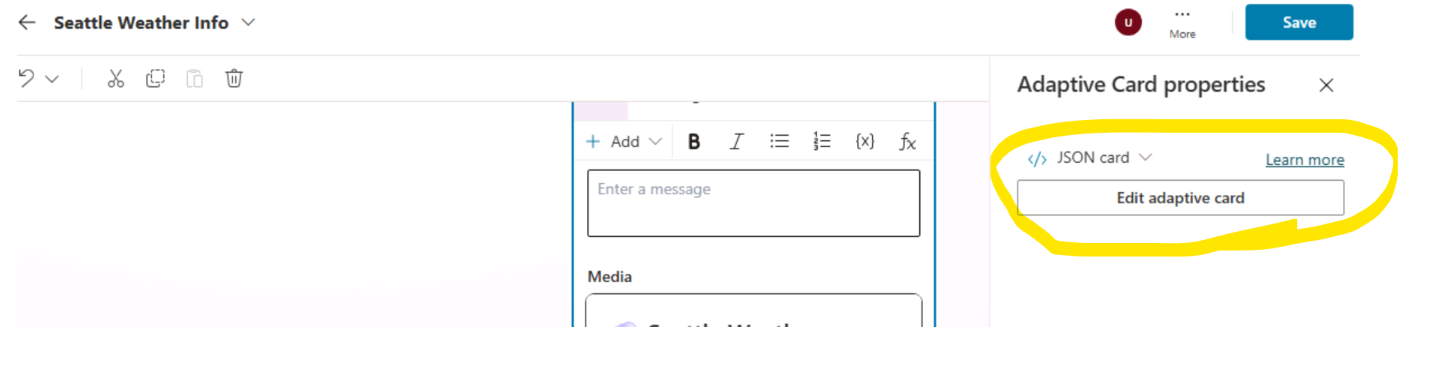
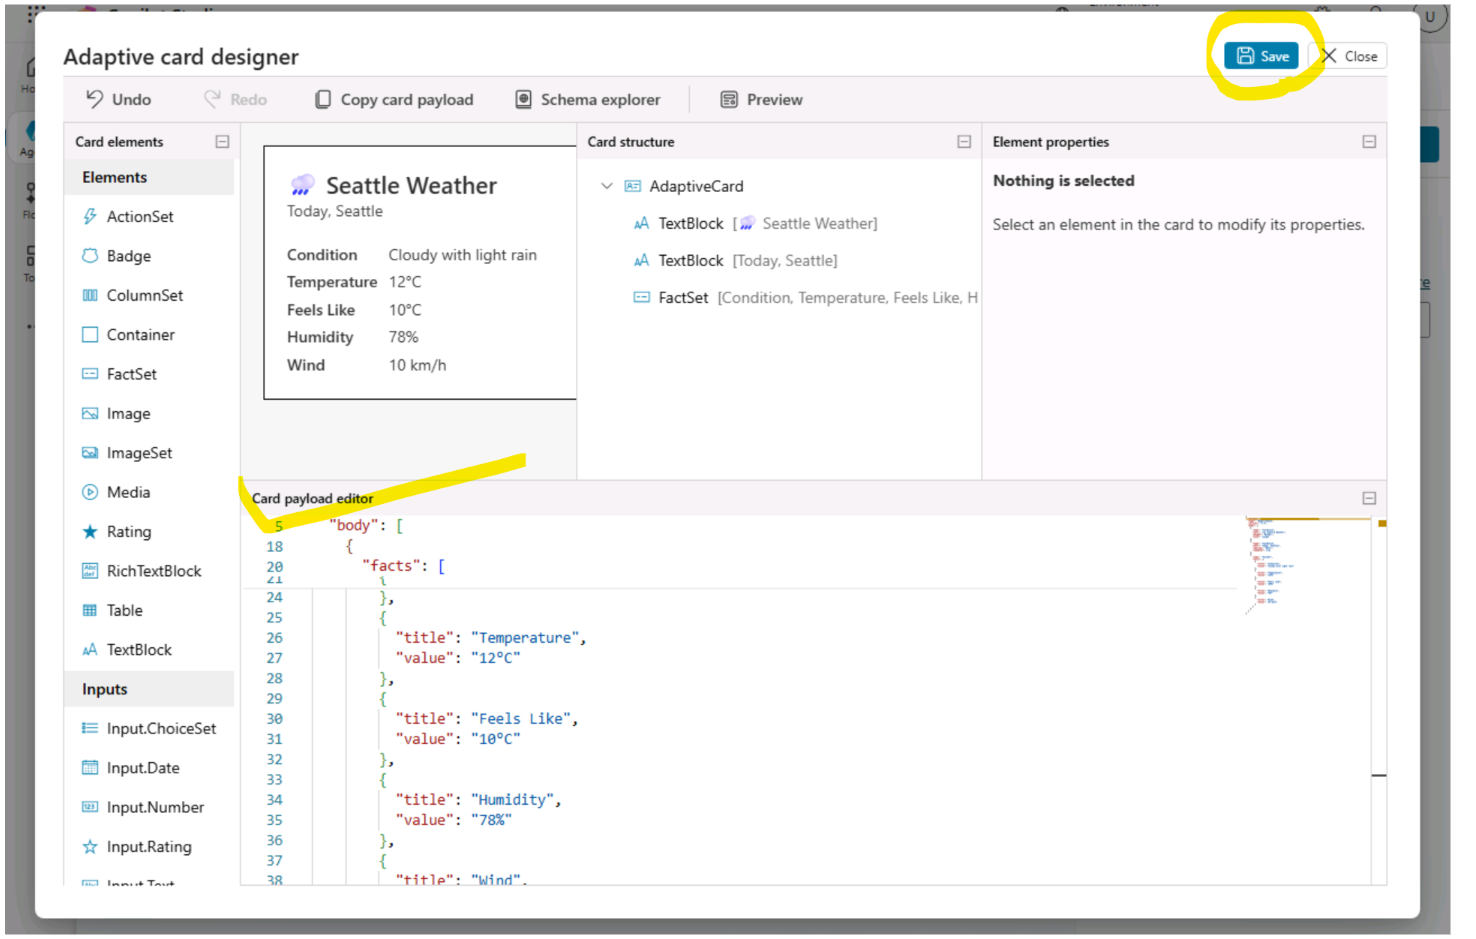
"$schema": "http://adaptivecards.io/schemas/adaptive-card.json", "type": "AdaptiveCard", "version": "1.5", "body": [ { "type": "TextBlock", "text": "🌧️ Seattle Weather", "weight": "Bolder", "size": "Large" }, { "type": "TextBlock", "text": "Today, Seattle", "spacing": "None", "isSubtle": true }, { "type": "FactSet", "facts": [ { "title": "Condition", "value": "Cloudy with light rain" }, { "title": "Temperature", "value": "12°C" }, { "title": "Feels Like", "value": "10°C" }, { "title": "Humidity", "value": "78%" }, { "title": "Wind", "value": "10 km/h" } ] } ] }
```
- Click on Publish to publish the Agent.
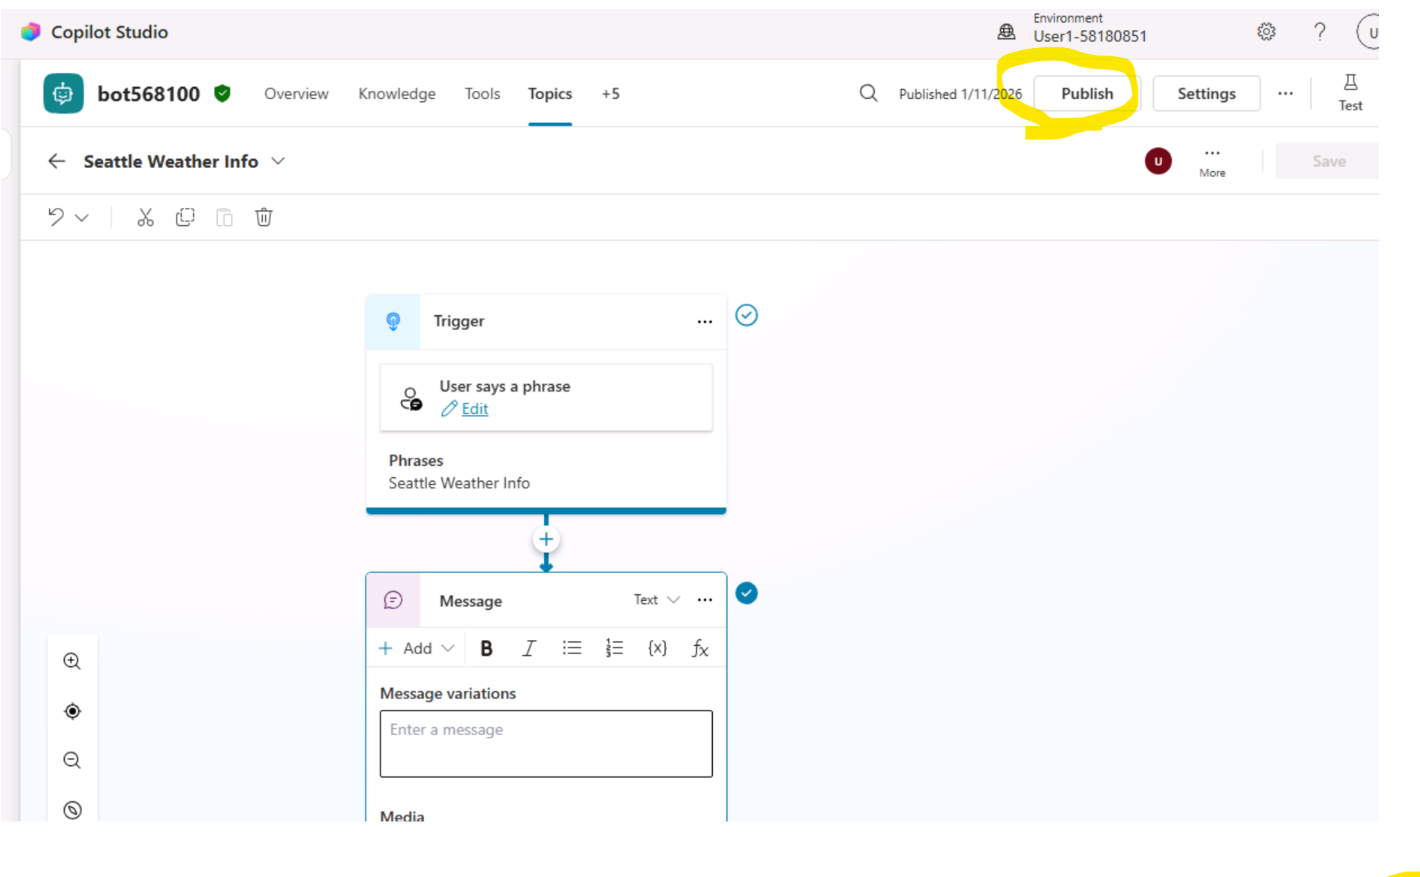
- Go back to your canvas app window. Click on Publish to publish your canvas app.
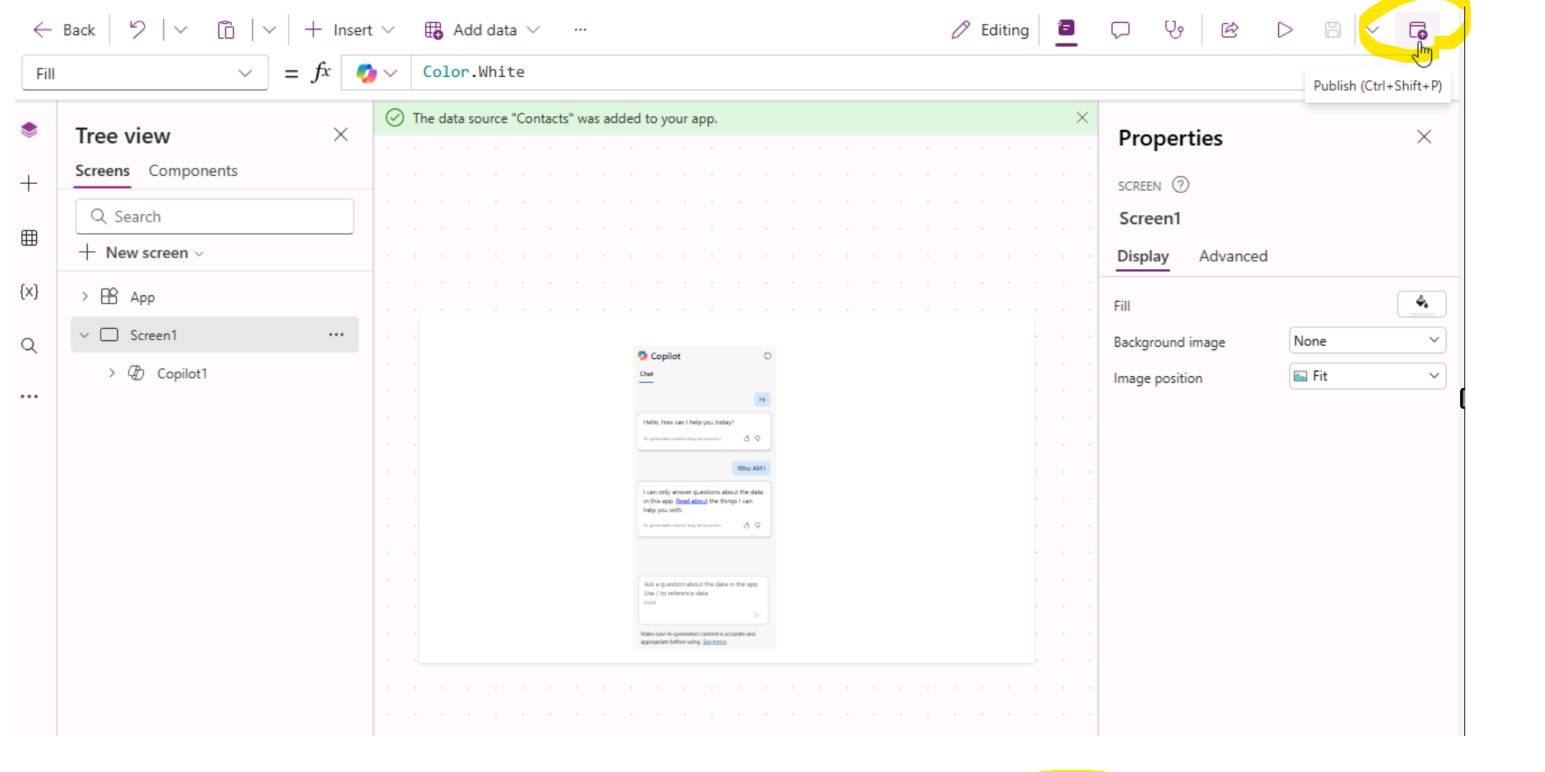
- Play your created Canvas app from Apps section.
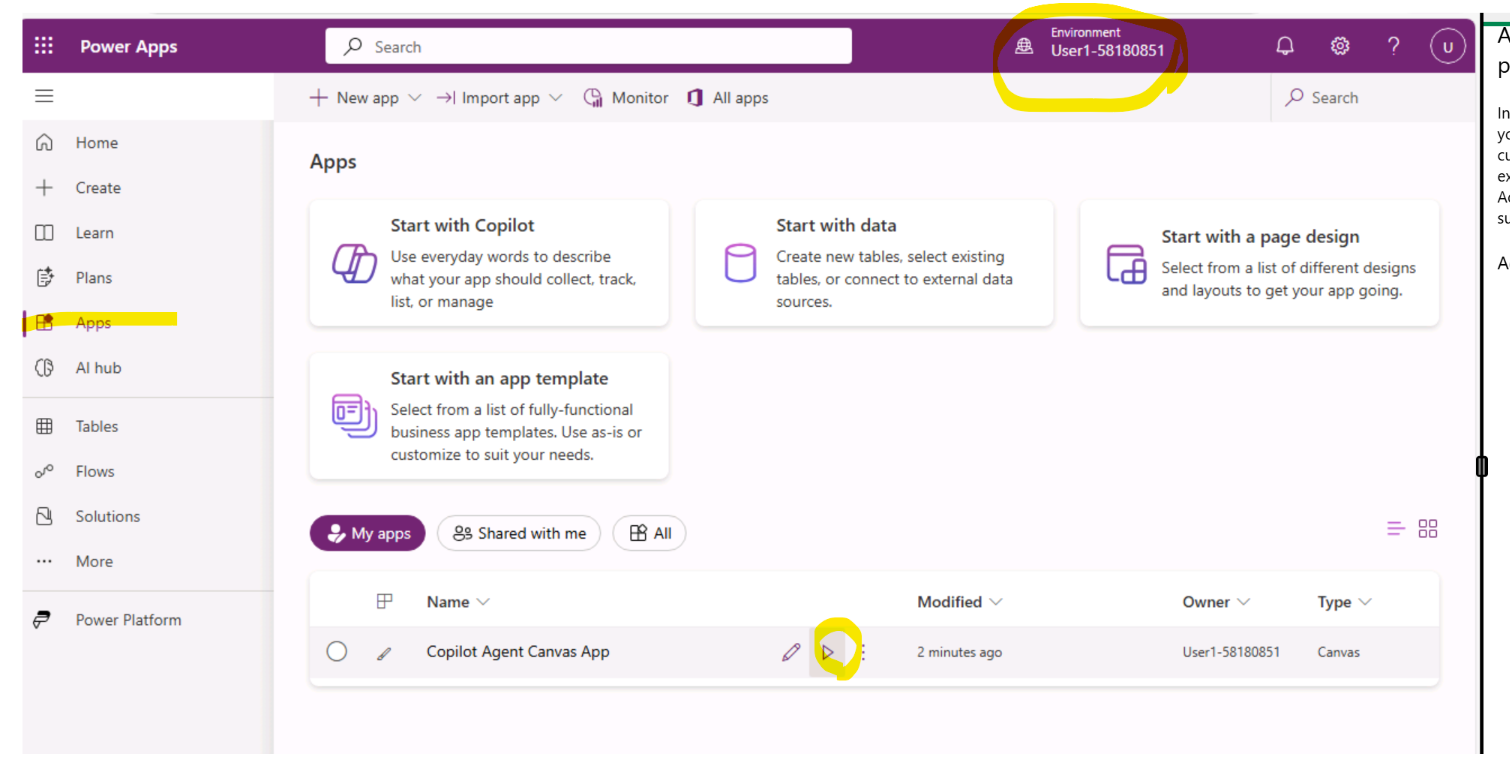
- Test your app by providing the input as shown on the below images. Note: The first response may take some time. Please wait while the agent processes your request.