Adapters
Adapters enable you to use the MobFox SDK inside other ad networks SDK's that you are using. This way you can display MobFox ads in addition to ads from other host networks.
- Install the MobFox Android SDK Core.
- Install the MoPub Android SDK.
- Download the MobFox-Android-MoPub-Adapter.jar and Place it in your application's libs folder (next to your src folder).
- Add MobFox-Android-MoPub-Adapter.jar as a dependency in your gradle.build file.
- See the docs in MoPub for creating and integrating Banner / Interstitial ads.
- Create a MobFox publication.
- See the docs in MoPub for implementing custom networks on the MoPub ads previously created.
- For banner ads use this CUSTOM EVENT CLASS
com.mobfox.sdk.adapters.MoPubBannerAdapterand in CUSTOM EVENT CLASS DATA input:{"invh":"<your-publication-hash>"}Use your required MobFox's publication hash. - For interstitial (fullscreen) ads use this CUSTOM EVENT CLASS
com.mobfox.sdk.adapters.MoPubInterstitialAdapterand in CUSTOM EVENT CLASS DATA input:{"invh":"<your-publication-hash>"}Use your required MobFox's publication hash.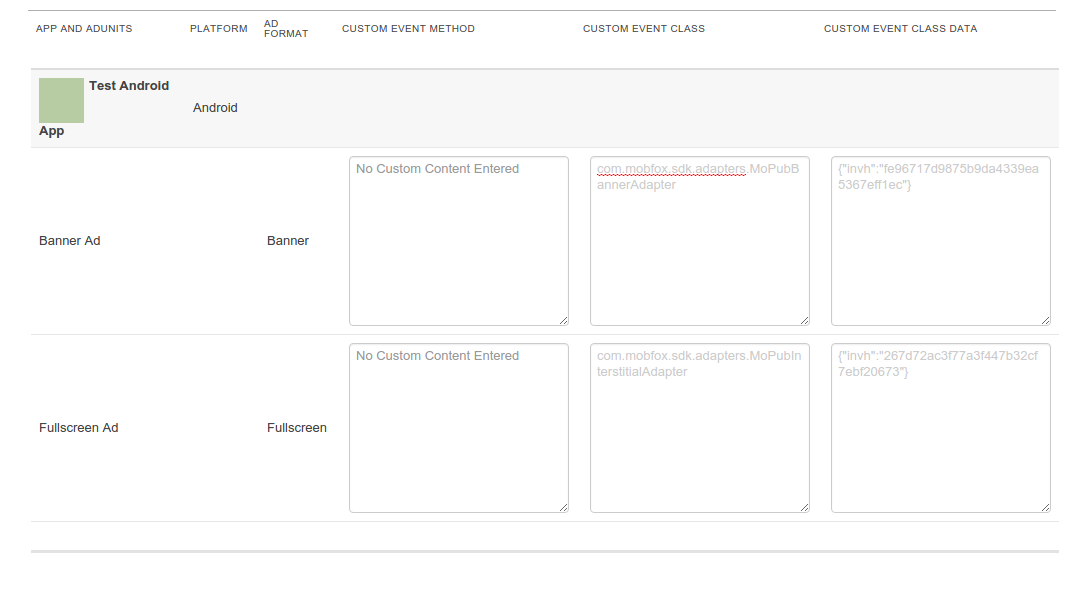
- Now, when calling your MoPub ads, you should get the respective MobFox ads.
- Extra data can be passed to MobFox using the MoPub's localExtras object. "gender", "age" and "location" are supported at the moment. In your MoPub integration code create a new HashMap, and put the extra data in it (e.g. "gender"):
// ...
Map<String, Object> localExtras = new HashMap<>();
localExtras.put("gender", gender);
// ...- location:
- key: "location"
- format: Location (java class)
- gender:
- key: "gender"
- format: String
- value: "m|f"
- age:
- key: "age"
- format: Integer
After putting all the data needed in the localExtras HashMap, pass it to the moPubView object:
// ...
moPubView.setLocalExtras(localExtras);
// ...
The data will be appended to your MobFox request.
#AdMob
- Install the MobFox Android SDK Core.
- Install the AdMob Android SDK.
- Place the MobFox-Android-AdMob-Adapter.jar in your application's libs folder
(next to your src folder) and add it as a dependency in your
gradle.buildfile. - In your AdMob control panel:
- Click the
Monetizetab. - Under
All Appsselect your app. - On the relevant
Ad Unit, click thead sourceslink. - Click the
+ New ad networkbutton. - Select the MobFox network from the available ad networks list.
- Fill in:
-
Publisher Site ID- your MobFox publication hash.
-

#Smaato
- Install the MobFox Android SDK Core.
- Install the Smaato Android SDK.
- Place the MobFox-Android-Smaato-Adapter.jar in your application's libs folder
(next to your src folder) and add it as a dependency in your
gradle.buildfile. - In your Smaato console:
- In the
networkstab, selectcustom sdk networkand NOT MobFox network (deprecated). Smaato wiki. - Under
All Appsselect your app. - On the relevant
Ad Unit, click thead sourceslink. - Click the
+ New ad networkbutton. - Select the MobFox network from the available ad networks list.
- Fill in:
-
Publisher Site ID- your MobFox publication hash.
-
#DFP DFP uses the same adapter as AdMob.
- Install the MobFox Android SDK Core.
- Install the DFP Android SDK.
- Place the MobFox-Android-AdMob-Adapter.jar in your application's libs folder
(next to your src folder) and add it as a dependency in your
gradle.buildfile. - In your DFP creative select the MobFox network and put in your MobFox publication hash.
 More DFP custom event documentation can be found here: https://developers.google.com/mobile-ads-sdk/docs/dfp/android/custom-events.