nginx-development-guide 한글 번역 및 개발 가이드 정리 해보자
- Introduction(소개)
- Strings(문자열)
- Time (시간)
- Containers (자료구조)
- Memory management (메모리관리)
- Logging (로깅)
- Cycle (라이프 사이클)
- Buffer (버퍼)
- Networking (네트워킹)
- Events (이벤트)
- Processes (프로세스)
- Threads (쓰레드)
- Modules (모듈 개발)
- HTTP
- Examples
- Code style
- auto — build scripts
- src
- core — basic types and functions — string, array, log, pool etc
- event — event core
- modules — event notification modules: epoll, kqueue, select etc
- http — core HTTP module and common code
- modules — other HTTP modules
- v2 — HTTPv2
- mail — mail modules
- os — platform-specific code
- unix
- win32
- stream — stream modules
모든 nginx 파일들은 아래의 두 header 파일들을 포함하여야만 한다.
#include <ngx_config.h>
#include <ngx_core.h>
이외에, HTTP 모듈은 아래 헤더를 포함해야한다.
#include <ngx_http.h>
mail 모듈은 아래 헤더를 포함해야한다.
#include <ngx_mail.h>
Stream 모듈은 아래 헤더를 포함해야한다.
#include <ngx_stream.h>
범용적으로, nginx 모듈은 다음의 두개의 정수형 타입 ngx_int_t ,ngx_uint_t 을 사용한다.
nginx 모듈에서 제공하는 대부분의 function들은 아래의 코드를 return 값으로 가진다.
- NGX_OK — 성공
- NGX_ERROR — 실패
- NGX_AGAIN — 연산 불완전 성공 ( 이 return 값은 function을 다시 호출해야 됨을 의미할수도 있다.)
- NGX_DECLINED — 연산이 거부됨을 의미하는 return 값 ( ex. 설정값 disable ) . 이값이 에러를 의미하진 않는다.
- NGX_BUSY — 해당 resource가 사용 가능하지 않다.
- NGX_DONE — 성공의 대체 return 값
- NGX_ABORT — 에러의 대체 return 값
C 문자열에 대해서, nginx 코드는 u_char * 포인터를 사용한다.
nginx 문자열 타입 ngx_str_t은 아래와 같이 정의되어진다.
typedef struct {
    size_t      len;
    u_char     *data;
} ngx_str_t;
len 필드는 문자열의 길이를 나타낸다. data는 문자열 데이터를 의미한다. len bytes 이후의 data는 null 로 끝나지 않을수도 있지만, 대부분은 null로 끝난다.
nginx는 많은 문자열 연산 함수를 제공한다. C 표준 스트링 라이브러리를 wrapping하였으며, 아래와 같다.
- ngx_strcmp()
- ngx_strncmp()
- ngx_strstr()
- ngx_strlen()
- ngx_strchr()
- ngx_memcmp()
- ngx_memset()
- ngx_memcpy()
- ngx_memmove()
또한 몇몇 nginx 만의 특수한 함수들도 제공한다.
- ngx_memzero() : memory값을 0으로 채워준다.
- ngx_cpymem() : ngx_memcpy 와 동일하나, destination 주소를 반환한다. 여러 문자열을 append 하기에 편리하다.
- ngx_movemem() : ngx_memmove()와 동일하지만, destination 주소를 반환한다.
- ngx_strlchr() : 문자열에서 특정 character를 검색한다.
그밖에, 비교 및 변환 함수를 제공한다.
- ngx_tolower()
- ngx_toupper()
- ngx_strlow()
- ngx_strcasecmp()
- ngx_strncasecmp()
A number of formatting functions are provided by nginx. These functions support nginx-specific types:
- ngx_sprintf(buf, fmt, ...)
- ngx_snprintf(buf, max, fmt, ...)
- ngx_slpintf(buf, last, fmt, ...)
- ngx_vslprint(buf, last, fmt, args)
- ngx_vsnprint(buf, max, fmt, args)
The full list of formatting options, supported by these functions, can be found in src/core/ngx_string.c. Some of them are:
%O — off_t
%T — time_t
%z — size_t
%i — ngx_int_t
%p — void *
%V — ngx_str_t *
%s — u_char * (null-terminated)
%*s — size_t + u_char *
The ‘u’ modifier makes most types unsigned, ‘X’/‘x’ convert output to hex.
Example:
u_char     buf[NGX_INT_T_LEN];
size_t     len;
ngx_int_t  n;

/* set n here */

len = ngx_sprintf(buf, "%ui", n) — buf;
NGINX는 문자열 -> 숫자 변환 함수를 제공한다.
- ngx_atoi(line, n) —
n길이 만큼의 문자열을ngx_int_t타입의 정수로 변환한다. 실패 시, NGX_ERROR 를 반환한다. - ngx_atosz(line, n) — 기능은 위와 같으며,
size_t type의 정수로 반환한다. - ngx_atoof(line, n) — 기능은 위와 같으며,
off_t type의 정수로 반환한다. - ngx_atotm(line, n) — 기능은 위와 같으며,
time_t type의 정수로 반환한다. - ngx_atofp(line, n, point) —
n길이 만큼의 문자열을ngx_int_t타입의 정수로 변환한다. 변환 후에,point값만큼 shift left 연산을 수행한다. 실패시, NGX_ERROR 값을 반환한다. ( ex. ngx_atofp("10.5", 4, 2) = 1050 ) - ngx_hextoi(line, n) —
n길이 만큼의 문자열을 16진수 표현으로ngx_int_t타입으로 반환한다. 실패시, NGX_ERROR 값을 반환한다.
정규식 인터페이스는 PCRE Library를 랩핑해서 제공한다. 헤더파일 src/core/ngx_regex.h 를 include 하면 사용할수 있다.
문자열 매칭을 위한 정규식을 사용하기 위해서, configuration 단계에서 컴파일하는것이 필요하다.
#if (NGX_PCRE)
ngx_regex_t          *re;
ngx_regex_compile_t   rc;

u_char                errstr[NGX_MAX_CONF_ERRSTR];

ngx_str_t  value = ngx_string("message (\\d\\d\\d).*Codeword is '(?<cw>\\w+)'");

ngx_memzero(&rc, sizeof(ngx_regex_compile_t));

rc.pattern = value;
rc.pool = cf->pool;
rc.err.len = NGX_MAX_CONF_ERRSTR;
rc.err.data = errstr;
/* rc.options are passed as is to pcre_compile() */

if (ngx_regex_compile(&rc) != NGX_OK) {
    ngx_conf_log_error(NGX_LOG_EMERG, cf, 0, "%V", &rc.err);
    return NGX_CONF_ERROR;
}

re = rc.regex;
#endif
After successful compilation, ngx_regex_compile_t structure fields captures and named_captures are filled with count of all and named captures respectively found in the regular expression.
Later, the compiled regular expression may be used to match strings against it:
ngx_int_t  n;
int        captures[(1 + rc.captures) * 3];

ngx_str_t input = ngx_string("This is message 123. Codeword is 'foobar'.");

n = ngx_regex_exec(re, &input, captures, (1 + rc.captures) * 3);
if (n >= 0) {
    /* string matches expression */

} else if (n == NGX_REGEX_NO_MATCHED) {
    /* no match was found */

} else {
    /* some error */
    ngx_log_error(NGX_LOG_ALERT, log, 0, ngx_regex_exec_n " failed: %i", n);
}
The arguments of ngx_regex_exec() are: the compiled regular expression re, string to match s, optional array of integers to hold found captures and its size. The captures array size must be a multiple of three, per requirements of the PCRE API. In the example, its size is calculated from a total number of captures plus one for the matched string itself.
Now, if there are matches, captures may be accessed:
u_char     *p;
size_t      size;
ngx_str_t   name, value;

/* all captures */
for (i = 0; i < n * 2; i += 2) {
    value.data = input.data + captures[i];
    value.len = captures[i + 1] — captures[i];
}

/* accessing named captures */

size = rc.name_size;
p = rc.names;

for (i = 0; i < rc.named_captures; i++, p += size) {

    /* capture name */
    name.data = &p[2];
    name.len = ngx_strlen(name.data);

    n = 2 * ((p[0] << 8) + p[1]);

    /* captured value */
    value.data = &input.data[captures[n]];
    value.len = captures[n + 1] — captures[n];
}
The ngx_regex_exec_array() function accepts the array of ngx_regex_elt_t elements (which are just compiled regular expressions with associated names), a string to match and a log. The function will apply expressions from the array to the string until the match is found or no more expressions are left. The return value is NGX_OK in case of match and NGX_DECLINED otherwise, or NGX_ERROR in case of error.
The ngx_time_t structure represents time split into seconds and milliseconds with specification of GMT offset:
typedef struct {
    time_t      sec;
    ngx_uint_t  msec;
    ngx_int_t   gmtoff;
} ngx_time_t;
The ngx_tm_t is an alias for struct tm on UNIX platforms and SYSTEMTIME on Windows.
To obtain current time, usually it is enough to access one of available global variables, representing the cached time value in desired format. The ngx_current_msec variable holds milliseconds elapsed since Epoch and truncated to ngx_msec_t.
Available string representations are:
- ngx_cached_err_log_time — used in error log: "1970/09/28 12:00:00"
- ngx_cached_http_log_time — used in HTTP access log: "28/Sep/1970:12:00:00 +0600"
- ngx_cached_syslog_time — used in syslog: "Sep 28 12:00:00"
- ngx_cached_http_time — used in HTTP for headers: "Mon, 28 Sep 1970 06:00:00 GMT"
- ngx_cached_http_log_iso8601 — in the ISO 8601 standard format: "1970-09-28T12:00:00+06:00"
The ngx_time() and ngx_timeofday() macros returning current value of seconds are a preferred way to access cached time value.
To obtain the time explicitly, ngx_gettimeofday() may be used, which updates its argument (pointer to struct timeval). Time is always updated when nginx returns to event loop from system calls. To update the time immediately, call ngx_time_update(), or ngx_time_sigsafe_update() if you need it in the signal handler context.
The following functions convert time_t into broken-down time representation, either ngx_tm_t or struct tm for those with libc prefix:
- ngx_gmtime(), ngx_libc_gmtime() — result time is UTC
- ngx_localtime(), ngx_libc_localtime() — result time is relative to the timezone
The ngx_http_time(buf, time) returns string representation suitable for use with HTTP headers (for example, "Mon, 28 Sep 1970 06:00:00 GMT"). Another possible conversion is provided by ngx_http_cookie_time(buf, time) that produces format suitable for HTTP cookies ("Thu, 31-Dec-37 23:55:55 GMT").
The nginx array type ngx_array_t is defined as follows
typedef struct {
    void        *elts;
    ngx_uint_t   nelts;
    size_t       size;
    ngx_uint_t   nalloc;
    ngx_pool_t  *pool;
} ngx_array_t;
The elements of array are available through the elts field. The number of elements is held in the nelts field. The size field holds the size of a single element and is set when initializing the array.
An array can be created in a pool with the ngx_array_create(pool, n, size) call. An already allocated array object can be initialized with the ngx_array_init(array, pool, n, size) call.
ngx_array_t  *a, b;

/* create an array of strings with preallocated memory for 10 elements */
a = ngx_array_create(pool, 10, sizeof(ngx_str_t));

/* initialize string array for 10 elements */
ngx_array_init(&b, pool, 10, sizeof(ngx_str_t));
Adding elements to array are done with the following functions:
- ngx_array_push(a) adds one tail element and returns pointer to it
- ngx_array_push_n(a, n) adds n tail elements and returns pointer to the first one
If currently allocated memory is not enough for new elements, a new memory for elements is allocated and existing elements are copied to that memory. The new memory block is normally twice as large, as the existing one.
s = ngx_array_push(a);
ss = ngx_array_push_n(&b, 3);
List in nginx is a sequence of arrays, optimized for inserting a potentially large number of items. The list type is defined as follows:
typedef struct {
    ngx_list_part_t  *last;
    ngx_list_part_t   part;
    size_t            size;
    ngx_uint_t        nalloc;
    ngx_pool_t       *pool;
} ngx_list_t;
The actual items are stored in list parts, defined as follows:
typedef struct ngx_list_part_s  ngx_list_part_t;

struct ngx_list_part_s {
    void             *elts;
    ngx_uint_t        nelts;
    ngx_list_part_t  *next;
};
Initially, a list must be initialized by calling ngx_list_init(list, pool, n, size) or created by calling ngx_list_create(pool, n, size). Both functions receive the size of a single item and a number of items per list part. The ngx_list_push(list) function is used to add an item to the list. Iterating over the items is done by direct accessing the list fields, as seen in the example:
ngx_str_t        *v;
ngx_uint_t        i;
ngx_list_t       *list;
ngx_list_part_t  *part;

list = ngx_list_create(pool, 100, sizeof(ngx_str_t));
if (list == NULL) { /* error */ }

/* add items to the list */

v = ngx_list_push(list);
if (v == NULL) { /* error */ }
ngx_str_set(v, "foo");

v = ngx_list_push(list);
if (v == NULL) { /* error */ }
ngx_str_set(v, "bar");

/* iterate over the list */

part = &list->part;
v = part->elts;

for (i = 0; /* void */; i++) {

    if (i >= part->nelts) {
        if (part->next == NULL) {
            break;
        }

        part = part->next;
        v = part->elts;
        i = 0;
    }

    ngx_do_smth(&v[i]);
}
The primary use for the list in nginx is HTTP input and output headers.
The list does not support item removal. However, when needed, items can internally be marked as missing without actual removing from the list. For example, HTTP output headers which are stored as ngx_table_elt_t objects, are marked as missing by setting the hash field of ngx_table_elt_t to zero. Such items are explicitly skipped, when iterating over the headers.
Queue in nginx is an intrusive doubly linked list, with each node defined as follows:
typedef struct ngx_queue_s  ngx_queue_t;

struct ngx_queue_s {
    ngx_queue_t  *prev;
    ngx_queue_t  *next;
};
The head queue node is not linked with any data. Before using, the list head should be initialized with ngx_queue_init(q) call. Queues support the following operations:
- ngx_queue_insert_head(h, x), ngx_queue_insert_tail(h, x) — insert a new node
- ngx_queue_remove(x) — remove a queue node
- ngx_queue_split(h, q, n) — split a queue at a node, queue tail is returned in a separate queue
- ngx_queue_add(h, n) — add second queue to the first queue
- ngx_queue_head(h), ngx_queue_last(h) — get first or last queue node
- ngx_queue_sentinel(h) - get a queue sentinel object to end iteration at
- ngx_queue_data(q, type, link) — get reference to the beginning of a queue node data structure, considering the queue field offset in it
Example:
typedef struct {
    ngx_str_t    value;
    ngx_queue_t  queue;
} ngx_foo_t;

ngx_foo_t    *f;
ngx_queue_t   values;

ngx_queue_init(&values);

f = ngx_palloc(pool, sizeof(ngx_foo_t));
if (f == NULL) { /* error */ }
ngx_str_set(&f->value, "foo");

ngx_queue_insert_tail(&values, f);

/* insert more nodes here */

for (q = ngx_queue_head(&values);
     q != ngx_queue_sentinel(&values);
     q = ngx_queue_next(q))
{
    f = ngx_queue_data(q, ngx_foo_t, queue);

    ngx_do_smth(&f->value);
}
The src/core/ngx_rbtree.h header file provides access to the effective implementation of red-black trees.
typedef struct {
    ngx_rbtree_t       rbtree;
    ngx_rbtree_node_t  sentinel;

    /* custom per-tree data here */
} my_tree_t;

typedef struct {
    ngx_rbtree_node_t  rbnode;

    /* custom per-node data */
    foo_t              val;
} my_node_t;
To deal with a tree as a whole, you need two nodes: root and sentinel. Typically, they are added to some custom structure, thus allowing to organize your data into a tree which leaves contain a link to or embed your data.
To initialize a tree:
my_tree_t  root;

ngx_rbtree_init(&root.rbtree, &root.sentinel, insert_value_function);
The insert_value_function is a function that is responsible for traversing the tree and inserting new values into correct place. For example, the ngx_str_rbtree_insert_value functions is designed to deal with ngx_str_t type.
void ngx_str_rbtree_insert_value(ngx_rbtree_node_t *temp,
                                 ngx_rbtree_node_t *node,
                                 ngx_rbtree_node_t *sentinel)
Its arguments are pointers to a root node of an insertion, newly created node to be added, and a tree sentinel.
The traversal is pretty straightforward and can be demonstrated with the following lookup function pattern:
my_node_t *
my_rbtree_lookup(ngx_rbtree_t *rbtree, foo_t *val, uint32_t hash)
{
    ngx_int_t           rc;
    my_node_t          *n;
    ngx_rbtree_node_t  *node, *sentinel;

    node = rbtree->root;
    sentinel = rbtree->sentinel;

    while (node != sentinel) {

        n = (my_node_t *) node;

        if (hash != node->key) {
            node = (hash < node->key) ? node->left : node->right;
            continue;
        }

        rc = compare(val, node->val);

        if (rc < 0) {
            node = node->left;
            continue;
        }

        if (rc > 0) {
            node = node->right;
            continue;
        }

        return n;
    }

    return NULL;
}
The compare() is a classic comparator function returning value less, equal or greater than zero. To speed up lookups and avoid comparing user objects that can be big, integer hash field is used.
To add a node to a tree, allocate a new node, initialize it and call ngx_rbtree_insert():
    my_node_t          *my_node;
    ngx_rbtree_node_t  *node;

    my_node = ngx_palloc(...);
    init_custom_data(&my_node->val);

    node = &my_node->rbnode;
    node->key = create_key(my_node->val);

    ngx_rbtree_insert(&root->rbtree, node);
to remove a node:
ngx_rbtree_delete(&root->rbtree, node);
Hash table functions are declared in src/core/ngx_hash.h. Exact and wildcard matching is supported. The latter requires extra setup and is described in a separate section below.
To initialize a hash, one needs to know the number of elements in advance, so that nginx can build the hash optimally. Two parameters that need to be configured are max_size and bucket_size. The details of setting up these are provided in a separate document. Usually, these two parameters are configurable by user. Hash initialization settings are stored as the ngx_hash_init_t type, and the hash itself is ngx_hash_t:
ngx_hash_t       foo_hash;
ngx_hash_init_t  hash;

hash.hash = &foo_hash;
hash.key = ngx_hash_key;
hash.max_size = 512;
hash.bucket_size = ngx_align(64, ngx_cacheline_size);
hash.name = "foo_hash";
hash.pool = cf->pool;
hash.temp_pool = cf->temp_pool;
The key is a pointer to a function that creates hash integer key from a string. Two generic functions are provided: ngx_hash_key(data, len) and ngx_hash_key_lc(data, len). The latter converts a string to lowercase and thus requires the passed string to be writable. If this is not true, NGX_HASH_READONLY_KEY flag may be passed to the function, initializing array keys (see below).
The hash keys are stored in ngx_hash_keys_arrays_t and are initialized with ngx_hash_keys_array_init(arr, type):
ngx_hash_keys_arrays_t  foo_keys;

foo_keys.pool = cf->pool;
foo_keys.temp_pool = cf->temp_pool;

ngx_hash_keys_array_init(&foo_keys, NGX_HASH_SMALL);
The second parameter can be either NGX_HASH_SMALL or NGX_HASH_LARGE and controls the amount of preallocated resources for the hash. If you expect the hash to contain thousands elements, use NGX_HASH_LARGE.
The ngx_hash_add_key(keys_array, key, value, flags) function is used to insert keys into hash keys array;
ngx_str_t k1 = ngx_string("key1");
ngx_str_t k2 = ngx_string("key2");

ngx_hash_add_key(&foo_keys, &k1, &my_data_ptr_1, NGX_HASH_READONLY_KEY);
ngx_hash_add_key(&foo_keys, &k2, &my_data_ptr_2, NGX_HASH_READONLY_KEY);
Now, the hash table may be built using the call to ngx_hash_init(hinit, key_names, nelts):
ngx_hash_init(&hash, foo_keys.keys.elts, foo_keys.keys.nelts);
This may fail, if max_size or bucket_size parameters are not big enough. When the hash is built, ngx_hash_find(hash, key, name, len) function may be used to look up elements:
my_data_t   *data;
ngx_uint_t   key;

key = ngx_hash_key(k1.data, k1.len);

data = ngx_hash_find(&foo_hash, key, k1.data, k1.len);
if (data == NULL) {
    /* key not found */
}
To create a hash that works with wildcards, ngx_hash_combined_t type is used. It includes the hash type described above and has two additional keys arrays: dns_wc_head and dns_wc_tail. The initialization of basic properties is done similarly to a usual hash:
ngx_hash_init_t      hash
ngx_hash_combined_t  foo_hash;

hash.hash = &foo_hash.hash;
hash.key = ...;
It is possible to add wildcard keys using the NGX_HASH_WILDCARD_KEY flag:
/* k1 = ".example.org"; */
/* k2 = "foo.*";        */
ngx_hash_add_key(&foo_keys, &k1, &data1, NGX_HASH_WILDCARD_KEY);
ngx_hash_add_key(&foo_keys, &k2, &data2, NGX_HASH_WILDCARD_KEY);
The function recognizes wildcards and adds keys into corresponding arrays. Please refer to the map module documentation for the description of the wildcard syntax and matching algorithm.
Depending on the contents of added keys, you may need to initialize up to three keys arrays: one for exact matching (described above), and two for matching starting from head or tail of a string:
if (foo_keys.dns_wc_head.nelts) {

    ngx_qsort(foo_keys.dns_wc_head.elts,
              (size_t) foo_keys.dns_wc_head.nelts,
              sizeof(ngx_hash_key_t),
              cmp_dns_wildcards);

    hash.hash = NULL;
    hash.temp_pool = pool;

    if (ngx_hash_wildcard_init(&hash, foo_keys.dns_wc_head.elts,
                               foo_keys.dns_wc_head.nelts)
        != NGX_OK)
    {
        return NGX_ERROR;
    }

    foo_hash.wc_head = (ngx_hash_wildcard_t *) hash.hash;
}
The keys array needs to be sorted, and initialization results must be added to the combined hash. The initialization of dns_wc_tail array is done similarly.
The lookup in a combined hash is handled by the ngx_hash_find_combined(chash, key, name, len):
/* key = "bar.example.org"; — will match ".example.org" */
/* key = "foo.example.com"; — will match "foo.*"        */

hkey = ngx_hash_key(key.data, key.len);
res = ngx_hash_find_combined(&foo_hash, hkey, key.data, key.len);
System Heap에 메모리를 할당하기위해서, NGINX 에서는 다음과 같은 함수들을 제공한다.
- ngx_alloc(size, log) — heap에 메모리를 할당한다. 이 함수는 logging 과 함께, malloc() 를 wrapping 한 함수이다.
- ngx_calloc(size, log) — ngx_alloc() 과 동일하지만, 할당 시에, memory를
0x00으로 초기화 한다. - ngx_free(p) — 할당된 메모리를 해제한다. ( free()를 wrapping 한 함수임 )
Most nginx allocations are done in pools. Memory allocated in an nginx pool is freed automatically when the pool in destroyed. This provides good allocation performance and makes memory control easy.
A pool internally allocates objects in continuous blocks of memory. Once a block is full, a new one is allocated and added to the pool memory block list. When a large allocation is requested which does not fit into a block, such allocation is forwarded to the system allocator and the returned pointer is stored in the pool for further deallocation.
Nginx pool has the type ngx_pool_t. The following operations are supported:
- ngx_create_pool(size, log) — create a pool with given block size. The pool object returned is allocated in the pool as well. The size should be at least NGX_MIN_POOL_SIZE and a multiple of NGX_POOL_ALIGNMENT.
- ngx_destroy_pool(pool) — free all pool memory, including the pool object itself.
- ngx_palloc(pool, size) — allocate aligned memory from pool
- ngx_pcalloc(pool, size) — allocated aligned memory from pool and fill it with zeroes
- ngx_pnalloc(pool, size) — allocate unaligned memory from pool. Mostly used for allocating strings
- ngx_pfree(pool, p) — free memory, previously allocated in the pool. Only allocations, forwarded to the system allocator, can be freed.
u_char      *p;
ngx_str_t   *s;
ngx_pool_t  *pool;

pool = ngx_create_pool(1024, log);
if (pool == NULL) { /* error */ }

s = ngx_palloc(pool, sizeof(ngx_str_t));
if (s == NULL) { /* error */ }
ngx_str_set(s, "foo");

p = ngx_pnalloc(pool, 3);
if (p == NULL) { /* error */ }
ngx_memcpy(p, "foo", 3);
Since chain links ngx_chain_t are actively used in nginx, nginx pool provides a way to reuse them. The chain field of ngx_pool_t keeps a list of previously allocated links ready for reuse. For efficient allocation of a chain link in a pool, the function ngx_alloc_chain_link(pool) should be used. This function looks up a free chain link in the pool list and only if it's empty allocates a new one. To free a link ngx_free_chain(pool, cl) should be called.
Cleanup handlers can be registered in a pool. Cleanup handler is a callback with an argument which is called when pool is destroyed. Pool is usually tied with a specific nginx object (like HTTP request) and destroyed in the end of that object’s lifetime, releasing the object itself. Registering a pool cleanup is a convenient way to release resources, close file descriptors or make final adjustments to shared data, associated with the main object.
A pool cleanup is registered by calling ngx_pool_cleanup_add(pool, size) which returns ngx_pool_cleanup_t pointer to be filled by the caller. The size argument allows allocating context for the cleanup handler.
ngx_pool_cleanup_t  *cln;

cln = ngx_pool_cleanup_add(pool, 0);
if (cln == NULL) { /* error */ }

cln->handler = ngx_my_cleanup;
cln->data = "foo";

...

static void
ngx_my_cleanup(void *data)
{
    u_char  *msg = data;

    ngx_do_smth(msg);
}
NGINX의 shared memory는 worker 프로세스들간의 데이터 공유를 위해서 사용되어진다.ngx_shared_memory_add(cf, name, size, tag) 는 공유 메모리 entry인 ngx_shm_zone_t 를 추가한다.
각 shared zone은 고유ㅢ 이름을 가지고 있다. 만약, shared_zone에 제공된 name이 이미 존재한다면, 이전의 zone entry는 재 사용되어진다. tag 값의 경우, 매칭되지 않으면 error가 반환된다. 대게, nginx module 의 주소를 tag로써 사용한다.
shared memory 엔트리 구조인ngx_shm_zone_t 는 다음의 필드들을 가지고 있다.
-
init : 초기화 callback 함수이다. shared memory가 실제, 메모리에 mapping 되어진후에 호출되어 진다.
-
data : 데이터를 초기화하는데 사용되어지는 context
-
noreuse : old cycle에서 shared zone 재사용을 끄는 flag
-
tag : shared zone tag
-
shm :
ngx_shm_t구조체의 객체이며, 적어도 다음의 필드를 가진다.- addr : 매핑된 shared memory 주소 (초기값 NULL)
- size : shared memory 사이즈
- name : shared memory 이름
- log : shared memory 로그
- exists : master process로부터 상속되어진 shared_memory를 보여줄지에 대한 flag (window 한정)
shared zone 엔트리들은 configuration이 파싱된 이후에, ngx_init_cycle() 에서 실제 메모리에 맵핑되어진다. (POSIX 의 경우, mmap() syscall 호출, Windows의 경우 CreateFileMapping()/MapViewOfFileEx() 호출)
shared_memory에 할당하기 위해서 NGINX는 slab pool 인 ngx_slab_pool_t 를 제공한다. 각 NGINX shared zone에서 slab pool은 zone에 메모리 할당을 위해, 자동으로 생성되어진다. 해당 ozne은 shared zone 처음에 위치하며, (ngx_slab_pool_t *) shm_zone->shm.addr 를 통해서 접근되어진다. shared zone에 메모리 할당은 ngx_slab_alloc(pool, size)/ngx_slab_calloc(pool, size) 호출을 통해서 이루어지며, memory 해제는 ngx_slab_free(pool, p)를 통해서 이루어진다.
slab pool은 모든 shared zone을 페이지 단위로 나눈다. 각 페이지는 같은 사이즈의 객체를 할당하기위해 사용된다. 또한,2 의 제곱 사이즈만 가능하며, 적어도 8보다 적지 않도록 고려되어져야 한다. page의 절반 크기(2048 byte)보다 큰 사이즈에 대해서는 할당은 페이지 entry에 할당되어 진다.
동시접근에서 shared_memory의 데이터를 보호하기위해서, ngx_slab_pool_t 필드의 mutex field를 사용할수 있다. mutex는 slab pool에 의해서 사용되어진다.
ngx_str_t        name;
ngx_foo_ctx_t   *ctx;
ngx_shm_zone_t  *shm_zone;

ngx_str_set(&name, "foo");

/* allocate shared zone context */
ctx = ngx_pcalloc(cf->pool, sizeof(ngx_foo_ctx_t));
if (ctx == NULL) {
    /* error */
}

/* add an entry for 65k shared zone */
shm_zone = ngx_shared_memory_add(cf, &name, 65536, &ngx_foo_module);
if (shm_zone == NULL) {
    /* error */
}

/* register init callback and context */
shm_zone->init = ngx_foo_init_zone;
shm_zone->data = ctx;


...


static ngx_int_t
ngx_foo_init_zone(ngx_shm_zone_t *shm_zone, void *data)
{
    ngx_foo_ctx_t  *octx = data;

    size_t            len;
    ngx_foo_ctx_t    *ctx;
    ngx_slab_pool_t  *shpool;

    value = shm_zone->data;

    if (octx) {
        /* reusing a shared zone from old cycle */
        ctx->value = octx->value;
        return NGX_OK;
    }

    shpool = (ngx_slab_pool_t *) shm_zone->shm.addr;

    if (shm_zone->shm.exists) {
        /* initialize shared zone context in Windows nginx worker */
        ctx->value = shpool->data;
        return NGX_OK;
    }

    /* initialize shared zone */

    ctx->value = ngx_slab_alloc(shpool, sizeof(ngx_uint_t));
    if (ctx->value == NULL) {
        return NGX_ERROR;
    }

    shpool->data = ctx->value;

    return NGX_OK;
}
For logging nginx code uses ngx_log_t objects. Nginx logger provides support for several types of output:
- stderr — logging to standard error output
- file — logging to file
- syslog — logging to syslog
- memory — logging to internal memory storage for development purposes. The memory could be accessed later with debugger
A logger instance may actually be a chain of loggers, linked to each other with the next field. Each message is written to all loggers in chain.
Each logger has an error level which limits the messages written to that log. The following error levels are supported by nginx:
- NGX_LOG_EMERG
- NGX_LOG_ALERT
- NGX_LOG_CRIT
- NGX_LOG_ERR
- NGX_LOG_WARN
- NGX_LOG_NOTICE
- NGX_LOG_INFO
- NGX_LOG_DEBUG
For debug logging, debug mask is checked as well. The following debug masks exist:
- NGX_LOG_DEBUG_CORE
- NGX_LOG_DEBUG_ALLOC
- NGX_LOG_DEBUG_MUTEX
- NGX_LOG_DEBUG_EVENT
- NGX_LOG_DEBUG_HTTP
- NGX_LOG_DEBUG_MAIL
- NGX_LOG_DEBUG_STREAM
Normally, loggers are created by existing nginx code from error_log directives and are available at nearly every stage of processing in cycle, configuration, client connection and other objects.
Nginx provides the following logging macros:
- ngx_log_error(level, log, err, fmt, ...) — error logging
- ngx_log_debug0(level, log, err, fmt), ngx_log_debug1(level, log, err, fmt, arg1) etc — debug logging, up to 8 formatting arguments are supported
A log message is formatted in a buffer of size NGX_MAX_ERROR_STR (currently, 2048 bytes) on stack. The message is prepended with error level, process PID, connection id (stored in log->connection) and system error text. For non-debug messages log->handler is called as well to prepend more specific information to the log message. HTTP module sets ngx_http_log_error() function as log handler to log client and server addresses, current action (stored in log->action), client request line, server name etc.
Example:
/* specify what is currently done */
log->action = "sending mp4 to client”;

/* error and debug log */
ngx_log_error(NGX_LOG_INFO, c->log, 0, "client prematurely
              closed connection”);

ngx_log_debug2(NGX_LOG_DEBUG_HTTP, mp4->file.log, 0,
               "mp4 start:%ui, length:%ui”, mp4->start, mp4->length);
Logging result:
2016/09/16 22:08:52 [info] 17445#0: *1 client prematurely closed connection while
sending mp4 to client, client: 127.0.0.1, server: , request: "GET /file.mp4 HTTP/1.1”
2016/09/16 23:28:33 [debug] 22140#0: *1 mp4 start:0, length:10000
Cycle object keeps nginx runtime context, created from a specific configuration. The type of the cycle is ngx_cycle_t. Upon configuration reload a new cycle is created from the new version of nginx configuration. The old cycle is usually deleted after a new one is successfully created. Currently active cycle is held in the ngx_cycle global variable and is inherited by newly started nginx workers.
A cycle is created by the function ngx_init_cycle(). The function receives the old cycle as the argument. It's used to locate the configuration file and inherit as much resources as possible from the old cycle to keep nginx running smoothly. When nginx starts, a fake cycle called “init cycle” is created and is then replaced by a normal cycle, built from configuration.
Some members of the cycle:
- pool — cycle pool. Created for each new cycle
- log — cycle log. Initially, this log is inherited from the old cycle. After reading configuration, this member is set to point to new_log
- new_log — cycle log, created by the configuration. It's affected by the root scope error_log directive
- connections, connections_n — per-worker array of connections of type ngx_connection_t, created by the event module while initializing each nginx worker. The number of connections is set by the worker_connections directive
- free_connections, free_connections_n — the and number of currently available connections. If no connections are available, nginx worker refuses to accept new clients
- files, files_n — array for mapping file descriptors to nginx connections. This mapping is used by the event modules, having the NGX_USE_FD_EVENT flag (currently, it's poll and devpoll)
- conf_ctx — array of core module configurations. The configurations are created and filled while reading nginx configuration files
- modules, modules_n — array of modules ngx_module_t, both static and dynamic, loaded by current configuration
- listening — array of listening objects ngx_listening_t. Listening objects are normally added by the the listen directive of different modules which call the ngx_create_listening() function. Based on listening objects, listen sockets are created by nginx
- paths — array of paths ngx_path_t. Paths are added by calling the function ngx_add_path() from modules which are going to operate on certain directories. These directories are created by nginx after reading configuration, if missing. Moreover, two handlers can be added for each path:
- path loader — executed only once in 60 seconds after starting or reloading nginx. Normally, reads the directory and stores data in nginx shared memory. The handler is called from a dedicated nginx process “nginx cache loader”
- path manager — executed periodically. Normally, removes old files from the directory and reflects these changes in nginx memory. The handler is called from a dedicated nginx process “nginx cache manager”
- open_files — list of ngx_open_file_t objects. An open file object is created by calling the function ngx_conf_open_file(). After reading configuration nginx opens all files from the open_files list and stores file descriptors in the fd field of each open file object. The files are opened in append mode and created if missing. The files from this list are reopened by nginx workers upon receiving the reopen signal (usually it's USR1). In this case the fd fields are changed to new descriptors. The open files are currently used for logging
- shared_memory — list of shared memory zones, each added by calling the ngx_shared_memory_add() function. Shared zones are mapped to the same address range in all nginx processes and are used to share common data, for example HTTP cache in-memory tree
For input/output operations, nginx provides the buffer type ngx_buf_t. Normally, it's used to hold data to be written to a destination or read from a source. Buffer can reference data in memory and in file. Technically it's possible that a buffer references both at the same time. Memory for the buffer is allocated separately and is not related to the buffer structure ngx_buf_t.
The structure ngx_buf_t has the following fields:
- start, end — the boundaries of memory block, allocated for the buffer
- pos, last — memory buffer boundaries, normally a subrange of start .. end
- file_pos, file_last — file buffer boundaries, these are offsets from the beginning of the file
- tag — unique value, used to distinguish buffers, created by different nginx module, usually, for the purpose of buffer reuse
- file — file object
- temporary — flag, meaning that the buffer references writable memory
- memory — flag, meaning that the buffer references read-only memory
- in_file — flag, meaning that current buffer references data in a file
- flush — flag, meaning that all data prior to this buffer should be flushed
- recycled — flag, meaning that the buffer can be reused and should be consumed as soon as possible
- sync — flag, meaning that the buffer carries no data or special signal like flush or last_buf. Normally, such buffers are considered an error by nginx. This flags allows skipping the error checks
- last_buf — flag, meaning that current buffer is the last in output
- last_in_chain — flag, meaning that there's no more data buffers in a (sub)request
- shadow — reference to another buffer, related to the current buffer. Usually current buffer uses data from the shadow buffer. Once current buffer is consumed, the shadow buffer should normally also be marked as consumed
- last_shadow — flag, meaning that current buffer is the last buffer, referencing a particular shadow buffer
- temp_file — flag, meaning that the buffer is in a temporary file
For input and output buffers are linked in chains. Chain is a sequence of chain links ngx_chain_t, defined as follows:
typedef struct ngx_chain_s  ngx_chain_t;

struct ngx_chain_s {
    ngx_buf_t    *buf;
    ngx_chain_t  *next;
};
Each chain link keeps a reference to its buffer and a reference to the next chain link.
Example of using buffers and chains:
ngx_chain_t *
ngx_get_my_chain(ngx_pool_t *pool)
{
    ngx_buf_t    *b;
    ngx_chain_t  *out, *cl, **ll;

    /* first buf */
    cl = ngx_alloc_chain_link(pool);
    if (cl == NULL) { /* error */ }

    b = ngx_calloc_buf(pool);
    if (b == NULL) { /* error */ }

    b->start = (u_char *) "foo";
    b->pos = b->start;
    b->end = b->start + 3;
    b->last = b->end;
    b->memory = 1; /* read-only memory */

    cl->buf = b;
    out = cl;
    ll = &cl->next;

    /* second buf */
    cl = ngx_alloc_chain_link(pool);
    if (cl == NULL) { /* error */ }

    b = ngx_create_temp_buf(pool, 3);
    if (b == NULL) { /* error */ }

    b->last = ngx_cpymem(b->last, "foo", 3);

    cl->buf = b;
    cl->next = NULL;
    *ll = cl;

    return out;
}
Connection type ngx_connection_t is a wrapper around a socket descriptor. Some of the structure fields are:
- fd — socket descriptor
- data — arbitrary connection context. Normally, a pointer to a higher level object, built on top of the connection, like HTTP request or Stream session
- read, write — read and write events for the connection
- recv, send, recv_chain, send_chain — I/O operations for the connection
- pool — connection pool
- log — connection log
- sockaddr, socklen, addr_text — remote socket address in binary and text forms
- local_sockaddr, local_socklen — local socket address in binary form. Initially, these fields are empty. Function ngx_connection_local_sockaddr() should be used to get socket local address
- proxy_protocol_addr, proxy_protocol_port - PROXY protocol client address and port, if PROXY protocol is enabled for the connection
- ssl — nginx connection SSL context
- reusable — flag, meaning, that the connection is at the state, when it can be reused
- close — flag, meaning, that the connection is being reused and should be closed
An nginx connection can transparently encapsulate SSL layer. In this case the connection ssl field holds a pointer to an ngx_ssl_connection_t structure, keeping all SSL-related data for the connection, including SSL_CTX and SSL. The handlers recv, send, recv_chain, send_chain are set as well to SSL functions.
The number of connections per nginx worker is limited by the worker_connections value. All connection structures are pre-created when a worker starts and stored in the connections field of the cycle object. To reach out for a connection structure, ngx_get_connection(s, log) function is used. The function receives a socket descriptor s which needs to be wrapped in a connection structure.
Since the number of connections per worker is limited, nginx provides a way to grab connections which are currently in use. To enable or disable reuse of a connection, function ngx_reusable_connection(c, reusable) is called. Calling ngx_reusable_connection(c, 1) sets the reuse flag of the connection structure and inserts the connection in the reusable_connections_queue of the cycle. Whenever ngx_get_connection() finds out there are no available connections in the free_connections list of the cycle, it calls ngx_drain_connections() to release a specific number of reusable connections. For each such connection, the close flag is set and its read handler is called which is supposed to free the connection by calling ngx_close_connection(c) and make it available for reuse. To exit the state when a connection can be reused ngx_reusable_connection(c, 0) is called. An example of reusable connections in nginx is HTTP client connections which are marked as reusable until some data is received from the client.
Event object ngx_event_t in nginx provides a way to be notified of a specific event happening.
Some of the fields of the ngx_event_t are:
- data — arbitrary event context, used in event handler, usually, a pointer to a connection, tied with the event
- handler — callback function to be invoked when the event happens
- write — flag, meaning that this is the write event. Used to distinguish between read and write events
- active — flag, meaning that the event is registered for receiving I/O notifications, normally from notification mechanisms like epoll, kqueue, poll
- ready — flag, meaning that the event has received an I/O notification
- delayed — flag, meaning that I/O is delayed due to rate limiting
- timer — Red-Black tree node for inserting the event into the timer tree
- timer_set — flag, meaning that the event timer is set, but not yet expired
- timedout — flag, meaning that the event timer has expired
- eof — read event flag, meaning that the eof has happened while reading data
- pending_eof — flag, meaning that the eof is pending on the socket, even though there may be some data available before it. The flag is delivered via EPOLLRDHUP epoll event or EV_EOF kqueue flag
- error — flag, meaning that an error has happened while reading (for read event) or writing (for write event)
- cancelable — timer event flag, meaning that the event handler should be called while performing nginx worker graceful shutdown, event though event timeout has not yet expired. The flag provides a way to finalize certain activities, for example, flush log files
- posted — flag, meaning that the event is posted to queue
- queue — queue node for posting the event to a queue
Each connection, received with the ngx_get_connection() call, has two events attached to it: c->read and c->write. These events are used to receive notifications about the socket being ready for reading or writing. All such events operate in Edge-Triggered mode, meaning that they only trigger notifications when the state of the socket changes. For example, doing a partial read on a socket will not make nginx deliver a repeated read notification until more data arrive in the socket. Even when the underlying I/O notification mechanism is essentially Level-Triggered (poll, select etc), nginx will turn the notifications into Edge-Triggered. To make nginx event notifications consistent across all notifications systems on different platforms, it's required, that the functions ngx_handle_read_event(rev, flags) and ngx_handle_write_event(wev, lowat) are called after handling an I/O socket notification or calling any I/O functions on that socket. Normally, these functions are called once in the end of each read or write event handler.
An event can be set to notify a timeout expiration. The function ngx_add_timer(ev, timer) sets a timeout for an event, ngx_del_timer(ev) deletes a previously set timeout. Timeouts currently set for all existing events, are kept in a global timeout Red-Black tree ngx_event_timer_rbtree. The key in that tree has the type ngx_msec_t and is the time in milliseconds since the beginning of January 1, 1970 (modulus ngx_msec_t max value) at which the event should expire. The tree structure provides fast inserting and deleting operations, as well as accessing the nearest timeouts. The latter is used by nginx to find out for how long to wait for I/O events and for expiring timeout events afterwards.
An event can be posted which means that its handler will be called at some point later within the current event loop iteration. Posting events is a good practice for simplifying code and escaping stack overflows. Posted events are held in a post queue. The macro ngx_post_event(ev, q) posts the event ev to the post queue q. Macro ngx_delete_posted_event(ev) deletes the event ev from whatever queue it's currently posted. Normally, events are posted to the ngx_posted_events queue. This queue is processed late in the event loop — after all I/O and timer events are already handled. The function ngx_event_process_posted() is called to process an event queue. This function calls event handlers until the queue is not empty. This means that a posted event handler can post more events to be processed within the current event loop iteration.
Example:
void
ngx_my_connection_read(ngx_connection_t *c)
{
    ngx_event_t  *rev;

    rev = c->read;

    ngx_add_timer(rev, 1000);

    rev->handler = ngx_my_read_handler;

    ngx_my_read(rev);
}


void
ngx_my_read_handler(ngx_event_t *rev)
{
    ssize_t            n;
    ngx_connection_t  *c;
    u_char             buf[256];

    if (rev->timedout) { /* timeout expired */ }

    c = rev->data;

    while (rev->ready) {
        n = c->recv(c, buf, sizeof(buf));

        if (n == NGX_AGAIN) {
            break;
        }

        if (n == NGX_ERROR) { /* error */ }

        /* process buf */
    }

    if (ngx_handle_read_event(rev, 0) != NGX_OK) { /* error */ }
}
All nginx processes which do I/O, have an event loop. The only type of process which does not have I/O, is nginx master process which spends most of its time in sigsuspend() call waiting for signals to arrive. Event loop is implemented in ngx_process_events_and_timers() function. This function is called repeatedly until the process exits. It has the following stages:
- find nearest timeout by calling ngx_event_find_timer(). This function finds the leftmost timer tree node and returns the number of milliseconds until that node expires
- process I/O events by calling a handler, specific to event notification mechanism, chosen by nginx configuration. This handler waits for at least one I/O event to happen, but no longer, than the nearest timeout. For each read or write event which has happened, the ready flag is set and its handler is called. For Linux, normally, the ngx_epoll_process_events() handler is used which calls epoll_wait() to wait for I/O events
- expire timers by calling ngx_event_expire_timers(). The timer tree is iterated from the leftmost element to the right until a not yet expired timeout is found. For each expired node the timedout event flag is set, timer_set flag is reset, and the event handler is called
- process posted events by calling ngx_event_process_posted(). The function repeatedly removes the first element from the posted events queue and calls its handler until the queue gets empty
All nginx processes handle signals as well. Signal handlers only set global variables which are checked after the ngx_process_events_and_timers() call.
- NGX_PROCESS_MASTER — 마스터 프로세스는
ngx_master_process_cycle()에서 시작된다. 마스터 프로세스는 어떤 I/O도 처리하지 않으며, 시그널로만 응답한다. configuration을 읽고, cycles를 생성하여 worker process를 시작하고, 관리한다. - NGX_PROCESS_WORKER — 워커 프로세스는
ngx_worker_process_cycle()에서 시작된다. 워커 프로세스들은 master에 의해서 시작되어 지며 client 커넥션들을 처리한다. 워커 프로세스는 master로 부터 받은 channel command와 signal에 대해서 응답한다. - NGX_PROCESS_SINGLE — single 프로세스는 master process off mode에서만 동작하는 프로세스 타입이다. 이 process의 cycle은
ngx_single_process_cycle()이다. 이 프로세스는 cycle를 생성하고, client connection을 처리한다. (master process/worker process 역할을 동시에 함) - NGX_PROCESS_HELPER — Cache Manager와 Cache Loader 두 종류가 있다.
ngx_cache_manager_process_cycle()에서 둘다 같은 cycle를 공유한다.
All nginx processes handle the following signals:
-
NGX_SHUTDOWN_SIGNAL (SIGQUIT) — 우아한 종료 signal. master process가 이 signal를 받으면, 모든 worker process에게 shutdown signal를 보낸다. worker process가 남아있지 않을때, master process는 cycle pool를 지우고, 종료한다. worker process는 이 시그널을 받았을때, 모든 listening socket들을 close 하고, timeout tree가 비어질때 까지 기다린다. cache manaer process는 이 시그널은 받은후, 바로 종료된다.
ngx_quit변수가 이 시그널을 받은 후에 세팅되어지고,ngx_exiting변수가 worker process들이 shutdown 상태가 되어졌을때 세팅되어진다. -
NGX_TERMINATE_SIGNAL (SIGTERM) - 종료 signal. master process는 이 시그널을 받은후, 모든 worker process에게 terminate signal를 보낸다. worker process가 만약, 1초 후에 종료되지 않으면, SIGKILL signal에 의해서 해당 프로세스들은 kill 되어진다. worker process들이 더이상 남아있지 않을때 master process는 cycle pool를 지우고, 종료한다. worker process 또는 cache manager process들은 이 시그널을 받은후, cycle pool를 지우고 종료한다.
ngx_terminate변수는 이 시그널을 받은후 세팅 되어진다. -
NGX_NOACCEPT_SIGNAL (SIGWINCH) - worker process들을 우아하게 종료한다.
-
NGX_RECONFIGURE_SIGNAL (SIGHUP) - reconfigure signal. master process는 이 시그널을 받으면, t새로운 cycle를 configuration 파일을 읽어서 생성한다. 새로운 cycle이 성공적으로 생성된다면, 이전 cycle은 지워지고, 새로운 worker process들이 시작되어진다. 한편, 이전 process들은 shutdown signal를 받는다. single process 모드에서는 새로운 cycle를 생성하지만, 모든 클라이언트가 구 cycle에 연결되어져있을때까지는 유지되어진다. worker 와 helper 프로세스는 이 signal를 무시한다.
-
NGX_REOPEN_SIGNAL (SIGUSR1) — reopen files signal. master process는 worker에게 이 signal를 전달한다. 모든 worker process들은 모든 open_files 들을 reopen 한다.
-
NGX_CHANGEBIN_SIGNAL (SIGUSR2) — nginx binary 교체 signal. master process는 새로운 nginx binary를 실행하고, 모든 listen socket에게 전달한다. 이 list는 NGINX 라는 환경변수로 전달되어진다. 새로운 NGINX 인스턴스는 변수를 읽어들이고, socket을 init cycle에 추가한다. 다른 프로세스들은 해당 시그널을 무시한다.
모든 nginx worker process들은 POSIX singal를 받아서 처리하고, master process는 일반적으로 해당 시그널들을 kill() syscall를 가지고 보내지는 않는다. 대신에, nginx는 IPC channel를 이용하여, 모든 NGINX process들에해 해당 메세지를 전달한다. 현재는 모든 메세지는 오로지 master에서 child에게만 전달되어 진다. 이 메세지는 같은 signal를 전달한다. channel은 양방향 소켓이다.
NGINX binary가 동작할때, 몇몇 value들이 -s 파라미터로 명시되어진다. 이 변수들은 stop,quit,reopen,reload 이다. 이 변수들은 NGX_TERMINATE_SIGNAL, NGX_SHUTDOWN_SIGNAL, NGX_REOPEN_SIGNAL and NGX_RECONFIGURE_SIGNA 로 변환되어 지며, NGINX master process에게 보내진다. 해당 master process에게 전달하기 위한 pid는 nginx pid file로 부터 읽어진다.
./nginx -s reload
./nginx -s quit
./nginx -s reopen
./nginx -s reload
NGINX Worker Process의 blocking 할수있는 task들을 독립적인 쓰레드로 수행하는것이 가능하다.
예를 들어, NGINX는 file I/O를 수행하기 위한 쓰레드를 사용할수 있다. 또다른 예로는 nignx를 가지고 일반적으로 처리할수 없는 비동기 처리를 지원하지 않는 library들을 사용하는것이 가능하다. 즉, NGINX 에서의 thread interface는 기존의 클라이언트 요청을 비동기적으로 처리하는것에 대해 더유용하게 해준다.
쓰레드 동기화 처리를위해서, NGINX는 아래의 primitives 들을 지원한다. ( pthread wrapper )
typedef pthread_mutex_t  ngx_thread_mutex_t;

ngx_int_t ngx_thread_mutex_create(ngx_thread_mutex_t *mtx, ngx_log_t *log);
ngx_int_t ngx_thread_mutex_destroy(ngx_thread_mutex_t *mtx, ngx_log_t *log);
ngx_int_t ngx_thread_mutex_lock(ngx_thread_mutex_t *mtx, ngx_log_t *log);
ngx_int_t ngx_thread_mutex_unlock(ngx_thread_mutex_t *mtx, ngx_log_t *log);

typedef pthread_cond_t  ngx_thread_cond_t;

ngx_int_t ngx_thread_cond_create(ngx_thread_cond_t *cond, ngx_log_t *log);
ngx_int_t ngx_thread_cond_destroy(ngx_thread_cond_t *cond, ngx_log_t *log);
ngx_int_t ngx_thread_cond_signal(ngx_thread_cond_t *cond, ngx_log_t *log);
ngx_int_t ngx_thread_cond_wait(ngx_thread_cond_t *cond, ngx_thread_mutex_t *mtx,
    ngx_log_t *log);
각 task 처리를위해서, 새로운 thread를 생성하는것 대신에, NGINX는 thread pool 전략으로 처리한다. 여러개의 thread pool들은 각자 다른 목적으로 구성가능하다. 각 thread pool은 시작시에 만들어질수 있고, 제한된 수의 thread 수와 task 처리를위한 큐를 구성할 수 있다. task가 완료되면, 미리 정의한 completion handler가 불려진다.
The src/core/ngx_thread_pool.h 헤더파일은 다음의 definitions들을 포함한다.
struct ngx_thread_task_s {
    ngx_thread_task_t   *next;
    ngx_uint_t           id;
    void                *ctx;
    void               (*handler)(void *data, ngx_log_t *log);
    ngx_event_t          event;
};

typedef struct ngx_thread_pool_s  ngx_thread_pool_t;

ngx_thread_pool_t *ngx_thread_pool_add(ngx_conf_t *cf, ngx_str_t *name);
ngx_thread_pool_t *ngx_thread_pool_get(ngx_cycle_t *cycle, ngx_str_t *name);

ngx_thread_task_t *ngx_thread_task_alloc(ngx_pool_t *pool, size_t size);
ngx_int_t ngx_thread_task_post(ngx_thread_pool_t *tp, ngx_thread_task_t *task);
thread를 사용하려는 module은 ngx_thread_pool_add(cf, name)를 호출하여 thred pool 참조(포인터)를 가져와야 한다.
ngx_thread_task_post(tp, task)는 thread pool Queue에 task를 추가하는데 사용됩니다.ngx_thread_task_t는 thread에서 기능을 수행하는데 모든 필수적인 요소(사용자 function 실행, parameter 전달, completion handler 설정 등)를 포함하고 있다.
typedef struct {
    int    foo;
} my_thread_ctx_t;


static void
my_thread_func(void *data, ngx_log_t *log)
{
    my_thread_ctx_t *ctx = data;

    /* this function is executed in a separate thread */
}


static void
my_thread_completion(ngx_event_t *ev)
{
    my_thread_ctx_t *ctx = ev->data;

    /* executed in nginx event loop */
}


ngx_int_t
my_task_offload(my_conf_t *conf)
{
    my_thread_ctx_t    *ctx;
    ngx_thread_task_t  *task;

    task = ngx_thread_task_alloc(conf->pool, sizeof(my_thread_ctx_t));
    if (task == NULL) {
        return NGX_ERROR;
    }

    ctx = task->ctx;

    ctx->foo = 42;

    task->handler = my_thread_func;
    task->event.handler = my_thread_completion;
    task->event.data = ctx;

    if (ngx_thread_task_post(conf->thread_pool, task) != NGX_OK) {
        return NGX_ERROR;
    }

    return NGX_OK;
}
https://ofstack.com/Nginx/17046/nginx-source-analysis-thread-pool-details.html
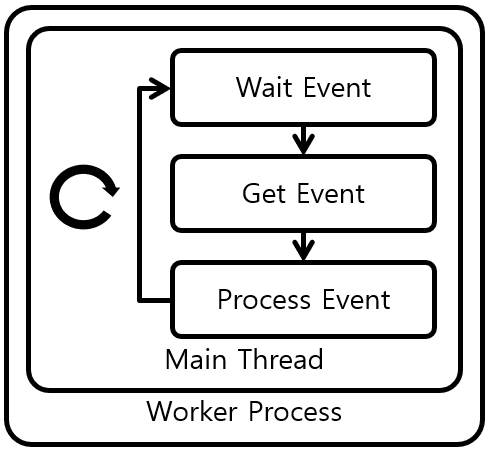
[그림 1] Nginx Worker Process without Thread Pool
Nginx의 Thread Pool 기법을 분석한다. [그림 1]은 Nginx의 Thread Pool 기법을 적용하지 않은, 기존의 Worker Process의 동작을 나타내고 있다. Nginx의 Worker Process는 Kernel이 제공하는 select(), epoll(), kqueue()와 같은 Multiplexing 함수를 이용하여 단일 Thread 안에서 Event Loop를 동작시킨다. Event Loop는 Event를 대기, 감시, 처리하는 과정을 반복한다.
이러한 단일 Thread Event Loop 기법은 Process/Thread의 과도한 생성을 방지하여 Kernel Memory 절약, Context Switching Overhead 등의 성능적 이점을 가져다 준다. 하지만 Event 처리 시간이 길어져 단일 Thread를 점유하고 있으면 다른 Evnet 처리도 늦어지는 Blocking 현상이 발생하는 큰 문제점을 갖고 있다. 주로 Disk 동작이 동반되는 File Read/Write 동작의 경우, 상황에 따라서 오랜 시간 Thread를 점유하며 동작하기 때문에 Blocing 현상의 주요 원인이다. 또한 Nginx Third-party Module들의 처리 시간이 긴 함수들도 원인이 될 수 있다.
Nginx는 Backend의 응답을 File로 Caching하기 때문에 File Read/Write 동작이 매우 자주 발생한다. 동일한 요청이 자주온다면 Memory 기반의 Filesystem Cache를 통해서 Disk 접근은 최소화 되기 때문에, 빠른 File Read/Write 동작이 가능하다. 하지만 Video Streaming Data처럼 큰 Data Stream을 주고받는 경우에는 Filesystem Cache의 효과를 얻지 못하기 때문에, 대부분의 File Read/Write 동작은 Disk에 접근하게 되고 느려질수 밖에 없다. 이러한 File Read/Write 동작으로 인한 Blocking 문제를 해결하기 위해서 Nginx의 Thread Pool 기법이 고안되었다.

[그림 2] Nginx Worker Process with Thread Pool
[그림 2]는 Thread Pool 기법을 적용한 Worker Process를 나타내고 있다. Event Loop가 동작하는 Main Thread에서는 Event를 직접처리 하거나, Event를 Event Queue에 넣는다. Event Queue에 들어간 Event는 Thread Pool의 Worker Thread들이 하나씩 가저가 처리하고, 처리가 완료되면 Main Loop에게 Event 처리 완료 메세지를 보낸다. 이러한 Thread Pool 기법에서는 하나의 Worker Thread가 Event 처리로 Blocking 되어도 나머지 Worker Thread에게는 영향을 주지 않기 때문에 Blocking 문제를 해결할 수 있다.
현재 Nginx는 File Read/Write 동작만 Thread Pool의 Thread에서 처리하고, 나머지 Event들은 기존 그대로 Main Thread에서 처리하고 있다. Thread Pool안의 Thread 개수는 설정을 통해서 변경할 수 있다. Nginx의 Thread Pool 기법은 Nginx 1.7.11 이후 Version에서 이용할 수 있다.
example)
master process 1
worker process 2
thread_pool http_router_tp threads=20 max_queue=65536;
worker process 당 쓰레드풀 하나씩 가지므로, 총 40개의 쓰레드를 가짐
The standalone nginx module resides in a separate directory that contains at least two files: config and a file with the module source. The first file contains all information needed for nginx to integrate the module, for example:
ngx_module_type=CORE
ngx_module_name=ngx_foo_module
ngx_module_srcs="$ngx_addon_dir/ngx_foo_module.c"

. auto/module

ngx_addon_name=$ngx_module_name
The file is a POSIX shell script and it can set (or access) the following variables:
-
ngx_module_type — the type of module to build. Possible options are CORE, HTTP, HTTP_FILTER, HTTP_INIT_FILTER, HTTP_AUX_FILTER, MAIL, STREAM, or MISC
-
ngx_module_name — the name of the module. A whitespace separated values list is accepted and may be used to build multiple modules from a single set of source files. The first name indicates the name of the output binary for a dynamic module. The names in this list should match the names used in the module.
-
ngx_addon_name — supplies the name of the module in the console output text of the configure script.
-
ngx_module_srcs — a whitespace separated list of source files used to compile the module. The $ngx_addon_dir variable can be used as a placeholder for the path of the module source.
-
ngx_module_incs — include paths required to build the module
-
ngx_module_deps — a list of module's header files.
-
ngx_module_libs — a list of libraries to link with the module. For example, libpthread would be linked using ngx_module_libs=-lpthread. The following macros can be used to link against the same libraries as nginx: LIBXSLT, LIBGD, GEOIP, PCRE, OPENSSL, MD5, SHA1, ZLIB, and PERL
-
ngx_module_link — set by the build system to DYNAMIC for a dynamic module or ADDON for a static module and used to perform different actions depending on linking type. ngx_module_order — sets the load order for the module which is useful for HTTP_FILTER and HTTP_AUX_FILTER module types. The order is stored in a reverse list.
The ngx_http_copy_filter_module is near the bottom of the list so is one of the first to be executed. This reads the data for other filters. Near the top of the list is ngx_http_write_filter_module which writes the data out and is one of the last to be executed.
The format for this option is typically the current module’s name followed by a whitespace separated list of modules to insert before, and therefore execute after. The module will be inserted before the last module in the list that is found to be currently loaded.
By default for filter modules this is set to “ngx_http_copy_filter” which will insert the module before the copy filter in the list and therefore will execute after the copy filter. For other module types the default is empty.
A module can be added to nginx by means of the configure script using --add-module=/path/to/module for static compilation and --add-dynamic-module=/path/to/module for dynamic compilation.
Modules are building blocks of nginx, and most of its functionality is implemented as modules. The module source file must contain a global variable of ngx_module_t type which is defined as follows:
struct ngx_module_s {

    /* private part is omitted */

    void                 *ctx;
    ngx_command_t        *commands;
    ngx_uint_t            type;

    ngx_int_t           (*init_master)(ngx_log_t *log);

    ngx_int_t           (*init_module)(ngx_cycle_t *cycle);

    ngx_int_t           (*init_process)(ngx_cycle_t *cycle);
    ngx_int_t           (*init_thread)(ngx_cycle_t *cycle);
    void                (*exit_thread)(ngx_cycle_t *cycle);
    void                (*exit_process)(ngx_cycle_t *cycle);

    void                (*exit_master)(ngx_cycle_t *cycle);

    /* stubs for future extensions are omitted */
};
The omitted private part includes module version, signature and is filled using the predefined macro NGX_MODULE_V1.
Each module keeps its private data in the ctx field, recognizes specific configuration directives, specified in the commands array, and may be invoked at certain stages of nginx lifecycle. The module lifecycle consists of the following events:
- Configuration directive handlers are called as they appear in configuration files in the context of the master process
- The init_module handler is called in the context of the master process after the configuration is parsed successfully
- The master process creates worker process(es) and init_process handler is called in each of them
- When a worker process receives the shutdown command from master, it invokes the exit_process handler
- The master process calls the exit_master handler before exiting.
init_module handler may be called multiple times in the master process if the configuration reload is requested.
The init_master, init_thread and exit_thread handlers are not implemented at the moment; Threads in nginx are only used as supplementary I/O facility with its own API and init_master handler looks unnecessary.
The module type defines what exactly is stored in the ctx field. There are several types of modules:
- NGX_CORE_MODULE
- NGX_EVENT_MODULE
- NGX_HTTP_MODULE
- NGX_MAIL_MODULE
- NGX_STREAM_MODULE
The NGX_CORE_MODULE is the most basic and thus the most generic and most low-level type of module. Other module types are implemented on top of it and provide more convenient way to deal with corresponding problem domains, like handling events or http requests.
The examples of core modules are ngx_core_module, ngx_errlog_module, ngx_regex_module, ngx_thread_pool_module, ngx_openssl_module modules and, of course, http, stream, mail and event modules itself. The context of a core module is defined as:
typedef struct {
    ngx_str_t             name;
    void               *(*create_conf)(ngx_cycle_t *cycle);
    char               *(*init_conf)(ngx_cycle_t *cycle, void *conf);
} ngx_core_module_t;
where the name is a string with a module name for convenience, create_conf and init_conf are pointers to functions that create and initialize module configuration correspondingly. For core modules, nginx will call create_conf before parsing a new configuration and init_conf after all configuration was parsed successfully. The typical create_conf function allocates memory for the configuration and sets default values. The init_conf deals with known configuration and thus may perform sanity checks and complete initialization.
For example, the simplistic ngx_foo_module can look like this:
/*
 * Copyright (C) Author.
 */


#include <ngx_config.h>
#include <ngx_core.h>


typedef struct {
    ngx_flag_t  enable;
} ngx_foo_conf_t;


static void *ngx_foo_create_conf(ngx_cycle_t *cycle);
static char *ngx_foo_init_conf(ngx_cycle_t *cycle, void *conf);

static char *ngx_foo_enable(ngx_conf_t *cf, void *post, void *data);
static ngx_conf_post_t  ngx_foo_enable_post = { ngx_foo_enable };


static ngx_command_t  ngx_foo_commands[] = {

    { ngx_string("foo_enabled"),
      NGX_MAIN_CONF|NGX_DIRECT_CONF|NGX_CONF_FLAG,
      ngx_conf_set_flag_slot,
      0,
      offsetof(ngx_foo_conf_t, enable),
      &ngx_foo_enable_post },

      ngx_null_command
};


static ngx_core_module_t  ngx_foo_module_ctx = {
    ngx_string("foo"),
    ngx_foo_create_conf,
    ngx_foo_init_conf
};


ngx_module_t  ngx_foo_module = {
    NGX_MODULE_V1,
    &ngx_foo_module_ctx,                   /* module context */
    ngx_foo_commands,                      /* module directives */
    NGX_CORE_MODULE,                       /* module type */
    NULL,                                  /* init master */
    NULL,                                  /* init module */
    NULL,                                  /* init process */
    NULL,                                  /* init thread */
    NULL,                                  /* exit thread */
    NULL,                                  /* exit process */
    NULL,                                  /* exit master */
    NGX_MODULE_V1_PADDING
};


static void *
ngx_foo_create_conf(ngx_cycle_t *cycle)
{
    ngx_foo_conf_t  *fcf;

    fcf = ngx_pcalloc(cycle->pool, sizeof(ngx_foo_conf_t));
    if (fcf == NULL) {
        return NULL;
    }

    fcf->enable = NGX_CONF_UNSET;

    return fcf;
}


static char *
ngx_foo_init_conf(ngx_cycle_t *cycle, void *conf)
{
    ngx_foo_conf_t *fcf = conf;

    ngx_conf_init_value(fcf->enable, 0);

    return NGX_CONF_OK;
}


static char *
ngx_foo_enable(ngx_conf_t *cf, void *post, void *data)
{
    ngx_flag_t  *fp = data;

    if (*fp == 0) {
        return NGX_CONF_OK;
    }

    ngx_log_error(NGX_LOG_NOTICE, cf->log, 0, "Foo Module is enabled");

    return NGX_CONF_OK;
}
The ngx_command_t describes single configuration directive. Each module, supporting configuration, provides an array of such specifications that describe how to process arguments and what handlers to call:
struct ngx_command_s {
    ngx_str_t             name;
    ngx_uint_t            type;
    char               *(*set)(ngx_conf_t *cf, ngx_command_t *cmd, void *conf);
    ngx_uint_t            conf;
    ngx_uint_t            offset;
    void                 *post;
};
The array should be terminated by a special value “ngx_null_command”. The name is the literal name of a directive, as it appears in configuration file, for example “worker_processes” or “listen”. The type is a bitfield that controls number of arguments, command type and other properties using corresponding flags. Arguments flags:
- NGX_CONF_NOARGS — directive without arguments
- NGX_CONF_1MORE — one required argument
- NGX_CONF_2MORE — two required arguments
- NGX_CONF_TAKE1..7 — exactly 1..7 arguments
- NGX_CONF_TAKE12, 13, 23, 123, 1234 — one or two arguments, or other combinations
Directive types:
- NGX_CONF_BLOCK — the directive is a block, i.e. it may contain other directives in braces, or even implement its own parser to handle contents inside.
- NGX_CONF_FLAG — the directive value is a flag, a boolean value represented by “on” or “off” strings.
Context of a directive defines where in the configuration it may appear and how to access module context to store corresponding values:
- NGX_MAIN_CONF — top level configuration
- NGX_HTTP_MAIN_CONF — in the http block
- NGX_HTTP_SRV_CONF — in the http server block
- NGX_HTTP_LOC_CONF — in the http location
- NGX_HTTP_UPS_CONF — in the http upstream block
- NGX_HTTP_SIF_CONF — in the http server “if”
- NGX_HTTP_LIF_CONF — in the http location “if”
- NGX_HTTP_LMT_CONF — in the http “limit_except”
- NGX_STREAM_MAIN_CONF — in the stream block
- NGX_STREAM_SRV_CONF — in the stream server block
- NGX_STREAM_UPS_CONF — in the stream upstream block
- NGX_MAIL_MAIN_CONF — in the the mail block
- NGX_MAIL_SRV_CONF — in the mail server block
- NGX_EVENT_CONF — in the event block
- NGX_DIRECT_CONF — used by modules that don't create a hierarchy of contexts and store module configuration directly in ctx
The configuration parser uses this flags to throw an error in case of a misplaced directive and calls directive handlers supplied with a proper configuration pointer, so that same directives in different locations could store their values in distinct places.
The set field defines a handler that processes a directive and stores parsed values into corresponding configuration. Nginx offers a convenient set of functions that perform common conversions:
- ngx_conf_set_flag_slot — converts literal “on” or “off” strings into ngx_flag_t type with values 1 or 0
- ngx_conf_set_str_slot — stores string as a value of the ngx_str_t type
- ngx_conf_set_str_array_slot — appends ngx_array_t of ngx_str_t with a new value. The array is created if not yet exists
- ngx_conf_set_keyval_slot — appends ngx_array_t of ngx_keyval_t with a new value, where key is the first string and value is second. The array is created if not yet exists
- ngx_conf_set_num_slot — converts directive argument to a ngx_int_t value
- ngx_conf_set_size_slot — converts size to size_t value in bytes
- ngx_conf_set_off_slot — converts offset to off_t value in bytes
- ngx_conf_set_msec_slot — converts time to ngx_msec_t value in milliseconds
- ngx_conf_set_sec_slot — converts time to time_t value in seconds
- ngx_conf_set_bufs_slot — converts two arguments into ngx_bufs_t that holds ngx_int_t number and size of buffers
- ngx_conf_set_enum_slot — converts argument into ngx_uint_t value. The null-terminated array of ngx_conf_enum_t passed in the post field defines acceptable strings and corresponding integer values
- ngx_conf_set_bitmask_slot — arguments are converted to ngx_uint_t value and OR'ed with the resulting value, forming a bitmask. The null-terminated array of ngx_conf_bitmask_t passed in the post field defines acceptable strings and corresponding mask values
- set_path_slot — converts arguments to ngx_path_t type and performs all required initializations. See the proxy_temp_path directive description for details
- set_access_slot — converts arguments to file permissions mask. See the proxy_store_access directive description for details
The conf field defines which context is used to store the value of the directive, or zero if contexts are not used. Only simple core modules use configuration without context and set NGX_DIRECT_CONF flag. In real life, such modules like http or stream require more sophisticated configuration that can be applied per-server or per-location, or even more precisely, in the context of the “if” directive or some limit. In this modules, configuration structure is more complex. Please refer to corresponding modules description to understand how they manage their configuration.
- NGX_HTTP_MAIN_CONF_OFFSET — http block configuration
- NGX_HTTP_SRV_CONF_OFFSET — http server configuration
- NGX_HTTP_LOC_CONF_OFFSET — http location configuration
- NGX_STREAM_MAIN_CONF_OFFSET — stream block configuration
- NGX_STREAM_SRV_CONF_OFFSET — stream server configuration
- NGX_MAIL_MAIN_CONF_OFFSET — mail block configuration
- NGX_MAIL_SRV_CONF_OFFSET — mail server configuration
The offset defines an offset of a field in a module configuration structure that holds values of this particular directive. The typical use is to employ offsetof() macro.
he post is a twofold field: it may be used to define a handler to be called after main handler completed or to pass additional data to the main handler. In the first case, ngx_conf_post_t structure needs to be initialized with a pointer to handler, for example:
static char *ngx_do_foo(ngx_conf_t *cf, void *post, void *data);
static ngx_conf_post_t  ngx_foo_post = { ngx_do_foo };
The post argument is the ngx_conf_post_t object itself, and the data is a pointer to value, converted from arguments by the main handler with the appropriate type.
NGINX는 여러 phase를 통해서, HTTP 요청을 처리한다.각 phase는 하나 이상의 handler를 호출한다.
phase는 다음과 같다.
-
NGX_HTTP_SERVER_REWRITE PHASE : virtual server 레벨에서, URI 요청 변환 단계
-
NGX_HTTP_FIND_CONFIG PHASE : configuration location 찾기 단계
- handler를 호출하지 않고, location 설정을 탐색하고,
Location요청 헤더가 채워진다.
- handler를 호출하지 않고, location 설정을 탐색하고,
-
NGX_HTTP_REWRITE_PHASE : location 레벨에서, URI 요청 변환 단계
-
NGX_HTTP_POST_REWRITE_PHASE : URI 변환 후처리 단계
- handler를 호출하지 않는다.
-
NGX_HTTP_PREACCESS_PHASE : 접근 제한 확인 전처리 단계
-
NGX_HTTP_ACCESS_PHASE : 접근 제한 확인 단계
-
NGX_HTTP_POST_ACCESS_PHASE : 접근 제한 확인 후처리 단계
- 접근 제한 검사 결과만 처리하고, directive
anyorall를 구현하는데 필요하다.
- 접근 제한 검사 결과만 처리하고, directive
-
NGX_HTTP_TRY_FILES_PHASE :
try_filesdirective 처리 단계- handler를 호출하지 않는다.
-
NGX_HTTP_CONTENT_PHASE : content 생성 단계
-
NGX_HTTP_LOG_PHASE : 로깅 단계
bold체로 처리된 모든 단계에서 원하는 수의 handler 등록이 가능하다.
NGX_OK : 요청 성공적으로 처리. request가 다음 단계로 라우팅된다.
NGX_DECLINED : request가 다음 단계로 라우팅된다.
NGX_AGAIN, NGX_DONE : 요청이 성공적으로 처리되었음을 의미하나, 해당 request는 일부 이벤트까지 일시중단되었다가 handler를 다시 호출한다.
NGX_ERROR, NGX_HTTP... : request처리동안, 오류 발생
handler를 등록하기 위해선, ngx_http_core_module 의 configuration이 필요하며, phases vector 에 handler를 추가하면 된다. handler를 추가한 역순으로 런타임에 호출되어진다.
요청 처리 순서는 구성파일의 directive 순서와는 관계 없이 수행된다.
이 단계에서는 resource에 대한 access를 제한하는 handler를 호출한다.
이 단계에서 handler가 호출되는 순서는 satisfy directive 에 의해서 결정된다. 해당 단계에서의 handler의 return 값들은 다음을 의미한다.
NGX_OK : handler가 요청 URI로 지정된 resource를 접근할 수 있음을 의미한다.
NGX_HTTP_FORBIDDEN, NGX_HTTP_UNAUTHORIZED : handler가 요청 URI에 지정된 resource를 요청하도록 허용하지 않는다.
satisfy all 모든 handler들은 반드시 NGX_OK를 다음 단계 처리를 위해서, return 해야 한다.
satisfy any 의 handle들 중 적어도 하나는 NGX_OK를 다음 단계 처리를 위해서, reaturn 해야 한다.
이 단계에서 NGINX는 HTTP Response를 생성한다.
ngx_http_core_module 의 location 설정이 해당 handler field를 가지고 있다면, 모든 요청들에 대해서는 NGX_HTTP_CONTENT_PHASE 단계에서, 이 handler로 라우팅되어진다.
content handler가 설정되어 있지 않으면, main 설정 단계의 NGX_HTTP_CONTENT_PHASE handler로 라우팅되어진다.
content handler 오버라이딩 방법
static char *
ngx_http_sample_module_command(ngx_conf_t *cf, ngx_command_t *cmd, void *conf)
{
    ngx_http_core_loc_conf_t  *clcf;

    clcf = ngx_http_conf_get_module_loc_conf(cf, ngx_http_core_module);
    clcf->handler = ngx_http_sample_handler;

    return NGX_CONF_OK;
}
- 재실행되지 않는다.
- 각 location은 자체적인 Content Handler들을 가지고 있다.
- 만약, Content Handler가 NGX_DECLINED를 return 하면 NGINX는 요청을 content phase handlers 로 라우팅한다.
NGX_HTTP_ACCESS_PHASE : satisfy directive 에 의해서 조작할 필요가 있을때, ( ex. 접근 제한 확인 )
NGX_HTTP_PREACCESS_PHASE : 특정 resource를 제한하는것을 필요로 할때,
NGX_HTTP_REWRITE_PHASE : URI를 변경하거나, 변수를 조작하거나 재작성 하는것을 필요로 할때,
NGX_HTTP_CONTENT_PHASE : Content를 생성하는것을 필요로할때,
NGX_HTTP_LOG_PHASE : handler가 로깅하는것을 필요로할때,
content phase handler는 NGX_HTTP_CONTENT_PHASE 단계에서의 모든 요청들에 대해서 호출되어진다. content handler는 오직, content handler가 구성되어진 location에 대해서만 호출되어진다.
NGINX HTTP Server는 내부적으로 output filter 체인을 가지고 있다. 이 filter들은 두가지 타입이 있다. (header filter, body filter)
Header Filter는 응답의 Header 와 status line을 조절하는데 사용할수 있다. NGINX는 응답 헤더를 보내는데 사용되는 데이터를 저장하는 ngx_http_headers_out_t 구조체를 가지고 있다. 이 구조체는 ngx_http_request_t 구조체의 headers_out 로 있다.
typedef struct {
    ngx_list_t                        headers;
    ngx_list_t                        trailers;

    ngx_uint_t                        status;
    ngx_str_t                         status_line;

    [...]
} ngx_http_headers_out_t;
언제든지 응답 헤더를 보내기 전에, 헤더들을 확장거나, status line을 변경하는것이 가능하다. header filter는 그 자체가 function 이며 아래와 같다.
ngx_int_t header_filter(ngx_http_request_t *r);
filter 체인 구성은 어떻게 할까? NGINX는 ngx_http_top_header_filter 라는 전역 변수를 가지고 있다. 이것은 항상, filter의 stack의 top header를 가리키고 있다. NGINX는 구동시, 각 모듈에 대한 초기화 함수를 호출한다. 일반적으로, top filter는 ngx_http_next_header_filter 변수에 저장되어진다.
static ngx_http_output_header_filter_pt ngx_http_next_header_filter;

static ngx_int_t my_module_init(ngx_conf_t *cf)
{
    ngx_http_next_header_filter = ngx_http_top_header_filter;
    ngx_http_top_header_filter = my_header_filter;

    return NGX_OK;
}
ngx_http_next_header_filter 를 호출함으로써, header filter는 다음 헤더 필터로 실행을 진행한다.
본인 스스로의 header filter는 아래와 같이 작성 가능하다.
static ngx_int_t my_header_filter(ngx_http_request_t *r)
{
   if([ check if any adaptation of the reply is needed ])
   {
      [ modify the reply by adding/changing headers lines or changing status ]

      h = ngx_list_push(&r->headers_out.headers);
      if(h == NULL) {
          return NGX_ERROR;
      }

      h->hash = 1;
      ngx_str_set(&h->key, "X-Header");
      ngx_str_set(&h->value, "x-value");
   }

   // Call the next header filter in the chain
   return ngx_http_next_header_filter(r);
}
클라이언트에게 응답을 보내기 위해서는 http response의 header와 body를 필요로 한다.ngx_http_send_header 를 사용해서, 응답헤더를 보내는것이 가능하다.
#include <ngx_http.h>
ngx_int_t ngx_http_send_header(ngx_http_request_t *r);
r은 니가 헤더를 생성하고 보내길 원하는 HTTP Request를 의미한다. 이 함수는 header를 r->headers_out 에 있는 헤더 리스트를 직렬화 하여, buffer에 넣고, 이 buffer를 클라이언트에게 보내거나, 만약 client socket이 아직 write가 불가능하다면, otuput queue인 r->out으로 보낸다. status line의 자동으로 결정되어 지고, HTTP status code는 r->headers_out.status에 해당한다. status description은 status code에 따라서, 채워지게 된다.
또한, custom header를 다음과 같이 추가 가능하다.
h = ngx_list_push(&r->headers_out.headers);
if (h == NULL) {
	return NGX_HTTP_INTERNAL_SERVER_ERROR;
}

h->key.len = sizeof("X-Custom-Header") - 1;
h->key.data = (u_char *) "X-Custom-Header";
h->value.len = sizeof("test") - 1;
h->value.data = (u_char *) "test";
이 code는 response header에 X-Custom-Header: test 를 추가한다.
ngx_http_send_header function은 다음의 상태값을 return 한다.
NGX_OK : 헤더가 성공적으로 보내짐
NGX_AGAIN : 클라이언트에게 보내지고 있는 중이다.
NGX_ERROR, NGX_HTTP_… : 헤더를 보내는데 실패했거나, 헤더를 생성하는데 실패함.
여기서, 주의 할점은 NGX_AGAIN이 반환될 경우, NGX_OK로 처리해야된다는 것이다. 왜냐하면, NGX_AGAIN에 대한 추가적인 로직은 너무 복잡하고, NGINX가 이를 따로 처리를 해준다.(에러처리 불필요) 즉, 헤더 데이터 또한 body 데이터 처럼 큐잉되어진다는 것이다.
헤더가 직렬화 되어지기전에 NGINX는 header filter를 호출한다. 또한, ngx_http_send_header 가 호출되었을때, body가 필요하지 않다고 결정 가능하다. 즉, ngx_http_send_header 가 r->header_only를 1로 변경할수 있다는 것이다. 따라서, 응답헤더 준비시에, 오류 발생 or body 불필요 한 경우에 대한 방어코드를 넣어둬야 한다.
r-> headers_out.status = NGX_HTTP_OK;
r-> headers_out.content_length_n = ngx_http_sample_text.len;

rc = ngx_http_send_header (r);

if (rc == NGX_ERROR || rc> NGX_OK || r-> header_only) {
	return rc;
}
response의 body를 보내려면, buffer chain에 할당하고, body가 포함된 하나 이상의 buffer를 안에 넣어야 한다. 즉, chain을 만든후 ngx_http_output_filter를 호출한다.
ngx_int_t ngx_http_output_filter (ngx_http_request_t * r, ngx_chain_t * in);
r의 경우 request에 해당하며, in은 response body를 포함한 buffer chain을 나타낸다.
ngx_http_output_filter의 return 값은 아래와 같다.
NGX_OK : 모든 버퍼가 성공적으로 전송하거나 대기되어진 상태이다.
NGX_AGAIN : 데이터가 클라이언트로 전송되어지고 있는 중이다.
NGX_ERROR : 데이터를 보내거나 buffer 체인 처리하는동안 에러 발생
response body를 포함하는 buffer들은 상수 segment에 의해서 할당되어질수도 있고, request의 memory pool 또는 configuration의 memory pool에 의해서 할당되어질 수 도 있다.
buffer는 file 내에서 byte 시퀀스 형태의 pointer를 허용한다. 이 경우에는 , in_file 필드 값을 1로 주어야한다. in_file 필드 값을 1로 설정한후에는 , file 필드는 file를 가리키게 되고, file_pos는 해당 파일의 첫 byte 를 나타내고, file_last는 파일의 마지막 byte를 나타낸다. ngx_http_output_filter 를 통해서, buffer는 전송되어 질수 있고, NGINX는 이 file를 memory로 chunk 단위로 load 하거나, 가능한 경우 sendfile syscall를 호출한다.
아래는 buffer chain을 구성하고, 큐잉하는 예이다.
ngx_int_t     rc;
ngx_buf_t    *b;
ngx_chain_t   out;

b = ngx_calloc_buf(r->pool);
if (b == NULL) {
	return NGX_HTTP_INTERNAL_SERVER_ERROR;
}

out.buf = b;
out.next = NULL;

b->start = b->pos = ngx_http_sample_text.data;
b->end = b->last = ngx_http_sample_text.data + ngx_http_sample_text.len;
b->memory = 1;
b->last_buf = 1;
b->last_in_chain = 1;

return ngx_http_output_filter(r, &out);
r->headers_out.content_length_n 값은 response body가 있는 경우, 필요하다. 왜냐하면, Content-Lenght : ${body size} 를 body가 있다면 보내야만 하기 때문이다.
struct ngx_module_s {

    [...]

    ngx_uint_t            version;

    void                 *ctx;
    ngx_command_t        *commands;
    ngx_uint_t            type;

    [...]

    ngx_int_t           (*init_module)(ngx_cycle_t *cycle);

    ngx_int_t           (*init_process)(ngx_cycle_t *cycle);

    [...]

    void                (*exit_process)(ngx_cycle_t *cycle);

    void                (*exit_master)(ngx_cycle_t *cycle);

    [...]

};

typedef struct ngx_module_s      ngx_module_t;
version : 현재 NGINX API의 버전을 나타낸다. (현재는 1)
ctx : 모듈의 전역 context를 의미한다.
commands : 모듈 command의 지시어 vector 이다.
type : NGINX 모듈의 타입을 나타낸다. (NGX_HTTP_MODULE, NGX_EVENT_MODULE, NGX_MAIL_MODULE)
init_module : event loop 진입 전에, master process 내에서 모듈 초기화를 위해 호출되는 callback 함수
init_process : worekr process 내에서 모듈 초기화 시에, 호출되어지는 callback 함수
exit_process : worker process 종료시에 호출되어지는 callback 함수
exit_master : master process 종료시에 호출되어지는 callback 함수
모듈 정의 example)
#include <ngx_config.h>
#include <ngx_core.h>

ngx_module_t  ngx_http_some_module = {
    NGX_MODULE_V1,
    &ngx_http_some_module_ctx,             /* module context */
    ngx_http_some_commands,                /* module directives */
    NGX_HTTP_MODULE,                       /* module type */
    NULL,                                  /* init master */
    NULL,                                  /* init module */
    NULL,                                  /* init process */
    NULL,                                  /* init thread */
    NULL,                                  /* exit thread */
    NULL,                                  /* exit process */
    NULL,                                  /* exit master */
    NGX_MODULE_V1_PADDING
};
configure 스크립트는 포인터의 목록 ngx_module_t 구조체의 모든 모듈들을 빌드한다.이 포인터 목록에는 전역 vector ngx_module_s 가 저장되어진다. core 모듈 관점에서 NGINX는 모듈들을 설정가능한 event loop에 불가하다. 즉, mail module 이나 http module 들이 초기화하고 구성할수 있는 모든 작업들을 구성해야한다는것을 의미한다.
NGINX 모듈 추가시에는 -add-module 키워드를 추가해야한다.이 설정은 config 이름의 파일을 바라보고 있고, 이를 바탕으로 shell을 실행한다.
ngx_addon_name : NGINX 모듈 이름
NGX_ADDON_SRCS : 컴파일에 포함할 모든 source 파일
NGX_ADDON_DEPS : 모든 종속 파일(header 파일)
HTTP_MODULES : 모든 HTTP 모듈 목록
HTTP_AUX_FILTER_MODULES : 모든 보조 필터 목록
USE_MD5 : MD5 지원 활성화 여부를 지정합니다 (YES / NO)
USE_SHA1 : SHA-1 지원을 활성화할지 여부를 지정합니다 (YES / NO)
USE_ZLIB : zlib 라이브러리 지원을 활성화할지 여부를 지정합니다 (YES / NO)
- config 파일 example
ngx_addon_name = ngx_http_sample_module
HTTP_MODULES = "$ HTTP_MODULES ngx_http_sample_module"
NGX_ADDON_SRCS = "$ NGX_ADDON_SRCS $ ngx_addon_dir / ngx_http_sample_module.c"
configure 수행 이후에, Makefile 를 통해서 빌드 진행하면 NGINX 바이너리가 형성되어진다.
make
make install
HTTP 모듈은 type 필드는 NGX_HTTP_MODULE 를 가지고 있고, ctx 필드는 ngx_http_module_t 구조체의 전역 객체를 가리키고 있다.
typedef struct {
    ngx_int_t   (*preconfiguration)(ngx_conf_t *cf);
    ngx_int_t   (*postconfiguration)(ngx_conf_t *cf);

    void       *(*create_main_conf)(ngx_conf_t *cf);
    char       *(*init_main_conf)(ngx_conf_t *cf, void *conf);

    void       *(*create_srv_conf)(ngx_conf_t *cf);
    char       *(*merge_srv_conf)(ngx_conf_t *cf, void *prev, void *conf);

    void       *(*create_loc_conf)(ngx_conf_t *cf);
    char       *(*merge_loc_conf)(ngx_conf_t *cf, void *prev, void *conf);
} ngx_http_module_t;
이 handler는 다음과 같다.
preconfiguration : HTTP 설정을 파싱하기 전에 호출되어지는 handler
postconfiguration : HTTP 설정을 파싱한 후에 호출되어지는 handler
create_main_conf : module에서 main 설정을 만들기 위해 호출되어지는 handler
init_main_conf : module의 설정을 초기화하기 위해 호출되어지는 handler
create_srv_conf : virtual server 설정을 만들기 위해 호출되어지는 handler
merge_srv_conf : 2개의 virtual server 설정을 합치기 위해 호출되어지는 handler
create_loc_conf : location 설정을 만들기 위해 호출되어지는 handler
merge_loc_conf : 2개의 location 설정을 합치기 위해 호출되어지는 handler
모든 필드는 NULL 값을 포함할 수 있다. 하지만, create_srv_conf , create_loc_conf 및 merge_srv_conf , merge_loc_conf 형태의 쌍으로 제공되어진다. 이 모든 handler는 구성 단계에서 호출되어지므로, master process 내의 리소스에 대한 동기화는 하지 않아도 된다.
preconfiguration handler 는 HTTP server 설정을 처리하는 동안에 접근되어질수 있는 리소스를 등록하는데 사용되어진다.
postconfiguration handler는 HTTP server 설정을 처리하는 동안에 나타내는 리소스를 구성하는데 사용되어진다.

NGINX HTTP Server는 2가지 설정을 가지고 있다. main , virtual server, location. 각 설정은 모든 HTTP Module에서 구조체로 구성되어 진다. main 설정은 모듈에서 오직 하나만 있다. NGINX는 create_main_conf handler를 호출함으로써 각 모듈들이 스스로 main 설정을 만들도록 한다. 또한, server 블록이 구성되어진만큼 server 설정이 구성되어진다. server 설정은 또한 default를 가지고 있는데, 이는 http 블록에 정의되어진 파라미터들을 저장한다. 또한 main 설정과 각 server 설정은 default location 설정을 가지고 있는데, 이는 http / server 블록에 정의된 각각의 파라미터를 저장한다. 이는 또한 ,location 설정에도 포함된다.
NGINX는 http 설정 블록의 파싱이 완료되면 merge_srv_conf handler를 호출하여, default server 설정을 해당 모든 블록에 정의된 모든 server 설정과 병합합니다. 그런다음에, merge_loc_conf handler를 호출하여, http 블록의 default location 설정을 해당 모든 server 블록에 정의된 모든 location 설정과 병합한다.
각각의 client HTTP 커넥션은 다음의 단계로 동작한다.
ngx_event_accept()가 client TCP connection 를 받는다. 이 handler는 listen socket으로 부터 온 노티를 읽는 시점에서 호출되어진다. 이 단계에서ngx_connection_t객체가 만들어진다. 이 객체는 새롭게 받은 client socket을 랩핑하고 있다. 각 NGINX listener는 handler에게 이 connetion 객체를ngx_http_init_connection(c)에게 전달한다.ngx_http_init_connection()HTTP Connection의 초기화를 수행한다. 이 단계에서ngx_http_connection_t객체가 만들어지고, 이 reference(포인터)가 connection 데이터 필드에 저장된다.후에 이 객체는 HTTP Request 객체로 대체되어진다. PROXY 프로토콜 parser와 SSL handshake가 이 단계에서 시작된다.ngx_http_wait_request_handler()는 read event handler 이다. 이 핸들러는 client socket에서 데이터를 읽을수 있을때 호출되어진다. 이 단계에서ngx_http_request_t객체가 만들어지고, connection의 데이터 필드가 세팅되어진다.ngx_http_process_request_line()는 client request line을 읽는 read event handler 이다. 이 handler는ngx_http_wait_request_handler()에서 세팅되어진다. reading은 connection 버퍼에서 이루어진다. buffer 사이즈는client_header_buffer_sizedirective로 초기화되어진다. 전체 client header는 buffer 해당 버퍼에 맞추어진다. 만약, 초기 사이즈가 충분하지 않다면, 더큰 buffer가 할당되어 지며, 이 사이즈는large_client_header_buffersdirective에 의해서 세징되어진다.ngx_http_process_request_headers()는 read event handler이며,ngx_http_process_request_line()가 client request header를 읽은 이후에 세팅되어진다.ngx_http_core_run_phases()는 request h eader가 읽어지고, 파싱된 이후에 호출되어진다. 이 function은 NGX_HTTP_POST_READ_PHASE 에서 NGX_HTTP_CONTENT_PHASE 로 넘어가는 요청단계에서 실행되어진다. 마지막 단계는 응답을 생성하고, filter chain으로 전달한다. 해당 응답은 필수적이지는 않다. 마지막 단계에서, 버퍼되어진채로 남아있을수도 있고, 전송되어질수도 있다.ngx_http_finalize_request()는 대게 요청이 모든 output과 에러처리가 완료되어졌을때, 호출되어진다. 후자는 적절한 error page를 룩업하고, 응답으로써 사용된다. 만약, 응답이 이 시점에 완전히 클라이언트에게 보내지지 않는다면, 나머지 처리되지 않은 데이터를 보내는것을 끝낼때 까지, HTTP writerngx_http_writer가 활성화되어진다.ngx_http_finalize_connection()는 클라이언트에게 응답을 완전히 보내고, request가 지워졌을때 호출되어진다. 해당 client connection이 keepalive가 활성화 되어져있다면,ngx_http_set_keepalive()가 불려지고, 현재 request만 지우고, 다음 요청의 connetion을 기다린다. 만약, keepalive가 활성화되어있지 않다면,ngx_http_close_request()가 호출되어, request와 connection 둘다 지워진다.
각 클라이언트 HTTP request는 ngx_http_request_t 객체를 생성한다. 이객체의 구성은 다음과 같다.
- connection —
ngx_connection_tclient 커넥션 객체 포인터이다.요청들은 동시에 같은 커넥션 객체를 참조할 수 있다. 요청이 삭제되어진후에, 새로운 요청은 같은 커넥션에 의해서 만들어 질수도 있다. HTTP 연결의 경우ngx_connection_t의 데이터 필드가 다시 요청을 가리킨다. 커넥션과 관련된 request와 달리 이러한 요청들은 active request 라고 합니다. active request는 클라이언트 연결 이벤트를 처리하는 데 사용되며 클라이언트에 해당 응답을 출력할 수 있습니다. 일반적으로 각 요청은 출력을 보낼 수 있는 시점에 active 된다. - ctx — HTTP 모듈 context 배열이다. 각 NGX_HTTP_MODULE 타입의 모듈은 request에 대한 값을 가지고 있다. 그 값에는 ctx array가 저장된다. 다음의 function들은 request context를 가져오고 세팅하는것을 위해 제공한다.
- ngx_http_get_module_ctx(r, module) — module's context 반환한다.
- ngx_http_set_ctx(r, c, module) — module's context를
c로 세팅한다.
- main_conf, srv_conf, loc_conf — request configuration 배열이다. configuration들에는 module의 ctx array가 저장되어져 있다.
- read_event_handler, write_event_handler - 요청에 대한 read and write event handler 이다. 일반적으로,
ngx_http_request_handler()에서 두 event handler를 세팅한다. 이 function은 현재 active request의 write/read handler를 호출한다. - cache — upstream 응답을 캐싱하기 위한 캐시 객체
- upstream — 프록싱을 위한 request upstream object
- pool — request pool 이다. 이 pool은 요청이 제거될때 지워진다. 요청객체는 스스로 이 pool에 할당되어진다. 클라이언트 커넥션 동안 사용할수 있어야하는 할당은
ngx_connection_t의 pool를 대신 사용해야한다.
-
header_in — buffer where client HTTP request header in read
-
headers_in, headers_out — input and output HTTP headers objects. Both objects contain the headers field of type ngx_list_t keeping the raw list of headers. In addition to that, specific headers are available for getting and setting as separate fields, for example content_length_n, status etc
-
request_body — 클라이언트 request body 객체
-
start_sec, start_msec — time point when the request was created. Used for tracking request duration
-
method, method_name — numeric and textual representation of client HTTP request method. Numeric values for methods are defined in src/http/ngx_http_request.h with macros NGX_HTTP_GET, NGX_HTTP_HEAD, NGX_HTTP_POST etc
-
http_protocol, http_version, http_major, http_minor - client HTTP protocol version in its original textual form (“HTTP/1.0”, “HTTP/1.1” etc), numeric form (NGX_HTTP_VERSION_10, NGX_HTTP_VERSION_11 etc) and separate major and minor versions
-
request_line, unparsed_uri — client original request line and URI
-
uri, args, exten — current request URI, arguments and file extention. The URI value here might differ from the original URI sent by the client due to normalization. Throughout request processing, these value can change while performing internal redirects
-
main — pointer to a main request object. This object is created to process client HTTP request, as opposed to subrequests, created to perform a specific sub-task within the main request
-
parent — pointer to a parent request of a subrequest
-
postponed — list of output buffers and subrequests in the order they are sent and created. The list is used by the postpone filter to provide consistent request output, when parts of it are created by subrequests
-
post_subrequest — pointer to a handler with context to be called when a subrequest gets finalized. Unused for main requests
-
posted_requests — list of requests to be started or resumed. Starting or resuming is done by calling the request's write_event_handler. Normally, this handler holds the request main function, which at first runs request phases and then produces the output.
A request is usually posted by the ngx_http_post_request(r, NULL) call. It is always posted to the main request posted_requests list. The function ngx_http_run_posted_requests(c) runs all requests, posted in the main request of the passed connection's active request. This function should be called in all event handlers, which can lead to new posted requests. Normally, it's called always after invoking a request's read or write handler
-
phase_handler — index of current request phase
-
ncaptures, captures, captures_data — regex captures produced by the last regex match of the request. While processing a request, there's a number of places where a regex match can happen: map lookup, server lookup by SNI or HTTP Host, rewrite, proxy_redirect etc. Captures produced by a lookup are stored in the above mentioned fields. The field ncaptures holds the number of captures, captures holds captures boundaries, captures_data holds a string, against which the regex was matched and which should be used to extract captures. After each new regex match request captures are reset to hold new values
-
count — request reference counter. The field only makes sense for the main request. Increasing the counter is done by simple r->main->count++. To decrease the counter ngx_http_finalize_request(r, rc) should be called. Creation of a subrequest or running request body read process increase the counter
-
subrequests — current subrequest nesting level. Each subrequest gets the nesting level of its parent decreased by one. Once the value reaches zero an error is generated. The value for the main request is defined by the NGX_HTTP_MAX_SUBREQUESTS constant
-
uri_changes — number of URI changes left for the request. The total number of times a request can change its URI is limited by the NGX_HTTP_MAX_URI_CHANGES constant. With each change the value is decreased until it reaches zero. In the latter case an error is generated. The actions considered as URI changes are rewrites and internal redirects to normal or named locations
-
blocked — counter of blocks held on the request. While this value is non-zero, request cannot be terminated. Currently, this value is increased by pending AIO operations (POSIX AIO and thread operations) and active cache lock
-
buffered — bitmask showing which modules have buffered the output produced by the request. A number of filters can buffer output, for example sub_filter can buffer data due to a partial string match, copy filter can buffer data because of the lack of free output_buffers etc. As long as this value is non-zero, request is not finalized, expecting the flush
-
header_only — flag showing that output does not require body. For example, this flag is used by HTTP HEAD requests
-
keepalive — flag showing if client connection keepalive is supported. The value is inferred from HTTP version and “Connection” header value
-
header_sent — flag showing that output header has already been sent by the request
-
internal — flag showing that current request is internal. To enter the internal state, a request should pass through an internal redirect or be a subrequest. Internal requests are allowed to enter internal locations
-
allow_ranges — flag showing that partial response can be sent to client, if requested by the HTTP Range header
-
subrequest_ranges — flag showing that a partial response is allowed to be sent while processing a subrequest
-
single_range — flag showing that only a single continuous range of output data can be sent to the client. This flag is usually set when sending a stream of data, for example from a proxied server, and the entire response is not available at once
-
main_filter_need_in_memory, filter_need_in_memory — flags showing that the output should be produced in memory buffers but not in files. This is a signal to the copy filter to read data from file buffers even if sendfile is enabled. The difference between these two flags is the location of filter modules which set them. Filters called before the postpone filter in filter chain, set filter_need_in_memory requesting that only the current request output should come in memory buffers. Filters called later in filter chain set main_filter_need_in_memory requiring that both the main request and all the subrequest read files in memory while sending output
-
filter_need_temporary — flag showing that the request output should be produced in temporary buffers, but not in readonly memory buffers or file buffers. This is used by filters which may change output directly in the buffers, where it's sent
HTTP module은 3가지 configuration을 가지고 있다.
- Main configuration : 이 configuration은 nginx http block 전체에 적용된다. global configuration으로, 모듈을 위한 global settings를 이곳에 정의한다.
- Server configuration : 이 configuration은 nginx 하나의 server block에 적용된다. server의 구체적인 settings를 위해서 사용한다.
- Location configuration : 이 configuration은 하나의 location/if/limit_except block에 적용된다. location의 settings를 위해서 사용된다.
- 이 configuration은 NGINX 구성단계에서 할당 및 초기화하고 병합하는 함수를 호출해서 생성된다. 다음 예에서는 location configuration을 구성하는 예제를 보여준다.
typedef struct {
    ngx_uint_t  foo;
} ngx_http_foo_loc_conf_t;


static ngx_http_module_t  ngx_http_foo_module_ctx = {
    NULL,                                  /* preconfiguration */
    NULL,                                  /* postconfiguration */

    NULL,                                  /* create main configuration */
    NULL,                                  /* init main configuration */

    NULL,                                  /* create server configuration */
    NULL,                                  /* merge server configuration */

    ngx_http_foo_create_loc_conf,          /* create location configuration */
    ngx_http_foo_merge_loc_conf            /* merge location configuration */
};


static void *
ngx_http_foo_create_loc_conf(ngx_conf_t *cf)
{
    ngx_http_foo_loc_conf_t  *conf;

    conf = ngx_pcalloc(cf->pool, sizeof(ngx_http_foo_loc_conf_t));
    if (conf == NULL) {
        return NULL;
    }

    conf->foo = NGX_CONF_UNSET_UINT;

    return conf;
}


static char *
ngx_http_foo_merge_loc_conf(ngx_conf_t *cf, void *parent, void *child)
{
    ngx_http_foo_loc_conf_t *prev = parent;
    ngx_http_foo_loc_conf_t *conf = child;

    ngx_conf_merge_uint_value(conf->foo, prev->foo, 1);
}
예제에서 보여진대로, ngx_http_foo_create_loc_conf() 는 새로운 configuration을 생성하고, ngx_http_foo_merge_loc_conf()는 더 상위 레벨(server/http)로부터 다른 configuration과 병합한다. 사실, server 와 location configuration은 server/location 레벨에 존재할뿐만 아니라, 위의 모든 레벨에 대해서도 만들어진다. 즉, 다시 말해서 server configuration는 main level에서도 만들어지며, location configuration은 server/main 과 또다른 location level에서도 만들어진다. 이러한 구성을 통해 nginx 구성 파일의 모든 수준에서 server 및 location 설정이 지정가능하다. 최종적으로는 모든 configuration들은 머지되어진다. 누락된 설정을 표시하고 병합하는 동안 이를 무시하기 위해 nginx는 NGX_CONF_UNSET 및 NGX_CONF_UNSET_UINT와 같은 여러 매크로를 제공합니다. ngx_conf_merge_value() 및 ngx_conf_merge_uint_value()와 같은 표준 nginx_value를 사용하여 병합하여 편리하게 설정할 수 있습니다. 다른 유형의 전체 매크로 목록은 src/core/ngx_conf_file.h를 참조하십시오.
configuration 타임에 HTTP 모듈 configuration에 접근하기 위해서, 다음의 function들이 사용가능하다.
- ngx_http_conf_get_module_main_conf(cf, module)
- ngx_http_conf_get_module_srv_conf(cf, module)
- ngx_http_conf_get_module_loc_conf(cf, module)
다음 예에서는 표준 nginx 코어 모듈 ngx_http_core_module의 location configuration에 대한 포인터를 가져오고 location content handler를 변경한다.
static ngx_int_t ngx_http_foo_handler(ngx_http_request_t *r);


static ngx_command_t  ngx_http_foo_commands[] = {

    { ngx_string("foo"),
      NGX_HTTP_LOC_CONF|NGX_CONF_NOARGS,
      ngx_http_foo,
      0,
      0,
      NULL },

      ngx_null_command
};


static char *
ngx_http_foo(ngx_conf_t *cf, ngx_command_t *cmd, void *conf)
{
    ngx_http_core_loc_conf_t  *clcf;

    clcf = ngx_http_conf_get_module_loc_conf(cf, ngx_http_core_module);
    clcf->handler = ngx_http_bar_handler;

    return NGX_CONF_OK;
}
runtime에도 다음 function을 사용하여, HTTP module configuration을 가져올 수 있다.
- ngx_http_get_module_main_conf(r, module)
- ngx_http_get_module_srv_conf(r, module)
- ngx_http_get_module_loc_conf(r, module)
이 function들은 ngx_http_request_t 의 참조(포인터)를 받는다. main configuration은 변경되지 않는다. server configuration은 request에 대한 virtual server 선택 이후에, default 값으로 변경되어질 수 있다. location configuration은 rewrite 또는 내부 redirect를 통해서 여러번 변경되어질 수 있다. 다음의 예는 HTTP configuration은 runtime에 접근할수 있는 방법을 보여준다.
static ngx_int_t
ngx_http_foo_handler(ngx_http_request_t *r)
{
    ngx_http_foo_loc_conf_t  *flcf;

    flcf = ngx_http_get_module_loc_conf(r, ngx_http_foo_module);

    ...
}
Each HTTP request passes through a list of HTTP phases. Each phase is specialized in a particular type of processing. Most phases allow installing handlers. The phase handlers are called successively once the request reaches the phase. Many standard nginx modules install their phase handlers as a way to get called at a specific request processing stage. Following is the list of nginx HTTP phases.
- NGX_HTTP_POST_READ_PHASE is the earliest phase. The ngx_http_realip_module installs its handler at this phase. This allows to substitute client address before any other module is invoked
- NGX_HTTP_SERVER_REWRITE_PHASE is used to run rewrite script, defined at the server level, that is out of any location block. The ngx_http_rewrite_module installs its handler at this phase
- NGX_HTTP_FIND_CONFIG_PHASE — a special phase used to choose a location based on request URI. This phase does not allow installing any handlers. It only performs the default action of choosing a location. Before this phase, the server default location is assigned to the request. Any module requesting a location configuration, will receive the default server location configuration. After this phase a new location is assigned to the request
- NGX_HTTP_REWRITE_PHASE — same as NGX_HTTP_SERVER_REWRITE_PHASE, but for a new location, chosen at the prevous phase
- NGX_HTTP_POST_REWRITE_PHASE — a special phase, used to redirect the request to a new location, if the URI was changed during rewrite. The redirect is done by going back to NGX_HTTP_FIND_CONFIG_PHASE. No handlers are allowed at this phase
- NGX_HTTP_PREACCESS_PHASE — a common phase for different types of handlers, not associated with access check. Standard nginx modules ngx_http_limit_conn_module and ngx_http_limit_req_module register their handlers at this phase
- NGX_HTTP_ACCESS_PHASE — used to check access permissions for the request. Standard nginx modules such as ngx_http_access_module and ngx_http_auth_basic_module register their handlers at this phase. If configured so by the satisfy directive, only one of access phase handlers may allow access to the request in order to confinue processing
- NGX_HTTP_POST_ACCESS_PHASE — a special phase for the satisfy any case. If some access phase handlers denied the access and none of them allowed, the request is finalized. No handlers are supported at this phase
- NGX_HTTP_TRY_FILES_PHASE — a special phase, for the try_files feature. No handlers are allowed at this phase
- NGX_HTTP_CONTENT_PHASE — a phase, at which the response is supposed to be generated. Multiple nginx standard modules register their handers at this phase, for example ngx_http_index_module or ngx_http_static_module. All these handlers are called sequentially until one of them finally produces the output. It's also possible to set content handlers on a per-location basis. If the ngx_http_core_module's location configuration has handler set, this handler is called as the content handler and content phase handlers are ignored
- NGX_HTTP_LOG_PHASE is used to perform request logging. Currently, only the ngx_http_log_module registers its handler at this stage for access logging. Log phase handlers are called at the very end of request processing, right before freeing the request
Following is the example of a preaccess phase handler.
static ngx_http_module_t  ngx_http_foo_module_ctx = {
    NULL,                                  /* preconfiguration */
    ngx_http_foo_init,                     /* postconfiguration */

    NULL,                                  /* create main configuration */
    NULL,                                  /* init main configuration */

    NULL,                                  /* create server configuration */
    NULL,                                  /* merge server configuration */

    NULL,                                  /* create location configuration */
    NULL                                   /* merge location configuration */
};


static ngx_int_t
ngx_http_foo_handler(ngx_http_request_t *r)
{
    ngx_str_t  *ua;

    ua = r->headers_in->user_agent;

    if (ua == NULL) {
        return NGX_DECLINED;
    }

    /* reject requests with "User-Agent: foo" */
    if (ua->value.len == 3 && ngx_strncmp(ua->value.data, "foo", 3) == 0) {
        return NGX_HTTP_FORBIDDEN;
    }

    return NGX_DECLINED;
}


static ngx_int_t
ngx_http_foo_init(ngx_conf_t *cf)
{
    ngx_http_handler_pt        *h;
    ngx_http_core_main_conf_t  *cmcf;

    cmcf = ngx_http_conf_get_module_main_conf(cf, ngx_http_core_module);

    h = ngx_array_push(&cmcf->phases[NGX_HTTP_PREACCESS_PHASE].handlers);
    if (h == NULL) {
        return NGX_ERROR;
    }

    *h = ngx_http_foo_handler;

    return NGX_OK;
}
Phase handlers are expected to return specific codes:
- NGX_OK — proceed to the next phase
- NGX_DECLINED — proceed to the next handler of the current phase. If current handler is the last in current phase, move to the next phase
- NGX_AGAIN, NGX_DONE — suspend phase handling until some future event. This can be for example asynchronous I/O operation or just a delay. It is supposed, that phase handling will be resumed later by calling ngx_http_core_run_phases()
- Any other value returned by the phase handler is treated as a request finalization code, in particular, HTTP response code. The request is finalized with the code provided
Some phases treat return codes in a slightly different way. At content phase, any return code other that NGX_DECLINED is considered a finalization code. As for the location content handlers, any return from them is considered a finalization code. At access phase, in satisfy any mode, returning a code other than NGX_OK, NGX_DECLINED, NGX_AGAIN, NGX_DONE is considered a denial. If none of future access handlers allow access or deny with a new code, the denial code will become the finalization code.
Variables may be referenced using index (this is the most common method) or names (see below in the section about creating variables). Index is created at configuration stage, when a variable is added to configuration. The variable index can be obtained using ngx_http_get_variable_index():
ngx_str_t  name;  /* ngx_string("foo") */
ngx_int_t  index;

index = ngx_http_get_variable_index(cf, &name);
Here, the cf is a pointer to nginx configuration and the name points to a string with the variable name. The function returns NGX_ERROR on error or valid index otherwise, which is typically stored somewhere in a module configuration for future use.
All HTTP variables are evaluated in the context of HTTP request and results are specific to and cached in HTTP request. All functions that evaluate variables return ngx_http_variable_value_t type, representing the variable value:
typedef ngx_variable_value_t  ngx_http_variable_value_t;

typedef struct {
    unsigned    len:28;

    unsigned    valid:1;
    unsigned    no_cacheable:1;
    unsigned    not_found:1;
    unsigned    escape:1;

    u_char     *data;
} ngx_variable_value_t;
where:
- len — length of a value
- data — value itself
- valid — value is valid
- not_found — variable was not found and thus the data and len fields are irrelevant; this may happen, for example, with such variables as $arg_foo when a corresponding argument was not passed in a request
- no_cacheable — do not cache result
- escape — used internally by the logging module to mark values that require escaping on output
The ngx_http_get_flushed_variable() and ngx_http_get_indexed_variable() functions are used to obtain the variable value. They have the same interface - accepting a HTTP request r as a context for evaluating the variable and an index, identifying it. Example of typical usage:
ngx_http_variable_value_t  *v;

v = ngx_http_get_flushed_variable(r, index);

if (v == NULL || v->not_found) {
    /* we failed to get value or there is no such variable, handle it */
    return NGX_ERROR;
}

/* some meaningful value is found */
The difference between functions is that the ngx_http_get_indexed_variable() returns cached value and ngx_http_get_flushed_variable() flushes cache for non-cacheable variables.
There are cases when it is required to deal with variables which names are not known at configuration time and thus they cannot be accessed using indexes, for example in modules like SSI or Perl. The ngx_http_get_variable(r, name, key) function may be used in such cases. It searches for the variable with a given name and its hash key.
To create a variable ngx_http_add_variable() function is used. It takes configuration (where variable is registered), variable name and flags that control its behaviour:
- NGX_HTTP_VAR_CHANGEABLE — allows redefining the variable; If another module will define a variable with such name, no conflict will happen. For example, this allows user to override variables using the set directive.
- NGX_HTTP_VAR_NOCACHEABLE — disables caching, is useful for such variables as $time_local
- NGX_HTTP_VAR_NOHASH — indicates that this variable is only accessible by index, not by name. This is a small optimization which may be used when it is known that the variable is not needed in modules like SSI or Perl.
- NGX_HTTP_VAR_PREFIX — the name of this variable is a prefix. A handler must implement additional logic to obtain value of specific variable. For example, all “arg_” variables are processed by the same handler which performs lookup in request arguments and returns value of specific argument.
The function returns NULL in case of error or a pointer to ngx_http_variable_t:
struct ngx_http_variable_s {
    ngx_str_t                     name;
    ngx_http_set_variable_pt      set_handler;
    ngx_http_get_variable_pt      get_handler;
    uintptr_t                     data;
    ngx_uint_t                    flags;
    ngx_uint_t                    index;
};
The get and set handlers are called to obtain or set the variable value, data will be passed to variable handlers, index will hold assigned variable index, used to reference the variable.
Usually, a null-terminated static array of such structures is created by a module and processed at the preconfiguration stage to add variables into configuration:
static ngx_http_variable_t  ngx_http_foo_vars[] = {

    { ngx_string("foo_v1"), NULL, ngx_http_foo_v1_variable, NULL, 0, 0 },

    { ngx_null_string, NULL, NULL, 0, 0, 0 }
};

static ngx_int_t
ngx_http_foo_add_variables(ngx_conf_t *cf)
{
    ngx_http_variable_t  *var, *v;

    for (v = ngx_http_foo_vars; v->name.len; v++) {
        var = ngx_http_add_variable(cf, &v->name, v->flags);
        if (var == NULL) {
            return NGX_ERROR;
        }

        var->get_handler = v->get_handler;
        var->data = v->data;
    }

    return NGX_OK;
}
This function is used to initialize the preconfiguration field of the HTTP module context and is called before parsing HTTP configuration, so it could refer to these variables.
The get handler is responsible for evaluating the variable in a context of specific request, for example:
static ngx_int_t
ngx_http_variable_connection(ngx_http_request_t *r,
    ngx_http_variable_value_t *v, uintptr_t data)
{
    u_char  *p;

    p = ngx_pnalloc(r->pool, NGX_ATOMIC_T_LEN);
    if (p == NULL) {
        return NGX_ERROR;
    }

    v->len = ngx_sprintf(p, "%uA", r->connection->number) - p;
    v->valid = 1;
    v->no_cacheable = 0;
    v->not_found = 0;
    v->data = p;

    return NGX_OK;
}
It returns NGX_ERROR in case of internal error (for example, failed memory allocation) or NGX_OK otherwise. The status of variable evaluation may be understood by inspecting flags of the ngx_http_variable_value_t (see description above).
The set handler allows setting the property referred by the variable. For example, the $limit_rate variable set handler modifies the request's limit_rate field:
...
{ ngx_string("limit_rate"), ngx_http_variable_request_set_size,
  ngx_http_variable_request_get_size,
  offsetof(ngx_http_request_t, limit_rate),
  NGX_HTTP_VAR_CHANGEABLE|NGX_HTTP_VAR_NOCACHEABLE, 0 },
...

static void
ngx_http_variable_request_set_size(ngx_http_request_t *r,
    ngx_http_variable_value_t *v, uintptr_t data)
{
    ssize_t    s, *sp;
    ngx_str_t  val;

    val.len = v->len;
    val.data = v->data;

    s = ngx_parse_size(&val);

    if (s == NGX_ERROR) {
        ngx_log_error(NGX_LOG_ERR, r->connection->log, 0,
                      "invalid size \"%V\"", &val);
        return;
    }

    sp = (ssize_t *) ((char *) r + data);

    *sp = s;

    return;
}
A complex value, despite its name, provides an easy way to evaluate expressions that may contain text, variables, and their combination.
The complex value description in ngx_http_compile_complex_value is compiled at the configuration stage into ngx_http_complex_value_t which is used at runtime to obtain evaluated expression results.
ngx_str_t                         *value;
ngx_http_complex_value_t           cv;
ngx_http_compile_complex_value_t   ccv;

value = cf->args->elts; /* directive arguments */

ngx_memzero(&ccv, sizeof(ngx_http_compile_complex_value_t));

ccv.cf = cf;
ccv.value = &value[1];
ccv.complex_value = &cv;
ccv.zero = 1;
ccv.conf_prefix = 1;

if (ngx_http_compile_complex_value(&ccv) != NGX_OK) {
    return NGX_CONF_ERROR;
}
Here, ccv holds all parameters that are required to initialize the complex value cv:
- cf — configuration pointer
- value — string for parsing (input)
- complex_value — compiled value (output)
- zero — flag that enables zero-terminating value
- conf_prefix — prefixes result with configuration prefix (the directory where nginx is currently looking for configuration)
- root_prefix — prefixes result with root prefix (this is the normal nginx installation prefix)
The zero flag is usable when results are to be passed to libraries that require zero-terminated strings, and prefixes are handy when dealing with filenames.
Upon successful compilation, cv.lengths may be inspected to get information about the presence of variables in the expression. The NULL value means that the expression contained static text only, and there is no need in storing it as a complex value, so a simple string can be used.
The ngx_http_set_complex_value_slot() is a convenient function used to initialize complex value completely right in the directive declaration.
At runtime, a complex value may be calculated using the ngx_http_complex_value() function:
ngx_str_t  res;

if (ngx_http_complex_value(r, &cv, &res) != NGX_OK) {
    return NGX_ERROR;
}
Given the request r and previously compiled value cv the function will evaluate expression and put result into res.
An HTTP request is always connected to a location via the loc_conf field of the ngx_http_request_t structure. This means that at any point the location configuration of any module can be retrieved from the request by calling ngx_http_get_module_loc_conf(r, module). Request location may be changed several times throughout its lifetime. Initially, a default server location of the default server is assigned to a request. Once a request switches to a different server (chosen by the HTTP “Host” header or SSL SNI extension), the request switches to the default location of that server as well. The next change of the location takes place at the NGX_HTTP_FIND_CONFIG_PHASE request phase. At this phase a location is chosen by request URI among all non-named locations configured for the server. The ngx_http_rewrite_module may change the request URI at the NGX_HTTP_REWRITE_PHASE request phase as a result of rewrite and return to the NGX_HTTP_FIND_CONFIG_PHASE phase for choosing a new location based on the new URI.
It is also possible to redirect a request to a new location at any point by calling one of the functions ngx_http_internal_redirect(r, uri, args) or ngx_http_named_location(r, name).
The function ngx_http_internal_redirect(r, uri, args) changes the request URI and returns the request to the NGX_HTTP_SERVER_REWRITE_PHASE phase. The request proceeds with a server default location. Later at NGX_HTTP_FIND_CONFIG_PHASE a new location is chosen based on the new request URI.
The following example performs an internal redirect with the new request arguments.
ngx_int_t
ngx_http_foo_redirect(ngx_http_request_t *r)
{
    ngx_str_t  uri, args;

    ngx_str_set(&uri, "/foo");
    ngx_str_set(&args, "bar=1");

    return ngx_http_internal_redirect(r, &uri, &args);
}
The function ngx_http_named_location(r, name) redirects a request to a named location. The name of the location is passed as the argument. The location is looked up among all named locations of the current server, after which the requests switches to the NGX_HTTP_REWRITE_PHASE phase.
The following example performs a redirect to a named location @foo.
ngx_int_t
ngx_http_foo_named_redirect(ngx_http_request_t *r)
{
    ngx_str_t  name;

    ngx_str_set(&name, "foo");

    return ngx_http_named_location(r, &name);
}
Both functions ngx_http_internal_redirect(r, uri, args) and ngx_http_named_location(r, name) may be called when a request already has some contexts saved in its ctx field by nginx modules. These contexts could become inconsistent with the new location configuration. To prevent inconsistency, all request contexts are erased by both redirect functions.
Redirected and rewritten requests become internal and may access the internal locations. Internal requests have the internal flag set.
Subrequests are primarily used to include output of one request into another, possibly mixed with other data. A subrequest looks like a normal request, but shares some data with its parent. Particularly, all fields related to client input are shared since a subrequest does not receive any other input from client. The request field parent for a subrequest keeps a link to its parent request and is NULL for the main request. The field main keeps a link to the main request in a group of requests.
A subrequest starts with NGX_HTTP_SERVER_REWRITE_PHASE phase. It passes through the same phases as a normal request and is assigned a location based on its own URI.
Subrequest output header is always ignored. Subrequest output body is placed by the ngx_http_postpone_filter into the right position in relation to other data produced by the parent request.
Subrequests are related to the concept of active requests. A request r is considered active if c->data == r, where c is the client connection object. At any point, only the active request in a request group is allowed to output its buffers to the client. A non-active request can still send its data to the filter chain, but they will not pass beyond the ngx_http_postpone_filter and will remain buffered by that filter until the request becomes active. Here are some rules of request activation:
- Initially, the main request is active
- The first subrequest of an active request becomes active right after creation
- The ngx_http_postpone_filter activates the next request in active request's subrequest list, once all data prior to that request are sent
- When a request is finalized, its parent is activated
A subrequest is created by calling the function ngx_http_subrequest(r, uri, args, psr, ps, flags), where r is the parent request, uri and args are URI and arguments of the subrequest, psr is the output parameter, receiving the newly created subrequest reference, ps is a callback object for notifying the parent request that the subrequest is being finalized, flags is subrequest creation flags bitmask. The following flags are available:
- NGX_HTTP_SUBREQUEST_IN_MEMORY - subrequest output should not be sent to the client, but rather stored in memory. This only works for proxying subrequests. After subrequest finalization its output is available in r->upstream->buffer buffer of type ngx_buf_t
- NGX_HTTP_SUBREQUEST_WAITED - the subrequest done flag is set even if it is finalized being non-active. This subrequest flag is used by the SSI filter
- NGX_HTTP_SUBREQUEST_CLONE - the subrequest is created as a clone of its parent. It is started at the same location and proceeds from the same phase as the parent request
The following example creates a subrequest with the URI of "/foo".
ngx_int_t            rc;
ngx_str_t            uri;
ngx_http_request_t  *sr;

...

ngx_str_set(&uri, "/foo");

rc = ngx_http_subrequest(r, &uri, NULL, &sr, NULL, 0);
if (rc == NGX_ERROR) {
    /* error */
}
This example clones the current request and sets a finalization callback for the subrequest.
ngx_int_t
ngx_http_foo_clone(ngx_http_request_t *r)
{
    ngx_http_request_t          *sr;
    ngx_http_post_subrequest_t  *ps;

    ps = ngx_palloc(r->pool, sizeof(ngx_http_post_subrequest_t));
    if (ps == NULL) {
        return NGX_ERROR;
    }

    ps->handler = ngx_http_foo_subrequest_done;
    ps->data = "foo";

    return ngx_http_subrequest(r, &r->uri, &r->args, &sr, ps,
                               NGX_HTTP_SUBREQUEST_CLONE);
}


ngx_int_t
ngx_http_foo_subrequest_done(ngx_http_request_t *r, void *data, ngx_int_t rc)
{
    char  *msg = (char *) data;

    ngx_log_error(NGX_LOG_INFO, r->connection->log, 0,
                  "done subrequest r:%p msg:%s rc:%i", r, msg, rc);

    return rc;
}
Subrequests are normally created in a body filter. In this case subrequest output can be treated as any other explicit request output. This means that eventually the output of a subrequest is sent to the client after all explicit buffers passed prior to subrequest creation and before any buffers passed later. This ordering is preserved even for large hierarchies of subrequests. The following example inserts a subrequest output after all request data buffers, but before the final buffer with the last_buf flag.
ngx_int_t
ngx_http_foo_body_filter(ngx_http_request_t *r, ngx_chain_t *in)
{
    ngx_int_t                   rc;
    ngx_buf_t                  *b;
    ngx_uint_t                  last;
    ngx_chain_t                *cl, out;
    ngx_http_request_t         *sr;
    ngx_http_foo_filter_ctx_t  *ctx;

    ctx = ngx_http_get_module_ctx(r, ngx_http_foo_filter_module);
    if (ctx == NULL) {
        return ngx_http_next_body_filter(r, in);
    }

    last = 0;

    for (cl = in; cl; cl = cl->next) {
        if (cl->buf->last_buf) {
            cl->buf->last_buf = 0;
            cl->buf->last_in_chain = 1;
            cl->buf->sync = 1;
            last = 1;
        }
    }

    /* Output explicit output buffers */

    rc = ngx_http_next_body_filter(r, in);

    if (rc == NGX_ERROR || !last) {
        return rc;
    }

    /*
     * Create the subrequest.  The output of the subrequest
     * will automatically be sent after all preceding buffers,
     * but before the last_buf buffer passed later in this function.
     */

    if (ngx_http_subrequest(r, ctx->uri, NULL, &sr, NULL, 0) != NGX_OK) {
        return NGX_ERROR;
    }

    ngx_http_set_ctx(r, NULL, ngx_http_foo_filter_module);


    /* Output the final buffer with the last_buf flag */

    b = ngx_calloc_buf(r->pool);
    if (b == NULL) {
        return NGX_ERROR;
    }

    b->last_buf = 1;

    out.buf = b;
    out.next = NULL;

    return ngx_http_output_filter(r, &out);
}
A subrequest may also be created for other purposes than data output. For example, the ngx_http_auth_request_module creates a subrequest at NGX_HTTP_ACCESS_PHASE phase. To disable any output at this point, the subrequest header_only flag is set. This prevents subrequest body from being sent to the client. Its header is ignored anyway. The result of the subrequest can be analyzed in the callback handler.
An HTTP request is finalized by calling the function ngx_http_finalize_request(r, rc). It is usually finalized by the content handler after sending all output buffers to the filter chain. At this point the output may not be completely sent to the client, but remain buffered somewhere along the filter chain. If it is, the ngx_http_finalize_request(r, rc) function will automatically install a special handler ngx_http_writer(r) to finish sending the output. A request is also finalized in case of an error or if a standard HTTP response code needs to be returned to the client.
The function ngx_http_finalize_request(r, rc) expects the following rc values:
- NGX_DONE - fast finalization. Decrement request count and destroy the request if it reaches zero. The client connection may still be used for more requests after that
- NGX_ERROR, NGX_HTTP_REQUEST_TIME_OUT (408), NGX_HTTP_CLIENT_CLOSED_REQUEST (499) - error finalization. Terminate the request as soon as possible and close the client connection.
- NGX_HTTP_CREATED (201), NGX_HTTP_NO_CONTENT (204), codes greater than or equal to NGX_HTTP_SPECIAL_RESPONSE (300) - special response finalization. For these values nginx either sends a default code response page to the client or performs the internal redirect to an error_page location if it's configured for the code
- Other codes are considered success finalization codes and may activate the request writer to finish sending the response body. Once body is completely sent, request count is decremented. If it reaches zero, the request is destroyed, but the client connection may still be used for other requests. If count is positive, there are unfinished activities within the request, which will be finalized at a later point.
For dealing with client request body, nginx provides the following functions: ngx_http_read_client_request_body(r, post_handler) and ngx_http_discard_request_body(r). The first function reads the request body and makes it available via the request_body request field. The second function instructs nginx to discard (read and ignore) the request body. One of these functions must be called for every request. Normally, it is done in the content handler.
Reading or discarding client request body from a subrequest is not allowed. It should always be done in the main request. When a subrequest is created, it inherits the parent request_body object which can be used by the subrequest if the main request has previously read the request body.
The function ngx_http_read_client_request_body(r, post_handler) starts the process of reading the request body. When the body is completely read, the post_handler callback is called to continue processing the request. If request body is missing or already read, the callback is called immediately. The function ngx_http_read_client_request_body(r, post_handler) allocates the request_body request field of type ngx_http_request_body_t. The field bufs of this object keeps the result as a buffer chain. The body can be saved in memory buffers or file buffers, if client_body_buffer_size is not enough to fit the entire body in memory.
The following example reads client request body and returns its size.
ngx_int_t
ngx_http_foo_content_handler(ngx_http_request_t *r)
{
    ngx_int_t  rc;

    rc = ngx_http_read_client_request_body(r, ngx_http_foo_init);

    if (rc >= NGX_HTTP_SPECIAL_RESPONSE) {
        /* error */
        return rc;
    }

    return NGX_DONE;
}


void
ngx_http_foo_init(ngx_http_request_t *r)
{
    off_t         len;
    ngx_buf_t    *b;
    ngx_int_t     rc;
    ngx_chain_t  *in, out;

    if (r->request_body == NULL) {
        ngx_http_finalize_request(r, NGX_HTTP_INTERNAL_SERVER_ERROR);
        return;
    }

    len = 0;

    for (in = r->request_body->bufs; in; in = in->next) {
        len += ngx_buf_size(in->buf);
    }

    b = ngx_create_temp_buf(r->pool, NGX_OFF_T_LEN);
    if (b == NULL) {
        ngx_http_finalize_request(r, NGX_HTTP_INTERNAL_SERVER_ERROR);
        return;
    }

    b->last = ngx_sprintf(b->pos, "%O", len);
    b->last_buf = (r == r->main) ? 1: 0;
    b->last_in_chain = 1;

    r->headers_out.status = NGX_HTTP_OK;
    r->headers_out.content_length_n = b->last - b->pos;

    rc = ngx_http_send_header(r);

    if (rc == NGX_ERROR || rc > NGX_OK || r->header_only) {
        ngx_http_finalize_request(r, rc);
        return;
    }

    out.buf = b;
    out.next = NULL;

    rc = ngx_http_output_filter(r, &out);

    ngx_http_finalize_request(r, rc);
}
The following fields of the request affect the way request body is read:
- request_body_in_single_buf - read body to a single memory buffer
- request_body_in_file_only - always read body to a file, even if fits the memory buffer
- request_body_in_persistent_file - do not unlink the file right after creation. Such a file can be moved to another directory
- request_body_in_clean_file - unlink the file the when the request is finalized. This can be useful when a file was supposed to be moved to another directory but eventually was not moved for some reason
- request_body_file_group_access - enable file group access. By default a file is created with 0600 access mask. When the flag is set, 0660 access mask is used
- request_body_file_log_level - log file errors with this log level
- request_body_no_buffering - read request body without buffering
When the request_body_no_buffering flag is set, the unbuffered mode of reading the request body is enabled. In this mode, after calling ngx_http_read_client_request_body(), the bufs chain may keep only a part of the body. To read the next part, the ngx_http_read_unbuffered_request_body(r) function should be called. The return value of NGX_AGAIN and the request flag reading_body indicate that more data is available. If bufs is NULL after calling this function, there is nothing to read at the moment. The request callback read_event_handler will be called when the next part of request body is available.
An HTTP response in nginx is produced by sending the response header followed by the optional response body. Both header and body are passed through a chain of filters and eventually get written to the client socket. An nginx module can install its handler into the header or body filter chain and process the output coming from the previous handler.
Output header is sent by the function ngx_http_send_header(r). Prior to calling this function, r->headers_out should contain all the data required to produce the HTTP response header. It's always required to set the status field of r->headers_out. If the response status suggests that a response body follows the header, content_length_n can be set as well. The default value for this field is -1, which means that the body size is unknown. In this case, chunked transfer encoding is used. To output an arbitrary header, headers list should be appended.
static ngx_int_t
ngx_http_foo_content_handler(ngx_http_request_t *r)
{
    ngx_int_t         rc;
    ngx_table_elt_t  *h;

    /* send header */

    r->headers_out.status = NGX_HTTP_OK;
    r->headers_out.content_length_n = 3;

    /* X-Foo: foo */

    h = ngx_list_push(&r->headers_out.headers);
    if (h == NULL) {
        return NGX_ERROR;
    }

    h->hash = 1;
    ngx_str_set(&h->key, "X-Foo");
    ngx_str_set(&h->value, "foo");

    rc = ngx_http_send_header(r);

    if (rc == NGX_ERROR || rc > NGX_OK || r->header_only) {
        return rc;
    }

    /* send body */

    ...
}
The ngx_http_send_header(r) function invokes the header filter chain by calling the top header filter handler ngx_http_top_header_filter. It's assumed that every header handler calls the next handler in chain until the final handler ngx_http_header_filter(r) is called. The final header handler constructs the HTTP response based on r->headers_out and passes it to the ngx_http_writer_filter for output.
To add a handler to the header filter chain, one should store its address in ngx_http_top_header_filter global variable at configuration time. The previous handler address is normally stored in a module's static variable and is called by the newly added handler before exiting.
The following is an example header filter module, adding the HTTP header "X-Foo: foo" to every output with the status 200.
#include <ngx_config.h>
#include <ngx_core.h>
#include <ngx_http.h>


static ngx_int_t ngx_http_foo_header_filter(ngx_http_request_t *r);
static ngx_int_t ngx_http_foo_header_filter_init(ngx_conf_t *cf);


static ngx_http_module_t  ngx_http_foo_header_filter_module_ctx = {
    NULL,                                   /* preconfiguration */
    ngx_http_foo_header_filter_init,        /* postconfiguration */

    NULL,                                   /* create main configuration */
    NULL,                                   /* init main configuration */

    NULL,                                   /* create server configuration */
    NULL,                                   /* merge server configuration */

    NULL,                                   /* create location configuration */
    NULL                                    /* merge location configuration */
};


ngx_module_t  ngx_http_foo_header_filter_module = {
    NGX_MODULE_V1,
    &ngx_http_foo_header_filter_module_ctx, /* module context */
    NULL,                                   /* module directives */
    NGX_HTTP_MODULE,                        /* module type */
    NULL,                                   /* init master */
    NULL,                                   /* init module */
    NULL,                                   /* init process */
    NULL,                                   /* init thread */
    NULL,                                   /* exit thread */
    NULL,                                   /* exit process */
    NULL,                                   /* exit master */
    NGX_MODULE_V1_PADDING
};


static ngx_http_output_header_filter_pt  ngx_http_next_header_filter;


static ngx_int_t
ngx_http_foo_header_filter(ngx_http_request_t *r)
{
    ngx_table_elt_t  *h;

    /*
     * The filter handler adds "X-Foo: foo" header
     * to every HTTP 200 response
     */

    if (r->headers_out.status != NGX_HTTP_OK) {
        return ngx_http_next_header_filter(r);
    }

    h = ngx_list_push(&r->headers_out.headers);
    if (h == NULL) {
        return NGX_ERROR;
    }

    h->hash = 1;
    ngx_str_set(&h->key, "X-Foo");
    ngx_str_set(&h->value, "foo");

    return ngx_http_next_header_filter(r);
}


static ngx_int_t
ngx_http_foo_header_filter_init(ngx_conf_t *cf)
{
    ngx_http_next_header_filter = ngx_http_top_header_filter;
    ngx_http_top_header_filter = ngx_http_foo_header_filter;

    return NGX_OK;
}
Response body is sent by calling the function ngx_http_output_filter(r, cl). The function can be called multiple times. Each time it sends a part of the response body passed as a buffer chain. The last body buffer should have the last_buf flag set.
The following example produces a complete HTTP output with "foo" as its body. In order for the example to work not only as a main request but as a subrequest as well, the last_in_chain flag is set in the last buffer of the output. The last_buf flag is set only for the main request since a subrequest's last buffers does not end the entire output.
static ngx_int_t
ngx_http_bar_content_handler(ngx_http_request_t *r)
{
    ngx_int_t     rc;
    ngx_buf_t    *b;
    ngx_chain_t   out;

    /* send header */

    r->headers_out.status = NGX_HTTP_OK;
    r->headers_out.content_length_n = 3;

    rc = ngx_http_send_header(r);

    if (rc == NGX_ERROR || rc > NGX_OK || r->header_only) {
        return rc;
    }

    /* send body */

    b = ngx_calloc_buf(r->pool);
    if (b == NULL) {
        return NGX_ERROR;
    }

    b->last_buf = (r == r->main) ? 1: 0;
    b->last_in_chain = 1;

    b->memory = 1;

    b->pos = (u_char *) "foo";
    b->last = b->pos + 3;

    out.buf = b;
    out.next = NULL;

    return ngx_http_output_filter(r, &out);
}
The function ngx_http_output_filter(r, cl) invokes the body filter chain by calling the top body filter handler ngx_http_top_body_filter. It's assumed that every body handler calls the next handler in chain until the final handler ngx_http_write_filter(r, cl) is called.
A body filter handler receives a chain of buffers. The handler is supposed to process the buffers and pass a possibly new chain to the next handler. It's worth noting that the chain links ngx_chain_t of the incoming chain belong to the caller. They should never be reused or changed. Right after the handler completes, the caller can use its output chain links to keep track of the buffers it has sent. To save the buffer chain or to substitute some buffers before sending further, a handler should allocate its own chain links.
Following is the example of a simple body filter counting the number of body bytes. The result is available as the $counter variable which can be used in the access log.
#include <ngx_config.h>
#include <ngx_core.h>
#include <ngx_http.h>


typedef struct {
    off_t  count;
} ngx_http_counter_filter_ctx_t;


static ngx_int_t ngx_http_counter_body_filter(ngx_http_request_t *r,
    ngx_chain_t *in);
static ngx_int_t ngx_http_counter_variable(ngx_http_request_t *r,
    ngx_http_variable_value_t *v, uintptr_t data);
static ngx_int_t ngx_http_counter_add_variables(ngx_conf_t *cf);
static ngx_int_t ngx_http_counter_filter_init(ngx_conf_t *cf);


static ngx_http_module_t  ngx_http_counter_filter_module_ctx = {
    ngx_http_counter_add_variables,        /* preconfiguration */
    ngx_http_counter_filter_init,          /* postconfiguration */

    NULL,                                  /* create main configuration */
    NULL,                                  /* init main configuration */

    NULL,                                  /* create server configuration */
    NULL,                                  /* merge server configuration */

    NULL,                                  /* create location configuration */
    NULL                                   /* merge location configuration */
};


ngx_module_t  ngx_http_counter_filter_module = {
    NGX_MODULE_V1,
    &ngx_http_counter_filter_module_ctx,   /* module context */
    NULL,                                  /* module directives */
    NGX_HTTP_MODULE,                       /* module type */
    NULL,                                  /* init master */
    NULL,                                  /* init module */
    NULL,                                  /* init process */
    NULL,                                  /* init thread */
    NULL,                                  /* exit thread */
    NULL,                                  /* exit process */
    NULL,                                  /* exit master */
    NGX_MODULE_V1_PADDING
};


static ngx_http_output_body_filter_pt  ngx_http_next_body_filter;

static ngx_str_t  ngx_http_counter_name = ngx_string("counter");


static ngx_int_t
ngx_http_counter_body_filter(ngx_http_request_t *r, ngx_chain_t *in)
{
    ngx_chain_t                    *cl;
    ngx_http_counter_filter_ctx_t  *ctx;

    ctx = ngx_http_get_module_ctx(r, ngx_http_counter_filter_module);
    if (ctx == NULL) {
        ctx = ngx_pcalloc(r->pool, sizeof(ngx_http_counter_filter_ctx_t));
        if (ctx == NULL) {
            return NGX_ERROR;
        }

        ngx_http_set_ctx(r, ctx, ngx_http_counter_filter_module);
    }

    for (cl = in; cl; cl = cl->next) {
        ctx->count += ngx_buf_size(cl->buf);
    }

    return ngx_http_next_body_filter(r, in);
}


static ngx_int_t
ngx_http_counter_variable(ngx_http_request_t *r, ngx_http_variable_value_t *v,
    uintptr_t data)
{
    u_char                         *p;
    ngx_http_counter_filter_ctx_t  *ctx;

    ctx = ngx_http_get_module_ctx(r, ngx_http_counter_filter_module);
    if (ctx == NULL) {
        v->not_found = 1;
        return NGX_OK;
    }

    p = ngx_pnalloc(r->pool, NGX_OFF_T_LEN);
    if (p == NULL) {
        return NGX_ERROR;
    }

    v->data = p;
    v->len = ngx_sprintf(p, "%O", ctx->count) - p;
    v->valid = 1;
    v->no_cacheable = 0;
    v->not_found = 0;

    return NGX_OK;
}


static ngx_int_t
ngx_http_counter_add_variables(ngx_conf_t *cf)
{
    ngx_http_variable_t  *var;

    var = ngx_http_add_variable(cf, &ngx_http_counter_name, 0);
    if (var == NULL) {
        return NGX_ERROR;
    }

    var->get_handler = ngx_http_counter_variable;

    return NGX_OK;
}


static ngx_int_t
ngx_http_counter_filter_init(ngx_conf_t *cf)
{
    ngx_http_next_body_filter = ngx_http_top_body_filter;
    ngx_http_top_body_filter = ngx_http_counter_body_filter;

    return NGX_OK;
}
When writing a body or header filter, a special care should be taken of the filters order. There's a number of header and body filters registered by nginx standard modules. It's important to register a filter module in the right place in respect to other filters. Normally, filters are registered by modules in their postconfiguration handlers. The order in which filters are called is obviously the reverse of when they are registered.
A special slot HTTP_AUX_FILTER_MODULES for third-party filter modules is provided by nginx. To register a filter module in this slot, the ngx_module_type variable should be set to the value of HTTP_AUX_FILTER in module's configuration.
The following example shows a filter module config file assuming it only has one source file ngx_http_foo_filter_module.c
ngx_module_type=HTTP_AUX_FILTER
ngx_module_name=ngx_http_foo_filter_module
ngx_module_srcs="$ngx_addon_dir/ngx_http_foo_filter_module.c"

. auto/module
When issuing or altering a stream of buffers, it's often desirable to reuse the allocated buffers. A standard approach widely adopted in nginx code is to keep two buffer chains for this purpose: free and busy. The free chain keeps all free buffers. These buffers can be reused. The busy chain keeps all buffers sent by the current module which are still in use by some other filter handler. A buffer is considered in use if its size is greater than zero. Normally, when a buffer is consumed by a filter, its pos (or file_pos for a file buffer) is moved towards last (file_last for a file buffer). Once a buffer is completely consumed, it's ready to be reused. To update the free chain with newly freed buffers, it's enough to iterate over the busy chain and move the zero size buffers at the head of it to free. This operation is so common that there is a special function ngx_chain_update_chains(free, busy, out, tag) which does this. The function appends the output chain out to busy and moves free buffers from the top of busy to free. Only the buffers with the given tag are reused. This lets a module reuse only the buffers allocated by itself.
The following example is a body filter inserting the “foo” string before each incoming buffer. The new buffers allocated by the module are reused if possible. Note that for this example to work properly, it's also required to set up a header filter and reset content_length_n to -1, which is beyond the scope of this section.
typedef struct {
    ngx_chain_t  *free;
    ngx_chain_t  *busy;
}  ngx_http_foo_filter_ctx_t;


ngx_int_t
ngx_http_foo_body_filter(ngx_http_request_t *r, ngx_chain_t *in)
{
    ngx_int_t                   rc;
    ngx_buf_t                  *b;
    ngx_chain_t                *cl, *tl, *out, **ll;
    ngx_http_foo_filter_ctx_t  *ctx;

    ctx = ngx_http_get_module_ctx(r, ngx_http_foo_filter_module);
    if (ctx == NULL) {
        ctx = ngx_pcalloc(r->pool, sizeof(ngx_http_foo_filter_ctx_t));
        if (ctx == NULL) {
            return NGX_ERROR;
        }

        ngx_http_set_ctx(r, ctx, ngx_http_foo_filter_module);
    }

    /* create a new chain "out" from "in" with all the changes */

    ll = &out;

    for (cl = in; cl; cl = cl->next) {

        /* append "foo" in a reused buffer if possible */

        tl = ngx_chain_get_free_buf(r->pool, &ctx->free);
        if (tl == NULL) {
            return NGX_ERROR;
        }

        b = tl->buf;
        b->tag = (ngx_buf_tag_t) &ngx_http_foo_filter_module;
        b->memory = 1;
        b->pos = (u_char *) "foo";
        b->last = b->pos + 3;

        *ll = tl;
        ll = &tl->next;

        /* append the next incoming buffer */

        tl = ngx_alloc_chain_link(r->pool);
        if (tl == NULL) {
            return NGX_ERROR;
        }

        tl->buf = cl->buf;
        *ll = tl;
        ll = &tl->next;
    }

    *ll = NULL;

    /* send the new chain */

    rc = ngx_http_next_body_filter(r, out);

    /* update "busy" and "free" chains for reuse */

    ngx_chain_update_chains(r->pool, &ctx->free, &ctx->busy, &out,
                            (ngx_buf_tag_t) &ngx_http_foo_filter_module);

    return rc;
}
The ngx_http_upstream_module provides basic functionality to pass requests to remote servers. This functionality is used by modules that implement specific protocols, such as HTTP or FastCGI. The module also provides an interface for creating custom load balancing modules and implements a default round-robin balancing method.
Examples of modules that implement alternative load balancing methods are least_conn and hash. Note that these modules are actually implemented as extensions of the upstream module and share a lot of code, such as representation of a server group. The keepalive module is an example of an independent module, extending upstream functionality.
The ngx_http_upstream_module may be configured explicitly by placing the corresponding upstream block into the configuration file, or implicitly by using directives that accept a URL evaluated at some point to the list of servers, for example, proxy_pass. Only explicit configurations may use an alternative load balancing method. The upstream module configuration has its own directive context NGX_HTTP_UPS_CONF. The structure is defined as follows:
struct ngx_http_upstream_srv_conf_s {
    ngx_http_upstream_peer_t         peer;
    void                           **srv_conf;

    ngx_array_t                     *servers;  /* ngx_http_upstream_server_t */

    ngx_uint_t                       flags;
    ngx_str_t                        host;
    u_char                          *file_name;
    ngx_uint_t                       line;
    in_port_t                        port;
    ngx_uint_t                       no_port;  /* unsigned no_port:1 */

#if (NGX_HTTP_UPSTREAM_ZONE)
    ngx_shm_zone_t                  *shm_zone;
#endif
};
- srv_conf — configuration context of upstream modules
- servers — array of ngx_http_upstream_server_t, the result of parsing a set of server directives in the upstream block
- flags — flags that mostly mark which features (configured as parameters of the server directive) are supported by the particular load balancing method.
- NGX_HTTP_UPSTREAM_CREATE — used to distinguish explicitly defined upstreams from automatically created by proxy_pass and “friends” (FastCGI, SCGI, etc.)
- NGX_HTTP_UPSTREAM_WEIGHT — “weight” is supported
- NGX_HTTP_UPSTREAM_MAX_FAILS — “max_fails” is supported
- NGX_HTTP_UPSTREAM_FAIL_TIMEOUT — “fail_timeout” is supported
- NGX_HTTP_UPSTREAM_DOWN — “down” is supported
- NGX_HTTP_UPSTREAM_BACKUP — “backup” is supported
- NGX_HTTP_UPSTREAM_MAX_CONNS — “max_conns” is supported
- host — the name of an upstream
- file_name, line — the name of the configuration file and the line where the upstream block is located
- port and no_port — unused by explicit upstreams
- shm_zone — a shared memory zone used by this upstream, if any
- peer — an object that holds generic methods for initializing upstream configuration:
typedef struct {
    ngx_http_upstream_init_pt        init_upstream;
    ngx_http_upstream_init_peer_pt   init;
    void                            *data;
} ngx_http_upstream_peer_t;
A module that implements a load balancing algorithm must set these methods and initialize private data. If init_upstream was not initialized during configuration parsing, ngx_http_upstream_module sets it to default ngx_http_upstream_init_round_robin.
- init_upstream(cf, us) — configuration-time method responsible for initializing a group of servers and initializing the init() method in case of success. A typical load balancing module uses a list of servers in the upstream block to create some efficient data structure that it uses and saves own configuration to the data field.
- init(r, us) — initializes per-request ngx_http_upstream_t.peer (not to be confused with the ngx_http_upstream_srv_conf_t.peer described above which is per-upstream) structure that is used for load balancing. It will be passed as data argument to all callbacks that deal with server selection.
When nginx has to pass a request to another host for processing, it uses a configured load balancing method to obtain an address to connect to. The method is taken from the ngx_http_upstream_t.peer object of type ngx_peer_connection_t:
struct ngx_peer_connection_s {
    [...]

    struct sockaddr                 *sockaddr;
    socklen_t                        socklen;
    ngx_str_t                       *name;

    ngx_uint_t                       tries;

    ngx_event_get_peer_pt            get;
    ngx_event_free_peer_pt           free;
    ngx_event_notify_peer_pt         notify;
    void                            *data;

#if (NGX_SSL || NGX_COMPAT)
    ngx_event_set_peer_session_pt    set_session;
    ngx_event_save_peer_session_pt   save_session;
#endif

    [..]
};
The structure has the following fields:
- sockaddr, socklen, name — address of an upstream server to connect to; this is the output parameter of a load balancing method
- data — per-request load balancing method data; keeps the state of selection algorithm and usually includes the link to upstream configuration. It will be passed as an argument to all methods that deal with server selection (see below)
- tries — allowed number of attempts to connect to an upstream.
- get, free, notify, set_session, and save_session - methods of the load balancing module, see description below
All methods accept at least two arguments: peer connection object pc and the data created by ngx_http_upstream_srv_conf_t.peer.init(). Note that in general case it may differ from pc.data due to “chaining” of load balancing modules.
- get(pc, data) — the method is called when the upstream module is ready to pass a request to an upstream server and needs to know its address. The method is responsible to fill in the sockaddr, socklen, and name fields of ngx_peer_connection_t structure. The return value may be one of:
- NGX_OK — server was selected
- NGX_ERROR — internal error occurred
- NGX_BUSY — there are no available servers at the moment. This can happen due to many reasons, such as: dynamic server group is empty, all servers in the group are in the failed state, all servers in the group are already handling the maximum number of connections or similar.
- NGX_DONE — this is set by the keepalive module to indicate that the underlying connection was reused and there is no need to create a new connection to the upstream server.
- free(pc, data, state) — the method is called when an upstream module has finished work with a particular server. The state argument is the status of upstream connection completion. This is a bitmask, the following values may be set: NGX_PEER_FAILED — this attempt is considered unsuccessful, NGX_PEER_NEXT — a special case with codes 403 and 404 (see link above), which are not considered a failure. NGX_PEER_KEEPALIVE. Also, tries counter is decremented by this method.
- notify(pc, data, type) — currently unused in the OSS version.
- set_session(pc, data) and save_session(pc, data) — SSL-specific methods that allow to cache sessions to upstream servers. The implementation is provided by the round-robin balancing method.
The nginx-dev-examples repository provides nginx module examples.
- maximum text width is 80 characters
- indentation is 4 spaces
- no tabs, no trailing spaces
- list elements on the same line are separated with spaces
- hexadecimal literals are lowercase
- file names, function and type names, and global variables have the ngx_ or more specific prefix such as ngx_http_ and ngx_mail_
size_t
ngx_utf8_length(u_char *p, size_t n)
{
    u_char  c, *last;
    size_t  len;

    last = p + n;

    for (len = 0; p < last; len++) {

        c = *p;

        if (c < 0x80) {
            p++;
            continue;
        }

        if (ngx_utf8_decode(&p, n) > 0x10ffff) {
            /* invalid UTF-8 */
            return n;
        }
    }

    return len;
}
A typical source file may contain the following sections separated by two empty lines:
- copyright statements
- includes
- preprocessor definitions
- type definitions
- function prototypes
- variable definitions
- function definitions
Copyright statements look like this:
/*
 * Copyright (C) Author Name
 * Copyright (C) Organization, Inc.
 */
If the file is modified significantly, the list of authors should be updated, the new author is added to the top.
The ngx_config.h and ngx_core.h files are always included first, followed by one of ngx_http.h, ngx_stream.h, or ngx_mail.h. Then follow optional external header files:
#include <ngx_config.h>
#include <ngx_core.h>
#include <ngx_http.h>

#include <libxml/parser.h>
#include <libxml/tree.h>
#include <libxslt/xslt.h>

#if (NGX_HAVE_EXSLT)
#include <libexslt/exslt.h>
#endif
Header files should include the so called "header protection":
#ifndef _NGX_PROCESS_CYCLE_H_INCLUDED_
#define _NGX_PROCESS_CYCLE_H_INCLUDED_
...
#endif /* _NGX_PROCESS_CYCLE_H_INCLUDED_ */
- “//” comments are not used
- text is written in English, American spelling is preferred
- multi-line comments are formatted like this:
/*
 * The red-black tree code is based on the algorithm described in
 * the "Introduction to Algorithms" by Cormen, Leiserson and Rivest.
 */
/* find the server configuration for the address:port */
Macro names start from ngx_ or NGX_ (or more specific) prefix. Macro names for constants are uppercase. Parameterized macros and macros for initializers are lowercase. The macro name and value are separated by at least two spaces:
#define NGX_CONF_BUFFER  4096

#define ngx_buf_in_memory(b)  (b->temporary || b->memory || b->mmap)

#define ngx_buf_size(b)                                                      \
    (ngx_buf_in_memory(b) ? (off_t) (b->last - b->pos):                      \
                            (b->file_last - b->file_pos))

#define ngx_null_string  { 0, NULL }
Conditions are inside parentheses, negation is outside:
#if (NGX_HAVE_KQUEUE)
...
#elif ((NGX_HAVE_DEVPOLL && !(NGX_TEST_BUILD_DEVPOLL)) \
       || (NGX_HAVE_EVENTPORT && !(NGX_TEST_BUILD_EVENTPORT)))
...
#elif (NGX_HAVE_EPOLL && !(NGX_TEST_BUILD_EPOLL))
...
#elif (NGX_HAVE_POLL)
...
#else /* select */
...
#endif /* NGX_HAVE_KQUEUE */
Type names end with the “_t” suffix. A defined type name is separated by at least two spaces:
typedef ngx_uint_t ngx_rbtree_key_t;
Structure types are defined using typedef. Inside structures, member types and names are aligned:
typedef struct {
    size_t      len;
    u_char     *data;
} ngx_str_t;
Keep alignment identical among different structures in the file. A structure that points to itself has the name, ending with “_s”. Adjacent structure definitions are separated with two empty lines:
typedef struct ngx_list_part_s  ngx_list_part_t;

struct ngx_list_part_s {
    void             *elts;
    ngx_uint_t        nelts;
    ngx_list_part_t  *next;
};


typedef struct {
    ngx_list_part_t  *last;
    ngx_list_part_t   part;
    size_t            size;
    ngx_uint_t        nalloc;
    ngx_pool_t       *pool;
} ngx_list_t;
Each structure member is declared on its own line:
typedef struct {
    ngx_uint_t        hash;
    ngx_str_t         key;
    ngx_str_t         value;
    u_char           *lowcase_key;
} ngx_table_elt_t;
Function pointers inside structures have defined types ending with “_pt”:
typedef ssize_t (*ngx_recv_pt)(ngx_connection_t *c, u_char *buf, size_t size);
typedef ssize_t (*ngx_recv_chain_pt)(ngx_connection_t *c, ngx_chain_t *in,
    off_t limit);
typedef ssize_t (*ngx_send_pt)(ngx_connection_t *c, u_char *buf, size_t size);
typedef ngx_chain_t *(*ngx_send_chain_pt)(ngx_connection_t *c, ngx_chain_t *in,
    off_t limit);

typedef struct {
    ngx_recv_pt        recv;
    ngx_recv_chain_pt  recv_chain;
    ngx_recv_pt        udp_recv;
    ngx_send_pt        send;
    ngx_send_pt        udp_send;
    ngx_send_chain_pt  udp_send_chain;
    ngx_send_chain_pt  send_chain;
    ngx_uint_t         flags;
} ngx_os_io_t;
Enumerations have types ending with “_e”:
typedef enum {
    ngx_http_fastcgi_st_version = 0,
    ngx_http_fastcgi_st_type,
    ...
    ngx_http_fastcgi_st_padding
} ngx_http_fastcgi_state_e;
Variables are declared sorted by length of a base type, then alphabetically. Type names and variable names are aligned. The type and name “columns” are separated with two spaces. Large arrays are put at the end of a declaration block:
u_char                      |  | *rv, *p;
ngx_conf_t                  |  | *cf;
ngx_uint_t                  |  |  i, j, k;
unsigned int                |  |  len;
struct sockaddr             |  | *sa;
const unsigned char         |  | *data;
ngx_peer_connection_t       |  | *pc;
ngx_http_core_srv_conf_t    |  |**cscfp;
ngx_http_upstream_srv_conf_t|  | *us, *uscf;
u_char                      |  |  text[NGX_SOCKADDR_STRLEN];
Static and global variables may be initialized on declaration:
static ngx_str_t ngx_http_memcached_key = ngx_string("memcached_key");
static ngx_uint_t mday[] = { 31, 28, 31, 30, 31, 30, 31, 31, 30, 31, 30, 31 };
static uint32_t  ngx_crc32_table16[] = {
    0x00000000, 0x1db71064, 0x3b6e20c8, 0x26d930ac,
    ...
    0x9b64c2b0, 0x86d3d2d4, 0xa00ae278, 0xbdbdf21c
};
There is a bunch of commonly used type/name combinations:
u_char                        *rv;
ngx_int_t                      rc;
ngx_conf_t                    *cf;
ngx_connection_t              *c;
ngx_http_request_t            *r;
ngx_peer_connection_t         *pc;
ngx_http_upstream_srv_conf_t  *us, *uscf;
All functions (even static ones) should have prototypes. Prototypes include argument names. Long prototypes are wrapped with a single indentation on continuation lines:
static char *ngx_http_block(ngx_conf_t *cf, ngx_command_t *cmd, void *conf);
static ngx_int_t ngx_http_init_phases(ngx_conf_t *cf,
    ngx_http_core_main_conf_t *cmcf);

static char *ngx_http_merge_servers(ngx_conf_t *cf,
    ngx_http_core_main_conf_t *cmcf, ngx_http_module_t *module,
    ngx_uint_t ctx_index);
The function name in a definition starts with a new line. The function body opening and closing braces are on separate lines. The body of a function is indented. There are two empty lines between functions:
static ngx_int_t
ngx_http_find_virtual_server(ngx_http_request_t *r, u_char *host, size_t len)
{
    ...
}


static ngx_int_t
ngx_http_add_addresses(ngx_conf_t *cf, ngx_http_core_srv_conf_t *cscf,
    ngx_http_conf_port_t *port, ngx_http_listen_opt_t *lsopt)
{
    ...
}
There is no space after the function name and opening parenthesis. Long function calls are wrapped such that continuation lines start from the position of the first function argument. If this is impossible, format the first continuation line such that it ends at position 79:
ngx_log_debug2(NGX_LOG_DEBUG_HTTP, r->connection->log, 0,
               "http header: \"%V: %V\"",
               &h->key, &h->value);

hc->busy = ngx_palloc(r->connection->pool,
                  cscf->large_client_header_buffers.num * sizeof(ngx_buf_t *));
The ngx_inline macro should be used instead of inline:
static ngx_inline void ngx_cpuid(uint32_t i, uint32_t *buf);
Binary operators except “.” and “−>” should be separated from their operands by one space. Unary operators and subscripts are not separated from their operands by spaces:
width = width * 10 + (*fmt++ - '0');
ch = (u_char) ((decoded << 4) + (ch - '0'));
r->exten.data = &r->uri.data[i + 1];
Type casts are separated by one space from casted expressions. An asterisk inside type cast is separated with space from type name:
len = ngx_sock_ntop((struct sockaddr *) sin6, p, len, 1);
If an expression does not fit into single line, it is wrapped. The preferred point to break a line is a binary operator. The continuation line is lined up with the start of expression:
if (status == NGX_HTTP_MOVED_PERMANENTLY
    || status == NGX_HTTP_MOVED_TEMPORARILY
    || status == NGX_HTTP_SEE_OTHER
    || status == NGX_HTTP_TEMPORARY_REDIRECT
    || status == NGX_HTTP_PERMANENT_REDIRECT)
{
    ...
}
p->temp_file->warn = "an upstream response is buffered "
                     "to a temporary file";
As a last resort, it is possible to wrap an expression so that the continuation line ends at position 79:
hinit->hash = ngx_pcalloc(hinit->pool, sizeof(ngx_hash_wildcard_t)
                                     + size * sizeof(ngx_hash_elt_t *));
The above rules also apply to sub-expressions, where each sub-expression has its own indentation level:
if (((u->conf->cache_use_stale & NGX_HTTP_UPSTREAM_FT_UPDATING)
     || c->stale_updating) && !r->background
    && u->conf->cache_background_update)
{
    ...
}
Sometimes, it is convenient to wrap an expression after a cast. In this case, the continuation line is indented:
node = (ngx_rbtree_node_t *)
           ((u_char *) lr - offsetof(ngx_rbtree_node_t, color));
Pointers are explicitly compared to NULL (not 0):
if (ptr != NULL) {
    ...
}
The “if” keyword is separated from the condition by one space. Opening brace is located on the same line, or on a dedicated line if the condition takes several lines. Closing brace is located on a dedicated line, optionally followed by “else if / else”. Usually, there is an empty line before the “else if / else” part:
if (node->left == sentinel) {
    temp = node->right;
    subst = node;

} else if (node->right == sentinel) {
    temp = node->left;
    subst = node;

} else {
    subst = ngx_rbtree_min(node->right, sentinel);

    if (subst->left != sentinel) {
        temp = subst->left;

    } else {
        temp = subst->right;
    }
}
Similar formatting rules are applied to “do” and “while” loops:
while (p < last && *p == ' ') {
    p++;
}
do {
    ctx->node = rn;
    ctx = ctx->next;
} while (ctx);
The “switch” keyword is separated from the condition by one space. Opening brace is located on the same line. Closing brace is located on a dedicated line. The “case” keywords are lined up with “switch”:
switch (ch) {
case '!':
    looked = 2;
    state = ssi_comment0_state;
    break;

case '<':
    copy_end = p;
    break;

default:
    copy_end = p;
    looked = 0;
    state = ssi_start_state;
    break;
}
Most “for” loops are formatted like this:
for (i = 0; i < ccf->env.nelts; i++) {
    ...
}
for (q = ngx_queue_head(locations);
     q != ngx_queue_sentinel(locations);
     q = ngx_queue_next(q))
{
    ...
}
If some part of the “for” statement is omitted, this is indicated by the “/* void */” comment:
for (i = 0; /* void */ ; i++) {
    ...
}
A loop with an empty body is also indicated by the “/* void */” comment which may be put on the same line:
for (cl = *busy; cl->next; cl = cl->next) { /* void */ }
An endless loop looks like this:
for ( ;; ) {
    ...
}
Labels are surrounded with empty lines and are indented at the previous level:
    if (i == 0) {
        u->err = "host not found";
        goto failed;
    }

    u->addrs = ngx_pcalloc(pool, i * sizeof(ngx_addr_t));
    if (u->addrs == NULL) {
        goto failed;
    }

    u->naddrs = i;

    ...

    return NGX_OK;

failed:

    freeaddrinfo(res);
    return NGX_ERROR;
http://www.nginxguts.com/phases/
http://www.nginxguts.com/how-to-return-a-simple-page/
http://www.nginxguts.com/working-with-cookies/
http://www.nginxguts.com/plugs/
http://www.nginxguts.com/http-modules/
https://www.nginx.com/resources/wiki/extending/api/main/
https://titanwolf.org/Network/Articles/Article?AID=73b033b1-c297-4cf0-8ee2-1b4847e9af27#gsc.tab=0