3. Certbot
4. Crontab

Ensure your server's package list is up to date by running:
sudo apt updateInstall Apache and the mod_wsgi module for hosting Python applications:
sudo apt install apache2 libapache2-mod-wsgi-py3It's a good practice to use a virtual environment for your Django project. If you haven't already, create and activate a virtual environment for your project:
cd /var/www/dir_name  # Navigate to your project directory
python3 -m venv venv  # Create a virtual environment
source venv/bin/activate # Activate the virtual environmentInstall the required packages for your Django project using pip. Typically, this includes Django itself and any additional packages you've used:
pip install django # Replace with your project's requirementsConfigure your Django project settings, including the ALLOWED_HOSTS setting in your Django project's settings.py file to include your domain:
ALLOWED_HOSTS = ['backend.bioemr.com', 'your_server_ip']Collect your Django project's static files:
python manage.py collectstaticCreate a new Apache configuration file for your Django project:
sudo nano /etc/apache2/sites-available/backend.bioemr.com.confAdd the following configuration to the file, replacing /var/www/dir_name with your project's directory path and your_project.wsgi with your project's WSGI file:
<VirtualHost *:80>
    ServerAdmin admin@backend.bioemr.com
    ServerName backend.bioemr.com
    DocumentRoot /var/www/dir_name

    WSGIDaemonProcess your_project python-home=/var/www/dir_name/venv python-path=/var/www/dir_name
    WSGIProcessGroup your_project
    WSGIScriptAlias / /var/www/dir_name/your_project.wsgi

    Alias /static/ /var/www/dir_name/static/
    Alias /media/ /var/www/dir_name/media/

    <Directory /var/www/dir_name>
        Require all granted
    </Directory>

    ErrorLog ${APACHE_LOG_DIR}/error.log
    CustomLog ${APACHE_LOG_DIR}/access.log combined
</VirtualHost>
Save the file and exit the text editor.
Enable the site configuration and disable the default Apache site:
sudo a2ensite backend.bioemr.com
sudo a2dissite 000-default.conf # Disable the default site if it's enabledTest the Apache configuration to check for any syntax errors:
sudo apache2ctl configtestIf you see "Syntax OK," the configuration is correct.
Restart Apache to apply the changes:
sudo systemctl restart apache2Ensure that your domain backend.bioemr.com points to your server's IP address. This is typically done through your domain registrar's DNS settings.
If you have a firewall enabled (e.g., UFW), make sure it allows traffic on port 80 (HTTP):
sudo ufw allow 80/tcpNow that your Django project is configured and your server is set up, you should be able to access your project at http://backend.bioemr.com. Your Django website should be up and running!
Remember to keep your server and Django project secure by regularly updating packages, configuring HTTPS (SSL/TLS), and following best practices for web application security.
If you encounter any issues during this setup or have further questions, please feel free to ask for assistance.

sudo apt updatemysql -u root -pif mysql isn't installed sudo apt install mysql-server
CREATE DATABASE wordpress DEFAULT CHARACTER SET utf8 COLLATE utf8_unicode_ci;CREATE USER 'wordpressUsername'@'%' IDENTIFIED WITH mysql_native_password BY 'wordpressPassword';GRANT ALL ON wordpress.* TO 'wordpressUsername'@'%';FLUSH PRIVILEGES;EXIT;
or
\q;sudo apt install php8.1 libapache2-mod-php8.1
sudo apt install php-curl php-gd php-mbstring php-xml php-xmlrpc php-soap php-intl php-zipYou’ll need to restart Apache to load these new extensions.
sudo systemctl restart apache2sudo nano /etc/apache2/sites-available/wordpressWebsite.confPaste below code:
<VirtualHost *:80>
        # The ServerName directive sets the request scheme, hostname and port that
        # the server uses to identify itself. This is used when creating
        # redirection URLs. In the context of virtual hosts, the ServerName
        # specifies what hostname must appear in the request's Host: header to
        # match this virtual host. For the default virtual host (this file) this
        # value is not decisive as it is used as a last resort host regardless.
        # However, you must set it for any further virtual host explicitly.

        ServerName www.fourthX.com
        ServerAdmin webmaster@localhost
        DocumentRoot /var/www/wordpress

        # Available loglevels: trace8, ..., trace1, debug, info, notice, warn,
        # error, crit, alert, emerg.
        # It is also possible to configure the loglevel for particular
        # modules, e.g.
        #LogLevel info ssl:warn

        ErrorLog ${APACHE_LOG_DIR}/error.log
        CustomLog ${APACHE_LOG_DIR}/access.log combined

        # For most configuration files from conf-available/, which are
        # enabled or disabled at a global level, it is possible to
        # include a line for only one particular virtual host. For example the
        # following line enables the CGI configuration for this host only
        # after it has been globally disabled with "a2disconf".
        #Include conf-available/serve-cgi-bin.conf
</VirtualHost>
you can enable mod_rewrite so that you can use the WordPress permalink feature:
sudo a2enmod rewriteBefore implementing the changes you’ve made, check to make sure you haven’t made any syntax errors by running the following test:
sudo apache2ctl configtest
sudo systemctl restart apache2cd /tmp
- Download the latest compressed wordpress release:
curl -O https://wordpress.org/latest.tar.gz
- Extract the compressed file:
tar xzvf latest.tar.gz
cp /tmp/wordpress/wp-config-sample.php /tmp/wordpress/wp-config.php
mkdir /tmp/wordpress/wp-content/upgrade
- Copy the entire contents of the directory into your document root:
sudo cp -a /tmp/wordpress/. /var/www/wordpressOwnership of all the files to the www-data user and group. This is the user that the Apache web server runs as, and Apache will need to be able to read and write WordPress files in order to serve the website and perform automatic updates. Update the ownership with the chown command which allows you to modify file ownership. Be sure to point to your server’s relevant directory:
sudo chown -R www-data:www-data /var/www/wordpress
sudo find /var/www/wordpress/ -type d -exec chmod 750 {} \;
sudo find /var/www/wordpress/ -type f -exec chmod 640 {} \;
grab secure values from the WordPress secret key generator:
curl -s https://api.wordpress.org/secret-key/1.1/salt/Copy the output of curl
Open:
sudo nano /var/www/wordpress/wp-config.phpReplace the below code with output copied above:
define('AUTH_KEY',         'put your unique phrase here');
define('SECURE_AUTH_KEY',  'put your unique phrase here');
define('LOGGED_IN_KEY',    'put your unique phrase here');
define('NONCE_KEY',        'put your unique phrase here');
define('AUTH_SALT',        'put your unique phrase here');
define('SECURE_AUTH_SALT', 'put your unique phrase here');
define('LOGGED_IN_SALT',   'put your unique phrase here');
define('NONCE_SALT', 'put your unique phrase here');The other change you need to make is to set the method that WordPress should use to write to the filesystem. Since you’ve given the web server permission to write where it needs to, you can explicitly set the filesystem method to “direct”. Failure to set this with your current settings would result in WordPress prompting for FTP credentials when performing some actions.
// ** MySQL settings - You can get this info from your web host ** //
/** The name of the database for WordPress */
define( 'DB_NAME', 'CHANGE THIS' );

/** MySQL database username */
define( 'DB_USER', 'CHANGE THIS' );

/** MySQL database password */
define( 'DB_PASSWORD', 'CHANGE THIS' );

/** MySQL hostname */
define( 'DB_HOST', 'localhost' );

/** Database Charset to use in creating database tables. */
define( 'DB_CHARSET', 'utf8' );

/** The Database Collate type. Don't change this if in doubt. */
define( 'DB_COLLATE', '' );

define('FS_METHOD', 'direct');
sudo systemctl restart apache2E1.
Your PHP installation appears to be missing the MySQL extension which is required by WordPress.
Please check that the mysqli PHP extension is installed and enabled.
E1.A:
sudo apt install php-mysql
systemctl restart apache2sudo apt-get update
sudo apt-get install certbot python3-certbot-nginx
sudo certbot --nginx -d fourthX.com
--------------------------------------------------
sudo certbot
email@address.me
A
N
1
sudo certbot renew --dry-run
-
SSH or Login into the server
-
Install snapd
sudo apt install snapd- Remove certbot-auto and any Certbot OS packages
sudo apt remove certbot- Install Certbot
sudo snap install --classic certbot- Prepare the Certbot command
sudo ln -s /snap/bin/certbot /usr/bin/certbot- Get and Install your certificates
sudo certbot --apacheNow read all the instruction and give input accordingly.
- Test automatic renewal
sudo certbot renew --dry-run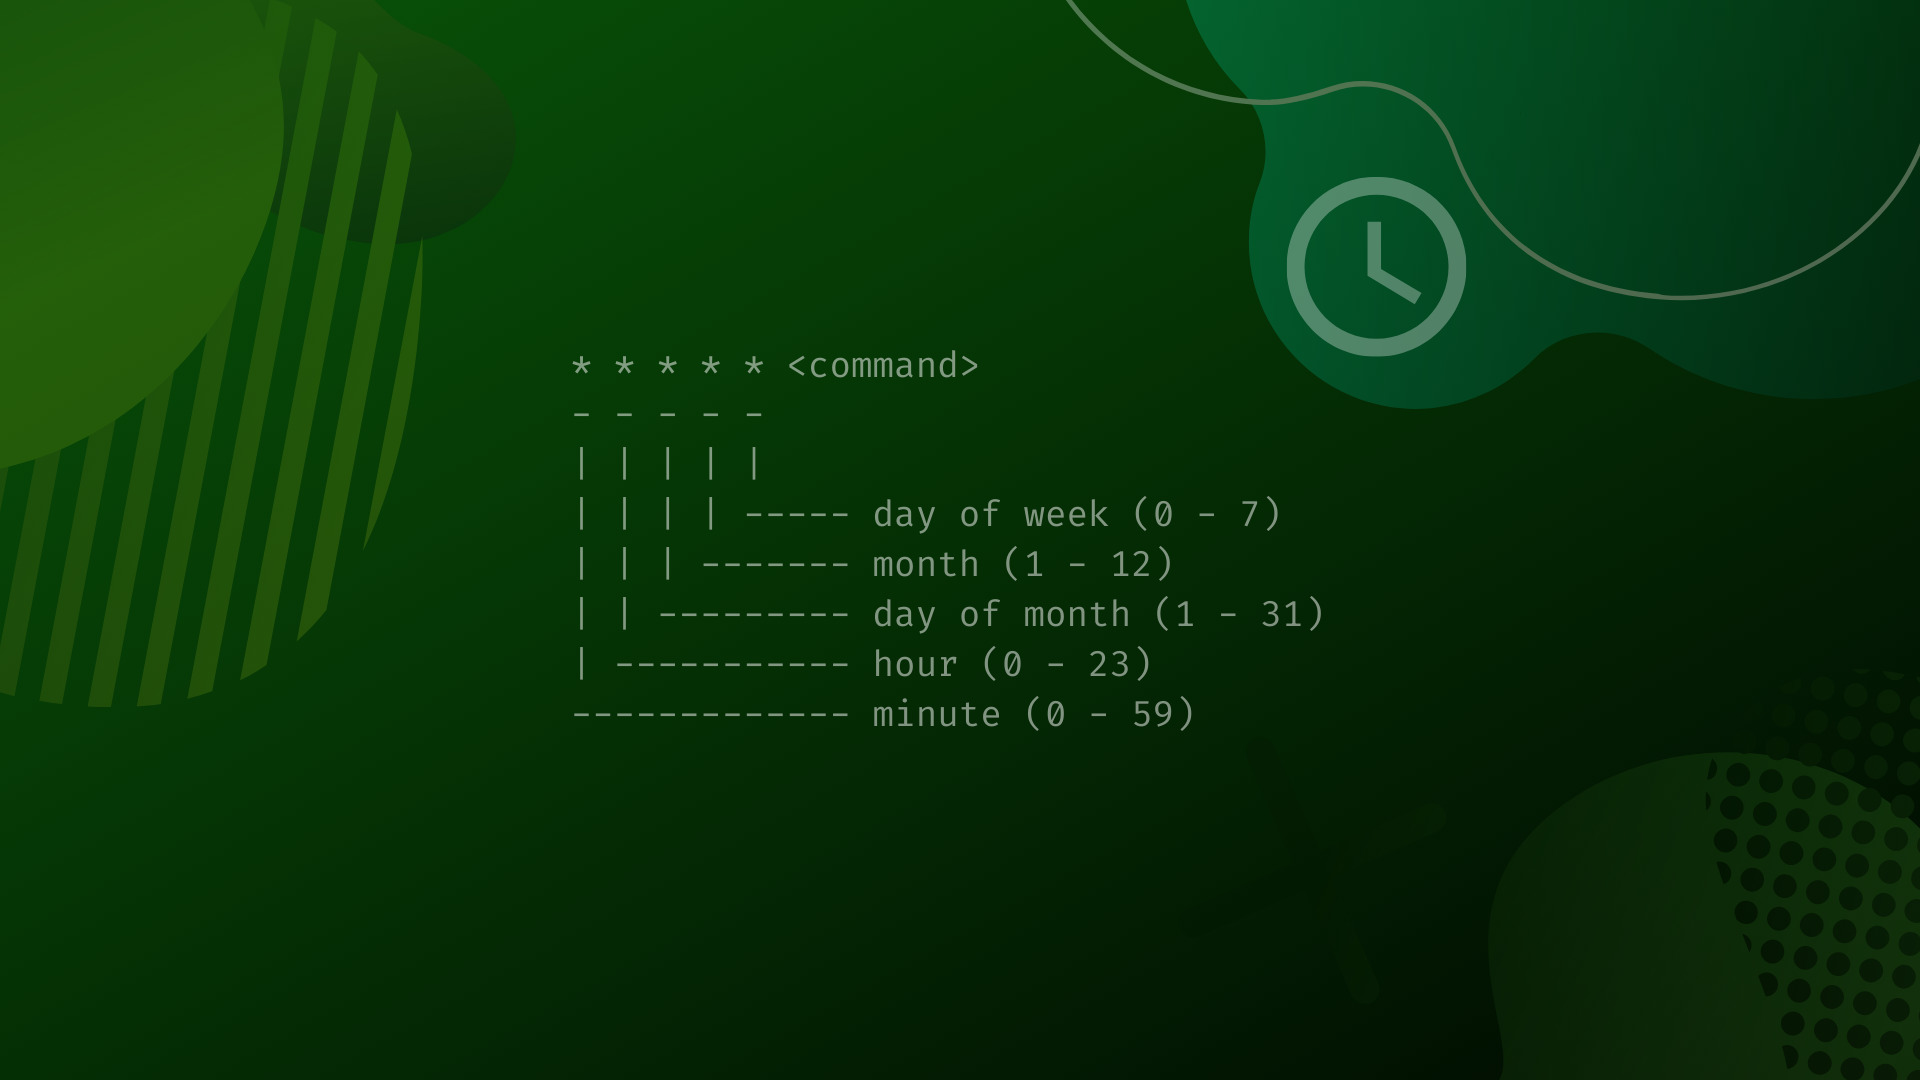
- To Installation related certbot refer
crontab -ePaste
# Each task to run has to be defined through a single line
# indicating with different fields when the task will be run
# and what command to run for the task
#
# To define the time you can provide concrete values for
# minute (m), hour (h), day of month (dom), month (mon),
# and day of week (dow) or use '*' in these fields (for 'any').
#
# Notice that tasks will be started based on the cron's system
# daemon's notion of time and timezones.
#
# Output of the crontab jobs (including errors) is sent through
# email to the user the crontab file belongs to (unless redirected).
#
# For example, you can run a backup of all your user accounts
# at 5 a.m every week with:
# 0 5 * * 1 tar -zcf /var/backups/home.tgz /home/
#
# For more information see the manual pages of crontab(5) and cron(8)
#
# m h  dom mon dow   command

0 6 * * 0 certbot renew -n -q
To save:
ctrl X
Press y
Return(Enter)- At 06:00 AM, only on Sunday.
- It will run on every sunday (non interactively and quietly)
daphne -b 0.0.0.0 -p 8000 core.asgi:applicationuvicorn core.asgi:application --host 0.0.0.0 --port 8000
- For faster transcriptions
If you have a capable GPU, you can also leverage it for faster transcription by installing torch with CUDA supportpip install torch torchvision torchaudio --index-url https://download.pytorch.org/whl/cu117
- Required installs
pip install openai-whisper ffmpeg-python
- Whisper Model selection:
"tiny": Fastest but less accurate."base": Small but good accuracy for basic tasks."small": Moderate size and higher accuracy."medium": Even more accurate but requires more processing."large": Best accuracy but requires more time and resources.
- Linux Required installation
sudo apt update && sudo apt install espeak ffmpeg libespeak1
- Linux Required step before doing anything
sudo apt update && sudo apt install python3.11 python3.11-fullsudo apt update && sudo apt install gunicorn nginxsudo chown -R $USER:$USER /var/www/internal/internalpython3.11 -m venv /var/www/internal/internal/venv
- If any permission issue
sudo chown -R $USER:$USER /var/www/internal/internal/venvsudo chown www-data:www-data /run/gunicornas per yourgunicorn_internal.serviceconfiguration file
- Gunicorn Service
/etc/systemd/system/gunicorn_internal.service
[Unit]
Description=gunicorn Internal project
Requires=gunicorn.socket
After=network.target

[Service]
User=ubuntu
Group=www-data
WorkingDirectory=/var/www/internal/internal
ExecStart=/var/www/internal/internal/venv/bin/gunicorn \
          --access-logfile - \
          --workers 3 \
          --bind unix:/run/gunicorn/gunicorn_internal.sock \
          core.wsgi:application

[Install]
WantedBy=multi-user.target
- Gunicorn Socket
/etc/systemd/system/gunicorn_internal.socketit's not required
Description=gunicorn socket for Internal project (Internal is name of the project)

[Socket]
ListenStream=/run/gunicorn/gunicorn_internal.sock

[Install]
WantedBy=sockets.target
- Nginx Configuration
/etc/nginx/sites-available/internal.yoursite.com
server {
server_name internal.yoursite.com  www.internal.yoursite.com;
location = /favicon.ico { access_log off; log_not_found off; }
location /static/ {
    root /var/www/internal/internal;
}
    location / {

            include proxy_params;
            proxy_pass http://unix:/run/gunicorn/gunicorn_internal.sock;
    }
}
sudo ln -s /etc/nginx/sites-available/internal.yoursite.com /etc/nginx/sites-enabled/
- Gunicorn and Nginx setup
-
sudo ln -s /etc/nginx/sites-available/internal.yoursite.com /etc/nginx/sites-enabled/ -
sudo service nginx restart -
sudo systemctl enable gunicorn_internal -
sudo systemctl start gunicorn_internal -
sudo systemctl daemon-reload