This Discord bot can control your home!
Services needed:
Applications needed (for Windows anyway):
Make sure you install PyCharm and Anaconda and have the accounts for Discord and IFTTT.
Open up PyCharm and let everything load. Then, click on new project. At the top, you'll see a file path. You can change the end of it to whatever you want the project to be named.

Then, click on 'New Environment Using' and choose conda from the drop down.

Press 'Create' and let everything load.
Open up the 'Anaconda Prompt' app.
To select/activate the environment, type activate <ENVIRONMENT NAME>. Remember, the environment is what you chose in the file path when creating the environment.
Now, install the Discord package by typing pip install discord. After that finishes, you might want to install another package called requests which will be used later: pip install requests.
Now you can open up PyCharm again and you'll see an example project. You can select and delete that.
The first thing we need to do is import the modules. We'll do the two we just installed:
import discord
import requests
The bot also needs the commands module to use commands. Import that, too:
from discord.ext import commands
We need to tell the bot and Discord what the prefix is. Most bots use prefixes to indicate a command (example !command where '!' is the prefix). You can do that by adding
bot = commands.Bot(command_prefix='!')
To indicate a command, type this:
@bot.command()
On a new line, define the name of the command:
async def <COMMAND_NAME>(ctx):
We need to have a way of controlling the devices. We can do this through a service called IFTTT.
In IFTTT, go to where you create an applet. For the trigger (or the if this part), choose webhooks. You'll have to choose an event name. Then, you can choose whatever you want for the then that part. This is what will happen when the command is ran. When you finish, click on the webhooks icon.

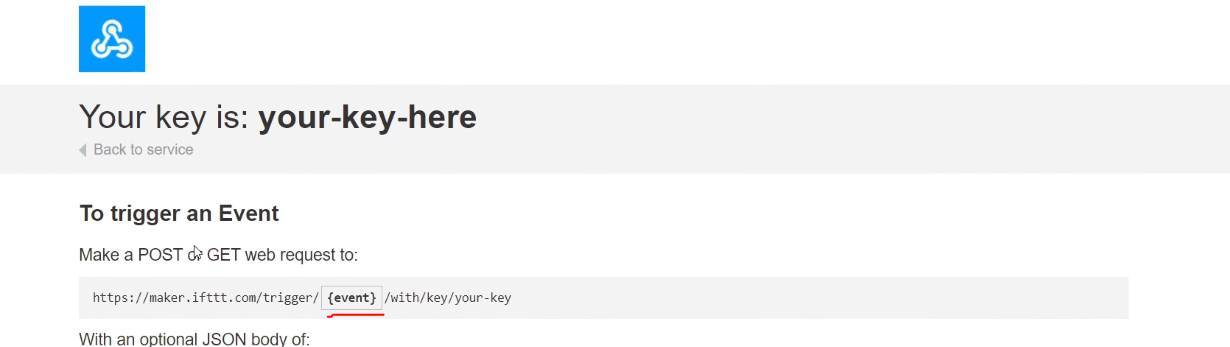
Then, click on Documentation. At the top link, change {event} to the name of the event you set up. Then, you can copy the link!
You can add that under the async line with an indent. It will use the requests module.
requests.post('<WEBHOOK LINK>')
You might want to add some kind of console output, too.
print('<CONSOLE OUTPUT>')
So far, this is what you should have:
import discord
import requests
from discord.ext import commands

bot = commands.Bot(command_prefix='!')


@bot.command()
async def <COMMAND_NAME>(ctx):
	requests.post('<WEBHOOK LINK>')
	print('<CONSOLE OUTPUT>')
This part is best explained in video.. Here's a section of it for creating the Discord bot.
<iframe type="text/html" frameborder="0" width="1280" height="720" src="https://www.youtube.com/embed/E96H2ls5dvU?start=403&end=426&rel=0&showinfo=0&vq=hd720" allowfullscreen></iframe>Once you have the token, you can paste this into the code like so:
bot.run('<TOKEN>')
Again, this is best explained in video. Here's the clip:
<iframe type="text/html" frameborder="0" width="1280" height="720" src="https://www.youtube.com/embed/E96H2ls5dvU?start=455&end=486&iv_load_policy=3&rel=0&showinfo=0&vq=hd720" allowfullscreen></iframe>Now, you can run the bot! You should be able to type !<COMMAND NAME> in the Discord chat to trigger the command.
You can also make the bot send a message back by adding ctx.send('<MESSAGE>') to the async function.
To add more commands, you can copy and paste the command part in the code. Then, make a new applet in IFTTT. Change the following: Command name, IFTTT event name in URL, and the print and ctx.send messages.
