A solar-powered time-lapse camera for your plants.

Main Features:
- takes time-lapses of your plants outdoors
- solar-powered
- uses xiao esp32s3
- sends images to gofile.io api server
Table of Contents:
- ESP32 Plant CAM
Quick timelapse created from the ESP32 Plant Cam 😄!
Full instructional video coming soon...
-
Circuit Materials
-
Soldering Materials
- Solid Stranded Wire
- Heat Shrink
- Solder
-
Camera
-
Soldering Station
- Soldering Iron
- Solder Fume Extractor
-
3D Printer
Refer to this diagram for soldering all the components together:

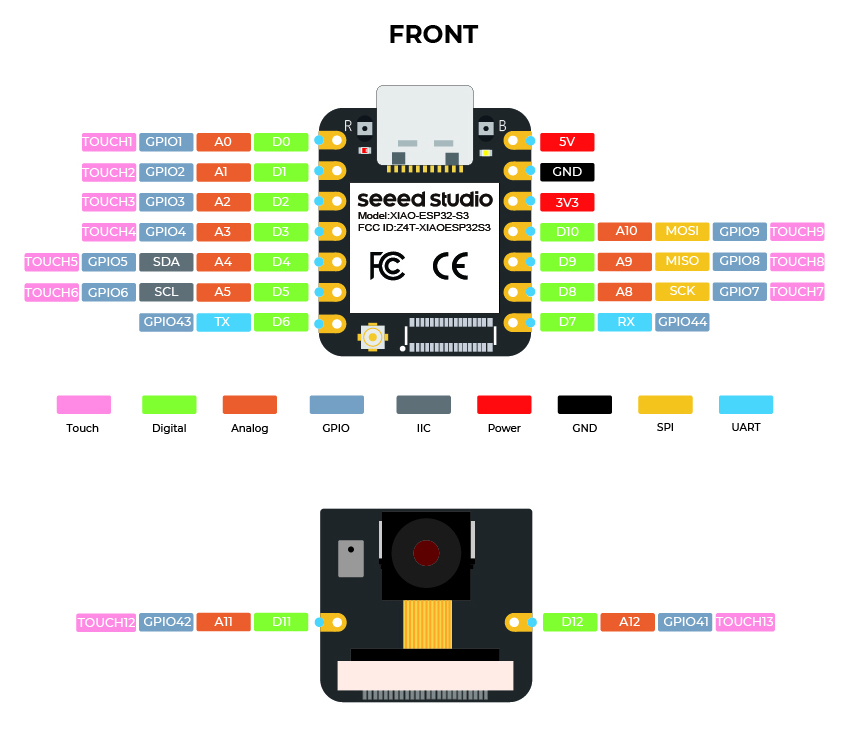
Use the XIAO ESP32S3 pinout diagram for on which pins to use when soldering:
-
Take off the camera module to expose the pin holes
-
Then solder the end of the JST 2-Pin Female Connector to the XIAO-ESP32S3
-
The red wire should go to the 3V3 pin
-
The black wire should go to the GND pin

-
-
Then connect the JST female end to the LOAD out port on the bq24074

-
Next, put the camera module back on the XIAO-ESP32S3

-
Next, plug in the LIPO battery to the bq24074
-
Finally, this is a bit annoying, but for the 6V 2W Solar Panel, you'll have to cut the male end off, feed it through the hole in the flanged weather proof enclosure, and solder it directly to the female barrel connector on the bq24074.
- I had to do this because if I plugged a male barrel connector in, it wouldn't fit on in the flanged weather proof enclosure I got.


-
Laser cut the assembly/back-board-cutout.svg on a 3mm thick piece of wood
-
3D print the plant_cam_xiao_holder.stl
- also use a soldering iron to insert the M3 threaded inserts

-
3D print the esp32 seatbelt seat_belt.stl
-
3D print 2 of the battery_holder.stl
-
Super glue the 3D prints to the backboard in this orientation:

-
Add all the electronics to the backboard in the same orientation as the picture
-
Add the seatbelt to over the ESP32S3 with 2 M3 screws to make sure it doesn't fall out


ℹ️: I want to improve this in the future and just make one solid 3D printed piece.
Reference: Seeed Studio | xiao esp32s3 Software Preparation
-
Install Arduino 2.3.7+
- Download Link: https://www.arduino.cc/en/software/
- Download Link for Nerds: https://github.com/arduino/arduino-ide/releases/tag/2.3.7
-
Add Board URL
- Navigate to: File -> Preferences
- In the text box labeled "Additional boards manager URL's" insert the following
https://raw.githubusercontent.com/espressif/arduino-esp32/gh-pages/package_esp32_index.json
- Then click OK
-
Install esp32 Board Drivers
- On the left side panel, click on the Boards Manager Icon
- Then search for "esp32"
- Install "esp32 by Espressif Systems"
- ❗ If you run into the DEADLINE_EXCEEDED error, follow this workaround
-
Select the esp32s3 board

-
IMPORTANT: Turn on PSRAM option
- Follow instructions
- Go to Tools > PSRAM
- Then select OPI PSRAM
- Follow instructions

- Get your gofile.io API token
-
Make an account

-
Go to My Profile

-
⭐ Copy your Account Token

-


-
Make folder for your Images
-
I created one called "plant_cam"

-
For your Folder, click on the three dots and click Properties

-
⭐ Copy your folder id:
- ℹ️ we will use this id to upload images to

-


-
Create a
config.hfile in the same folder asplant_cam.ino. └── plant_cam/ ├── camera_index.h ├── camera_pins.h ├── plant_cam.ino └── config.h <---- Create this file here
-
Get your gofile account token from step - setup gofile
-
Get your gofile folder id from step - get your gofile folder id
-
Add the following variables to the file, and fill out your own values:
const char *ssid = "YOUR_NETWORK_SSID";
const char *password = "YOUR_NETWORK_PASSWORD";
const String folderId = "YOUR_GOFILE_FOLDER_ID";
const String bearerToken = "YOUR_GOFILE_AUTHORIZATION_TOKEN";
- Finally, go ahead and upload the Arduino code to the XIAO ESP32S3
- Open up the weatherproof enclosure
- Slide the end of the backboard to align with the hole
- Screw 2 M6 screws to secure in place
- Finally, close the lid on the weather proof enclosure
- For mounting, I don't have specific instructions, because you can mount the enclosure and solar panel anywhere you want with the mounting holes.
- Personally, I just mounted it to some spare aluminum extrusion I had.
Refer to this diagram for soldering all the components together:
Use the XIAO ESP32S3 pinout diagram for on which pins to use when soldering:
The basic flow for code is:
- initialize the SD card
- initialize wifi <--- this will loop until successful
- initialize the camera
- take a photo
- send it to the gofile server
One useful tip for linux users is to use AppImageLauncher. I use Ubuntu and an AppImage for Arduino IDE 2.0, but one thing that annoys me about using an AppImage is having to keep track of where the AppImage executable is. To circumvent this problem, I learned about this tool called AppImageLauncher that manages your AppImages and integrates it in your desktop.
To avoid scope creep, I'll just write down my thoughts here, otherwise I'll never finish this project 😅. Some improvement ideas include:
- Having a LED to signal Wifi Connection
- I can only find out until it takes a picture
- Using a higher definition camera module with auto-focusing
- Maybe using a Raspberry Pi 3 Camera
- Overall design simplifications
- As I was writing the instructions, I realized how many steps there were to assemble this. To improve I think I can:
- make the back-board one assembled piece
- have a bigger weather proof enclosure to fit everything better.
- As I was writing the instructions, I realized how many steps there were to assemble this. To improve I think I can:
- esp32 plant cam - my cad files I designed for this project. It's probably not the best, I'm still learning.
- Waste Watcher Adafruit IO - a project I worked on before that also uses the esp32cam and uses Adafruit IO
- Waste Watcher - another similar project to the one above