Avaia is an AI-powered smart dustbin project designed for a CS exhibition. It combines an ESP32 microcontroller for hardware control (motor, ultrasonic sensor, servo, IR sensor) with a Python Flask backend for AI integration (OpenAI LLM, speech-to-text, text-to-speech) and web-based control. The dustbin can respond to voice commands to move to the user, open its lid, and return to a home position.
- Voice Control: Interact with the dustbin using natural language commands.
- Autonomous Navigation: The dustbin can move towards the user and return to a home position.
- Obstacle Avoidance: Basic obstacle detection using an ultrasonic sensor.
- Lid Automation: Automatic lid opening and closing via servo motor.
- IR Home Detection: Uses an IR sensor to detect its home base.
- Web Interface: A simple web interface for interaction and control.
- AI Integration: Leverages OpenAI for language understanding and response generation.
To build the Avaia Smart Dustbin, you will need the following hardware components:
- ESP32 Development Board: The microcontroller responsible for hardware control and Wi-Fi communication.
- L298N Motor Driver Module: To control the DC motors for movement.
- DC Motors (x2): For driving the dustbin.
- HC-SR04 Ultrasonic Sensor: For distance measurement and obstacle detection.
- MG90S Servo Motor: To control the dustbin lid.
- IR Sensor: For detecting the home position.
- Battery Pack (7.4V - 12V): To power the motors and ESP32.
- Jumper Wires, Breadboard, etc.
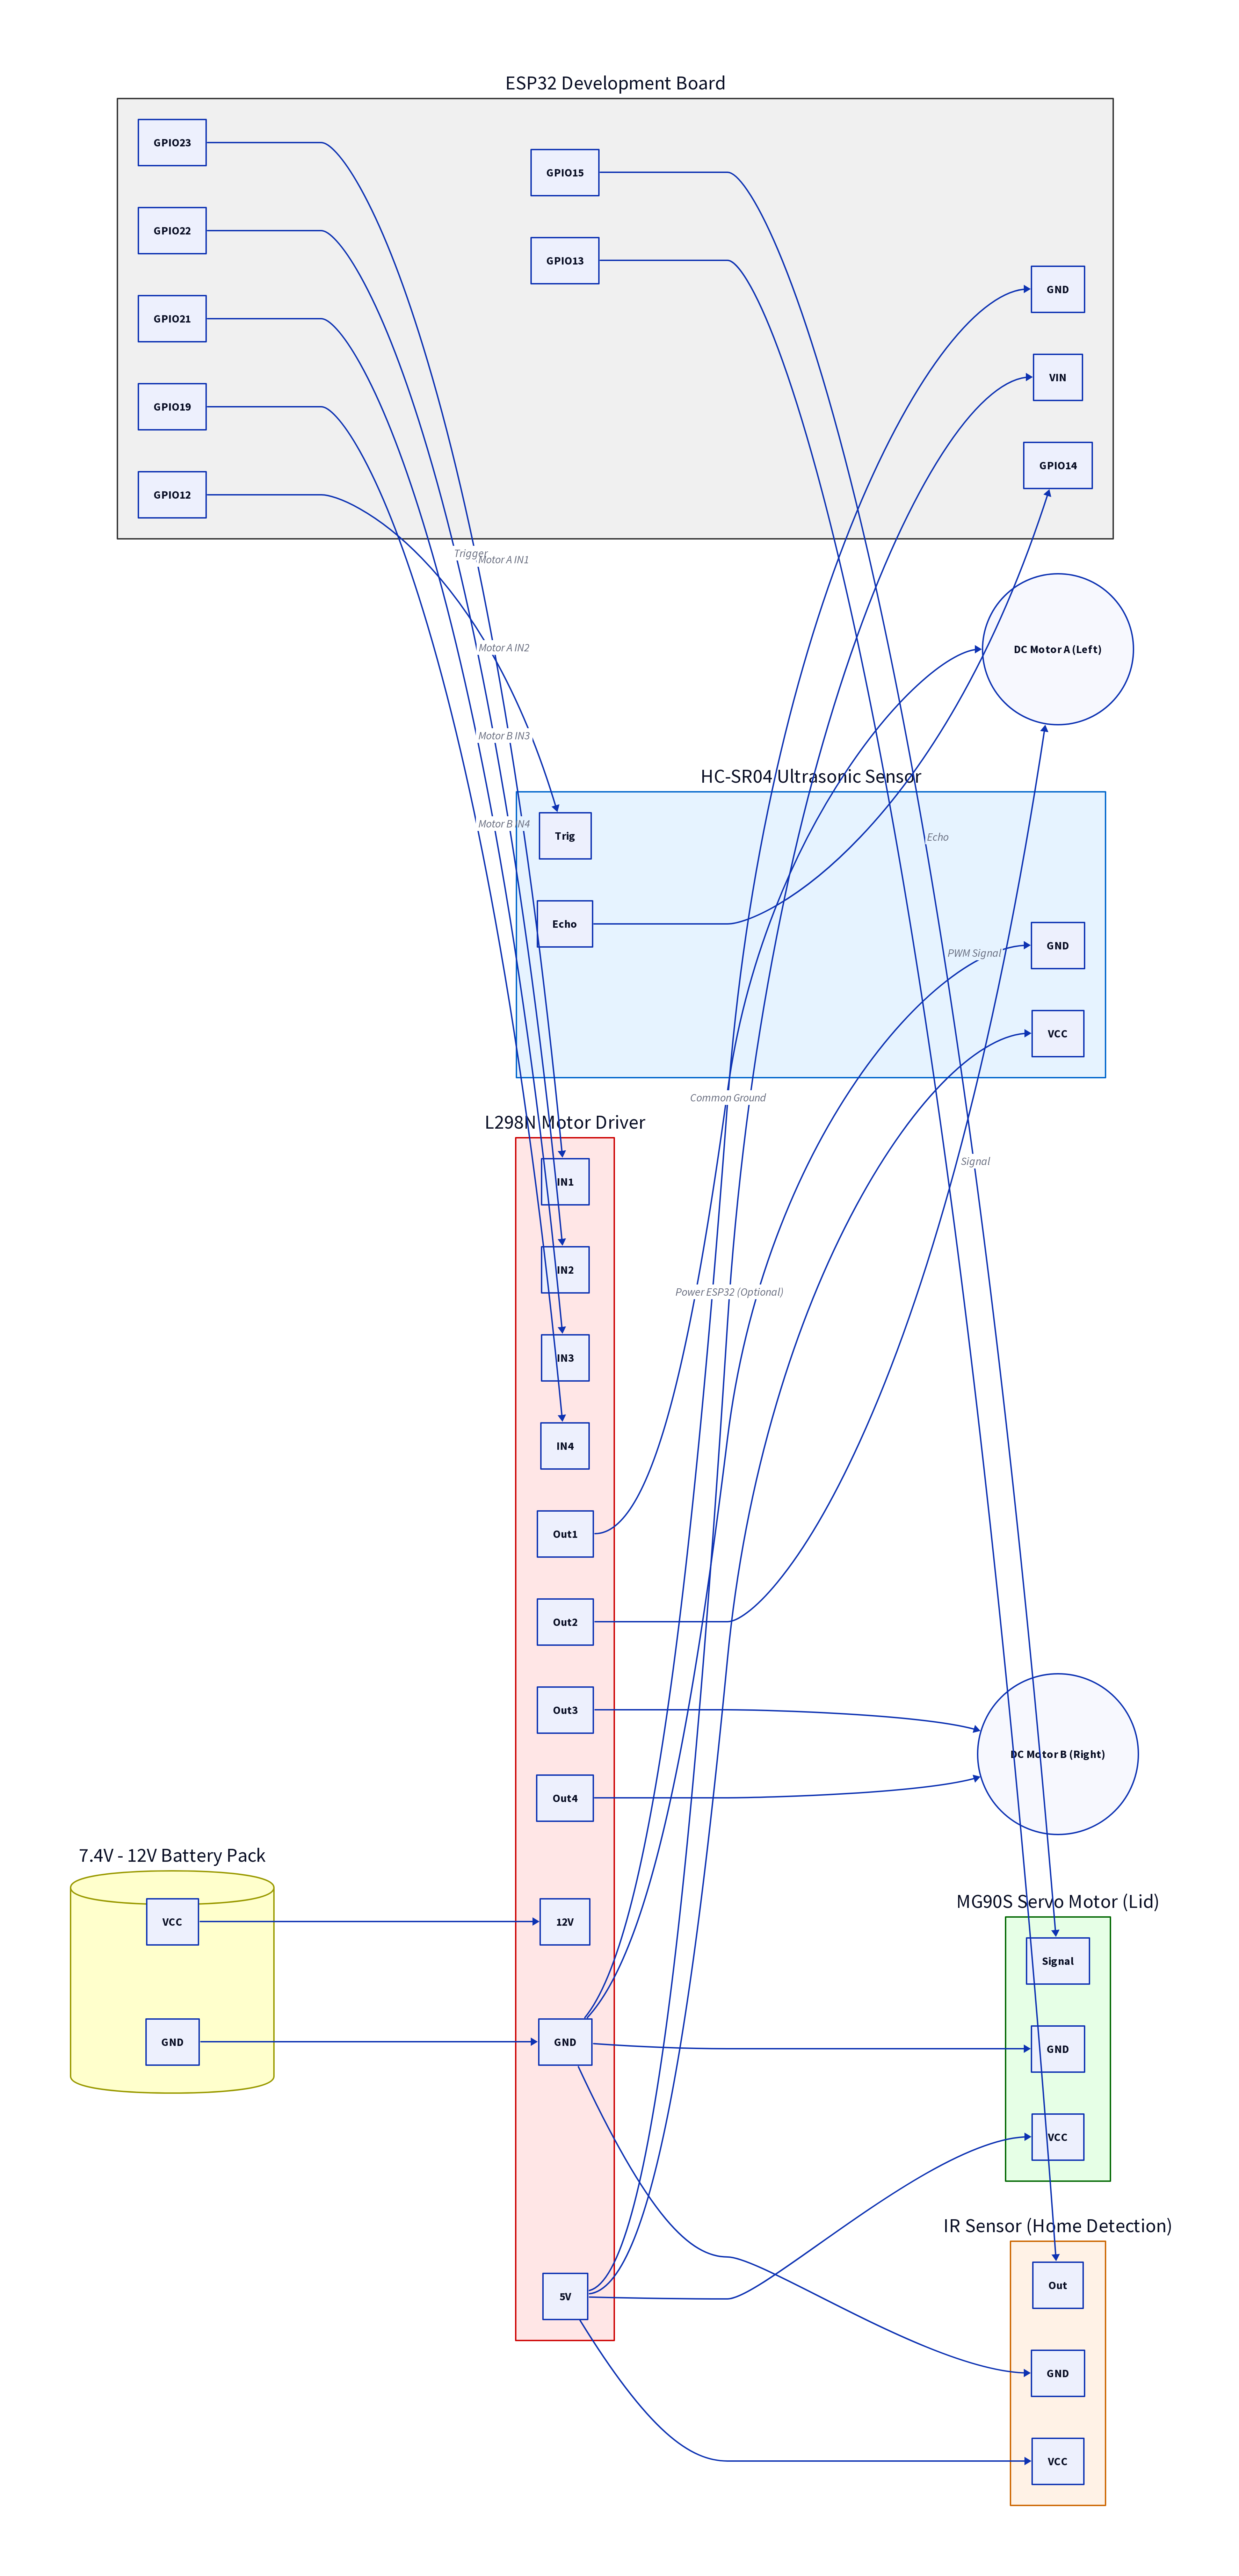
The following diagram illustrates the wiring connections between the ESP32 and the various components:
-
Motor Driver (L298N):
motorA_IN1(GPIO 23) -> L298N IN1motorA_IN2(GPIO 22) -> L298N IN2motorB_IN3(GPIO 21) -> L298N IN3motorB_IN4(GPIO 19) -> L298N IN4- L298N 12V -> Battery VCC
- L298N GND -> Battery GND & ESP32 GND (Common Ground)
- L298N 5V -> HC-SR04 VCC
- L298N 5V -> Servo VCC
- L298N 5V -> IR Sensor VCC
- L298N 5V -> ESP32 VIN (Optional, if not powered via USB)
-
Ultrasonic Sensor (HC-SR04):
trigPin(GPIO 12) -> HC-SR04 TrigechoPin(GPIO 14) -> HC-SR04 Echo
-
Servo Motor (MG90S):
servoPin(GPIO 15) -> Servo Signal Pin
-
IR Sensor:
irSensorPin(GPIO 13) -> IR Sensor Output Pin
- Install Arduino IDE: Download and install the Arduino IDE.
- ESP32 Board Manager: Add the ESP32 board manager URL to your Arduino IDE preferences and install the ESP32 boards.
- Go to
File > Preferences. - Add
https://raw.githubusercontent.com/espressif/arduino-esp32/gh-pages/package_esp32_index.jsonto "Additional Board Manager URLs." - Go to
Tools > Board > Boards Manager, search for "esp32" and install it.
- Go to
- Install Libraries:
WiFi.h(usually built-in with ESP32 core)HTTPClient.h(usually built-in with ESP32 core)ESP32Servo.h: Go toSketch > Include Library > Manage Libraries..., search for "ESP32Servo" and install.
- Upload
sketch_feb17a.ino:- Open
sketch_feb17a.inoin Arduino IDE. - Update
ssidandpasswordwith your Wi-Fi credentials (lines 6-7). - Update
serverAddresswith the IP address of your Python backend (line 33). - Select your ESP32 board and port (
Tools > Board,Tools > Port). - Upload the code to your ESP32.
- Open
-
Prerequisites: Ensure you have Python 3.8+ installed.
-
Navigate to Project Directory: Open your terminal or command prompt and navigate to the
Avaia BETA 2.0.0directory. -
Install Dependencies:
pip install -r requirements.txt
(Note: The following packages are likely needed:
flask,requests,openai,python-dotenv,langdetect,silero(or a compatible VAD/STT/TTS library). You may need to create this file manually or install them one by one.)Example
requirements.txtcontent:Flask requests openai python-dotenv langdetect # silero (or specific version if needed, or replace with actual VAD/STT/TTS) -
OpenAI API Key:
- Obtain an OpenAI API key from the OpenAI website.
- In
main.py(line 174) andserver.py(line 11), replace"OpenAI API key"with your actual OpenAI API key. - Alternatively, create a
.envfile in the same directory asmain.pyand addOPENAI_API_KEY="your_api_key_here".
-
Update ESP32 IP Address:
- In
main.py(line 116), updateDUSTBIN_IP_ADDRESS = "ESP32 IP"with the actual IP address of your ESP32. - In
server.py(line 14), updateDUSTBIN_IP_ADDRESS = "000.000.00.00"with the actual IP address of your ESP32.
- In
-
Run the Backend Server:
python main.py
or
python server.py
(Note: It appears there are two Flask applications,
main.pyandserver.py. You should clarify which one is the primary backend or if they serve different purposes. For a single integrated system, typically one Flask app handles all functionalities. If both are intended to run, they would need to run on different ports or be integrated into a single application.)
- Power On: Ensure your ESP32 and the Python backend are running.
- Access Web Interface: Open a web browser and navigate to the IP address of your Python backend (e.g.,
http://localhost:5000if running locally, or the server's IP address). - Voice Commands: Use the web interface to issue voice commands to the dustbin. Supported commands include:
- "Dustbin come here"
- "Dustbin open lid"
- "Dustbin go home"
- AI Interaction: You can also ask general questions to Avaia, the AI assistant.
- Wi-Fi Connection Issues: Double-check your
ssidandpasswordinsketch_feb17a.ino. - ESP32 IP Address: Ensure the
DUSTBIN_IP_ADDRESSin your Python files matches the actual IP address of your ESP32. - OpenAI API Key: Verify your OpenAI API key is correctly set and has the necessary permissions.
- Motor/Servo Not Responding: Check wiring connections and ensure sufficient power supply to the L298N motor driver.
- Ultrasonic Sensor Inaccurate: Ensure the sensor is clear of obstructions and correctly wired.
Feel free to fork this repository, submit pull requests, or open issues for any improvements or bug fixes.
This project is open-source and available under the MIT License.
For any questions or inquiries, please contact Om Girkar.