Advanced Motion Control
Advanced Motion Control is just a summary label for a new feature-set that aims at improving OpenPnP Motion Control. Better Motion Control should improve the precision and sometimes the speed of operations through various improvements.
Because Motion Control is such a fundamental function inside OpenPnP, the feature-set has touched many parts in a Machine Setup: Axes, Drivers, Nozzles, Cameras, Actuators and the new Motion Planners. To put it all together, this page must also touch and connect many of these topics.
Advanced Motion Control aims to improve these areas:
- Simpler all-GUI setup of Machine-Axes, Transformed-Axes and their assignment to Nozzles, Cameras etc. (no more
machine.xmlhacking). - Making features such as Axis Mapping, Backlash-Compensation, Visual-Homing, Non-Squareness Compensation etc. available for all types of drivers (formerly just the GcodeDriver).
- Allowing multiple drivers of mixed types.
- Simpler and more unified G-code configuration of axes in (multiple) drivers.
- Better control of speed factors: no longer just control maximum feed-rates, but also acceleration (and optionally jerk).
- Operations at reduced speeds perform much gentler, improving handling delicate parts, nozzle tip changing, mechanical feeder operation, etc.
- Separate control of (nozzle) rotation rate limits for (much needed) higher angular speeds.
- Add jerk control to ...
- ... reduce vibrations, therefore reduce needed camera settling times but also improve pick and place accuracy.
- ... prevent any slipping of parts on the nozzle (for cheap DIY vacuum systems).
- ... allow for higher peak acceleration without stalling steppers, improving the speed of long moves.
- Employ paralellized operation and asynchronous communication between OpenPnP and (multiple) controllers to improve throughput and reduce delays.
- (Experimental) Add motion blending, to improve speed.
- Add graphical diagnostics for Motion Planning as a basis for fact based machine optimization.
On one hand, adding jerk control does reduce the motion speed of the machine per se.
On the other hand, some of that loss can be regained through shorter Camera Settling times and it turns out (somewhat unexpectedly) through much improved pick accuracy, needing fewer bottom vision alignment passes or even allowing the elimination of bottom vision altogether for some parts (e.g. small passives). Other features clearly improve the speed, with the best improvment (motion blending) still being experimental.

Whether the machine will be slower or faster in the end, probably depends on the machine, the controller, the parts etc. but it seems that accuracy and reliability of operations will benefit for sure.
It is one design goal of the Advanced Motion Control feature set to be optional in OpenPnP and to provide a continuous experience for those who don't want to use it. Almost all the setting of a previous OpenPnP machine configuration should automatically be migrated to the new version. The machine should work the same way as before.
Some of the new features are visible in the GUI, such as Machine-Axes/Mapping-Axes that was formerly done by hacking the machine.xml file. Some features have moved to different parts of the GUI such as Backlash-Compensation. But all the really "advanced" features are initially inactive or even hidden to keep it simple. This guide aims to document these features so you can enable them step-by-step.
Note: as long as Advanced Motion Control is only available in the testing version and the older OpenPnP 2.0 versions are still in use, this guide also acts as a repository for instructions that have completely changed from the previous ways. Some parts may later be incorporated into existing Wiki pages to replace or complement existing instructions.
OpenPnP should migrate all but the most exotic machine setups automatically from previous OpenPnP 2.0 versions. After the migration, follow these initial steps to prepare for the Advanced Motion Control features:
-
If you use more than four axes on one controller: check out if you can use it without pre-move commands (the
Tletter commands used to switch between extruderEaxes). Smoothieware, Duet3D, Bill's fork of Marlin 2.0 and possibly others can be used with proper axis lettersA,B,Cinstead. Warning: if this is not the case, only a limited number of advanced features will be available. This guide assumes you do not have pre-move commands! -
Go to each of your GcodeDrivers, enable Letter Variables? and disable Pre-Move Commands? (other settings will be explained later).

-
The Axes are now in the GUI (formerly a proprietary part of the GcodeDriver). This guide assumes that you checked them out and read about the setup as needed for your machine. See the Machine-Axes, Transformed-Axes, Linear-Transformed-Axes pages plus the parts about Mapping-Axes and Backlash-Compensation.
-
Make sure you have assigned the correct Axis Letter to each controller axis as described in the Controller Settings.
-
Go to each of the GcodeDrivers and create a Default
MOVE_TO_COMMANDthat moves all the axes of your controller at once, using the Axis Letters as the variable names. Add the acceleration command in front. Make sure to move any G-code letter inside the curly brackets (including theFletter, formerly outside). Remove anyBacklashvariables and extra commands if present (best to start fresh):{Acceleration:M204 S%.2f} G1 {X:X%.4f} {Y:Y%.4f} {Z:Z%.4f} {A:A%.4f} {B:B%.4f} {FeedRate:F%.2f} ; move to target
-
Remove any
MOVE_TO_COMMANDs from the other Head Mountables. They are no longer needed. -
Create a Default
SET_GLOBAL_OFFSETS_COMMAND, again for all the axes of that controller at once and using the Axis Letters as the variable names:G92 {X:X%.4f} {Y:Y%.4f} {Z:Z%.4f} {A:A%.4f} {B:B%.4f} ; reset coordinates in the controller -
Delete any
POST_VISION_HOME_COMMAND. -
Create a
GET_POSITION_COMMAND. The command must report all axes (for Smoothieware, try M114.2 if it does not work and/or use my special firmware).M114 ; get position -
Create or change the
POSITION_REPORT_REGEX, again for all the axes of that controller at once and using the Axis Letters as the regex group names:^ok C: X:(?<X>-?\d+\.\d+) Y:(?<Y>-?\d+\.\d+) Z:(?<Z>-?\d+\.\d+) A:(?<A>-?\d+\.\d+) B:(?<B>-?\d+\.\d+).* -
Test the machine. Jog around a bit.

Motion Control Type Determines how the OpenPnP MotionPlanner will plan the motion and how it will talk to the controller:
-
ToolpathFeedRate:
Apply the nominal driver feed-rate limit multiplied by the speed factor to the tool-path. No acceleration control is applied. Behaves like earlier versions of OpenPnP.
Note: The driver feed-rate must be specified.
-
EuclideanAxisLimits:
Apply axis feed-rate, acceleration and jerk limits multiplied by the proper speed factors.
The Euclidean Metric is calculated to allow the machine to run faster in a diagonal, as long as the driver's Max Feed Rate does not limit it. Remove the driver's limit (set to 0) for best speed.
OpenPnP only sets the maximum limits. It is left to the controller to find the maximum rates it can reach for the length of the move.
-
ConstantAcceleration:
Apply motion planning assuming a controller with constant acceleration motion control. The maximum feed-rate is calculated and set.
-
ModeratedConstantAcceleration:
Apply motion planning assuming a controller with constant acceleration motion control but moderate the acceleration and velocity to resemble those of 3rd order control, resulting in a move that takes the same amount of time and has similar average acceleration.
This will reduce vibrations to a degree.
-
SimpleSCurve:
Apply motion planning assuming a controller with simplified S-Curve motion control.
Simplified S-Curves have no constant acceleration phase, only jerk phases. Examples are TinyG and Marlin (if enabled). Slow for longer moves.
-
Simulated3rdOrderControl:
Apply motion planning assuming a controller with constant acceleration motion control but simulating 3rd order control with time step interpolation.
-
Full3rdOrderControl:
Apply motion planning assuming a controller with full 3rd order motion control. No such controller is currently known.
Letter Variables changes the Gcode variable names (the {var } markers) from the stock 4-axis X, Y, Z, Rotation to the actual controller Axis Letters, i.e. X, Y, Z, A, B, C etc. simplifying commands. Allows defining commands for all the axes of the controller at once. Different MOVE_TO_COMMANDs for different Head Mountables are no longer needed. The motion planner can now move all the axes at once (not just 4), which is needed for some "motion blending" applications.
Allow Pre-Move Commands? must obviously be switched off for all-axis Letter Variables. Switching it off hides the pre-move command fields on the controller axes and allows some of the more advanced motion control features.
Remove Comments? removes all Gcode comments from the command strings sent to the controller. Safes bandwidth, which is relevant for Simulated3rdOrderControl mode, where the motion path interpolation creates a high volume of commands per time.
Compress Gcode? removes all unnecessary characters from the Gcode command, such as all whitespace, trailing floating point-zeros etc., again to safe bandwidth.
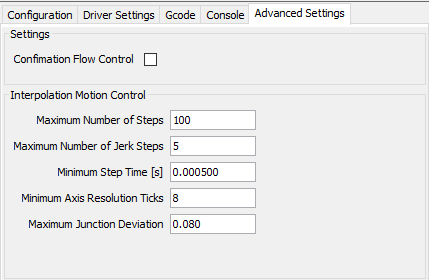
The GcodeAsyncDriver can improve the performance of sending commands to the controller. All commands are prepared and then only put into an outgoing queue. The queued commands are sent to the controller using a separate writer thread. OpenPnP no longer waits for a command to be acknowledged by the controller. Instead, the two sides can fully work in parallel. Multiple GcodeAsyncDrivers can also fully work in parallel. Only when there is a real functional need, are the participants waiting for each other.
Only the GcodeAsyncDriver allows you to use the Simulated3rdOrderControl mode, where a high volume of commands must be sent to the controller at great speed.
Caution: Be aware that using the asynchronous driver(s) changes the behavior of the machine. There is no longer a strict ping-pong between OpenPnP and the controller(s). Things can now happen in parallel. This is especially critical, if you are using multiple controllers. They no longer wait for each other, unless explicitly told to. Be careful when testing the machine for the first times, including the homing cycle.
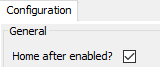
Perhaps switch off Home after Enable in the Machine:

- Close OpenPnP.
- Open the
machine.xmlfound here. - Search and replace GcodeDriver with GcodeAsyncDriver. Save.
- Restart OpenPnP.
--- WORK IN PROGRESS ---
 Search the Wiki