-
Notifications
You must be signed in to change notification settings - Fork 28
Open Street Map Tutorial
The goals of this tutorial are to:
- get the Schedoscope tutorial code running in the Cloudera Quickstart VM;
- watch Schedoscope doing its work;
- explore the results;
- explore metadata and data lineage with Metascope;
- watch Schedoscope dealing with change;
- understand the components of a view specification;
- get familiar with the Schedoscope test framework;
- get the tutorial running on your own Hadoop Cluster;
- show how to integrate Schedoscope with cron.
- Basic knowledge of Apache Hive
In this tutorial, we want to explore how one could find an ideal shop location using a Hadoop data warehouse controlled by Schedoscope.
We use geospatial data of the Hamburg area from the Open Street Map project. The data is available in two TSV files, which for convenience we provide by the Maven artifact schedoscope-tutorial-osm-data. The structure of the files looks like this:
    nodes  -- points on the map defined by longitude and latitude

      id BIGINT
      version INT
      user_id INT
      tstamp TIMESTAMP
      changeset_id BIGINT
      longitude DOUBLE
      latitude DOUBLE

    node_tags  -- tags describing a node's feature
      node_id BIGINT
      k STRING
      v STRING
For measuring the suitability of a shop location, we assume the following:
- The more restaurants are around, the more customers will show up. (+)
- The more trainstations are around, the more customers will show up. (+)
- The more other shops are around, the fewer customers will show up. They rather might go to the competitors. (-)
To measure distance, we use a geo hash. Two nodes are close to each other if they lie in the same area. A node's area is defined by the first 7 characters of GeoHash.geoHashStringWithCharacterPrecision(longitude, latitude).
-
Calculate each node's geohash
-
Filter for restaurants, trainstations, and shops
-
Provide aggregated data such that the measures can be applied; the aggregation is stored in view
schedoscope.example.osm.datamart/ShopProfiles. You can then find the best location for your shop by analyzingschedoscope.example.osm.datamart/ShopProfiles.
For the tutorial, we translated this plan into a hierarchy of interdependent Schedoscope views, i.e., Hive tables:

Let's get started:
-
Pull the docker image
docker pull ottogroupbi/cloudera-schedoscope-env:latest -
Start a docker container from the image and make sure that the port 7180 is forwarded in order to access the Cloudera Manager web interface.
docker run --hostname=quickstart.cloudera --privileged=true -p 8080:8080 -p 8888:8888 -p 7180:7180 -p 80:80 -p 18089:18089 -p 8088:8088 -p 19888:19888 -p 21050:21050 -it ottogroupbi/cloudera-schedoscope-env:latestIt may take a while until the container is ready and the terminal appears.
More information about the available ports can be found in the Cloudera documentation
-
Add the Spark 2 service to the cluster
-
Open the Cloudera Manager UI (http://localhost:7180) on your browser. Please login yourself with
- username: cloudera
- password: cloudera
-
On the Home > Status tab, click
 to the right of the cluster name Cloudera Quickstart and select Add a Service. A list of service types will be displayed and select Spark 2 as the service type. .
 -
Afterwards select HDFS, Hive, Spark, YARN (MR2 Included) and Zookeeper as dependencies for Spark 2
-
When customizing the role assignments, please choose the host quickstart.cloudera as history server and gateway.
-
TLS/SSL for History Server does not need to be activated.
-
Complete the steps to add Spark 2 service.
More information about adding a new service can be found on the Cloudera documentation
-
-
Make sure the directory /hdp has been properly created in HDFS.
hdfs dfs -ls /In case you could not connect to the HDFS, you should restart the Cloudera Management Service and the Cloudera Quickstart cluster. Afterwards you have to create the folder /hdp in HDFS manually.
[cloudera@quickstart ~]$ sudo su - hdfs -bash-4.1$ hdfs dfs -mkdir /hdp /user/cloudera -bash-4.1$ hdfs dfs -chown -R cloudera:cloudera /hdp /user/cloudera -bash-4.1$ exit -
The Schedoscope git repository has been already cloned in /home/cloudera/schedoscope.
-
Go into the directory
schedoscopeand build the project:[cloudera@quickstart ~]$ cd ~/schedoscope [cloudera@quickstart schedoscope]$ MAVEN_OPTS="-Xmx1G" mvn install -DskipTests
-
Launch Schedoscope:
[cloudera@quickstart schedoscope]$ cd ~/schedoscope/schedoscope-tutorial [cloudera@quickstart schedoscope-tutorial]$ SPARK_HOME="/opt/cloudera/parcels/SPARK2/lib/spark2" MAVEN_OPTS="-Xmx1G" mvn exec:java -
The Schedoscope Shell opens in the terminal. You can find the full command reference in the Schedoscope wiki.
-
Type
materialize -v schedoscope.example.osm.datamart/ShopProfilesto trigger all data ingestions and view computations leading to the requested view of shop profiles.
-
Type
viewsand see which views are already materialized with current data.schedoscope> views Starting VIEWS ... RESULTS ======= Details: +-----------------------------------------------------+--------------+-------+ | VIEW | STATUS | PROPS | +-----------------------------------------------------+--------------+-------+ | schedoscope.example.osm.processed/NodesWithGeohash/ | materialized | | | schedoscope.example.osm.processed/Nodes/2014/04 | transforming | | | schedoscope.example.osm.processed/Nodes/2014/10 | transforming | | | schedoscope.example.osm.processed/Nodes/2014/07 | transforming | | | schedoscope.example.osm.processed/Nodes/2014/01 | transforming | | | schedoscope.example.osm.processed/Nodes/2015/05 | transforming | | | schedoscope.example.osm.datahub/Restaurants/ | waiting | | | schedoscope.example.osm.processed/Nodes/2015/02 | transforming | | | schedoscope.example.osm.processed/Nodes/2014/12 | transforming | | | schedoscope.example.osm.datahub/Shops/ | waiting | | | schedoscope.example.osm.processed/Nodes/2014/09 | transforming | | | schedoscope.example.osm.stage/Nodes/ | materialized | | | schedoscope.example.osm.processed/Nodes/2014/03 | transforming | | | schedoscope.example.osm.processed/Nodes/2014/06 | transforming | | | schedoscope.example.osm.datamart/ShopProfiles/ | waiting | | | schedoscope.example.osm.stage/NodeTags/ | materialized | | | schedoscope.example.osm.processed/Nodes/2015/04 | transforming | | | schedoscope.example.osm.processed/Nodes/2014/05 | transforming | | | schedoscope.example.osm.processed/Nodes/2014/11 | transforming | | | schedoscope.example.osm.processed/Nodes/2015/01 | transforming | | | schedoscope.example.osm.processed/Nodes/2014/08 | transforming | | | schedoscope.example.osm.processed/Nodes/2014/02 | transforming | | | schedoscope.example.osm.datahub/Trainstations/ | waiting | | | schedoscope.example.osm.processed/Nodes/2015/03 | transforming | | | schedoscope.example.osm.processed/Nodes/2015/06 | transforming | | | schedoscope.example.osm.processed/Nodes/2013/12 | transforming | | +-----------------------------------------------------+--------------+-------+ Total: 26 materialized: 3 transforming: 19 waiting: 4 -
Type
transformations -s runningto see what is going on. -
Take a look at the resource manager of the virtual Hadoop Cluster in Firefox (http://localhost:8088/cluster) and see whether you can identify the running actions on the cluster.
-
Opening another terminal window, you can also take a look at the activity in the log file:
[cloudera@quickstart ~]$ tail -F ~/schedoscope/schedoscope-tutorial/target/logs/schedoscope.log -
Type
shutdownor^Cin the Schedoscope shell if you want to stop Schedoscope. You should wait for it to complete the materialization of views to continue with the tutorial, though. This might take up to an hour.
Open a new terminal. Use the Hive CLI to see the data materialized by Schedoscope:
-
Start Hive:
[cloudera@quickstart ~]$ hive -
List the databases that Schedoscope automatically created:
hive> show databases;The database names look like
{environment}_{packagename}, with the dots in the package name of the materialized views replaced by underscores. The environment is set in~/schedscope/schedoscope-tutorial/src/main/resources/schedoscope.conf. -
List the tables of a database:
 hive> use demo_schedoscope_example_osm_datamart;
 hive> show tables;
A table name is the name of the corresponding view class extending base class
Viewin lower case. E.g.NodesWithGeohashbecomes a Hive table namednodes_with_geohash. -
List the columns of a table:
hive> describe shop_profiles;Column names are the same as the names of the fields specified in the corresponding view class, similarly transformed to lower case.
-
List the first 10 entries of a table:
hive> select * from shop_profiles limit 10; -
Take a look around the tables yourself.
As one can see, every tutorial table does contain columns
id,created_at(when was the data loaded) andcreated_by(which Job provided the data). These fields are defined using common traits carrying predefined fields. -
Let's take a surprised look at the MySQL server running in the quickstart VM:
 [cloudera@quickstart ~]$ mysql schedoscope_tutorial -u root -pcloudera

 mysql> select * from demo_schedoscope_example_osm_datamart_shop_profiles limit 10;
A MySQL export has been configured with the
ShopProfilesview. As a result, not only hasShopProfilesbeen materialized in Hive; after transformation, Schedoscope created an equivalent table in MySQL and exportedShopProfilesto that table using a mapreduce job. Schedoscope's export module supports simple, parallel export to [JDBC](JDBC Export), [Redis](Redis Export), [Kafka](Kafka Export), and [(S)FTP]((S)FTP Export).
Metascope is a metadata management platform for Schedoscope. It lets you browse and search your views, their schema information, data lineage and many more through a REST API or web interface.
Let's start Metascope:
-
Open a new terminal (Note: Schedoscope still needs to be running).
-
Change the directory and start Metascope:
 [cloudera@quickstart ~]$ cd schedoscope/schedoscope-metascope
 [cloudera@quickstart ~]$ SPARK_HOME="/opt/cloudera/parcels/SPARK2/lib/spark2" MAVEN_OPTS="-Xmx1G" mvn exec:java -Dconfig.file=../schedoscope-tutorial/src/main/resources/schedoscope.conf
Metascope will start an embedded web server, connect to Schedoscope, the Hive Metastore and the HDFS, retrieve all necessary metadata and write it to the repository. Depending on the amount of your views and your data, this may take a while. In this tutorial, it shouldn't take more than a minute.
-
Browse to http://localhost:8080 and login with user
adminand passwordadmin
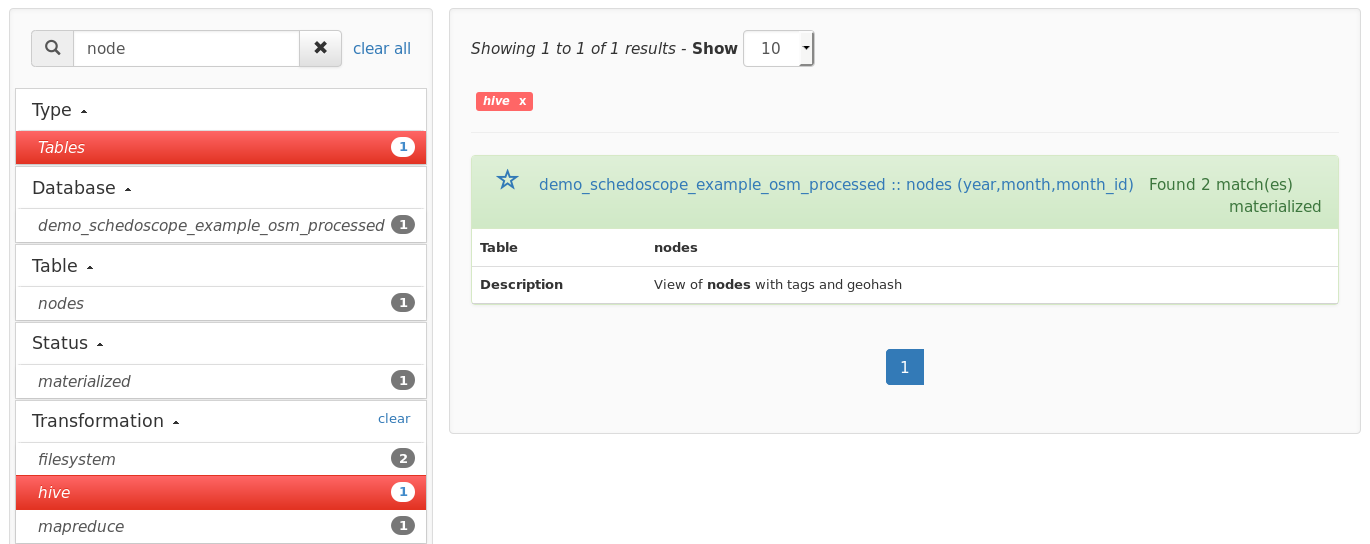
Metacope offers you various ways to navigate and browse through the metadata of your datahub. Use the facetted filters and search functionality to find the view you need.

Click on a view to open the table detail page. This page shows all critical metadata of the selected table. Use the navigation tabs to browse through the different sections, e.g. click on 'Sample' tab to view a sample of the data:

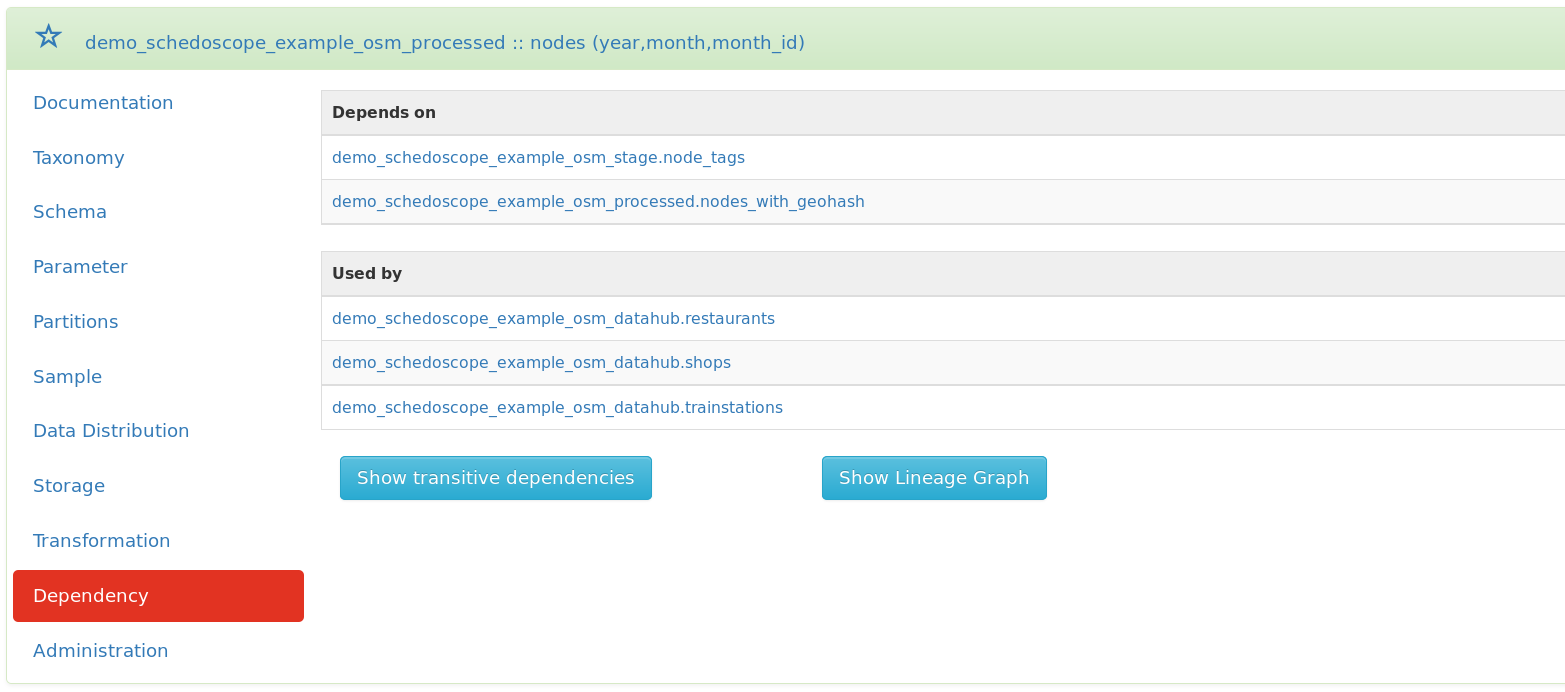
You need to know the dependencies for a table or need to figure out which other tables are using a specific view? Click on the 'Dependency' tab:

Take a look at the lineage graph to get a better understanding of your data lineage on the view level. Click on the nodes to expand the lineage tree by a level.

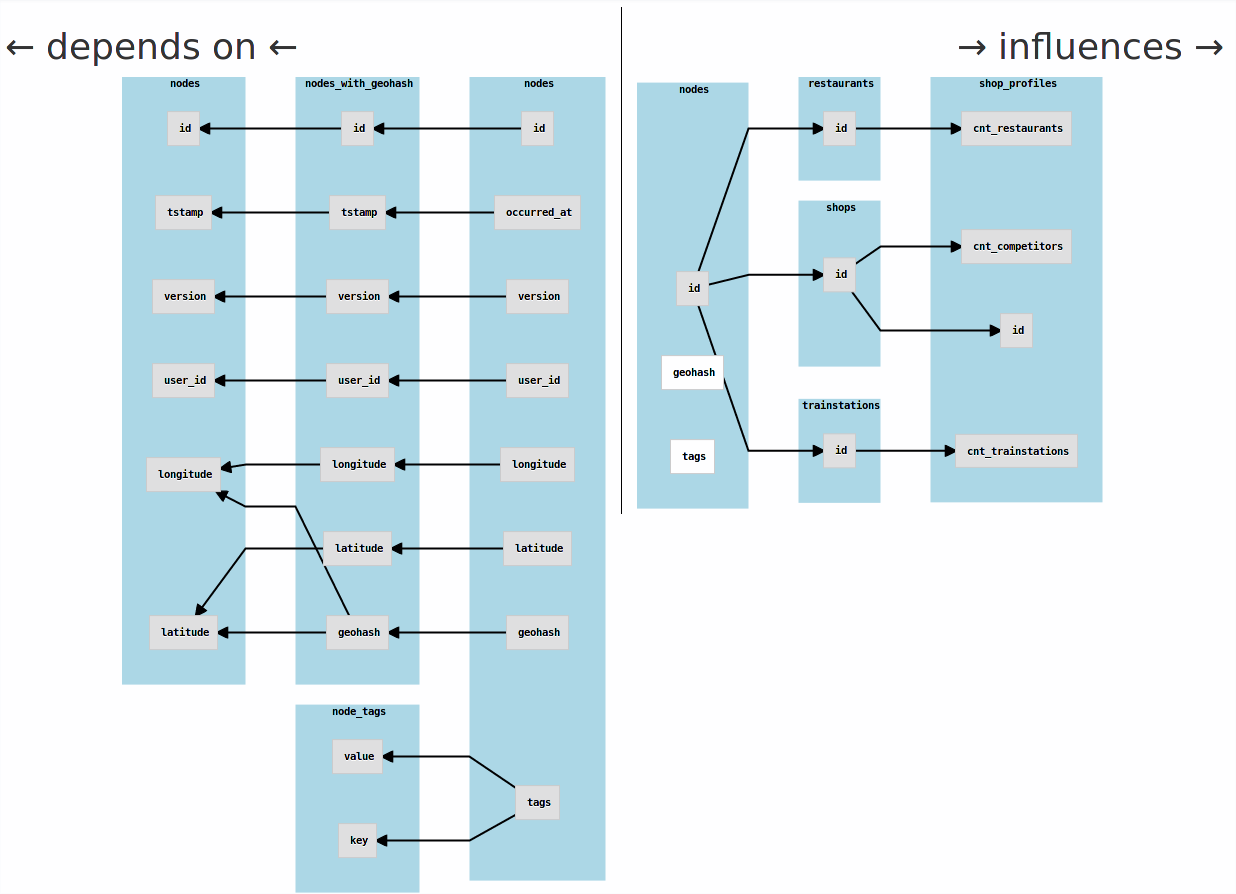
On top of the view-level lineage, you can also analyze field-level lineage with Metascope. Click on the Schema tab to take a look at the view's schema. The button Show Lineage Graph at the very bottom of the page opens a graphical representation of the field-level lineage that is analogous to the view-level lineage.

This graph is separated into two parts, showing the forward lineage (influences) and backward lineage (dependencies). You can explore the lineage data by clicking on the graph's nodes, which will fade-in another level of it.

Check the Metascope Primer to get a complete list of features which Metascope has to offer.
One way to deal with change is to explicitly retrigger computation of views:
-
Type
invalidate -v schedoscope.example.osm.datahub/Restaurantsin the schedoscope shell. This is how to manually tell Schedoscope that this view shall be recalculated.schedoscope> views Starting VIEWS ... RESULTS ======= Details: +-----------------------------------------------------+--------------+-------+ | VIEW | STATUS | PROPS | +-----------------------------------------------------+--------------+-------+ | schedoscope.example.osm.processed/NodesWithGeohash/ | materialized | | | schedoscope.example.osm.processed/Nodes/2015/05 | materialized | | | schedoscope.example.osm.datahub/Restaurants/ | invalidated | | | schedoscope.example.osm.datamart/ShopProfiles/ | materialized | |
...
    |     schedoscope.example.osm.processed/Nodes/2015/06 | materialized |       |
    |     schedoscope.example.osm.processed/Nodes/2013/12 | materialized |       |
    +-----------------------------------------------------+--------------+-------+
    Total: 26

    materialized: 25
    invalidated: 1
-
Type
materialize -v schedoscope.example.osm.datamart/ShopProfilesType
viewsto see that onlydemo_schedoscope_example_osm_datahub.restaurantsand its depending viewdemo_schedoscope_example_osm_datamart.ShopProfilesare recalculated. Schedoscope knows that the other views' data still is up-to-date.| schedoscope.example.osm.processed/NodesWithGeohash/ | materialized | | | schedoscope.example.osm.processed/Nodes/2014/04 | materialized | | | schedoscope.example.osm.processed/Nodes/2015/05 | materialized | | | schedoscope.example.osm.datahub/Restaurants/ | transforming | | | schedoscope.example.osm.datahub/Shops/ | materialized | | | schedoscope.example.osm.stage/Nodes/ | materialized | | | schedoscope.example.osm.datamart/ShopProfiles/ | waiting | | | schedoscope.example.osm.stage/NodeTags/ | materialized | | | schedoscope.example.osm.datahub/Trainstations/ | materialized | | +-----------------------------------------------------+--------------+-------+ Total: 26 materialized: 24 transforming: 1 waiting: 1 -
Switch to Hive CLI and compare column
created_atofrestaurantsandshops. As you can see tablerestaurantshas been written again during recalculation. Tableshopshas not been touched. -
Have a look at the logfile
schedoscope/schedoscope-tutorial/target/logs/schedoscope.log. -
Once everything has been materialized, type
shutdownto stop Schedoscope.
Way more interesting is to see Schedoscope discover change all by itself, however!
-
Make sure all views have been materialized and that you have quit the Schedoscope shell.
-
Go back to the
schedoscope-tutorialfolder:cd ~/schedoscope/schedoscope-tutorial -
Open the query that computes the
Restaurantsview in an editor:[cloudera@quickstart schedoscope-tutorial]$ vim src/main/resources/hiveql/datahub/insert_restaurants.sql -
From now on, restaurant names are to be uppercase. So wrap the statement
tags['name'] AS restaurant_name,into
ucase(tags['name']) AS restaurant_name, -
Save your work and go back to the shell.
-
Recompile the tutorial (skipping tests, as the restaurant test will fail now):
[cloudera@quickstart schedoscope-tutorial]$ mvn install -DskipTests -
Relaunch Schedoscope:
[cloudera@quickstart schedoscope-tutorial]$ mvn exec:java -
Materialize
schedoscope.example.osm.datamart/ShopProfiles/again:schedoscope> materialize -v schedoscope.example.osm.datamart/ShopProfiles -
Watch Schedoscope rematerialize
schedoscope.example.osm.datahub/Restaurantsandschedoscope.example.osm.datamart/ShopProfileswithout any explicit migration commands from your side. No other views are recomputed because they are not affected by the change.The criteria for detecting changes to transformation logic depend on the respective transformation type. Please have a look at the various transformation type descriptions for more information on this topic.
-
Take again a look at the MySQL database:
 [cloudera@quickstart ~]$ mysql schedoscope_tutorial -u root -pcloudera

 mysql> select * from demo_schedoscope_example_osm_datamart_shop_profiles limit 10;
Note how the changes have been reflected by the MySQL export as well.
In order to understand how the demonstrated functionality is possible, it is time to look at the constituents of a view specification. This is best done from within a Scala IDE.
-
Download Scala IDE for Eclipse into your quickstart VM (Note that you can also use IntelliJ).
[cloudera@quickstart ~]$ wget http://downloads.typesafe.com/scalaide-pack/4.4.0-vfinal-luna-211-20160401/scala-SDK-4.4.0-vfinal-2.11-linux.gtk.x86_64.tar.gz -
Extract it to a folder and launch it:
[cloudera@quickstart ~]$ tar xzf scala-SDK-4.4.0-vfinal-2.11-linux.gtk.x86_64.tar.gz [cloudera@quickstart ~]$ cd eclipse; ./eclipse -
Select
File > Import > Maven > Existing Maven Projects -
Choose the root folder
~/schedoscope -
Check all pom.xml files offered to you (schedoscope-suite, -export, -core, -tutorial, -metascope)
-
Choose import
Finally, we are able to take a look at the ShopProfiles view. Press CTRL-T and start to type ShopProfile and you should be able to select ShopProfiles.scala in the dialog that pops up. The file looks like this:
case class ShopProfiles() extends View
    with Id
    with JobMetadata {

  val shopName = fieldOf[String]("The name of the profiled shop")
  val shopType = fieldOf[String]("The type of shop, as given by OSM")
  val area = fieldOf[String]("A geoencoded area string")
  val cntCompetitors = fieldOf[Int]("The number of competitors in the area (shops of the same type)")
  val cntRestaurants = fieldOf[Int]("The number of restaurants in the area")
  val cntTrainstations = fieldOf[Int]("The number of trainstations in the area")

  dependsOn { () => Shops() }
  dependsOn { () => Restaurants() }
  dependsOn { () => Trainstations() }

  transformVia { () =>
    HiveTransformation(
      insertInto(
        this,
        queryFromResource("hiveql/datamart/insert_shop_profiles.sql"),
        settings = Map("parquet.compression" -> "GZIP")))
      .configureWith(defaultHiveQlParameters(this))
  }

  comment("Shop profiles showing number of nearby competitors, restaurants and trainstations for each shop")

  storedAs(Parquet())

  exportTo(() => Jdbc(this, "jdbc:mysql://localhost:3306/schedoscope_tutorial?createDatabaseIfNotExist=true", "root", "cloudera"))
}
As you can see:
-
The specification lists all the fields either directly (via
fieldOf) or indirectly (via the traitsIdandJobMetadata) that ended up in theshop_profilestable. The names of the fields have merely been changed from camel-case to lower case with underscores. -
Likewise, the table name as well as database name have been derived from the package and the case class names.
-
The specification also defines the storage format.
As a consequence, Schedoscope had all the data structure information at hand to create the Hive table.
Next,
- the specification defines the dependencies of
ShopProfiles(viadependsOn). It depends on the viewsShops,Restaurants, andTrainstations.
Given this knowledge of data dependencies, Schedoscope was able to infer a correct materialization and transformation order of views.
Finally,
-
the specification defines the transformation logic (using
transformVia). It is a Hive query kept in the fileinsert_shop_profiles.sql. -
Also, it defines the export to MySQL.
Hence, Schedoscope was able to compute ShopProfiles from Shops, Restaurants, and Trainstations.
What's essential: only because this explicit definition of data structure, dependencies, and logic, Schedoscope is able to identify when changes to structure and logic happen, and to derive a minimal transformation / materialization plan to accommodate the changes.
Refer to the [Schedoscope View DSL Primer](Schedoscope View DSL Primer) for more detailed information about the capabilities of the Schedoscope view DSL.
Schedoscope comes with a nice [Test Framework](Test Framework) that facilitates quick testing of code.
-
You can run a test by right clicking on a test class in the Scala IDE's package explorer (e.g.,
schedoscope-tutorial/src/test/scala/schedoscope/example/osm/datahub/RestaurantsTest.scalaand choosingRun As > Scala Test - File -
Initially, this will fail because you need to provide a
HADOOP_HOMEenvironment variable setting. Lookup the IDE's run configuration for your failed test and setHADOOP_HOMEto~/schedoscope/schedoscope-tutorial/target/hadoop. The Schedoscope test framework will automatically deploy a local Hadoop installation in that folder.

-
Rerun the test.
-
Look at the test:
 case class RestaurantsTest() extends FlatSpec
     with Matchers {

   val nodes = new Nodes(p("2014"), p("09")) with rows {
     set(v(id, "267622930"),
       v(geohash, "t1y06x1xfcq0"),
       v(tags, Map("name" -> "Cuore Mio",
         "cuisine" -> "italian",
         "amenity" -> "restaurant")))
     set(v(id, "288858596"),
       v(geohash, "t1y1716cfcq0"),
       v(tags, Map("name" -> "Jam Jam",
         "cuisine" -> "japanese",
         "amenity" -> "restaurant")))
     set(v(id, "302281521"),
       v(geohash, "t1y17m91fcq0"),
       v(tags, Map("name" -> "Walddörfer Croque Café",
         "cuisine" -> "burger",
         "amenity" -> "restaurant")))
     set(v(id, "30228"),
       v(geohash, "t1y77d8jfcq0"),
       v(tags, Map("name" -> "Giovanni",
         "cuisine" -> "italian")))
   }

   "datahub.Restaurants" should "load correctly from processed.nodes" in {
     new Restaurants() with test {
       basedOn(nodes)
       then()
       numRows shouldBe 3
       row(v(id) shouldBe "267622930",
         v(restaurantName) shouldBe "Cuore Mio",
         v(restaurantType) shouldBe "italian",
         v(area) shouldBe "t1y06x1")
     }
   }
 }
As you can see, because Schedoscope views have knowledge about data structure and logic, the test framework is able to exploit that for concise specification of test fixtures, automatic setup of the test environment, and compact specification of assertions.
You can get the tutorial running on your own hadoop cluster.
Install the Schedoscope tutorial on a gateway machine to your cluster:
-
Clone the source code (see Installation Step 4).
-
Prepare a
/hdpfolder in your cluster's HDFS and give proper write permissions for the user with which you want to execute Schedoscope. (similar to Installation Step 3). -
Then change the configuration settings in
schedoscope-tutorial/src/main/resources/schedoscope.confto match the needs of your cluster. The default configuration settings are defined inschedoscope-core/src/main/resources/reference.conf. They are overwritten by the settings you define inschedoscope.conf. Perform the following changes:schedoscope { app { # The chosen environment name is set as root HDFS folder. # The data for each view will end up in `/hdp/${env}/${package_name}/${ViewName}`. environment = "yourenvironmentasyoulikeit" } hadoop { resourceManager = "yourhost:yourport" nameNode = "hdfs://yourhost:yourport" } metastore { metastoreUri = "thrift://your/Hive/metastore/uri" jdbcUrl = "your/Hive/jdbc/uri" # include the kerberos principal if needed } kerberos { principal = "your/kerberos/principal" # if needed } transformations = { Hive : { libDirectory = "/your/local/absolute/path/to/schedoscope/schedoscope-tutorial/target/Hive-libraries" } } } -
Compile Schedoscope (similar to Installation Step 5).
Go into directory schedoscope/schedoscope-tutorial and execute the tutorial using your own hadoop cluster:
mvn exec:java
Schedoscope offers an HTTP API. The API is particularly useful for automating job runs and connecting Schedoscope to shell scripts or other ETL tools.
For example, if you want your data up-to-date 5 minutes past every hour during business time (8am-8pm) simply register a cronjob, such as:
5 8-20 * * * curl http://localhost:20698/materialize/schedoscope.example.osm.datamart/ShopProfiles
The registered GET request is the HTTP API equivalent to the materialize -v schedoscope.example.osm.datamart/ShopProfiles command you have issued on the shell before. Upon receiving this request, Schedoscope will check for new or changed direct or indirect dependencies to ShopProfiles, for structural changes, and changes of transformation logic. Only if any of these criteria apply, Schedoscope will trigger a (re-)computation.
Our example data was taken from the Open Street Map project
