Repository navigation
Control GPIOs
This module makes extensive use of a character device. If you are not comfortable with them, check this page first. In order to communicate with GPIOs, we can build a character device to which we write and read data depending if we want to set a value (e.g. lighting up an LED) or read a value (e.g. read the status of a button).
Check the GPIO pinout of the board and choose a couple of pins to connect an LED and a button.
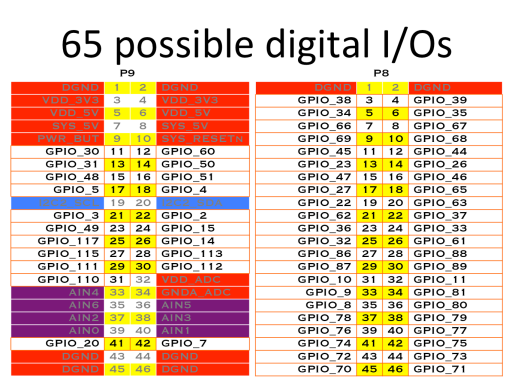
For the following example, I chose GPIO 49 (pin 23 on P9) for the LED and pin 117 (pin 25 on P9) for the button. Don't forget a pull-down resistor on the button and a current-limiting resistor for the LED.
GPIOs are readily available from the CLI. See what happens with the following commands:
debian@beaglebone:~$ cd /sys/class/gpio/
debian@beaglebone:/sys/class/gpio$ sudo su
root@beaglebone:/sys/class/gpio# echo 49 > export
root@beaglebone:/sys/class/gpio# cd gpio49
root@beaglebone:/sys/class/gpio/gpio49# ls
active_low  device  direction  edge  label  power  subsystem  uevent  value
root@beaglebone:/sys/class/gpio/gpio49# echo out > direction
root@beaglebone:/sys/class/gpio/gpio49# echo 1 > value
root@beaglebone:/sys/class/gpio/gpio49# echo 0 > value
root@beaglebone:/sys/class/gpio/gpio49# cd ..
root@beaglebone:/sys/class/gpio# echo 49 > unexport
We just controlled an LED by writing some values in registers.
We will engineer the LKM code around a basic character device (go build one if you haven't done it before!).
We start by defining some macros for the GPIOs.
#define GPIO_BUTTON 117
#define GPIO_LED 49
The open() and close() functions are exactly the same, and so is the file operations structure.
The initialisation function still needs to create a device, but we also need to request some GPIOs.
- Request the GPIO using
gpio_request(), undone withgpio_free(). - Set the GPIO direction with
gpio_direction_output()orgpio_direction_input(). - Export the GPIO so that is appears in SYSFS with
gpio_export(), undone withgpio_unexport().
/* The second string is custom */
if(gpio_request(GPIO_LED, "bbb-gpio-49")) {
	goto GPIORequestError;
}
/* Set GPIO direction */
/* Second argument is the value at initiatlisation, 0 or 1. */
if(gpio_direction_output(GPIO_LED, 1)) {
	goto GPIOLEDError;
}
/* Export GPIO so that it appearts in SYSFS */
gpio_export(GPIO_LED, false);
The goto Error send to a point in the code where we undo anything that has been done previously.
In the __exit function, we need to undo all the GPIO registration.
gpio_set_value(GPIO_LED, 0); /* Set the GPIO value to 0 before freeing it. */
gpio_unexport(GPIO_LED);
gpio_free(GPIO_LED);
The device_write() callback is used for GPIOs set as outputs.
This time, the buffer contains only a single value of interest to us: 1 or 0 to set the pin high or low.
static ssize_t driver_write(struct file *File, const char *user_buffer, size_t count, loff_t *offs) {
	int to_copy, not_copied, delta;
	char value;
	to_copy = min(count, sizeof(value));
	not_copied = copy_from_user(&value, user_buffer, to_copy);
	switch(value) {
	case '0':
		gpio_set_value(GPIO_LED, 0);
		break;
	case '1':
		gpio_set_value(GPIO_LED, 1);
		break;
	default:
		printk("Invalid input: %d\n",value);
	}
	delta = to_copy - not_copied;
	return delta;
}
On the other hand, the driver_read() callback is used for input devices (such as a button).
static ssize_t driver_read(struct file *File, char *user_buffer, size_t count, loff_t *offs) {
	int to_copy, not_copied, delta;
	/* Array for three characters:
	[0] a dummy space (that will hold our value
	[1] New line for nice displaying in terminal. Remove if not necessary.
	[2] \0 end of string. (implicit) */
	char tmp[3] = " \n";
	/* Amount of data to copy */
	to_copy = min(count, sizeof(tmp));
	/* Read value of button */
	/* gpio_get_value() return 0 or 1, but we would like to store the
	ASCII character '0' or '1' so that we can display it.
	To that end, we offset the value with the ASCII character '0'. */
	printk("Value of button: %d\n", gpio_get_value(GPIO_BUTTON));
	tmp[0] = gpio_get_value(GPIO_BUTTON) + '0';
	not_copied = copy_to_user(user_buffer, &tmp, to_copy);
	delta = to_copy - not_copied;
	return delta;
}
Don't forget to include <linux/gpio.h>, build it using the usual Makefile and you should be ready to go.
A full example is available in the repository.
If the insertion went well, we should see our GPIO registration in /sys/kernel/debug/gpio:
debian@beaglebone:~/LKM/GPIO$ cat /sys/kernel/debug/gpio
[...]
 gpio-49  (GPMC_A1             |bbb-gpio-49         ) out lo
[...]
If you don't see it marked with the correct direction and state, something went wrong.
We can now control it from CLI again (don't forget to set a udev rule).
debian@beaglebone:~/LKM/GPIO$ sudo insmod LKM_gpio.ko
debian@beaglebone:~/LKM/GPIO$ echo 1 > /dev/LKM_gpio
debian@beaglebone:~/LKM/GPIO$ echo 0 > /dev/LKM_gpio
Alternatively, we can write a program that sends or read data from the device /dev/LKM_gpio in a similar fashion to the basic character device.