GradBot Student Assignments
In this assignment, you will construct a function that will allow you to easily set your robot’s translational and rotational speeds. This function will be a handy function, and we will make use of it throughout future lab assignments.
Recall that the kinematic model of our robot consists of the following equations:
- x translational speed in m/s
$$V_{x}= \frac{r}{2}(S_{left}+S_{right})$$
- yaw rotational speed in radians/s
$$V_{yaw}= \frac{r}{L}(S_{left}-S_{right})$$
- motor speed in radians per second
$$S_{m}= \frac{(Power⋅6.80)}{100}$$
- r=0.065 m, L=0.238 m
-
Working as a class, solve the equations so that given a desired Vx and Vyaw, we can compute a corresponding power setting for the motors.
-
Type in the following skeleton of a function:

-
Complete the function by implementing the math that you developed in step 1 in the part that says “YOUR CODE HERE”.
-
Use your function to perform the following actions:
a. Have your robot roll forward 1 meter.
b. Have your robot roll in a circle that is 2 meters in diameter.
c. Have your robot stop after completing the circle.
- Open notepad and create a file on your flash drive called “functions.txt”, copy the setSpeed function into this file so we can use it again later.
In this lab, we will be implementing turtle graphics. Turtle graphics is a classic way to introduce programming and robotics. The idea is that your robot will use a marker to draw on the floor as it moves, and you will write programs to draw creative images.
- Add a marker to your robot. The best place for the marker to be is in the center of your robot, so don’t move it once you add it. The final robot should look something like this:
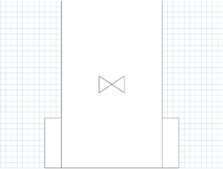
- Rename the marker part to “marker” as shown above.
-
Enter the functions as shown in the section titled "Turtle Functions" in Lab 2.
-
Copy all your new functions into the “functions.txt” file on your flash drive. These may prove useful!
-
Take a look at the function “toRadians”
Note: Turtle graphics uses degrees, not radians in their commands as this is easier to think of while drawing shapes.
- Take a look at the four basic turtle commands:
a. forward(d)
b. back(d)
c. turnLeft(d)
d. turnRight(d)
- Take a look at the reference for the marker. You can raise and lower the pen, and you can change its color.
- Enter the following code below the line of slashes:
marker.penUp();
await forward(5);
await turnRight(90);
await forward(5);
await turnLeft(90);
marker.penDown();

for(var i=1; i <= 4; i = i+1) {
  await forward(2);
  await turnRight(90);
}
-
Look at the “for” loop and note how it repeats its contents a fixed number of times.
-
Alter the code so that your turtle makes left-hand turns instead of right-hand turns.
-
Alter the code so that your turtle moves backward instead of forward.
Write a program to draw your own interesting figures. This could be a scene of some kind, or a geometric shape. The key thing is that you experiment with what your robot can do! The best pictures will be awarded a certificate at the end of the summer institute.
To submit your assignment, email a screenshot of your picture and your robot.txt file to relowe@pstcc.edu. Make the message’s subject: “Your Name Lab 2”
function setSpeed(vx, vyaw) {
  const r = 0.065;    //wheel radius
  const l = 0.238;    //axle length
  var sleft;          //left speed
  var sright;         //right speed
  var lpower;         //left power
  var rpower;         //right power

  // Compute lpower and rpower
  sright = 1/r * vx - l/(2*r) * vyaw;
  sleft = 2/r * vx - sright;
  lpower = 100/6.8 * sleft;
  rpower = 100/6.8 * sright;

  left.setPower(lpower);
  right.setPower(rpower);
}

// Turtle Graphics
const tspeed=0.4;  //rolling speed
const trot=0.25;   //rotation speed

async function forward(d)
{
  // calculate move time
  var t = d/tspeed;

  // move for the specified time
  setSpeed(tspeed, 0);
  await delay(t*1000);
  setSpeed(0, 0);
}

async function back(d)
{
  // calculate move time
  var t = d/tspeed;

  // move for the specified time
  setSpeed(-tspeed, 0);
  await delay(t*1000);
  setSpeed(0, 0);
}

function toRadians(deg)
{
  return Math.PI * deg / 180.0;
}

async function turnLeft(d)
{
  // calculate move time
  var t = toRadians(d) / trot;

  // move for the specified time
  setSpeed(0, -trot);
  await delay(t*1000);
  setSpeed(0, 0);
}

async function turnRight(d)
{
  // calculate move time
  var t = toRadians(d) / trot;

  // move for the specified time
  setSpeed(0, trot);
  await delay(t*1000);
  setSpeed(0, 0);
}
//////////////////////////////////////
In this lab, we will be replicating some of the famous “Braitenberg Vehicles” as described in Valentino Braitenberg’s classic book Vehicles: Experiments in Synthetic Psychology (MIT Press 1984). This lab is an exploration of simple stimulus and response control, and we should see that intelligent behavior can emerge from rather simple control schemes.
Because this lab is mainly about observation, you will need to create a word document. In each problem, add your answers to the document. This is the document you will submit at the end of the assignment.
The first thing to do is connect to the robot simulator at: https://relowe.github.io/gradbot/
Note: The robot simulator may have changed since the last time you opened it, so please be sure to refresh the page by holding shift while you click reload. This will make sure your locally cached version of the program is up to date.
The first vehicle is called “Getting Around.” Braitenberg’s diagram of this vehicle is:
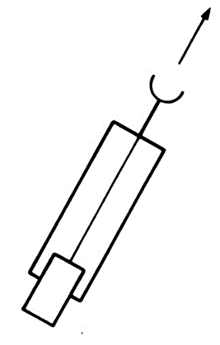
The idea is we have a single light sensor connected to a single motor. Of course, we can’t have just one motor in our simulator, but we can have one light sensor and connect it to both motors!
Construction of Vehicle 1
-
Add a single light sensor to your robot.
-
Change the name of the light sensor to “light”
-
Enter the following code:
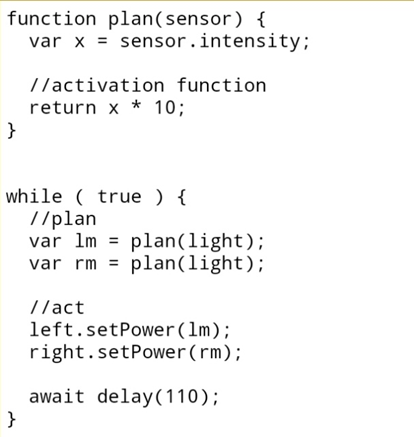
This code will serve as the starting point for our robots. Notice that the planning function multiplies the light sensor’s intensity by 10. This is because the values are typically too small to directly move the motors at a satisfying speed. Also notice how both motors receive the same “plan”. This is the way we connect motors directly to the light sensors, by passing their values multiplied by some constant to the motors.
Observations
Answer the following questions in your word document.
-
Experiment with different multiplier values. What effect does changing the value of the multiplier have?
-
State, in your own words, what this robot actually does. That is, summarize its behavior.
Now we are going to move on to Braitenberg’s vehicle two which is called “fear and anger”. The diagrams of these vehicles are shown below.
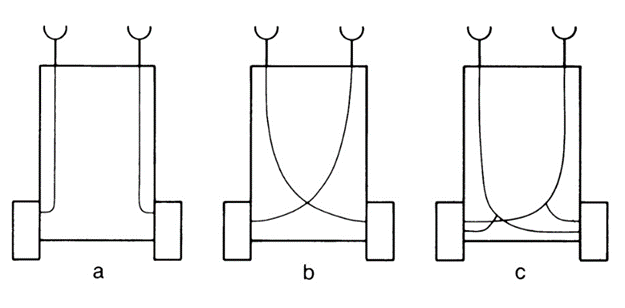
Constructing Vehicle 2
-
Move your light sensor to the upper left hand corner of the robot.
-
Add another light sensor and move it to the upper right hand corner of the robot.
-
Name the left hand sensor “leftSensor”.
-
Name the right hand sensor “rightSensor”.
-
Try connecting the sensors as shown in the diagrams. The way you connect your sensors is by changing which sensor gets to plan which motor. For instance, vehicle B can be constructed by changing the plans to: “lm = plan(rightSensor);” and “rm = plan(leftSensor);”
Observations
Answer the following in your word document.
-
Paste your code for vehicle 2a.
-
Paste your code for vehicle 2b.
-
Paste your code for vehicle 2c.
-
Braitenberg said of these vehicles that one represents anger, another represents fear, and another is just a more complex version of vehicle 1. Which vehicle belongs to which category and why? Describe how the angry, frightened, and simple vehicles behave.
-
Experiment with different multipliers for each vehicle. What effect does changing the value of the multiplier have?
Our final vehicle is called “love”. There are two types of vehicles, and their diagram is shown below:
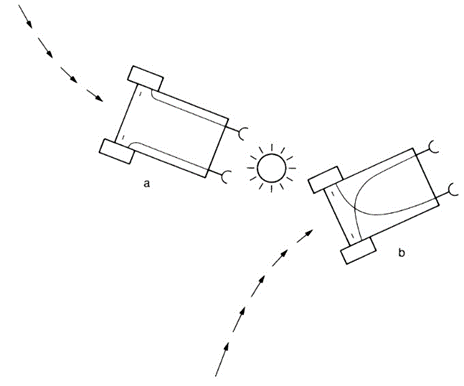
Notice that the motors have little minus signs on them. This is Braitenberg’s way of showing us that here the sensors inhibit the motors rather than accelerate them. That is to say, the brighter the light is, the slower the motors will turn. In order to accomplish this, we need to change our planning function a bit. If you are using 10 as a multiplier, the planning formula would be “100 - x * 10”. Wiring the motors up will work as before.
Observations
Answer the following in your word document.
-
Enter your code for vehicle 3a.
-
Enter your code for vehicle 3b.
-
Braitenberg describes one of these vehicles as a fickle lover and the other as a devoted lover. Which vehicle appears to be fickle? Which vehicle appears to be devoted? Explain your answers by describing the behavior of each.
-
Experiment with different multipliers for each vehicle. What effect does changing the value of the multiplier have?
In this lab, we will continue to explore sensor based control. This lab centers around using our range finder part. This part is an analog to the HC-SR04 Ultrasonic Rangefinder. This part is very common in hobby robotics as it is a relatively inexpensive part and yet it gives a very precise range to the nearest target. The two parts of the rangefinder are a speaker and a microphone. The speaker emits a burst of ultrasonic energy, which is sound that is inaudible to humans. The microphone listens for the echo of the soundwave returning to the rangefinder, and then the computer controlling the rangefinder measures the time it takes to receive the echo. By dividing the time of flight by the speed of sound, the computer can tell how far away the nearest object is. Our simulator can mimic this part and give you experience programming for it.
The first step in this lab is to prepare your robot by adding the rangefinder part. The robot should appear as shown. Name the rangefinder "range" and place it near the front of the robot. The code which triggers the ultrasound pulses happens automatically in our simulation. All you need to do to access the distance is look at the value in:
range.distance
This is updated by the system approximately ten times per second. The number you will find in this variable is the number of meters between the sensor and the nearest object. This is why it is important that you put your sensor toward the front of the robot.
In the simulate tab, add a wall object and move it into the path of your robot. The end result will look like the following:
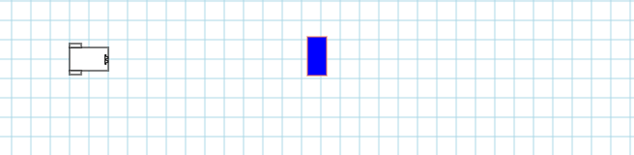
Now we are going to write the program that will allow our robot to avoid obstacles. To do this follow these steps:
-
Copy and paste your turtle functions and constants (setSpeed, tspeed, trot, forward, back, turnLeft, and turnRight) into your code window. You should have these in funtions.txt.
-
Enter the following code below the slashes after the last function:
while ( true ) {
  // sense
  var dist = range.distance;

  // plan & act
  if(dist > 2) {
    await forward(1);
  }

  // delay to make this a 10hz loop
  await delay(100);
}
-
Run this code and observe what it does. Note that this follows the "sense, plan. act" pattern we established in the previous lab. One new thing is the if statement. If the condition in the parenthesis is true, then we execute the code in the curly braces, otherwise we skip it.
-
Let's alter this code so that it turns away from the obstacle. Here we will make of the "else" statement. Change the plan & act section that it reads as follows:
  // plan & act
  if(dist > 2) {
    await forward(1);
  } else {
    await turnRight(90);
  }
- Now the robot turns away from the obstacles. One last challenge remains and that is for you to solve it! The robot avoids the obstacle, but ideally it should drive around it. Alter the program so that when your robot encounters the obstacle, it drives in the path shown below. Remember, it is up to you to invent this code. Good luck!
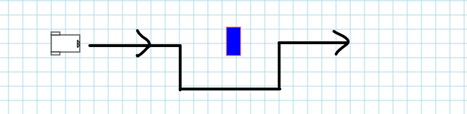
Now that you’ve learned how to program a robot, and how to make it respond to its environment, it is time to put this knowledge to good use! We will hold a double-elimination tournament where robot swill be pitted against each other in a game of laser tag. The rules of the game are as follows:
-
Your robot must have a red light mounted somewhere along the center-line of the robot.
-
Your robot must have at least one laser.
-
If your robot is hit by at least three laser blasts, it will explode and you lose the match.
-
Your robot draws energy for its lasers from a special battery. This battery can only provide enough energy for 50 laser blasts. You may put as many lasers as you like on your robot, but if you fire multiple lasers, you will exhaust your shots quickly!
-
If both robots run out of laser blasts before one is destroyed, the match will be decided by a random coin toss.
-
Your battle bot’s control loop must end with “await delay(100);” If your robot’s loop slows things down, it will be disqualified. (If you follow the code in the next section, you should be fine.)
-
Create a new robot (Though you may want to make use of your turtle functions for ease of control). Feel free to make use of the code from previous labs.
-
Add a light to your robot. Place it somewhere along the center line of your robot.
-
Set the fill color of the light to “red.”
-
Add a laser to your robot.
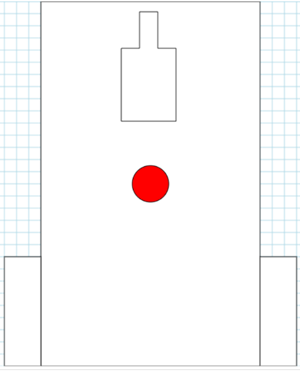 5.Change the name of the laser to “laser.”
- Enter the following basic code for the battle bot (Below the slashes after your functions if you are keeping any of them):
//Battle Bot Control Loop
while(true) {
    // get data from the sensors

    // plan & act
    laser.fire();

    // required 0.1 second delay
    await delay(100);
}
- Try the robot out. It will stay in place and fire its laser once every second. That’s another detail to keep in mind. Your laser requires 1 second to recharge in between laser blasts.
Ok, so your basic battle bot will not do very will in the competition. You really need to help it out! Add sensors and other parts to allow your robot to seek out and destroy the competition. Remember, your opponent will have a red light on their robot. So maybe you want to work out some way for the light sensors to guide you toward your target. (Maybe think about some of those vehicle strategies from lab 3 or the range finder from lab 4. Both can see the opponent!)
There are three sample opponents, which you can add to the simulation by clicking on their respective buttons. These robots are equipped with the standard hardware, and they do not use sensors. They simply roll and fire in different patterns. Try to program your robot so it can seek and destroy all three sample opponents. The sample robots are:
-
Rover– Rover will roam around the arena, driving the perimeter. It fires its laser beam after each change of direction.
-
Circler – Circler drives in a circle with a frequently changing radius. It fires its laser beam at various intervals as it spirals in and out.
-
Spinner – Spinner wobbles in a tight circle and fires its laser as rapidly as it is able.
For full credit, your robot must have at least some changes from the basic battle bot. Though, really, I want you to have fun with this. Your robot will be competing against the other robots in the summer institute, and certificates will be awarded to the winners. Good luck and enjoy!
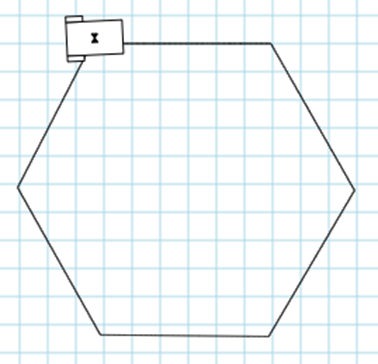
Polygon

async function polygon(sides, size)
{
  // calculate the exterior angle rotation
  var angle = 180 - (sides - 2) * 180 / sides;

  // draw each side and turn its corner
  for(var i=1; i<=sides; i++) {
     await forward(size);
     await turnRight(angle);
  }
 }
/////////////////////////////////////////////////////

marker.penDown();
await polygon(6, 2);
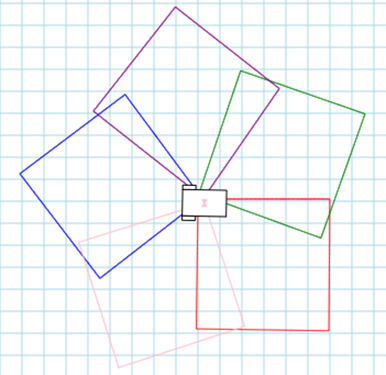
Flower

async function flower(petals, size) {
  // calculate the rotation angle for each petal
  var angle = 360/petals;

  //set up an array of colors to rotate through
  var colors = new Array("red", "green", "purple", "blue", "pink", "magenta");
  var ci=0;

  for(var i=0; i<petals; i++) {
    //set the color and advance to the next one
    marker.setColor(colors[ci]);
    ci = ci + 1;
    if(ci >= colors.length) {
      ci = 0;
    }

    //draw a square and turn
    await polygon(4, size);
    await turnLeft(angle);
  }
}

/////////////////////////////////////////////////////

marker.penDown();
await flower(5, 2);
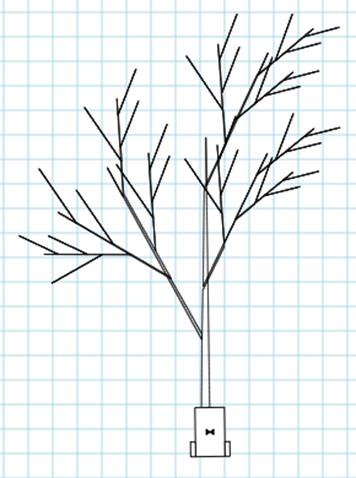
Tree
async function tree(size)
{
  if(size < 1) {
    await forward(size);
    await back(size);
    return;
  }
  await forward(size/3);
  await turnLeft(30);
  await tree(size*2/3);
  await turnRight(30);
  await forward(size/6);
  await turnRight(25);
  await tree(size/2);
  await turnLeft(25);
  await forward(size/3);
  await turnRight(25);
  await tree(size/2);
  await turnLeft(25);
  await forward(size/6);
  await back(size);
}
/////////////////////////////////////////////////////

marker.penDown();
tree(4);
Corrected Back Function

async function back(d)
{
  // calculate move time
  var t = d/tspeed;

  // move for the specified time
  setSpeed(-tspeed, 0);
  await delay(t*1000);
  setSpeed(0, 0);
}