
You can learn how to test our project with React + Vite here. You will be able to see and learn about the required methods and packages. Through this, you will have the opportunity to independently test your project.
To set up the project, follow these steps:
-
Clone the repository:
git clonehttps://github.com/Rofiyev/reactjs-testing.git cd reactjs-testing -
Install the dependencies:
npm install
-
Run the development server:
npm run dev
-
Run the jest testing:
npm run testOpen http://localhost:3000 with your browser to see the result.
Open the terminal in your text editor (For the project, we will be making use of the VSCode) and proceed to create the react app using the command below:
npm create vite@latest
Follow the wizard and select the desired options

From the above, you'd see we have selected React and Typescript, and we called the project "mini-app-testing" so we will be building with Typescript.
- Now run the following commands to get started and install the needed packages, step by step.
cd mini-app-testing - to navigate to the project directory.
npm install - to install the packages. (You can also use yarn but we started with npm so we stick with it).
npm run dev - to start the project.
If you have done the above correctly, you should have something like this On your VSCode ( Maybe other code editors! )

On your browser

Before we dive into the process, note that Vite has certain limitations with Jest which makes setting up Jest in a Vite application to seem a bit complicated. Follow the process below to get started
-
npm install jest --save-dev -
npm install @testing-library/react --save-dev -
npm install ts-jest @types/jest --save-dev -
In the package.json, add
"test": "jest"to the script
// package.json

{
  "name": "mini-app-testing",
  "private": true,
  "version": "0.0.0",
  "type": "module",
  "scripts": {
    "dev": "vite",
    "build": "tsc && vite build",
    "lint": "eslint src --ext ts,tsx --report-unused-disable-directives --max-warnings 0",
    "test": "jest"
},- run
npm run testand you receive a message saying no test found as seen below.

- So to fix the above, In the src folder, we create a folder called __tests__ and add the test file:
src/__ tests __/App.spec.tsx.

-
So to fix the above, In the src folder, we create a folder called __tests__ and add the test file:
src/__ tests __/App.spec.tsx. -
Add a simple test in the test file: App.test.tsx
// src/__ tests __/App.test.tsx

test("demo", () => {
  expect(true).toBe(true);
});- Run the
npm run testagain. Voila!!! our first test passed

- To test the components, we import the App.tsx into the App.test.tsx and run a simple truthy test on the App component.
// src/__ tests __/App.test.tsx

import { render } from "@testing-library/react";
import App from "../App";

test("demo", () => {
  expect(true).toBe(true);
});

test("Renders the main page", () => {
  render(<App />);
  expect(true).toBeTruthy();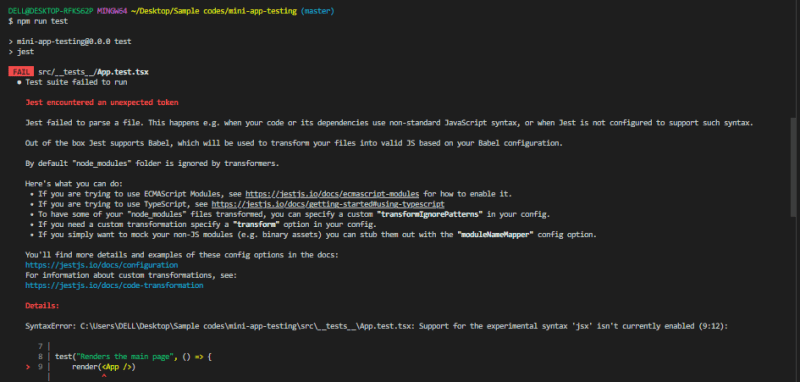
});- Let test again, run
npm run test. But it will fail due to missing dependencies and configurations as seen below. So it has to be configured to be able to import and read imported components.
- Run
npm install ts-node @testing-library/jest-dom --save-dev - Run
npm install jest-environment-jsdom - Run
npm install identity-obj-proxy --save-dev - In your root directory, create a jest.config.ts file and add the following to it
// jest.config.ts

export default {
  preset: "ts-jest",
  testEnvironment: "jest-environment-jsdom",
  transform: {
    "^.+\\.tsx?$": "ts-jest",
    // process `*.tsx` files with `ts-jest`
  },
  moduleNameMapper: {
    "\\.(gif|ttf|eot|svg|png)$": "<rootDir>/test/__ mocks __/fileMock.js",
  },
};- In the src folder, create a test folder, then create a __mocks___ folder in the test folder and add a fileMock.js file:
src/test/__mocks__/fileMock.jsand add the following content:
// src/test/__ mocks __/fileMock.js

module.exports = {
  __esModule: true,
  default: "test-file-stub",
};- In the App.test.tsx,
import @testing-library/jest-dom
// src/__ tests __/App.test.tsx

import "@testing-library/jest-dom";
import { render } from "@testing-library/react";
import App from "../App";

test("demo", () => {
  expect(true).toBe(true);
});

test("Renders the main page", () => {
  render(<App />);
  expect(true).toBeTruthy();
});- Then run the
npm run testto check if all issues have been resolved.
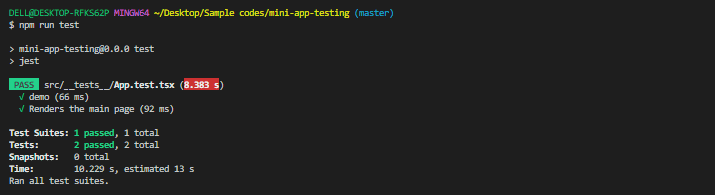
You can go ahead with your testing process. Happy testing!!!😀
In summary, incorporating Jest and installing the essential Jest packages in a React Vite application is a simple and uncomplicated process. By following a series of straightforward steps, developers can seamlessly integrate Jest into their projects and harness its robust testing features. With Jest successfully implemented, they can confidently create tests to guarantee the quality and accuracy of their React Vite applications.