- Shadman Ahmed - Computer Engineering - Georgia Tech
- Momen Yacoub - Computer Engineering - Georgia Tech
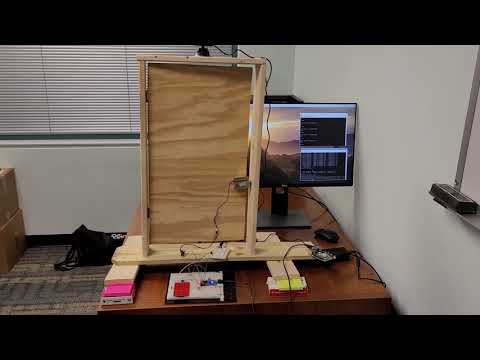
This project creates a smart security system using the Mbed NXP LPC1768 and Raspberry Pi 4. The smart security system includes:
- a solenoid lock that unlocks using GPIO
- a I2C Keypad to enter the code to unlock the solenoid
- a camera that detects motion and save the video
- a RGB LED status indicator that lights green upon correct code entry and blinks red upon incorrect code entry
- Amazon Web Services (AWS) cloud resources to save unlock and motion detection events and store uploaded motion detection videos
- Web Application GUI dashboard to view unlock and motion detection events and view motion detection video online.
The overall project architecture can be seen here:

- (1) Mbed NXP LPC1768
- (1) Raspberry Pi 4 (with USB-C Powersupply)
- (1) Solenoid Lock
- (1) MOSFET Driver
- (1) RGB LED
- (1) Freescale MPR121 Touch Keypad
- (1) USB Camera or Rpi Camera Module
- (1) 12V Power Supply for Solenoid Lock
- (2) 10k Ohm Resistor
- (1) 330 Ohm Resistor

This setup assumes that the mbed is on the latest firmware. It also assumes that Raspian OS is installed on your Rpi with the latest package updates using:
$ sudo apt-get update
$ sudo apt-get upgrade
It also assumes that the Python Package Installer (pip) is installed. It also assumes that you have a AWS account setup and ready to create cloud resources on.
The Mbed should be connected to the computer to flash code to it. The code, which is found in the Mbed folder can be compiled in the Mbed cloud compiler. To interface with the touch keypad, this code this library was utilized.
To run our project, OpenCV and AWS SDK must be installed on the Rpi. The steps below show the methods used to install and build these libraries:
The version of OpenCV installed on the Rpi for this project is 4.2.0. To install OpenCV follow this guide by Q-engineering [1]. Once completing the guide, make sure to set the swap size back to its orginal value. The guide also includes methods to check if the installaton was correct using python. Once completed, we can use the Makefile inside the /MotionDetection directory to build the executable (details in the Code section).
The lastest version of the AWS C++ SDK needs to be installed and built to be used in our project. To install and build the AWS SDK follow this guide provided by AWS [2]. Note that we do not need to build all parts of the SDK, instead we only need S3 and DynamoDB. Tweak the cmake command in the AWS guide to:
$ cmake -DCMAKE_BUILD_TYPE=Debug -D BUILD_ONLY="s3;dynamodb"
Follow the rest of the guide to successfully install and build the SDK.
Three AWS resources is needed: 1 S3 Bucket, 2 DynamoDB tables and 1 Identity and Access Management(IAM) User.
To setup the S3 bucket navigate to the S3 console in aws.amazon.com. Create a new S3 bucket for hosting the static website and enable static website hosting for the bucket. Uncheck Block all public access under Bucket setting for Block Public Access section. The bucket name must be unique. Once created, go to the settings of the bucket and add a bucket policy shown below enable public access to the videos uploaded:.
{
"Version": "2012-10-17",
"Statement": [
{
"Sid": "PublicReadGetObject",
"Effect": "Allow",
"Principal": "*",
"Action": "s3:GetObject",
"Resource": "arn:aws:s3:::mybucketname/*"
}
]
}
Note that in a real application a bucket would not configured for Public Access.
To setup the DynamoDB tables navigate to the DynamoDB console in aws.amazon.com. Create a table named SmartSecurityUnlockEvents using the setup wizard. Use all default settings in the setup. Repeat this step to create another table called SmartSecurityVideoEvents.
To setup the IAM user, navigate to the IAM console in aws.amazon.com. Select the User from the dropdown on the left then click Add User. Following the setup wizard, name the user and make the Access Type Programmatic Access. Next under permission, click attach existing policies directly and search for AmazonDynamoDBFullAccess and AmazonS3FullAccess and click their respective check boxes. This will give our user full access to S3 resources and DynamoDB tables. In a real applicaton, IAM roles would use custom policies for a specific resources instead allowing full access. Next in the setup wizard, skip the tags section and create the user. The wizard will then show the Access Key ID and Secret Access Key that we will need to configure our AWS CLI and Flask Application. Store this in a safe place as the Secret Key will only be accessible here.
The AWS CLI must be setup to configure our AWS acceess key, secret access key and region. This is an important part as it will allow us to access the AWS API in our C++ code to upload object to S3 and put items in DynamoDB. The AWS SDKs and CLIs use provider chains to look for AWS credentials in several different places, including system/user environment variables and local AWS configuration files. For details, see Credentials Providers in the aws-sdk-cpp repository in GitHub. To install the AWS CLI, use pip install command in your Rpi terminal:
$ sudo pip install awscli
Verify that is installed and working:
$ aws --version
Next use the AWS configure command in the terminal to insert the Access Key, Secret Access Key from the IAM Role that we created earlier [2]:
$ aws configure
AWS Access Key ID [None]: AKIAIOSFODNN7EXAMPLE
AWS Secret Access Key [None]: wJalrXUtnFEMI/K7MDENG/bPxRfiCYEXAMPLEKEY
Default region name [None]: us-east-1
Default output format [None]: json
This code is located in the folder named Mbed The Mbed was used to control when the door is unlocked, the indicator LED, and it would alert the PI when an unlock event would occur. The Mbed would keep the indicator LED red while the door was locked. If an incorrect passcode were entered the Mbed would flash the LED red, and if the correct passcode was entered the led would turn green. The Mbed would receive an interrupt when the touch keypad is pressed. The Mbed would then store the key that was pressed in a buffer. If the keys in the buffer matched the passcode, the Mbed would unlock the door and alert the PI that an unlock even occurred. The buffer would be flushed every 3 seconds (this was achieved using a timer) or whenever it is full. It is only before flushing the buffer that the passcode is compared with the keys pressed.
When the correct passcode has been entered, the MBED would unlock the door by driving the control pin on the MOSFET high and it would keep the door unlocked for 2 seconds (achieved using a wait). A MOSFET is needed to control the external 12 V power supply because the voltage provided by the Mbed isn’t sufficient for the solenoid lock.
This code is located in the folder named serialWithMbed Since the mbed is connected to the Rpi over serial, there needs to be code on the Rpi to handle the serial characters sent to it. Using the standard Linux file system I/O API calls, it is possible to communicate with the mbed. The code will open the USB virtual com port checking for errors, then it will sit in a loop waiting to receive commands from the mbed. If a unlock event is sent over the serial communication, the code will make a system call to the DynamoDB Put executable, shown here:
sys_call = "/home/pi/dynamoDBPut/build/app SmartSecurityUnlockEvents unlock timestamp=" + to_string(time) + " &";
char_sys_call = &sys_call[0];
system(char_sys_call);
A system call is used to invoke an operating system command from a C/C++ program. In our case, it calling the C++ DynamoDB Put executable and passing in the command line argument for the table name and the timestamp it occured at. The '&' informs the shell to put the command in the background. This means it continues to the serial communication code while doing the DynamoDB Put in parallel. This is a useful way to break our code into modular parts and make sure that our serial communication is not slowed down by waiting for the network.
Before running this section of the code, make sure to build and compile the DynamoDB Put code (more on that below). Remember to change the directory in the system calls to match your setup. To build, compile and run the code, simply use g++ in the terminal:
$ g++ serialWithMbed.cpp -o serialMbed.o
This code is located in the folder named MotionDetection
The frames captured by the camera attached to the Rpi is processed for motion detection using OpenCV. The flowchart shown below describes everything the MotionDetection program does [4]:

The files and folders inside MotionDetection are broken down as such [5]:
main.cpp
./include
     camLib.hpp
     camLib.cpp
CMakeLists.txt
./detections
     time_stamped_video_files.avi
- main.cpp: The main routine that creates instances of the Camera class library. It activate the camera and then in an endless loop to find out if anything moved in the field-of-view (FoV) of the camera. This all is achieved by calling member functions in ./include/camLib.cpp, which itself calls e.g. openCV functions. Once a video is saved, the code makes a system call (similar to the Serial Communication with Mbed section mentioned above) to call a executable to put the saved video file in S3 and make an entry of the motion event in DynamoDB:
//Build system call strings based on time
sys_call_table = "/home/pi/dynamoDBPut/build/app SmartSecurityVideoEvents MotionDetect timestamp=" + to_string(time) + " &";
sys_call_s3 = "/home/pi/s3putVideo/build/app /home/pi/VideoCapture/MotionVideoCapture/detections/" + to_string(time) + ".mp4 &";
...
//make two threads to write that video to the cloud and store record in DB
char_sys_call_table = &sys_call_table[0];
system(char_sys_call_table);
char_sys_call_s3 = &sys_call_s3[0];
system(char_sys_call_s3);
- include/camLib.hpp: The definition of the applied classes.
- include/camLib.cpp: The header file (here with the name camLib.hpp) defines the implemented classed and is basically a listing of all element functions and variables used in this class. It also contains a listing of all required include files which are used in all other parts of the program.
- CMakeLists.txt: cmake library that enables simple compilation with openCV bindings.
To build and compile this part of the project, utilize cmake to build the project using the make file provide. This step assumes that OpenCV was correctly installed and that the DynamoDB Put code has been built and compiled. Remember to change the directory in the system calls to match your setup. In the in the directory of where the CMakeLists.txt is located, run this to build and compile the code:
$ cmake CMakeLists.txt
$ make
This code is located in the folder named AWSS3Put As mentioned in the sections above, this C++ executable is called in the Motion Capture Program to upload the video file to AWS S3. The code utilized the AWS SDK and its respective APIs to send the video files to S3. Details regarding how the AWS S3 Put code works can be found on AWS[6].
Remember to change the name of the S3 bucket to match the name of the resource you created earlier. To build and compile this the AWS S3 Put program, utilize the CMakeLists.txt make file located in the folder. Make a directory to where cmake will build the application:
$ mkdir my_project_build
Change to that directory and run cmake using the path to the project's source directory:
$ cd my_project_build
$ cmake ../
After cmake generates your build directory, you can use make to build and compile the application.
$ make
The executable in this program expects one command line argument (as demonstrated in the Motion Detection Program system call):
./AWSPutS3.o [path-of-file-to-upload]
This code is located in the folder named AWSDynamoDBPut As mentioned in the sections above, this C++ executable is called in both the Serial Commmunication with mbed Program and Motion Capture Program to put items into the Database of when an event occurs. The code utilized the AWS SDK and its respective APIs to send the data to the database. Details regarding how the AWS DynamoDB Put code works can be found on AWS [7].
To build and compile this the AWS DynamoDB Put program, utilize the CMakeLists.txt make file located in the folder. Make a directory to where cmake will build the application:
$ mkdir my_project_build
Change to that directory and run cmake using the path to the project's source directory:
$ cd my_project_build
$ cmake ../
After cmake generates your build directory, you can use make to build and compile the application.
$ make
The executable in this program expects one command line argument (as demonstrated in the Motion Detection Program system call):
./AWSDynamoDBPut.o [name-of-table] [event-name] timestamp=[epoch-timestamp]
Flask is a web framework, it’s a Python module that lets you develop web applications easily. Flask depends on the Jinja template engine and the Werkzeug WSGI toolkit [8]. The web application for this project is hosted using Flask and can be run the Pi itself, a virtual machine or locally on your computer. The web application also using the AWS library called boto3 to read data from the DynamoDB database. The data from the database is then rendered into the template using Flasks web templating system. The static HTML files and its corresponding assests (like CSS stlyes etc.) are located inside the static folder.
Before running the application, a env.py file must be made. This file will store the variables of your Access Key ID, Secret Key ID and web application hostname. Keep this file seperate and not hardcoded into your app.py is a good and secure practice. Create a env.py inside the same directory of your app.py and add this:
# IAM User access configuration
AWS_ACCESS_KEY="INSERT-KEY-HERE"
AWS_SECRET_ACCESS_KEY="INSERT-SECRET-KEY-HERE"
AWS_REGION="INSERT-REGION-HERE"

SERVER_HOSTNAME = 'localhost:5000'
Also ensure that you use pip install any missing packages that you may not have to run app.py.
To run the application, simple open a terminal in that directory and run:
$ python app.py //or python3 app.py
[1] OpenCV 4.2.0 Installation Guide: https://qengineering.eu/install-opencv-4.1-on-raspberry-pi-4.html
[2] AWS C++ SDK Setup for Linux: https://docs.aws.amazon.com/es_es/sdk-for-cpp/v1/developer-guide/setup-linux.html
[3] AWS CLI Configureation Basics: https://docs.aws.amazon.com/cli/latest/userguide/cli-configure-quickstart.html
[4] VideoCapture: https://github.com/Arri/VideoCapture
[5] Simple Home-Surveillance with OpenCV, C++ and Rpi: https://www.manmade2.com/simple-home-surveillance-with-opencv-c-and-raspberry-pi/
[6] C++ Code Samples for Amazon S3: https://docs.aws.amazon.com/code-samples/latest/catalog/code-catalog-cpp-example_code-s3.html
[7] C++ Code Samples for Amazon DynamDB: https://docs.aws.amazon.com/code-samples/latest/catalog/code-catalog-cpp-example_code-dynamodb.html
[8] Flask: https://flask.palletsprojects.com/en/1.1.x/