Object-Oriented Programming or OOPs is a programming style that is associated with concepts like:
- Inheritance: Inheritance is a process where one class acquires the properties of another.
- Encapsulation: Encapsulation in Java is a mechanism of wrapping up the data and code together as a single unit.
- Abstraction: Abstraction is the methodology of hiding the implementation details from the user and only providing the functionality to the users.
- Polymorphism: Polymorphism is the ability of a variable, function or object to take multiple forms.
Java language was developed in such a way that it does not depend on any hardware or software due to the fact that the compiler compiles the code and then converts it to platform-independent byte code which can be run on multiple systems.
The only condition to run that byte code is for the machine to have a runtime environment (JRE) installed in it.
Java supports primitive data types - byte, boolean, char, short, int, float, long, and double and hence it is not a pure object-oriented language.
In Java, SOLID principles are an object-oriented approach that are applied to software structure design. It is conceptualized by Robert C. Martin (also known as Uncle Bob). These five principles have changed the world of object-oriented programming, and also changed the way of writing software. It also ensures that the software is modular, easy to understand, debug, and refactor
- Single Responsibility Principle(SRP): Each class should be responsible for a single part or functionality of the system.
- Open-Closed Principle(OCP): Software components should be open for extension, but not for modification.
- Liskov Substitution Principle(LSP): Objects of a superclass should be replaceable with objects of its subclasses without breaking the system.
- Interface Segregation Principle(ISP): No client should be forced to depend on methods that it does not use.
- Dependency Inversion Principle(DIP): High-level modules should not depend on low-level modules, both should depend on abstractions.
- Multiple inheritance is not supported because it leads to deadly diamond problem.
- In java, every class is a child of Object class. When it inherits from more than one super class, sub class gets the ambiguity to acquire the property of Object class.
For example two class A,B having same method m1(). And class C extends both A, B.
class C extends A, B // for explaining purpose.
Now, class C will search the definition of m1. First, it will search in class if it didn't find then it will check to parents class. Both A, B having the definition So here ambiguity occur which definition should choose. So java does not support multiple inheritance.
Java supports multiple inheritance through interfaces only. A class can implement any number of interfaces but can extend only one class.
static keyword is meant for providing memory and executing logic without creating Objects, a class does not have a value logic directly, so the static keyword is not allowed for outer class
If you declare the outer class as static, it will not allow to compile giving : Illegal modifier for the class classname; only public, abstract & final are permitted
top-level class with public, abstract, and final modifiers. Top-level classes can only have public, abstract, and final modifiers, and it is also possible to not define any class modifiers at all. This is called default/package accessibility
When a method is declared as private, the program compiles properly but it will give runtime error. Main method not public
In Java, methods and data members can be encapsulated by the following four access specifiers. The access specifiers are listed according to their restrictiveness order.
- private: - accessible within the class where defined
- default or package-private: - when no access specifier is specified
- protected: - accessible only to classes that subclass your class directly within the current or different package
- public - accessible from any class
Static class always a inner class and static class can create multiple objects. All object have different reference value.
But on the other hand SingleTon class can have only single object because every object reference variable have same reference value.
-
final:
- final key word can be used for class,method and variables.
- A final class cannot be subclassed and it prevents other programmers from subclassing a secure class to invoke insecure methods.
- A final method can't be overridden.
- A final variable can't change from it's initialize value.
-
finalize(): finalize() method is used just before an object is destroyed and can be called just prior to garbage collection.
-
finally:
- finally, a key word used in exception handling,creates a block of code that will be executed after a try/catch block has completed and before the code following the try//catch block.
- The finally block will execute whether or not an exception is thrown.
- For example , if a method opens a file upon exit,then you will not want the code that closes the file to be bypassed by the exception-handling mechanism. This finally keyword is designed to address this contingency.
- Lambda expressions
- Functional interfaces
- Stream API
- Optional class
- Date Time API
- Functional Interfaces And Lambda Expressions:
-
In Java 8, a new notion called functional interfaces was introduced. A Functional Interface is an interface that has exactly one abstract method. To designate an interface as a Functional Interface, we don’t need to use the @FunctionalInterface annotation.
-
The
@FunctionalInterfaceannotation prevents abstract methods from being accidentally added to functional interfaces. It’s similar to a@Overrideannotation, and it’s recommended that you use it.java.lang.Runnableis a fantastic example of a functional interface since it has one abstract method,run (). -
One of the most appealing features of the functional interface is creating objects using lambda expressions. We can create an interface using an anonymous class, but the code is cumbersome. For example:
@FunctionalInterface
	public interface FunctionalInterface_one
	{
		public void firstInt_method();

		@Override
		public String toString(); //Overridden from Object class

		@Override
		public boolean equals(Object obj); //Overridden from Object class
	}
- Lambda Expression:
-
An anonymous function may be defined as a Lambda Expression (or function) (a function with no name and an identifier). Lambda Expressions are defined precisely where they are required, often as a parameter to another function.
-
Lambda Expressions implement functional interfaces by implementing the single abstract function provided in the functional interface.
A basic example of the Lambda Expression is:
(x,y) -> x+y
The formula above accepts two parameters, x, and y, and returns their total, x+y. The procedure may be used numerous times in different locations depending on the data type of x and y. As a result, the arguments x and y will match int or Integer and string, and depending on the context; it will either add two numbers (if the parameters are int) or concatenate the two strings (when parameters are a string).
interface MyInterface
{
     void abstract_func(int x,int y);
     default void default_Fun()
    {
         System.out.println("This is default method");
    }
}
 class Main
{
     public static void main(String args[])
    {
        //lambda expression
        MyInterface fobj = (int x, int y)->System.out.println(x+y);

        System.out.print("The result = ");
        fobj.abstract_func(5,5);
        fobj.default_Fun();
    }
}
forEach()Method In Iterable Interface:
- In Java 8, the
Java.langinterface now supports a “forEach” function. - Iterable that can iterate over the collection’s items. The Iterable interface has a default method called “forEach.”
- Collection classes use it to iterate items, which extends the Iterable interface.
- You may send Lambda Expression as an argument to the “forEach” method, which accepts the Functional Interface as a single parameter.
importjava.util.ArrayList;
importjava.util.List;
public class Main {
     public static void main(String[] args) {
        List<String> subList = new ArrayList<String>();
        subList.add("Carrot");
        subList.add("Potato");
        subList.add("Cauliflower");
        subList.add("LadyFinger");
        subList.add("Tomato");
        System.out.println("------------Vegetable List--------------");
        subList.forEach(sub -> System.out.println(sub));
  }
}
- Optional Class:
In Java 8, the “java.util” package included an optional class. The public final class “Optional” is used to handle NullPointerException in a Java program. You may give other code or values to execute using Optional. Thus, optional reduces the number of null checks required to avoid a nullPointerException.
You may use the Optional class to prevent the application from crashing and terminating unexpectedly. The Optional class has methods for checking the existence of a value for a given variable.
The following program demonstrates the use of the Optional class.
import java.util.Optional;
public class Main{

   public static void main(String[] args) {
        String[] str = new String[10];
        Optional<String>checkNull =
                       Optional.ofNullable(str[5]);
        if (checkNull.isPresent()) {
            String word = str[5].toLowerCase();
            System.out.print(str);
         } else
           System.out.println("string is null");
    }
}
Output: String is null
To verify whether the string is null in this application, we utilize the Optional class’s “ofNullable” attribute. If it is, the user receives the relevant message.
Introduced in Java 8, the Stream API is used to process collections of objects. A stream is a sequence of objects that supports various methods which can be pipelined to produce the desired result. The features of Java stream are –
- A stream is not a data structure instead it takes input from the Collections, Arrays or I/O channels.
- Streams don’t change the original data structure, they only provide the result as per the pipelined methods.
- Each intermediate operation is lazily executed and returns a stream as a result, hence various intermediate operations can be pipelined.
- Terminal operations mark the end of the stream and return the result.
Different Operations On Streams- Intermediate Operations:
- map: The map method is used to returns a stream consisting of the results of applying the given function to the elements of this stream.
List number = Arrays.asList(2,3,4,5);
List square = number.stream().map(x->x*x).collect(Collectors.toList());
- filter: The filter method is used to select elements as per the Predicate passed as argument.
List names = Arrays.asList("Reflection","Collection","Stream");
List result = names.stream().filter(s->s.startsWith("S")).collect(Collectors.toList());
- sorted: The sorted method is used to sort the stream.
List names = Arrays.asList("Reflection","Collection","Stream");
List result = names.stream().sorted().collect(Collectors.toList());

// Sort object by attribute

// Let user has age fileds and we need to sort users by its age

List<User> sortedList = users.stream()
			.sorted(Comparator.comparingInt(User::getAge))
			.collect(Collectors.toList());
Terminal Operations:
- collect: The collect method is used to return the result of the intermediate operations performed on the stream.
List number = Arrays.asList(2,3,4,5,3);
Set square = number.stream().map(x->x*x).collect(Collectors.toSet());
- forEach: The forEach method is used to iterate through every element of the stream.
List number = Arrays.asList(2,3,4,5);
number.stream().map(x->x*x).forEach(y->System.out.println(y));
- reduce: The reduce method is used to reduce the elements of a stream to a single value. The reduce method takes a BinaryOperator as a parameter.
List number = Arrays.asList(2,3,4,5);
int even = number.stream().filter(x->x%2==0).reduce(0,(ans,i)-> ans+i);
Java 8 introduced new APIs for Date and Time to address the shortcomings of the older java.util.Date and java.util.Calendar.
Local: Simplified date-time API with no timezone management complexity. Zoned: specialized date-time API that can handle several time zones.
- Issues With the Existing Date/Time APIs
- Thread safety – The Date and Calendar classes are not thread safe, leaving developers to deal with the headache of hard-to-debug concurrency issues and to write additional code to handle thread safety. On the contrary, the new Date and Time APIs introduced in Java 8 are immutable and thread safe, thus taking that concurrency headache away from developers.
- API design and ease of understanding – The Date and Calendar APIs are poorly designed with inadequate methods to perform day-to-day operations. The new Date/Time API is ISO-centric and follows consistent domain models for date, time, duration and periods. There are a wide variety of utility methods that support the most common operations.
- ZonedDate and Time – Developers had to write additional logic to handle time-zone logic with the old APIs, whereas with the new APIs, handling of time zone can be done with Local and ZonedDate/Time APIs.
The LocalDate represents a date in ISO format (yyyy-MM-dd) without time. An instance of current date can be created from the system clock:
LocalDate localDate = LocalDate.now();
And we can get the LocalDate representing a specific day, month and year by using the of method or the parse method. For example, these code snippets represent the LocalDate for February 20, 2015:
LocalDate.of(2015, 02, 20);
LocalDate.parse("2015-02-20");
The following code snippet gets the current local date and adds one day:
LocalDate tomorrow = LocalDate.now().plusDays(1);
The LocalTime represents time without a date.
LocalTime now = LocalTime.now();
LocalDateTime is used to represent a combination of date and time. This is the most commonly used class when we need a combination of date and time.
LocalDateTime.now();
Java 8 provides ZonedDateTime when we need to deal with time-zone-specific date and time. The ZoneId is an identifier used to represent different zones. There are about 40 different time zones, and the ZoneId represents them as follows.
Here, we create a Zone for Paris:
ZoneId zoneId = ZoneId.of("Europe/Paris");
And we can get a set of all zone ids:
Set<String> allZoneIds = ZoneId.getAvailableZoneIds();
The LocalDateTime can be converted to a specific zone:
ZonedDateTime zonedDateTime = ZonedDateTime.of(localDateTime, zoneId);
The ZonedDateTime provides the parse method to get time-zone-specific date-time:
ZonedDateTime.parse("2015-05-03T10:15:30+01:00[Europe/Paris]");
In Java, a String is represented internally by an array of byte values. strings are immutable to improve performance and security.
Benefits to having immutable strings:
- The string pool is only possible if the strings, once created, are never changed, as they are supposed to be reused
- The code can safely pass a string to another method, knowing that it can't be altered by that method
- Immutably automatically makes this class thread-safe
- Since this class is thread-safe, there is no need to synchronize common data, which in turn improves performance
- Since they are guaranteed to not change, their hashcode can be easily cached
How Is a String Stored in Memory?
According to the JVM Specification, String literals are stored in a runtime constant pool, which is allocated from the JVM's method area.
how many strings are allocated:
- The JVM stores only one copy of a particular String in the pool
- When creating a new String, the JVM searches in the pool for a String having the same value
- If found, the JVM returns the reference to that String without allocating any additional memory
- If not found, then the JVM adds it to the pool (interns it) and returns its reference
Equals() method is defined in Object class in Java and used for checking equality of two objects defined by business logic.
“==” or equality operator in Java is a binary operator provided by Java programming language and used to compare primitives and objects. public boolean equals(Object o) is the method provided by the Object class. The default implementation uses == operator to compare two objects. For example: method can be overridden like String class. equals() method is used to compare the values of two objects.
As we know that abstraction refers to hiding the internal implementation of the feature and only showing the functionality to the users. i.e. what it works (showing), how it works (hiding). Both abstract class and interface are used for abstraction, henceforth Interface and Abstract Class are required prerequisites
1) Type of methods: Interface can have only abstract methods. An abstract class can have abstract and non-abstract methods. From Java 8, it can have default and static methods also. 2) Final Variables: Variables declared in a Java interface are by default final. An abstract class may contain non-final variables. 3) Type of variables: Abstract class can have final, non-final, static and non-static variables. The interface has only static and final variables. 4) Implementation: Abstract class can provide the implementation of the interface. Interface can’t provide the implementation of an abstract class.
access specifiers that can be used by interfaces and abstract classes:
- Interface: Public or default
- Abstract Class: (Anything ) : public , private or Default
- A Java interface can be implemented using the keyword “implements” and an abstract class can be extended using the keyword “extends”.
- Multiple implementations: An interface can extend another Java interface only, an abstract class can extend another Java class and implement multiple Java interfaces.
- Accessibility of Data Members: Members of a Java interface are public by default. A Java abstract class can have class members like private, protected, etc.
ArrayList and Vectors both implement the List interface, and both use (dynamically resizable) arrays for their internal data structure, much like using an ordinary array.
ArrayList: ArrayList<T> al = new ArrayList<T>();
Vector: Vector<T> v = new Vector<T>();
| Array list | vector |
|---|---|
| ArrayList is not synchronized. | Vector is synchronized. |
| ArrayList increments 50% of the current array size if the number of elements exceeds ts capacity. | Vector increments 100% means doubles the array size if the total number of elements exceeds its capacity. |
| ArrayList is not a legacy class. It is introduced in JDK 1.2. | Vector is a legacy class. |
| ArrayList is fast because it is non-synchronized. | Vector is slow because it is synchronized, i.e., in a multithreading environment, it holds the other threads in a runnable or non-runnable state until the current thread releases the lock of the object. |
| ArrayList uses the Iterator interface to traverse the elements. | A Vector can use the Iterator interface or Enumeration interface to traverse the elements. |
| Key | Hash Set | Tree Set |
|---|---|---|
| Implementation | Hash set is implemented using HashTable | The tree set is implemented using a tree structure. |
| Null Object | HashSet allows a null object | The tree set does not allow the null object. It throws the null pointer exception. |
| Methods | Hash set use equals method to compare two objects | Tree set use compare method for comparing two objects. |
| Heterogeneous object | Hash set doesn't now allow a heterogeneous object | Tree set allows a heterogeneous object |
| Ordering | HashSet does not maintain any order | TreeSet maintains an object in sorted order |
ArrayList and LinkedList both implements List interface and maintains insertion order. Both are non synchronized classes.
| ArrayList | LinkedList |
|---|---|
| ArrayList internally uses a dynamic array to store the elements. | LinkedList internally uses a doubly linked list to store the elements. |
| Manipulation with ArrayList is slow because it internally uses an array. If any element is removed from the array, all the bits are shifted in memory. | Manipulation with LinkedList is faster than ArrayList because it uses a doubly linked list, so no bit shifting is required in memory. |
| An ArrayList class can act as a list only because it implements List only. | LinkedList class can act as a list and queue both because it implements List and Deque interfaces. |
| ArrayList is better for storing and accessing data. | LinkedList is better for manipulating data. |
import java.util.*;
class TestArrayLinked {
    public static void main(String args[]) {

        List < String > al = new ArrayList < String > (); //creating arraylist
        al.add("Ravi"); //adding object in arraylist
        al.add("Vijay");
        al.add("Ravi");
        al.add("Ajay");

        List < String > al2 = new LinkedList < String > (); //creating linkedlist
        al2.add("James"); //adding object in linkedlist
        al2.add("Serena");
        al2.add("Swati");
        al2.add("Junaid");

        System.out.println("arraylist: " + al);
        System.out.println("linkedlist: " + al2);
    }
}
| Hashmap | Hashtable |
|---|---|
| No method is synchronized. | Every method is synchronized. |
| Multiple threads can operate simultaneously and hence hashmap’s object is not thread-safe. | At a time only one thread is allowed to operate the Hashtable’s object. Hence it is thread-safe. |
| Threads are not required to wait and hence relatively performance is high. | It increases the waiting time of the thread and hence performance is low. |
| Null is allowed for both key and value. | Null is not allowed for both key and value. Otherwise, we will get a null pointer exception. |
public static void main(String args[])
    {
        //----------hashtable -------------------------
        Hashtable<Integer,String> ht=new Hashtable<Integer,String>();
        ht.put(101," ajay");
        ht.put(101,"Vijay");
        ht.put(102,"Ravi");
        ht.put(103,"Rahul");
        System.out.println("-------------Hash table--------------");
        for (Map.Entry m:ht.entrySet()) {
            System.out.println(m.getKey()+" "+m.getValue());
        }

        //----------------hashmap--------------------------------
        HashMap<Integer,String> hm=new HashMap<Integer,String>();
        hm.put(100,"Amit");
        hm.put(104,"Amit");
        hm.put(101,"Vijay");
        hm.put(102,"Rahul");
        System.out.println("-----------Hash map-----------");
        for (Map.Entry m:hm.entrySet()) {
            System.out.println(m.getKey()+" "+m.getValue());
        }
    }
Reflection is a runtime API for inspecting and changing the behavior of methods, classes, and interfaces. Java Reflection allows you to analyze classes, interfaces, fields, and methods during runtime without knowing what they are called at compile time. Reflection can also be used to create new objects, call methods, and get/set field values. External, user-defined classes can be used by creating instances of extensibility objects with their fully-qualified names. Debuggers can also use reflection to examine private members of classes.
Reflection can be used to get information about –
- Class: The
getClass()method is used to get the name of the class to which an object belongs. - Constructors: The
getConstructors()method is used to get the public constructors of the class to which an object belongs. - Methods: The
getMethods()method is used to get the public methods of the class to which an objects belongs.
// A simple Java program to demonstrate the use of reflection
import java.lang.reflect.Method;
import java.lang.reflect.Field;
import java.lang.reflect.Constructor;

// class whose object is to be created
class Test
{
    // creating a private field
    private String s;

    // creating a public constructor
    public Test()  {  s = "GeeksforGeeks"; }

    // Creating a public method with no arguments
    public void method1()  {
        System.out.println("The string is " + s);
    }

    // Creating a public method with int as argument
    public void method2(int n)  {
        System.out.println("The number is " + n);
    }

    // creating a private method
    private void method3() {
        System.out.println("Private method invoked");
    }
}

class Demo
{
    public static void main(String args[]) throws Exception
    {
        // Creating object whose property is to be checked
        Test obj = new Test();

        // Creating class object from the object using
        // getclass method
        Class cls = obj.getClass();
        System.out.println("The name of class is " +
                            cls.getName());

        // Getting the constructor of the class through the
        // object of the class
        Constructor constructor = cls.getConstructor();
        System.out.println("The name of constructor is " +
                            constructor.getName());

        System.out.println("The public methods of class are : ");

        // Getting methods of the class through the object
        // of the class by using getMethods
        Method[] methods = cls.getMethods();

        // Printing method names
        for (Method method:methods)
            System.out.println(method.getName());

        // creates object of desired method by providing the
        // method name and parameter class as arguments to
        // the getDeclaredMethod
        Method methodcall1 = cls.getDeclaredMethod("method2",
                                                 int.class);

        // invokes the method at runtime
        methodcall1.invoke(obj, 19);

        // creates object of the desired field by providing
        // the name of field as argument to the
        // getDeclaredField method
        Field field = cls.getDeclaredField("s");

        // allows the object to access the field irrespective
        // of the access specifier used with the field
        field.setAccessible(true);

        // takes object and the new value to be assigned
        // to the field as arguments
        field.set(obj, "JAVA");

        // Creates object of desired method by providing the
        // method name as argument to the getDeclaredMethod
        Method methodcall2 = cls.getDeclaredMethod("method1");

        // invokes the method at runtime
        methodcall2.invoke(obj);

        // Creates object of the desired method by providing
        // the name of method as argument to the
        // getDeclaredMethod method
        Method methodcall3 = cls.getDeclaredMethod("method3");

        // allows the object to access the method irrespective
        // of the access specifier used with the method
        methodcall3.setAccessible(true);

        // invokes the method at runtime
        methodcall3.invoke(obj);
    }
}
Output:
The name of class is Test
The name of constructor is Test
The public methods of class are :
method2
method1
wait
wait
wait
equals
toString
hashCode
getClass
notify
notifyAll
The number is 19
The string is JAVA
Private method invoked
HashMap is the Class which is under Traditional Collection and ConcurrentHashMap is a Class which is under Concurrent Collections.
HashMap is non-Synchronized in nature i.e. HashMap is not Thread-safe whereas ConcurrentHashMap is Thread-safe in nature. HashMap performance is relatively high because it is non-synchronized in nature and any number of threads can perform simultaneously. But ConcurrentHashMap performance is low sometimes because sometimes Threads are required to wait on ConcurrentHashMap. While one thread is Iterating the HashMap object, if other thread try to add/modify the contents of Object then we will get Run-time exception saying ConcurrentModificationException.Whereas In ConcurrentHashMap we won’t get any exception while performing any modification at the time of Iteration.
Serialization is a mechanism of converting the state of an object into a byte stream. The byte array can be the class, version, and internal state of the object.
Deserialization is the reverse process where the byte stream is used to recreate the actual Java object in memory. This mechanism is used to persist the object.
Case 1: If the superclass is serializable, then subclass is automatically serializable If the superclass is Serializable, then by default, every subclass is serializable. Hence, even though subclass doesn’t implement Serializable interface( and if its superclass implements Serializable), then we can serialize subclass object.
Case 2: If a superclass is not serializable, then subclass can still be serialized Even though the superclass doesn’t implement a Serializable interface, we can serialize subclass objects if the subclass itself implements a Serializable interface. So we can say that to serialize subclass objects, superclass need not be serializable. But what happens with the instances of superclass during serialization in this case. The following procedure explains this.
Case 2(a): What happens when a class is serializable, but its superclass is not? Serialization: At the time of serialization, if any instance variable inherits from the non-serializable superclass, then JVM ignores the original value of that instance variable and saves the default value to the file.
By using transient keyword
// A sample class that uses transient keyword to
// skip their serialization.
class Test implements Serializable
{
    // Making password transient for security
    private transient String password;

    // Making age transient as age is auto-
    // computable from DOB and current date.
    transient int age;

    // serialize other fields
    private String username, email;
    Date dob;

    // other code
}
Volatile:
The Volatile keyword is used to mark the JVM and thread to read its value from primary memory and not utilize cached value present in the thread stack. It is used in concurrent programming in java.
Transient:
The Transient keyword is used with the instance variable to eliminate it from the serialization process. During serialization, the value of the transient field or variable is not saved.
Java provides two interfaces to sort objects using data members of the class:
- Comparable
- Comparator
| Comparable | Comparator |
|---|---|
| Comparable provides a single sorting sequence. In other words, we can sort the collection on the basis of a single element such as id, name, and price. | The Comparator provides multiple sorting sequences. In other words, we can sort the collection on the basis of multiple elements such as id, name, and price etc. |
| Comparable affects the original class, i.e., the actual class is modified. | Comparator doesn't affect the original class, i.e., the actual class is not modified. |
| Comparable provides compareTo() method to sort elements. | Comparator provides compare() method to sort elements. |
| Comparable is present in java.lang package. | A Comparator is present in the java.util package. |
| We can sort the list elements of Comparable type by Collections.sort(List) method. | We can sort the list elements of Comparator type by Collections.sort(List, Comparator) method. |
To summarize, if sorting of objects needs to be based on natural order then use Comparable whereas if you sorting needs to be done on attributes of different objects, then use Comparator in Java.
RestTemplate uses Java Servlet API and is therefore synchronous and blocking.
Conversely, WebClient is asynchronous and will not block the executing thread while waiting for the response to come back. The notification will be produced only when the response is ready.
The Java ClassLoader is a subset of JVM (Java Virtual Machine) that is responsible for loading the class files. Whenever a Java program is executed it is first loaded by the classloader. Java provides three built-in classloaders:
Bootstrap ClassLoader Extension ClassLoader System/Application ClassLoader
An exception is an issue (run time error) that occurred during the execution of a program. When an exception occurred the program gets terminated abruptly and, the code past the line that generated the exception never gets executed.
Java provides us the facility to create our own exceptions which are basically derived classes of Exception. Creating our own Exception is known as a custom exception or user-defined exception. Basically, Java custom exceptions are used to customize the exception according to user needs. In simple words, we can say that a User-Defined Exception or custom exception is creating your own exception class and throwing that exception using the ‘throw’ keyword.
Why use custom exceptions? Java exceptions cover almost all the general types of exceptions that may occur in the programming. However, we sometimes need to create custom exceptions.
Following are a few of the reasons to use custom exceptions:
To catch and provide specific treatment to a subset of existing Java exceptions. Business logic exceptions: These are the exceptions related to business logic and workflow. It is useful for the application users or the developers to understand the exact problem.
public class BaseException extends RuntimeException{
	private static final long serialVersionUID = -1165516792304036105L;
    	private ErrorResponse error;

	/**
     *
     * @param errorCode
     * @param errorMessage
     * @param cause
     */
    public BaseException(int errorCode, String errorMessage, Throwable cause) {
        super(errorMessage, cause);
        this.error = new ErrorResponse(errorCode, errorMessage);
    }
}
Threads are basically the lightweight and smallest unit of processing that can be managed independently by a scheduler. Threads are referred to as parts of a process that simply let a program execute efficiently with other parts or threads of the process at the same time. Using threads, one can perform complicated tasks in the easiest way. It is considered the simplest way to take advantage of multiple CPUs available in a machine. They share the common address space and are independent of each other.
A process is a self contained execution environment and it can be seen as a program or application whereas Thread is a single task of execution within the process. Java runtime environment runs as a single process which contains different classes and programs as processes. Thread can be called lightweight process. Thread requires less resources to create and exists in the process, thread shares the process resources.
There are various benefits of multithreading as given below:
- Allow the program to run continuously even if a part of it is blocked.
- Improve performance as compared to traditional parallel programs that use multiple processes.
- Allows to write effective programs that utilize maximum CPU time
- Improves the responsiveness of complex applications or programs.
- Increase use of CPU resources and reduce costs of maintenance.
- Saves time and parallelism tasks.
- If an exception occurs in a single thread, it will not affect other threads as threads are independent.
- Less resource-intensive than executing multiple processes at the same time.
- Extending the Thread class
class MultithreadingDemo extends Thread
{
  public void run()
 {
     System.out.println("My thread is in running state.");
 }
  public static void main(String args[])
 {
    MultithreadingDemo obj=new MultithreadingDemo();
        obj.start();
  }
}
- Implementing Runnable interface in Java
lass MultithreadingDemo implements Runnable
{
   public void run()
 {
      System.out.println("My thread is in running state.");
  }
    public static void main(String args[])
 {
      MultithreadingDemo obj=new MultithreadingDemo();
      Threadtobj =new Thread(obj);       tobj.start();
 }
}
Class Lock: In java, each and every class has a unique lock usually referred to as a class level lock. These locks are achieved using the keyword ‘static synchronized’ and can be used to make static data thread-safe. It is generally used when one wants to prevent multiple threads from entering a synchronized block.
public class ClassLevelLockExample
{
  public void classLevelLockMethod()
 {
     synchronized (ClassLevelLockExample.class)
       {
            //DO your stuff here
       }
 }
}
Object Lock: In java, each and every object has a unique lock usually referred to as an object-level lock. These locks are achieved using the keyword ‘synchronized’ and can be used to protect non-static data. It is generally used when one wants to synchronize a non-static method or block so that only the thread will be able to execute the code block on a given instance of the class.
public class ObjectLevelLockExample
{
  public void objectLevelLockMethod()
 {
     synchronized (this)
       {
            //DO your stuff here
       }
 }
}
User Thread (Non-Daemon Thread): In Java, user threads have a specific life cycle and its life is independent of any other thread. JVM (Java Virtual Machine) waits for any of the user threads to complete its tasks before terminating it. When user threads are finished, JVM terminates the whole program along with associated daemon threads.
Daemon Thread: In Java, daemon threads are basically referred to as a service provider that provides services and support to user threads. There are basically two methods available in thread class for daemon thread: setDaemon() and isDaemon().
wait(): As the name suggests, it is a non-static method that causes the current thread to wait and go to sleep until some other threads call the notify () or notifyAll() method for the object’s monitor (lock). It simply releases the lock and is mostly used for inter-thread communication. It is defined in the object class, and should only be called from a synchronized context.
synchronized(monitor)
{
monitor.wait();       Here Lock Is Released by Current Thread
}
*sleep(): As the name suggests, it is a static method that pauses or stops the execution of the current thread for some specified period. It doesn’t release the lock while waiting and is mostly used to introduce pause on execution. It is defined in thread class, and no need to call from a synchronized context.
synchronized(monitor)
{
Thread.sleep(1000);     Here Lock Is Held by The Current Thread
//after 1000 milliseconds, the current thread will wake up, or after we call that is interrupt() method
}
notify(): It sends a notification and wakes up only a single thread instead of multiple threads that are waiting on the object’s monitor. notifyAll(): It sends notifications and wakes up all threads and allows them to compete for the object's monitor instead of a single thread.
start(): In simple words, the start() method is used to start or begin the execution of a newly created thread. When the start() method is called, a new thread is created and this newly created thread executes the task that is kept in the run() method. One can call the start() method only once.
run(): In simple words, the run() method is used to start or begin the execution of the same thread. When the run() method is called, no new thread is created as in the case of the start() method. This method is executed by the current thread. One can call the run() method multiple times.
A Thread pool is simply a collection of pre-initialized or worker threads at the start-up that can be used to execute tasks and put back in the pool when completed. It is referred to as pool threads in which a group of fixed-size threads is created. By reducing the number of application threads and managing their lifecycle, one can mitigate the issue of performance using a thread pool. Using threads, performance can be enhanced and better system stability can occur. To create the thread pools, java.util.concurrent.Executors class usually provides factory methods.
With the increase in the number of cores available in the processors nowadays, coupled with the ever-increasing need to achieve more throughput, multi-threading APIs are getting quite popular. Java provides its own multi-threading framework called the Java Executor Framework.
Java executor framework (java.util.concurrent.Executor) is used to run the Runnable objects without creating new threads every time and mostly re-using the already created threads.
The java.util.concurrent.Executors provide factory methods that are being used to create ThreadPools of worker threads. Thread pools overcome this issue by keeping the threads alive and reusing the threads. Any excess tasks flowing in that the threads in the pool can handle are held in a Queue. Once any of the threads get free, they pick up the next task from this queue. This task queue is essentially unbounded for the out-of-box executors provided by the JDK.
Some types of Java Executors are listed below
Executor 1: SingleThreadExecutor
A single thread pool can be obtained by calling the static newSingleThreadExecutor() method of the Executors class. It is used to execute tasks sequentially.
ExecutorService executor = Executors.newSingleThreadExecutor();
Executor 2: FixedThreadPool(n)
As the name indicates, it is a thread pool of a fixed number of threads. The tasks submitted to the executor are executed by the n threads and if there is more task they are stored on a LinkedBlockingQueue. It uses Blocking Queue.
ExecutorService fixedPool = Executors.newFixedThreadPool(2);
Executor 3: CachedThreadPool
Creates a thread pool that creates new threads as needed, but will reuse previously constructed threads when they are available. Calls to execute will reuse previously constructed threads if available. If no existing thread is available, a new thread will be created and added to the pool. It uses a SynchronousQueue queue.
ExecutorService executorService = Executors.newCachedThreadPool();
Executor 4: ScheduledExecutor
Scheduled executors are based on the interface ScheduledExecutorService which extends the ExecutorService interface. This executor is used when we have a task that needs to be run at regular intervals or if we wish to delay a certain task.
ScheduledExecutorService scheduledExecService = Executors.newScheduledThreadPool(1);
- A design pattern provides a general reusable solution for the common problems that occur in software design.
- The pattern typically shows relationships and interactions between classes or objects.
- The idea is to speed up the development process by providing well-tested, proven development/design paradigms.
- Design patterns are programming language independent strategies for solving a common problem.
- That means a design pattern represents an idea, not a particular implementation.
- By using design patterns, you can make your code more flexible, reusable, and maintainable.
-
Creational These design patterns are all about class instantiation or object creation. Creational design patterns are the Factory Method, Abstract Factory, Builder, Singleton, Object Pool, and Prototype.
-
Structural These design patterns are about organizing different classes and objects to form larger structures and provide new functionality. Structural design patterns are Adapter, Bridge, Composite, Decorator, Facade, Flyweight, Private Class Data, and Proxy.
- Abstract Factory is a creational design pattern that lets you produce families of related objects without specifying their concrete classes.
- Builder is a creational design pattern that lets you construct complex objects step by step. The pattern allows you to produce different types and representations of an object using the same construction code.
- Prototype is a creational design pattern that lets you copy existing objects without making your code dependent on their classes.
- Factory Method is a creational design pattern that provides an interface for creating objects in a superclass, but allows subclasses to alter the type of objects that will be created.
- Iterator is a behavioral design pattern that lets you traverse elements of a collection without exposing its underlying representation (list, stack, tree, etc.)
- Bridge is a structural design pattern that lets you split a large class or a set of closely related classes into two separate hierarchies—abstraction and implementation—which can be developed independently of each other.
The singleton pattern is one of the simplest design patterns. Sometimes we need to have only one instance of our class for example a single DB connection shared by multiple objects as creating a separate DB connection for every object may be costly. Similarly, there can be a single configuration manager or error manager in an application that handles all problems instead of creating multiple managers
The singleton pattern is a design pattern that restricts the instantiation of a class to one object.
// Classical Java implementation of singleton
// design pattern
class Singleton
{
    private static Singleton obj;

    // private constructor to force use of
    // getInstance() to create Singleton object
    private Singleton() {}

    public static Singleton getInstance()
    {
        if (obj==null)
            obj = new Singleton();
        return obj;
    }
}
Here we have declared getInstance() static so that we can call it without instantiating the class. The first time getInstance() is called it creates a new singleton object and after that, it just returns the same object. Note that Singleton obj is not created until we need it and call getInstance() method. This is called lazy instantiation.
| Runnable | Callable |
|---|---|
| It is a part of java.lang package | It is a part of the java.util.concurrent package |
| It cannot return the return of computation. | It can return the result of the parallel processing of a task. |
| It cannot throw a checked Exception. | It can throw a checked Exception. |
| In a runnable interface, one needs to override the run() method in Java. | In order to use Callable, you need to override the call() |
| Runnable.run() returns void | Callable.call() returns a generic value V |
Runnable Example:
public interface Runnable {
    public void run();
}

public class EventLoggingTask implements  Runnable{
    private Logger logger
      = LoggerFactory.getLogger(EventLoggingTask.class);

    @Override
    public void run() {
        logger.info("Message");
    }
}
Callable Example:
public interface Callable<V> {
    V call() throws Exception;
}

public class FactorialTask implements Callable<Integer> {
    int number;

    // standard constructors

    public Integer call() throws InvalidParamaterException {
        int fact = 1;
        // ...
        for(int count = number; count > 1; count--) {
            fact = fact * count;
        }

        return fact;
    }
}
Immutable class in java means that once an object is created, we cannot change its content. In Java, all the wrapper classes (like Integer, Boolean, Byte, Short) and String class is immutable. We can create our own immutable class as well.
- The class must be declared as final so that child classes can’t be created.
- Data members in the class must be declared private so that direct access is not allowed.
- Data members in the class must be declared as final so that we can’t change the value of it after object creation.
- A parameterized constructor should initialize all the fields performing a deep copy so that data members can’t be modified with an object reference.
- Deep Copy of objects should be performed in the getter methods to return a copy rather than returning the actual object reference)
// Java Program to Create An Immutable Class

// Importing required classes
import java.util.HashMap;
import java.util.Map;

// Class 1
// An immutable class
final class Student {

	// Member attributes of final class
	private final String name;
	private final int regNo;
	private final Map<String, String> metadata;

	// Constructor of immutable class
	// Parameterized constructor
	public Student(String name, int regNo,
				Map<String, String> metadata)
	{

		// This keyword refers to current instance itself
		this.name = name;
		this.regNo = regNo;

		// Creating Map object with reference to HashMap
		// Declaring object of string type
		Map<String, String> tempMap = new HashMap<>();

		// Iterating using for-each loop
		for (Map.Entry<String, String> entry :
			metadata.entrySet()) {
			tempMap.put(entry.getKey(), entry.getValue());
		}

		this.metadata = tempMap;
	}

	// Method 1
	public String getName() { return name; }

	// Method 2
	public int getRegNo() { return regNo; }

	// Note that there should not be any setters

	// Method 3
	// User -defined type
	// To get meta data
	public Map<String, String> getMetadata()
	{

		// Creating Map with HashMap reference
		Map<String, String> tempMap = new HashMap<>();

		for (Map.Entry<String, String> entry :
			this.metadata.entrySet()) {
			tempMap.put(entry.getKey(), entry.getValue());
		}
		return tempMap;
	}
}

// Class 2
// Main class
class GFG {

	// Main driver method
	public static void main(String[] args)
	{

		// Creating Map object with reference to HashMap
		Map<String, String> map = new HashMap<>();

		// Adding elements to Map object
		// using put() method
		map.put("1", "first");
		map.put("2", "second");

		Student s = new Student("ABC", 101, map);

		// Calling the above methods 1,2,3 of class1
		// inside main() method in class2 and
		// executing the print statement over them
		System.out.println(s.getName());
		System.out.println(s.getRegNo());
		System.out.println(s.getMetadata());

		// Uncommenting below line causes error
		// s.regNo = 102;

		map.put("3", "third");
		// Remains unchanged due to deep copy in constructor
		System.out.println(s.getMetadata());
		s.getMetadata().put("4", "fourth");
		// Remains unchanged due to deep copy in getter
		System.out.println(s.getMetadata());
	}
}
output:
ABC
101
{1=first, 2=second}
{1=first, 2=second}
{1=first, 2=second}
Iterators in java are used to iterate over the Collection objects.
Fail-Fast
- Fail-Fast iterators immediately throw ConcurrentModificationException if there is a structural modification of the collection.
- Structural modification means adding, removing any element from collection while a thread is iterating over that collection.
- Iterator on ArrayList, HashMap classes are some examples of fail-fast Iterator.
Fail-Safe
- Fail-Safe iterators don’t throw any exceptions if a collection is structurally modified while iterating over it.
- This is because, they operate on the clone of the collection, not on the original collection and that’s why they are called fail-safe iterators.
- Iterator on CopyOnWriteArrayList, ConcurrentHashMap classes are examples of fail-safe Iterator.
- Garbage collection in Java is the process by which Java programs perform automatic memory management.
- Java programs compile to bytecode that can be run on a Java Virtual Machine.
- When Java programs run on the JVM, objects are created on the heap, which is a portion of memory dedicated to the program.
- Eventually, some objects will no longer be needed. The garbage collector finds these unused objects and deletes them to free up memory.
- The main objective of Garbage Collector is to free heap memory by destroying unreachable objects.
- The garbage collector is the best example of the Daemon thread as it is always running in the background.
Important Concepts Related to Garbage Collection in Java
-
Unreachable objects:
An object is said to be unreachable if it doesn’t contain any reference to it. Also, note that objects which are part of the island of isolation are also unreachable.
  Integer i = new Integer(4);
// the new Integer object is reachable  via the reference in 'i'
i = null;
// the Integer object is no longer reachable.
-
Using Runtime.getRuntime().gc() method: Runtime class allows the application to interface with the JVM in which the application is running. Hence by using its gc() method, we can request JVM to run Garbage Collector.
-
Finalization: Just before destroying an object, Garbage Collector calls finalize() method on the object to perform cleanup activities. Once finalize() method completes, Garbage Collector destroys that object. finalize() method is present in Object class with the following prototype. protected void finalize() throws Throwable
Spring is a powerful open-source, loosely coupled, lightweight, java framework meant for reducing the complexity of developing enterprise-level applications.
This framework is also called the “framework of frameworks” as spring provides support to various other important frameworks like JSF, Hibernate, Structs, EJB, etc.
Spring handles all the infrastructure-related aspects which lets the programmer to focus mostly on application development.
There are around 20 modules which are generalized into the following types:
- Core Container
- Data Access/Integration
- Web
- AOP (Aspect Oriented Programming)
- Instrumentation
- Messaging
- Test
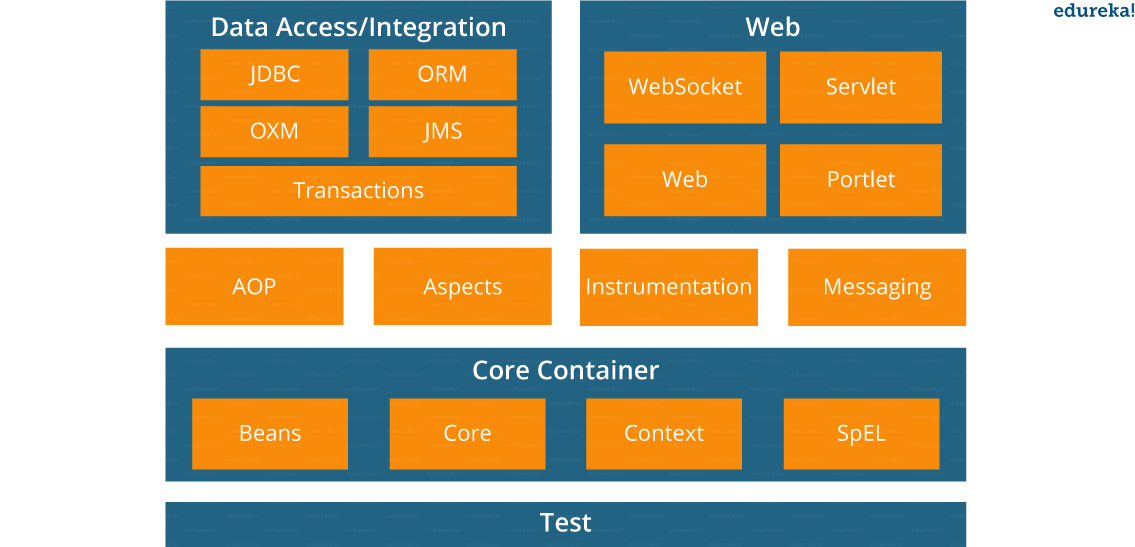
Spring Core Container – This layer is basically the core of Spring Framework. It contains the following modules :
- Spring Core
- Spring Bean
- SpEL (Spring Expression Language)
- Spring Context
Data Access/Integration – This layer provides support to interact with the database. It contains the following modules :
- JDBC (Java DataBase Connectivity)
- ORM (Object Relational Mapping)
- OXM (Object XML Mappers)
- JMS (Java Messaging Service)
- Transaction
Web – This layer provides support to create web application. It contains the following modules :
- Web
- Web – MVC
- Web – Socket
- Web – Portlet
Aspect Oriented Programming (AOP) – In this layer you can use Advices, Pointcuts etc., to decouple the code. Instrumentation – This layer provides support to class instrumentation and classloader implementations. Test – This layer provides support to testing with JUnit and TestNG.
Few Miscellaneous modules are given below:
Messaging – This module provides support for STOMP. It also supports an annotation programming model that is used for routing and processing STOMP messages from WebSocket clients. Aspects – This module provides support to integration with AspectJ.
- Lightweight: Spring is lightweight when it comes to size and transparency.
- Inversion of control (IOC): The objects give their dependencies instead of creating or looking for dependent objects. This is called Inversion Of Control.
- Aspect oriented Programming (AOP): Aspect oriented programming in Spring supports cohesive development by separating application business logic from system services.
- Container: Spring Framework creates and manages the life cycle and configuration of the application objects.
- MVC Framework: Spring Framework’s MVC web application framework is highly configurable. Other frameworks can also be used easily instead of Spring MVC Framework.
- Transaction Management: Generic abstraction layer for transaction management is provided by the Spring Framework. Spring’s transaction support can be also used in container less environments.
- JDBC Exception Handling: The JDBC abstraction layer of the Spring offers an exception hierarchy, which simplifies the error handling strategy.
A Spring configuration file is basically an XML file that mainly contains the classes information and describes how those classes are configured and linked to each other. The XML configuration files are verbose and cleaner.
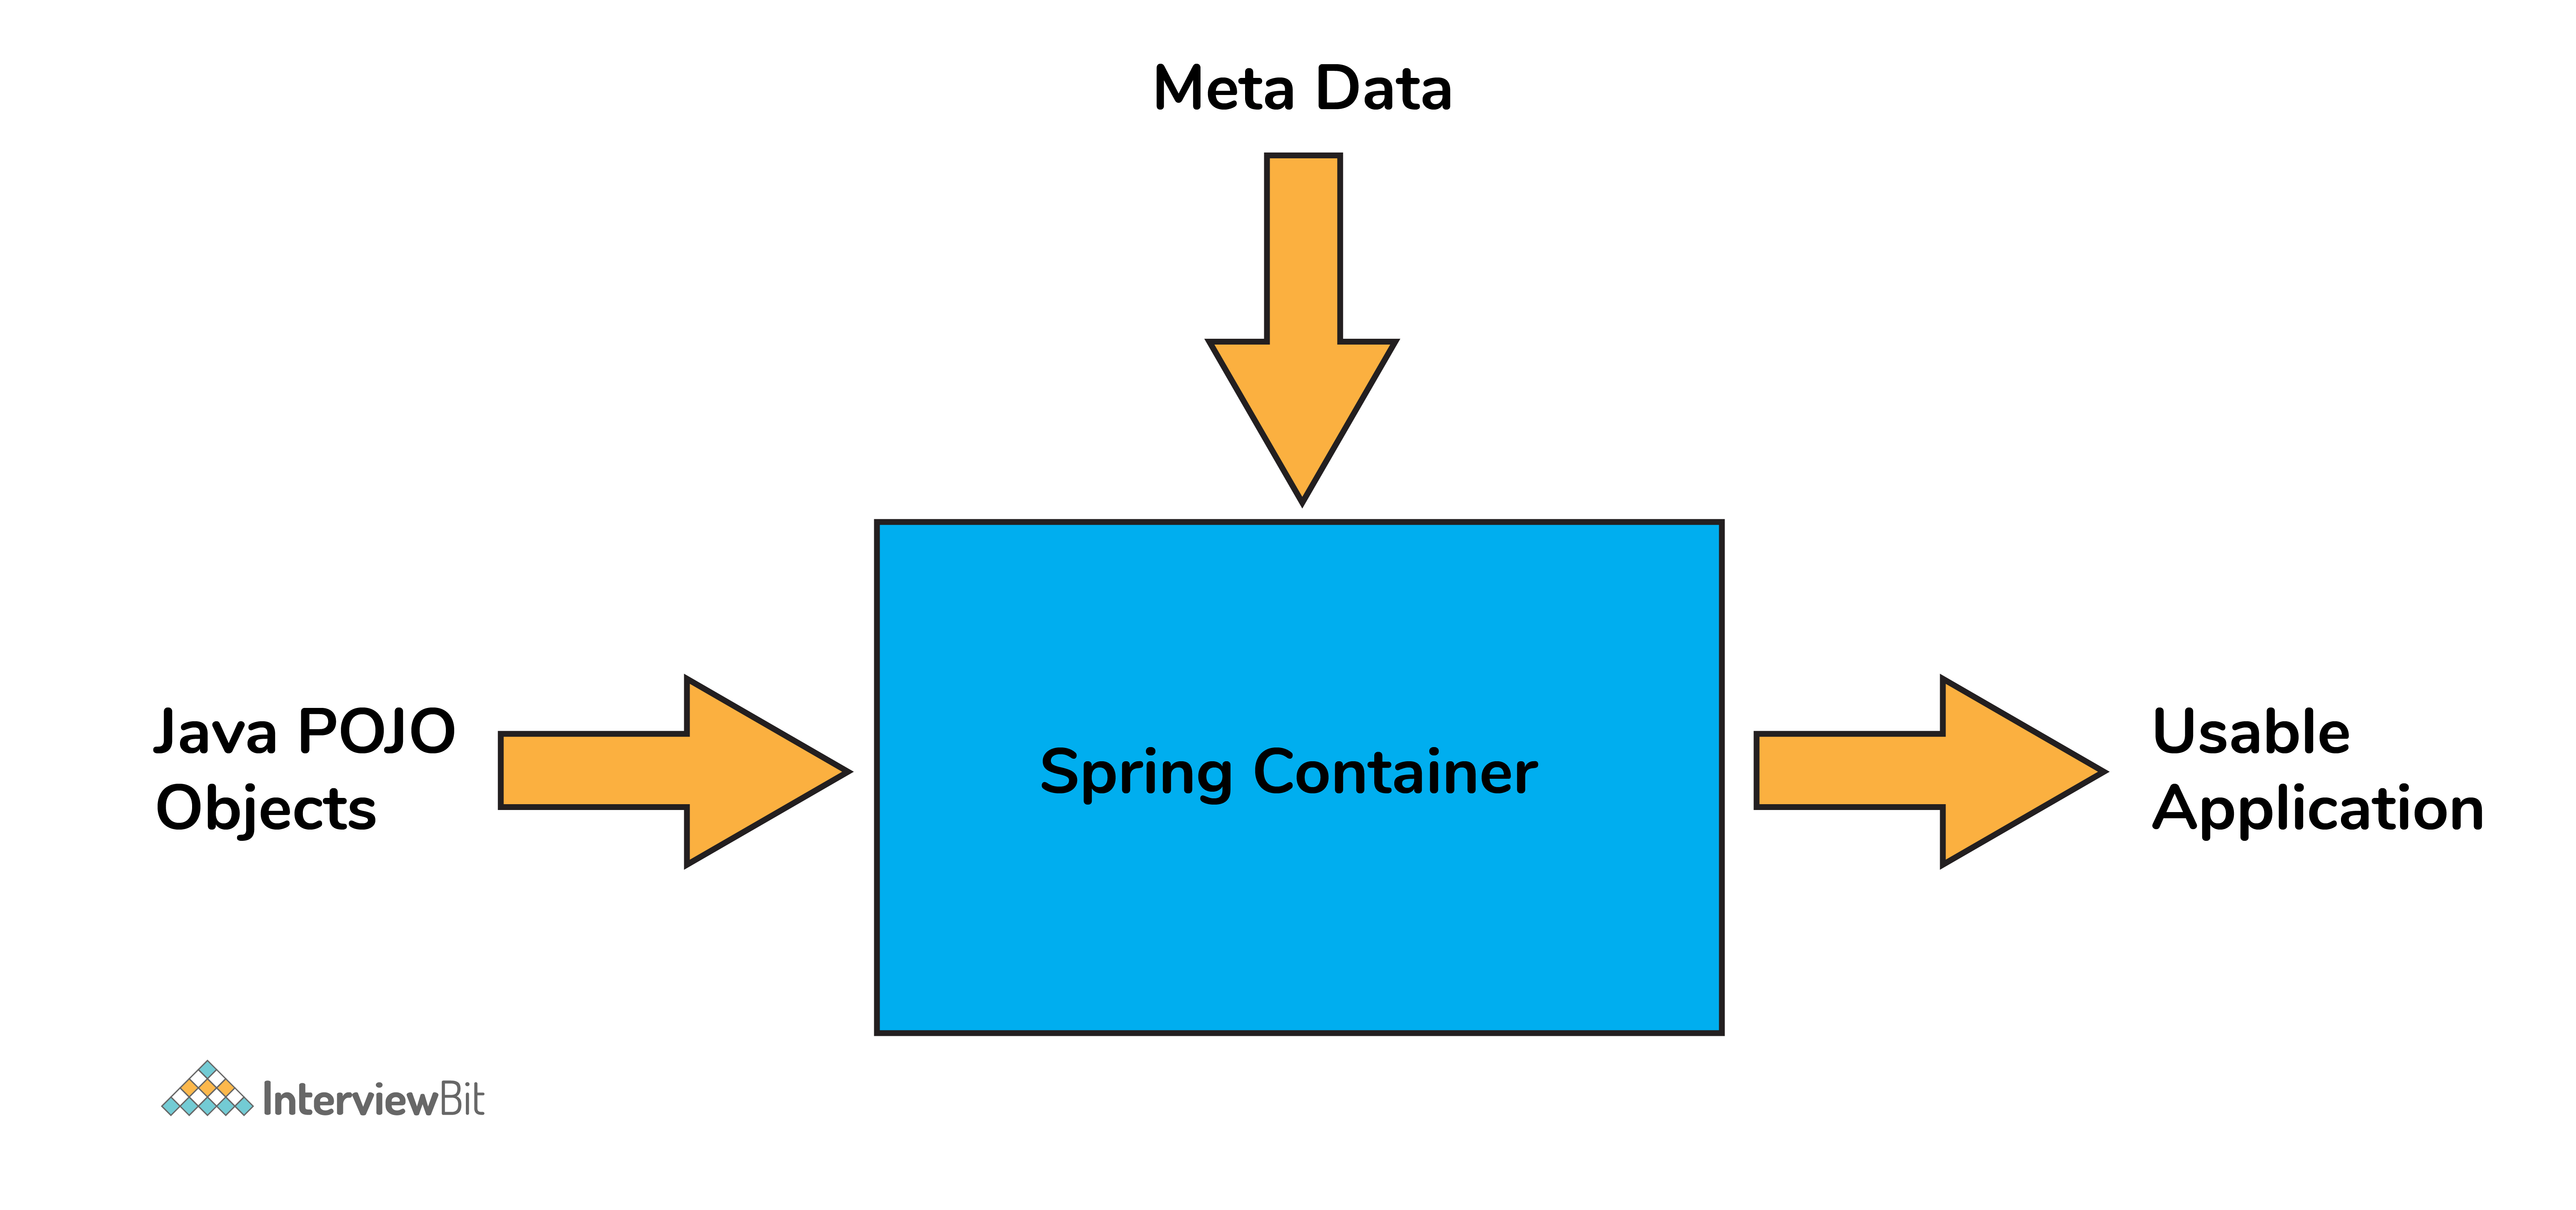
Spring container forms the core of the Spring Framework. The Spring container uses Dependency Injection (DI) for managing the application components by creating objects, wiring them together along with configuring and managing their overall life cycles.
The instructions for the spring container to do the tasks can be provided either by XML configuration, Java annotations, or Java code.
- BeanFactory: BeanFactory is like a factory class that contains a collection of beans. It instantiates the bean whenever asked for by clients.
- ApplicationContext: The ApplicationContext interface is built on top of the BeanFactory interface. It provides some extra functionality on top BeanFactory.
| BeanFactory | ApplicationContext |
|---|---|
| It is an interface defined in org.springframework.beans.factory.BeanFactory | It is an interface defined in org.springframework.context.ApplicationContext |
| It uses Lazy initialization | It uses Eager/ Aggressive initialization |
| It explicitly provides a resource object using the syntax | It creates and manages resource objects on its own |
| It doesn’t supports internationalization | It supports internationalization |
| It doesn’t supports annotation based dependency | It supports annotation based dependency |
- It will minimize the amount of code in your application.
- It will make your application easy to test because it doesn’t require any singletons or JNDI lookup mechanisms in your unit test cases.
- It promotes loose coupling with minimal effort and least intrusive mechanism.
- It supports eager instantiation and lazy loading of the services.
The main idea in Dependency Injection is that you don’t have to create your objects but you just have to describe how they should be created.
The components and services need not be connected by us in the code directly. We have to describe which services are needed by which components in the configuration file. The IoC container present in Spring will wire them up together.
In Java, the 2 major ways of achieving dependency injection are:
- Constructor injection: Here, the IoC container invokes the class constructor with a number of arguments where each argument represents a dependency on the other class.
- Setter injection: Here, the spring container calls the setter methods on the beans after invoking a no-argument static factory method
| Constructor Injection | Setter Injection |
|---|---|
| There is no partial injection. | There can be partial injection. |
| It doesn’t override the setter property. | It overrides the constructor property. |
| It will create a new instance if any modification is done. | It will not create new instance if any modification is done. |
| It works better for many properties. | It works better for few properties. |
A Spring application, generally consists of following components:
- Interface: It defines the functions.
- Bean class: It contains properties, its setter and getter methods, functions etc.
- Spring Aspect Oriented Programming (AOP): Provides the functionality of cross-cutting concerns.
- Bean Configuration File: Contains the information of classes and how to configure them.
- User program: It uses the function.
- They are the objects forming the backbone of the user’s application and are managed by the Spring IoC container.
- Spring beans are instantiated, configured, wired, and managed by IoC container.
- Beans are created with the configuration metadata that the users supply to the container (by means of XML or java annotations configurations.)

XML-Based configuration:
- In Spring Framework, the dependencies and the services needed by beans are specified in configuration files which are in XML format.
- These configuration files usually contain a lot of bean definitions and application specific configuration options.
- They generally start with a
beantag. For example:
<bean id="studentbean" class="org.edureka.firstSpring.StudentBean">
 <property name="name" value="Edureka"></property>
</bean>
Annotation-Based configuration:
- Instead of using XML to describe a bean wiring, you can configure the bean into the component class itself by using annotations on the relevant class, method, or field declaration.
- By default, annotation wiring is not turned on in the Spring container. So, you need to enable it in your Spring configuration file before using it. For example:
<beans>
<context:annotation-config/>
<!-- bean definitions go here -->
</beans>
Java-based configuration:
- The key features in Spring Framework’s new Java-configuration support are
@Configurationannotated classes and@Beanannotated methods. @Beanannotation plays the same role as the element.@Configurationclasses allows to define inter-bean dependencies by simply calling other@Beanmethods in the same class.
@Configuration
public class StudentConfig {
  @Bean
  public StudentBean myStudent()
  { return new StudentBean(); }}
The Spring Framework has five scope supports. They are:
- Singleton: The scope of bean definition while using this would be a single instance per IoC container.
- Prototype: Here, the scope for a single bean definition can be any number of object instances.
- Request: The scope of the bean definition is an HTTP request.
- Session: Here, the scope of the bean definition is HTTP-session.
- Global-session: The scope of the bean definition here is a Global HTTP session. Note: The last three scopes are available only if the users use web-aware ApplicationContext containers.
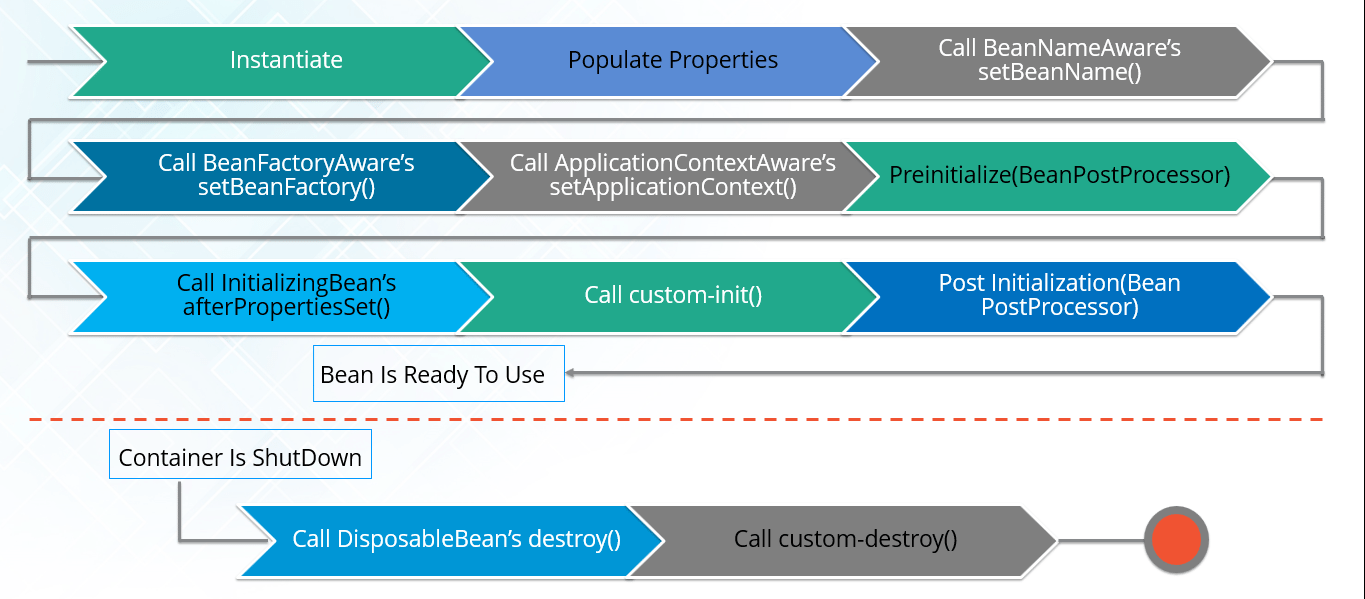
- The IoC container instantiates the bean from the bean’s definition in the XML file.
- Spring then populates all of the properties using the dependency injection as specified in the bean definition.
- The bean factory container calls
setBeanName()which take the bean ID and the corresponding bean has to implement BeanNameAware interface. - The factory then calls
setBeanFactory()by passing an instance of itself (if BeanFactoryAware interface is implemented in the bean). - If BeanPostProcessors is associated with a bean, then the
preProcessBeforeInitialization()methods are invoked. - If an init-method is specified, then it will be called.
- Lastly, postProcessAfterInitialization() methods will be called if there are any BeanPostProcessors associated with the bean that needs to be run post creation.
- A bean can be declared as an inner bean only when it is used as a property of another bean.
- For defining a bean, the Spring’s XML based configuration metadata provides the use of
<bean>element inside the<property>or<constructor-arg>. - Inner beans are always anonymous and they are always scoped as prototypes.
- For example, let’s say we have one Student class having reference of Person class. Here we will be creating only one instance of Person class and use it inside Student. Here’s a Student class followed by bean configuration file: Student.java
public class Student {
    private Person person;
    //Setters and Getters
}
public class Person {
    private String name;
    private String address;
    //Setters and Getters
}
studentbean.xml
<bean id=“StudentBean" class="com.edureka.Student">
<property name="person">
<!--This is inner bean -->
<bean class="com.edureka.Person">
<property name="name" value=“Scott"></property>
<property name="address" value=“Bangalore"></property>
</bean>
</property>
</bean>
- When beans are combined together within the Spring container, it’s called wiring or bean wiring.
- The Spring container needs to know what beans are needed and how the container should use dependency injection to tie the beans together, while wiring beans.
- The Spring container is able to autowire relationships between the collaborating beans.
- That is, it is possible to let Spring resolve collaborators for your bean automatically by inspecting the contents of the BeanFactory.
- Different modes of bean auto-wiring are:
- no: This is default setting which means no autowiring. Explicit bean reference should be used for wiring.
- byName: It injects the object dependency according to name of the bean. It matches and wires its properties with the beans defined by the same names in the XML file.
- byType: It injects the object dependency according to type. It matches and wires a property if its type matches with exactly one of the beans name in XML file.
- constructor: It injects the dependency by calling the constructor of the class. It has a large number of parameters.
- autodetect: First the container tries to wire using autowire by constructor, if it can’t then it tries to autowire by byType.
- Spring ApplicationContext is where Spring holds instances of objects that it has identified to be managed and distributed automatically. These are called beans.
- Bean management and the opportunity for dependency injection are some of Spring's main features.
- Using the Inversion of Control principle, Spring collects bean instances from our application and uses them at the appropriate time. We can show bean dependencies to Spring without needing to handle the setup and instantiation of those objects.
- The ability to use annotations like @Autowired to inject Spring-managed beans into our application is a driving force for creating powerful and scalable code in Spring
Spring Annotations are a form of metadata that provides data about a program. Annotations are used to provide supplemental information about a program. It does not have a direct effect on the operation of the code they annotate. It does not change the action of the compiled program.
- @SpringBootApplication
- @SpringBootApplication annotation is one point replacement for using @Configuration, @EnableAutoConfiguration and @ComponentScan annotations alongside their default attributes.
- @Autowired:
- @Autowired annotation is applied to the fields, setter methods, and constructors.
- It injects object dependency implicitly. We use @Autowired to mark the dependency that will be injected by the Spring container.
- @Qualifier:
- If more than one bean of the same type is available in the container, the framework will throw NoUniqueBeanDefinitionException, indicating that more than one bean is available for autowiring Ex. incase we have interface with multiple implementation then avoid issue we are using the @qulifier annotation.
- @Component:
- @Component is an annotation that allows Spring to automatically detect our custom beans.
- This marks a java class as a bean.
- It is a generic stereotype for any Spring-managed component.
- The component-scanning mechanism of spring now can pick it up and pull it into the application context.
In other words, without having to write any explicit code, Spring will:
- Scan our application for classes annotated with @Component
- Instantiate them and inject any specified dependencies into them
- Inject them wherever needed
Stereotype Annotations Spring Framework provides us with some special annotations. These annotations are used to create Spring beans automatically in the application context. @Component annotation is the main Stereotype Annotation. There are some Stereotype meta-annotations which is derived from @Component those are
1 @Service:
- We specify a class with @Service to indicate that they’re holding the business logic.
- Besides being used in the service layer, there isn’t any other special use for this annotation.
- The utility classes can be marked as Service classes.
- You can use @Service over @Component in service-layer classes as it specifies intent in a better way.
2 @Repository:
- We specify a class with @Repository to indicate that they’re dealing with CRUD operations, usually, it’s used with DAO (Data Access Object) or Repository implementations that deal with database tables.
3: @Controller:
- We specify a class with @Controller to indicate that they’re front controllers and responsible to handle user requests and return the appropriate response.
- It is mostly used with REST Web Services.
- This marks a class as a Spring Web MVC controller.
- Beans marked with it are automatically imported into the Dependency Injection container
- @Required is applied to bean property setter methods.
- This annotation simply indicates that the affected bean property must be populated at the configuration time with the help of an explicit property value in a bean definition or with autowiring.
- If the affected bean property has not been populated, the container will throw
BeanInitializationException.
public class Employee {
    private String name;
    @Required
    public void setName(String name) {
        this.name = name;
    }
    public string getName() {
        return name;
    }
}
- The @Autowired annotation provides more accurate control over where and how autowiring should be done.
- This annotation is used to autowire bean on the setter methods, constructor, a property or methods with arbitrary names or multiple arguments.
- By default, it is a type driven injection.
public class Employee {
    private String name;
    @Autowired
    public void setName(String name) {
        this.name = name;
    }
    public string getName() {
        return name;
    }
}
- When you create more than one bean of the same type and want to wire only one of them with a property you can use the @Qualifier annotation along with @Autowired to remove the ambiguity by specifying which exact bean should be wired.
For example, here we have two classes, Employee and EmpAccount respectively. In EmpAccount, using @Qualifier its specified that bean with id emp1 must be wired.
Employee.java
public class Employee {
    private String name;
    @Autowired
    public void setName(String name) {
        this.name = name;
    }
    public string getName() {
        return name;
    }
}
EmpAccount.java
public class EmpAccount {
    private Employee emp;
    @Autowired
    @Qualifier(emp1)
    public void showName() {
        System.out.println(“Employee name: ”+emp.getName);
    }
}
Yes, in large projects, having multiple Spring configurations is recommended to increase maintainability and modularity.
We can load multiple Java-based configuration files:
@Configuration
@Import({MainConfig.class, SchedulerConfig.class})
public class AppConfig {
Or we can load one XML file that will contain all other configs:
ApplicationContext context = new ClassPathXmlApplicationContext("spring-all.xml");
And inside this XML file we'll have the following:
<import resource="main.xml"/>
<import resource="scheduler.xml"/>
- Spring Security is a separate module of the Spring framework that focuses on providing authentication and authorization methods in Java applications.
- It also takes care of most of the common security vulnerabilities such as CSRF attacks.
- To use Spring Security in web applications, we can get started with the simple annotation @EnableWebSecurity.
- Spring Boot helps to create stand-alone applications which can be started using java.jar (Doesn’t require configuring WAR files).
- Spring Boot also offers pinpointed ‘started’ POMs to Maven configuration.
- Has provision to embed Undertow, Tomcat, Jetty, or other web servers directly.
- Auto-Configuration: Provides a way to automatically configure an application based on the dependencies present on the classpath.
- Spring Boot was developed with the intention of lessening the lines of code.
- It offers production-ready support like monitoring and apps developed using spring boot are easier to launch
Below are the four key components of spring-boot:
- Spring Boot auto-configuration.
- Spring Boot CLI.
- Spring Boot starter POMs.
- Spring Boot Actuators.
Below are some key points which spring boot offers but spring doesn’t:
- Starter POM.
- Version Management.
- Auto Configuration.
- Component Scanning.
- Embedded server.
- InMemory DB.
- Actuators
- Spring Boot CLI – This allows you to Groovy / Maven for writing Spring boot application and avoids boilerplate code.
- Starter Dependency – With the help of this feature, Spring Boot aggregates common dependencies together and eventually improves productivity and reduces the burden on
- Spring Initializer – This is a web application that helps a developer in creating an internal project structure. The developer does not have to manually set up the structure of the project while making use of this feature.
- Auto-Configuration – This helps in loading the default configurations according to the project you are working on. In this way, unnecessary WAR files can be avoided.
- Spring Actuator – Spring boot uses actuator to provide “Management EndPoints” which helps the developer in going through the Application Internals, Metrics etc.
- Logging and Security – This ensures that all the applications made using Spring Boot are properly secured without any hassle.
There is no doubt in the fact that Spring Boot allows the developers to run the same application in different environments. Well, this is done with the support it provides for external configuration. It uses environment variables, properties files, command-line arguments, YAML files, and system properties to mention the required configuration properties. Also, the @value annotation is used to gain access to the properties. So, the most possible sources of external configuration are as follows:
-
Application Properties: – By default, Spring Boot searches for the application properties file or its YAML file in the current directory, classpath root or config directory to load the properties.
-
Command-line properties: – Spring Boot provides command-line arguments and converts these arguments to properties. Then it adds them to the set of environment properties.
-
Profile-specific properties: – These properties are loaded from the application-{profile}.properties file or its YAML file. This file resides in the same location as that of the non-specific property files and the{profile} placeholder refers to an active profile.
Can you explain what happens in the background when a Spring Boot Application is “Run as Java Application”?
When a Spring Boot application is executed as “Run as Java application”, then it automatically launches up the tomcat server as soon as it sees, that you are developing a web application.
Spring Boot starters are a set of convenient dependency management providers that can be used in the application to enable dependencies. These starters, make development easy and rapid. All the available starters come under the org.springframework.boot group. Few of the popular starters are as follows:
- spring-boot-starter: This is the core starter and includes logging, auto-configuration support, and YAML.
- spring-boot-starter-jdbc: This starter is used for HikariCP connection pool with JDBC
- spring-boot-starter-web: Is the starter for building web applications, including RESTful, applications using Spring MVC
- spring-boot-starter-data-jpa: Is the starter to use Spring Data JPA with Hibernate
- spring-boot-starter-security: Is the starter used for Spring Security
- spring-boot-starter-aop: This starter is used for aspect-oriented programming with AspectJ and Spring AOP
- spring-boot-starter-test: Is the starter for testing Spring Boot applications
Spring Boot automatically configures your application based on the dependencies you have added to the project by using annotation. The entry point of the spring boot application is the class that contains @SpringBootApplication annotation and the main method.
Spring Boot automatically scans all the components included in the project by using @ComponentScan annotation.
The @SpringBootApplication annotation is equivalent to using @Configuration, @EnableAutoConfiguration, and @ComponentScan with their default attributes. Spring Boot enables the developer to use a single annotation instead of using multiple. But, as we know, Spring provided loosely coupled features that we can use for each annotation as per our project needs
Spring Boot application scans all the beans and package declarations when the application initializes. You need to add the @ComponentScan annotation for your class file to scan your components added to your project
Just like any other Java program, a Spring Boot application must have a main method. This method serves as an entry point, which invokes the SpringApplication#run method to bootstrap the application
@SpringBootApplication
public class MyApplication {

       public static void main(String[] args) {

             SpringApplication.run(MyApplication.class);
               // other statements
       }
}
Spring boot starter is a maven template that contains a collection of all the relevant transitive dependencies that are needed to start a particular functionality. Like we need to import spring-boot-starter-web dependency for creating a web application.
<dependency>
<groupId> org.springframework.boot</groupId>
<artifactId> spring-boot-starter-web </artifactId>
</dependency>
Spring Initializer is a web application that helps you to create an initial spring boot project structure and provides a maven or gradle file to build your code. It solves the problem of setting up a framework when you are starting a project from scratch.
Spring Boot CLI is a command-line interface that allows you to create a spring-based java application using Groovy.
Example: You don’t need to create getter and setter method or access modifier, return statement. If you use the JDBC template, it automatically loads for you
-run, -test, -grap, -jar, -war, -install, -uninstall, --init, -shell, -help.
The primary annotations that Spring Boot offers reside in its org.springframework.boot.autoconfigure and its sub-packages. Here are a couple of basic ones:
@EnableAutoConfiguration – to make Spring Boot look for auto-configuration beans on its classpath and automatically apply them. @SpringBootApplication – used to denote the main class of a Boot Application. This annotation combines @Configuration, @EnableAutoConfiguration, and @ComponentScan annotations with their default attributes.
Spring Boot dependency management is used to manage dependencies and configuration automatically without you specifying the version for any of that dependencies
The default port of the tomcat server-id 8080. It can be changed by adding sever.port properties in the application.property file.
Yes, it is possible. By using the server.port in the application.properties
Yes, we can replace the Embedded Tomcat server with any server by using the Starter dependency in the pom.xml file. Like you can use spring-boot-starter-jetty as a dependency for using a jetty server in your project
You can use exclude attribute of @EnableAutoConfiguration if you want auto-configuration not to apply to any specific class.
//use of exclude
@EnableAutoConfiguration(exclude={className})
- The @Controller is a common annotation which is used to mark a class as Spring MVC Controller while the @RestController is a special controller used in RESTFul web services and the equivalent of @Controller + @ResponseBody.
- Another key difference between @RestController and @Controller is that you don’t need to use @ResponseBody on every handler method once you annotate the class with @RestController
While developing the application we deal with multiple environments such as dev, QA, Prod, and each environment requires a different configuration. For eg., we might be using an embedded H2 database for dev but for prod, we might have proprietary Oracle or DB2. Even if DBMS is the same across the environment, the URLs will be different.
To make this easy and clean, Spring has the provision of Profiles to keep the separate configuration of environments.
An actuator is an additional feature of Spring that helps you to monitor and manage your application when you push it to production. These actuators include auditing, health, CPU usage, HTTP hits, and metric gathering, and many more that are automatically applied to your application.
Spring Actuator is a cool feature of Spring Boot with the help of which you can see what is happening inside a running application. So, whenever you want to debug your application, and need to analyze the logs you need to understand what is happening in the application right? In such a scenario, the Spring Actuator provides easy access to features such as identifying beans, CPU usage, etc. The Spring Actuator provides a very easy way to access the production-ready REST points and fetch all kinds of information from the web. These points are secured using Spring Security’s content negotiation strategy.
To enable the spring actuator feature, we need to add the dependency of “spring-boot-starter-actuator” in pom.xml.
<dependency>
<groupId> org.springframework.boot</groupId>
<artifactId> spring-boot-starter-actuator </artifactId>
</dependency>
Thymeleaf is a server-side Java template engine used for web applications. It aims to bring natural template for your web application and can integrate well with Spring Framework and HTML5 Java web applications. To use Thymeleaf, you need to add the following code in the pom.xml file:
<dependency>
<groupId>org.springframework.boot</groupId>
<artifactId>spring-boot-starter-thymeleaf</artifactId>
</dependency>
Spring Boot Dev Tools are an elaborated set of tools and aims to make the process of developing an application easier. If the application runs in the production, then this module is automatically disabled, repackaging of archives are also excluded by default. So, the Spring Boot Developer Tools applies properties to the respective development environments. To include the DevTools, you just have to add the following dependency into the pom.xml file:
<dependency>
    <groupId>org.springframework.boot</groupId>
    <artifactId>spring-boot-devtools</artifactId>
</dependency>
Spring Boot starter projects provide the required libraries to connect the application with JDBC. So, for example, if you just have to create an application and connect it with MySQL database, you can follow the below steps:
Step 1: Create a database in MySQL
CREATE DATABASE example;
Step 2: Then you have to create a table inside this database.
CREATE TABLE customers(customerid INT PRIMARY KEY NOT NULL AUTO_INCREMENT, customername VARCHAR(255));
Step 3: Now, create a Spring Boot project and provide the required details
Step 4: Add the JDBC, MySQL and web dependencies.
// MYSQL
<dependency>
	<groupId>mysql</groupId>
	<artifactId>mysql-connector-java</artifactId>
	<scope>runtime</scope>
</dependency>
// JPA
<dependency>
	<groupId>org.springframework.boot</groupId>
	<artifactId>spring-boot-starter-data-jpa</artifactId>
</dependency>
// WEB
<dependency>
	<groupId>org.springframework.boot</groupId>
	<artifactId>spring-boot-starter-web</artifactId>
</dependency>
Step 5: Once the project is created, you have to configure the database into application properties
spring.datasource.url=jdbc:mysql://localhost:3306/example
spring.datasource.username=root
spring.datasource.password=edureka
spring.jpa.hibernate.ddl-auto=create-drop
- JPA is a Data Access Abstraction used to reduce the amount of boilerplate code
- Hibernate is an implementation of Java Persistence API and offers benefits of loose coupling
To create a custom endpoint in Spring Boot 2.x, you can use the @Endpoint annotation. Spring Boot also exposes endpoints using @WebEndpointor, @WebEndpointExtension over HTTP with the help of Spring MVC, Jersey, etc.
Spring Data aims to make it easy for the developers to use relational and non-relational databases, cloud-based data services, and other data access technologies. So, basically, it makes it easy for data access and still retains the underlying data.
What do you understand by auto-configuration in Spring Boot and how to disable the auto-configuration?
Auto-configuration is used to automatically configure the required configuration for the application. For example, if you have a data source bean present in the classpath of the application, then it automatically configures the JDBC template. With the help of auto-configuration, you can create a Java application in an easy way, as it automatically configures the required beans, controllers, etc.
To disable the auto-configuration property, you have to exclude attribute of @EnableAutoConfiguration, in the scenario where you do not want it to be applied.
@EnableAutoConfiguration(exclude={DataSourceAutoConfiguration.class})
If the class is not on the classpath, then to exclude the auto-configuration, you have to mention the following code:
@EnableAutoConfiguration(excludeName={Sample.class})
Apart from this, Spring Boot also provides the facility to exclude list of auto-configuration classes by using the spring.autoconfigure.exclude property. You can go forward, and add it either in the application.properties or add multiple classes with comma-separated.
To deploy a Spring Boot web application, you just have to add the following plugin in the pom.xml file:
<plugin>
    <groupId>org.springframework.boot</groupId>
    <artifactId>spring-boot-maven-plugin</artifactId>
</plugin>
By using the above plugin, you will get a JAR executing the package phase. This JAR will contain all the necessary libraries and dependencies required. It will also contain an embedded server. So, you can basically run the application like an ordinary JAR file.
The packaging element in the pom.xml file must be set to jar to build a JAR file as below:
<packaging>jar</packaging>
Similarly, if you want to build a WAR file, then you will mention
<packaging>war</packaging>
When we use the Spring Boot Auto Configuration, automatically the spring-boot-starter-data-jpa dependency gets added to the pom.xml file. Now, since this dependency has a transitive dependency on JPA and Hibernate, Spring Boot automatically auto-configures Hibernate as the default implementation for JPA, whenever it sees Hibernate in the classpath.
The boundary of the transaction should start from the Service Layer since the logic for the business transaction is present in this layer itself.
In order to register an auto-configuration class, you have to mention the fully-qualified name under the @EnableAutoConfiguration key META-INF/spring. factories file. Also, if we build the with maven, then this file should be placed in the resources/META-INT directory.
Spring Data REST is not recommended in real-world applications as you are exposing your database entities directly as REST Services. While designing RESTful services, the two most important things that we consider is the domain model and the consumers. But, while using Spring Data REST, none of these parameters are considered. The entities are directly exposed. So, I would just say, you can use Spring Data REST, for the initial evolution of the project.
Microservices, also known as Microservices Architecture, is basically an SDLC approach in which large applications are built as a collection of small functional modules. It is one of the most widely adopted architectural concepts within software development. In addition to helping in easy maintenance, this architecture also makes development faster. Additionally, microservices are also a big asset for the latest methods of software development such as DevOps and Agile. Furthermore, it helps deliver large, complex applications promptly, frequently, and reliably. Applications are modeled as collections of services, which are:
- Maintainable and testable
- Loosely coupled
- Independently deployable
- Designed or organized around business capabilities
- Managed by a small team
- Decoupling: Within a system, services are largely decoupled. The application as a whole can therefore be easily constructed, altered, and scalable
- Componentization: Microservices are viewed as independent components that can easily be exchanged or upgraded
- Business Capabilities: Microservices are relatively simple and only focus on one service
- Team autonomy: Each developer works independently of each other, allowing for a faster project timeline
- Continuous Delivery: Enables frequent software releases through systematic automation of software development, testing, and approval
- Responsibility: Microservices are not focused on applications as projects. Rather, they see applications as products they are responsible for
- Decentralized Governance: Choosing the right tool according to the job is the goal. Developers can choose the best tools to solve their problems
- Agility: Microservices facilitate agile development. It is possible to create new features quickly and discard them again at any time.
Components for MS are
- Clients: Different users send requests from various devices.
- Identity Provider: Validate a user's or client's identity and issue security tokens.
- API Gateway: Handles the requests from clients.
- Static Content: Contains all of the system's content.
- Management: Services are balanced on nodes and failures are identified.
- Service Discovery: A guide to discovering the routes of communication between microservices.
- Content Delivery Network: Includes distributed network of proxy servers and their data centers.
- Remote Service: Provides remote access to data or information that resides on networked computers and devices.
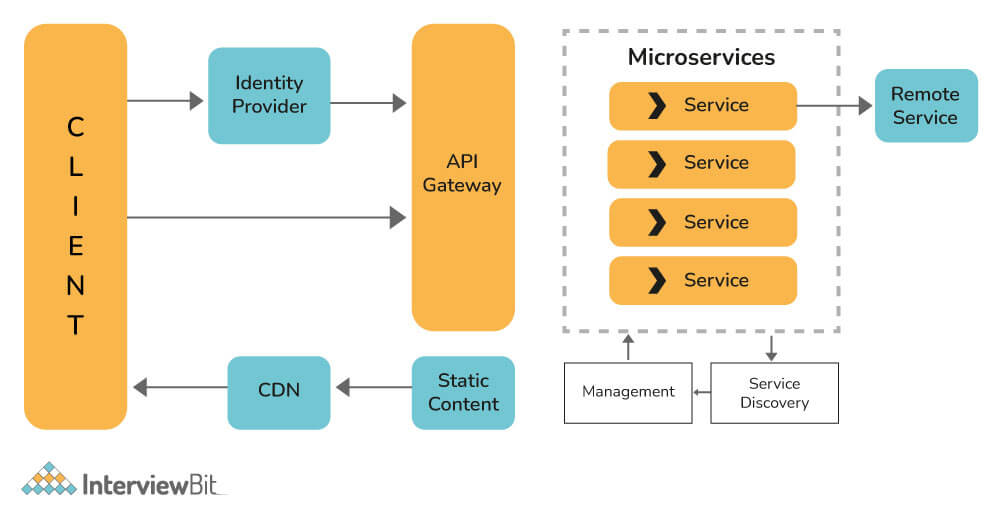
As the name implies, CDC (Consumer-Driven Contract) basically ensures service communication compatibility by establishing an agreement between consumers and service providers regarding the format of the data exchanged between them. An agreement like this is called a contract. Basically, it is a pattern used to develop Microservices so that they can be efficiently used by external systems.
Synchronous:
A synchronous microservice is one in which data moves to and from an endpoint of a service in a blocking interaction. A typical example of a synchronous data exchange is an HTTP request/response interaction, When a request is made to an endpoint under HTTP, the caller is locked in the interaction until a response is received.
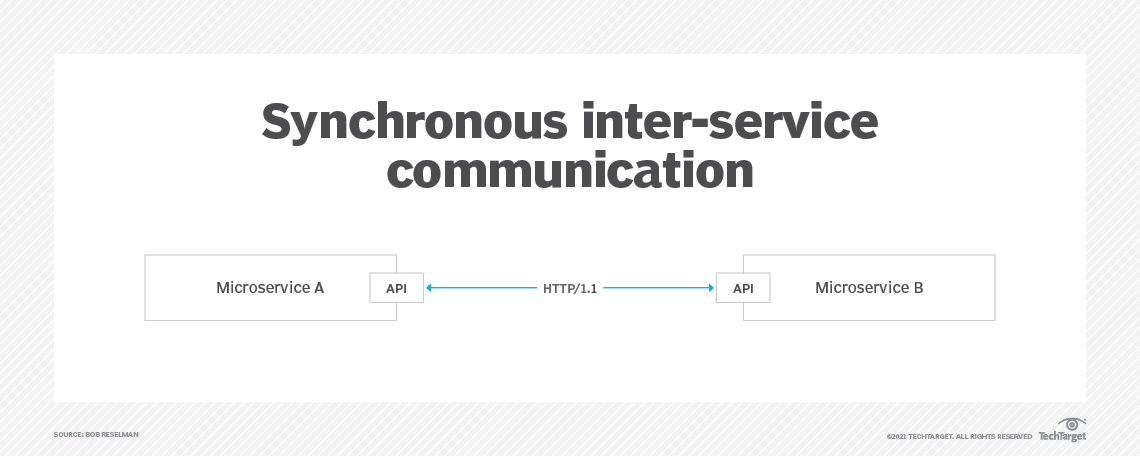
The caller might receive the response in a mere millisecond or in a few seconds. Regardless of the application latency, the caller cannot move forward to the next task until the response is received. REST is a good example of a synchronous microservice.
Asynchronous:
An asynchronous microservice is one in which a request to a service and the subsequent response occur independently from each other. The general practice for implementing an asynchronous microservice is to use a message broker technology, such as Kafka or RabbitMQ, to act as a go-between for services, One service will publish a message to another service using the message broker.
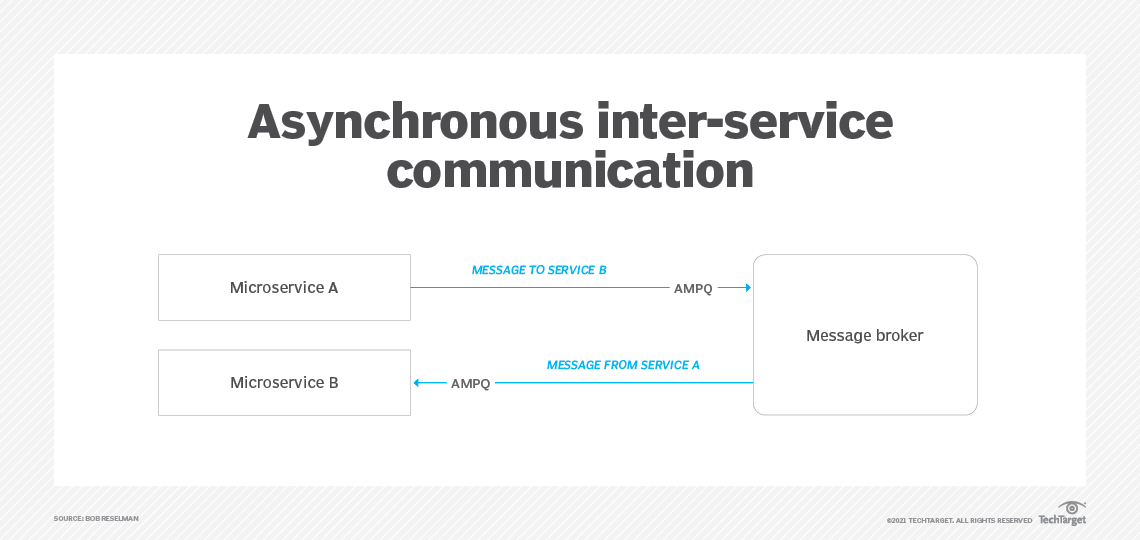
The intended service receives the message in its own time. The sending service is not locked to the broker. It simply fires and forgets.
The group of SQL statements which are or have been stored in the server database is known as a stored procedure. Input parameters are accepted in the stored procedures so that several clients can use that single procedure over the network using that single input data. It holds an advantage that whenever the procedure gets updated; all the clients automatically get the updated version. Stored procedures help in reducing the network traffic and also improve the performance of the data. The integrity of data can be ensured while making use of stored procedures
Stored procedures are used for various different things. Some of the uses of stored procedures are as follows:
- Stored procedures are often used as access control mechanism and for data validation.
- The logic applied in this application is centralized and is stored in the application.
- Procedures are used to process the huge amount of data for complex procedures and functionalities and for logic implementation access of their data.
- These procedures are used to store data in them and can be accessed by procedures.
- They support modular programming.
- Faster execution takes place.
- It can also be used as a security mechanism.
- They are used for reducing network traffic.
- A stored procedure accepts parameters. Whereas, views do not accept parameters.
- In any large query, a stored procedure cannot be used as a building block. Whereas, a view can be used as a building block.
- A stored procedure can contain several statements. Whereas, a view can contain only one single select query.
- Using stored procedures, one or more tables can be modified. Whereas, using view no table can be modified.
- A view can be used within a stored procedure. Whereas, a stored procedure cannot be used inside a view.