Velociraptor is a tool for collecting host based state information using The Velociraptor Query Language (VQL) queries.
To learn more about Velociraptor, read the documentation on:
https://docs.velociraptor.app/
If you want to see what Velociraptor is all about simply:
-
Download the binary from the release page for your favorite platform (Windows/Linux/MacOS).
-
Start the GUI
$ velociraptor guiThis will bring up the GUI, Frontend and a local client. You can collect artifacts from the client (which is just running on your own machine) as normal.
Once you are ready for a full deployment, check out the various deployment options at https://docs.velociraptor.app/docs/deployment/
We have our complete training course (7 sessions x 2 hours each) https://docs.velociraptor.app/training/
The course covers many aspects of Velociraptor in detail.
To run a Velociraptor server via Docker, follow the instructions here: https://github.com/weslambert/velociraptor-docker
Velociraptor is also useful as a local triage tool. You can create a self contained local collector using the GUI:
-
Start the GUI as above (
velociraptor gui). -
Select the
Server Artifactssidebar menu, thenBuild Collector. -
Select and configure the artifacts you want to collect, then select the
Uploaded Filestab and download your customized collector.
To build from source, make sure you have a recent Golang installed
from https://golang.org/dl/ (Currently at least Go 1.17) and the go
binary is on your path. In addition make sure the GOBIN directory is
also on your path (Defaults are: on linux and mac ~/go/bin, on
Windows c:\\Users\\<username>\\go\\bin):
    $ git clone https://github.com/Velocidex/velociraptor.git
    $ cd velociraptor

    # This will build the GUI elements. You will need to have node
    # installed first. For example get it from
    # https://nodejs.org/en/download/.
    $ cd gui/velociraptor/
    $ npm install

    # This will build the webpack bundle
    $ make build

    # To build a dev binary just run make.
    # NOTE: Make sure ~/go/bin is on your path -
    # this is required to find the Golang tools we need.
    $ cd ../..
    $ make

    # To build production binaries
    $ make linux
    $ make windows
In order to build Windows binaries on Linux you need the mingw tools. On Ubuntu this is simply:
$ sudo apt-get install mingw-w64-x86-64-dev gcc-mingw-w64-x86-64 gcc-mingw-w64other method
Task 1: Installing Velociraptor on Linux Finding the Latest Version In a Web browser, go to
https://github.com/Velocidex/velociraptor/releases
wget

mkdir velociraptor
cd velociraptor

wget https://github.com/Velocidex/velociraptor/releases/download/v0.6.0/velociraptor-v0.6.0-1-linux-amd64

chmod +x velociraptor-v0.6.0-1-linux-amd64
./velociraptor-v0.6.0-1-linux-amd64 config generate > velociraptor.config.yaml
ip a
nano velociraptor.config.yaml
Press Ctrl+W, Ctrl+R. Find localhost and replace it with your server's IP address for all occurrences (there are two of them).
Repeat the process to replace 127.0.0.1 with your server's IP address for all occurrences (there are three of them).

Save the file with Ctrl+X, Y, Enter.

On your Linux server, execute these command, to move the server configuration file to its home and create an admin user:
Press Ctrl+W, Ctrl+R. Find localhost and replace it with your server's IP address for all occurrences (there are two of them). Repeat the process to replace 127.0.0.1 with your server's IP address for all occurrences (there are three of them).
Save the file with Ctrl+X, Y, Enter. On your Linux server, execute these command, to move the server configuration file to its home and create an admin user:
sudo mv velociraptor.config.yaml /etc

./velociraptor-v0.6.0-1-linux-amd64 --config /etc/velociraptor.config.yaml user add admin --role administrator
When you are prompted to, enter a password you can remember. On your Linux server, execute this command, to start the server:
./velociraptor-v0.6.0-1-linux-amd64 --config /etc/velociraptor.config.yaml frontend -v
The server starts, as shown below. Leave this window open, and leave the process running.

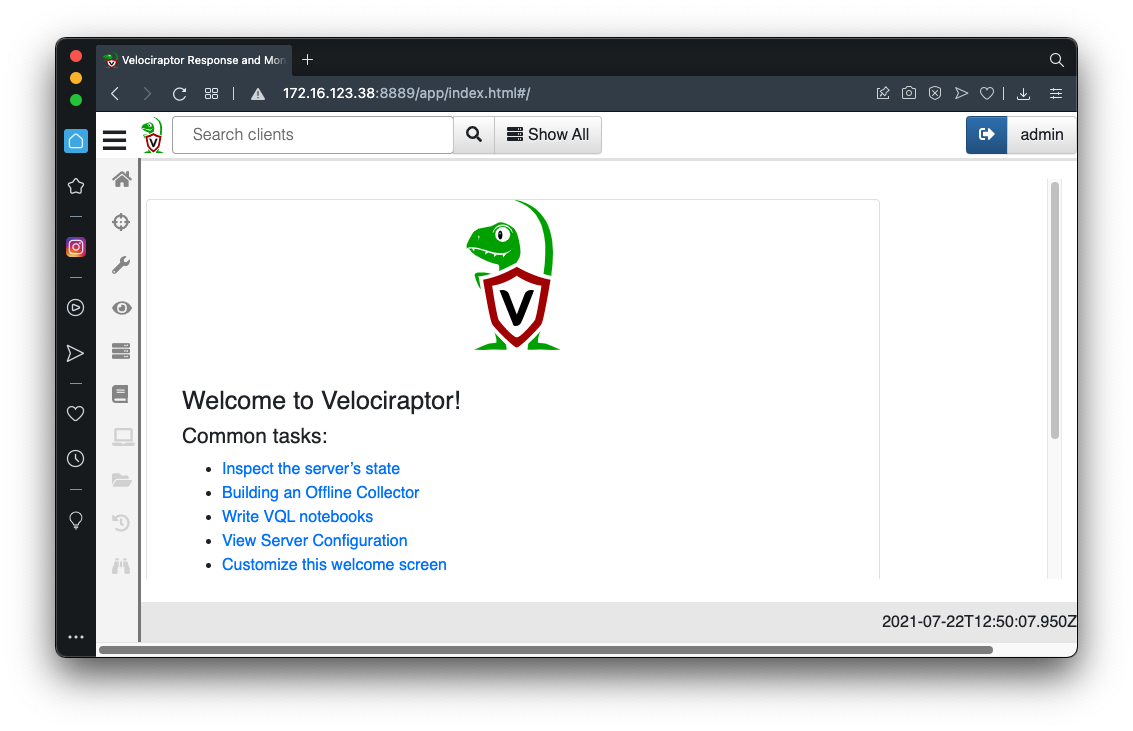
Viewing the GUI On your Windows machine, in a Web browser, open the GUI URL, for your server. My URL is outlined in the image above--yours will be different. Approve the use of an unsigned certificate.
Log in as admin with the password you chose earlier.
You see the GUI, as shown below.
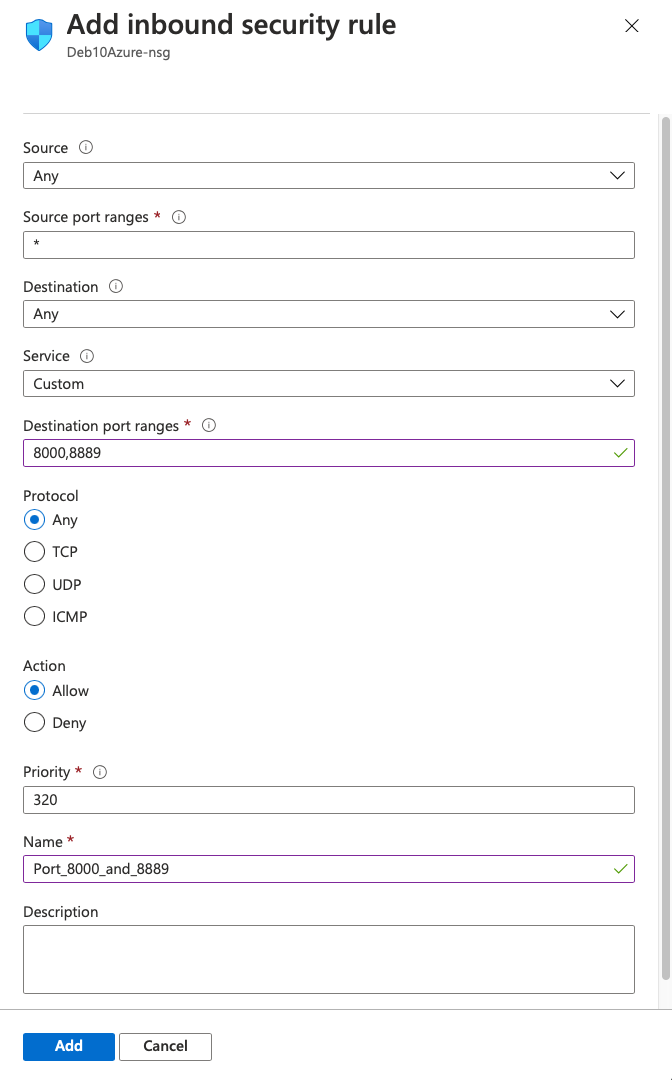
Note for Azure Users If you are using Azure cloud machines, you will need to open TCP ports 8000 and 8889 in the Azure firewall on your Linux server, and view the GUI using the public IP address of your Linux server. To reach the firewall settings, start at https://portal.azure.com/#home and click "Virtual machines", click the name of your Linux server, and click Networking.
Then click the "Add inbound port rule" and configure a rule as shown below.
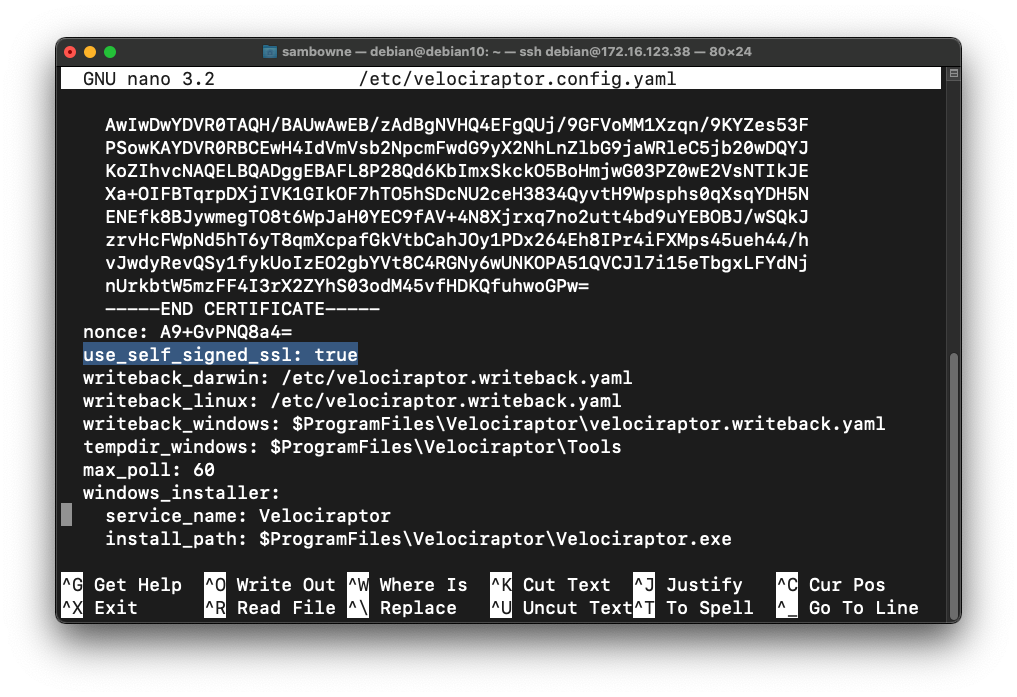
Task 2: Adding a Windows Client Preparing a Client Config File On your Linux server, open a new Terminal or SSH session and execute this command, to edit the server configuration file:
sudo nano /etc/velociraptor.config.yaml
Scroll down to the first END CERTIFICATE line. Below the "nonce: line, insert this line, as shown in the image below:
use_self_signed_ssl: true
 Save the file with Ctrl+X, Y, Enter.
Preparing a Windows Client Installer On your Linux server, execute these commands, to prepare a client config file, download the EXE installer, and combine the two into a repackaged single-file Windows installer. The last commands make sure your Debian server has an SSH server running.
cd
cd velociraptor

./velociraptor-v0.6.0-1-linux-amd64 --config /etc/velociraptor.config.yaml config client > client.config.yaml

wget https://github.com/Velocidex/velociraptor/releases/download/v0.6.0/velociraptor-v0.6.0-1-windows-amd64.exe

./velociraptor-v0.6.0-1-linux-amd64 config repack --exe velociraptor-v0.6.0-1-windows-amd64.exe client.config.yaml repackaged_velociraptor.exe

sudo apt update
sudo apt install openssh-server -y
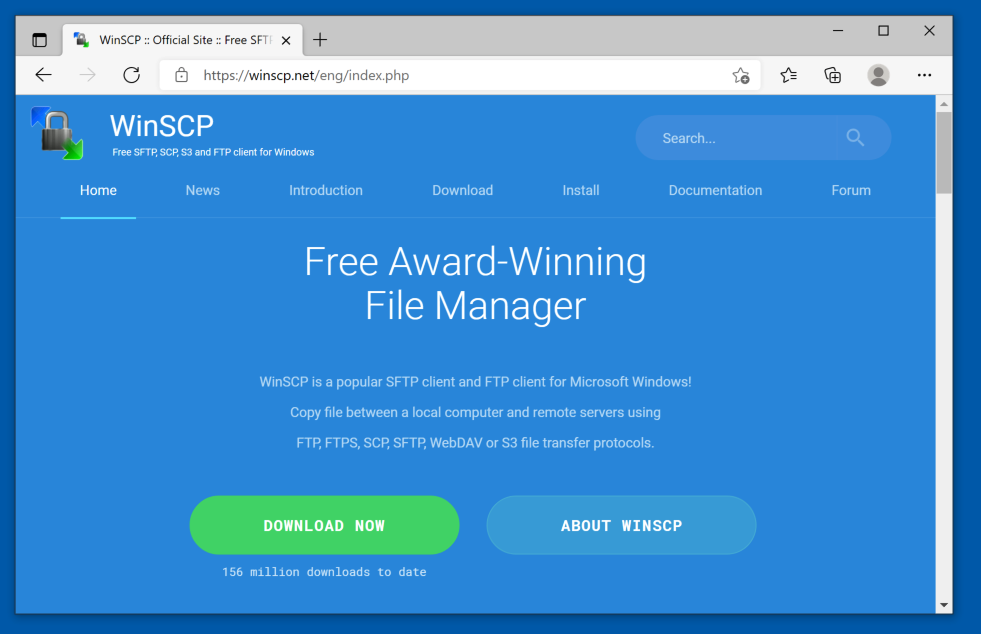
Installing the Windows Client On your Windows machine, in a Web browser, go to https://winscp.net/eng/index.php Download and install WinSCP, as shown below.
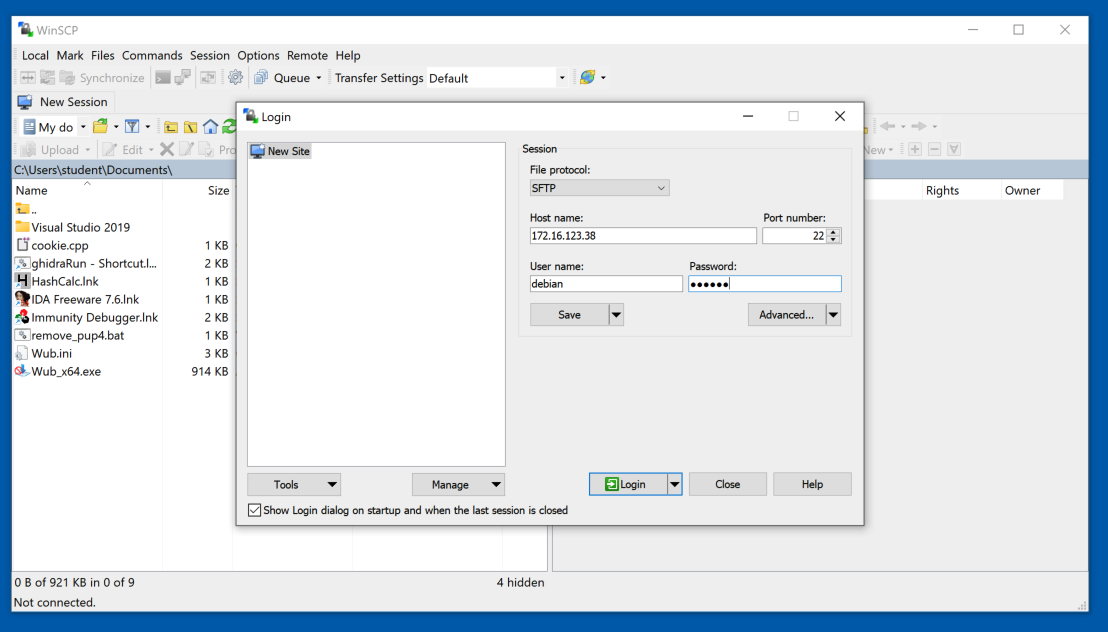
Click Login. Click Yes. Click Continue.
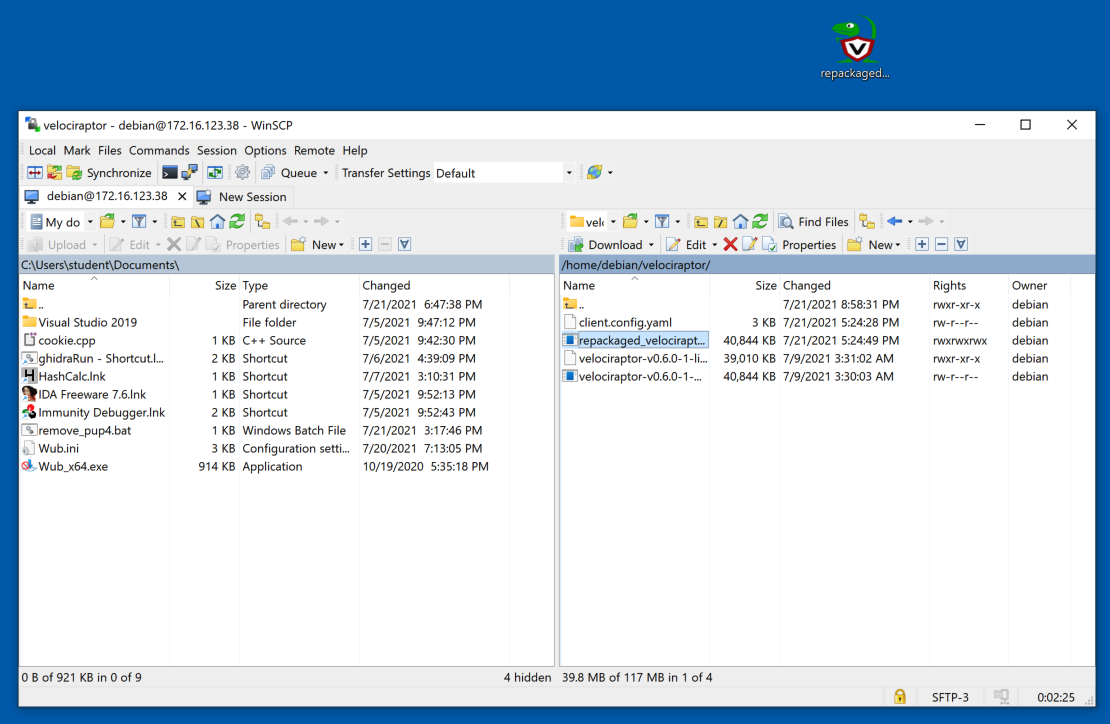
In the right pane, double-click the velociraptor folder.
Drag the repackaged_velociraptor.exe file to your Windows desktop, as shown below.
Then close WinSCP.
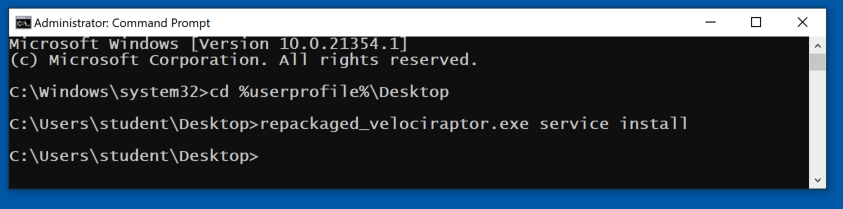
 On your Windows machine, open an Administrator Command Prompt and execute these commands, as shown below.
cd %userprofile%\Desktop
repackaged_velociraptor.exe service install
Restart Velociraptor after reboot.
./velociraptor-v0.6.0-1-linux-amd64 --config /etc/velociraptor.config.yaml frontend -v

sudo nano /etc/systemd/system/velociraptor.service

		[Unit]
		Description=Velociraptor Service
		After=network.target

		[Service]
		Type=simple
		ExecStart=/caminho/para/o/executável/velociraptor-v0.6.8-rc1-linux-amd64 --config /etc/velociraptor.config.yaml frontend -v
		Restart=always

		[Install]
		WantedBy=multi-user.target

sudo systemctl daemon-reload

sudo systemctl start velociraptor

sudo systemctl status velociraptor

sudo systemctl enable velociraptor
We have a pretty frequent release schedule but if you see a new feature submitted that you are really interested in, we would love to have more testing prior to the official release.
We have a CI pipeline managed by GitHub actions. You can see the pipeline by clicking the actions tab on our GitHub project. There are two workflows:
-
Windows Test: this workflow builds a minimal version of the Velociraptor binary (without the GUI) and runs all the tests on it. We also test various windows support functions in this pipeline. This pipeline builds on every push in each PR.
-
Linux Build All Arches: This pipeline builds complete binaries for many supported architectures. It only runs when the PR is merged into the master branch. To download the latest binaries simply select the latest run of this pipeline, scroll down the page to the "Artifacts" section and download the Binaries.zip file (Note you need to be logged into GitHub to see this).
If you fork the project on GitHub, the pipelines will run on your own fork as well as long as you enable GitHub Actions on your fork. If you need to prepare a PR for a new feature or modify an existing feature you can use this to build your own binaries for testing on all architectures before send us the PR.
Velociraptor is written in Golang and so is available for all the platforms supported by Go. This means that Windows XP and Windows server 2003 are not supported but anything after Windows 7/Vista is.
We build our releases on Centos 6 (x64) for Linux and Sierra for MacOS
so earlier platforms may not be supported by our release pipeline. If
you need 32 bit builds you will need to build from source. You can do
this easily by forking the project on GitHub, enabling GitHub Actions
in your fork and editing the Linux Build All Arches pipeline.
Velociraptor's power comes from VQL Artifacts, that define many
capabilities to collect many types of data from endpoints.
Velociraptor comes with many built in Artifacts for the most common
use cases. The community also maintains a large number of additional
artifacts through the Artifact Exchange.
If you need help performing a task such as deployment, VQL queries etc. Your first port of call should be the Velociraptor Knowledge Base at https://docs.velociraptor.app/knowledge_base/ where you will find helpful tips and hints.
Questions and feedback are welcome at velociraptor-discuss@googlegroups.com (or https://groups.google.com/g/velociraptor-discuss)
You can also chat with us directly on discord https://docs.velociraptor.app/discord
File issues on https://github.com/Velocidex/velociraptor
Read more about Velociraptor on our blog: https://docs.velociraptor.app/blog/
Hang out on Medium https://medium.com/velociraptor-ir
Follow us on Twitter @velocidex