USB Boot Mode
Every Ingenic SoC has a permanent recovery mode built into the chip itself, called USB boot mode. In this mode the camera shows up as a USB device on your computer, and flashing tools like the Web Flasher and thingino-dfu can read and write the camera's flash chip directly. No disassembly of the flash chip, no soldering, no serial adapter.
Because it lives in the chip's boot ROM, USB boot mode always works, even on a completely "bricked" camera with corrupted or erased firmware. It is the standard way to install thingino and to recover a device.
Note
Older guides call this "Cloner mode" or "USB Cloner mode". It is the exact same mode; only the tools have changed. Cloner is the legacy method and is no longer officially supported.
- A USB cable that fits your camera's port (or a soldered connection, see tips below)
- A computer with a free USB port
Important
Some cameras have power-only USB ports with no data lines connected. If your device is never detected no matter what you try, see the tips section.
There are three ways to get a camera into USB boot mode. Start with the first one that applies to your device.
If the flash chip is blank, erased, or the bootloader is corrupted, the SoC finds nothing to boot and drops into USB boot mode by itself. Just connect the camera to your computer via USB.
This is why a "bricked" camera is usually easy to recover: it is already waiting for you in USB boot mode.
Some cameras with a Micro-USB port enter USB boot mode when powered through an OTG adapter. No opening of the case required.
You need a Micro-USB OTG adapter and a USB-A to USB-A cable:


Important
A standard USB to Micro-USB cable will NOT work for this method.
- Attach the OTG adapter to the camera's Micro-USB port
- Connect the USB-A to USB-A cable between the OTG adapter and your computer
- The camera powers on and enters USB boot mode automatically
Video of the process: https://www.youtube.com/shorts/sRiBUtaGxl4
Devices confirmed to work with the OTG method:
- Eufy Outdoor E210, Indoor E220, Indoor C120
- Wyze Pan v2
- Wyze Doorbell V1
Devices where the OTG method does not work (use Method 3 instead):
- Wyze Cam V2 / NEOS SmartCam
- Wyze Cam V3
The universal method: briefly short two pins of the flash chip while plugging the camera in. This makes the first boot attempt fail, so the SoC falls back to USB boot mode.
Locate the flash memory chip on the camera circuit board. Typically this is a square chip with 8 pins labeled 25Q64 or 25Q128, rarely 25L64 or 25L128. If you have trouble locating the chip, take some pictures of both sides of your board and reach out to our community for assistance.
Pins 5 and 6 of the SOIC8 chip are on the opposite corner of pin 1, which is indicated by the embossed or drawn dot next to it.
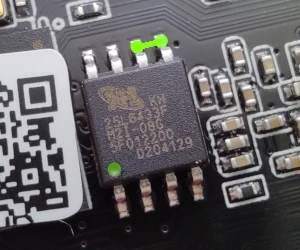
- Make sure the camera is completely unplugged
- Connect the USB cable to the camera, but leave the computer end disconnected
- Short-circuit pins 5 and 6 of the flash chip with a small metal object, such as a screwdriver or tweezers
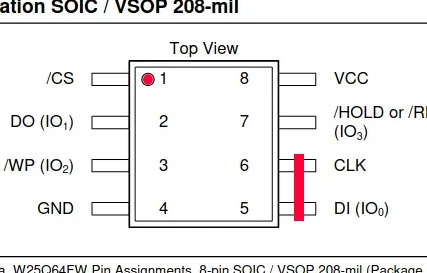
- While maintaining the short, connect the USB cable to the computer
- Wait about 1-2 seconds, then release the short
Caution
Short pins 5 and 6 on the flash chip only, not on the SoC or any other chip. Do not try to short-circuit any random chip! It will most likely burn your camera circuit.
A camera in USB boot mode identifies itself as an Ingenic USB Boot Device (USB ID a108:c309).
On Linux, run sudo dmesg | tail after plugging in. You should see something like:
usb 3-3.1: New USB device found, idVendor=a108, idProduct=c309, bcdDevice= 1.00
usb 3-3.1: Product: USB Boot Device
usb 3-3.1: Manufacturer: Ingenic
On Windows, check Device Manager for a new device. Note that Windows needs a one-time driver install before flashing tools can use the device: run Zadig and install the WinUSB driver. See the Windows Setup guide for details. If the old Ingenic vendor driver (libusb0) is installed, remove it first; it is not compatible with the current tools.
In the Web Flasher, the camera simply appears in the device list after you click Connect.
If nothing shows up, unplug, and repeat the method. With Method 3, the timing of the short takes a couple of tries for most people.
Once the camera is in USB boot mode, you are ready to install thingino:
- Web Flasher: flash straight from your browser (Chrome or Edge), no software to install
- thingino-dfu: command line tool for Linux, Windows, macOS, and Android
Both tools detect the SoC automatically, and both can make a full backup of your stock firmware before you write anything. Make a backup first.
If your camera has a USB wireless module, the camera's own USB port is most likely power-only and cannot be used. You can make a makeshift connection by borrowing the USB data wires from the wireless module. Locate the DP/D+ and DN/D- pads on the USB wireless module and solder the data wires from a stripped USB cable to them, like shown below.

If you have shell access to a running system, you can erase the bootloader so the SoC drops into USB boot mode on the next power-up (see Method 1).
Caution
This is irreversible until you flash new firmware. Only do this if you intend to reflash the device immediately, and know how to recover it.
From a U-Boot shell:
sf probe; sf erase 0 +1; reset
From a Linux shell:
flash_eraseall /dev/mtd0 && restart -f
The old flashing method, Ingenic USB Cloner, used this same USB boot mode with Ingenic's proprietary PC utility. Cloner is no longer officially supported; use the Web Flasher or thingino-dfu instead.